


Google already tells you exactly which keywords you rank for, which pages are broken, and where your next traffic win is hiding.
It’s a free tool called Google Search Console, and most WordPress site owners connect it once and then never log back in.
In this beginner-friendly guide, we’ll show you how to set it up on WordPress, control what Google crawls, fix indexing errors before they cost you traffic, and use its reports to grow your traffic.
What Is Google Search Console?
Google Search Console (GSC) is a free service from Google that helps you monitor and maintain your website’s presence in Google Search results. It’s like a health dashboard for your site, showing you exactly what Google sees when it looks at your pages.
Search Console offers three big benefits:
- Accurate Keyword Data: It shows you the exact terms people type into Google to find your site.
- Instant Error Alerts: It warns you about technical glitches, security issues, or mobile usability problems before they hurt your rankings.
- Direct Line to Google: It lets you submit new content for indexing and request re-crawls of updated pages.
Keep in mind that Google Search Console isn’t the same as Google Analytics:
- Google Analytics tracks what visitors do after they arrive on your WordPress blog or website.
- Google Search Console tracks how people find you in the first place, and how Google crawls your content.
Best of all, Search Console is 100% free to use, no matter how large your website grows. Along with Google Analytics, it should be the very first tool you set up on any new WordPress website.
How Search Engine Crawling and Indexing Work
Before you start fixing problems in Google Search Console, it helps to understand two words you’ll see constantly: crawling and indexing. They sound similar, but they describe two different stages.
Crawling is when search engine bots (which are automated programs sometimes called spiders) visit your website to discover its content. They follow the links on each page and then repeat the process on the pages those links point to, moving across your site one link at a time.
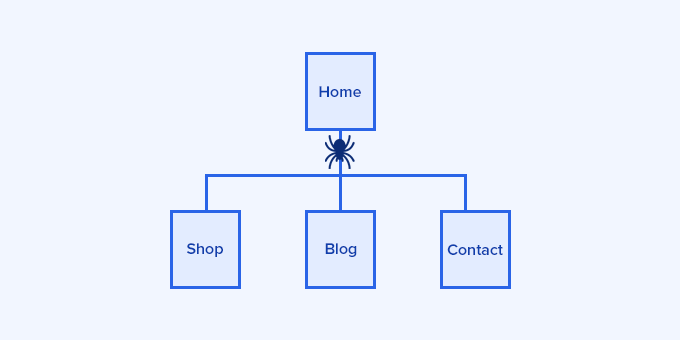
Indexing is the next stage, when Google adds the content it has crawled to its search database. A helpful way to picture it is a librarian reading a new book, which is the crawling, and then adding it to the library catalog, which is the indexing.
A page has to be indexed before it can appear in the search results. Some of the controls later in this guide stop crawling entirely, while others only prevent indexing, so we’ll make it clear which is which as we go.
Since we’re covering a lot of ground in this guide, you can use the quick links below to jump straight to the section you want to read first:
- Part 1: Setting Up Google Search Console on WordPress
- Part 2: Controlling What Search Engines Crawl and Index
- Part 3: Finding and Fixing Crawling and Indexing Issues
- Part 4: Understanding and Optimizing Crawl Budget
- Part 5: Using Google Search Console to Grow Your Traffic
- Part 6: Improving Technical Performance
- Part 7: Managing Your Search Console Account
- Frequently Asked Questions About Google Search Console
- Additional Resources for WordPress SEO
Part 1: Setting Up Google Search Console on WordPress
You can typically set up Google Search Console in just a few minutes, although the trickiest part for most beginners is proving to Google that you own your website.
Adding Your Website to Google Search Console
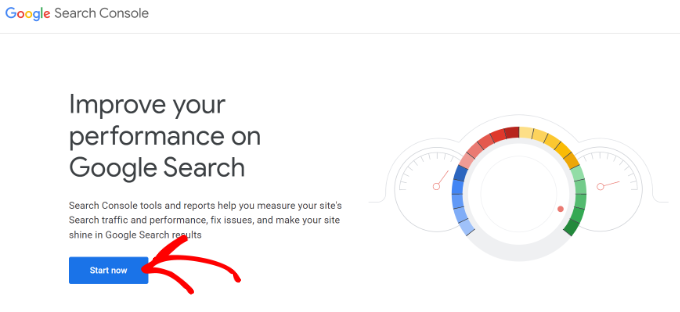
To begin, go to the Google Search Console website and click on the ‘Start now’ button.
You’ll be asked to sign in with a Google or Gmail account.
Once you’re logged in, Google asks you to choose between two property types, called Domain and URL prefix.
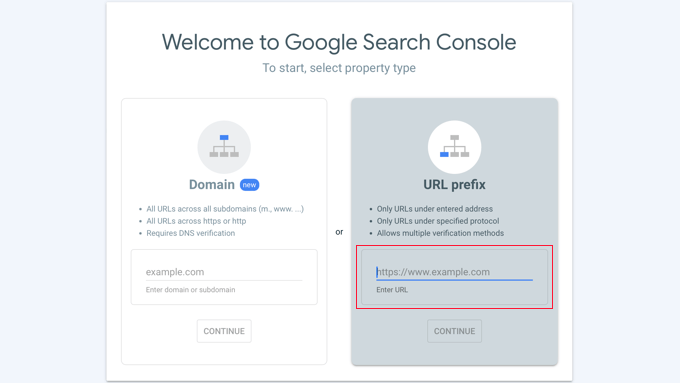
For this guide, we recommend the URL prefix method, because it’s the easiest way to verify your site using an SEO plugin. The Domain method covers every version of your site at once, but it requires editing DNS records, which can be complicated for beginners.
One thing to keep in mind is that Google treats http and https as different protocols, and it treats www.example.com and example.com as different sites. So, make sure you enter the exact address your site uses.
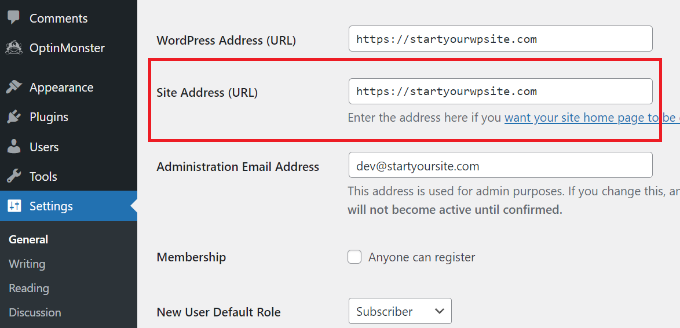
If you’re unsure about that address, log in to your WordPress admin area and go to the Settings » General page, where your address appears in the ‘Site Address’ field.
After entering this website address into GSC, go ahead and click the ‘Continue’ button.
Google will then ask you to verify ownership. Although there are several ways to do this, we’ll use the HTML tag method because it’s the easiest one.
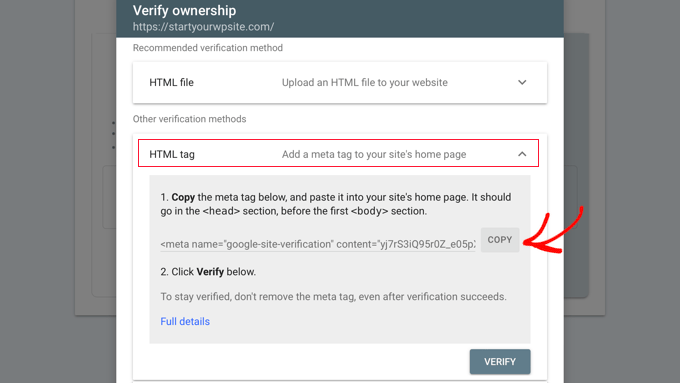
Next, click the HTML tag option to expand it and then copy the verification code inside.
The next step is adding that code to your WordPress site, but doing it manually involves editing your theme files, which is risky for beginners.
A much easier way is to use the All in One SEO (AIOSEO) plugin, which is the most beginner-friendly WordPress SEO plugin and the one we use on many of our own sites.
💡 If you’d prefer a tool made by Google itself, you can also use the Google Site Kit plugin. Site Kit connects your site to Search Console through a guided sign-in flow with no code to copy.
But we recommend using AIOSEO because it also handles your sitemaps, on-page SEO, and the crawl controls we cover later.
To start, install and activate the AIOSEO plugin on your website. You can use the free version of the plugin to link your website to Google Search Console.
After that, head to the AIOSEO » General Settings page.
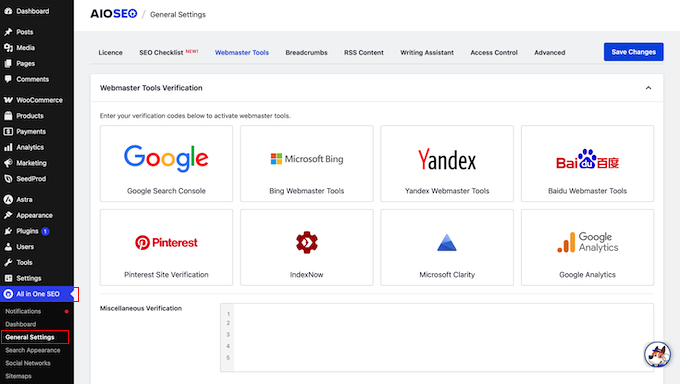
Next, click the ‘Webmaster Tools’ tab.
Then, select the ‘Google Search Console’ option.
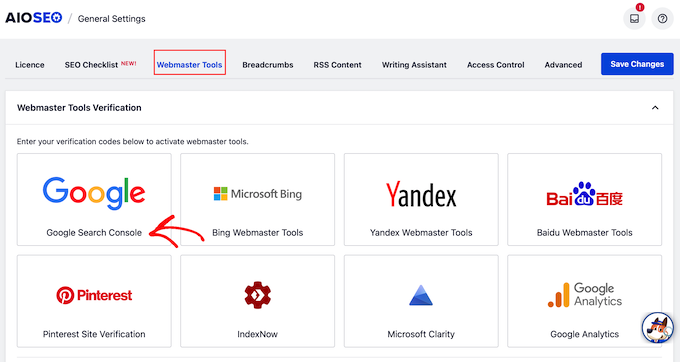
Now, paste the code you copied earlier into the ‘Google Verification Code’ box.
Finally, click the ‘Save Changes’ button to store it.
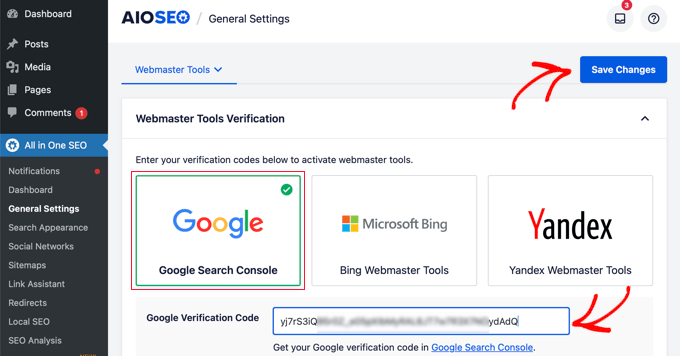
With the code in place, return to Google Search Console.
Here, click the ‘Verify’ button.
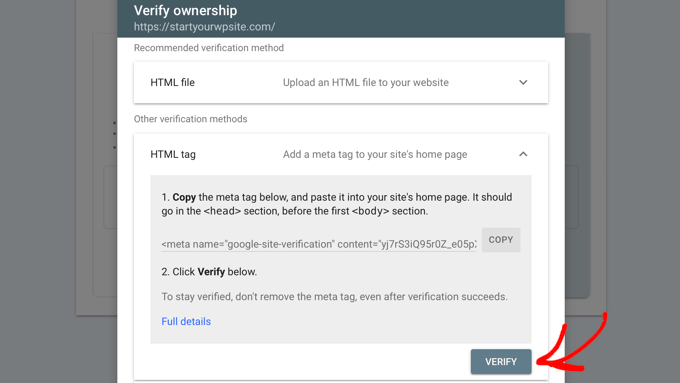
Google Search Console will now look for the HTML tag in your site’s code.
If you’ve been following along, then you’ll see an ‘Ownership verified’ message.
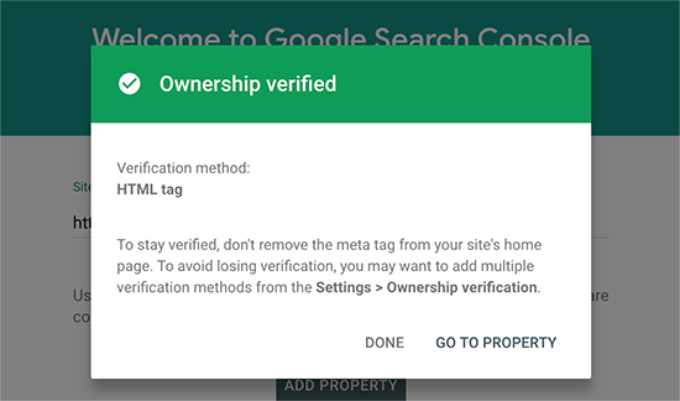
Now, you can now click the ‘Go to Property’ link to open your dashboard.
📝 If Google Search Console cannot verify your site after you add the code, then clear your WordPress cache and try again.
Submitting Your XML Sitemap
An XML sitemap is a file that lists all the important pages on your website and tells search engines which ones matter most.
While an XML sitemap doesn’t directly boost your rankings or guarantee that Google will index every single page, it acts as a roadmap to help Google discover your pages faster.
If you installed All in One SEO in the previous step, then the plugin creates a sitemap for you automatically.
To check it, go to All in One SEO » Sitemaps and make sure the ‘Enable Sitemap’ toggle is switched on.
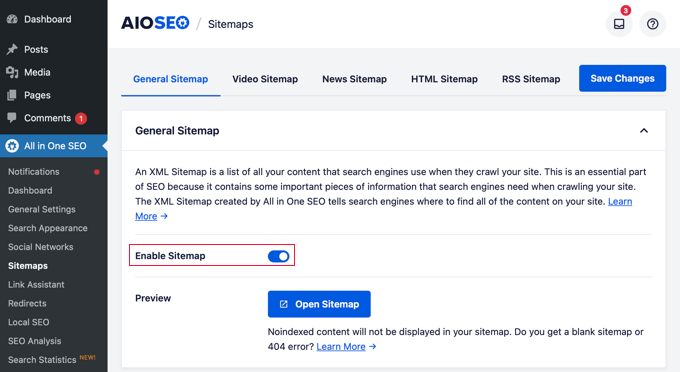
Your sitemap will be available at an address that looks like http://example.com/sitemap_index.xml, with your own domain in place of example.com.
To submit it, open the Google Search Console dashboard, click ‘Sitemaps’ in the left-hand column, paste the URL, and click the ‘Submit’ button.
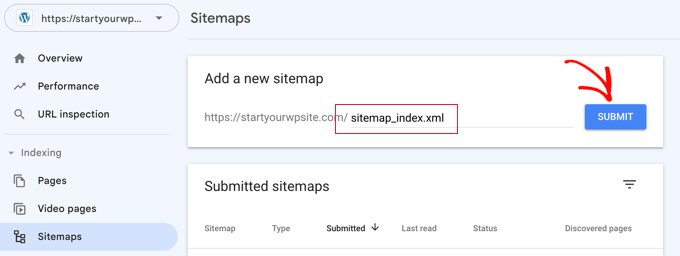
Google Search Console will now check the sitemap and use it to improve how it crawls your site.
For more details, see our guide on what a WordPress sitemap is and how to create one.
Connecting Google Search Console to Google Analytics
Connecting Search Console to Google Analytics 4 (GA4) lets you analyze your search data along with your traffic data, which gives you a fuller picture of your top content and keywords. The two tools answer different questions, so smart website owners use them together.
If you haven’t set up Analytics yet, we recommend the free version of MonsterInsights, as it’s the best Google Analytics plugin and easy for beginners. It automatically shows your top Search Console keywords right inside your WordPress admin area, so you don’t have to switch between tabs.
You can follow our step-by-step guide on how to install Google Analytics in WordPress.
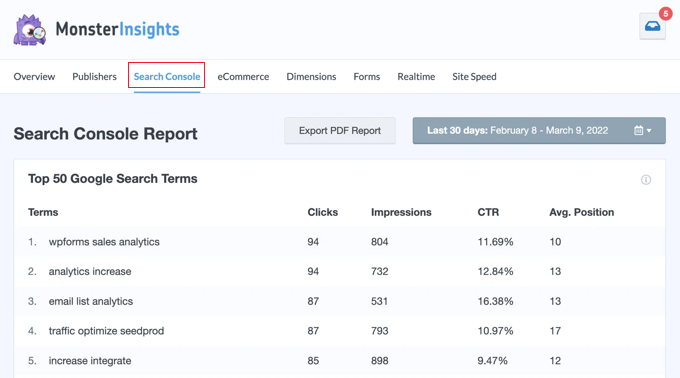
If you want to view your Search Console reports right inside the Google Analytics website, you’ll need to link the two tools first.
You can start this process from either platform, but we’ll begin inside Google Search Console since we’re already logged in.
In the bottom-left corner of Search Console, click the ‘Settings’ button, then under ‘General settings’ click the arrow next to ‘Associations’.
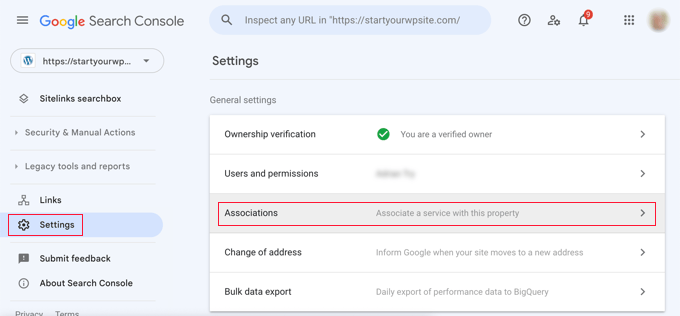
This opens a page listing any services you’ve already associated. Below that, you’ll find a link to associate Google Analytics, so go ahead and click the word ‘Associate’ to begin.
A quick setup wizard then opens in a popup, where you can choose your Google Analytics GA4 property and web stream, and then confirm the association.
Simply follow the onscreen prompts to complete the connection.
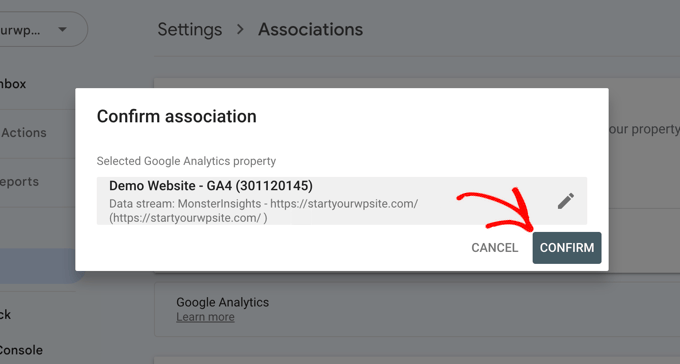
Once it’s done, Google Analytics will appear in your list of associated services.
📝 Search Console data becomes available in Analytics about 48 hours after it’s collected, and it then stays available for the next 16 months.
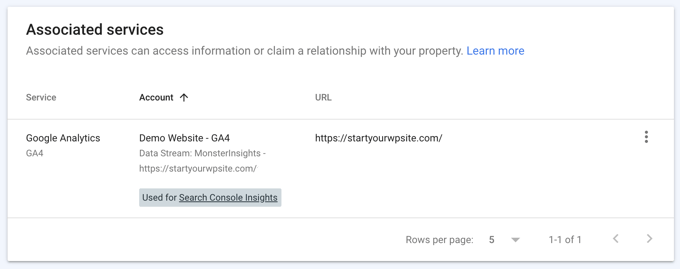
There is one more step that often confuses beginners, because the Search Console reports don’t appear in your GA4 menu automatically.
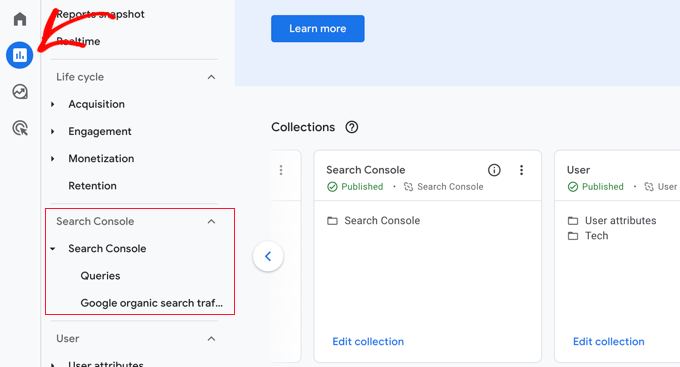
To add them, visit the Google Analytics website, click the ‘Reports’ icon on the left, and then click ‘Library’.
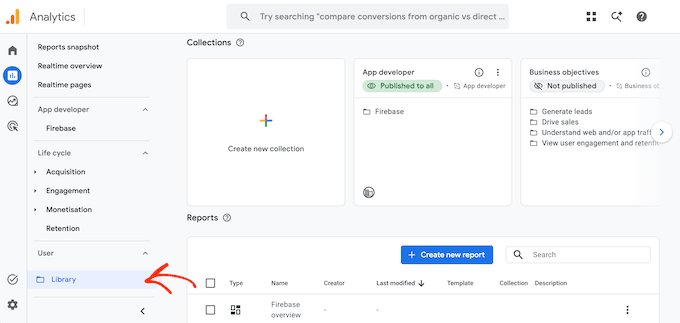
Under ‘Collections’, find the Search Console collection and click ‘Edit collection.’
You don’t need to change anything on the next screen, so simply click the ‘Back’ button at the top.
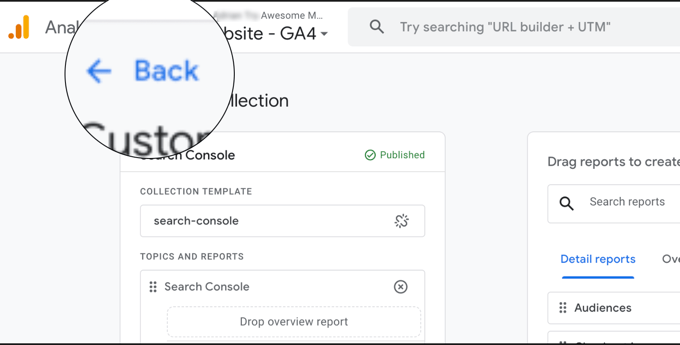
Next, click the three dots at the top of the Search Console card.
Then, choose ‘Publish’ from the menu that appears.
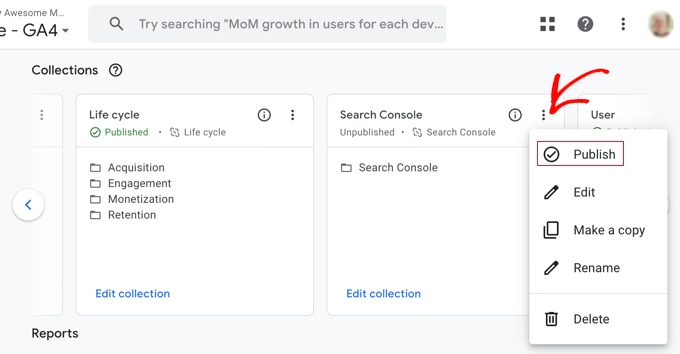
Publishing adds a new Search Console section to your Analytics reports menu.
From now on, you can view your search data in Analytics by going to Reports and then clicking to expand the Search Console section.
Part 2: Controlling What Search Engines Crawl and Index
Most of the time you want Google to crawl and index everything, but there are some situations where you may need the opposite.
For example, you might be building a site while it’s live, running a private blog, or using WordPress for an internal intranet whose documents shouldn’t be public.
Many people believe that search engines will never find a website if no other sites link to it. However, that isn’t true.
Someone else may have owned your domain name in the past. There are also thousands of web directories that simply list domain names, which means your site can still appear in search results without any backlinks.
Below, we’ll cover four ways to tell search engines which parts of your website they can and cannot access. You’ll use Google Search Console to confirm if your settings are working.
Method 1: Discouraging Search Engines With WordPress Settings
This is the simplest method, though it doesn’t fully protect your site.
WordPress has a built-in option for it, which you’ll find by going to Settings » Reading and checking the box next to ‘Search Engine Visibility’.
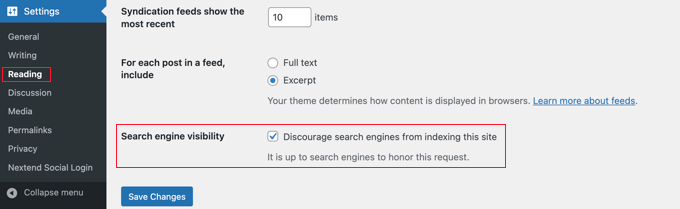
After checking this box, WordPress adds a noindex, nofollow robots meta tag to your pages, which asks search engines not to list them or follow their links.
It also adds a Disallow: / rule to your robots.txt file. This is a small text file that tells bots which parts of your site they may request.
There is an important catch here, though. Because the robots.txt rule blocks bots from crawling your pages, they may never actually read the noindex tag. If another website links to you, Google might still list your URL with a note that says ‘Information is unavailable for this page’.
For that reason, if you want to make it impossible for search engines to index your website, use one of the password methods below. They’re the most reliable choices.
Method 2: Preventing Indexing of Individual Pages With AIOSEO
Sometimes, you want search engines to index your website but exclude a specific post or page. The easiest way to do this is with the free AIOSEO plugin. It lets you control your index settings on a page-by-page basis.
To set this up, simply edit the post or page you want to hide. Then, scroll down to the AIOSEO Settings box below the content editor and click the ‘Advanced’ tab.
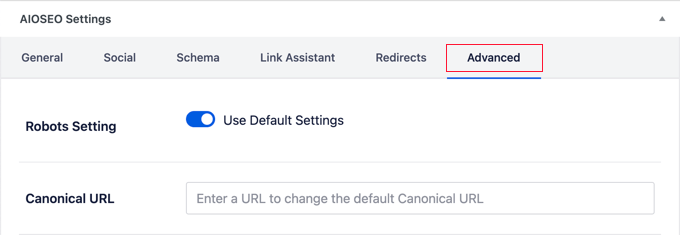
By default, the page uses your standard robots settings, so the next step is to switch the ‘Use Default Settings’ toggle to the off position.
With that off, check the ‘No Index’ box.
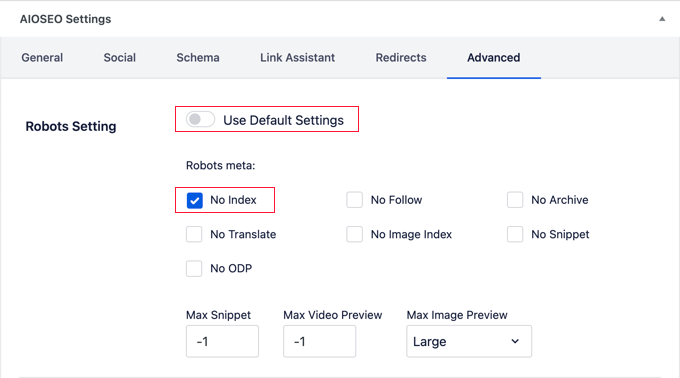
Once you publish or update the post, All in One SEO will tell search engines not to index that specific page. The rest of your website will stay completely open to search engines.
Method 3: Password Protecting Your Entire Site With cPanel
If your WordPress hosting provider offers cPanel, then you can lock down your entire site from there.
⚠️ Protecting your website at the server level blocks all external traffic from reaching it. If you’re testing third-party services like external cron jobs or payment gateways, they won’t be able to connect to your site.
With that in mind, you should only use this method for websites that aren’t live yet.
To start, log in to your cPanel dashboard and click the ‘Directory Privacy’ icon in the ‘Files’ section.
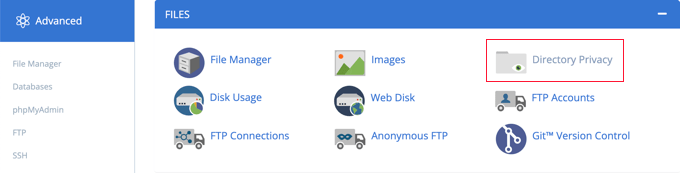
Next, find the folder where WordPress is installed, which is usually the public_html folder, and click the ‘Edit’ button next to it.
If you have several WordPress sites under public_html, click the public_html link to browse them, then edit the folder for the specific site you want to protect.
On the screen that opens, check the box that says ‘Password protect this directory’ and click ‘Save’, optionally giving the protected directory a name.
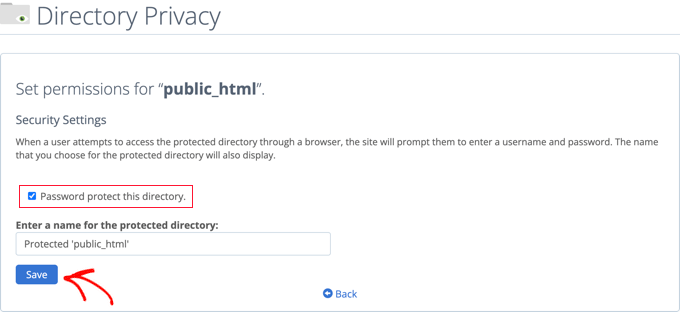
You’ll then see a confirmation that the access permissions have changed, so click the ‘Go Back’ button to continue.
On the next screen, create a new user by entering a username and password. It’s smart to save these details in a password manager, since you’ll need them to view your site.
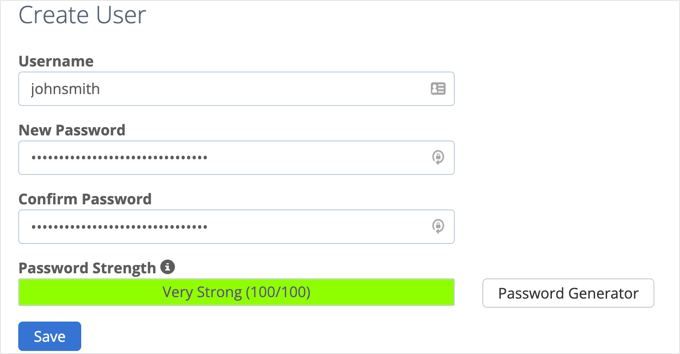
Once you click ‘Save’, your site is password protected.
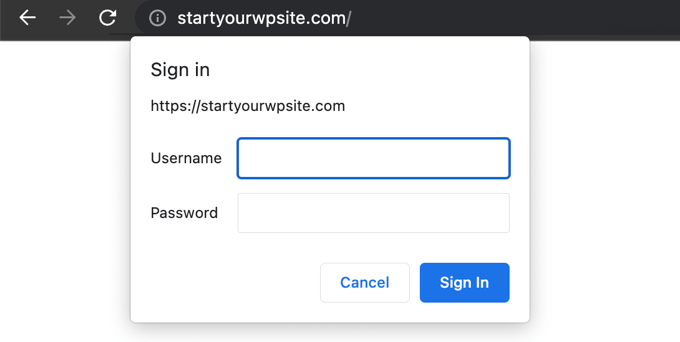
From now on, anyone who visits will need to enter the username and password before they can see anything, including search engine bots.
Method 4: Password Protecting WordPress With a Plugin
If you’re on managed WordPress hosting, you might not have access to cPanel. In that case, you can use a plugin instead.
The first option is SeedProd. It’s the most popular coming soon and maintenance mode plugin for WordPress.
It’s a great choice for websites under construction because it displays a polished landing page to your human visitors while completely hiding your unfinished website from search engines.
The second is the Password Protected plugin. It’s a simple tool that lets you lock your website behind a single password without creating any new user accounts.
How to Check Whether Google Has Indexed Your Site
After changing any of these settings, you’ll want to confirm they worked. You can do this quickly in two different ways.
The fast method is to type site:yourdomain.com into a Google search. The search results will show you roughly which of your pages Google currently has in its index.
The more precise method is the URL Inspection tool inside Search Console, which we cover in detail later. This tool tells you if Google indexed a specific URL. If it didn’t index a page, then the tool usually explains why.
Part 3: Finding and Fixing Crawling and Indexing Issues
Once search engines start crawling your website, Google Search Console becomes your early warning system for technical problems that could cost you traffic. The best place to start is the Pages report, which used to be called the Coverage report.
To find it, open the Indexing section in the left menu and click ‘Pages’. The report splits your URLs into indexed and not-indexed groups. Scrolling down reveals a detailed list of errors you can click on for more information.
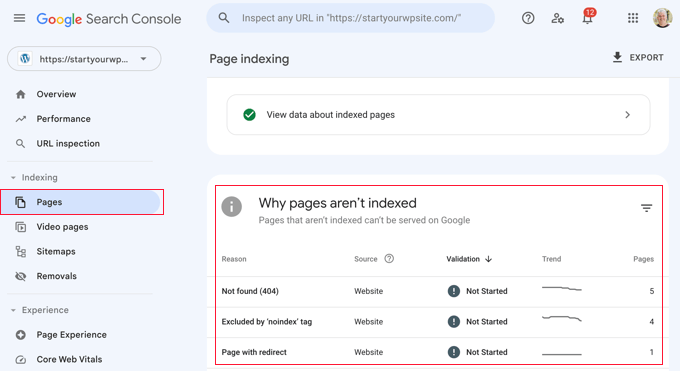
A few common errors you may see include the following:
- 404 error means the crawler followed a URL and reached a missing page.
- Soft 404 error means the page looks like a 404 to Google, but your server still reports it as a success.
- Server error means your server timed out or didn’t respond, often during heavy traffic or maintenance.
- Not followed means Googlebot couldn’t follow a particular link, often due to complex code or redirect chains.
Fixing 404 Errors
It helps to remember that you don’t need to fix all 404 errors. If you deleted a post on purpose and don’t want to redirect it, it’s completely fine to let Google see the 404 error. Google will eventually drop that page from its search index automatically.
To investigate, click the error in the Pages report to see the affected pages, then copy a URL and open it in a new browser tab.
If you see a 404 page for something that should still exist, you can restore it or set up a redirect to the closest live page, which our guide on fixing WordPress 404 errors walks through.
Sometimes, 404 errors can also happen because of a problem with your WordPress permalink settings instead. You can easily rule this out by going to Settings » Permalinks in your WordPress dashboard and clicking the ‘Save Changes’ button without changing any of the settings.
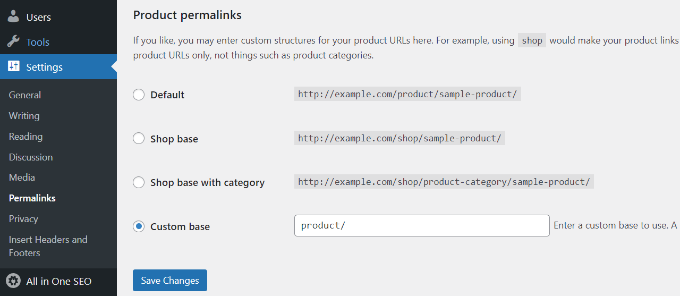
This simple action refreshes your website’s URL structure and often clears up the errors immediately.
Fixing Soft 404 Errors
Soft 404 errors are a little trickier. They happen when Google sees what looks like an empty or missing page, even though your server is sending a success code.
For example, this often happens on automatically generated category pages that don’t have any blog posts in them yet, or pages with very thin content that lack actual text.
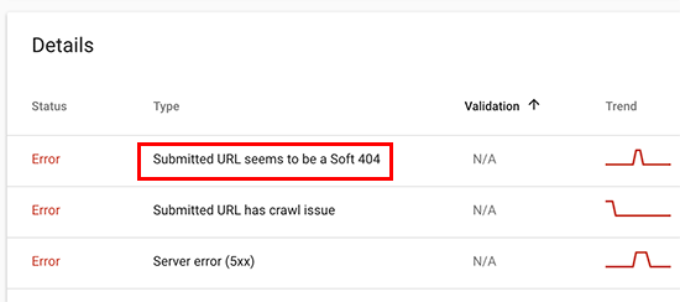
To resolve these errors, click on the specific error inside your Pages report and open one of the affected pages in a new browser tab.
If the page displays correctly for you, then you can safely ignore the warning. However, if the page really does show a missing-page document, it needs your attention right away.
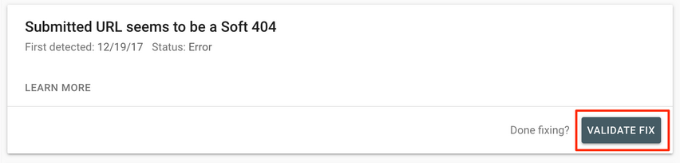
For a page that’s actually valid, click the ‘Submitted URL seems to be a Soft 404’ link, confirm the page in a new tab, and then click the ‘Validate Fix’ button so Google recrawls it.
If your WordPress search function is generating these errors, the simplest fix is to stop Google from crawling search URLs by adding Disallow: /?s= and Disallow: /search/ to your robots.txt file.
Remember that blocking a URL in your robots.txt stops crawling, but it doesn’t strictly guarantee the page won’t be indexed if someone links to it.
Fixing Server Errors
Server errors usually appear when your server times out during a crawl, throws an unexpected error, or seems to be offline. To check whether it’s a real problem, use the URL Inspection tool to confirm the affected URL is working.
If the page loads perfectly fine, you can safely ignore the error. If you use a reliable WordPress hosting company, most server errors will clear up on their own.
If you can reproduce the error by visiting the URL, then our guide to common WordPress errors and de-indexing fixes can help.
Finding and Fixing Security Issues
Security issues can stop Google from crawling your website and cause a sudden drop in your traffic. This happens because Google might remove the affected pages from search results, show a warning message to your visitors, or lower your search rankings.
These appear on the overview screen when you log in, and the most common one on WordPress is malware. If something shows up here, clean your site right away, since the longer it stays, the more traffic you lose.
Finding Manual Actions and Requesting a Review
Unlike security issues, which Google flags automatically, a manual action is a penalty applied by a human reviewer at Google. This usually happens because of spam or serious guideline violations.
A manual action is a very serious problem that can completely wipe out all your search traffic at once.
Clicking on the ‘Manual actions’ link shows you any penalties against your website, along with specific details on what caused them and how to clean them up.
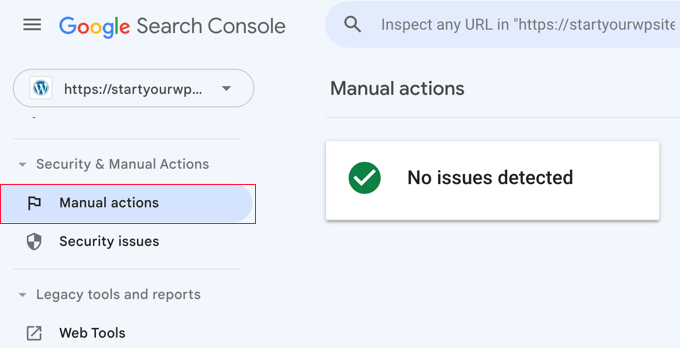
Once you’ve fixed the underlying issue, click the ‘Request review’ button so the Google team can reconsider and hopefully lift the penalty.
Part 4: Understanding and Optimizing Crawl Budget
As your WordPress site grows, a more advanced idea becomes important: crawl budget. Google Search Console gives you the tools and data you need to manage it.
What Crawl Budget Is and Why It Matters
Crawl budget is the number of pages search engines will visit on your website within a specific timeframe. This number isn’t fixed.
Instead, it changes daily based on your website’s authority, its size, and how often you update your content. Larger websites generally get a higher crawl budget.
If search engines waste their visits on low-value pages, they might be slow to discover your new blog posts and updates. This means it can take weeks for your important content to appear in search results, which can cause you to lose out on traffic.
What Causes Crawl Budget Problems on WordPress
The default way WordPress generates and handles URLs is actually the number one reason most websites waste their valuable Google crawl budget.
For starters, WordPress automatically creates RSS feeds for your main blog, your categories, your tags, the comments on every single post, and any custom post types. Search engines will try to crawl all of them.
On top of that, search engines often crawl low-priority items. These include unnecessary archive pages, author archives on single-author blogs, and attachment pages like PDF files. Plugins and marketing tools also add tracking query parameters to your URLs, which are the extra characters at the end of a web address.
Tracking codes like UTM parameters are a common example. A URL like https://yourdomain.com/landingpage/?utm_source=newsletter looks like a completely separate page to a search engine bot.
Each of these small variations eats into your crawl budget on pages that don’t matter, instead of using it for your real content.
Diagnosing Crawl Budget With the Crawl Stats Report
You can’t predict an exact crawl budget, but you can get a clear picture from recent activity.
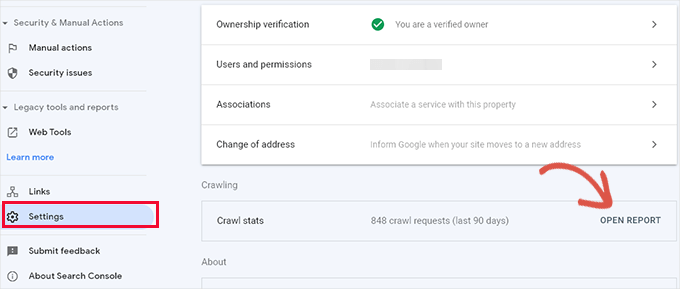
Navigate to the ‘Settings’ menu in the left column and click ‘Open Report’ next to ‘Crawl stats’.
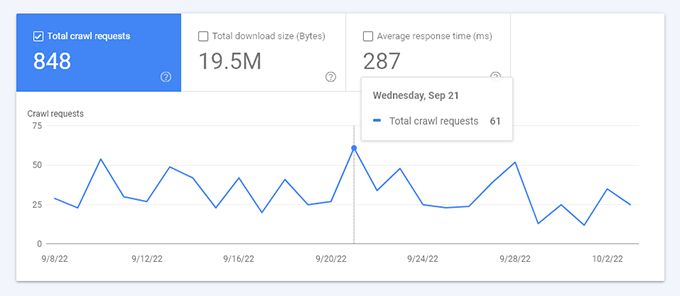
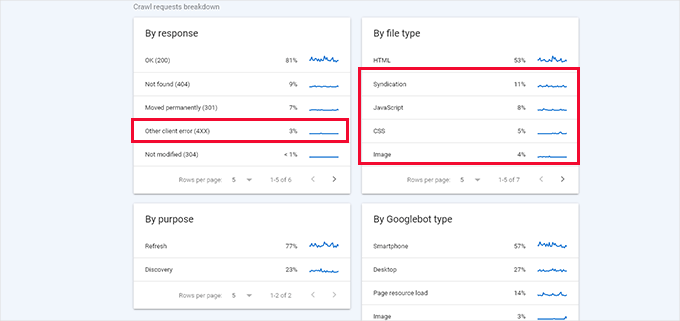
The report shows an overview of crawl requests over the last 90 days, and hovering over the chart reveals how many pages were requested each day.
This gives you a sense of your average crawl rate.
Below the chart, you’ll see a breakdown of your crawl activity by response code, file type, purpose, and Googlebot type.
Reviewing this data tells you exactly how much of your crawl budget is going to errors, RSS feeds, JavaScript, CSS, and images. This points you directly to what’s worth fixing on your website.
Optimizing Crawl Budget With AIOSEO Crawl Cleanup
The easiest and safest way to optimize crawl budget in WordPress is with the paid version of All in One SEO, which has a built-in Crawl Cleanup tool.
To begin, install and activate the plugin and either follow its setup wizard or check out our guide on how to set up AIOSEO correctly.
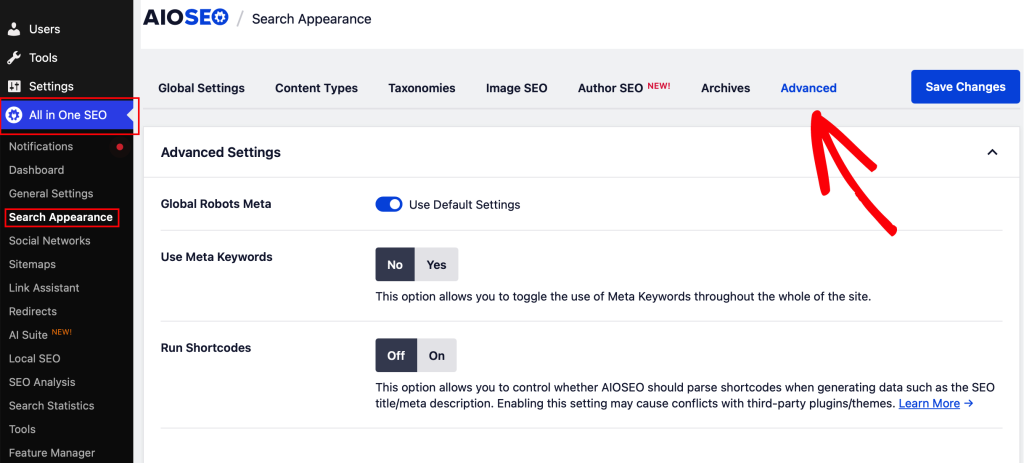
After that, go to All in One SEO » Search Appearance.
Then, switch to the ‘Advanced’ tab.
After that, scroll to the bottom until you find the ‘Crawl Cleanup’ option.
Here, click the toggle to enable it.
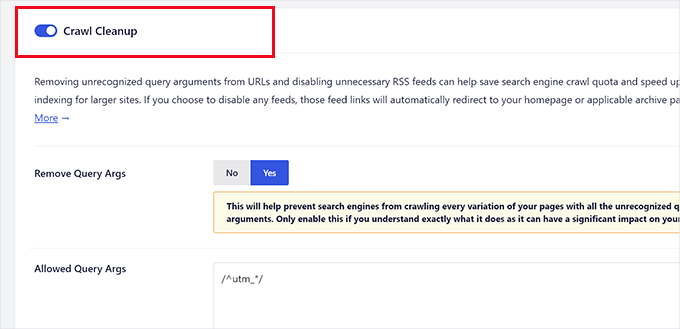
The first setting lets you remove query arguments to clean up your URLs.
AIOSEO uses safe default settings here, but you should be careful not to block arguments that your website needs to function. This includes the WordPress search parameter (usually labeled ‘s’) or online store product filters.
Next, you’ll see the RSS feed options. AIOSEO lists every single feed that WordPress generates so you can easily disable the ones you don’t need.
For example, if you run a single-author blog, you can disable the Author Feeds. This is because they just duplicate your main blog feed, so you won’t lose any content by turning them off.
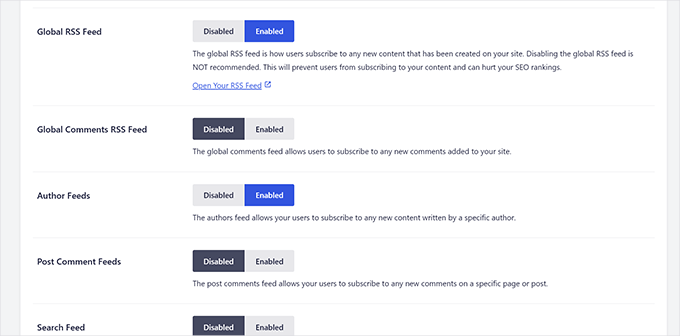
Once you’ve disabled the feeds you don’t want, click ‘Save Changes’ to store your settings.
You can also clean up the error pages you found earlier in your Crawl Stats report by redirecting them. To do that, go to All in One SEO » Redirects in your WordPress dashboard.
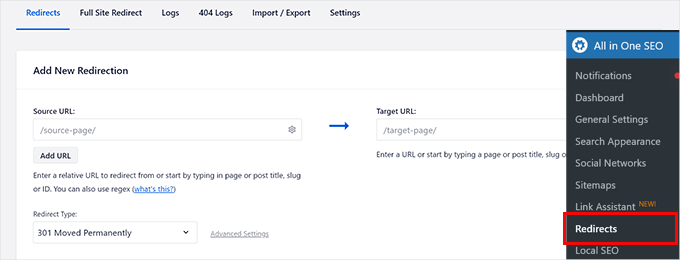
Next, enter the broken address in the Source URL field and a working web address in the Target URL field, and then click Add Redirect.
While you’re in the Redirects Manager, it’s worth watching out for redirect chains. A chain is when one address points to a second address, which then points to a third, so each visit takes an extra hop.
Every hop is a separate request, so a long chain slowly eats into your crawl budget and slows your site down at the same time.
Google’s crawler will usually follow only about five hops before it gives up. If a chain is longer than that, then the bot may never reach the final page, so that page can miss out on being indexed and ranked.
The fix is simple: point the original address straight to the final destination. If you change that destination again later, then update the original redirect to the newest address instead of stacking a fresh hop on top of the old one.
For a full walkthrough of setting up and managing redirects, see our beginner’s guide to creating 301 redirects in WordPress.
For more control over WordPress’s extra files, see our guides on disabling the default WordPress sitemap and adding an RSS sitemap.
Part 5: Using Google Search Console to Grow Your Traffic
This is where Search Console moves from maintenance to growth. The reports here show you the exact words people type in to find you online.
Getting Personalized Tips From the Recommendations Report
The Recommendations feature suggests practical ways to improve your visibility, right on your Search Console overview page.
For instance, the report might suggest adding structured data to help Google understand your content better, submitting a missing sitemap, or updating an old blog post that’s suddenly gaining attention for a trending search term.
To check your custom tips, simply open the Recommendations card on your main overview screen and click on any tip to see the full details and instructions.
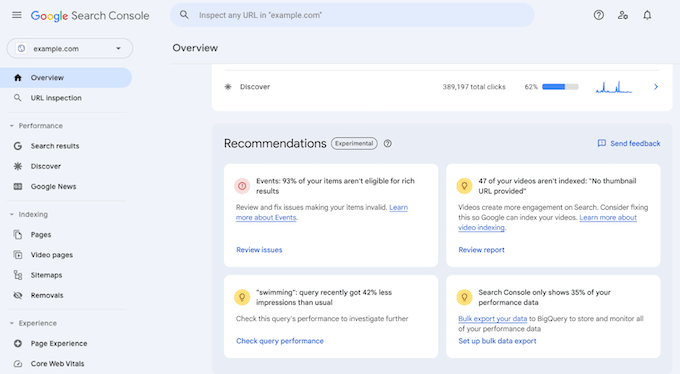
Because Google only generates these alerts when it finds something useful and specific to your site, you might not see recommendations every day. This makes it the perfect dashboard to review as part of your regular monthly website maintenance.
Mining Keyword Data in Google Search Console
Keywords are the search terms people type to find information. Google Search Console shows you every keyword your site already ranks for, along with its average position, clicks, and impressions.
You’ll find all of this under the ‘Performance’ tab.
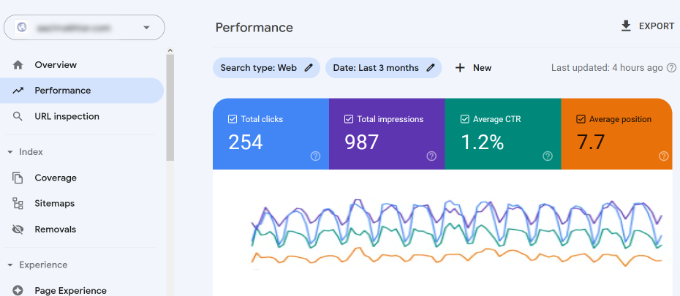
At the top of the page, you’ll see a graph that charts your overall performance in the search results.
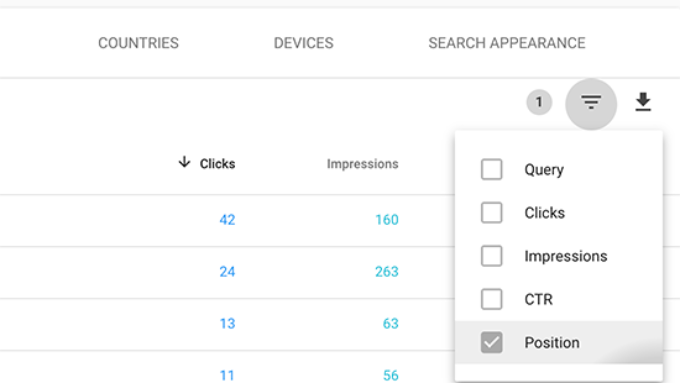
Below the graph sits your actual keyword data. You can easily sort this data by clicking on any of the column headings, or you can narrow it down by using the filter option.
Switching to the Pages tab shows you how your individual pages are performing.
If you click on a specific page, it filters the data for just that URL. From there, you can click back over to the Queries tab to see the exact keywords that bring traffic to that page. This information is invaluable for your content planning.
Checking Your Latest Data With the 24-Hour View
The standard Performance reports inside Google Search Console typically take a day or two to update. This can be frustrating when you’ve just launched a new marketing campaign or published an important post.
To fix this delay, Google added a real-time option that shows your search data with only a few hours of delay.
You can find this feature right at the top of your main Performance report, where you can simply change the date range filter to 24 hours.
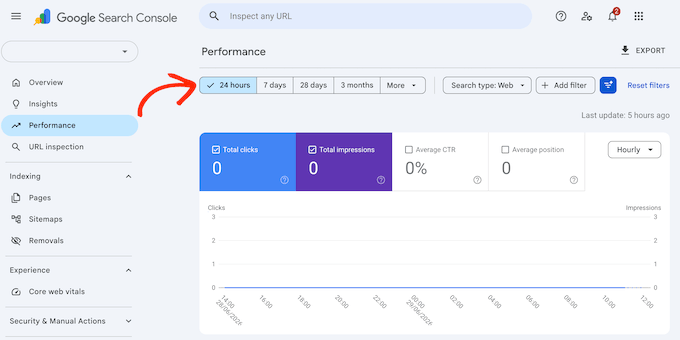
This fresh view breaks down all your organic clicks, impressions, and average keyword positions by specific search query, page, and country, giving you a near-instant look at your site’s health.
It also includes a built-in comparison mode that lets you measure the last 24 hours of search traffic against the previous 24 hours, or even the exact same day from last week.
This is especially helpful for confirming that Google has successfully started showing a brand-new article you recently asked it to crawl. It can also save you from waiting several days just to see the very first signs of traffic.
Finding Low-Hanging Keywords Where You Can Easily Rank
Many of your pages are probably sitting on page two or three of Google for certain keywords. These are your quickest wins for getting more traffic.
To find them, open your Performance report, click on the filter icon, and select the Position option. Then, look for keywords that have an average position greater than 7.
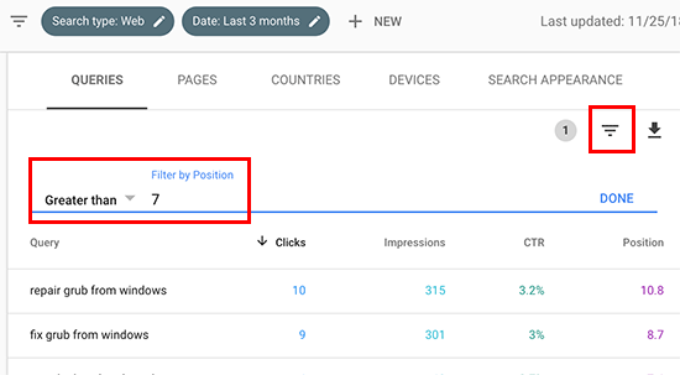
These are your low-hanging fruit. Because they’re already sitting on page two or three of Google, you don’t need to do a complete rewrite to get them to the first page. Often, just making a few small tweaks can give them the push they need.
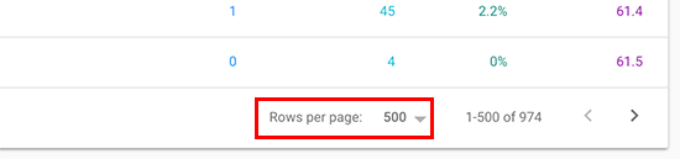
To see more at once, scroll to the bottom and choose a higher number for ‘Rows per page’.
When picking which keywords to work on, favor the ones with higher impressions, since they have more traffic to win.
You can also export the data to a spreadsheet to study it.
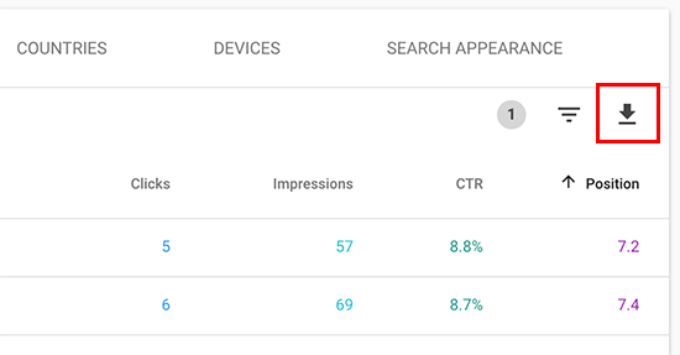
Once you’ve found those keywords, there are two reliable ways to improve your rankings for them:
1. Improve the content. The main reason a page isn’t ranking well is that Google finds other pages more useful. Take a look at the articles in the top five search positions to see what your page is missing. Your goal is to make your content more comprehensive and helpful, not just longer.
2. Evaluate your on-page SEO. You can use our ultimate SEO guide to improve your website. It gives you practical tips to improve your SEO title, keyword usage, readability, link structure, and more.
Using Link Reports in Google Search Console
Links play a big role in SEO because search engines use them to judge how important a page is on your website.
The Links report in Google Search Console displays your external links, internal links, top-linking sites, and the exact anchor text people use to link to you. You can use all this data to improve your SEO strategy.
Getting More Backlinks From Third-Party Websites
To find your backlinks, open the Links report and click the ‘More’ link under ‘Top linking sites’.
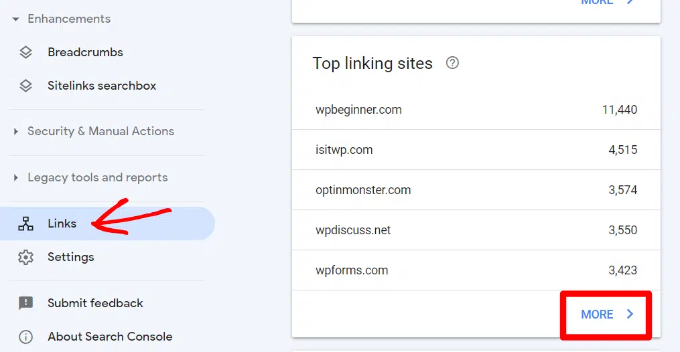
When you click on any domain name in this list, it will show every single page on your website that it links to. You can then click on a specific page to see the exact URL where that backlink is coming from.
You can use this to earn more backlinks by visiting each site, seeing how they linked to you, and politely reaching out to suggest other relevant articles of yours.
For more on this topic, please see our guide to the best backlink checker tools.
Improving Internal Links to Boost Rankings
Internal links matter because they help Google understand your website’s structure and figure out which of your pages matter most.
To use this report, open the Links section in your menu and click on the More link under the Internal links box.
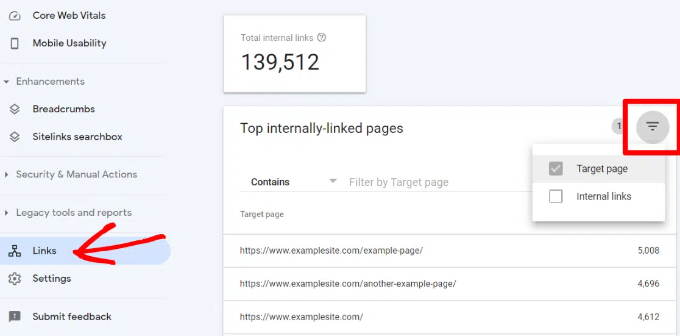
From there, you can click on the filter icon and select the Target page option. This will show you exactly how many internal pages are linking to each individual post or page on your site.
When you compare this data across your different articles, you’ll often find that the pages with the most internal links are the ones that rank the highest.
You can use this to your advantage by adding links from your most popular blog posts to the pages you want to boost in the search results. Just make sure the links fit naturally into the content.
To make this process much faster, check out our expert picks of the best internal linking plugins for WordPress.
Creating Rich Snippets for Your WordPress Pages
Rich snippets are the extra details, such as star ratings, prices, and reviews, that appear under some search results and make your listing stand out.
They are powered by schema markup, which is a type of code that describes your content to search engines.
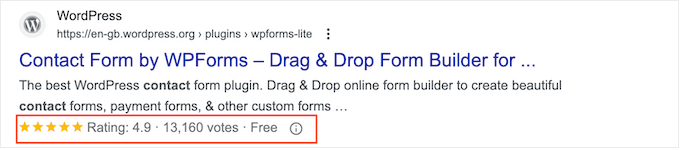
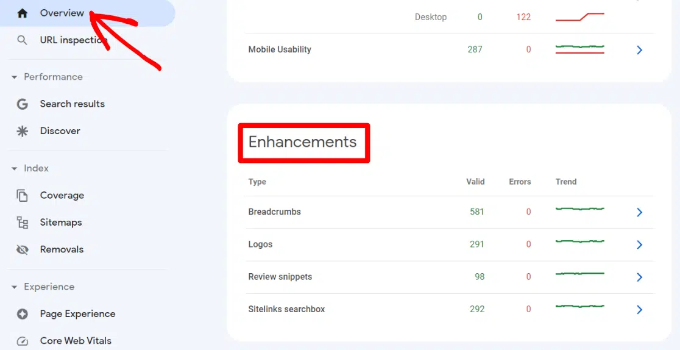
Search Console makes it easy to find pages that show rich snippets, along with any errors.
To see them, open ‘Overview’ and scroll down to the ‘Enhancements’ section, where you can spot and fix problems.
To learn more, see our guides on using rich snippets in WordPress and adding schema markup.
Tracking Your Visibility in AI Overviews and AI Mode
Google search results now go beyond the classic blue links.
Now, Google features AI Overviews at the top of many search results, alongside a conversational search experience called AI Mode. Your website can be picked as a source for both of these tools.
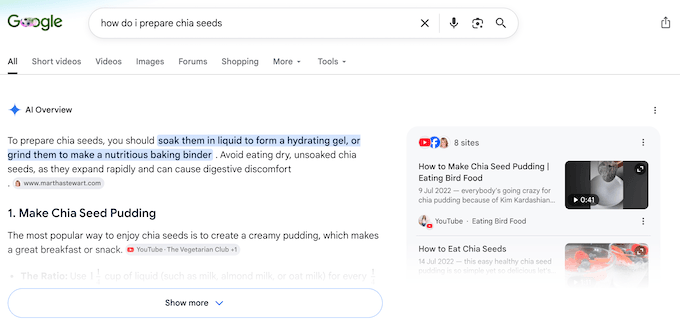
Google recently added dedicated generative AI performance reports to their Performance dashboard.
These reports show exactly how many search impressions your website earns inside AI Overviews and AI Mode. You can also break this data down by specific page, country, and device.
Currently, these reports only track impressions. This means you can see your overall visibility, but you cannot yet see the precise number of clicks or the exact click-through rate these AI answers send to your site.
It’s worth checking regularly, since AI summaries are becoming a major source of organic traffic.
To take your SEO strategy a step further, you can actually guide how AI crawlers read your website by setting up an llms.txt file.
This is a simple text file placed on your server that points AI crawlers toward the content you consider most important. It’s an emerging convention, so support varies, but some AI tools do read it.
Our complete guide on how to add llms.txt in WordPress walks you through the entire setup process.
Part 6: Improving Technical Performance
Google rewards websites that load quickly and work smoothly on mobile phones.
Search Console includes reports that show exactly how your pages measure up against these technical signals.
Using Core Web Vitals in Search Console
Core Web Vitals are a set of specific metrics that Google uses to measure how real users experience your pages.
The three current metrics are:
- Largest Contentful Paint (LCP): This measures how fast your main page content loads.
- Interaction to Next Paint (INP): This measures how responsive your page is when a user clicks or taps on it.
- Cumulative Layout Shift (CLS): This measures visual stability, checking if things unexpectedly move around on the screen while the page is loading.
Google previously used a metric called First Input Delay, but they officially replaced it with INP because it provides a much more thorough look at your site’s interactivity.
To check your scores, simply open the Core Web Vitals report.
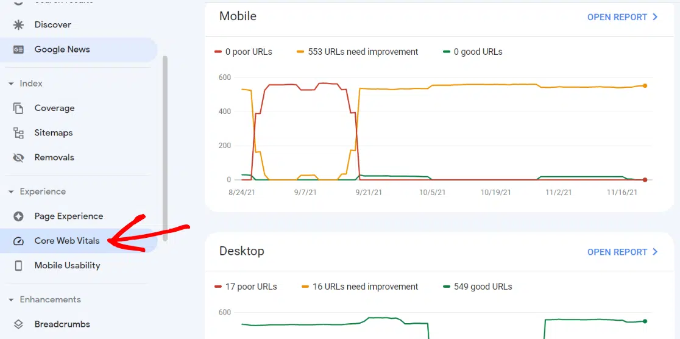
Here, you will see separate performance ratings for both mobile and desktop users, along with clear recommendations on what you need to improve.
For a full walkthrough of improving these scores, see our ultimate guide to optimizing Core Web Vitals for WordPress.
Checking Your Mobile Performance
More than half of all Google searches now come from mobile phones, and Google predominantly uses the mobile version of your site when it decides how to rank you (this is called mobile-first indexing). That makes a smooth mobile experience important for your visibility.
While the Core Web Vitals report tracks your overall mobile performance, you can also use Google’s free PageSpeed Insights tool to find and flag the specific technical issues you need to fix.
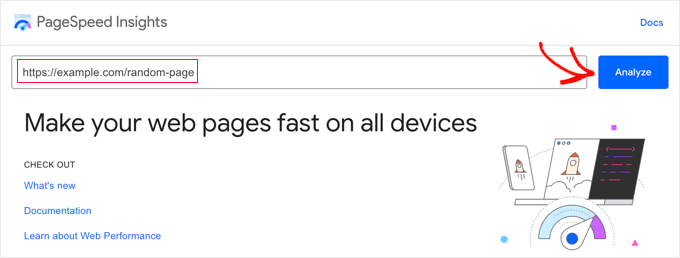
You can see our ultimate guide to WordPress speed and performance for tips on how to fix any issues.
Using the URL Inspection Tool in Search Console
The URL Inspection tool tells you whether a single page is in Google’s results and lets you request a recrawl.
To use it, enter a URL in the search bar at the top of Search Console.
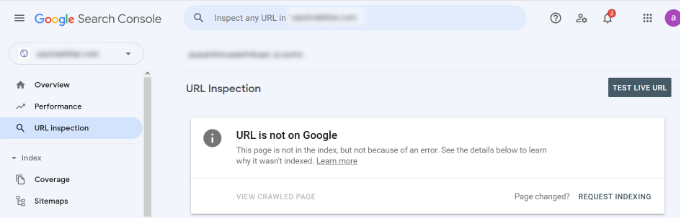
If your page isn’t indexed yet, you will see a clear message that says ‘URL is not on Google.’
When this happens, you can simply click the ‘Request Indexing’ link to ask Google to come and fetch your page.
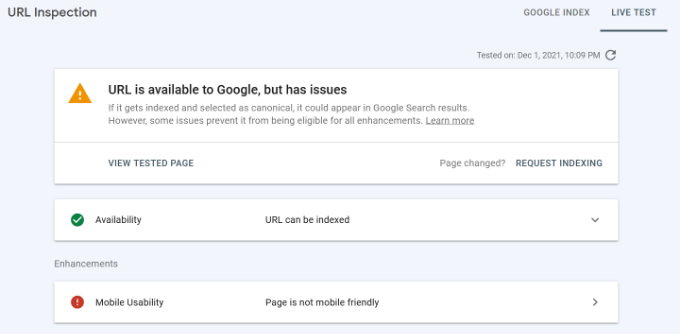
If you scroll down, you’ll find even more helpful details about your sitemaps, your website’s crawl history, and how Google discovered the page.
You can also run a live test to check for an indexable version, and request indexing from there. For more information, see our guide on how to ask Google to recrawl your URLs.
Part 7: Managing Your Search Console Account
This last set of features helps you keep your account tidy and bring your Search Console data into WordPress.
Removing URLs From Google Search
Sometimes you need to completely remove a page from Google’s search results as quickly as possible.
One option is to add a noindex tag to the page. However, depending on how often Google crawls your website, that method can take quite a bit of time to actually work.
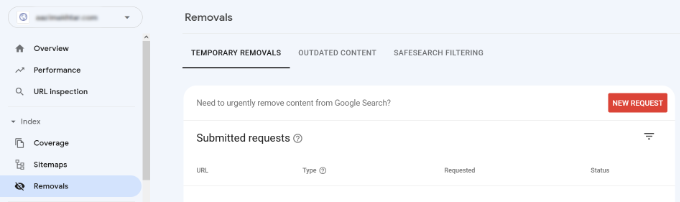
If you need something much faster, you can use the built-in Removals tool.
To do this, simply click on ‘Removals’ under the Index section in your left-hand menu, and then click the ‘New Request’ button.
In the popup, enter the URL, choose whether to remove just that address or everything with the same prefix.
Then, click ‘Next’.
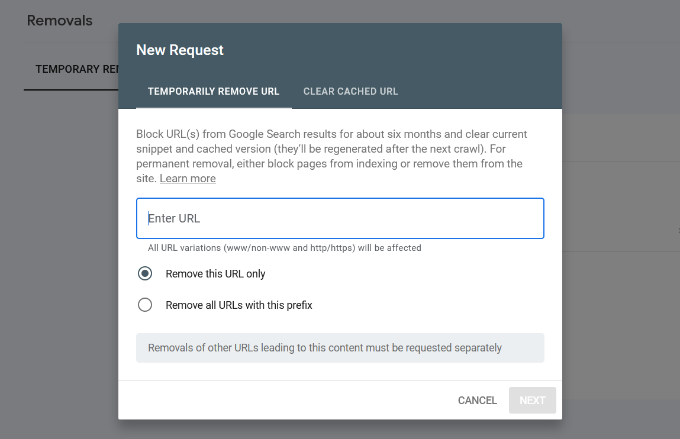
Google will then block the URL from its search results for about six months. Because this removal is only temporary, you will need to pair it with a permanent solution so the page doesn’t suddenly reappear after the six months are up.
To permanently hide the content, you can either add a noindex tag to the page, completely delete the page from your site, or set up a 410 status code to let search engines know the content is permanently gone.
Adding Users to Access Google Search Console
If you work with a marketing team or an SEO consultant, they will likely need access to your Google Search Console data. However, you should never share your main Google password with anyone.
Instead, you can easily grant them safe access by going to Settings » Users and permissions in GSC and clicking the ‘Add User’ button.

Next, just enter the person’s Google account email address and choose their permission level.
There are two main permission levels to choose from:
- Full permission: This gives the user access to every feature and tool, including the ability to add other new users.
- Restricted permission: This lets the person view all your search data and reports, but they won’t be able to make any changes to your settings.
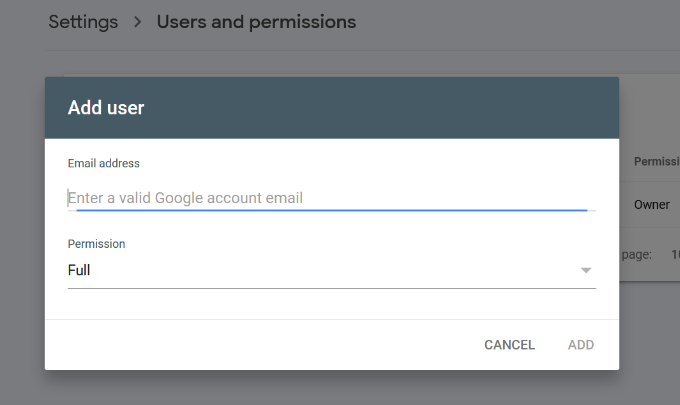
Once you’ve made your choice, simply click the ‘Add’ button. Google will send them an email notification right away so they can log into your dashboard.
Viewing Google Search Console Data Inside WordPress
Digging through Google Search Console reports can be time-consuming, especially if you’re a beginner. You can avoid switching back and forth between different tabs entirely.
The AIOSEO Search Statistics addon allows you to view your most important Search Console insights right inside your WordPress dashboard.
Once you’ve connected the plugin to your Google Search Console account, simply go to All in One SEO » Search Statistics to open up your new dashboard.
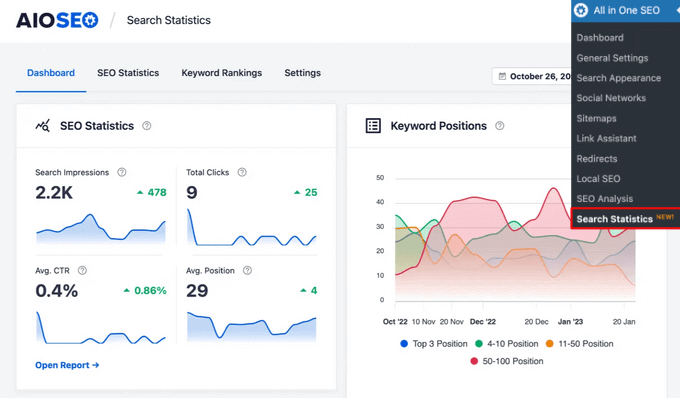
From here, you can track your total impressions, clicks, average click-through rate (CTR), and the average position of your content across any date range you choose.
The dashboard also highlights your Top Winning and Top Losing keywords. These are the specific search terms that have moved up or down the most in the search rankings, letting you know exactly where you need to focus your attention.
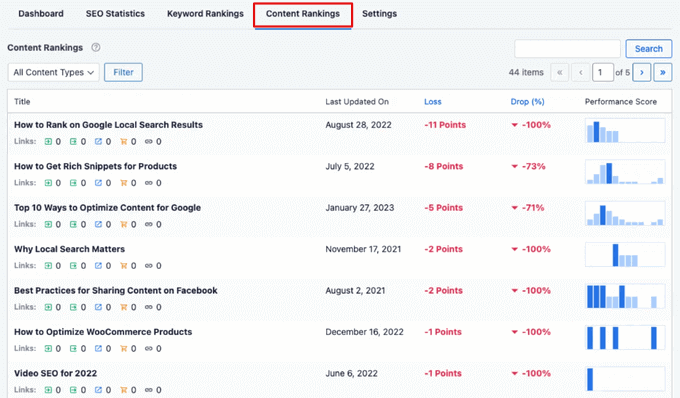
Alongside these keyword stats, you’ll also find the Content Rankings report. This report automatically flags content decay by showing you exactly when each URL was last updated and whether its rankings are starting to slip.
Frequently Asked Questions About Google Search Console
What is the difference between Google Search Console and Google Analytics?
They track two different parts of your site. Search Console focuses on search engines and what happens before a visitor arrives: which keywords you rank for, how often you show up in results, how many people click, and whether your site has technical errors.
Google Analytics focuses on what happens after a visitor arrives: how many people visit, which pages they view, and whether they buy or fill out a form. Search Console helps you optimize for Google, while Analytics helps you optimize for human visitors, so use both together for the full picture.
Is Google Search Console free to use?
Yes, Google Search Console is completely free to use. Google provides this web service at no cost for any website, regardless of how much traffic you get or how many pages you have.
How often should I check Google Search Console?
This varies depending on how old your website is and how often you publish new content.
If you’re managing a brand-new website, it’s a good idea to check your Search Console reports once a week. This allows you to closely watch your indexing progress, make sure Google is finding your new pages, and quickly fix any unexpected crawl errors before they hurt your traffic.
For a larger, more established website, logging in once or twice a month is usually more than enough. You do not need to obsess over the dashboard every day because Google will automatically send an urgent email notification to your inbox if it ever detects a serious security threat, manual penalty, or critical indexing issue on your site.
Why is my Search Console data empty when I first set it up?
When you first connect your website, your reports are empty because Google needs time to crawl your pages and process the information. Blank dashboards at this stage are normal and happen to almost every new site.
Search Console does not track data retroactively, so it only starts gathering information from the moment you verify ownership of your site.
It’s completely normal to wait anywhere from a few days to a full week before your first performance reports, click statistics, and keyword impressions start appearing.
What is the difference between blocking crawling and blocking indexing?
They control two different steps. Blocking crawling with your robots.txt file stops bots from visiting a page, but Google may still list that URL if another site links to it. Blocking indexing with a noindex meta tag tells search engines not to show the page even after they read it.
Neither method guarantees privacy. If you have sensitive or private pages, protecting them with a strong password is far more reliable than relying on SEO tags.
Will password protecting my site hurt my SEO when I launch it?
The short answer is no, password protecting a website during development will not hurt your future SEO rankings.
When a website is hidden behind a password, search engine bots cannot access your pages, read your text, or index your content. Because of this, your site essentially has no SEO standing to lose (positive or negative) while it’s locked down.
Once you remove the password protection, search engines will be able to access your site for the very first time. They will begin crawling your pages, understanding your site structure, and ranking your content completely normally, just like any other brand-new website on the internet.
How do I turn off SEO in WordPress?
There is no single ‘off switch’ for SEO in WordPress, but you can hide your site from search engines. The quickest way is to go to Settings » Reading, check ‘Discourage search engines from indexing this site,’ and save your changes.
For a stronger method, use a plugin like All in One SEO to set specific pages to noindex, or password protect the whole site with a maintenance mode plugin until it’s ready.
Does crawl budget matter for a small WordPress site?
Generally speaking, crawl budget is not something you need to worry about if you’re running a small WordPress website.
If your site only features a few dozen or even a few hundred pages, Google’s automated bots can easily discover, crawl, and index all your content within a matter of minutes. You do not need to spend time optimizing your server resources or managing crawl paths at this stage.
Can I see the exact crawl budget for my site?
The short answer is no, you cannot see an exact, static number for your crawl budget. Google does not publish a precise budget figure for any website, and the amount of attention your site receives actually shifts from day to day based on your domain authority, the total size of your site, and how frequently you publish fresh content.
The closest you can get at this data is by using the Crawl Stats report inside Google Search Console.
While it won’t give you a set limit, this report provides a detailed, behind-the-scenes look at exactly how many crawl requests Google made to your server over the last 90 days and precisely which file types or pages it spent those requests on.
Does Google Search Console show AI Overview traffic?
Yes. Google’s generative AI performance reports show how often your site appears inside AI Overviews and AI Mode (as impressions, not clicks yet). This data was always part of your traditional Search Console performance totals; the dedicated report simply breaks it out so you can see which pages Google’s AI layer is citing.
To learn how to format your content so it gets cited more often in these AI summaries, see our guide to generative engine optimization.
Can I stop my content from appearing in AI Overviews?
Yes, you can opt out of these features if you don’t want your website’s content used in AI answers. Google includes a dedicated setting inside Search Console that blocks your content across its suite of AI features, including AI Overviews, AI Mode, and the AI-driven summaries in Google Discover. Keep in mind that this setting is still rolling out, so it may not appear on every account yet.
In most cases, we don’t recommend using this blocking feature. Choosing to opt out means you’ll lose out on the visibility, citations, and referral traffic that these AI placements can send to your WordPress site.
Deciding to turn off the AI features will not hurt or change your traditional, organic search engine rankings, so you remain in full control of how your site appears on the web.
Additional Resources for WordPress SEO
- How to Install Google Analytics in WordPress
- What Is a WordPress Sitemap and How to Create One
- 9 Best WordPress SEO Plugins and Tools
- How to Add Your Website to Bing Webmaster Tools
- How to Submit Your Website to Search Engines
- How to Do Keyword Research for Your WordPress Blog
- Image SEO: Optimize Images for Search Engines
If you liked this article, then please subscribe to our YouTube Channel for WordPress video tutorials. You can also find us on Twitter and Facebook.


Olaf
Google Search Console is a great tool that not only helps you improve SEO and enhance search rankings but also often helps you understand where the problems lie and what Google doesn’t like. It’s basically essential if you want to start optimizing specifically for Google. This tutorial is excellent because it explains some lesser-known issues and how to resolve them. Honestly, Google’s help documentation is terrible, and before I learned to work with the console, I must say my frustration with the help resources was significant. In the end, I sought answers in articles like yours. Google should take a page from your book on how to write helpful documentation and tutorials.
Dayo Olobayo
I’m relieved to learn that Google Search Console is free to use. I thought tools like this would be expensive but now I know I can improve my website’s performance without breaking the bank. Thanks for taking the time to put this together.
WPBeginner Support
You’re welcome, glad we could clarify that it is a free tool
Admin
Moinuddin Waheed
for a newly website, I tried adding website to google search console using AIOSEO and waited a while before validating. But it didn’t validated, showing it does exist.
I tried it several times but didn’t work.
Then I finally made it using file manager, uploading the html file to main public folder and validated.
I don’t know if what time does it take for validation by Google search console through AIOSEO and adding code snippets to wpcode snippets?
WPBeginner Support
It should be the same amount of time as if you manually added the file. The most common reason for a delay like that would normally be a hiccup with the caching needing to be cleared on your site.
Admin
Moinuddin Waheed
Thanks for this much detailed guide on tips and hacks about Google search console.
Hardly what we do in google search console is to add a website and connect it to the Google analytics and never bother to get more out of this useful tool.
like targetting low hanging keywords which can be used to target and easily rank.
I have a query regarding indexing and crawling.
whether they are same or they are different?
also how are they different in terms of what they do?
WPBeginner Support
A crawled page would mean that Google knows the page exists while indexing would mean that it has analyzed the content of the page for it to appear in search results.
Admin
WPBeginner Support
If you deleted the post on the site itself then once Google attempts to recrawl the link after your removal request it will not add the post back into the search results.
Admin
Mrteesurez
Also, while removing a URL from Google search. It shows ‘Temporary Removal’. Does this mean the URL is only remove temporarily because I still found some pages and sites o have removed from Google search even after 6 months.
WPBeginner Support
Correct, the method you have used would remove the link from Google for 6 months which is why it is a temporary removal. You would need to take other steps to permanently remove the page.
Admin
Mrteesurez
Can you tell me the other steps I need to take to remove this URL permanently ??
Even some sub domain I have deleted and not in use again still show contents on search engines.
Iriogbe peter
When you use Google’s “Temporary Removal” tool, it’s a short-term fix to quickly take a page off search results. Yet, it’s temporary, and Google might re-show it over time. For a lasting solution, use methods like a ‘noindex’ tag or update the robots.txt file. Google’s guidelines should guide you for permanent content removal.
Mrteesurez
Ok, thanks.
But I can not use no index for website or pages I have even deleted. Do I need to create bit again to apply this or what ??
How do I adjust or update the robots.txt for website I have deleted and removed its domain.
WPBeginner Support
If you delete a page after removing it from search console then you do not need to worry about noindexing it as when Google recrawls your content it would not see that page to add it to search results.
Peter Iriogbe
According to the Admin, If you’ve deleted a website and its domain, adjusting or updating the robots.txt file is unnecessary. The robots.txt file is specific to a live website and won’t have any impact on a deleted site. Once a website is removed, search engines will naturally cease crawling it. There’s no need to recreate it or apply changes to the robots.txt file for a deleted and non-existent website.
Mrteesurez
Wow, you have really done a great job here. I believe learning never ends. I am just discovering these tips and guides to make best use of Google Search Console.
Thanks for this in-depth, Kudos to WPbeginner.
But my question is: There are some errors I am currently encountering in my blog.
It says: ‘Crawled but not indexed’.
What does this mean ??
The posts affected are not showing on Google search.
WPBeginner Support
That message means that Google knows about the page but has not put the page in search results at the moment. It would depend on the specific content for the steps to consider for those pages.
Admin
Mrteesurez
Specific contents ??
do you mean: either post or page ??
I didn’t the last line of your message.
I want you to know that, I have almost 30 posts on this particular blog.
In search engine console,
some: crawled but currently not indexed’
while some: discovered but currently not indexed’
WPBeginner Support
Not the content type as in post or page but the content on the page itself. Google can sometimes have this message for content that they feel is low value or should be improved before it includes the content. Next to the not indexed there should be an additional reason normally for why it is not indexed.
Jiří Vaněk
I also have quite a lot of results like this on my site. Personally, it always helped me to look at the given article and rework it a little. Edit text or insert new information, or add schema markup using AIO SEO. I then resubmitted the article for indexing in GSC and took this method many times. In my opinion, Google considers the content of the article low and therefore does not index it, even if it knows about it. Changing the ALT text quite often helped me with images. So try this.
Mrteesurez
Thanks you, Jiri.
I will try to work on the tips you just gave.
But as a news blog that use to have short contents and it’s frequently. Does that mean I will have to re-edit those posts manually to solve the issue ??
Iriogbe peter
No, you don’t have to. It is not how lengthy the content is that makes Google index it. (Though content that thoroughly addresses the needs of users is appreciated by search engines like Google)
I had a similar issue not quite long ago. I fixed it by writing multiple blogs in one type of category instead of just writing any topic. For example, I had a category in marketing so I wrote more than 10 posts about marketing and so on
Sometimes, especially for a new blog website it might take time for some of your content to be indexed. This is because search engines want to understand the type of content you want to serve with your website before they start indexing it. I recommend you have multiple content in the same category to help Google see the need to crawl and index your blog posts. For example, you might write a blog about SEO in many different ways( not just in one post but many) Doing so will trigger your website to Google crawlers that you are expertise in that niche giving your content the chance to be indexed.
Jiří Vaněk
If the articles are short, like some news, it can also be the reason that Google does not consider the content to be relevant. I often expand such articles and explanations. There is a term in the article, so I will provide a highlighted explanation for it (with the help of text from artificial intelligence). it helps to increase the content in a very easy way and it is more relevant.
Ahmed Omar
search console with no doubt is a powerful need for any site. and when ever I made changes to it to improve the performance, I always find new powerful changes
Tip number was good as I noticed it in many searches and I do not know how to do it , no it is all clear number
THANKGOD JONATHAN
I have just posted a comment on this post but I think I still need to make another comment after my experience with tip 12.
In my case I have tried filtering the result to “position” as you metioned in tip 12 above in this post but their is no position option in the filter. I can only see queries, clicks and impressions.
Please why is my own result different?
WPBeginner Support
Please check the icon next to the download button to see if it is unchecked for you to have it not visible.
Admin
THANKGOD JONATHAN
Thank you for the post.
I really got some tips I never know. much especially method 12. Finding Low-Hanging Keywords Where You Can Easily Rank. It the method I never use and I gonna try it out.
Moinuddin Waheed
Though I have done a lot in the Google search console, there is always room for improvement. I can here to check whether I have done everything the right way and found some of the things as to do for my websites.
This is purely a gold mine of tips and tricks for improving Google search console usability.
Thanks a lot wpbeginner.
Jiří Vaněk
Thank you for the great articles. I made it a task to go through your older articles, and even though I already know quite a lot, I always find some piece of the puzzle that had escaped me before. As I go through your older content now, I always stumble upon something that can be improved or implemented into my own website. You’re great.
WPBeginner Support
You’re welcome!
Admin
Ahmed Omar
Thank you so much for this helpful information.
I went through a recheck for most of the mentioned tips and I made sure it is all active on my site.
there was few missing things which Adding an XML Sitemap is one of them and I am working on it now to fix it
WPBeginner Support
You’re welcome, glad our tips were helpful
Admin
Ahmed Omar
important post with unique tips.
I took many notes from here, but number 12 is the one thatci was working on it in the last few months ” Finding Low-hanging Keywords Where You Can Easily Rank ”
Thank you
WPBeginner Support
Happy to hear our guide is helpful and we wish you luck with the keywords
Admin
Emma
Hi! Thanks for a helpful article and all your helpful articles in fact!
I have set up both Google Search console and Google analytics and am verified domain owner.
However, I am unable to connect console to analytics as given in the steps above. When I get to Enable Search Console data in Google Analytics it says I don’t have any verified sites under search console – even though my website is set up and showing data in google search console!
Can you offer any advice or link to an article please?!
WPBeginner Support
You would need to verify your account in Google’s Search Console before you can connect it, we would recommend taking a look at our guide below:
https://www.wpbeginner.com/beginners-guide/how-to-add-your-wordpress-site-to-google-webmaster-tools/
Admin
Christina Henry
i find all your articles brilliant. You’ve helped me so much. Thankyou
WPBeginner Support
Glad you’ve found our content helpful
Admin
Abdul Ahad
Hello,
Thanks for this great guide. I just want to say that step 2 is not applicable anymore and I cannot switch to the older version to reach site settings. Can you please provide a link to reach that page.
Also while doing step one, I was asked to select from domain and url prefix. that was something new which is not explained in this article, can you please elaborate the difference between both.
Thank you
WPBeginner Support
Thank you for letting us know that Google has updated their interface and method, we will look into updating this article as soon as we are able.
Admin
cheryl watson
Thank goodness you exist. finally finding my round wordpress and building my blog! phew…
WPBeginner Support
Glad you’ve found our guides helpful
Admin
Info
Really helpful articles you are supplying, I am learning an incredible amount of information here!!!
WPBeginner Support
Glad you found our guides helpful
Admin
Vegancheapneasy
Hello guys, thanks for the awesome article. I am a beginner stiil and I added all website versions to my search console properties (http, https, www etc). I want to ask you – when I connect analytics to the search console, should I repeat the process to add every version of my site or just the primary one that is in the wordpress general settings?
WPBeginner Support
Only worry about the primary address in your settings
Admin
Becky Antkowiak
Hey, there,
Just an FYI, you can no longer set preferred domain. Google has apparently removed this option.
Thanks for all your hard work. I started with one article and then I’ve been down the rabbit hole for the last several hours following links to “oh, wow, I need to know that, too!”
Have a super day!
WPBeginner Support
Thanks for letting us know, we’ll be sure to look into updating the article
Admin
Louise Findlay
Hi. Can you still access the old search console? Also, I have verified sites in Google Search Console but they don’t show up when I try to connect them to Google Analytics.
WPBeginner Support
If Google has updated the interface then sadly, not at the moment. For connecting your site to Google Analytics you may want to take a look at our guide here: https://www.wpbeginner.com/beginners-guide/how-to-install-google-analytics-in-wordpress/
Admin
hannachi
Great Article Thank you so much for all this information.
WPBeginner Support
Thank you and you’re welcome
Admin
Jonathan
Great post thank you!
Before I begin you should know that I have been following the steps you have laid out and have verified my site successfully, but…I have 2 issues I wonder if you could help me with.
Firstly, when I go to the old version of search console to set my preferred domain, a popup comes up basically saying that I have to “verify my site”. (which has been done already)
The second thing is when I try to save to the https: version on google analytics, I can save the https on the “view settings” but it won’t save under the “property settings”.
Any help you can give me in these issues would be greatly appreciated!
Thank you!
WPBeginner Support
Hi Jonathan,
Did you verify your site as HTTP or HTTPs. The URL you submit as the preferred domain name should be the same as your search console
Admin
Athar Bhatt
Great Article Like every other article on wpbeginner.com
Thank you so much
Koushik
Thank you so much for this helpful information.Recently I started my new website.This is really helpful to grow up.Thanks,Syed.
WPBeginner Support
Hi Koushik,
We re really glad that you found this guide helpful.
Admin
Fodiyo
Thank you so much for your wonderful support and information
WPBeginner Support
Hey Fodiyo,
You are welcome
Admin
Laurinda
Amazing content! Thank you so much. As a beginner website owner, I find this information really helpful. This is definitely an article to keep in a safe place for future reference. Thanks.
WPBeginner Support
Hi Laurinda,
We are glad you found it helpful.
Admin
Anwar
Guyz, this information is so useful
Ellen
Hello Syed,T
Thank you so much for all this information.
For someone like myself, who knows nothing, this is exactly what I need right now.
I will need to study this and start making progress.
With best wishes,
Ellen
Editorial Staff
Thanks Ellen
Admin