Getting the Yoast SEO plugin up and running in WordPress can help improve your website’s search engine visibility. This popular SEO plugin offers a range of features to optimize your site for search engines like Google.
However, setting up Yoast SEO can feel overwhelming, especially for beginners.
With so many options and technical terms, it’s hard to know which settings will actually make a difference. Making the wrong choices could even hurt your SEO efforts instead of helping them. But don’t worry, we’ve got you covered.
In this guide, we’ll walk you through the step-by-step process to install and set up Yoast SEO in WordPress.
🔈 Important Note: We have switched from Yoast SEO to All in One SEO for the WPBeginner website because it has far more powerful features. The plugin is used by over 3 million websites. You can follow our guide on how to install and set up AIOSEO for more details.
What is Yoast SEO and What Are its Features?
Yoast SEO is one of the most popular WordPress SEO plugins, with many built-in tools and features. Here is a quick overview of some of those features:
- Change the post’s SEO title and meta description on a per-post basis.
- Title and meta description support for taxonomies, such as categories and tags.
- Google search result snippet previews.
- Focus keyword testing.
- Meta robots configuration:
- Easily add noodp and nodir meta tags.
- Easily noindex or nofollow pages, taxonomies, or archives.
- RSS footer/header configuration.
- Breadcrumbs support, with configurable breadcrumbs titles.
- Advanced XML sitemaps.
- The
.htaccessandrobots.txteditors. - Ability to verify Google Search Console, Yahoo Site Explorer, and Bing Webmaster Tools.
- Schema markup support.
The premium version of Yoast SEO comes with even more features.
It includes a redirect manager for easily setting up redirects, the ability to use multiple focus keywords, and internal linking suggestions to improve site navigation.
You can also export focus keywords for analysis, access video tutorials that explain various features, and enjoy priority support for any issues or questions you may have.
For the plugin’s pros and cons and detailed analysis, you may want to see our comparison of Yoast SEO vs. All in One SEO.
How to Install the Yoast SEO Plugin
The first thing you need to do is install and activate the Yoast SEO plugin. For more details, see our step-by-step guide on how to install a WordPress plugin.
Upon activation, you’ll notice a new menu item labeled Yoast SEO.
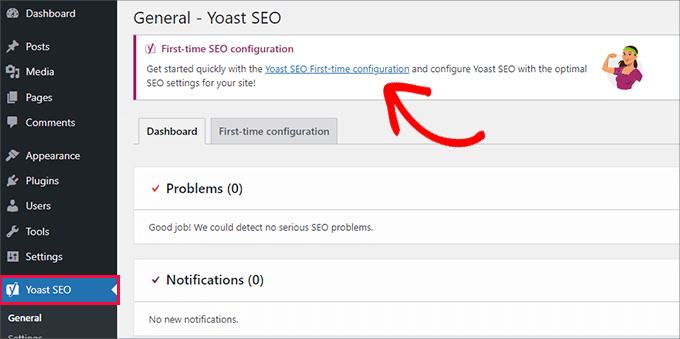
Upon clicking on it, you’ll be prompted to run the ‘First-time configuration’ wizard.
Simply click on the link to run the first-time configuration wizard.
How to Set Up the WordPress SEO Plugin by Yoast
Yoast SEO comes with a basic setup wizard that will guide you through the initial setup.
If you are setting it up on a new WordPress website, then you can skip Step 1 and directly run Step 2 in the first-time configuration wizard.
However, if you are setting up Yoast SEO on an existing website where you have previously used some other WordPress SEO plugin, then you need to import your existing SEO data first.
In the following sections, we’ll share the instructions on how to set up Yoast SEO. Here’s a quick overview of all the steps we’ll cover:
- Importing Your SEO Data
- Running the First-Time Configuration Wizard
- Configuring the Yoast SEO Settings – Site Basics
- Making Site Connections to Search Engines
- Setting Up Content Types Display for Search Results
- Step 6: Adjusting Category & Tag Search Settings
- Fine-Tuning the Advanced Settings
- Exploring Advanced Task Settings in Tools
- Integrating Yoast SEO With Third-Party Platforms
- Optimizing Your Posts and Pages With Yoast SEO
- Optimizing Taxonomies for SEO (Categories and Tags)
- Optimizing eCommerce Products
- Monitoring and Tracking SEO Performance
Let’s get started.
Step 1: Importing Your SEO Data
You can skip this step if you are setting up Yoast SEO on a new WordPress website or blog.
Other users who are installing the plugin on an existing website may have been using some other WordPress plugin for SEO, like All in One SEO for WordPress, RankMath, or a theme framework like Genesis to deal with your SEO data.
If you want to use Yoast SEO properly, then you need to make sure that all of your previous SEO data has been transported across before you deactivate the other plugin.
Luckily, Yoast SEO comes with a built-in SEO data import/export functionality.
Head over to the Yoast SEO » Tools page and click on the ‘Import and Export’ link.

This will bring you to the import/export tool.
From here, you need to switch to the ‘Import from other SEO plugins’ tab.
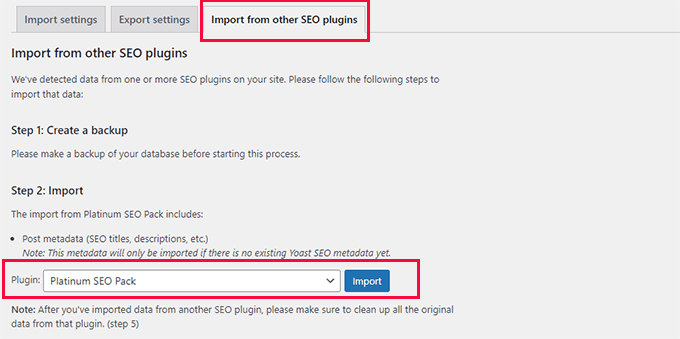
First, you will be advised to create a full database backup. We recommend using the Duplicator plugin, which is the quickest way to do this.
Note: There is also a free version of Duplicator, which will get the job done. But for automatic backups, secure cloud storage, and other features, we recommend upgrading to a paid plan.
Under ‘Step 2: Import’, you’ll want to choose the SEO plugin you used before from the dropdown menu.
After that, just click on the ‘Import’ button to fetch SEO data.
Next, you can edit a blog post or page and scroll down to the Yoast SEO section. There, you can see if the plugin correctly imported SEO data, such as the SEO title and meta description.
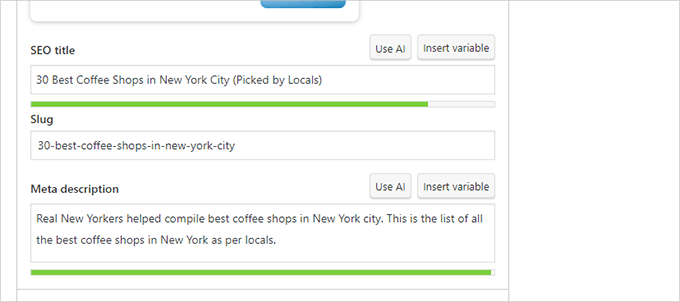
If everything looks good, then you can switch back to the ‘Import’ tab.
Step 4 will ask you to run the first-time configuration wizard now. We will show you how to do this in the next step of this tutorial.
After that, you can switch back again to the ‘Import’ tab.
You’ll need to select your previous SEO plugin under ‘Step 5: Clean up’ and then click the ‘Clean up’ button.
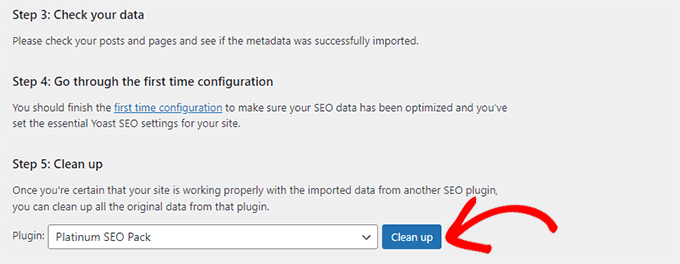
This will clean up the database and delete the old plugin’s data. After that, you can safely deactivate and delete your old SEO plugin.
Step 2: Running the First-Time Configuration Wizard
Yoast SEO comes with a first-time configuration wizard. To run it, let’s go to the Yoast SEO » General page and switch to the ‘First-time configuration’ tab.
Launching the configuration wizard will allow you to set up some basic SEO settings for your website.
The first step in the wizard is ‘SEO Data Optimization.’ Go ahead and click the ‘Start SEO data optimization’ button to run the analysis.
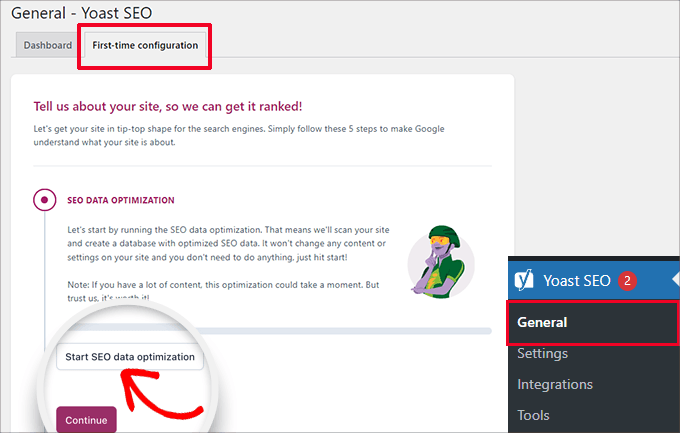
Don’t worry because the optimization process will not change any content on your website.
Once the data optimization process is finished, simply click the ‘Continue’ button to proceed.
Next, you will be asked to provide information about your website. This includes whether it is an organization or a person, your website name, organization name, and organization logo.
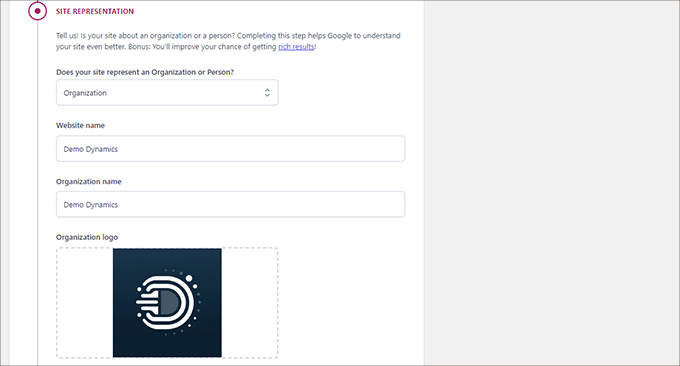
After entering this information, you need to click the ‘Save and continue’ button.
This will bring you to the next step.
Here, you’ll need to enter social profiles associated with the organization or business behind the website.
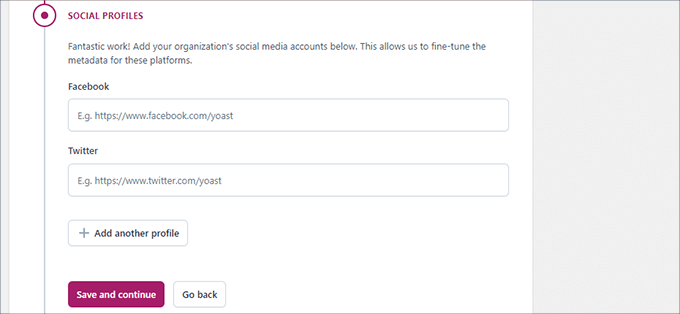
After entering your social profiles, you can click the ‘Save and continue’ button.
Next, you will be asked to enter your email address for the weekly Yoast SEO newsletter.
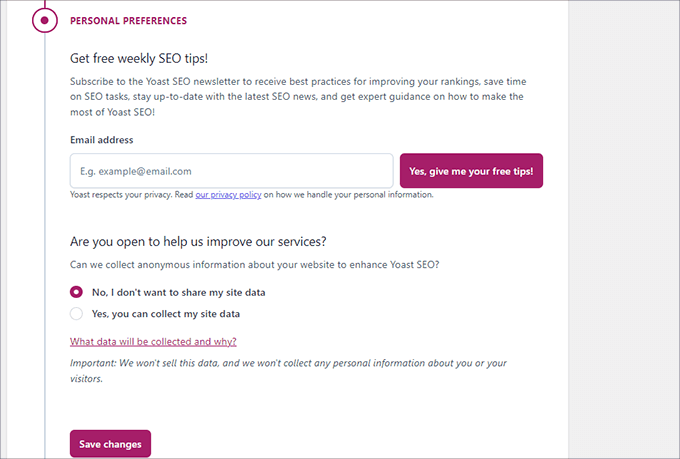
You will also be asked to opt in or out of usage data tracking.
You can select ‘No’ if you are uncomfortable sharing your usage data with the company behind Yoast SEO.
Now, go ahead and click on ‘Save and continue.’
That’s all. You have successfully run the setup wizard.

Next, we will walk you through the rest of the plugin settings. This will help you set up the plugin properly for optimal SEO benefits.
Step 3: Configuring the Yoast SEO Settings – Site Basics
First, you need to set up basic SEO appearance settings.
To do this, you’ll want to go to the Yoast SEO » Settings page and switch to the ‘Site Basics’ tab.
Here, you can change your site title, add an alternate title (optional), provide a tagline, and choose a title separator.
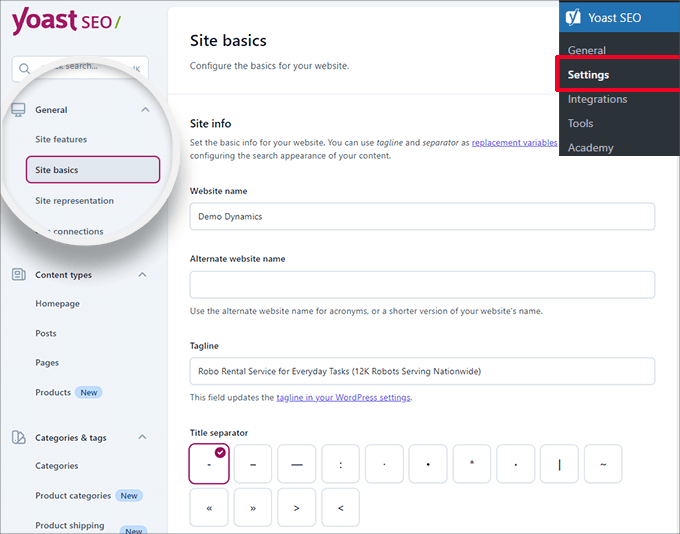
The title separator appears in the browser’s title bar. You can choose any of them, but the dash symbol is the most commonly used.
Below, you can provide a site image. The recommended size for this image is 1200 x 674 pixels.
This image will be used when your website is shared on the internet (not the individual articles, as they can have their own social sharing images).
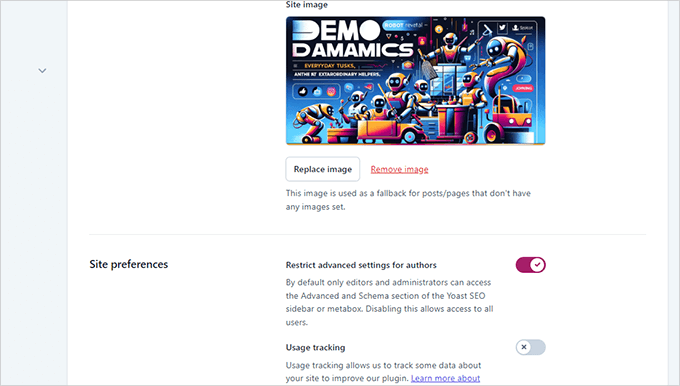
Under ‘Site preferences,’ let’s make sure that the option next to ‘Restrict advanced settings for authors’ is turned on.
This ensures that authors cannot set up redirects or block search engines when working on an article (editors and site administrators can still access those options).
Don’t forget to save your changes when you have finished making changes.
Step 4: Making Site Connections to Search Engines
The next step is to add your website to search engines. All top search engines allow users to submit their websites and track their search indexing and performance.
For more details, see our complete Google Search Console guide to learn more about these tools.
Yoast SEO makes verifying your website with all top search engines easy.
First, you need to sign up for the Webmaster Tools program for each search engine. After that, you will be asked to add a meta tag to verify your website ownership.
Now, you’ll want to head over to Yoast SEO » Settings.
Then, in the ‘General’ section, you can open the ‘Site Connections’ panel.
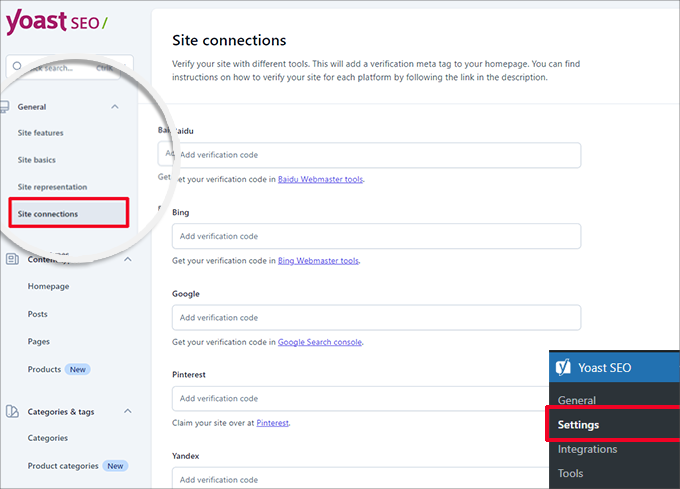
Simply add the meta code you received from the different search engines in the respective fields, and don’t forget to save your changes.
Step 5: Setting Up Content Types Display for Search Results
Next, you need to switch to the ‘Content types’ tab in the Yoast SEO settings.
From here, you can set the default options for how different content types will appear in search results.
1. Homepage
First, you need to enter an SEO title and description for your home page.
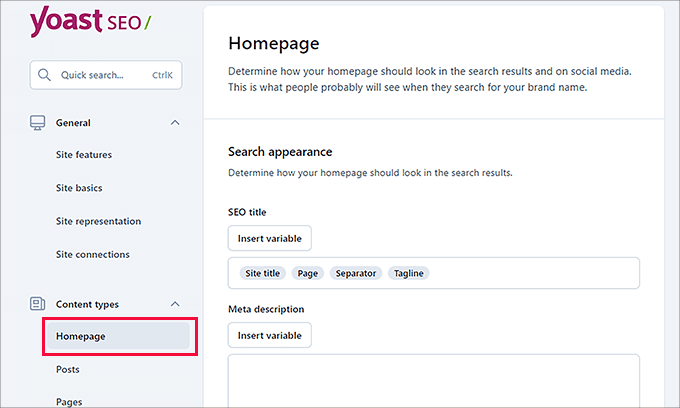
If you are using a custom homepage in WordPress, then Yoast SEO will use the SEO title and description from the custom homepage.
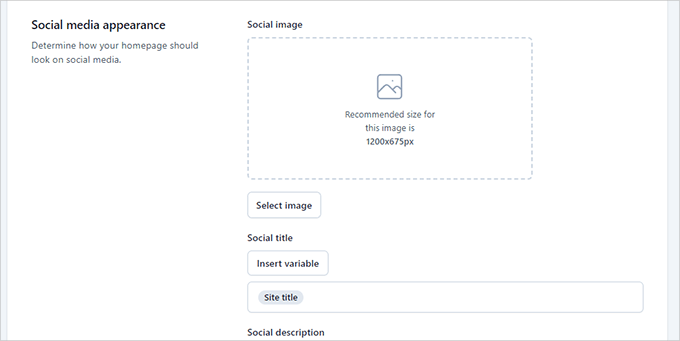
Below that, you can provide a social media image. Optionally, you can also provide a separate description and title for social sharing.
2. Posts
Next, switch to the ‘Posts’ tab under ‘Content types.’
From here, you’ll want to make sure that the toggle next to the ‘Show posts in search results’ option is turned on.
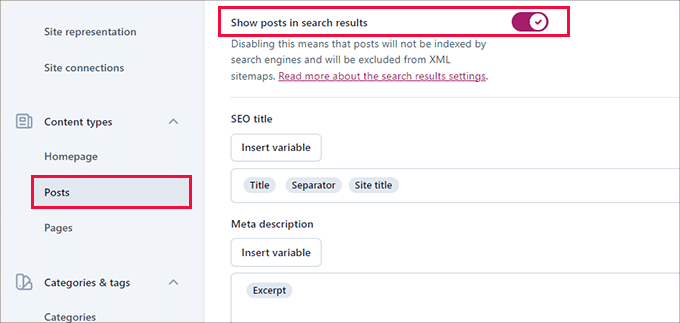
Below that, you can use variables to set a default format for SEO titles in your posts. This comes in handy if you have older posts without an SEO title or forget to manually write an SEO title for a post.
In the ‘Meta description’ field, you should add %excerpt as the default variable.
3. Pages
After that, you can switch to the ‘Pages’ tab and ensure that the toggle next to the ‘Show pages in search results’ option is turned on.
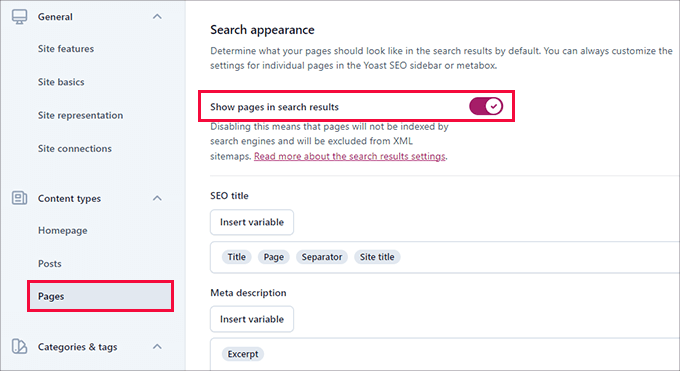
Then, you can scroll down and use the ‘Insert variable’ button to set up a default SEO title scheme for your pages.
In the meta description field, you will need to use %excerpt to select ‘Excerpt’ as the default meta description.
Step 6: Adjusting Category & Tag Search Settings
Next, you need to configure the default search appearance option for categories and tags.
So, let’s switch to the ‘Categories’ tab and then make sure the option ‘Show categories in search results’ is turned on.
Below that, you need to provide a default meta title for your categories using the variables.
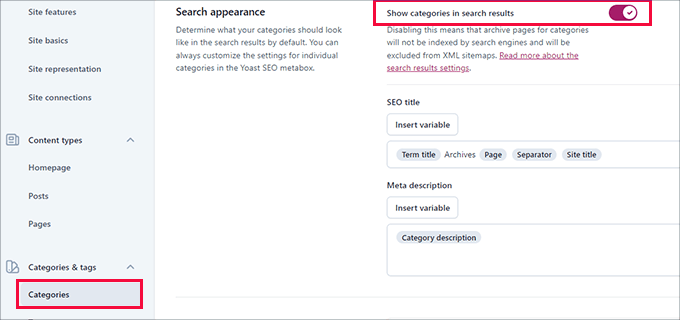
For the meta description, you can use %category description as the default meta description for categories.
Next up, you’ll switch to the ‘Tags’ tab and repeat the same steps.
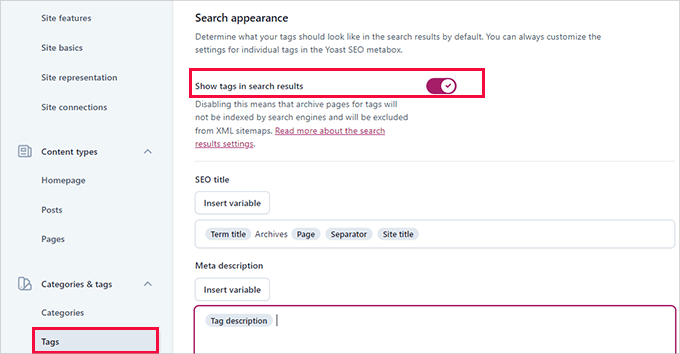
For the meta description, you’ll want to use %tag description as the default meta description for categories.
Step 7: Fine-Tuning the Advanced Settings
This part of the Yoast SEO settings offers advanced, technical SEO features.
They allow you to further optimize your website by cleaning up unwanted options and making it easier for search engines to crawl more of your content.
1. Crawl Optimization
As a website owner, you want Google to crawl more of your pages. However, WordPress generates several pages and RSS feeds that are not important for your website but consume a lot of the crawl budget.
Crawl optimization allows you to fix that. For more details on this topic, you can see our guide on fixing the SEO crawl budget issue in WordPress.
The first option is to ‘Remove unwanted metadata.’ This refers to data WordPress adds to each page on your site, and search engines crawl some of it.
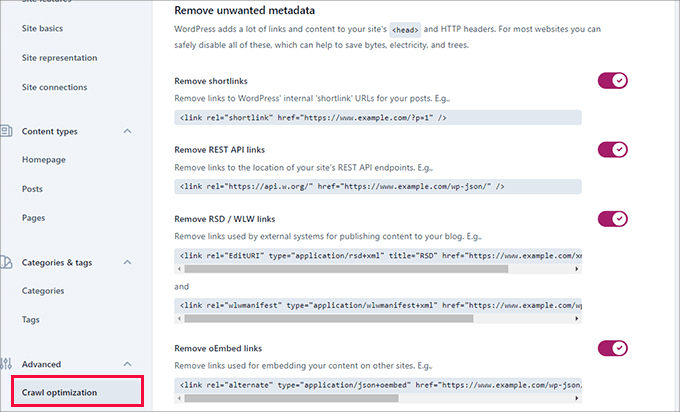
The plugin provides a description next to each option. You can turn the toggle on to remove each item.
After that, you can scroll down to the ‘Disable unwanted content formats’ section.
From here, you can disable unwanted RSS feeds generated by WordPress.
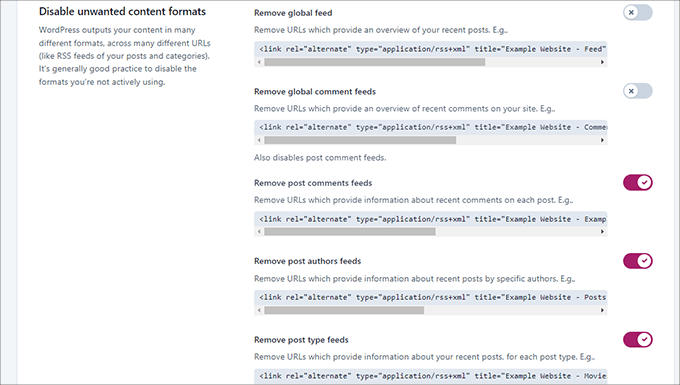
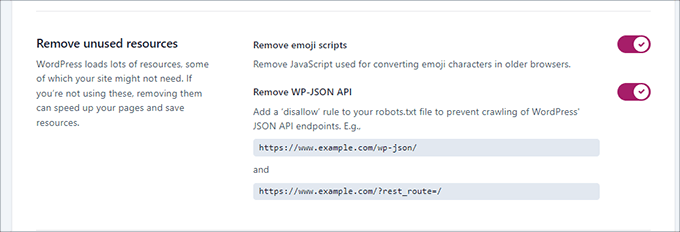
Lastly, you can disable unused resources, such as the emoji script, which is only used by very old browsers.
You can also disallow end-points for the WP-JSON API.
2. Breadcrumbs
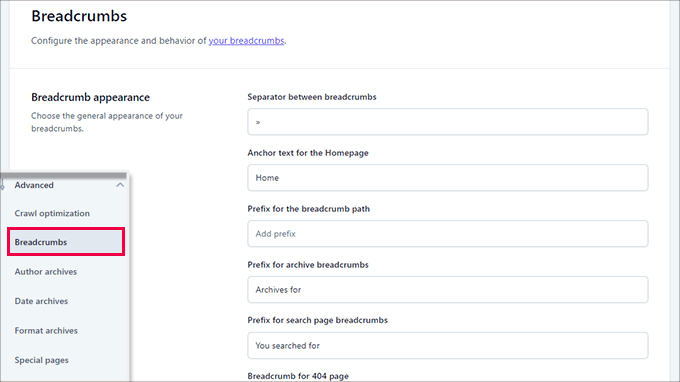
Breadcrumbs are great for internal linking because they define a clear path or trail to the page you are on.
These breadcrumbs also appear in search results, giving your site an extra advantage. Here’s an example:

The default settings for Yoast SEO are highly optimized and should work for most websites.
However, if you want to change something, then go ahead and make your changes.
Next, you’ll want to scroll down to the ‘How to insert breadcrumbs in your theme’ section.
Here, you can turn on the toggle next to ‘Enable breadcrumbs for your theme.’

Expert Tip: For better breadcrumb navigation, you may want to look at All in One SEO for WordPress. You will have full control over how your breadcrumbs are displayed and can create custom breadcrumb templates for your specific needs.
For more details, you can check out our tutorial on how to display breadcrumb navigation links in WordPress.
3. Author Archives
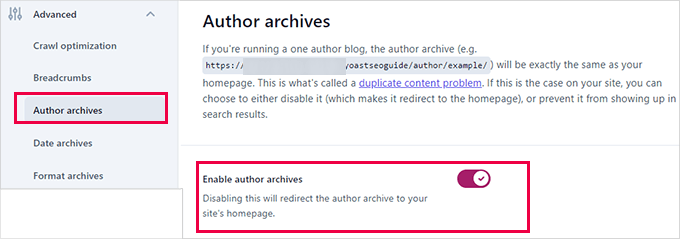
The next option in the ‘Advanced Settings’ is ‘Author archives.’
If you run a single-author blog, then you need to disable the author archives. This is important because your blog and author archives will have the same content.
So, if ou don’t disable these archives, search engines may penalize your website for duplicate or low-quality content.
4. Date Archives
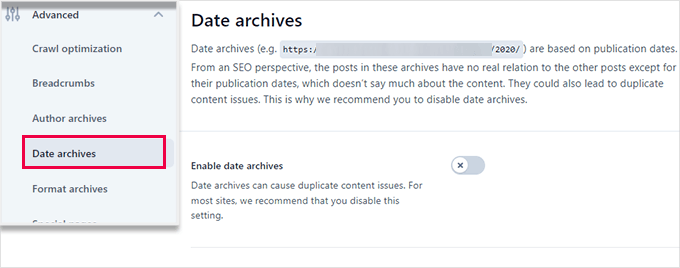
WordPress also creates archives based on dates. This may create more duplicate content issues.
Under ‘Date archives,’ you can turn off the switch next to the ‘Enable date archives’ option. This will disable those archives, improve the crawl budget, and avoid duplicate content.
5. Format Archives
Post formats are WordPress theme features that allow developers to add support for different formats. A post type can then use these for styling and appearance purposes.
However, this feature didn’t catch on, and many modern WordPress themes don’t add post format support.
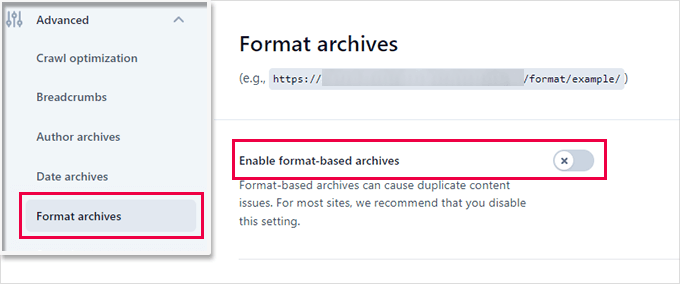
These post formats have separate URLs in WordPress, which search engines can crawl.
You can safely disable those URLs by going to the Advanced » Format Archives tab.
6. Special Pages
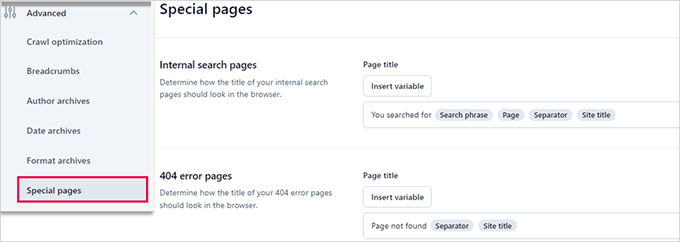
Next up, you’ll want to take a look at the ‘Special pages’ tab.
This is where you can provide an SEO title for the internal pages like the WordPress search result page or the 404 error page.
7. Media Pages
WordPress creates an attachment page when you upload an image or media file to a post or page.
This page only displays that particular image or media file with little to no information. It wastes your crawl budget, adds low-content pages to your site, and negatively impacts SEO.
So, you might need to disable these pages. To do this, you can navigate to the Advanced » Media Pages tab.
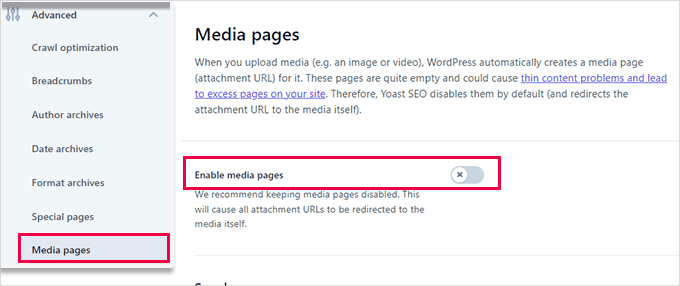
When you disable media pages, Yoast SEO automatically redirects users to the media file instead of the attachment page.
8. RSS
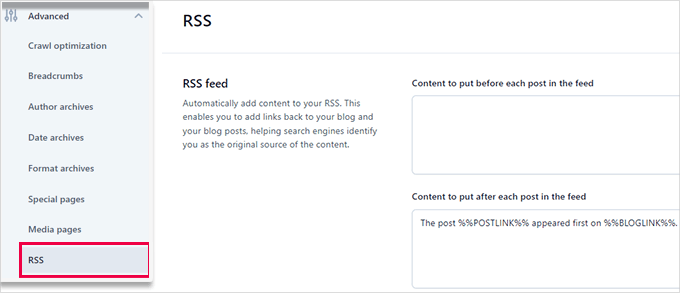
Yoast SEO allows you to add content to RSS feed items. By default, it adds a link to your website at the end of each RSS feed item.
You can leave it as is or add anything you want, and it will appear in your RSS feed.
Expert Tip: RSS feeds let readers subscribe to your blog and read posts in apps like Feedly without visiting your site manually. Plus, optimizing your RSS feed can help prevent content scraping and improve engagement.
For a detailed guide, you can see our expert tips for optimizing your WordPress RSS feed.
Step 8: Exploring Advanced Task Settings in Tools
Yoast SEO comes with built-in tools that allow you to perform advanced tasks. Most beginners may not need to use these tools. However, we will show you each tool and what it does.
First, you need to go to Yoast SEO » Tools to see the available tools.
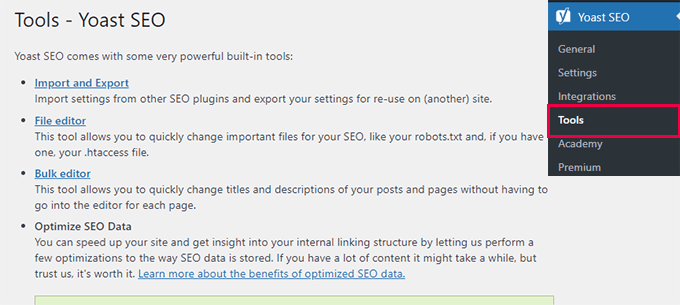
1. Import and Export
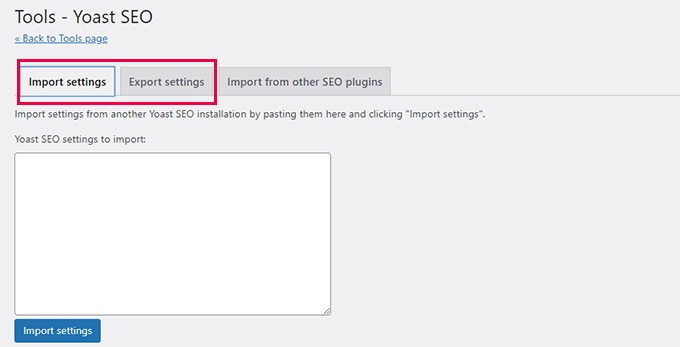
We have shown you how to use this tool to import SEO data from other SEO plugins in step 1 of this guide.
However, this tool can also be used in other ways. For instance, you can import and export the Yoast SEO plugin’s settings and use them on a different WordPress blog or website.
2. File editor
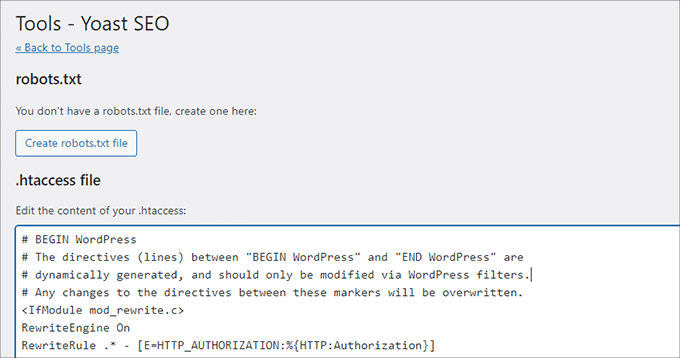
As your WordPress site grows, you may often come across tutorials asking you to add some code to your website’s .htaccess file or robots.txt file.
Both are configuration files and have a huge impact on your website’s SEO. Yoast SEO allows you to edit both files directly from the WordPress admin area.
3. Bulk editor
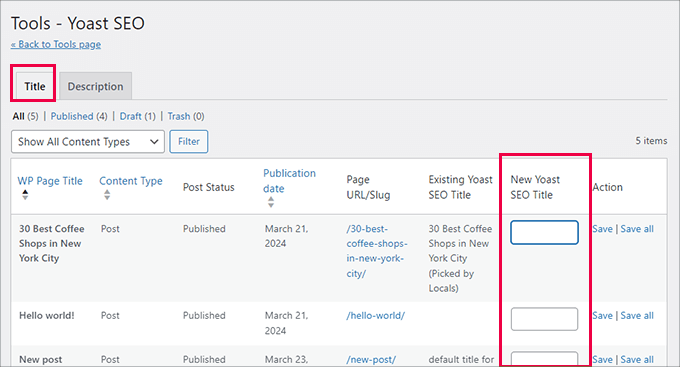
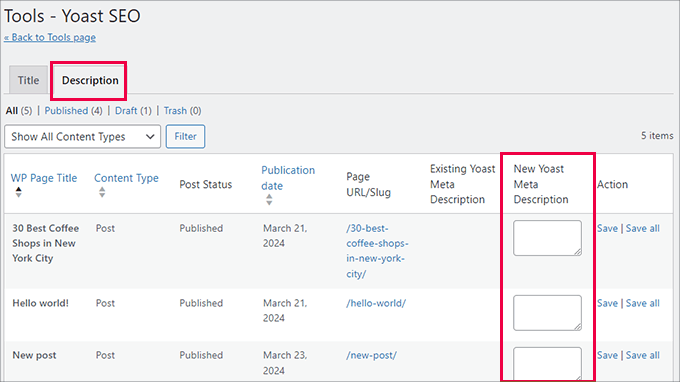
The bulk editor tool in Yoast SEO allows you to quickly add SEO titles and descriptions for all your blog posts and pages.
In the ‘Title’ tab, you will find a blank field in the ‘New Yoast SEO Title’ column where you can add your new SEO title for that blog post.
After that, go ahead and click on the ‘Save’ link to store your changes.
To add descriptions, you must switch to the ‘Description’ tab.
Once again, you can add a description for each blog post or page and save it.
Step 9: Integrating Yoast SEO With Third-Party Platforms
Yoast SEO has partnered up with a couple of premium SEO platforms to provide more features. It includes two free integrations: Semrush and Wincher.
These integrations are turned on by default on the Yoast SEO » Integrations page.
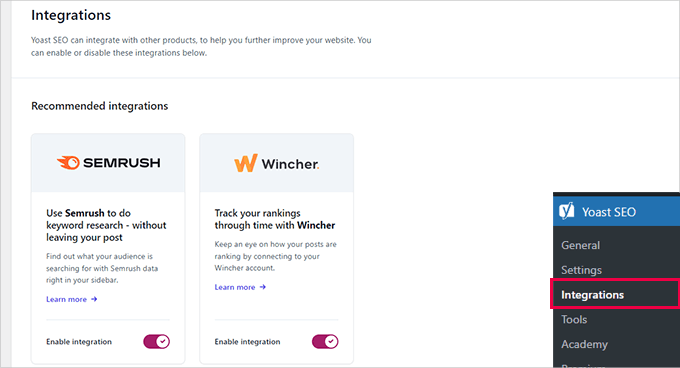
Keep in mind that you will need to create free accounts for both services to use them, and you will only get limited features with a free account.
Below that, you will find integrations with other premium WordPress plugins.
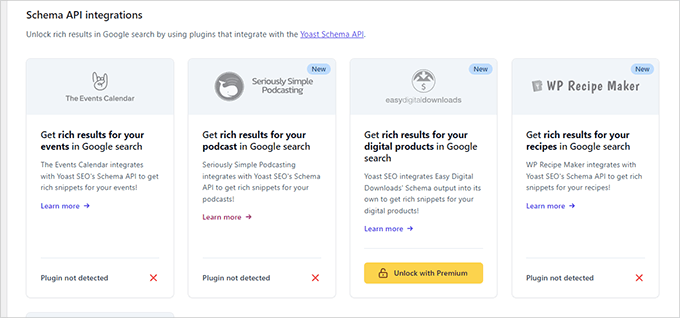
For instance, if you are using Easy Digital Downloads, then you can unlock that integration by upgrading to Yoast SEO Premium.
Step 10: Optimizing Your Posts and Pages With Yoast SEO
Just installing and setting up this plugin is not enough. To maximize the benefits of Yoast SEO, you will need to customize the settings per post.
Let’s look at maximizing the benefits by optimizing each post/page in WordPress.
Simply edit any post or page, and you will notice a new Yoast SEO meta box below the post editor.
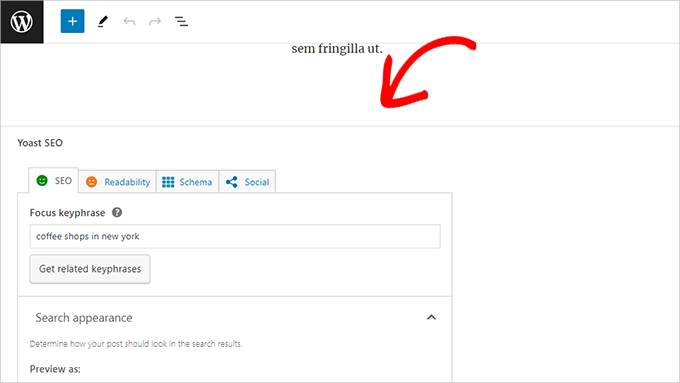
You can start by adding a ‘Focus keyphrase’ or keyword. This is the main keyword that you think your users will type into search engines to find this post.
After that, Yoast SEO will check your post content for SEO and a readability analysis. You can view the analysis to improve your article further.
Sometimes, your post title and your SEO title might not be the same. Every time, you should write a custom SEO description because the excerpt generator only picks up the first paragraph, which might not be the most important one.
Expert Tip: The SEO and readability analysis report in Yoast SEO is quite helpful for improving your content. However, don’t stress yourself out over it, or you might spend more time following the analysis instead of creating better content for your users.
To learn more about on-page optimization, see our article on how to optimize blog posts for SEO.
Step 11: Optimizing Taxonomies for SEO (Categories and Tags)
Just like your post and pages, you can also override the SEO title and meta descriptions for category, tag, and author archive pages.
Simply navigate to Posts » Categories and click the ‘Edit’ link below any category.
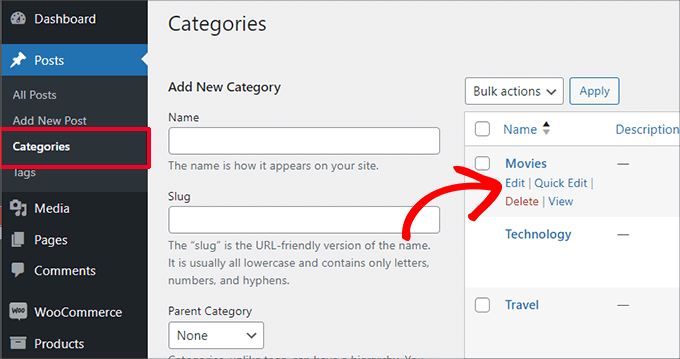
On the category edit page, scroll down to the bottom, and you will see the Yoast SEO meta box.
From here, you can provide an SEO title and meta description for your category.
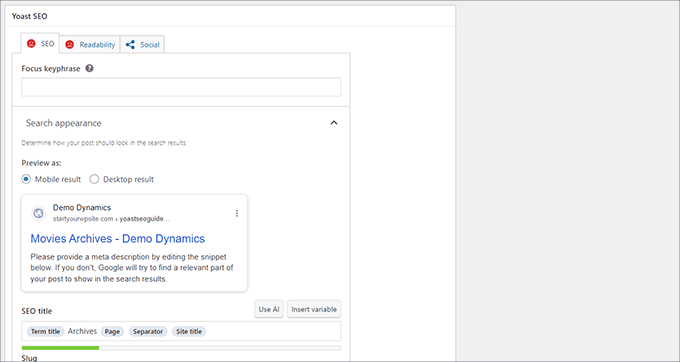
You can do that for all your categories, tags, and custom taxonomy archives.
Related: See our guide on taxonomy SEO to learn more about how to optimize your WordPress category pages.
Step 12: Optimizing eCommerce Products
Yoast SEO provides basic support for online stores and eCommerce websites using WooCommerce.
This allows you to optimize your product pages, just like blog posts and pages.
You will find all eCommerce SEO options when adding a new product to your website. You can also edit and optimize an old product by entering a focus keyword, SEO title, SEO description, and more.
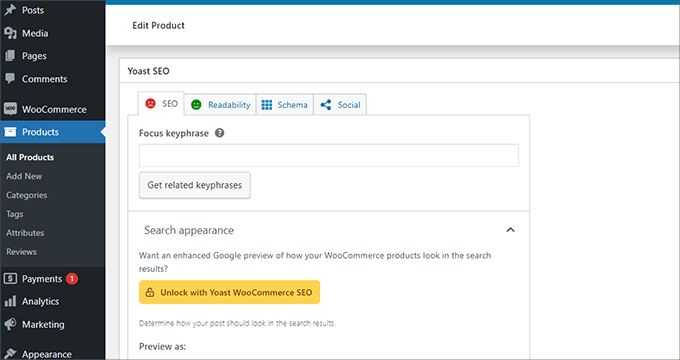
If you are using WooCommerce, then you will need to purchase the Yoast WooCommerce SEO add-on for extended eCommerce features.
Alternative: All in One SEO for WordPress has full eCommerce support even with the basic plan, which starts at $49.
Step 13: Monitoring and Tracking SEO Performance
Now that you have successfully set up Yoast SEO, it is important to start tracking your performance.
First, you need to add your WordPress site to Google Search Console.
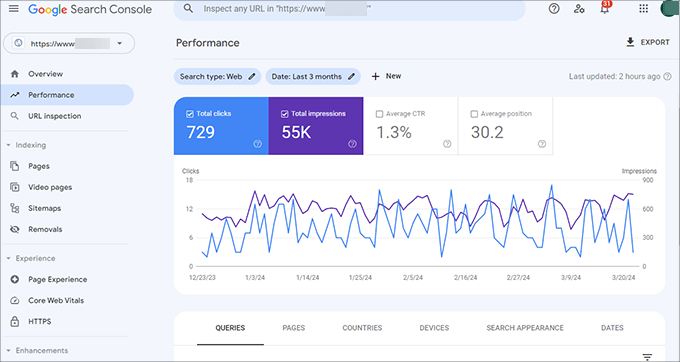
This shows you how your website is doing in search, which keywords you are ranking for, and which pages are not doing so well.
Next, you need to install Google Analytics in WordPress so that you can see your website data from your WordPress dashboard.
The easiest way to do this is by using MonsterInsights. It connects your WordPress site to Google Analytics and shows you how much traffic you are getting, as well as what your users do when they are on your website.
Most importantly, it shows Google Analytics reports inside WordPress in a more user-friendly, intuitive format.
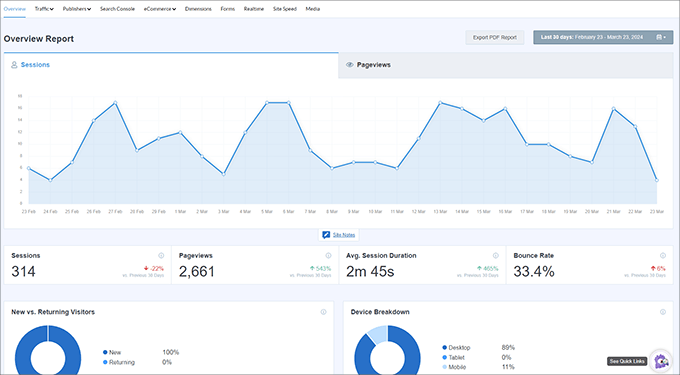
This helps you understand your target audience and make smart decisions to grow your business and improve SEO.
That’s all there is to it!
Yoast SEO is a great WordPress SEO plugin. However, it lacks certain features that could truly help you improve your SEO.
That’s why we recommend using All in One SEO for WordPress instead. We use it on all our brand websites, including WPBeginner. It comes packed with features, including a link assistant, SEO statistics, advanced XML sitemaps, and more.
For more details, you can take a look at our detailed All in One SEO review with pros and cons. You may also be interested in our post about why we switched from Yoast to AIOSEO.
We hope this article helped you set up Yoast SEO properly. Since speed is an important ranking factor in SEO, you may also want to follow our WordPress speed optimization guide or see our expert picks of the best WordPress themes for SEO experts.
If you liked this article, then please subscribe to our YouTube Channel for WordPress video tutorials. You can also find us on Twitter and Facebook.


Ahmed Omar
nice post, I was using Yoast for long time, since I started my site.
after reading the post, I found many points which I was unaware of it and it is importance.
any how now I am moving to use AIOSEO which considered the best SEO plugin
Thank you
WPBeginner Support
You’re welcome
Admin
CAMILLE
You don’t know how many of your articles have saved me!!! So thankful. Keep up the good work!
WPBeginner Support
Glad our guides have been helpful!
Admin
Sonia
Is seo plugin slow down the speed of a WordPress website ?
WPBeginner Support
SEO plugins should not cause a noticeable change in site speed.
Admin
Jiří Vaněk
I have practical experience on many websites with Yoast Seo and AIO SEO, including speed measurement. Both plugins are absolutely great and have never affected site speed in a negative way.
Gary Phillips
I do not have the search console. Do I need to install it with Webmaster Tools or how?
WPBeginner Support
You would want to take a look at our guide on Google’s Search console below:
https://www.wpbeginner.com/beginners-guide/google-search-console-ultimate-guide/
Admin
Gary Phillips
Hi – I cannot find the screen at the top of page 7 (Homepage – SEO Title – Meta description) on my Yoast installation when I try to follow along this tutorial. How do I access this screen? Thank you! Gary
WPBeginner Support
Yoast may have updated their interface for this, we will be sure to take a look and update our article when able.
Admin
Sammantha
Just wanted to say thank you for the help. I couldn’t (and wouldn’t have known how) to set this up on my own. Appreciate the advice – and for free too! xx
WPBeginner Support
You’re welcome, glad our guide could be helpful
Admin
Amruta Mohite
Thank you so much.
This one article my all doubts about yoast seo.
And also i found some important post links.
WPBeginner Support
Glad our article was able to help
Admin
Mohd Tabish Haleem
thank for the article..almost all doubt clear
WPBeginner Support
Glad our article could be helpful
Admin
Elena Whitehead
Thank you so much for so detailed instructions, so helpful!
WPBeginner Support
Glad our article could help
Admin
Srinath
This is really useful. I installed and activate Yoast as per your guidelines but XML sitemaps menu is not displaying. What should I do ?
WPBeginner Support
Yoast has updated and the setting is under General>Features for your sitemap
Admin
Andie Pas de Deux
Any chance of updating this, folks? So much of it no longer applies since the big Yoast update last year.
WPBeginner Support
We will certainly look into updating this article as we are able
Admin
Matt Robson
Thank you for sharing this fantastic article. This is very useful for me. Keep sharing.
WPBeginner Support
Glad our article was helpful
Admin
Kia Roberts
My yoast SEO does not have a tab named ‘your info’, nor does it have an option under features for ‘advanced settings’. Why not?
WPBeginner Support
Yoast has likely updated their interface since our last update of this article.
Admin
rachana
I have been reading a lot of your posts now. I’m actually starting out with a new blog and your articles really helped me a lot to understand the basics. thankx fr sharing this useful information.
WPBeginner Support
You’re welcome, glad our guides could help
Admin
Richard Ramirez
I came across your post doing a google search. Took the time, followed the instructions (which was very easy). Overall I had a very productive day. I just have to thank you all. This was very helpful.
WPBeginner Support
Glad our guide could help
Admin
moscotech
while google verification number on the webmaster tools verification number .It keeps give me this “Oops! That page can’t be found.”
what happened
WPBeginner Support
If your pages are returning that error you may want to take a look at: https://www.wpbeginner.com/wp-tutorials/how-to-fix-wordpress-posts-returning-404-error/
Admin
ADR
Hello,
As already mentioned by the two comments posted before mine, your article refers to an outdated version of Yoast. I was still able to install the plugin and adjust the basic settings as desired, however it turned out to be quite time consuming as I had to look for explanations elsewhere on the net.
Any chance you could update this tutorial?
Thanks!
WPBeginner Support
Thank you for letting us know, we are looking into updating this article.
Admin
Susanna
My dashboard does not show all the seo tags and information as shown in the above instructions…half seem to be missing….so unable to do most of the seo plug in work.
Stephanie
Is there any reason that when I go to my Yoast plugin, and click on SEO, that I only have 3 tabs – Dashboard, Features, and Webmaster Tools? No Your Links, Security, etc.
Sylver
What’s the best way to add Google Analytics? should i add the code using Yoast or using the plugin Insert Headers and Footers? since I’m using this for Google Adsense?
WPBeginner Support
Hi Sylver,
Please see our article on how to install Google Analytics in WordPress.
Admin
Bikramjit
Hi Wpbegginer
I have missed the Data Transfer part before setting Yoast SEO. Can I go for Data transfer at this moment. Wiil it create any problem?
Please guide
I am using genesis framework
WPBeginner Support
Hi Bikramjit,
Yes you can import SEO data later.
Admin
Bikramjit
Many thanks
Lulu
Most of the menu items don’t exist in the plugin I just downloaded 3 hours ago. Nothing matches this tutorial. Why?
Editorial Staff
Hi Lulu,
Yoast recently updated the plugin. We’ve added this article in our queue to update.
Admin
vickie
canonical URL vanished from my website.how does yoast free put it back ?
Ernest Darko
is it advisable to very all kinds of webmaster tools?
Kumar Mritunjay
Great post..! I’ve been using Yoast and was wondering: how important is it to have the exact keyword phrase density in the blog post?
For instance, if my focus keyword is ‘Weight Loss’ and I also use ‘Lose weight’ in my blog post, should I change ‘lose weight’ to ‘weight loss’ in order to fall under Yoast’s recommended keyword density?
WPBeginner Support
Hi Kumar,
The analysis tool in Yoast SEO are gives you a basic idea. You should feel free to use exact focus keyword along with keyword variations in your articles.
Admin
Kumar Mritunjay
Thank You…
Ashley
This is an awesome article and was SO helpful in setting up Yoast. There are a few things that have been added/removed so I would love to see an updated version of this. Please let me know if you decide to do one. I love this site and have used it many times while learning the Wordpress Monster
Tim
The XML Sitemap link generates a broken page. Help!
Muhammed Bakry
the user site map tab doesn’t appear for me is it a premium feature?
Kristina Bressler
Do I need to add SSL certificate as well when I install the Yoast plugin?
WPBeginner Support
Hi Kristina,
No, you do not need an SSL certificate to use Yoast SEO.
Admin
Juan Valdez
Hi! I’m having a problem with the YOAST Plugin. Even old versions. Every time I activate the plugin, I get the 500 Internal Error. It seems a problem with the theme, because if I use other theme, the plugin works fine.
Bhavin
Very good article.
Very easy understanding for non tech person.
I have one question that yoast increase page loading time or not ?
Because before installing yoast pages are loading in 0.45 sec. but after yoast time increased and it’s 0.95 sec so is it due to yoast ?
Aditya singh
This is my favorite plugin. You have done a good job of explaining every part of it.
Please be noted that this plugin has been updated and there are a few changes to it. I am waiting to read the updated version of this guide.
Thank you and great work guys.
Vishal Sahani
I want to buy wordpress seo tool please guide me
WPBeginner Support
Hi Vishal,
You can try Yoast SEO’s premium version. You can also check out other SEO tools that you can try.
Admin
Vishal Sahani
मुझे priuaum yosat seo tool क्या खरीदना चाहिये या नहीं
Penelope
Hi, useful article, thanks. I am trying to follow step 12, for the Google Search Console, but each time I enter the authentication code it comes back saying “no profiles found, reauthenticate”. I must be missing something but for the life of me I can’t work out what it is. Any help would be great.
Tara C
Great article! Love the step by step for unsavvy website people like me!
Jessica
I am using YOAST SEO plug-in for my wordpress site. Under Social – Yoast SEO I am able to enter the URL for my Instagram page.
However, every time I click on my Instagram logo on my website I get an error saying
“Sorry, this page isn’t available.
The link you followed may be broken, or the page may have been removed. Go back to Instagram.”
Somehow the very last character of my Instagram URL gets deleted.
The URL shows up correctly in my Yoast social page but once I click the social button the last character gets deleted and therefore I get a error message.
Please help me.
Thank you
Carolin
My WordPress Yoast SEO plugin stopped working and I don’t know why. How do I get it to work again? Any assistance would be greatly appreciated.
Madhu
Thank you for this post. It has helped me setup my SEO well .
Gaurav
Hi, I have my personal blog. In my Google search results, the article link is shown and not the breadcrumbed link like in case of wpbeginner. For example if your article is how to install and setup yoast, in google the link would be w, where as in my case it is
i want breadcrumb link in all my google results, is it possible through yoast or some other means?
Mohamad
Thank you for the great article.
I followed your tutorial to setup yoast from my woocommerce store. I still have 1 little problem: How can I set a default focus keyword template to all my products at once the way you do for SEO titles and meta description? setting them individually is a real hassle. I just want the search keyword to include %%title%% followed by the name of my country.
Orya Michael Durham
Hi, i created a hotel site for my company using wordpress. I have also installed the Yoast SEO but i have no knowledge of what to do so as to get my site search friendly on search engines. Please is there any way you can help me with this problem because i have zero knowledge on this. I have tried all the directions i found on the internet but i have no clue what to do or what the issue is.
Aman
Sir i have most common problem with seo yoast….seo yoast someday working fine. But today some that seo yoast all setting not show.. Only show “save changes” button..i mean no option show to change settings . Only show “save change”…plz help me
WPBeginner Support
Hey Aman,
Try switching off all other plugins except Yoast SEO. After that connect to your site using an FTP client. Next, backup and delete the .htaccess file from the root /public_html/ folder. Check if this resolves the issue. If it does, then reactivate plugins one by one, each time refresh Yoast SEO settings page until you find out the plugin that caused the issue.
Admin
bhaskar dhiman
Thank you. I got some work now for the next couple of days.
Godden
I followed your steps as outlined above. So far all works well except for one thing. When I share a specific page on Facebook, what appears is the the information from my FB open graph meta tags of my homepage instead of the specific page I shared.
How can fix this?
Fouad Sa
Hi. I installed SEO Data transporter like you said, But I can’t see Yoast in the given options. Also I already have Premium SEO Pack installed, But that also is not in the given options. Can you please help me? I’ve been looking for a way for to install yoast for a while, but had no success yet.
Dusan
Hi there,
Is this Yoast SEO free to use?
WPBeginner Support
Hi Dusan,
Yes, it is free to use.
Admin
Ramana
Dear Syed Balkhi,,
I have gone through this post, it was splendid. I have a doubt you are showing meta robots in index. where as shoutmeloud shows it as noindex.
Since both the blogs are authority blogs for the world, how do we come to a conclusion with these two variations?
Ramana
Yes, This was in deed a great information. I have few doubts on Nofollow,no index Etc., those were cleared with your post.
Herb
Perhaps you should reconsider your objection to the bulk editor in tools. You can edit titles and descriptions of your posts and pages without having to go into the editor for each page. This saves you a lot of time when entering titles and meta descriptions.
Lara
Hi, thesis 2 won’t work with the plugin – is there another you now recommend? Thanks in advance