Do you want to create a custom landing page on your WordPress site?
If you are running a marketing or advertising campaign, then a landing page can help you achieve your goals and get more conversions.
In this article, we will show you how to easily create a landing page in WordPress.

What Is a Landing Page?
A landing page is a standalone page created for a specific advertising, email, social media, or marketing campaign. Users coming from these sources will land on this page first, which is why it is called a landing page.
Landing pages are designed to get conversions, which just means the visitor performs the desired action on your website. That might be buying a particular product from your online store, subscribing to your email list, filling in a form, or any other action that benefits your site.
What Is the Difference Between a Homepage and a Landing Page?
A homepage is the page that visitors see when they type your domain name into their browser. You can think of it as your website’s front page or store window.
A good homepage will encourage visitors to engage with your WordPress website, explore other pages, browse products, or sign up for your email newsletter. With that in mind, a homepage typically has lots of links and gives visitors many different choices.
On the other hand, a landing page is built to convert visitors. It has fewer links and typically has a single goal, called the call to action (CTA). You can use any CTA you like, but many landing pages encourage visitors to buy something or share information as part of a lead generation strategy.
Your website will only ever have one homepage, but you can create as many landing pages as you want. For more on this topic, please see our guide on the differences between landing pages and a website.
That said, let’s take a look at how to create a beautiful custom landing page in WordPress. Simply use the quick links below to jump straight to the method you want to use:
Note: To help our readers avoid choice paralysis, we haven’t included all the landing page builders like Beaver Builder, Elementor, Leadpages, Instapage, Unbounce, or ClickFunnels. Instead, we have picked the best solutions for small businesses.
Method 1: Create a Landing Page With the WordPress Block Editor (No Plugin Required)
If you are using a block theme, then you can design a custom landing page using the full site editor. This allows you to create a custom page using the tools you are already familiar with.
Unfortunately, this method doesn’t work with every WordPress theme. If you are not using a block-based theme, then we recommend using a page builder plugin instead.
To start, simply create a new WordPress page, which we will turn into our landing page.
In the right-hand menu, click on the ‘Page’ tab. Then, click on the link next to ‘Template.’ The exact link text may vary depending on the template you are currently using.
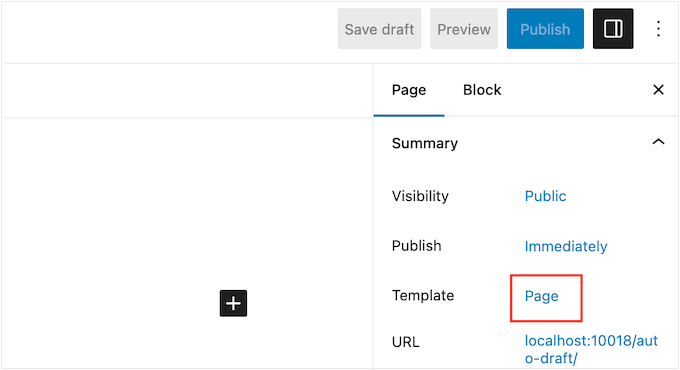
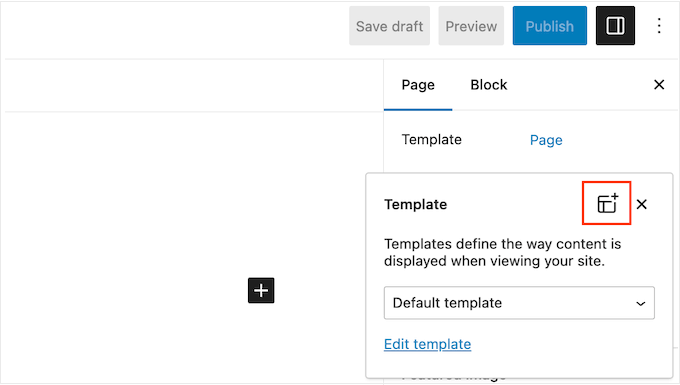
A popup will now appear with your current template.
Simply go ahead and click on the ‘New Template’ icon.
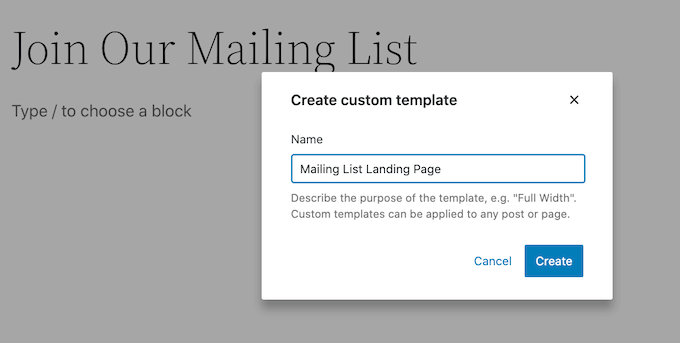
Now, give your landing page template a name. This is just for your reference, so you can use anything you want.
With that done, click on ‘Create.’
This launches the template editor. You can now design your landing page in exactly the same way you build a page in the standard WordPress block editor.
To add blocks to the landing page, just click on the blue ‘+’ button. You can now drag different blocks onto your design.
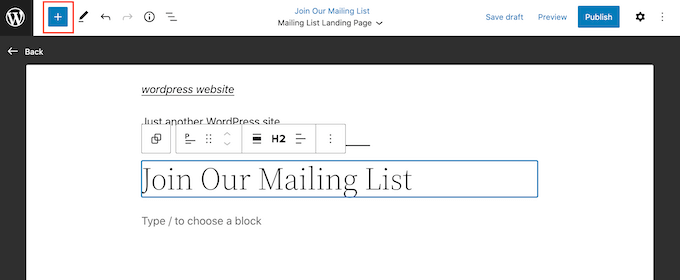
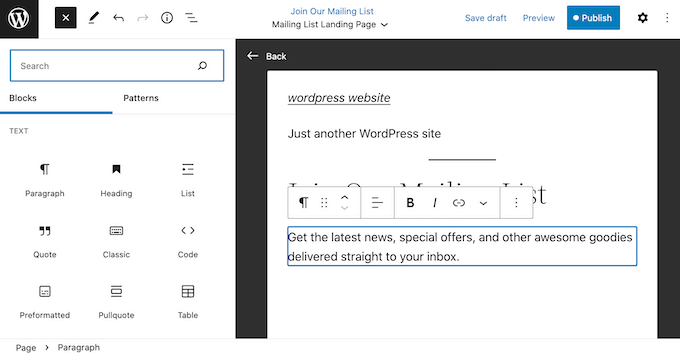
You can add content to a block or change its formatting using the familiar WordPress tools.
For example, you can type text into a Paragraph block, add links, change the text alignment, and apply bold or italic effects.
You can also create a landing page using WordPress block patterns, which are collections of blocks that are often used together. Patterns can help you create a landing page with a nice layout fast.
To see the patterns that are included in your WordPress theme, go ahead and click on the blue ‘+’ button and then select the ‘Patterns’ tab.
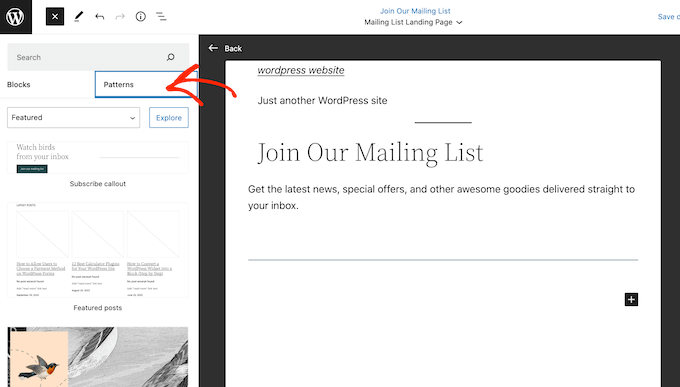
You can either drag and drop a block pattern onto your layout or click on the pattern, which will add it to the bottom of your template.
After adding a pattern, you can click to select any block within that pattern and then make your changes. For example, you can replace any placeholder text or add links so the call to action points to different areas of your WordPress blog.
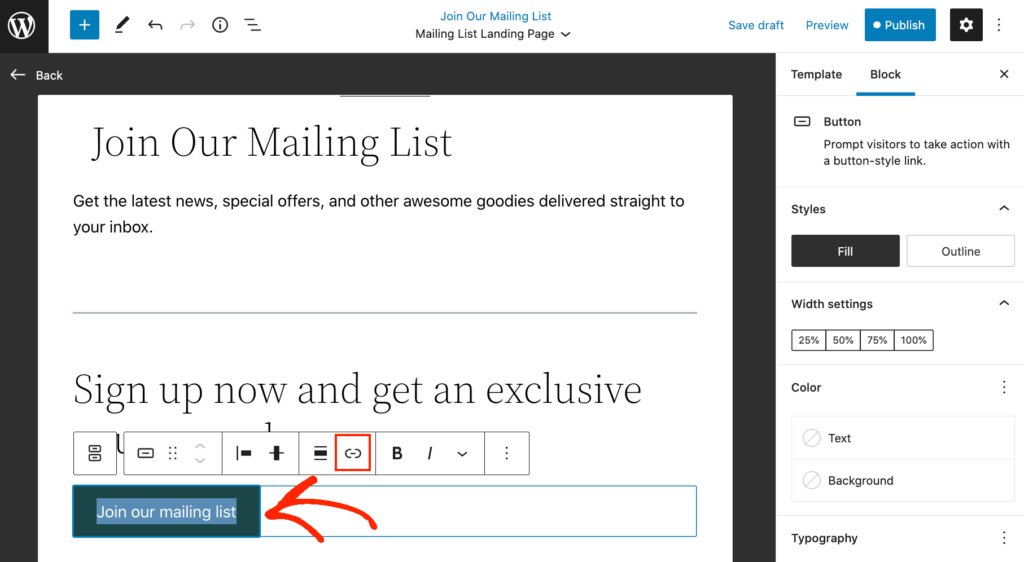
When you are happy with how the custom landing page looks, click on the ‘Publish’ button and then select ‘Save.’
Now, your page will be using the new template. You can simply update or publish the page to make your landing page live.
Method 2: Create a WordPress Landing Page With SeedProd (Recommended)
The easiest way to make a landing page is by using SeedProd. It is the best page builder on the market and allows you to create any type of landing page without writing code.
The plugin comes with more than 320 professionally-designed templates, including pages that are designed to help you get conversions.
Unlike the WordPress full site editor, SeedProd works with any WordPress theme, so you don’t need to be using a block-based theme.
For more information, see our complete SeedProd review.
Step 1: Set Up the SeedProd Plugin
First, you need to install and activate the SeedProd plugin. For more details, see our step-by-step guide on how to install a WordPress plugin.
Note: There is a free version of SeedProd available on WordPress.org, but we will be using the Pro version since it has more templates and blocks, including eCommerce blocks.
Upon activation, head over to SeedProd » Settings and enter your license key.
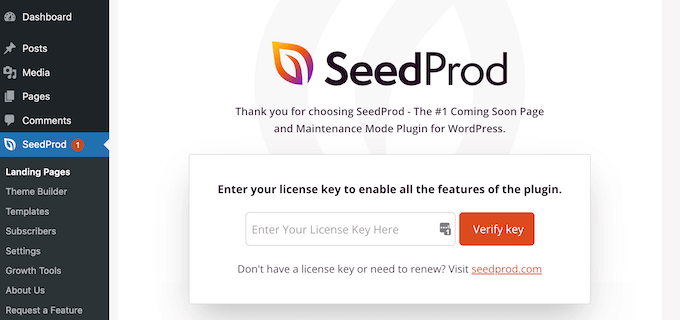
You can find this information in your account on the SeedProd website. After entering the license key, click on the ‘Verify Key’ button.
Step 2: Choose a Landing Page Template
Next, simply go to SeedProd » Landing Pages and click on ‘Add New Landing Page.’
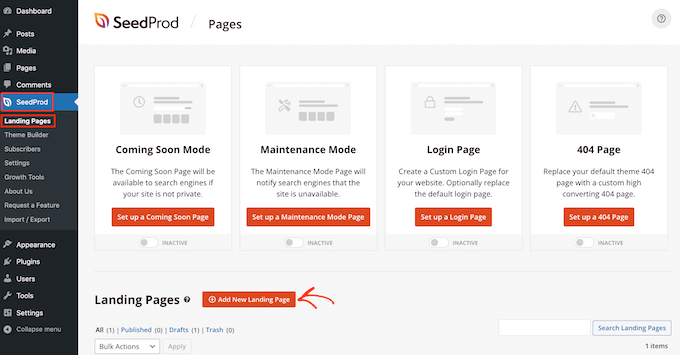
You can now choose a template for your landing page.
SeedProd has lots of designs that are organized into different campaign types, such as coming soon and 404 pages. You can click on the tabs at the top of the screen to filter templates based on campaign type.
Since we are creating a landing page, you may want to take a look at the Sales, Webinar, or Lead Squeeze tabs.
To preview a design, simply hover your mouse over it and then click on the magnifying glass.
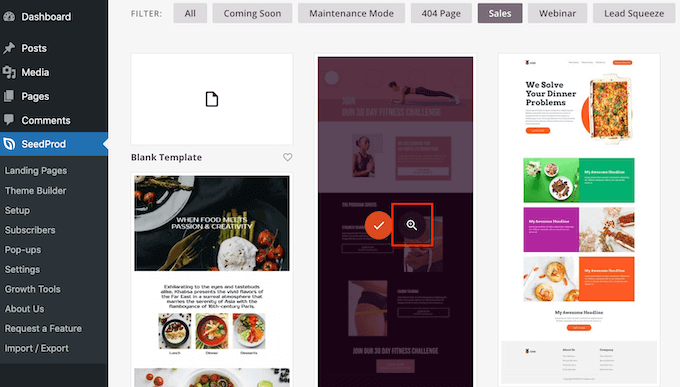
Choosing a design that matches the type of landing page you want to create will help you build the page faster. However, every template is fully customizable, so you can change every part of the template and create any landing page you like.
When you find a template that you want to use, simply click on ‘Choose This Template.’
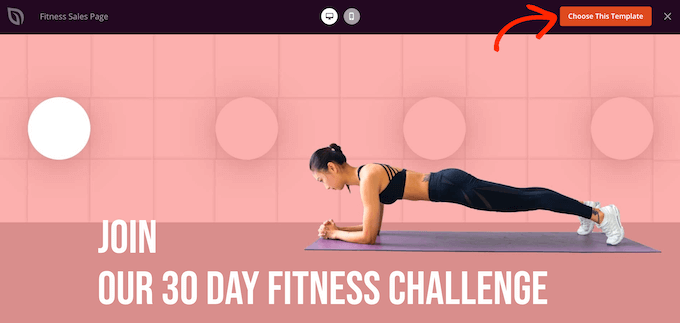
We are using the Fitness Sales Page template in all our images, but you can use any design.
Next, go ahead and type in a name for your landing page. SeedProd will automatically create a URL based on the page’s title, but you can change it to anything you want.
A descriptive URL will help search engines understand what the landing page is about so they can show it to the right users, which will improve your WordPress SEO.
To give your landing page the best chance of appearing in relevant search results, you may want to add any keywords that are missing from the URL. For more details, please see our guide on how to do keyword research.
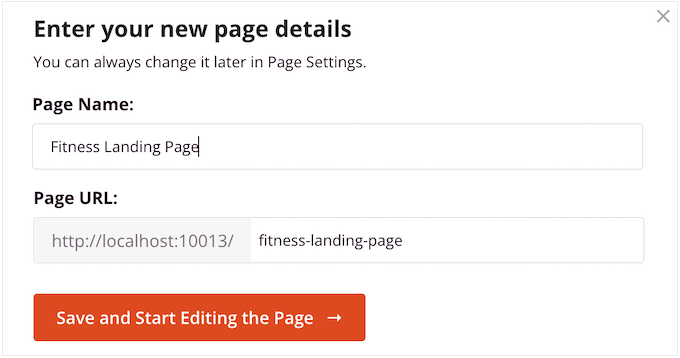
When you’re happy with the information you’ve entered, click on the ‘Save and Start Editing the Page’ button.
Step 3: Design Your Custom Landing Page
SeedProd will now open your chosen template in its drag-and-drop page builder. You’ll see a preview of the design to the right and some block settings on the left.
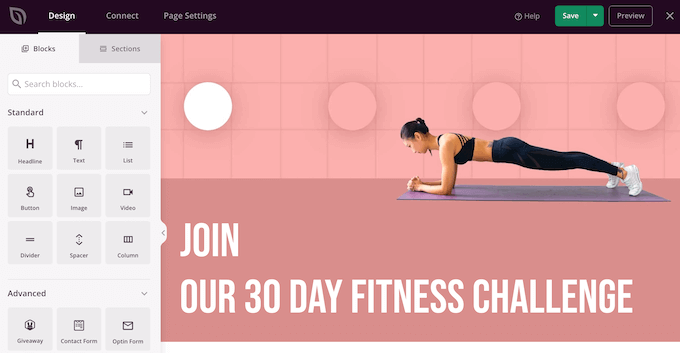
Blocks are a core part of SeedProd, and you can use them to create any kind of landing page.
Most templates already come with built-in blocks. To customize a block, simply click to select it in the page preview and then make any changes in the left-hand menu.
For example, to replace a placeholder image, simply click the Image block. Then, click on the ‘Select Image’ icon in the left-hand menu.
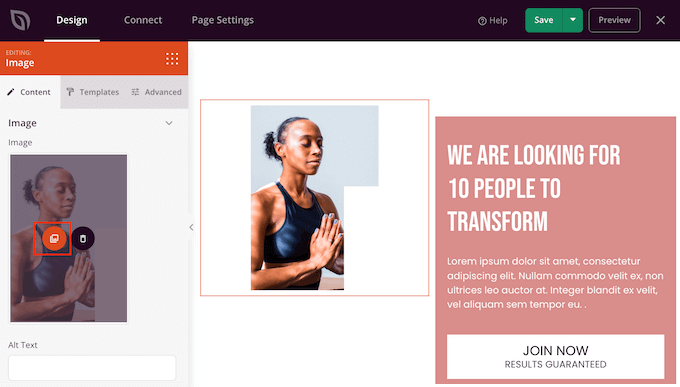
You can now either choose an image from the WordPress media library or upload a new file from your computer.
Similarly, you can replace any placeholder text with your own words. Simply select any Text or Headline block and then type into the small text editor.
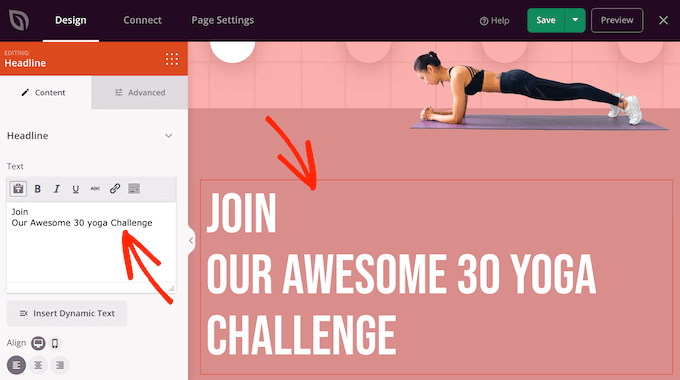
You can also completely change how the landing page looks using the settings in the left-hand menu, including changing the color scheme, font choice, link color, buttons, and more.
Most of these settings are fairly self-explanatory, so it is worth selecting different blocks in your layout and then looking through the settings.
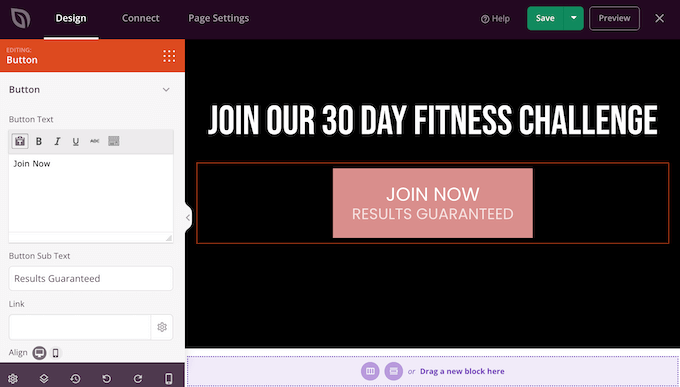
You can also drag and drop blocks to move them up or down in your layout.
To add more blocks to your landing page, simply drag and drop them onto your design.
Even better, SeedProd has lots of blocks that are perfect for creating a high-converting landing page.
For example, you may want to add a countdown timer that will count down the minutes until the visitor misses out on an offer. This can add a sense of urgency to sales, free gift coupons, pre-orders, and other campaigns.
Simply find the Countdown block and drag it onto your landing page.
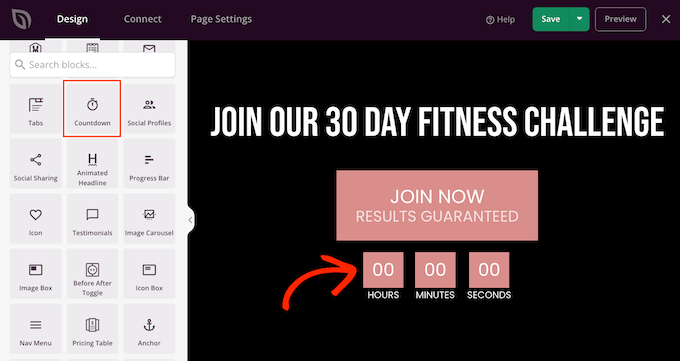
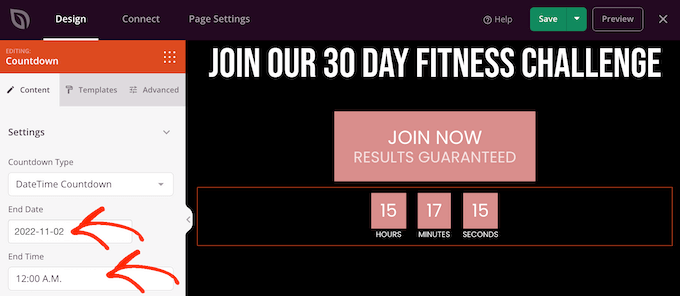
You can then set a time and date when the timer will expire.
In this way, you can use FOMO on your WordPress site to increase conversions.
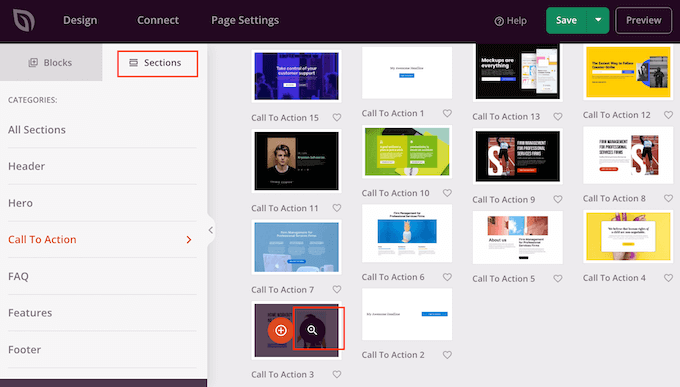
SeedProd also comes with ‘Sections,’ which are blocks that are often used together. This includes lots of sections that can help you build a landing page, including a header, hero image, call to action, testimonials, contact form, FAQs, features, footer sections, and more.
To take a look at the different sections, simply click on the ‘Sections’ tab. To preview any section, hover your mouse over it and then click on the magnifying glass.
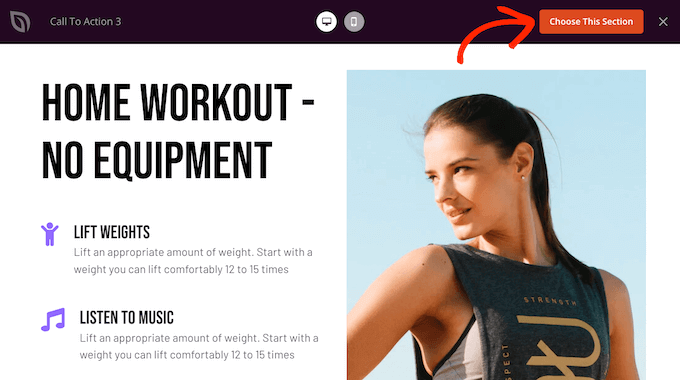
If you want to use the section, then just click on ‘Choose This Section.’
SeedProd will add the section to the bottom of your landing page, but you can move it around using drag and drop.
SeedProd is also fully compatible with WooCommerce, so you can easily create new landing pages to promote your products, services, sales, and other events.
Even better, SeedProd comes with special WooCommerce blocks, including add to cart, checkout, recent products, and more. This allows you to create custom WooCommerce checkout pages, custom cart pages, and more.
If you are building a landing page to get more sales on your online store, then we recommend creating popular products or recommended products sections.
To create this section, simply drag a Best Selling Products block onto your page.
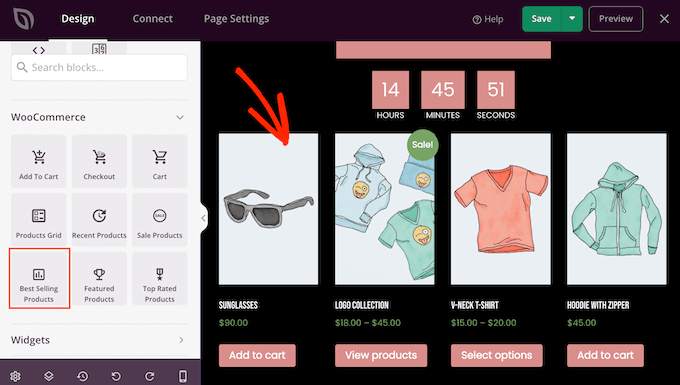
The block will show your most popular products by default, but you can also show products that are on sale, your newest products, and more.
Simply open the ‘Type’ dropdown and choose any option from the list.
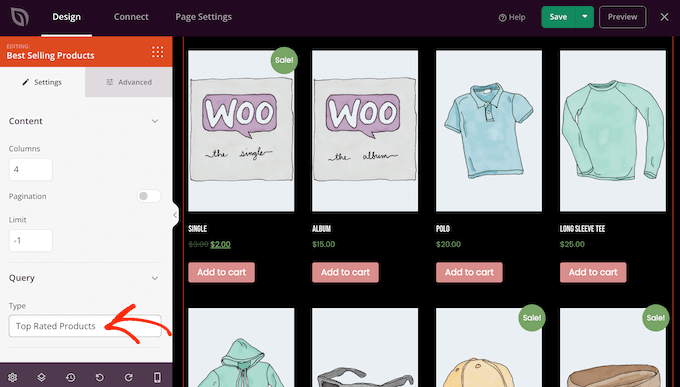
In this way, you can create a high-converting online store without being limited by your WooCommerce theme.
Step 4: Connect Your Landing Pages to Third-Party Tools
If you are creating a landing page to capture leads, then you may want to add a sign-up form for your email newsletter, or similar.
SeedProd makes it super easy to connect your landing pages to popular email marketing services like Constant Contact or ActiveCampaign.
Simply click on the ‘Connect’ tab and then select your email service provider.
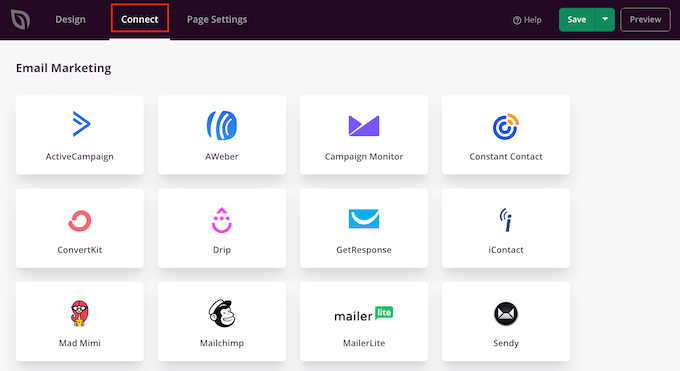
SeedProd will then show you exactly how to integrate this landing page with your email marketing service.
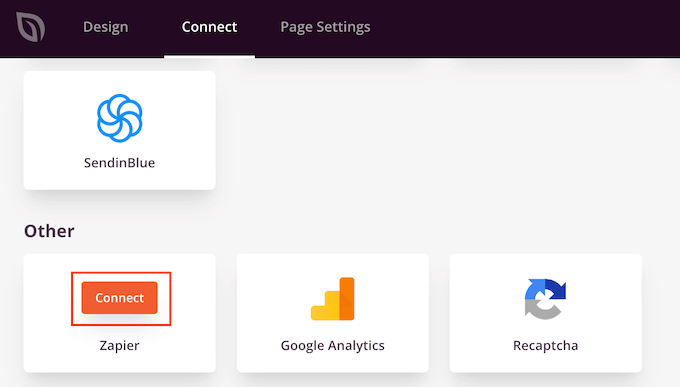
If you don’t see your email provider listed, don’t worry. SeedProd works with Zapier, which acts as a bridge between SeedProd and more than 3000+ other apps.
Just scroll to the ‘Other’ section and hover over ‘Zapier.’ When the ‘Connect’ button appears, give it a click and then follow the onscreen instructions to connect SeedProd and Zapier.
Step 5: Set Up a Custom Domain for Your Landing Page
SeedProd will publish the landing page under your website’s domain by default. However, you may sometimes want to use a custom domain instead.
This will give your campaign its own distinct identity, separate from the rest of your website. You’ll also find it easier to track the page’s performance in Google Analytics to see whether you’re achieving your Google Analytics goals.
Instead of creating a WordPress multisite network or installing multiple websites, you can easily map a custom domain to any landing page you create in SeedProd.
Before you get started, make sure your WordPress hosting provider allows you to use multiple domains and add the domain name to your hosting dashboard if you haven’t already.
For more details, please see our article on how to add a custom domain alias for your WordPress landing page.
With that done, select ‘Page Settings’ in the SeedProd editor. Then, click on ‘Custom Domain.’
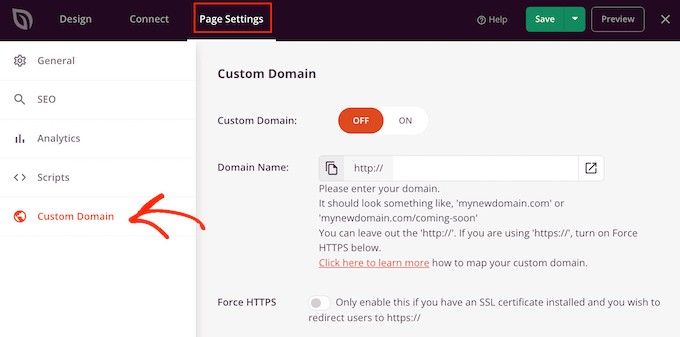
In the ‘Domain Name’ field, type in your custom domain.
After that, click on the ‘Custom Domain’ switch so it goes from ‘Off’ to ‘On.’
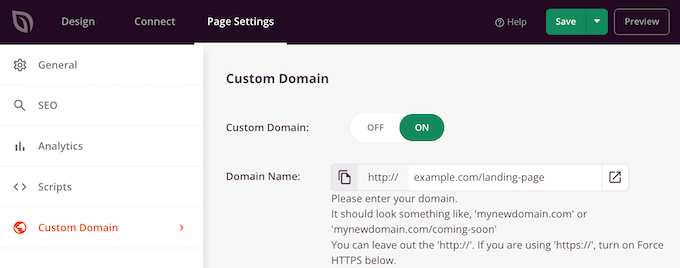
Don’t forget to click on ‘Save’ to store your changes.
Step 6: Save and Publish Your Landing Page
When you are happy with how the landing page looks, it is time to publish it by clicking on the ‘Save’ button.
Then, choose ‘Publish.’
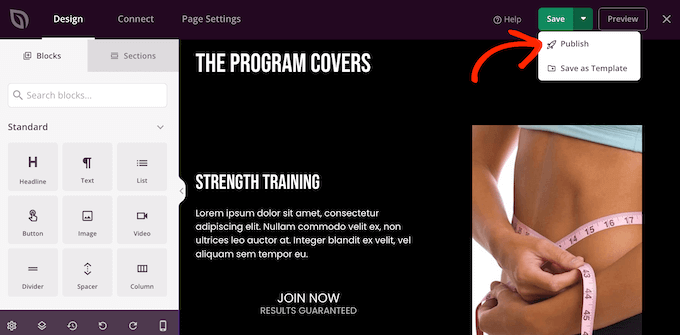
The landing page is now live on your website.
Method 3: Create a WordPress Landing Page With Thrive Architect
Thrive Architect is another popular drag-and-drop WordPress page builder. It allows you to easily create a landing page using ready-made templates.
Step 1: Install Thrive Architect and Choose a Template
First, you need to install and activate the Thrive Architect plugin. For more details, see our step-by-step guide on how to install a WordPress plugin.
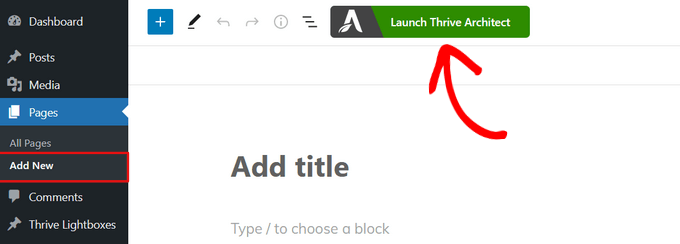
Upon activation, go to Pages » Add New from your WordPress admin dashboard to create a new landing page. Then, open the Thrive Architect Editor by clicking on the ‘Launch Thrive Architect’ button.
Next, a popup window will appear where you can choose to create a normal page or a pre-built landing page.
Click on the ‘Pre-built Landing Page’ option to select it.
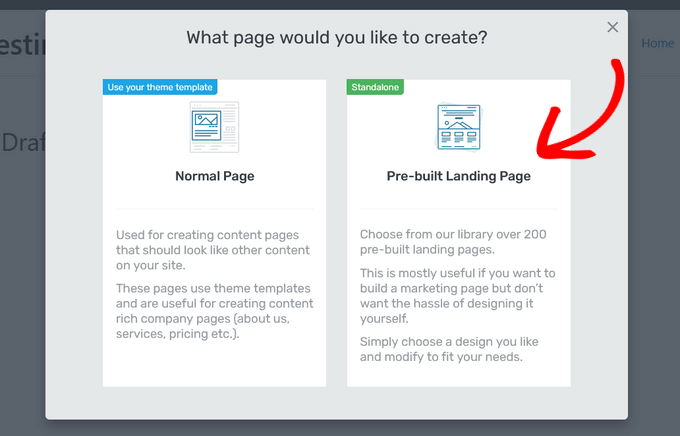
After that, you will be taken to Thrive Architect’s library of over 300+ landing page templates.
Simply scroll through the library and choose a landing page template that you like by clicking on it.
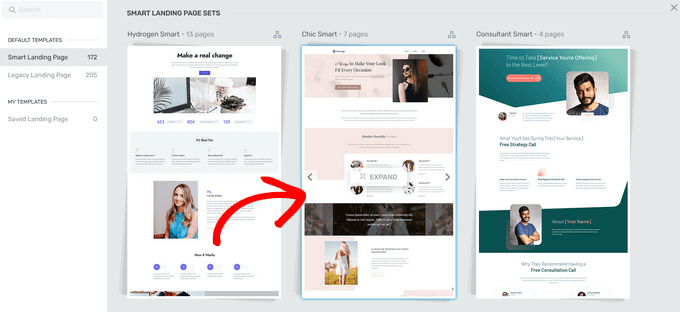
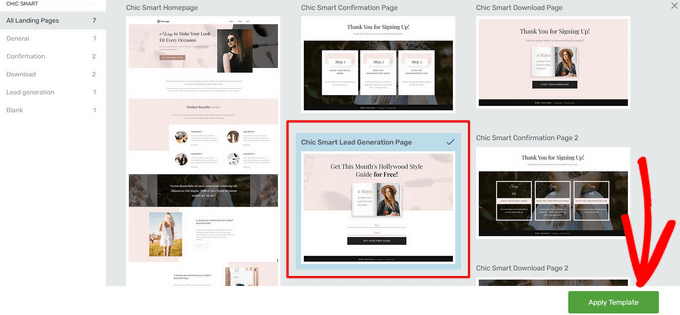
If you select a template from the ‘Smart Landing Page Sets’ section, then you can pick from multiple different landing page types. For this guide, we will choose the ‘Smart Lead Generation Page’ option.
When you find a design you like, click on the ‘Apply Template’ button to continue.
Step 2: Build Your Custom Landing Page
Now, the template will open in the Thrive Architect Editor, where you can adjust each page element to match your brand or your specific offer.
For example, to edit the ‘Heading’ text, simply click on it and type in some text. Clicking on the ‘Heading’ element will also bring up options for changing the font size, color, line spacing, and more.
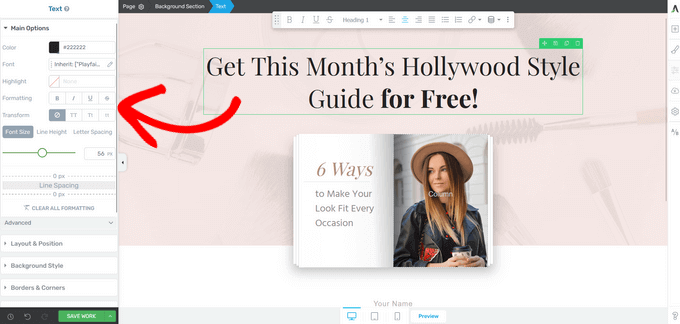
In the left-hand menu, you will also find options to change the section height, background style, border style, add a border and padding, and so on.
To add a new element to your landing page, click on the ‘Add Element’ button, which appears as a ‘plus sign (+)’ icon on the right-hand menu.

Thrive Architect offers many pre-built elements that you can add to your landing page. You can choose from elements like buttons, testimonials, countdown timers, Google Maps, star ratings, and much more.
To add a new element, simply drag it from the right-side menu and drop it into place on your landing page.
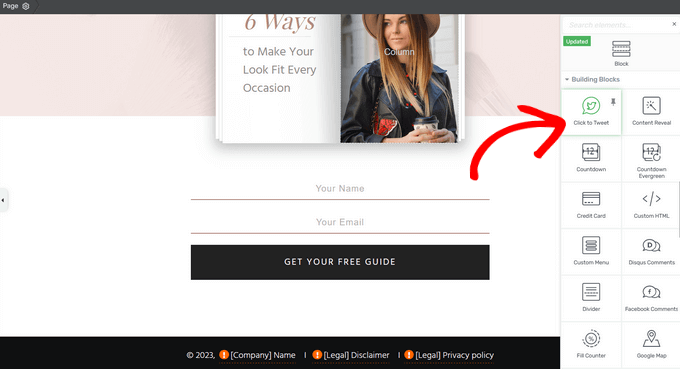
You can get even more ready-made elements by purchasing the Thrive Suite, which comes with Thrive Architect, Thrive Quiz Builder, Thrive Apprentice, and more.
For example, you can quickly add quizzes to your landing page using the ‘Quiz’ element. This can encourage people to engage with your site.
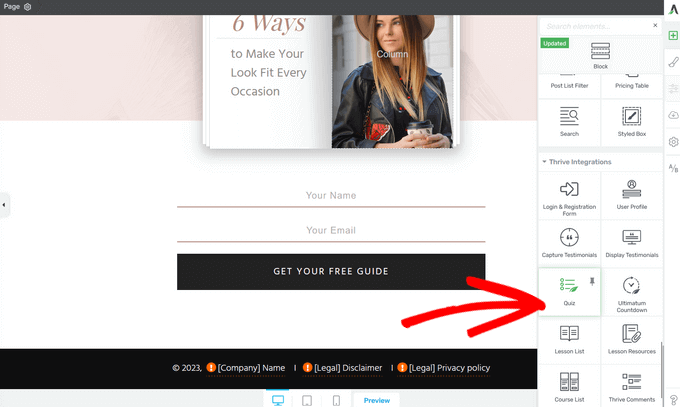
You can now continue editing your landing page by adding elements and customizing them using the settings in the left-hand menu.
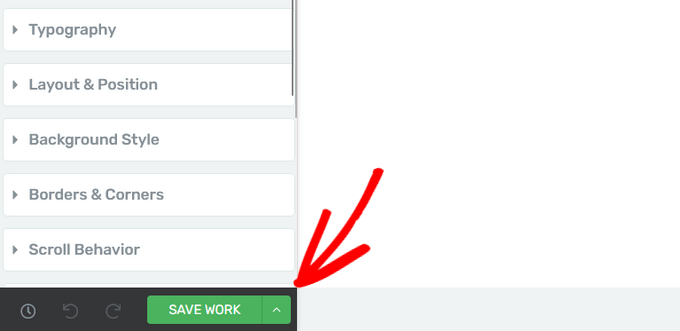
As you are editing your landing page, don’t forget to hit the ‘Save Work’ button in the bottom left-hand corner.
Step 3: Connect Your Landing Page to an Email Service Provider
Since you’re creating a landing page for lead generation, let’s also take a look at how to connect your email service provider with Thrive Architect.
To get started, simply click on the lead generation form on your landing page.
In the left-hand menu, make sure the ‘Connection’ is set to the ‘API’ option. Then, click on the ‘Add Connection’ button next to ‘Send leads to.’
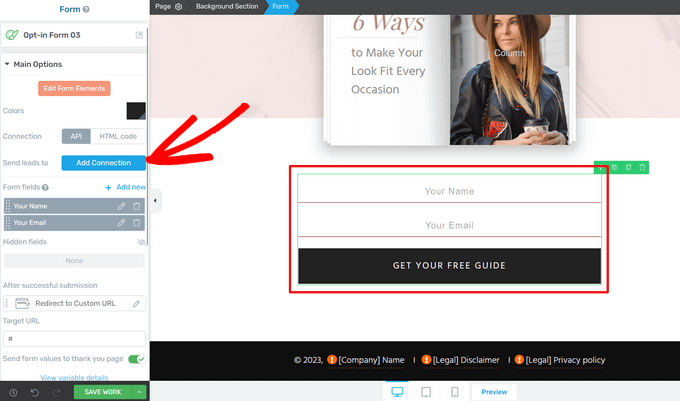
Next, you’ll need to see the list of available services.
With that in mind, click on the blue ‘Go to the API Dashboard’ link.
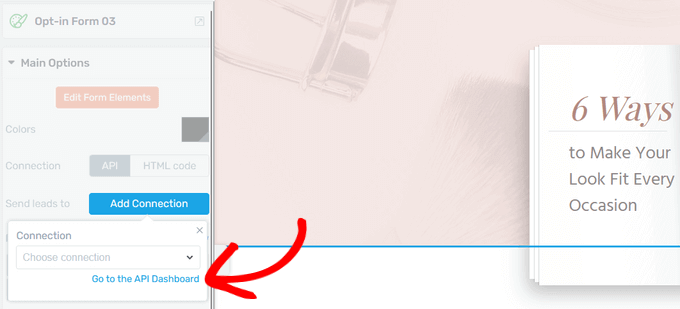
This opens the Active Connections dashboard in a new window.
From here, click on the ‘Add new Connection’ button.
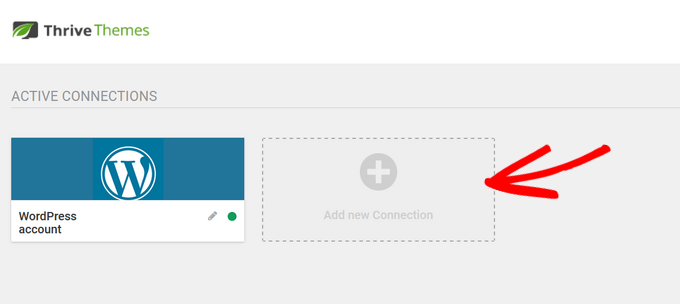
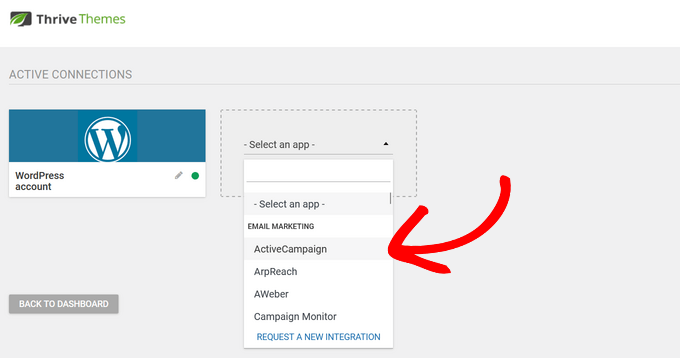
In the dropdown menu, select the email marketing provider you want to use.
Thrive Architect seamlessly connects with popular email marketing services and CRMs like ActiveCampaign, Constant Contact, Campaign Monitor, HubSpot, and more.
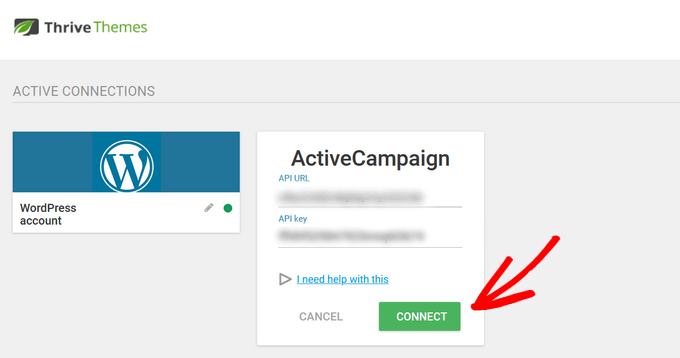
After that, you will need to copy and paste the provider’s API URL and API key into the appropriate fields. You can typically find this information in the settings area of your email service provider account.
With that done, click the ‘Connect’ button.
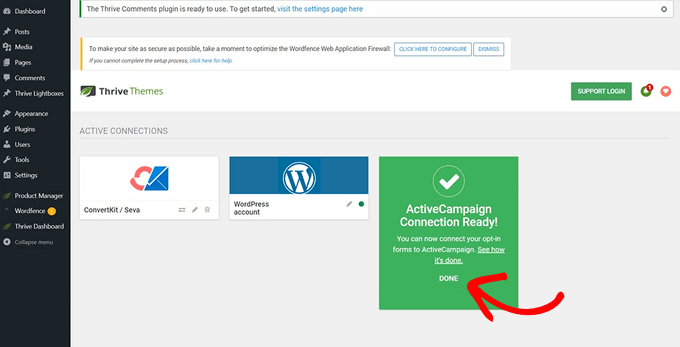
Once your email service provider is properly connected, you will see a success message.
Click ‘Done’ to return to the Thrive Architect editor.
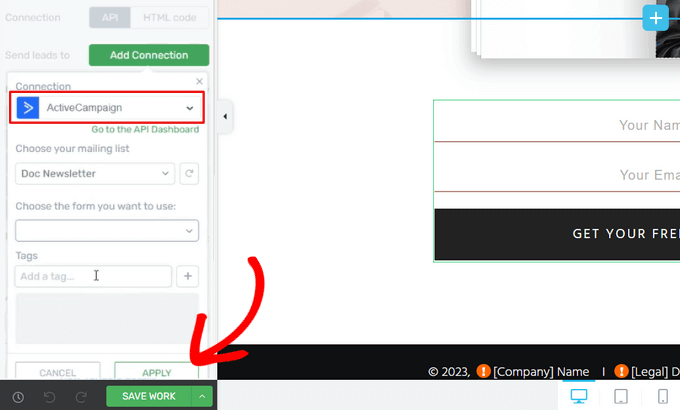
Now, when you click the ‘Add Connection’ button again, you can select the email service provider you just connected from the dropdown menu.
From here, you can select the mailing list where you will send your new subscribers. You can also select which form you want to use, and add tags to organize your form leads.
With that done, click the ‘Apply’ button to save your changes.
Step 4: Save and Publish Your WordPress Landing Page
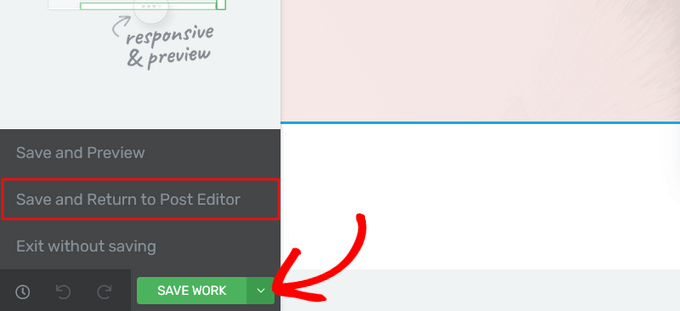
When you are ready to make the page live, click on the arrow (^) button next to ‘Save Work.’
Then, click the ‘Save and Return to Post Editor’ option.
Once you are back in the WordPress editor, simply click the ‘Publish’ button.
You can now visit your website to see the landing page in action.

Get More Leads With These Top Landing Page Tips
Already made your landing page in WordPress? Great. Now, let’s get you more leads. A weak landing page can miss out on growing your audience.
Optimizing a landing page is pretty simple. Here are some easy tips you can implement:
- Keep it clean – Your design should be simple and avoid anything that distracts visitors.
- Clear button – Make your call-to-action button easy to find and tell visitors exactly what to do next.
- Catchy writing – Use words in your headline and copy that make your offer sound exciting and explain how it benefits visitors.
John Turner from SeedProd has great insights on what makes a high-converting landing page. Be sure to check this article out for more in-depth information.
We also have extra tricks to increase your landing page conversions by up to 300%, like adding social proof and/or a live chat to answer questions right away.
To really make your landing page work, you’ll need some tools. We have a list of must-have WordPress plugins you can use to grow your website.
Don’t have time to create a landing page yourself? Let WPBeginner Pro Services handle it! We offer affordable Premium WordPress Support for one-time projects like landing page creation, theme customization, and more. Save time and leave the design work to us. Schedule WordPress Support Services today!
We hope this article helped you learn how to create a landing page with WordPress. You may also want to see our proven tips on driving more traffic to your WordPress site or our comparison of the best business phone services.
If you liked this article, then please subscribe to our YouTube Channel for WordPress video tutorials. You can also find us on Twitter and Facebook.


Syed Balkhi says
Hey WPBeginner readers,
Did you know you can win exciting prizes by commenting on WPBeginner?
Every month, our top blog commenters will win HUGE rewards, including premium WordPress plugin licenses and cash prizes.
You can get more details about the contest from here.
Start sharing your thoughts below to stand a chance to win!
Chris says
I have never really given much thought to how landing pages work. This article is very insightful. Thanks.
Jiří Vaněk says
When I create a page with Seed Prod, can I then use Optin Monster to measure button-to-action conversions?
WPBeginner Support says
Instead of OptinMonster, that would normally be a task for MonsterInsights or a similar plugin.
Admin
Jiří Vaněk says
Thanks for your reply, I use both plugins. I will follow your advice and try to measure with Monster Insight.
Ahmed Omar says
thank you for the detailed post.
I am wondering, the landing page also can be done through popup plugins, or it is different from landing page in the term of efficacy.
WPBeginner Support says
You could use a popup instead of a landing page if you like. There shouldn’t be a major efficacy difference depending on how you use the popup.
Admin
Angela says
How do I publish the landing page on just one of my pages on my site?
WPBeginner Support says
It would depend on which tool you are using and depending on your specific needs you may also want to take a look at OptinMonster
Admin
Shreevatsa Bhat says
I am starting a new tutorial website, the content of the tutorial will be like lesson 1, lesson 2, lesson 3 … for this kind of content which is better to use? a page or a post? Also, I want to have a different blog section to my website where I will be writing articles on the latest things related to my niche.
So for lessons page or post?
WPBeginner Support says
For grouping the lessons you may want to use pages if you plan on using posts for articles or you could use an LMS to group the lessons together: https://www.wpbeginner.com/plugins/best-wordpress-lms-plugins-compared/
Admin
Pieter says
Hi, thanks for this article! I was wondering about something.
I’d like to temporarily replace my homepage with a different landing page.
To advertise a special discount for the duration of 1 month. There won’t be much traffice from ads or email that I could direct to a special landing page url.
Would this harm my website’s SEO and if so, is there a way to avoid that?
Thank you
WPBeginner Support says
As long as your landing page is optimized for SEO it should not have a major effect on your site’s SEO
Admin
Bob says
Please explain why I need a specific plugin to create a page and the advantages of them versus just creating a regular page via WordPress.
WPBeginner Support says
Hi Bob,
A regular page in WordPress only follows the styles available in your WordPress theme. Some themes may have different layout choices or ready made landing page templates that you can use. However, most themes don’t have all the options you will need to quickly create landing pages.
A landing page plugin, allows you to create your own layout, add call to action buttons, and quickly create professional looking landing pages without writing code.
Admin
Des says
Thanks for the info. Are there any free options to create a landing page?
The two options you provided both require a paid subscription.
WPBeginner Support says
Hi Des,
Yes, there are quite a few free landing page plugins. If you are looking for a free option, then we’d recommend Elementor.
Admin
Des says
Thanks!