Do you want to learn how to change the link color in WordPress?
Changing the link color can make it easier for visitors to find their way around your website. Creating a unique color scheme can also help your site stand out.
In this article, we will show you how to change the link color in WordPress, step-by-step.

Why Change the Link Color in WordPress?
When you add a link in WordPress, your theme will automatically determine the color of that link. Sometimes, your WordPress theme’s default colors will be exactly what you want, but you may need more control over how the links look.
For example, you might want to change the link color to match your brand or custom logo. Or you may want to boost the color contrast to make your site more accessible to readers with limited vision.
With some themes, you can change the link color in the theme options panel or WordPress theme customizer, so make sure you check these places first. It’s also worth looking at your theme’s documentation.
That being said, let’s see how to change the link color on your WordPress website, no matter what theme you are using. Simply use the quick links below to jump straight to the method you want to use:
Video Tutorial
If you prefer written instructions, then just keep reading.
Method 1: Change the Color of Individual Links
Sometimes, you may want to change the color of individual links. For example, you might want to draw the visitor’s attention toward the call to action on a landing page.
To do this, simply highlight the link you want to customize. Then, click on the arrow icon in the mini toolbar and select ‘Highlight.’
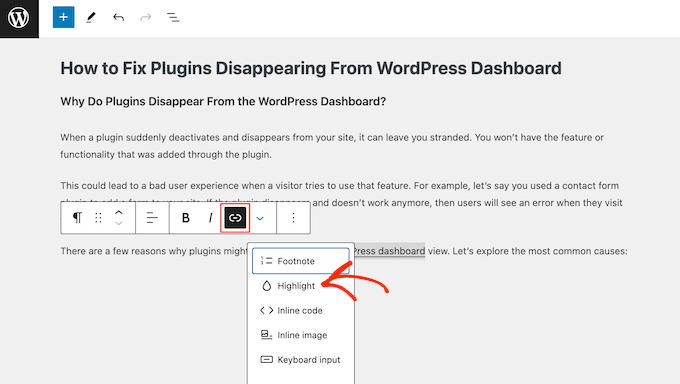
You can now either select ‘Background’ or ‘Text’ depending on the change you want to make.
With that done, go ahead and select the color you want to use.
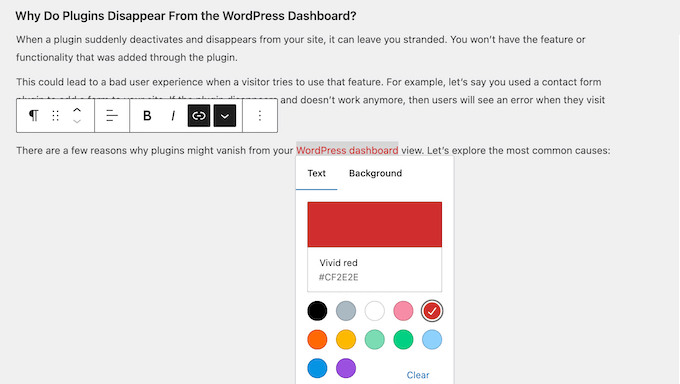
To customize more links, simply repeat these steps.
When you are happy with how the links look, click on either ‘Update’ or ‘Publish’ to make your changes live.
Method 2: Change Link Color in WordPress Using WPCode (Recommended)
The easiest way to change the link color is by adding custom CSS to your WordPress site.
Often, you will find code snippets in WordPress tutorials with instructions to add them to your theme’s functions.php file.
The biggest problem is that even a tiny mistake in the custom code snippet can break your WordPress site and make it inaccessible. You will also lose all your customizations the next time you update your WordPress theme.
That’s where WPCode comes in.
This free plugin makes it easy to add custom CSS without putting your site at risk.
The first thing you need to do is install and activate the free WPCode plugin. For more details, see our step-by-step guide on how to install a WordPress plugin.
Upon activation, head over to Code Snippets » Add Snippet.
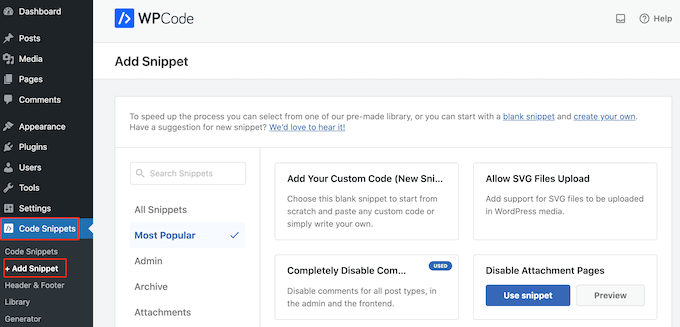
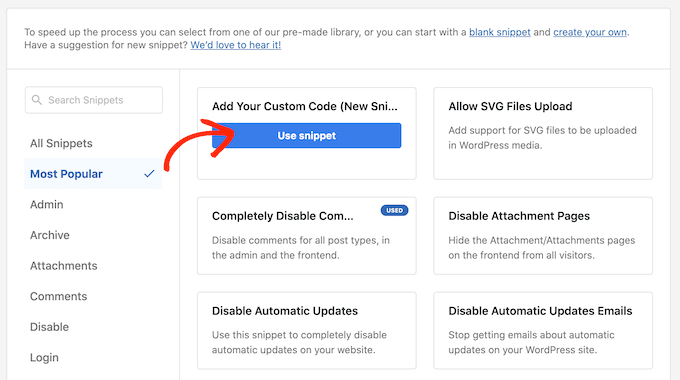
Here, simply hover your mouse over ‘Add Your Custom Code.’
When it appears, click on ‘Use snippet.’
To start, type in a title for the custom code snippet. This can be anything that helps you identify the snippet in the WordPress dashboard.
After that, open the ‘Code Type’ dropdown and select ‘CSS Snippet.’
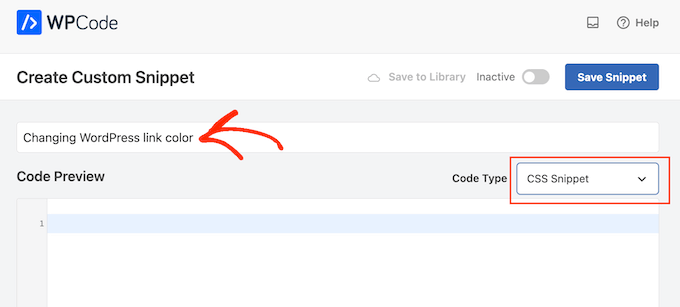
You can now go ahead and add a custom CSS snippet to the code box. Let’s look at some of the different snippets you can use.
Change the Link Color Across Your WordPress Website
To start, you may want to customize the overall link color. This is the color that visitors will see before they click on a link.
To do this, simply add the following snippet into the WPCode code box:
a {
     color: #FFA500;
}
In the above example, the # hex code will change the link color to orange, so you will need to change#FFA500 to the color you want to use.
If you are not sure what hex code to use, then you can explore different colors and get their codes on the HTML Color Codes website.
Meanwhile, if you need some help picking a link color, then please see our guide on how to choose a perfect color scheme.
When you are happy with how your code looks, click on the ‘Inactive’ toggle so that it shows ‘Active’ instead. Finally, click on ‘Save Snippet’ to make the CSS snippet live.
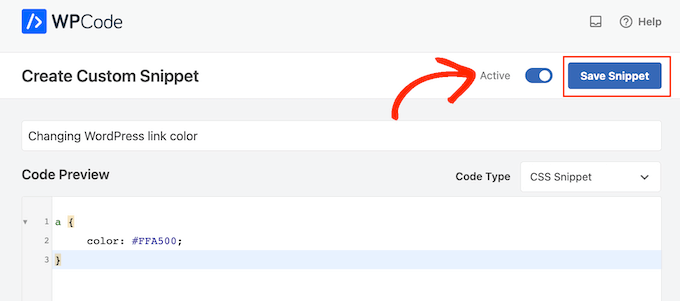
Now, if you visit your WordPress website, you will see the new link color in action.
Change the Link Hover Color in WordPress
Another option is to change the link hover color. This is the color that appears when a visitor hovers their mouse over a link, so it’s a great way to catch their attention and improve your click-through rate.
To make this change, simply paste the following snippet into WPCode’s editor:
a:hover {
     color: #FF0000;
     text-decoration: underline;
}
The code above will change the link color to red and underline the text when visitors hover over it. As before, you can change the #FF0000 hex code to any color you want to use.
When you are ready to go live, you can publish the code snippet by following the same process described above.
Change the Link Color After Visit in WordPress
Next, you may want to change the link color after a user clicks the link. This can help visitors find their way around your WordPress blog by showing which links they’ve already clicked.
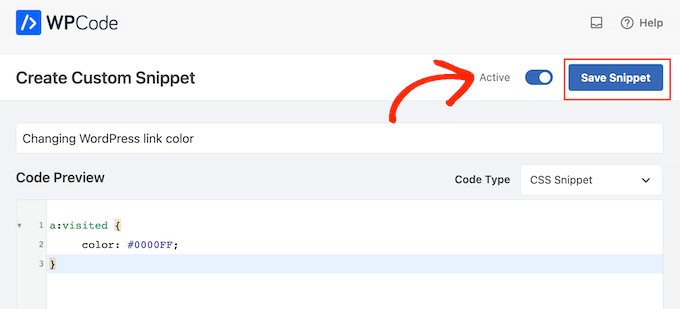
You can use the CSS code below to change the visited link color:
a:visited {
     color: #0000FF;
}
As always, make sure you change the blue #0000FFhex code to the color you want to use in your links.
With that done, click on the ‘Inactive’ toggle so that it changes to ‘Active.’ Then, just click on ‘Save Snippet’ to make the code live on your site, blog, or online store.
Change the Color of Your Navigation Links in WordPress
Finally, you may also want to customize the links in your navigation menu.

For more details, see our guide on how to style WordPress navigation menus.
Method 3: Change the Link Color Without Editing CSS
Instead of adding CSS code directly to your website, you can use a CSS styling plugin to visually edit your site.
We recommend using the CSS Hero plugin. It’s very beginner-friendly and lets you visually customize your website, similar to a drag and drop page builder.
After installing the plugin, click the ‘Proceed to Product Activation’ button to activate it and connect your account.

This will take you to a screen where you can enter your username and password.
Then, simply follow the onscreen instructions to verify your account. After that, CSS Hero will take you back to the WordPress dashboard automatically.
Next, click the ‘Customize with CSS Hero’ button at the top of the WordPress admin toolbar.

This will open your website with CSS Hero running on top of it.
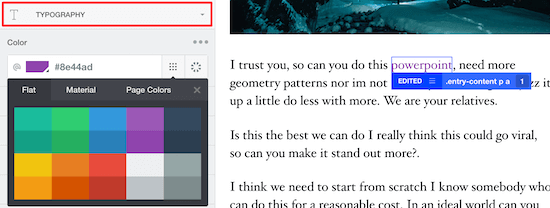
CSS Hero uses a What You See is What You Get (WYSIWYG) editor. This means you can click on any content to open a toolbar that lets you customize that content.
To get started, click on an example of the link that you want to edit. In this guide, we will customize blog post links.

After selecting a link, click the ‘Typography’ menu item and choose a new color for your links.
You can either select a color from the list or add a hex code.
Change the Color of Your WordPress Navigation Menu
Next, you can use CSS Hero to create a custom navigation menu by changing its link color.
Simply hover over your navigation menu and click any of the menu items.

Then, select the ‘Typography’ option.
You can now choose the color that you want to use instead.

Once you have finished changing the link colors, simply click the ‘Save and Publish’ button to make your changes live.
We hope this article helped you learn how to change the link color in WordPress. You may also want to see our guide on how to change the text color in WordPress or our expert pick of the best WordPress design examples you should check out.
If you liked this article, then please subscribe to our YouTube Channel for WordPress video tutorials. You can also find us on Twitter and Facebook.


Syed Balkhi says
Hey WPBeginner readers,
Did you know you can win exciting prizes by commenting on WPBeginner?
Every month, our top blog commenters will win HUGE rewards, including premium WordPress plugin licenses and cash prizes.
You can get more details about the contest from here.
Start sharing your thoughts below to stand a chance to win!
kzain says
I’ve been wanting to tweak the look of my links and this post made it super easy. The customizer option was perfect for my basic needs,
but I’ll definitely keep the CSS method in mind for more advanced changes.
Dayo Olobayo says
I’ve been struggling to change the link color in my WordPress site for weeks. Your step-by-step guide made it easy to understand and implement. I used the a tag in the custom CSS and it worked perfectly. Now my website looks more modern and visually appealing. Thanks for the help.
WPBeginner Support says
You’re welcome!
Admin
Chris says
The code was able to change the link colours in the side bar but not the links in the article. How do I change the colour of the link in the article?
WPBeginner Support says
The code if for all links, if it only changes the link color for you in one spot it means that your specific theme has more specific CSS rules than the code then it would override our CSS. To find the CSS affecting your content we would recommend using Inspect Element following our guide below!
https://www.wpbeginner.com/wp-tutorials/basics-of-inspect-element-with-your-wordpress-site/
Admin
Abdul Rehman Asad says
Thanks for sharing this.
WPBeginner Support says
You’re welcome!
Admin
Shaun Mendonsa says
Very useful article and just what I needed.
WPBeginner Support says
Glad our article was helpful!
Admin
Chloe says
Thank you, this is so helpful! Is there a way you can share how to add bolded links in CSS? I’d like to make all my links bold.
WPBeginner Support says
You should be able to add bold in the post editor for your links the same as you would for other text in your paragraphs without needing to edit your CSS.
Admin
Tom Maglienti says
Great Article! When using CSS Hero to change link colors for example, if I change the color on one blog post link does it change all links on the site the same way inserting the CSS code directly does?
Thanks!