If you run an online store with WooCommerce, you might want to customize your cart page. The default cart page isn’t set up to maximize conversions.
By making a few changes, you can increase sales and improve the shopping experience for your customers. And the best part? You don’t need to know any coding.
However, choosing the right tool can be a challenge. That’s why we researched and tested various page builders to help you out. Out of all the plugins we tested, we were most impressed with SeedProd. Its drag-and-drop builder makes customizing your cart page easy.
In this article, we’ll walk you through the steps to create a custom WooCommerce cart page. It’s quick, simple, and can make a big difference in your store’s performance.
Why Create a Custom WooCommerce Cart Page in WordPress?
WooCommerce comes with a built-in cart page. Simply install and activate this plugin, and your online store will start using the default cart page automatically.
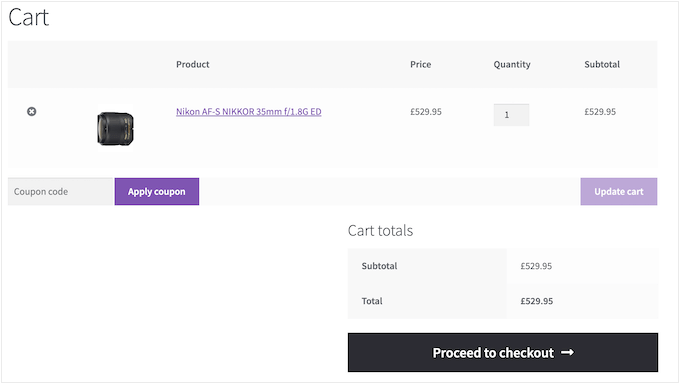
When your visitors have items in their carts, they are very close to making a purchase. However, research shows that nearly seven out of ten customers will abandon their carts and never come back.
With that in mind, your cart page should do everything possible to secure the sale.
By replacing the default design with a custom cart page, you can often improve the conversion rates on your online store.
Even simply customizing the page with your own branding and custom logo can improve the customer experience and boost your conversion rates.
With that in mind, we’ll share how you can customize your WooCommerce cart page with no code. Here’s a quick overview of all the things we’ll cover in the following sections:
Let’s dive right in!
How to Create a Custom WooCommerce Cart Page in WordPress
The easiest way to create custom pages for your WooCommerce store is by using SeedProd.
SeedProd is the best drag-and-drop page builder and comes with more than 300 professionally designed templates. These include eCommerce templates for creating sales pages and lead squeeze pages.
Even better, SeedProd has full support for WooCommerce and even comes with special WooCommerce blocks that allow you to show your best-selling products, most popular items, latest sales, and more.
Now, the first thing you need to do is install and activate the plugin. For more details, you can see our step-by-step guide on how to install a WordPress plugin.
Note: There is a free version of SeedProd, but for this guide, we’ll use the Pro version because it has the built-in WooCommerce blocks we need. It also integrates with all of the email marketing services you may already be using to get more sales and conversions.
Upon activation, let’s navigate to SeedProd » Settings and enter your license key.
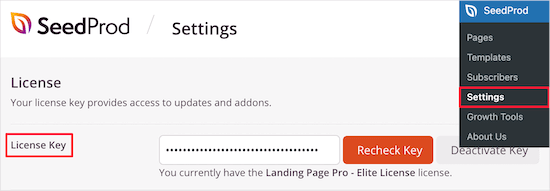
You can find this information under your account on the SeedProd website. After entering the license, go ahead and click the ‘Verify Key’ button.
Once you’ve done that, you’ll want to go to SeedProd » Landing Pages and click the ‘Add New Landing Page’ button.
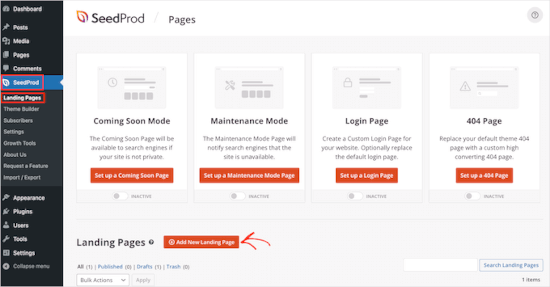
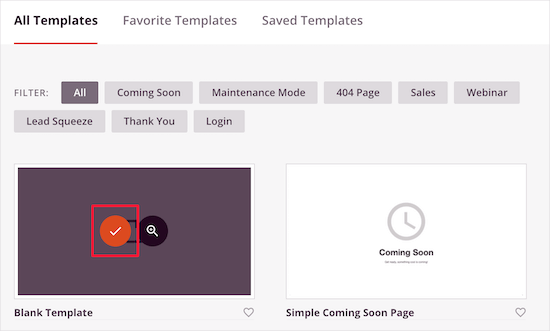
After that, you need to choose a cart page template.
SeedProd’s templates are organized into different campaign types, such as coming soon and 404 pages. You can click on the tabs at the top of the screen to filter templates based on campaign type.
When you find a template that you want to use, you’ll want to hover over it and click the ‘Checkmark’ icon.
For this tutorial, we’re going to use the ‘Blank Template’ since it lets us add only the sections we want.
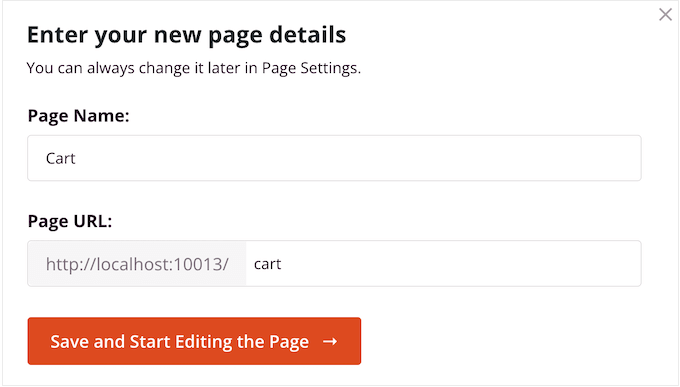
On the next screen, you’ll name your cart page.
SeedProd will automatically create a URL based on the page’s title, but you can change this URL to anything you want.
When you’re happy with the information you’ve entered, let’s click the ‘Save and Start Editing the Page’ button.
This will load the SeedProd page builder. It’s a simple drag-and-drop editor that shows a live preview of your custom cart page to the right and some settings on the left.
To start, we’ll add an image to the top of the page. We recommend using an image that looks like your store’s regular header, as this will keep your branding in place and consistent.
We want the header image to fill the full width of the cart page, so let’s click on the first layout in the ‘Choose your layout’ box.
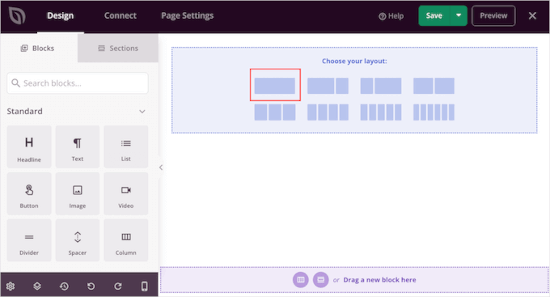
This will create a full-width layout.
Now, select the ‘Image’ block in the left-hand menu and drag it onto the layout.
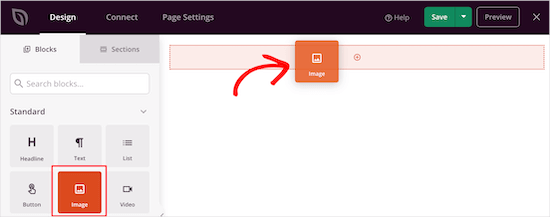
To upload your image, click to select the ‘Image’ block.
In the left-hand menu, let’s click on ‘Use Your Own Image’ and either select an image from the media library or upload a new file from your computer.
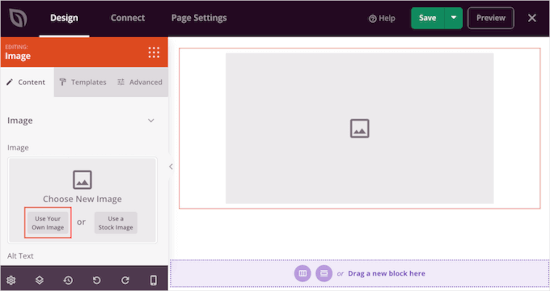
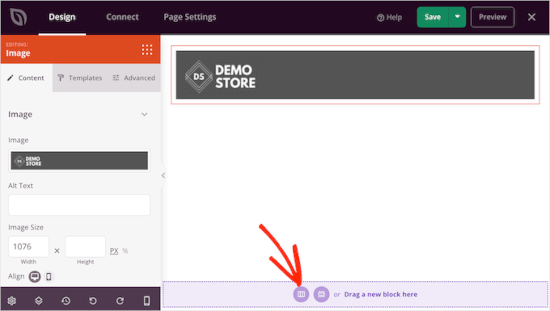
The settings on the left allow you to customize the image further. For example, you can add image alt text and change the image’s size.
When you’re happy with how the header looks, you can click the ‘Add Columns’ icon in the ‘Drag a new block here’ section.
You can now choose the layout that you want to use for the main cart page area.
Go ahead and click on the content and sidebar layout.
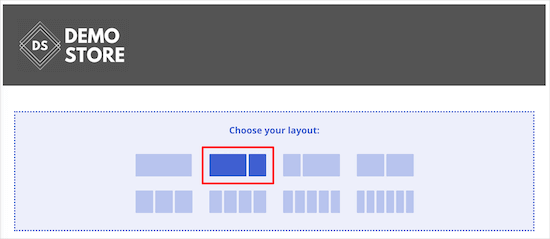
This lets you create a section for your cart and an area where you can show customer testimonials to boost conversions.
In the left-hand menu, you’ll want to scroll to the ‘WooCommerce’ section. Here, let’s find the ‘Cart’ block and drag it onto your layout.
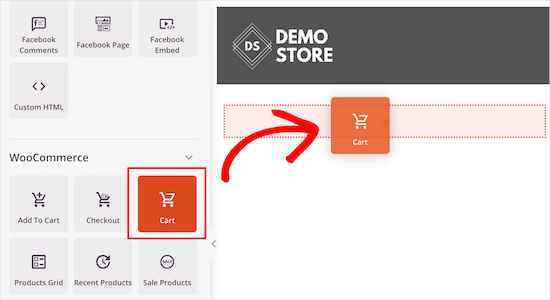
After that, you can customize every part of the cart using the left-hand menu.
This includes changing the fonts, colors, buttons, and more.
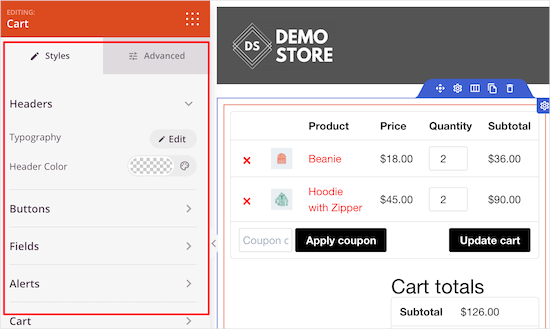
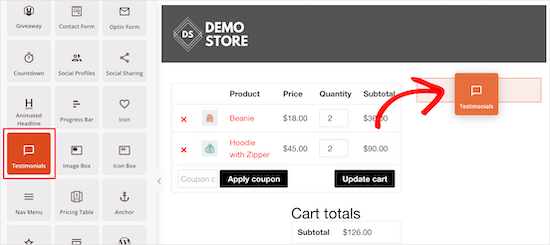
When you’re happy with how the cart area looks, it’s time to add a testimonials block. This is a form of social proof that will encourage visitors to complete their purchase.
Simply find the ‘Testimonials’ block and drag it onto your layout.
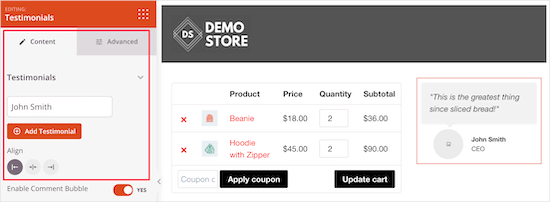
You can now change how the testimonials look on your online store.
For example, in the left-hand menu, you’ll see settings to change the color of the comment bubble, change the alignment, and add more customer testimonials.
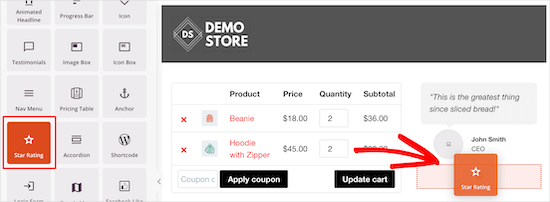
Another great idea is to show a star rating underneath your testimonial.
To do this, simply find the ’Star Rating’ block and drag it under the testimonial block.
Scarcity can encourage your customers to make a purchase now, rather than wait and risk missing out. With that in mind, you may want to add a countdown timer that will count down the minutes until the visitor’s cart expires.
To create this sense of urgency, find the ‘Countdown’ block and drag it to the top of your cart.
We want to show a fresh timer to each visitor, so you’ll want to open the ‘Countdown Type’ dropdown and select ‘Visitor Timer (Evergreen).’
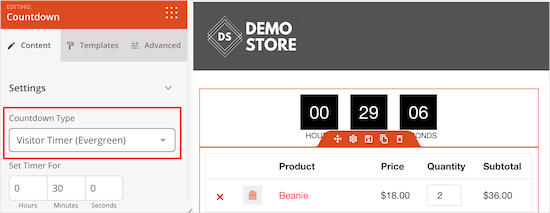
By default, the timer starts at 30 minutes, but you can change this by typing a new number into the ‘Set Timer For’ section.
We want to let shoppers know that their cart will expire when the timer reaches 0, so let’s add a ‘Headline’ block above it.
You can then type in the text that you want to show to shoppers.

You can encourage people to add more items to their shopping cart by creating a popular products section.
To promote your store’s biggest sellers, simply drag and drop a ‘Best Selling Products’ block onto your layout.
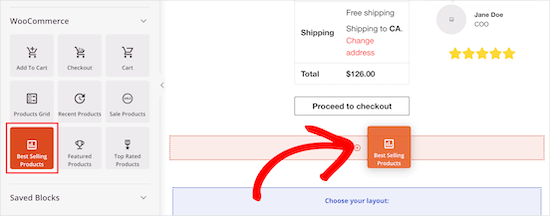
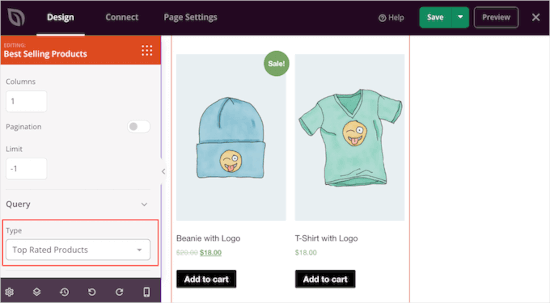
By default, this block will show your most popular products, but you can use the settings to show products that are on sale, your newest products, and more.
To do this, simply open the ‘Type’ dropdown and choose a new option.
For more details, please see our guide on how to display popular products in WooCommerce.
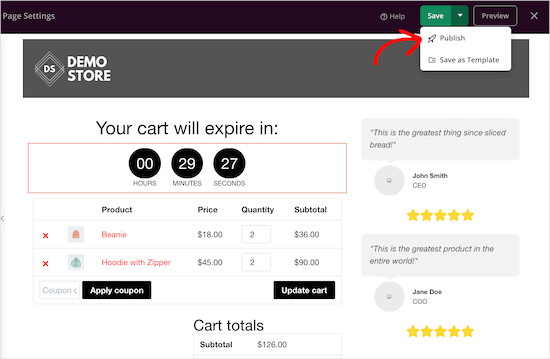
When you’re happy with the way the cart page looks, it’s time to publish it. Go ahead and click the dropdown arrow next to ‘Save’ and then select the ‘Publish’ option.
Next up, you’ll need to change the cart URL in the WooCommerce settings.
Simply go to WooCommerce » Settings and then switch to the ‘Advanced’ tab.
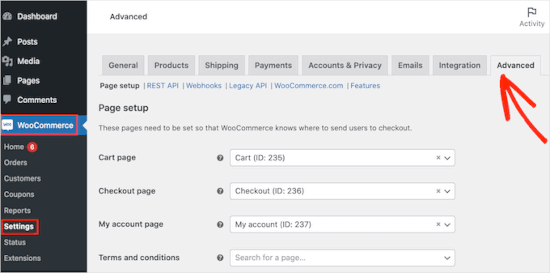
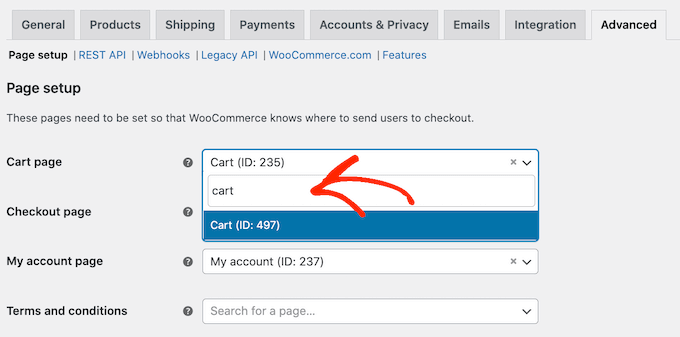
In this tab, you’ll want to open the ‘Cart page’ dropdown and start typing in the URL for your custom page.
When the right page shows up, simply click on it to select it.
Video Tutorial
If you are more of a visual learner, you may want to check out our video tutorial on how to create a custom WooCommerce cart page:
Bonus Tip: How to Further Improve WooCommerce Cart Page Conversions
Once you’ve created a custom WooCommerce cart page, there are lots of ways to reduce cart abandonment and get more sales. This helps you make more money from your existing traffic.
Here are a few simple ways to do it.
1. Track Your Conversions
Cart abandonment is a big problem for all online stores. In fact, 60 to 80% of people who add items to their cart don’t buy. (Source: Cart abandonment statistics)
Conversion tracking helps you understand what’s working on your cart page and what isn’t. You can then use SeedProd to fine-tune your custom cart page so more customers complete their purchases.
The easiest way to track WooCommerce conversions is to use Google Analytics. However, setting up analytics and creating Google Analytics goals manually requires writing a lot of custom code.
With that in mind, we recommend using MonsterInsights. It’s the best Google Analytics plugin for WooCommerce and comes with an eCommerce addon that enables conversion tracking with just a few clicks.

To track your WooCommerce cart conversions, see our step-by-step guide on how to set up WooCommerce conversion tracking.
2. Reduce Cart Abandonment with Timed Popups in WooCommerce
You can also reduce cart abandonment with a timed popup. The easiest and most effective way to do this is to use OptinMonster.
It’s the best WordPress popup plugin, and its unique Exit-Intent® technology displays popups exactly when a shopper is about to leave the cart page. You can even use this software to offer shoppers a special discount code if they complete the purchase now.
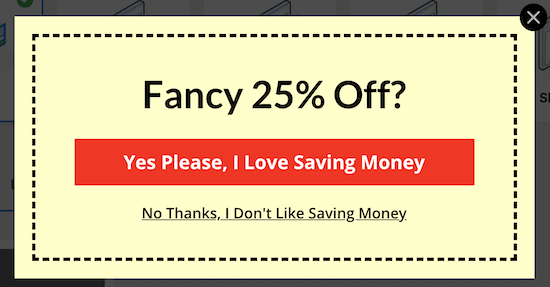
OptinMonster has a powerful set of targeting and personalization features.
For example, if you’ve already offered the shopper a coupon, then you can show them an educational popup instead. For example, you might encourage them to reach out and ask any questions they might have about your products.
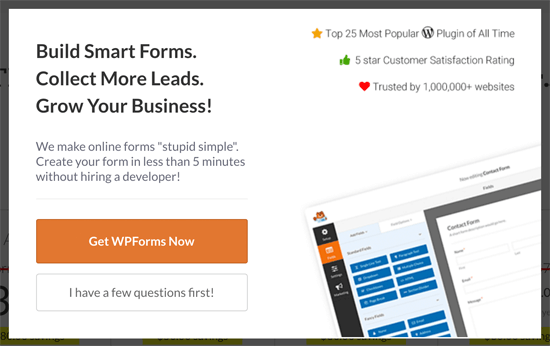
OptinMonster allows you to create different campaigns, including popups, fullscreen welcome mats, floating bars, scroll boxes, and slide-ins.
For example, if a customer adds an item to their cart and doesn’t complete the purchase, then you can offer them a coupon for that exact product using a slide-in.
For more details, see our guide on how to create a WooCommerce popup to increase sales.
3. Boost Sales with Social Activity Notifications in WooCommerce
Social activity notifications show all the products that shoppers are buying in real-time. This can reassure shoppers that you’re a popular, trustworthy website and also use FOMO to push them to buy.
The simplest way to add social proof notifications to your cart page is with TrustPulse.

It’s the best social proof plugin for WordPress and WooCommerce in the market and has been proven to increase conversions by 15%.
You can add TrustPulse to your site in just a few minutes, and start showing a notification bubble every time someone buys a product, starts a free trial, and more.

For more details, see our guide on how to use FOMO on your WordPress site.
We hope this article helped you create a custom WooCommerce cart page without writing any code. You may also want to see our step-by-step guide on how to increase your blog traffic and our expert pick of the best WooCommerce plugins for your store.
If you liked this article, then please subscribe to our YouTube Channel for WordPress video tutorials. You can also find us on Twitter and Facebook.


Dennis Muthomi
This guide couldn’t have come at a better time! I’ve implemented custom cart pages across several online stores, and combining SeedProd’s customization with social proof elements has been a game-changer.
One client’s cart abandonment rate dropped by 23% after we added a clean, branded design with testimonials and the TrustPulse notifications. The countdown timer feature mentioned in the article is particularly effective – it creates just enough urgency without being pushy.
Definitely SHARING this comprehensive guide to my colleagues
Pismai Peeters
Please, don’t use the word ‘simply’ in your posts. If you don’t know how to do something and you are searching for a solution, it’s never ‘simply’ …. It makes me nervous and it makes me feel stupid, which I’m not.
WPBeginner Support
Thank you for your feedback, we will look to improve our phrasing. Everyone has their own knowledge so what can be simple to one person can be complex to another. Our goal is to try to make the steps involved as simple as possible for our users
Admin
Mrteesurez
The design and outlook of default woocomerce cart page is not appealing in most of the themes, so it is essential to learn to style it or create a custom one that will be in line with the theme design.
This will gives chance to eliminate non-essential elements from the page. It is good that Seedprod is able to do this. Thanks for the guide.