Do you want to create a quiz in WordPress?
No matter whether you are testing knowledge or creating viral content like Buzzfeed, quizzes can get more engagement on your site. You can even use them to collect feedback and ideas from your customers so you can improve their experience.
In this article, we will show you how to easily create a quiz in WordPress.

Why Add Quizzes to Your WordPress Site?
Quizzes are fun and engaging. Since they are so interactive, users find them more rewarding than other types of forms.
Marketers have been using quizzes to generate leads since the very early days of the internet. For example, you might collect the visitor’s email address so you can send their quiz results or ask them to sign up for your email newsletter.
They are also a great way to get more social shares by encouraging visitors to post their results. BuzzFeed is probably the most popular example of viral quizzes.

If you sell online courses, then quizzes are an important way to test the student’s knowledge and reinforce learning. Since these quizzes are automated, they’re also an easy way to improve the student experience.
If you run an online store, then you might even create a short quiz that asks the shopper for some information and then suggests a product or service based on their answers.

This is much more engaging than asking them to read through product descriptions and could get you some extra sales.
Having said that, let’s go ahead and see how to easily create a quiz in WordPress. You can use the quick links below to jump straight to the method you prefer:
Method 1: Creating a WordPress Quiz With Thrive Quiz Builder (Recommended)
Thrive Quiz Builder is one of the best WordPress quiz plugins on the market. It allows you to easily build engaging and powerful lead quizzes without having to edit any code.
It comes with a user-friendly visual quiz builder, pre-made quiz templates, a built-in badge creator, powerful quiz analytics, and more.
To learn more, see our detailed Thrive Themes review.
With that being said, let’s see how you can create a WordPress quiz using Thrive Quiz Builder.
Step 1: Install the Thrive Quiz Builder Plugin
To get started, you need to visit the Thrive Quiz Builder website and sign up for an account.
Once you’ve purchased the plugin, go to your Member Dashboard. From here, you need to click on the green link in ‘Download and install the Thrive Product Manager plugin.’
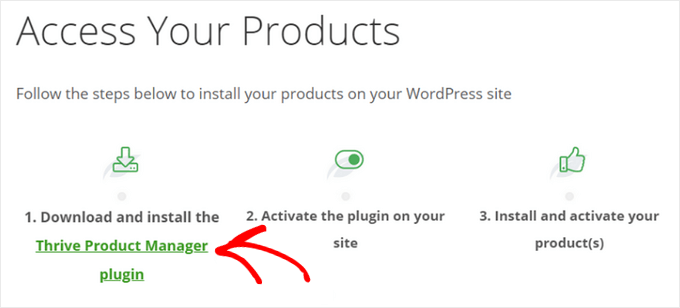
After downloading Thrive, you need to install and activate it on your WordPress site. For step-by-step instructions, see our guide on how to install a WordPress plugin.
In the WordPress dashboard, click on the new menu item labeled ‘Product Manager.’ Then, click the ‘Log into my account’ button.
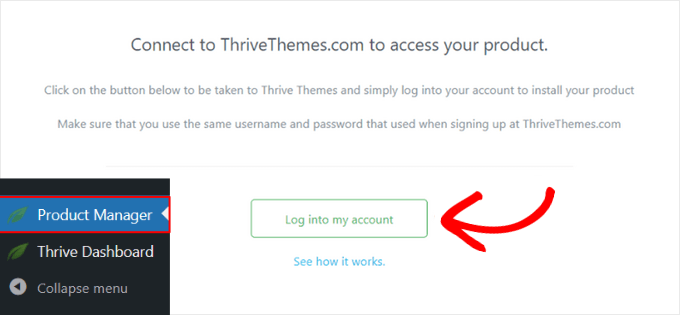
After entering your Thrive username and password, you’ll be able to see your Thrive Product Manager Dashboard.
Now, you can choose which products you want to install and license on your site. Click on the ‘Thrive Quiz Builder’ plugin to select it, then press the ‘Install selected products’ button.
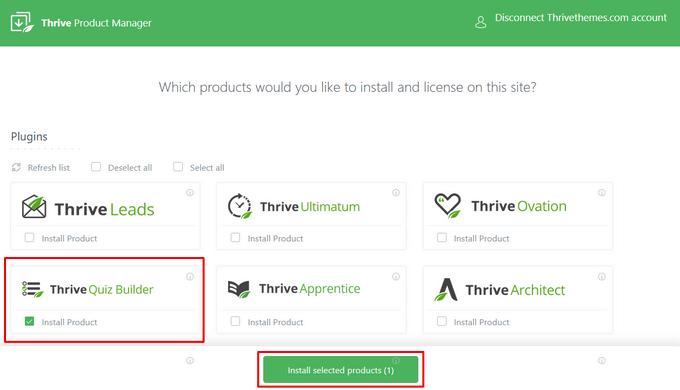
Note: If you purchase the Thrive Suite rather than the standalone quiz plugin, then you can select and install all of Thrive’s powerful plugins, including Thrive Leads, Thrive Apprentice, Thrive Architect, and more.
When the Thrive Quiz Builder plugin is ready to use, you’ll see a success message.
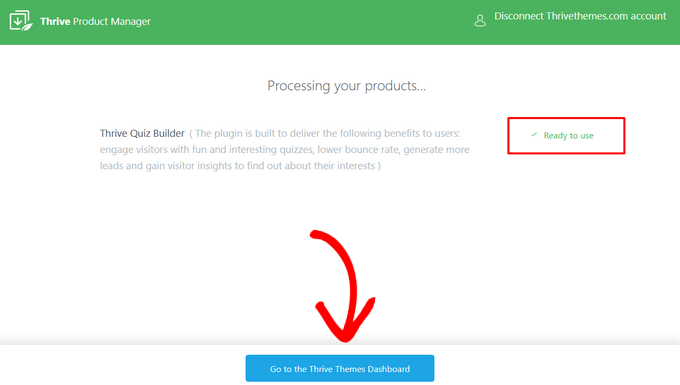
You can click on the ‘Go to the Thrive Themes Dashboard’ button to continue.
Step 2: Create a WordPress Quiz With Thrive Quiz Builder
Next, you’ll be taken to the Thrive Dashboard, where you can manage all your Thrive plugins. Here, click on the ‘Quiz Builder Dashboard’ button under ‘Thrive Quiz Builder.’
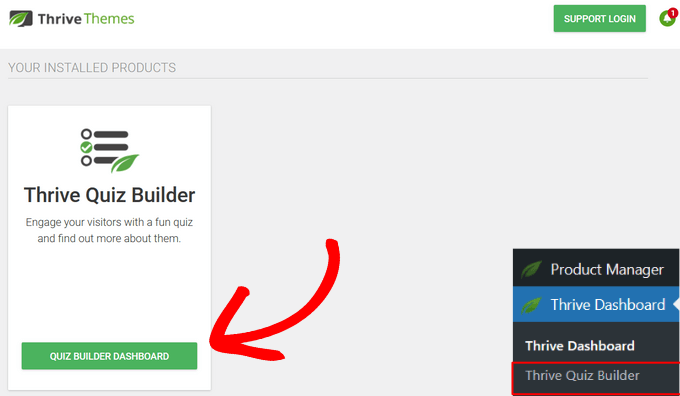
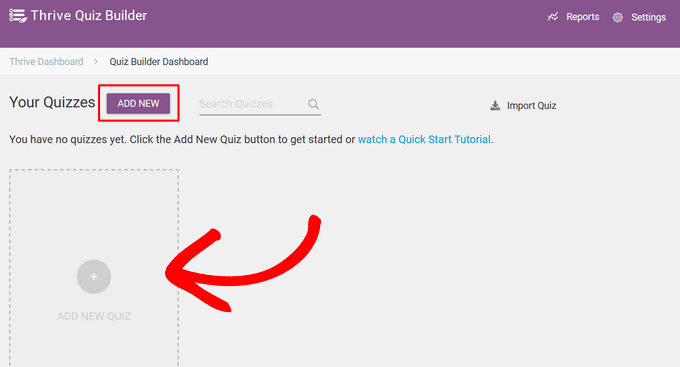
This will take you to the Quiz Builder Dashboard page, ready for you to create your first quiz.
To get started, click on the ‘Add New’ or ‘Add New Quiz’ button.
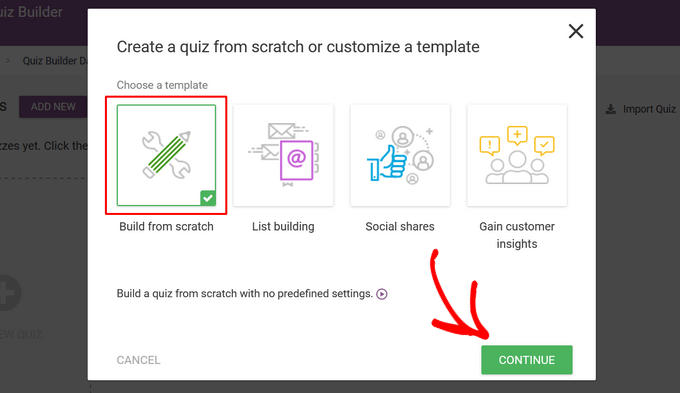
Next, you’ll be prompted to choose a template for your quiz. There are four different options:
- Build from scratch – A blank template with no predefined settings.
- List building – The results page will only appear if a user subscribes to your email list.
- Social shares – The quiz results page encourages visitors to share their results by adding a social share button.
- Gain custom insights – A survey quiz template, which is perfect for learning more about your audience.
For this guide, select the ‘Build from scratch’ template. Then, click on the ‘Continue’ button.
Next, you need to enter a name for your quiz.
This is just for your reference, so you can use anything that helps you remember what the quiz is about.
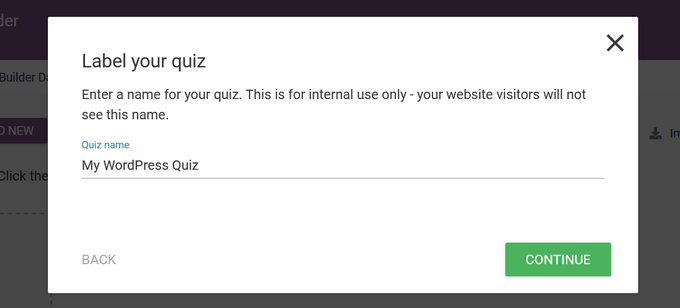
After entering a quiz name, click the ‘Continue’ button. Now, you’ll be taken back to the Quiz Builder Dashboard, where you can start building your quiz.
First, you need to select a quiz type. To do that, click on the ‘Change Type’ button.
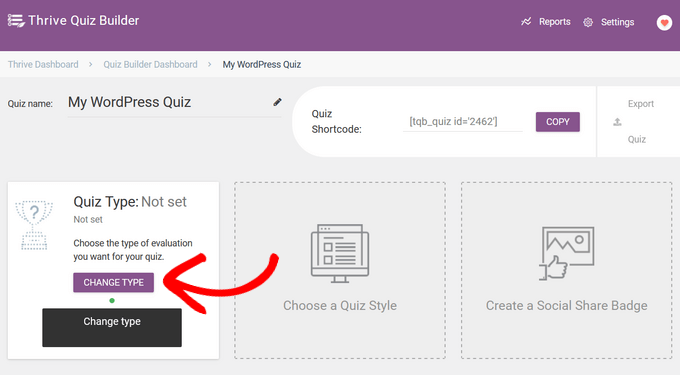
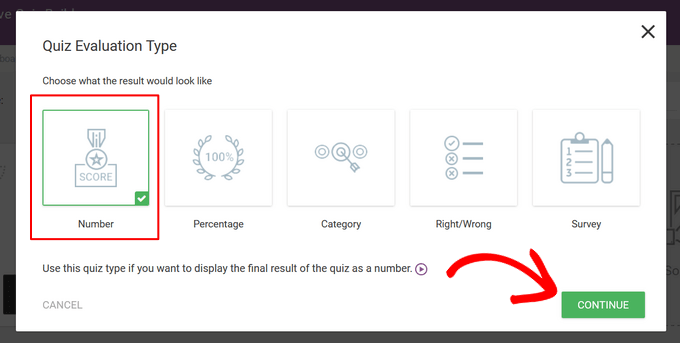
The plugin offers five different quiz types to choose from:
- Number – Display the final result of the quiz as a number.
- Percentage – Display the final result of the quiz as a percentage.
- Category – Create a quiz with multiple possible result categories, such as a personality quiz.
- Right / Wrong – Create a quiz with one or more correct answers to each question, with the correct answer highlighted in the results.
- Survey – Make a survey type quiz where participants don’t receive any specific results.
For this guide, we will click on the ‘Number’ option to select it and hit the ‘Continue’ button.
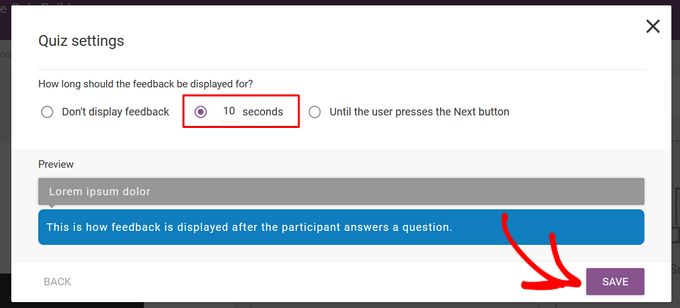
Next, you can choose how long the feedback appears onscreen. Feedback is a special message that appears after a user has answered a question.
The options are: ‘Don’t display feedback,’ ’10 seconds,’ and ‘Until the user presses the Next button.’ Simply click the option you want, and then hit the ‘Save’ button.
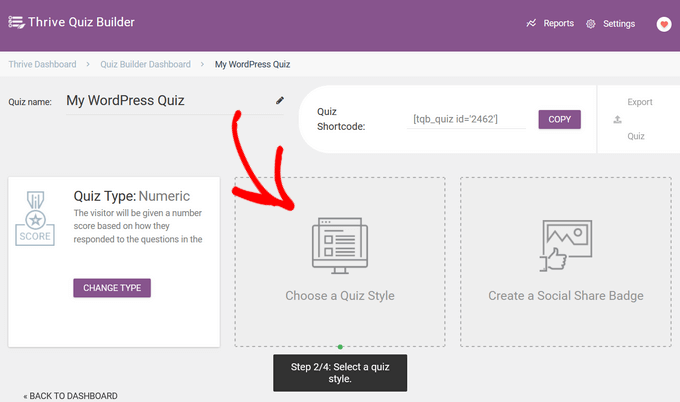
For the next step, you need to choose a quiz style, which controls how the quiz looks.
To do that, click on the ‘Choose a Quiz Style’ option.
Thrive Quiz Builder comes with multiple pre-designed templates to help you quickly create a beautiful and professional-looking quiz. These templates include a splash page, question and answers page, opt-in gate, and a results page.
Simply select the template you like and click the ‘Choose Style’ button to continue.
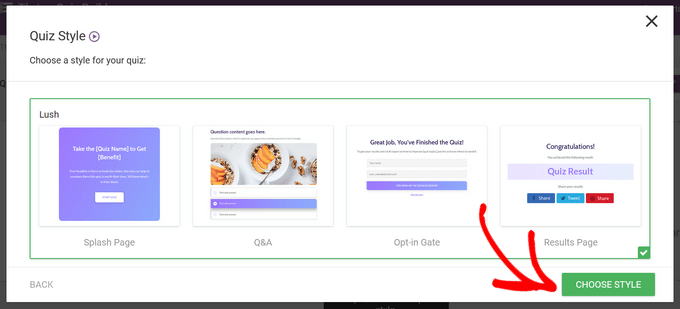
After picking a quiz style, you’ll be directed to the next step, which is creating the questions and answers for your quiz.
To do that, click on the ‘Manage’ button in the ‘Questions’ section.
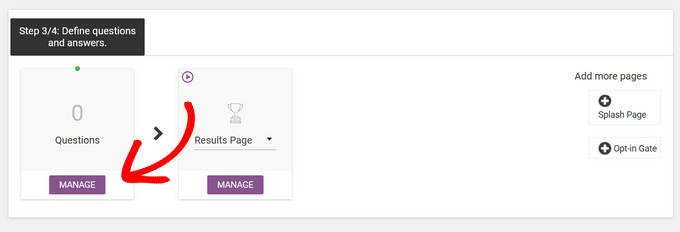
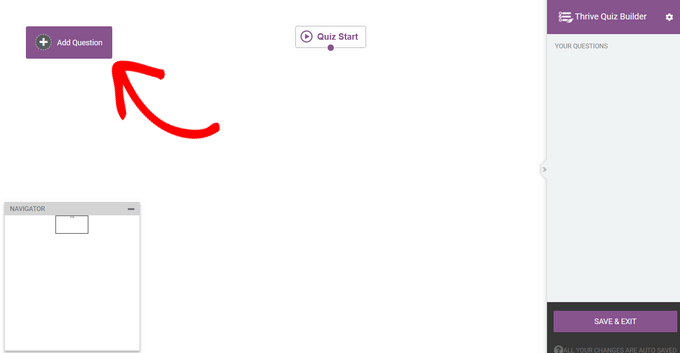
This will take you to Thrive’s Live Questions Editor.
To add the first question to your quiz, click on the ‘Add Question’ button in the top-left corner of the screen.
A popup will now appear where you can select the question type. You can choose from:
- Multiple choice with buttons
- Multiple choice with images
- Open ended question
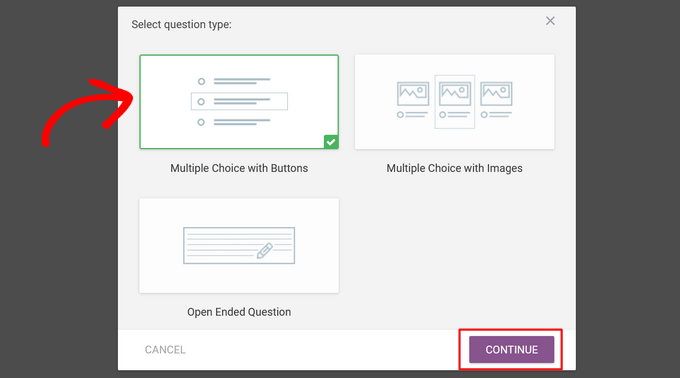
Select the ‘Multiple Choice with Buttons’ option, and click the ‘Continue’ button.
Next, a new popup window will open up. Here, you can type your question into the ‘Question text’ field.
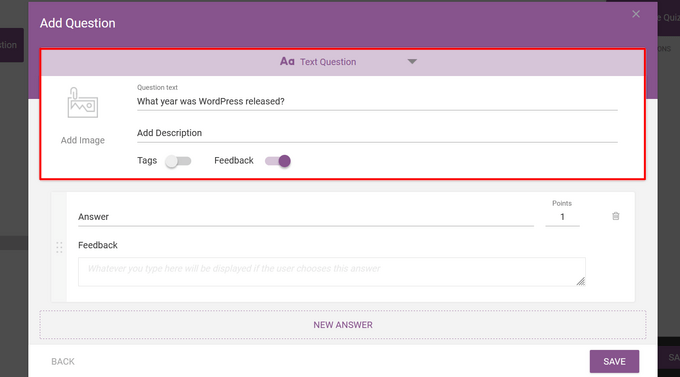
Optionally, you can add an image and description to the question and enable tags. Tags categorize users based on their answers and allow you to show feedback after each answer.
After that, type the first answer option into the ‘Answer’ field.
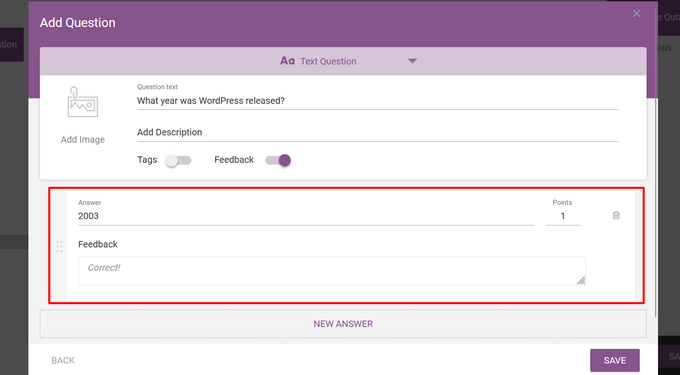
You can also type the text you want to display in the ‘Feedback’ field, if you have it enabled, and change how many points the answer is worth in the ‘Points’ field.
To add more answers, simply click the ‘New Answer’ button.
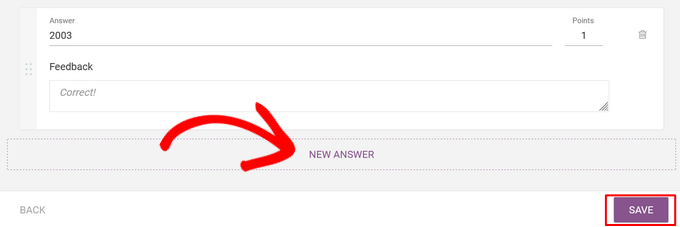
Repeat the process until you’ve added all the possible answers, and hit the ‘Save’ button when you’re done.
Now, you’ll see your first question in the Live Questions Editor.
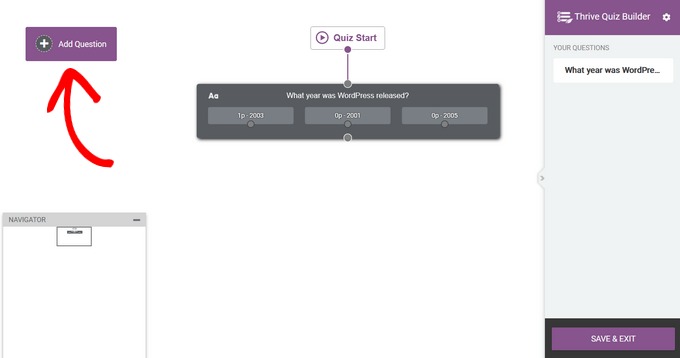
To add another question, simply click ‘Add Question’ again and repeat the process.
Once you’ve added all of your questions and answers, your quiz will look something like this in the Live Questions Editor:
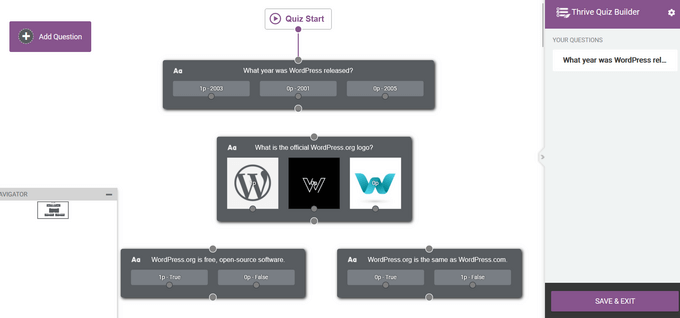
If you want to rearrange your questions, then simply drag and drop them into place.
Now, you need to create the flow of your quiz by connecting the questions together.
For example, to build a simple quiz that flows from one question to the next, click on the little circle in the middle of a question while holding the left mouse button. Then, drag and drop it onto the circle at the top of the next question.
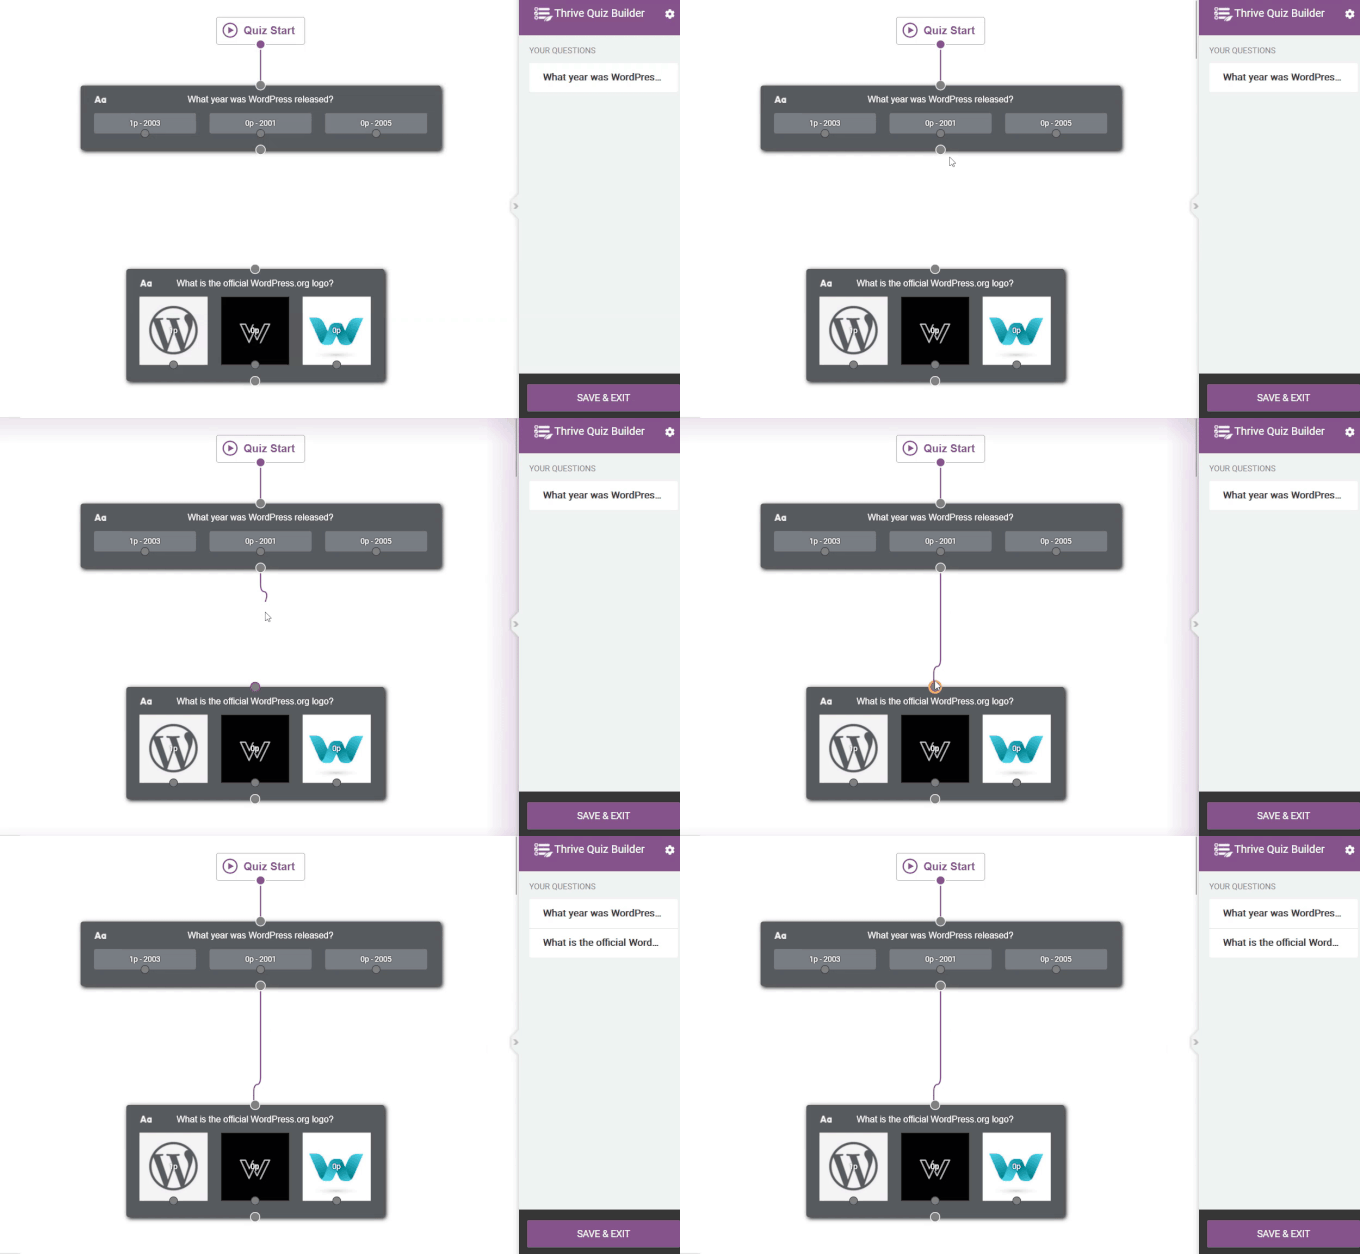
You can also create a more advanced flow for your quiz. For example, you might build a conditional quiz that displays questions based on the user’s previous answers.
To do that, click on the circle in an answer and drop it onto the circle at the top of a question.
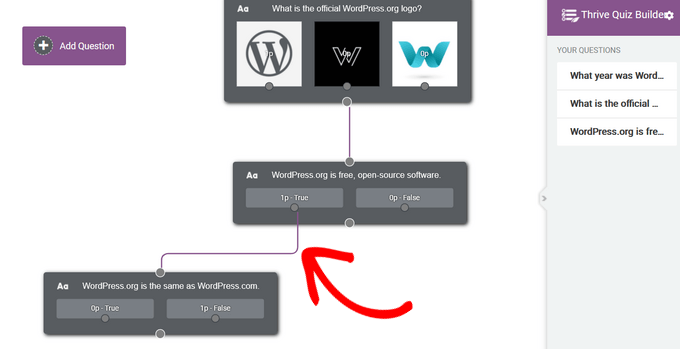
In the image above, we are only showing the next question to users who have answered ‘True.’
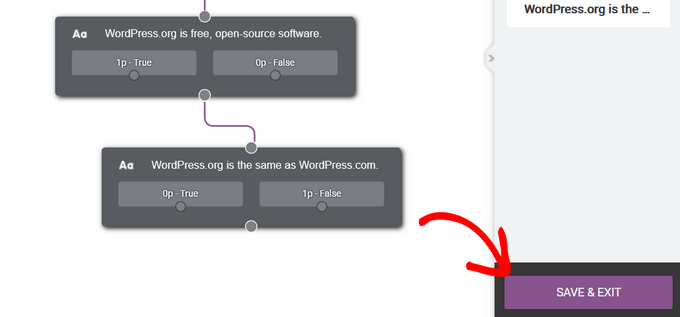
When you are happy with how your questions are configured, click the ‘Save & Exit’ button to leave the Live Questions Editor.
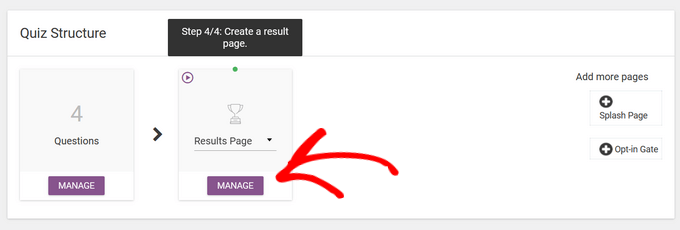
Next, you’ll be directed to the final step, which is creating a results page for your quiz.
Thrive’s quiz templates include ready-made results pages, so you don’t have to do much work here. However, if you want to adjust your results page, then click on the ‘Manage’ button under the ‘Result Page’ section to get started.
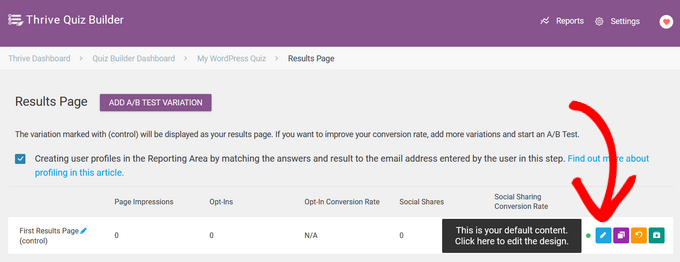
On the next page, click on the ‘Edit’ button (blue pencil icon) to edit the results page.
This will open up the Thrive Quiz Builder page.
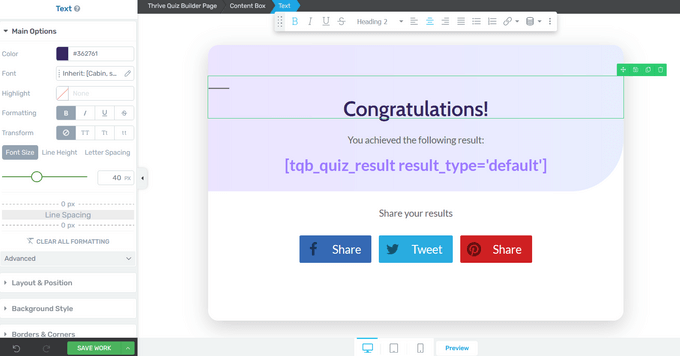
Here, you can click on any element to change the color, font, layout, background, and more.
When you are finished, don’t forget to click on the ‘Save Work’ button.
Step 3: Optimize Your Thrive Quiz
That’s all you need to create a simple quiz. However, Thrive Quiz Builder has a few extra features that can improve your quiz.
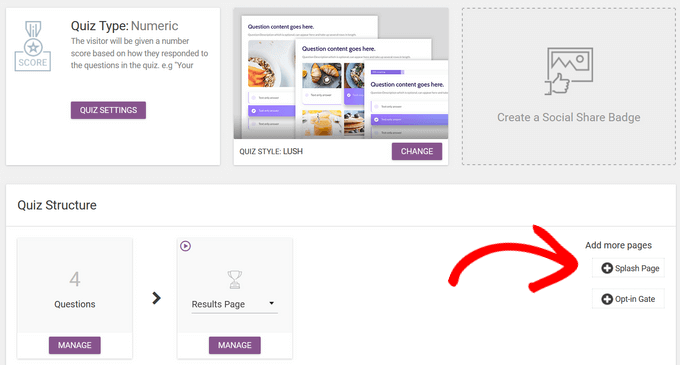
For example, you can add a splash page, which is an introductory page that encourages users to take your quiz.

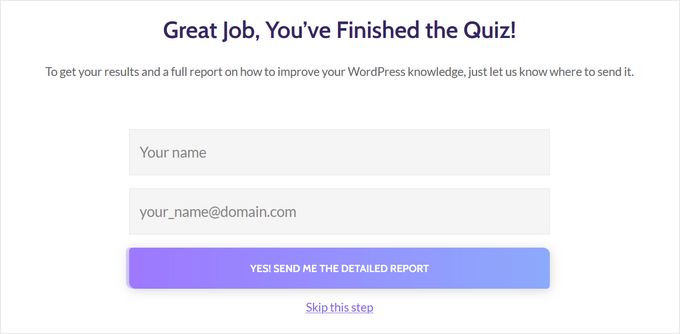
You can also add an opt-in gate, which will appear after a user has finished the quiz.
Users will need to provide their email addresses in order to get their results, which is perfect for building an email list.
To add these pages, simply click on them in the Thrive Quiz Builder dashboard.
They’ll be added to your quiz automatically.
When you are finished creating your quiz, it’s time to add it to your WordPress site.
Step 4: Display the Quiz on Your WordPress Website
You can easily display your quiz on any page, post, or widget-ready area of your WordPress website using shortcode. For this guide, we will add the quiz to a page, but the steps are similar when adding a quiz to the other areas in WordPress.
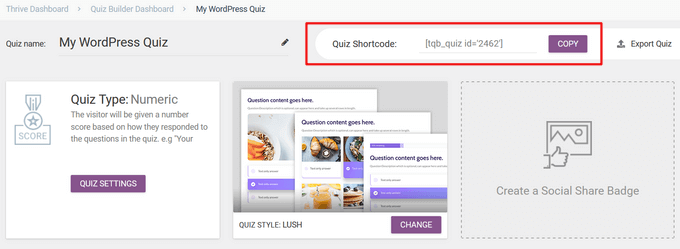
To get started, copy the quiz shortcode from the top of the Thrive Quiz Builder dashboard.
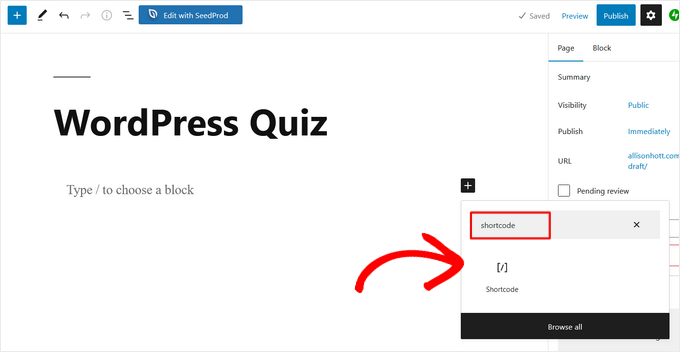
Next, go to Pages » Add New from your WordPress admin dashboard. When you are inside the WordPress content editor, click on the ‘+’ button to add a new block.
In the popup that appears, type ‘shortcode’ to find the ‘Shortcode’ block, and click on it to add it to your post.
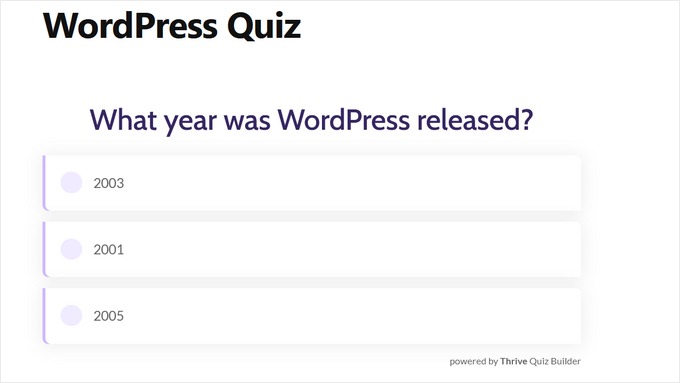
Then, paste the quiz shortcode you copied earlier into the Shortcode block. When you’re finished, simply publish or update the page.
Now, your quiz will be live on your website.
Method 2: Creating a WordPress Quiz Using a Form Builder
If you want to add quizzes and forms to your website, then you may want to use Formidable Forms instead. It is one of the best WordPress form builder plugins on the market and allows you to create both forms and advanced quizzes using a simple drag-and-drop builder.
This means that once it’s set up on your website, you can use it to create surveys, quizzes, contact forms, registration forms, booking forms, calculator forms, and more.
Here’s how to create a quiz in WordPress using Formidable Forms.
Step 1: Install the Formidable Forms and Quiz Maker Addon
To create a quiz, you’ll need to use the Formidable Forms Business plan, as it includes the Quiz Maker addon.
The first thing you need to do is install and activate the Formidable Forms plugin. For detailed instructions, see our guide on how to install a WordPress plugin.
Upon activation, you’ll also need to install Formidable Forms Lite. This free plugin provides the core foundation for the premium plugin’s more advanced features.
Once you’ve done that, go to the Formidable Forms » Global Settings page in your dashboard and select ‘Click to enter a license key manually.’
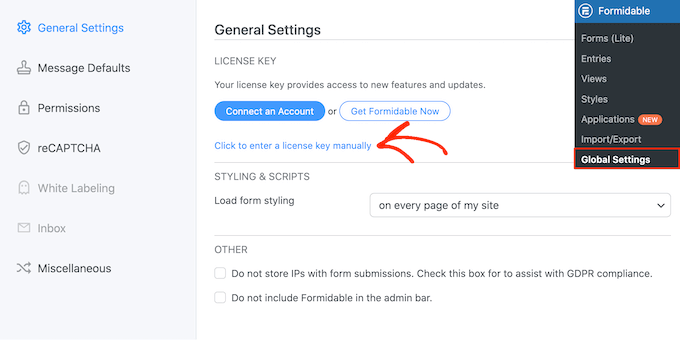
You can find the license key under your account on the Formidable Forms website. After entering this information, go ahead and click the ‘Save License’ button.
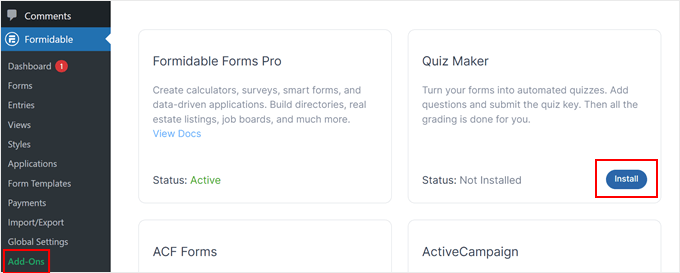
Next, you’ll need to install the Quiz Maker addon by going to Formidable » Add-Ons. On this screen, find Quiz Maker and click on its ‘Install’ button. After a few moments, Formidable Forms will mark the Quiz addon as ‘Active.’
Step 2: Create a WordPress Quiz With Formidable Quiz Maker
Now you’ve installed the Formidable Forms Quiz Maker, you are ready to create your first WordPress quiz.
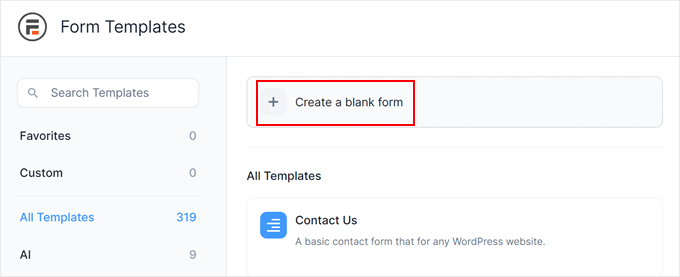
To get started, go to Formidable » Forms and then click the ‘Add New’ button.

This opens a popup showing all the plugin’s ready-made templates, including templates that you can use to create a mortgage calculator and a booking form.
In this guide, we will be starting from scratch, so click on ‘Blank Form.’
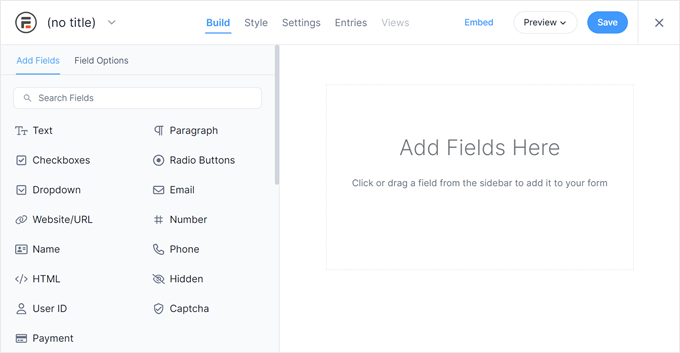
This will open the template in the Formidable Forms editor.
To the right is a live preview, and on the left-hand side is a menu with all the fields you can drag and drop into your quiz.
Quizzes can help you do lots of different things, including getting customer feedback, performing market research on your WordPress blog, testing knowledge, and more.
You may need different types of fields depending on the kind of quiz you’re creating. As an example, we will show you how to create a simple quiz that tests a student’s knowledge. We will be creating different kinds of questions, including multiple choice.
To add a field to your quiz, simply drag it from the left-hand menu and then drop it onto the live preview. Let’s start by adding a ‘Text’ field.
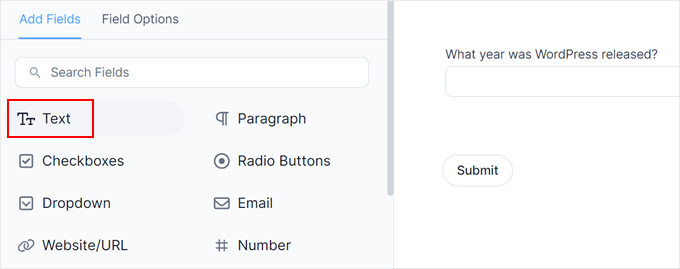
After that, click to select your new ‘Text’ field in the live editor.
You can then go ahead and type your question into the ‘Field Label.’
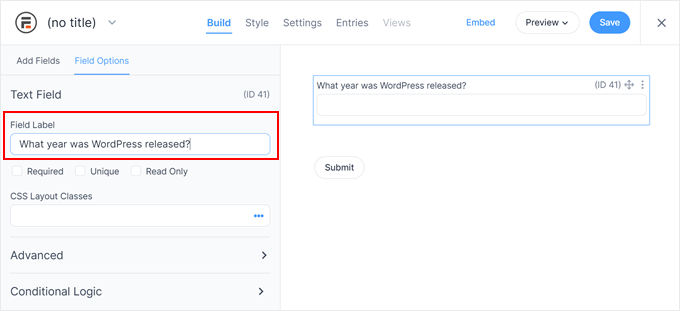
Next, we are going to create a multiple-choice question.
Simply drag a ‘Dropdown’ field onto the form.
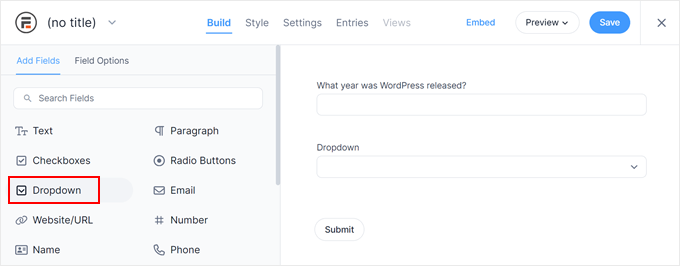
Once again, click the ‘Dropdown’ field in the preview to the right and then type your question into the ‘Field Label.’
You can now type the possible answers into the ‘Dropdown Options’ section.
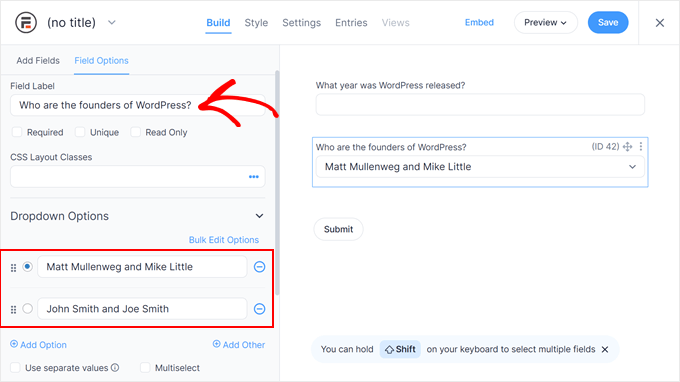
To add more answers to your multiple-choice question, simply click on the ‘Add Option’ button. You can repeat these steps to add more questions to your quiz.
When you are happy with how the quiz looks, click on ‘Save’ to store your changes.
Then, you will be prompted to name your form. This can be anything you want so long as it helps you identify the form later. Once done, just click ‘Save.’
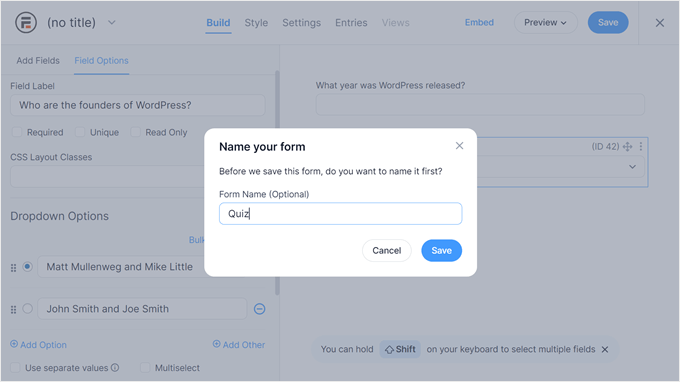
If you switch to the ‘Styles’ tab, you will see some pre-made design options you can use for the quiz.
Feel free to try each one to see which one suits your website’s design the best.
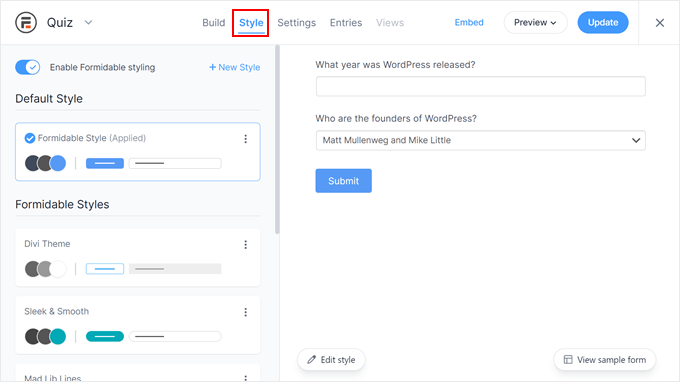
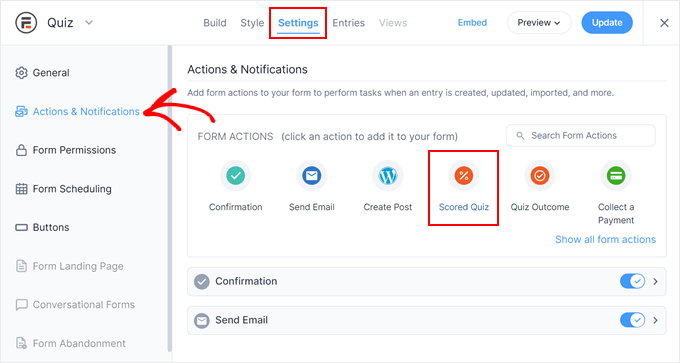
Now it’s time to configure the correct answers and show the user’s score by selecting the ‘Settings’ tab.
In the left-hand menu, choose ‘Actions & Notifications’ and then click on ‘Scored quiz.’
If you scroll to the new ‘Scored Quiz’ section, then you’ll see that this action already has some default settings.
Formidable Forms can randomize the questions and answers, which will make it more difficult for people to cheat.
By default, these settings are disabled, but you may want to enable them by clicking on the ‘Randomize questions’ and ‘Randomize options’ toggles.
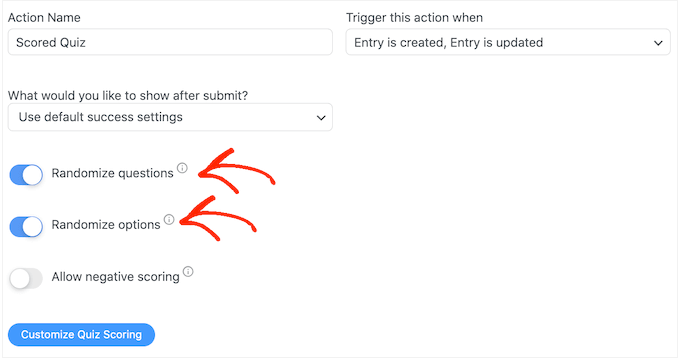
Formidable Forms awards one point for every right answer. However, if you enable advanced scoring, then you can take points away for wrong answers.
We will be covering advanced scoring shortly, but if you plan to deduct points, then you can click to activate the ‘Allow negative scoring’ toggle.

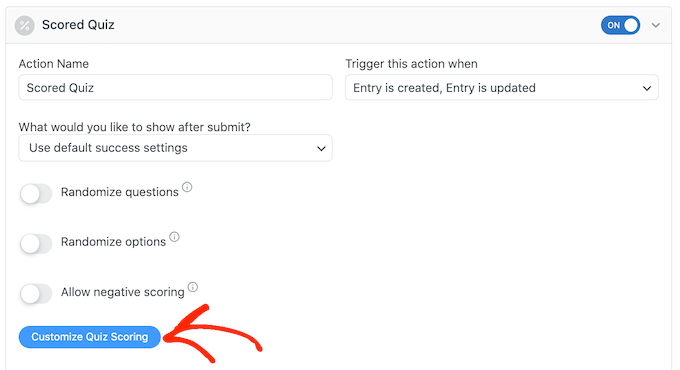
Next, let’s set the correct answers so that Formidable Forms can score visitors automatically.
To do this, go ahead and click on the ‘Customize Quiz Scoring’ button.
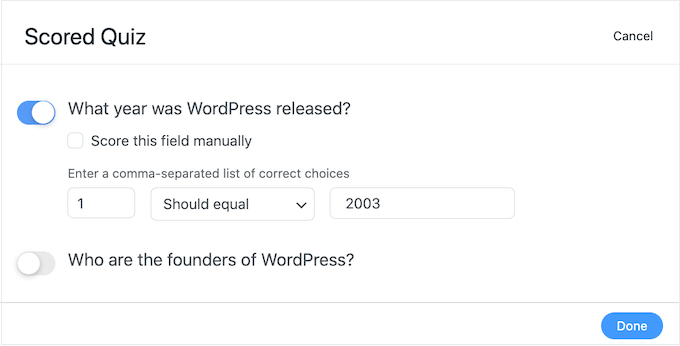
To set the correct answer, simply click on the toggle next to a question.
For text questions, you can simply type the correct answer into the field. You can also use the dropdown to specify whether the user’s answer should include this exact text, some of the text, or none of the text.
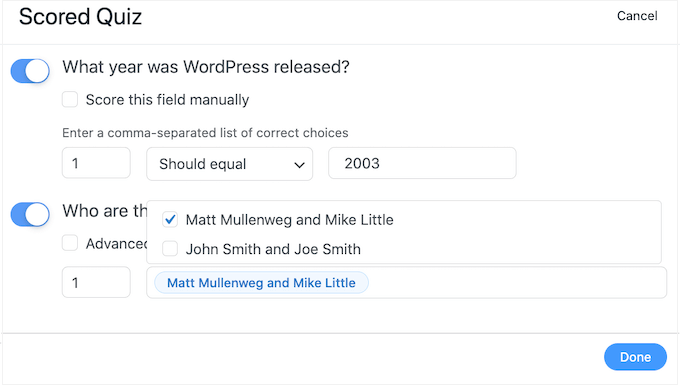
For multiple-choice questions, click on ‘Add Correct Answers’ to open a menu showing all the possible options.
You can now check the box next to each correct answer.
By default, each correct answer is worth 1 point. To award more points, simply type a different number into the ‘Max score’ box.
Sometimes, you may want to assign a unique score to the different answers in a multiple-choice question. To do this, check the box next to ‘Advanced scoring’ and then type in the score for each answer.
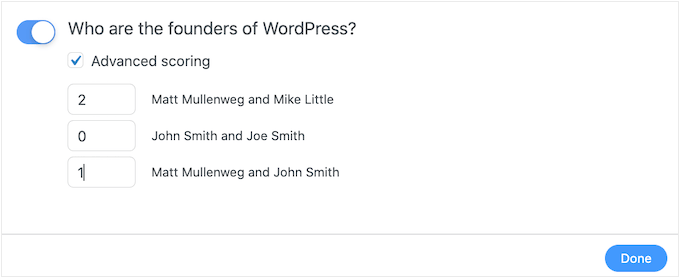
Once you’ve set all the correct answers, click on ‘Done’ to save your changes.
After that, you can set the action that Formidable Forms will perform every time someone submits a quiz. Simply open the following dropdown to see the different options: ‘What would you like to show after submit?’
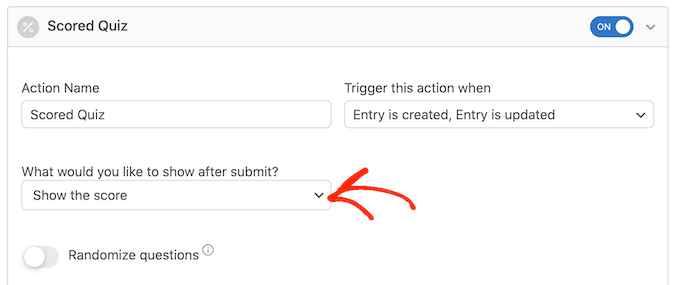
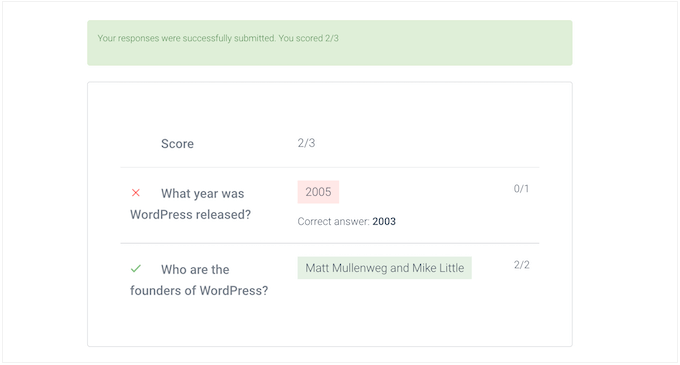
If you choose ‘Show the score,’ then Formidable Forms will display a standard message with the visitor’s score.
You can see an example of this in the following image.

If you select ‘Show user’s answers,’ then Formidable Forms will show the user’s score plus their answers.
This can help reinforce learning by encouraging visitors to review their answers and think about which ones might be wrong.

There is also ‘Show correct answers,’ which shows which questions the user got right.
If they get a question wrong, then Formidable Forms will show the right answer. This can help students learn from their mistakes.
However, if learners are free to retake the quiz, then this option could lead to cheating.
The final choice is ‘Use default success settings,’ which shows a message that reads, ‘Your responses were successfully submitted. Thank you!’
If you do choose this option, then you’ll typically want to change the message to include the user’s score. To do this, click to expand the ‘Confirmation’ section.
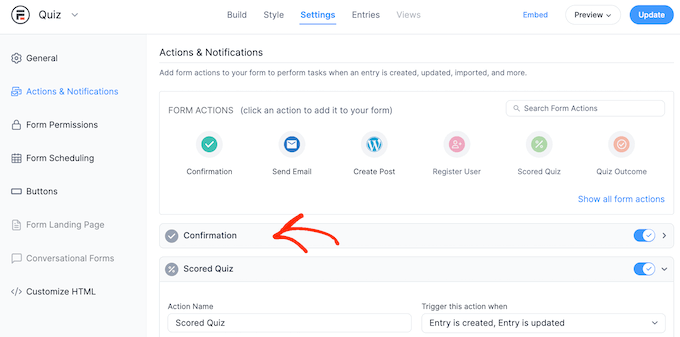
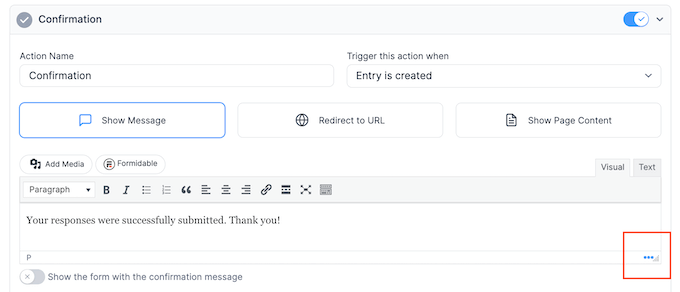
You can now change the message in the small text editor.
To show the user’s score, you’ll need to use a key, which is a placeholder that Formidable Forms will update with the user’s score. To get this key, click on the dotted icon in the bottom right corner of the text editor.
In the popup that appears, make sure the ‘Fields’ tab is selected.
You can then find ‘Score’ and give it a click.
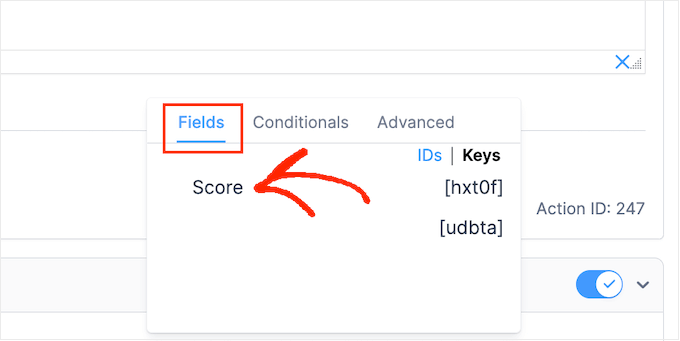
Formidable Forms will now add the key for the user’s score to the text editor.
You can now add any extra text you want to use. For example, you might type in: ‘Your responses were successfully submitted. You scored [hxt0f].’ Formidable Forms will then automatically replace [hxt0f] with the user’s score.
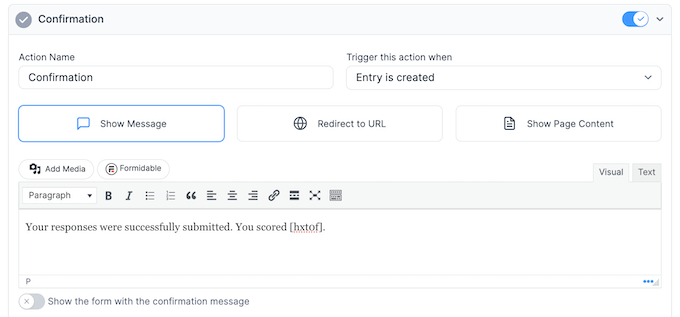
After that, click the ‘Update’ button to store your changes. You’ve now successfully created your first quiz.
Step 3: Adding Your Quiz to Your WordPress Site
You can now add your quiz to any post, page, or widget-ready area of your WordPress theme. In our example, we will add the quiz to a page, but the steps will be similar when adding the quiz to other areas of your WordPress site.
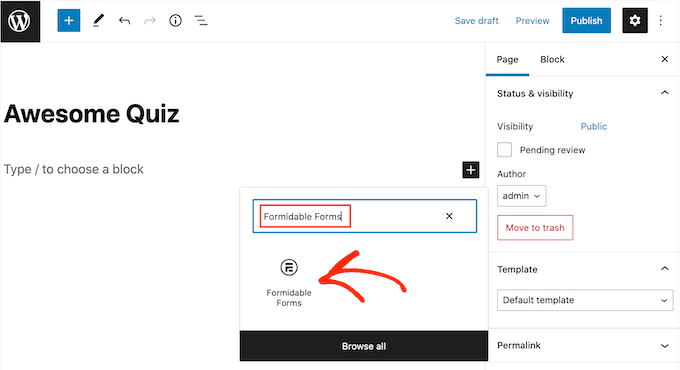
To start, go to Pages » Add New in your WordPress admin area. Once inside the content editor, click on the ‘+’ button to add a new block.
In the popup that appears, type ‘Formidable Forms’ to find the right block, and then click to add it to the post.
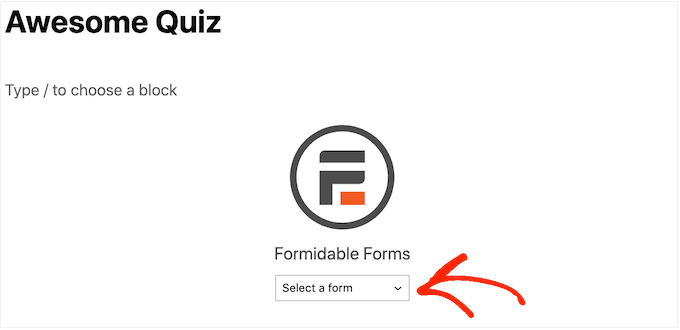
After that, simply open the ‘Select a form’ dropdown.
Then, choose the quiz you’ve just created, and WordPress will load the quiz automatically.
Now, you can add any other content to the page, including any categories and tags or customized permalinks that you want to use.
When you are ready, either publish or update the page. Your WordPress quiz is now live, and users can start answering questions.
Want to make a website with just quizzes? Check out our guide on how to make an online quiz website for step-by-step instructions.
We hope this article helped you add a quiz to your WordPress site. You may also want to see our guide on how to run a giveaway in WordPress and our expert pick of the best LMS plugins.
If you liked this article, then please subscribe to our YouTube Channel for WordPress video tutorials. You can also find us on Twitter and Facebook.


Syed Balkhi says
Hey WPBeginner readers,
Did you know you can win exciting prizes by commenting on WPBeginner?
Every month, our top blog commenters will win HUGE rewards, including premium WordPress plugin licenses and cash prizes.
You can get more details about the contest from here.
Start sharing your thoughts below to stand a chance to win!
Jiří Vaněk says
I have a somewhat less specific question. I’ve found that things like FAQs have been quite helpful for my SEO. Since I started placing FAQs at the end of articles, I’ve been better indexed, and it’s not just a feeling; I can see it in GSC as well. Could incorporating quizzes into tutorials also help with indexability? I have tutorials on my website, and at the end of them, I include quizzes for readers to test their understanding of the given topic. However, I’m not sure if this could also aid in indexability and SEO, such as being a better form of content and so on.
WPBeginner Support says
We have not tested quizes and their effect on SEO for sites at the moment.
Admin
Jiří Vaněk says
Thank you for answer. What I’ve been looking at is that I’m creating separate sitemaps for quizzes in the google search console, and some of them are actually indexed. In other words, it probably improves SEO anyway, although, like you, I haven’t verified it yet.
Dennis Muthomi says
I can rant here:
quizzes may not directly impact SEO, but they can indirectly contribute to better rankings through increased user engagement signals.
When users actively interact with the quizzes on your website, it sends positive user engagement signals to Google that your content is valuable and engaging.
You know how Google values user engagement metrics, so if visitors are spending more time on your pages due to the interactive quizzes, it can be seen as a sign of quality content.
Plus, quizzes help reduce bounce rates as users stick around longer to complete them. So while quizzes may not directly improve rankings, the increased engagement and lower bounce rates resulting from their implementation can give your SEO a nudge in the right direction.
Rhys Morgan says
Is it better to give each quiz a page or do them in a post format ? |s there any seo benefit for example?
WPBeginner Support says
There is no SEO difference with either method, you may want to use posts so you can use categories to group them but it is not required.
Admin
Gabriella says
Hi! Nice article. Thanks. Could you post some example/sample sites/blogs using quizzes, please? Stay safe
WPBeginner Support says
We will be sure to take your suggestion into consideration when we next update this article
Admin
suresh says
can i create maths quiz too?
WPBeginner Support says
You certainly could use this to create a math quiz
Admin
Kunj Bihari says
Nice article
WPBeginner Support says
Thank you
Admin
Muhammad Muzammal says
This Article is amazing & Thanks!
WPBeginner Support says
Thank you and you’re welcome
Admin
Wiggles says
Is there a way to span the quiz questions over several posts/pages? If not with these plugins then is anybody aware of a plugin which allows that?
Anindra says
Hi, how do I find who answered all questions correctly and first?
Pranoy Kumar Mahato says
Do I post articles and quizzes in a single website.
Or shall I use sub-domain for the quizzes. Which would be better for long term?
Martha says
Can I create a quiz to be used as an opt in
Ghouse basha says
Hello admin,thanks for the share.I have tried quiz master next in my genesis theme and don’t know why there is some grey border line appears below each and every option.DO it fits genesis theme?
Rishikesh says
If you know html CSS then you can easily change your code or that border line from the root dir