Running a giveaway in WordPress can be a game-changer for your website’s growth and engagement.
Whether you’re aiming to expand your email list, boost your social media following, or simply reward loyal readers, a well-executed contest can help you achieve these goals.
At WPBeginner, we’ve mastered the art of WordPress giveaways over the past decade. Our most successful contest attracted over 20,000 participants, and we’ve distilled these experiences into actionable advice that’s helped thousands of our readers.
In this guide, we’ll walk you through the process of running a giveaway in WordPress, step by step.

Why Run a Giveaway or Contest in WordPress?
Running a giveaway is an excellent way to get more email subscribers, increase website traffic, and boost sales.
Think about it. People love being able to win a prize for free. If you can create a giveaway or competition with simple entry requirements and an attractive prize, they’d be more than happy to join.
If you run a WooCommerce store, then you can create a contest to boost customer loyalty and engagement. Customers who haven’t made a purchase will return to your eCommerce site and, in turn, increase your business’s sales.
With that in mind, let’s look at how to run a successful giveaway or contest on your WordPress website. You can use these quick links to go through the steps:
- Step 1: Plan Your Giveaway Campaign
- Step 2: Install RafflePress and Create a Giveaway
- Step 3: Add Your Giveaway Prize Details
- Step 4: Add Your Contest or Giveaway Actions
- Step 5: Customize How the Giveaway Looks
- Step 6: Adjust the Giveaway / Contest Settings
- Step 7: Add the Giveaway to Your Website
- Step 8: Promote Your Giveaway / Contest
- Step 9: Announce the Giveaway Winners
Step 1: Plan Your Giveaway Campaign
Before you start, you need to decide what you want to achieve with your giveaway. For example, you might want to raise brand awareness, promote an event, get more visitors, or make more sales in your online store.
By setting a clear goal, you can design every part of the contest to help you reach that target.
You also need to choose a suitable prize that will motivate your target audience to take part in the contest. The prize doesn’t have to be expensive, but it should reflect your business niche and your customers.
For example, if you run a dropshipping business, then you may want to offer a t-shirt or mug with your brand name on it.
If you run a restaurant website, then a discounted or free meal coupon could be a great prize.
You can also offer multiple prizes to give people a better chance of winning. This will make your competition more exciting and encourage more people to enter.
Once you have planned your giveaway, it’s time to set it all up in WordPress.
Step 2: Install RafflePress and Create a Giveaway
In our early experience, WordPress didn’t have many reliable contest plugins. The few third-party services that existed were either too buggy or simply too expensive.
This changed with RafflePress. It is the best WordPress giveaway plugin on the market, and it allows you to easily run giveaways on your WordPress website.
RafflePress comes with integrations for all popular social platforms, including Facebook, Twitter, and Instagram. This way, you can use social media contests to grow your site.
To learn more about RafflePress, read our full RafflePress review.
With that said, let’s set up your first WordPress contest or giveaway.
First, you will need to install and activate the RafflePress plugin. For more details, see our step-by-step guide on how to install a WordPress plugin.
Note: While there is a free version of RafflePress, we will be using the premium version since it has more entry methods, integrates with all of the best email marketing services, and much more.
Upon activation, you’ll see the RafflePress welcome screen in the WordPress dashboard.
You can now go ahead and enter your license key.
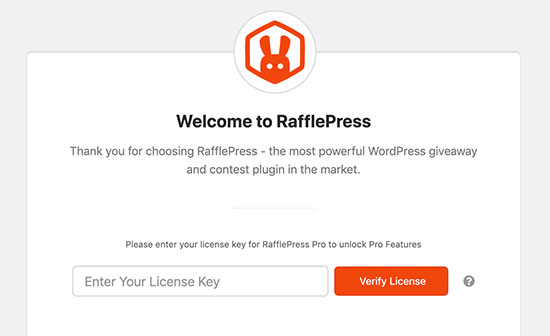
You’ll find this information in your account on the RafflePress website. Once you’ve done that, click on the ‘Verify Key’ button.
After that, you are ready to create your first giveaway by going to RafflePress » Add New.
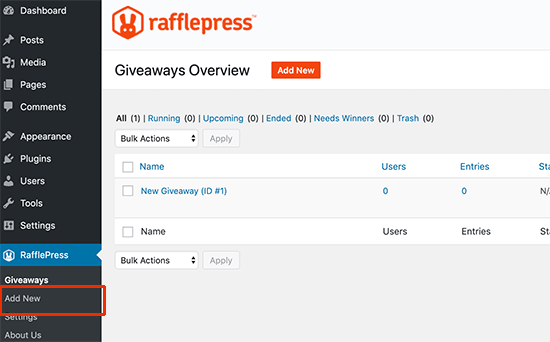
This will launch the RafflePress giveaway builder.
First, you need to type in a name for your new giveaway campaign. This is just for your reference, so you can use anything you want.
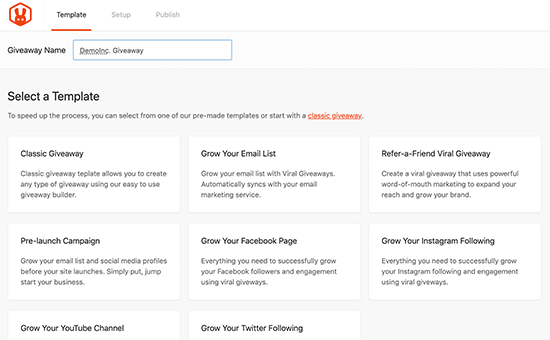
Next, choose the template that you want to use. RafflePress has ready-made templates for specific goals, such as growing your email list or creating a viral refer-a-friend giveaway.
You can choose the template that best suits your goals. In this case, we will be using the Classic Giveaway template, as it lets us start from scratch.
Simply hover your mouse over a template and then click on the ‘Use this Template’ button when it appears.
RafflePress will now load the template in the builder.
Step 3: Add Your Giveaway Prize Details
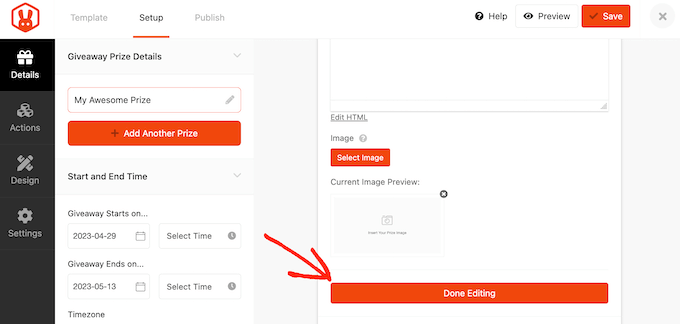
First, you need to let visitors know what they could win. To do this, click on the headline, which shows ‘My Awesome Prize’ by default.
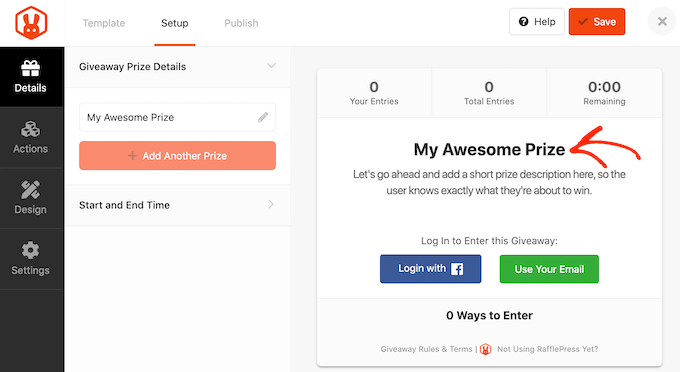
You can then go ahead and type some information about your prize into the ‘Name’ and ‘Description’ fields.
To encourage visitors to enter your competition, it’s a good idea to give them as much information as possible, such as how much the prize is worth and what it has to offer.
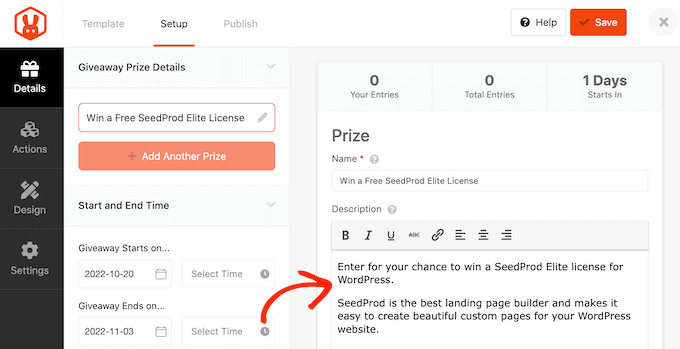
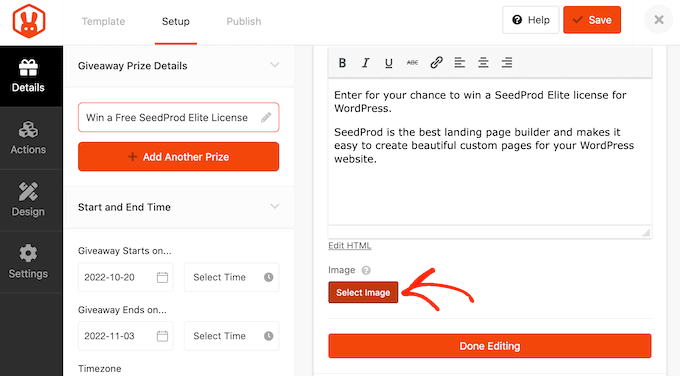
You might also add a photo of the prize so visitors can see what’s at stake. Even simply adding the product’s logo can make the competition more eye-catching.
To do this, simply click on ‘Select Image’ and then either add an image from the WordPress media library or upload a new file from your computer.
Next, you need to choose the start and end dates for your contest.
If you plan to run lots of giveaways on your site, then this allows you to schedule them in advance. It also guarantees that your contests will start and end on time, no matter how busy you get.
Whenever possible, we recommend leaving enough time before the start date so you can promote the giveaway properly.
For example, you might promote it using web push notifications or by sending SMS messages to your users. This helps build a sense of excitement and anticipation before the contest goes live.
To schedule the giveaway, simply enter a date and time into the ‘Giveaway starts…’ and ‘Giveaway ends…’ sections.
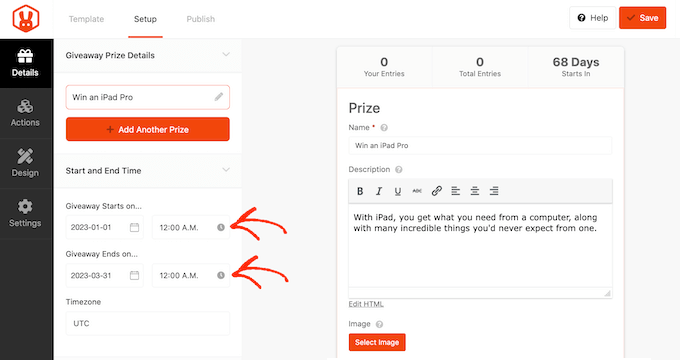
You’ll also want to check the ‘Timezone’ dropdown. By default, RafflePress uses the timezone in your WordPress website settings, but you can change this to anything you want.
When you are happy with the information you’ve entered, click on ‘Done Editing.’
Step 4: Add Your Contest or Giveaway Actions
Giveaway actions are the ways that users can participate in the contest, such as subscribing to your podcast or sharing a post on social media. RafflePress comes with lots of different actions that you can add to your campaign.
You need to choose the actions that will help you achieve your campaign goal. For example, if you want to increase your blog traffic, then you might use ‘Share on Facebook’ or ‘Visit a Page’ as your actions.
To see all the actions you can add, simply click on the ‘Actions’ tab in the left-hand menu.
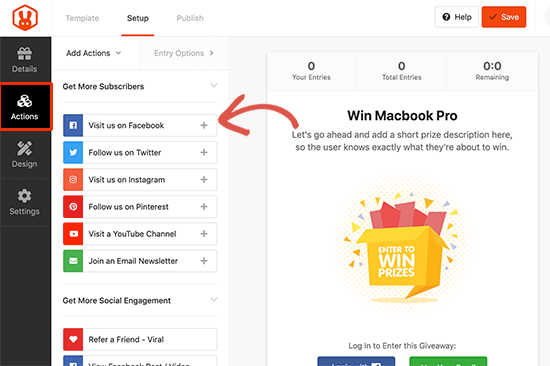
To add an action to your campaign, just give it a click. The action will now appear below your prize details.
You can then configure the action using the Entry Options settings in the left-hand menu.
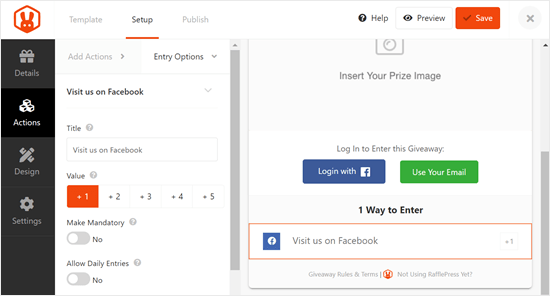
Each action has some basic settings. You can type in a title, which will be shown to your visitors, and make the action mandatory so that visitors must complete the action to enter your contest.
This is useful if you plan to offer multiple entry methods but want to ensure visitors perform one task over all the others.
By default, every action is worth one entry, but you can change this to make certain actions more valuable than others. Again, this will encourage visitors to complete a particular action, even if they have a choice of entry methods.
Apart from these options, you will also see settings related to specific actions. For example, if you want to create a Facebook giveaway to boost engagement, then you’ll need to enter your Facebook page’s URL.
Once you’ve filled in these settings, you can click on the ‘Add Actions’ tab and add more entry methods to your competition.
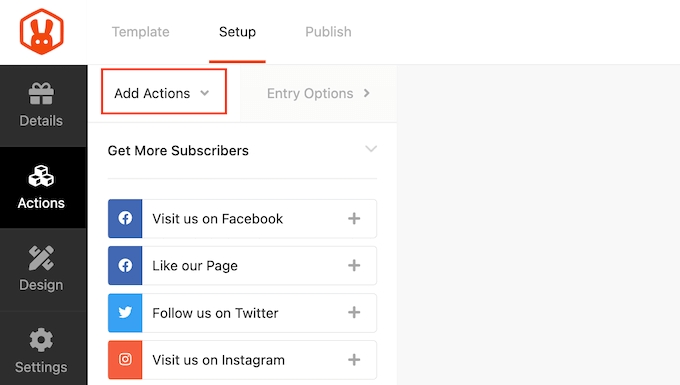
You can add as many actions as you like. Giving visitors multiple ways to participate can get you more entries.
There may also be some people who complete all the actions to give themselves the best possible chance of winning. In this way, you can achieve multiple goals with a single giveaway.
However, we recommend prioritizing actions based on your campaign goals. For example, if you want to do lead generation, then it’s a good idea to put ‘Join an Email Newsletter’ at the top of the ‘Entry Methods’ list.
Simply hover over the action in the editor and then grab the dotted button that appears to the left of the action. Then, move the entry method using drag and drop.
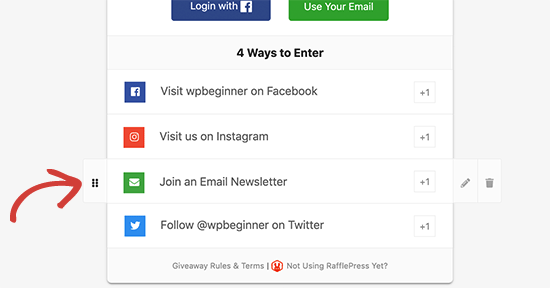
When you are happy with how the giveaway is set up, don’t forget to click on ‘Save’ to store your changes.
Step 5: Customize How the Giveaway Looks
Now your giveaway is set up, it’s time to change how it looks by selecting the ‘Design’ tab.
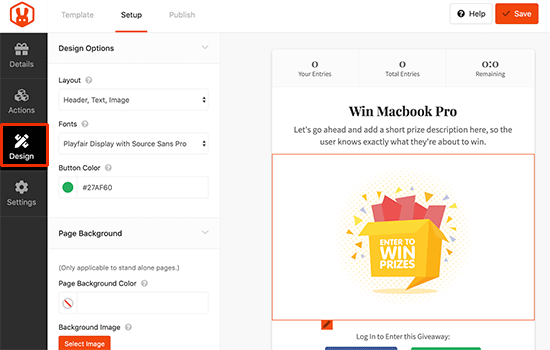
Here, you can change the fonts, select a new button color, change the background color, and more. You can even customize the giveaway template using custom CSS.
RafflePress will show a live preview of the giveaway so you can try different settings to see what looks the best.
When you are happy with how the contest looks, don’t forget to click on the ‘Save’ button.
Step 6: Adjust the Giveaway / Contest Settings
RafflePress has lots of settings you can use for your giveaway, including showing and hiding options, setting up tracking, and more.
Let’s look at these options by selecting the ‘Settings’ tab.
In ‘General,’ you can set the basic options for your giveaway, including showing the contest’s winners, the total number of entries, limiting signups based on IP address, and more.
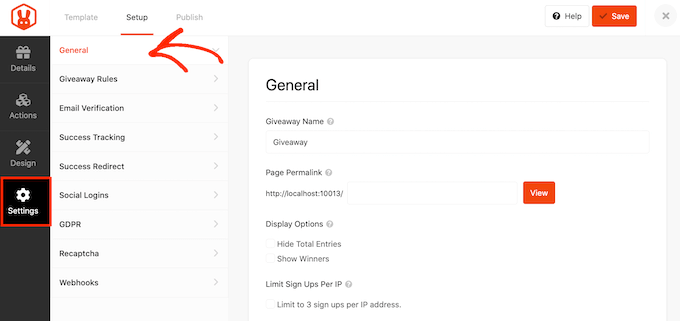
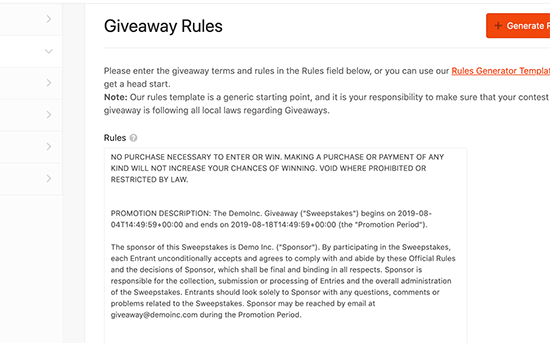
After making your changes, switch to the ‘Giveaway rules’ tab.
RafflePress comes with a Rules Generator that you can use to quickly and easily create giveaway rules for your campaign.
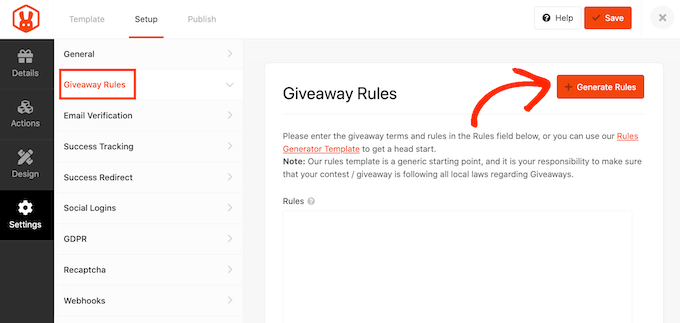
Clicking the ‘Generate Rules’ button will bring up a form where you can enter information about the giveaway.
In most cases, you or your company will be the contest’s sponsor. This means you’ll need to type in the company name, business email address, country, and eligible locations.
.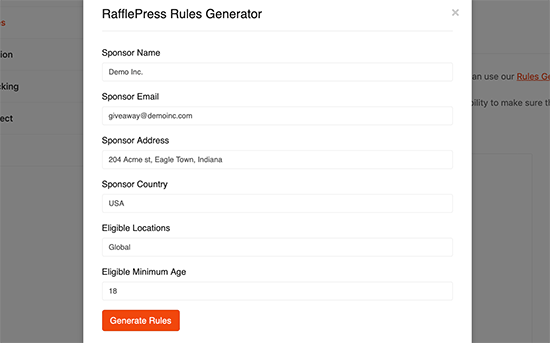
RafflePress will then use this information to create some basic giveaway guidelines and rules.
Just be aware that this is a starting point. You’ll still need to make sure your giveaway follows all local laws and guidelines.
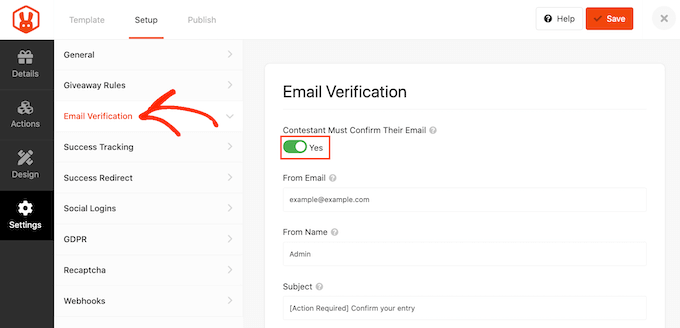
Next, switch to the ‘Email Verification’ tab.
If you’re using the contest to get more subscribers for your email newsletter or mailing list, then it’s a good idea to only accept entries from people who verify their email addresses.
To do this, simply click on the ‘Contest Must Confirm Their Email’ toggle so that it turns green.
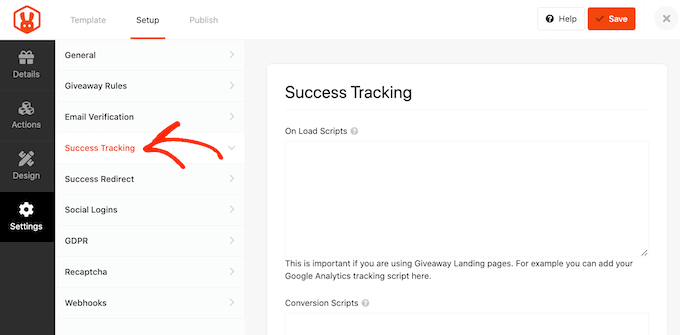
If you use Google Analytics to track user engagement, then you can select the ‘Success Tracking’ tab.
Here, you can add Google Analytics code so you can see exactly how people are interacting with your giveaway.
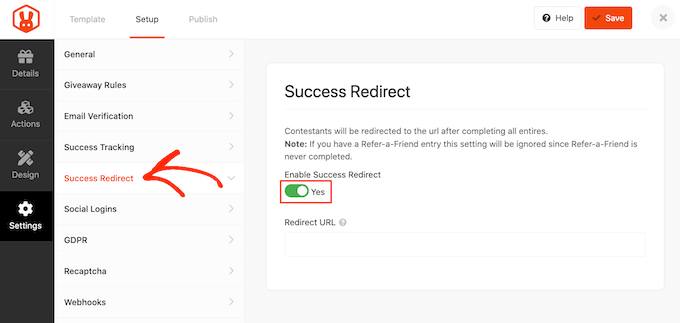
When a user submits an entry, it’s not the end of the process. You may want to redirect the participant to a specific page, such as a custom thank you page.
To set up a redirect, select the ‘Success Redirect’ tab and click to activate the ‘Enable Success Redirect’ toggle. You can then add the page to the ‘Redirect URL’ field.
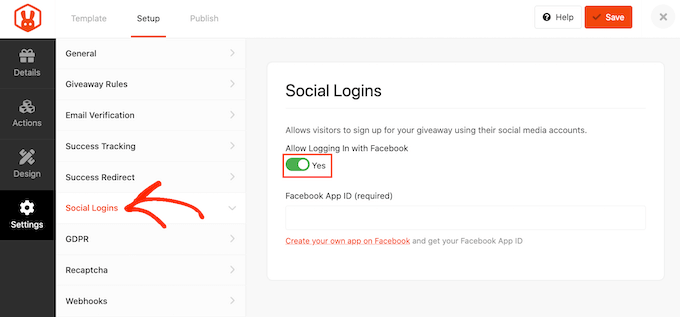
You may want to allow visitors to enter the giveaway using their Facebook account. This can get you more entries by making it easier to participate in your giveaway.
To allow logging in with Facebook, simply select the ‘Social Logins’ tab and then activate the ‘Allow logging…’ toggle.
The General Data Protection Regulation (GDPR) is a European Union (EU) law that aims to give EU citizens more control over their personal data. If you break a GDPR rule, then you could get a fine or even jail time.
Thankfully, RafflePress can help you comply with GDPR by asking for consent before each visitor enters your giveaway. To add this checkbox, simply select the ‘GDPR’ tab and then activate the ‘GDPR Consent’ toggle.
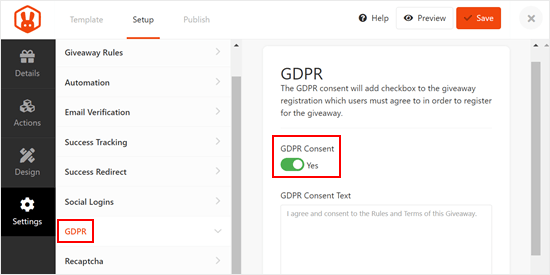
RafflePress has some default text that it will show to visitors, but you can change this if you want. For more on this topic, see our ultimate guide to WordPress and GDPR compliance.
Spam and fake entries can stop you from reaching your goals. With that in mind, you may want to protect your giveaway form using an invisible recaptcha.
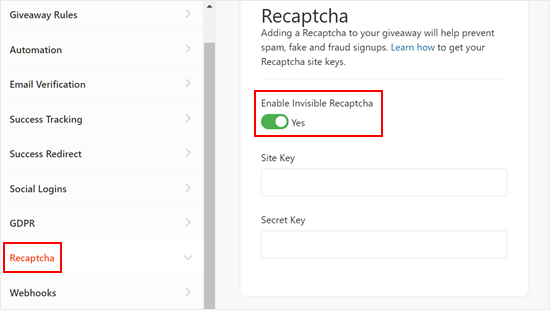
Unlike standard captchas that challenge visitors to complete a puzzle, invisible recaptchas run in the background. This allows them to block spam and bots without adding friction to the visitor experience.
To add an invisible recaptcha to your giveaway, select the ‘Recaptcha’ tab. Then, activate the ‘Enable Invisible Recaptcha’ toggle.
To learn more about how recaptcha works, please see our guide on how to add recaptcha to WordPress.
When you are happy with how your contest is set up, click on the ‘Save’ button.
Step 7: Add the Giveaway to Your Website
Now that your giveaway is ready, it’s time to publish it. You can either:
- Use the RafflePress block to embed the giveaway to a blog post or page.
- Use a shortcode to add the contest to any page, post, or widget-ready area.
- Create a giveaway landing page.
Let’s check out each of these methods.
Method 1: Using the RafflePress WordPress Block
To start, simply create a new post or page in WordPress or edit an existing one.
Then, in the block editor, click on the ‘+’ button and type in ‘RafflePress.’
When it appears, select the RafflePress block.
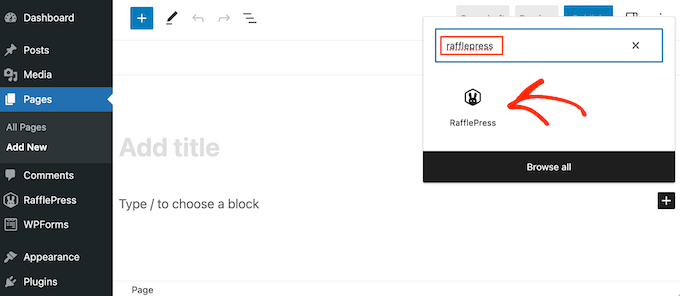
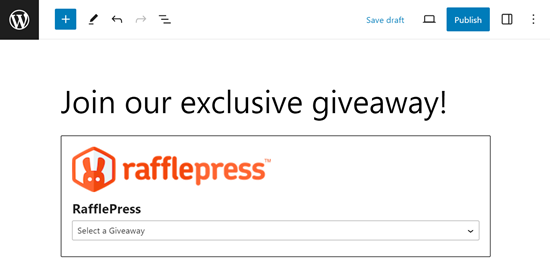
After adding the block, open the dropdown and choose the giveaway you created earlier.
You can then either click on ‘Publish’ or ‘Update’ to make the giveaway live on your WordPress blog.
Method 2: Using the RafflePress Shortcode
You can also add the contest to any page, post, or widget-ready area (like a sidebar) using a shortcode.
In the giveaway editor, go ahead and click on the ‘Publish’ tab. From here, click on ‘WordPress Shortcode’, and RafflePress will show the shortcode that you can use.
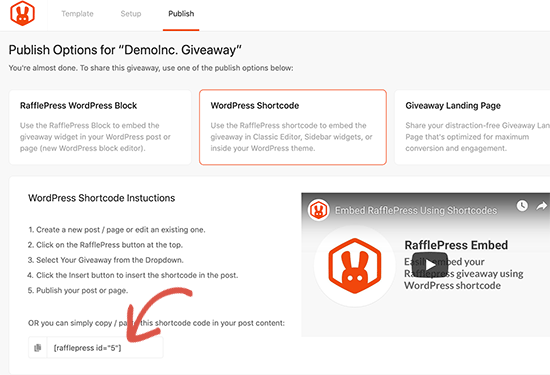
Simply copy the shortcode and then add it to your website. For more information on how to place the shortcode, please see our guide on how to add a shortcode in WordPress.
Method 3: Create a Giveaway Landing Page in WordPress
RafflePress also allows you to create a standalone giveaway landing page. This is perfect for sharing on social media or adding to your email newsletter.
In the giveaway editor, select the ‘Publish’ tab. Then, choose ‘Giveaway Landing Page’ and select the ‘Click here…’ link.
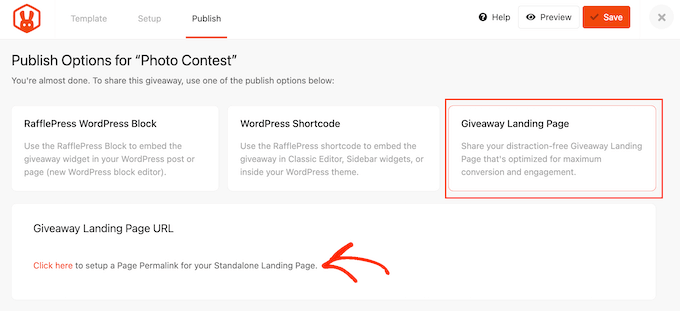
In ‘Page Permalink,’ type in the URL where you want to publish the page.
After that, go ahead and click on ‘View.’
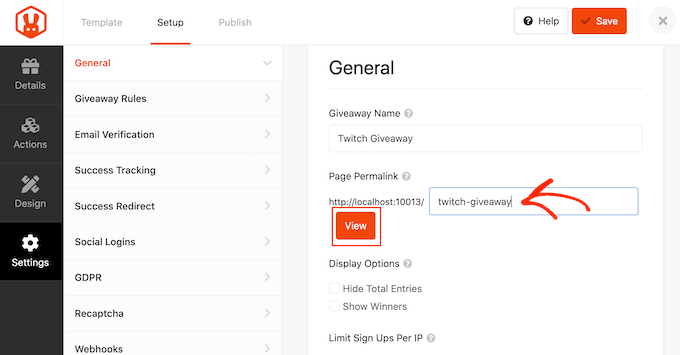
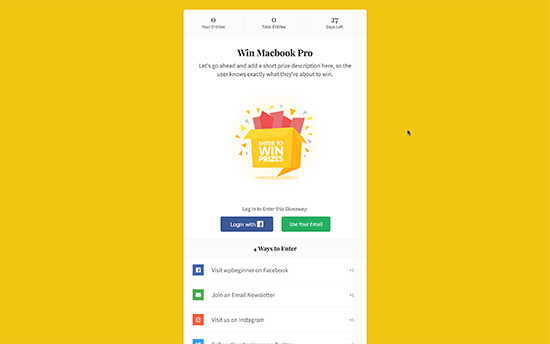
RafflePress will now publish your giveaway as a landing page.
If you visit the URL, then you’ll see the giveaway live.
Step 8: Promote Your Giveaway / Contest
After creating a giveaway, you’ll want to promote it so that more people can enter. Wherever possible, it’s smart to start promoting a contest before publishing it so you can spread the word and create a sense of excitement.
You can start by sending an email newsletter to your subscribers. You can even send out a series of newsletters: an initial announcement to generate buzz, a reminder as the deadline approaches, and a final “last chance” email just before the contest closes.
You can also announce the competition on your social media profiles. With a tool like ClickSocial, you can easily schedule social media posts well in advance.
Promoting the contest on relevant online communities and forums can be effective as well.
Another option is creating a floating bar with a link to the giveaway using a plugin such as OptinMonster.
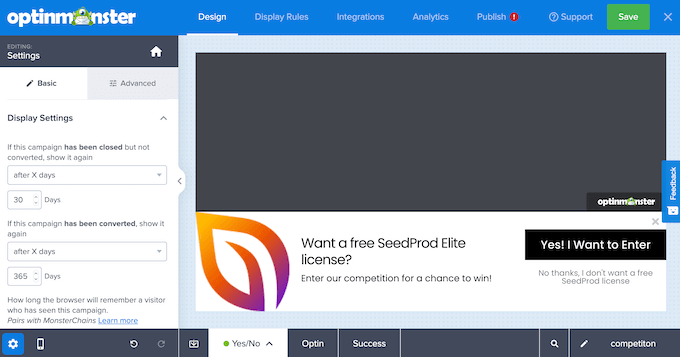
You might even create a sense of urgency by adding a countdown timer to the floating bar. In this way, you can use FOMO on your WordPress site to get more participants.
Sending web push notifications can also get you more participants. For example, you might ask your push notification subscribers to enter the giveaway or refer any friends or family members who might be interested in participating.
PushEngage is the best push notification tool on the market. It allows you to connect with visitors after they leave your website by sending them targeted push messages about your contest or giveaway.
PushEngage also has advanced features such as A/B testing, automatic drip campaigns, smart opt-in reminders, custom-triggered campaigns, interactive message options, and more.
Step 9: Announce the Giveaway Winners
Once your giveaway closes, you need to pick a lucky winner out of all the submissions.
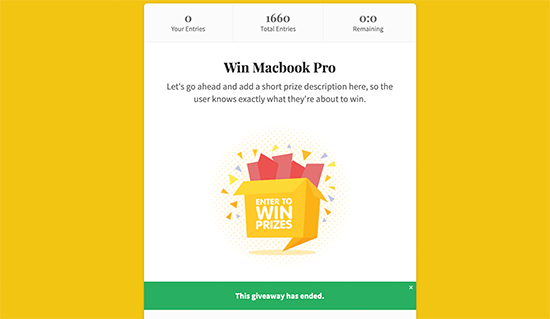
To choose a winner at random, simply head over to RafflePress » Giveaways in your WordPress dashboard.
If you didn’t schedule an end date for the contest, then you’ll need to hover over the giveaway and click on the ‘End Now’ link when it appears.
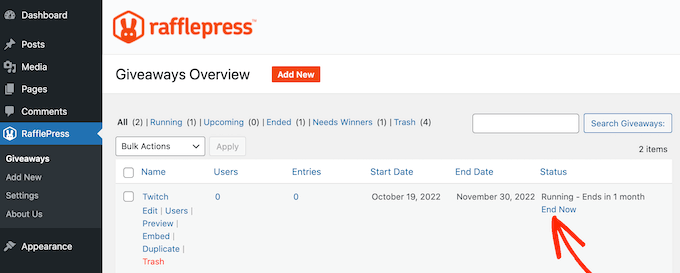
Then, click on ‘Needs Winners.’
On the following page, RafflePress will show all the people who entered your giveaway, along with how they entered, their total entries, and more.
Here, just type in the number of winners that you want to pick.
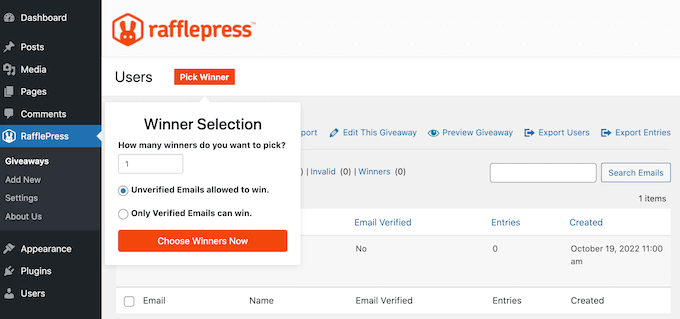
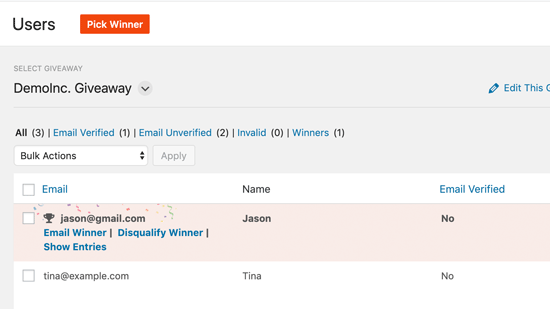
When you are ready, go ahead and click on the ‘Choose Winners Now’ button. RafflePress will then show the winner highlighted at the top of the list.
You can now send this person an email to let them know the good news.
That’s it! You have successfully created a giveaway in WordPress.
Learn More Ways to Boost Engagement on Your WordPress Site
After you’ve mastered running giveaways, you might want to explore other ways to boost engagement on your WordPress site. Here are some additional strategies we recommend:
- How to Do a Twitch Giveaway in WordPress (Step-by-Step) – Leverage the popularity of Twitch to run giveaways that engage your gaming audience or live stream viewers.
- How to Create a Viral TikTok Giveaway in WordPress – Tap into TikTok’s massive user base by creating a giveaway that encourages user-generated content and shares.
- How to Host a Virtual Event in WordPress – Engage your audience with online conferences, webinars, or workshops directly through your WordPress site.
- How to Embed Facebook Status Posts in WordPress – Increase social proof and encourage discussion by showcasing Facebook posts on your website.
- Quick Ways to Get More Facebook Likes Using WordPress – Implement these strategies to grow your Facebook following and increase engagement across platforms.
- How to Add Twitter Share and Retweet Button in WordPress – Make it easy for visitors to share your content on Twitter, expanding your reach and driving traffic back to your site.
We hope this article helped you learn how to easily create and run successful giveaways and contests in WordPress. You may also want to see our expert picks for the best URL shorteners for WordPress to track links and our guide on how to add click to tweet boxes in WordPress posts.
If you liked this article, then please subscribe to our YouTube Channel for WordPress video tutorials. You can also find us on Twitter and Facebook.


Jiří Vaněk
Contests are a fantastic way to inspire people to register and keep coming back to the website. I’ve always been fascinated by how you run your contests and the entire process behind the scenes. Everything is perfectly explained here. What I love most is the FOMO effect that a well-crafted contest creates, psychologically motivating people to achieve the best possible outcome to win. This is truly well-thought-out and perfect.
Chris
I’ll use this plugin to create giveaways when I eventually create a web site for my plugin. Right now I am trying to generate interest.
WPBeginner Support
Giveaways can be a good starting point for generating some interest as well
Admin
Dennis Muthomi
one major problem with contests is ensuring integrity.
whats the best way to ensure the integrity of the contest and prevent people from entering multiple times with different email addresses? It seems kind of unfair and unethical when some people try to game the system like that
Is there a way to prevent this, perhaps by restricting entries to one per person? Or could a plugin work alongside RafflePress to detect and block these shady practices? I’d appreciate any tips or suggestions you might have
WPBeginner Support
You are able to review the submissions to your giveaway to help check for any emails that may be suspicious for something like you are talking about. For other methods if you have a specific case then we would recommend reaching out to RafflePress and they can let you know what your options are
Admin
Dayo Olobayo
Great point! Transparency builds trust. I’ll advise you consider mentioning your anti-fraud measures in the contest description. Let people know you’ll verify emails and remove duplicates. This might discourage multiple entries and shows you’re committed to a fair contest.
John Graves
Does this application allow you to have a drawing monthly but with different prizes?
WPBeginner Support
You can set it up for different monthly drawings but the plugin would not automate the entire process if that is what you were wanting.
Admin
Lily
Does it display the winner on the page?
WPBeginner Support
Not at the moment as there are some local giveaway rules that may not allow this
Admin
Bishnu Mahali
Can I choose a winner based on the highest number of entries instead of choosing it randomly?
WPBeginner Support
You could certainly sort by the number of entries and choose the winner that way if you wanted.
Admin
Clayton Chase
Looks really cool. I’ve been looking for a good WordPress solution like this for a while!
WPBeginner Support
Thank you, we hope the plugin can help people looking for a good giveaway solution
Admin