Making your content shareable on Twitter isn’t just a nice-to-have. It’s a must these days. You’ve worked hard on your content, so why not make it easy for users to share it?
It’s not just about more eyeballs on your work. Twitter shares are also good SEO signals. Search engines see these shares as votes of confidence for your content.
That’s why we’re active on Twitter and make sure our content is easy to share. And if you want to do the same, we’ll show you 2 simple methods to add Twitter share and retweet buttons in WordPress.

Why Add Twitter Share and Retweet Buttons in WordPress?
According to our marketing statistics research, Twitter has over 217 million monthly active users. That makes it a great place to promote your website.
However, sharing your content on social media only reaches users who are already following your account. If you want to reach a new audience, then you need to get people to share and retweet your content.
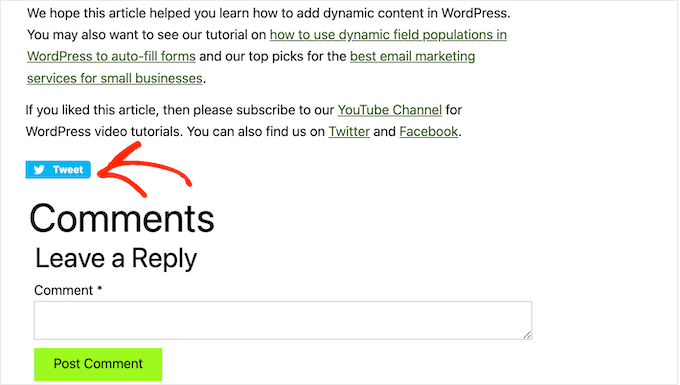
This can increase your blog traffic by introducing your brand to people who may not have been aware of your website. Reposting your content is also a powerful form of social proof. When someone shares a post or tweet with their followers, it’s often seen as an endorsement.
That said, let’s look at how easy it is to add Twitter share and retweet buttons in WordPress. Simply use the quick links below to jump straight to the method you want to use:
Pro Tip: Are you looking for a way to make your post content tweetable in WordPress? Check out our guide on how to add ‘Click to Tweet’ boxes in WordPress.
How to Add a Twitter Share Button in WordPress With Shared Counts
The easiest way to add a Twitter share button to WordPress is by using the Shared Counts plugin. Shared Counts is one of the best social media plugins for WordPress that lets you add all kinds of sharing buttons to your site.
Unlike some other social sharing plugins, Shared Counts uses a unique caching method, so it won’t have a big impact on your website’s speed and performance.
First, you will need to install and activate the plugin. If you need help, then please see our guide on how to install a WordPress plugin.
Upon activation, go to Settings » Shared Counts to configure the plugin’s settings.
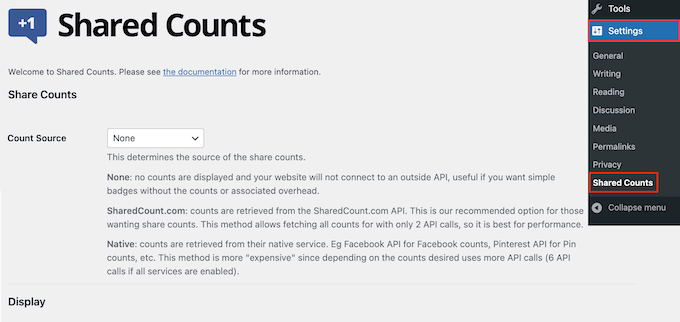
To start, scroll to ‘Share Buttons to Display’.
By default, Shared Counts adds sharing buttons for Facebook, Pinterest, and Twitter.
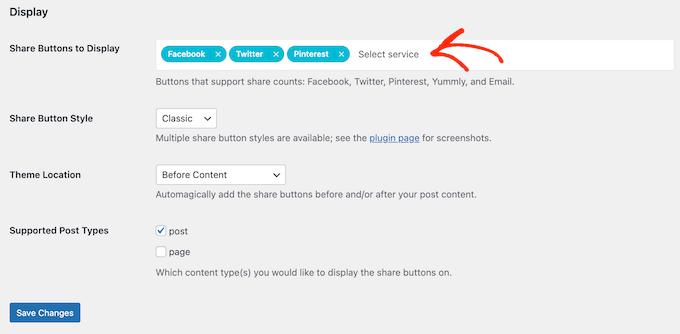
If you want to delete the Facebook or Pinterest sharing button, then simply click on its ‘x’ icon.
You can also add social sharing buttons for other platforms by typing into the field. For step-by-step instructions, please see our guide on how to add social share buttons in WordPress.

With that done, you will need to choose what type of button to use on your WordPress blog. There are 8 styles to pick from, and you can see examples of each button over at the Shared Counts plugin page.
When you have decided, just open the ‘Share Button Style’ dropdown and select the style you want to use.
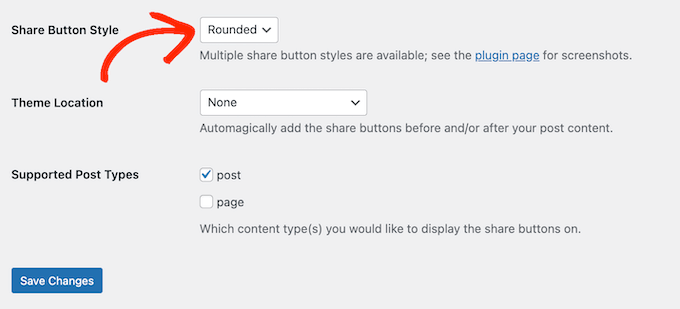
After that, you must choose where to show the Twitter button in your WordPress theme by opening the ‘Theme Location’ dropdown menu.
Here, you can pick Before Content, After Content, or Before and After Content.
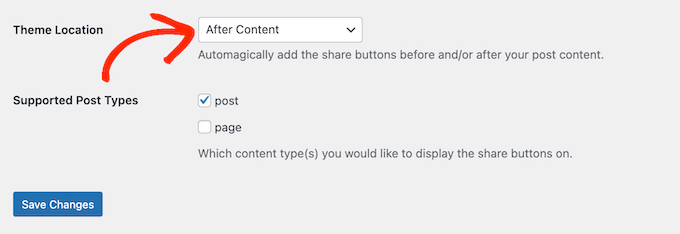
If you add the button to the top of the page, then more visitors will see it. However, most people will want to read a post before sharing it. With that being said, you may want to choose ‘After Content’ or ‘Before and After Content’.
Finally, you need to decide whether to add the Twitter button to your pages or posts.
By default, Shared Counts only adds the button to your posts. However, you may want to add it to your pages, too, especially if you create lots of landing pages.
In that case, you can check the box next to ‘Page.’

When you are happy with how the Twitter share button is set up, click on ‘Save Changes’.
Now, if you visit your WordPress website, then you will see the sharing button in action.

How to Let Users Retweet Your Tweets in WordPress With Smash Balloon
If you want to add a simple share button to a page or post, then Shared Counts is a good option. However, you may also want to encourage visitors to retweet your recent tweets. This can get you more engagement and spread your content even further.
The best way to get more retweets is by using Smash Balloon Twitter Feed Pro. This Twitter Feed plugin allows you to add your entire Twitter feed to any page, post, or widget-ready area.
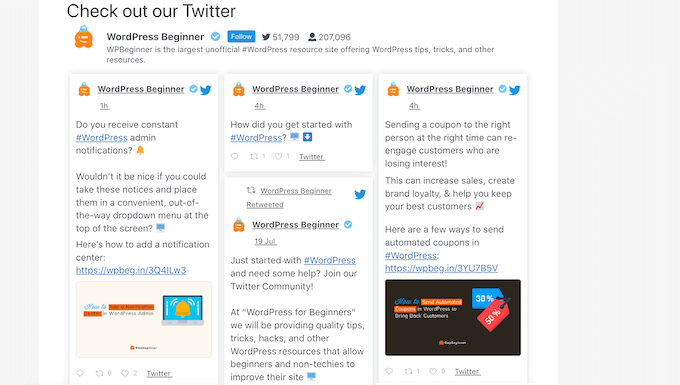
Each tweet has its own row of Twitter actions.
This means visitors can simply repost a tweet by clicking its ‘retweet’ button.
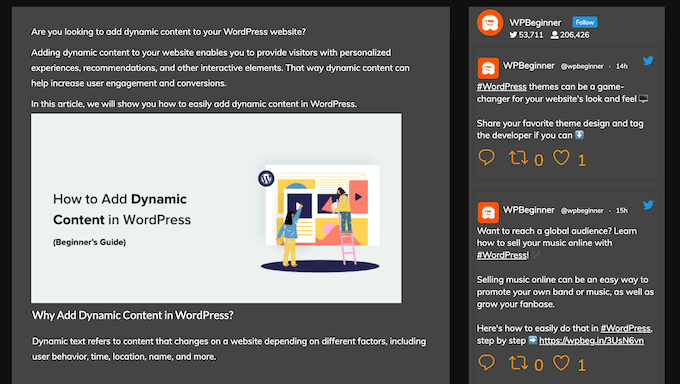
Even better, the feed updates automatically, so there are always new tweets for visitors to engage with. This can help keep your site fresh and interesting, even for regular visitors.
For more information about the plugin, check out our full Smash Balloon review.
Note: There is actually a free Smash Balloon Twitter Feed plugin available. However, we will use the Pro version as it comes with more features, like more feed templates and the ability to display hashtag feeds.
Set Up Twitter Feed Pro
First, you must install and activate Smash Balloon’s Twitter Feed Pro. If you need help, then please see our guide on how to install a WordPress plugin.
After you have installed the plugin, head over to Twitter Feed » Settings. You can now enter your Smash Balloon license key into the ‘License Key’ field.
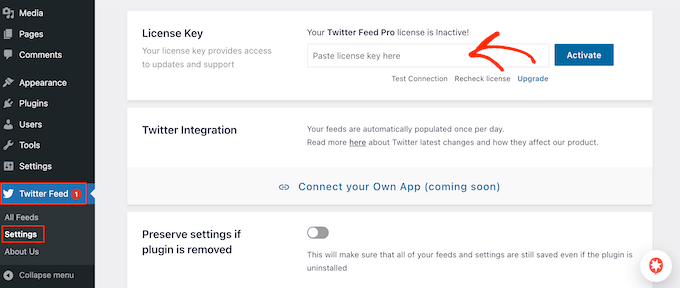
You can find this information in the confirmation email you got when you purchased Smash Balloon and in your Smash Balloon account.
After adding your license key, go ahead and click on the ‘Activate’ button.
Create a Live Twitter Feed for WordPress
Once you have done that, you are ready to create a custom Twitter feed. To get started, go to Twitter Feed » All Feeds and then click on the ‘Add New’ button.
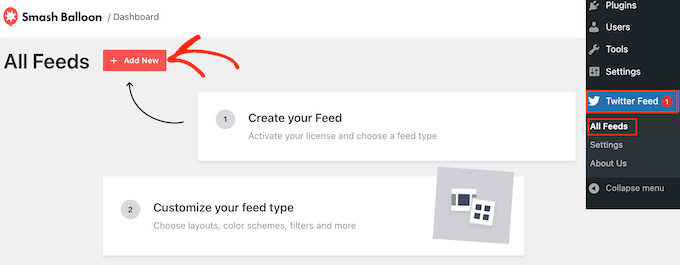
If this is your first time adding a Twitter feed with Smash Balloon, then you will be asked to verify your email address.
Simply click the ‘Connect’ button to do that and complete the on-screen instructions.

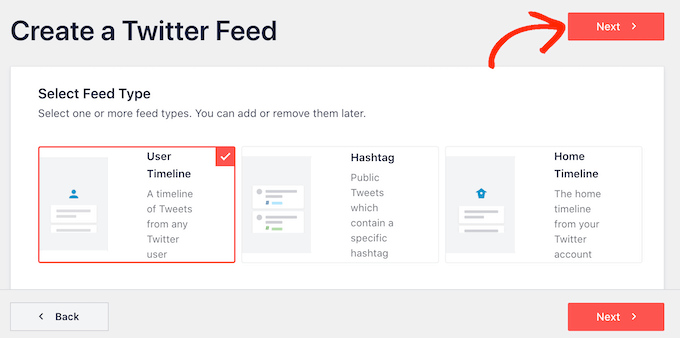
Once done, you will return to the plugin page. Smash Balloon will now show all the different types of Twitter feeds you can create.
Since you want more retweets, just select ‘User Timeline’ and click ‘Next’.
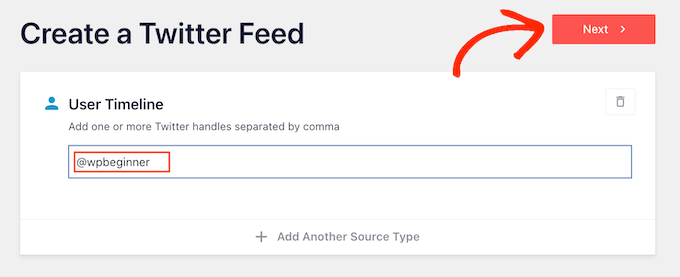
On the next screen, you need to type in the @ symbol followed by the name of your Twitter account.
When you are ready, click on ‘Next’ to open the main Smash Balloon editor.
Next, you can choose the template to use in your Twitter feed.
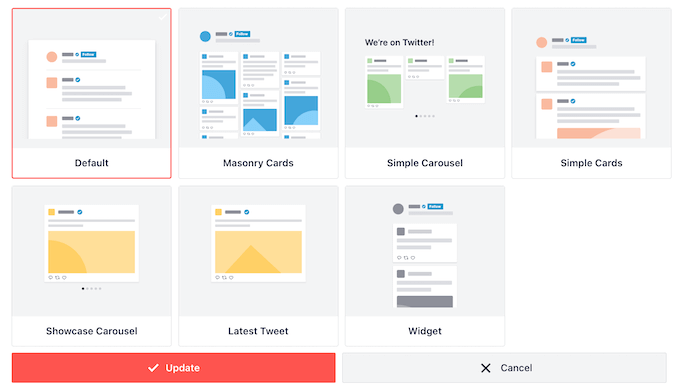
For example, you might show your tweets in a responsive slider by selecting ‘Simple Carousel’. If you only want to promote your most recent tweet, then you can select the ‘Latest Tweet’ template instead.
We will use the ‘Default’ template in all our images, but you can choose any template you want.
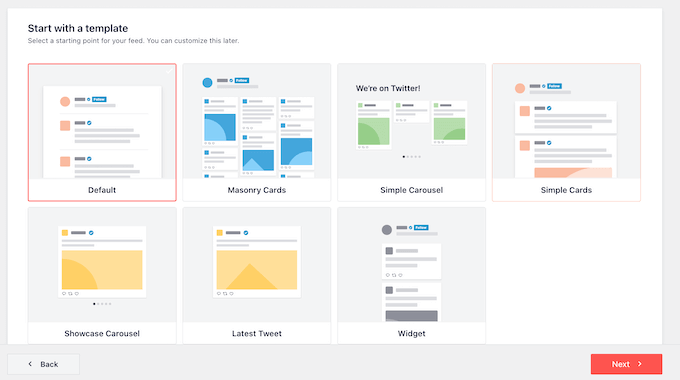
After making your decision, click on ‘Next’.
Smash Balloon will now show a preview of the social media feed, ready for you to customize.
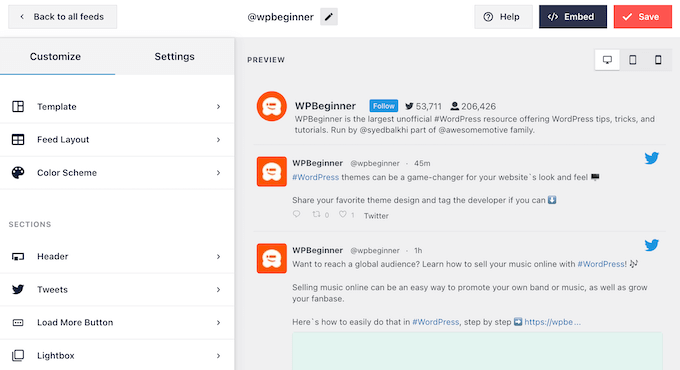
Customize Your WordPress Twitter Feed
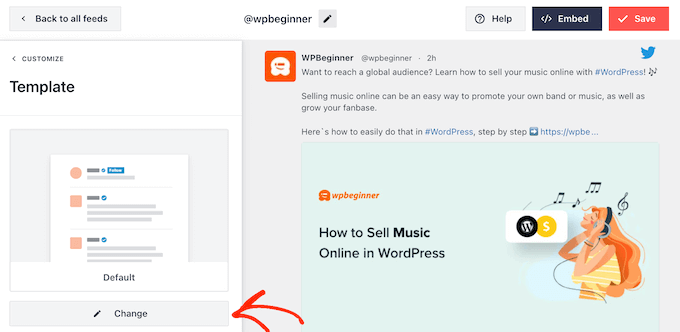
Not happy with how the template looks? To change it, simply select ‘Template’ from the left-hand menu.
You can then click on the ‘Change’ button.
This opens a popup where you can choose a new layout.
Simply select a new template and then click on ‘Update’.
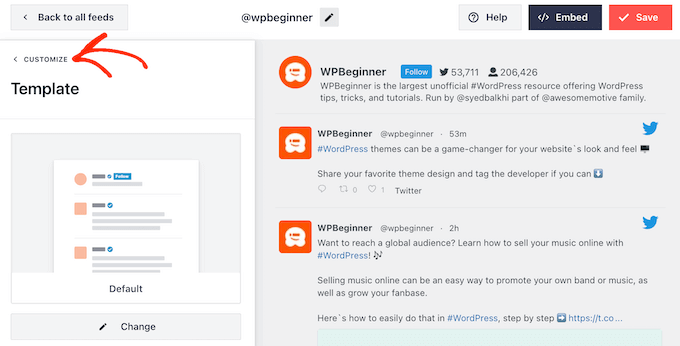
With that done, you need to click on the ‘Customize’ link.
This will take you back to the main Smash Balloon settings.
The next option in the left-hand menu is ‘Feed Layout’, so give it a click.
Here, you can change the height of the Twitter feed and the number of tweets the visitor initially sees. You can also switch between a Grid, Masonry, or Carousel layout.
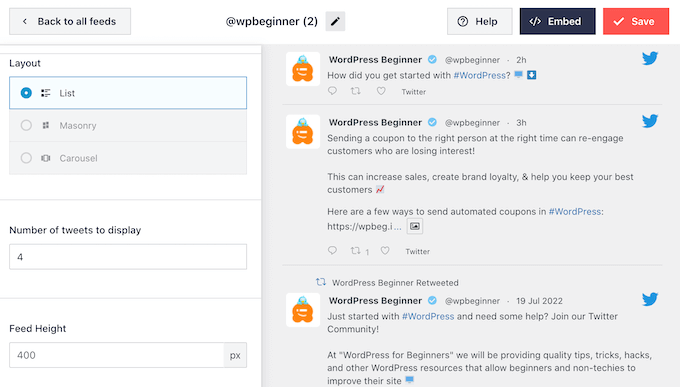
As you make changes, the preview will update automatically, so you can try different settings to see what looks the best.
Depending on the layout you are using, you may be able to change how many columns Smash Balloon displays on desktop, tablet, and mobile devices.
Smartphones and tablets typically have smaller screens and less processing power, so you may want to show fewer columns on mobile devices.
To do this, simply use the dropdown menus in the ‘Columns’ section.
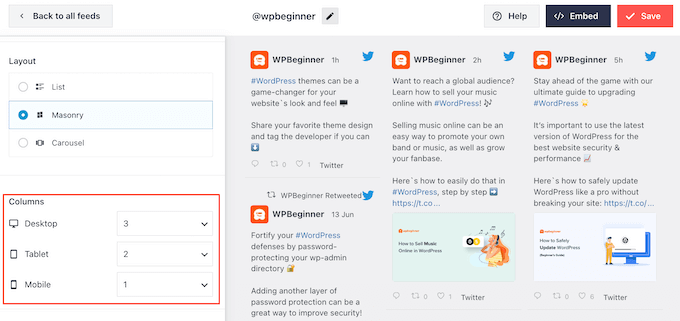
When you are happy with how the feed layout is set up, click on the ‘Customize’ link again to return to the main settings screen.
Here, you can click on ‘Color Scheme’.
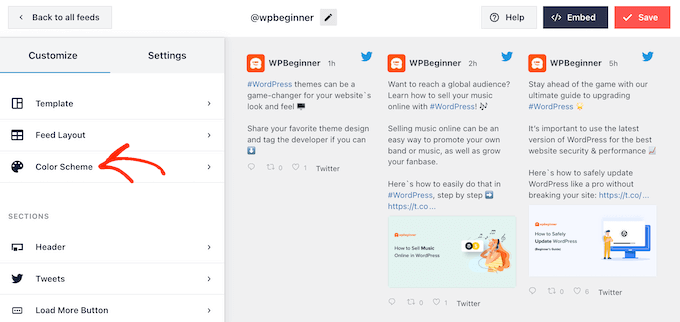
By default, Smash Balloon uses the colors inherited from your WordPress theme, but you can switch to a ‘Light’ or ‘Dark’ color scheme instead.
Another option is to create your own color scheme by selecting ‘Custom’ and then using the controls to change the background color, change the text color, and more.
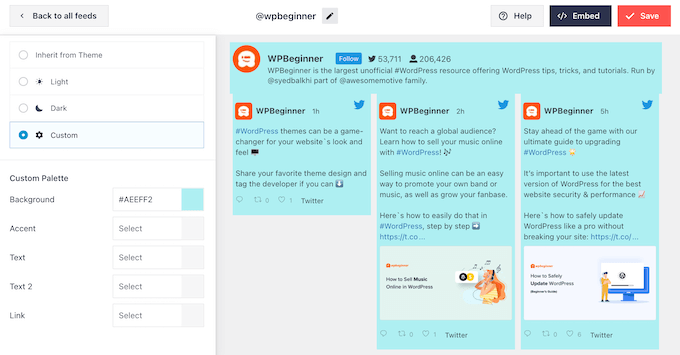
When you are happy with your changes, click on the ‘Customize’ link once again. Back on the main settings screen, you need to click on ‘Header.’
By default, Smash Balloon adds a ‘Standard’ header to the feed, which shows a ‘Follow’ button and your Twitter bio, if available.
If you want to hide the Twitter bio, then click to disable the ‘Show Bio’ toggle.
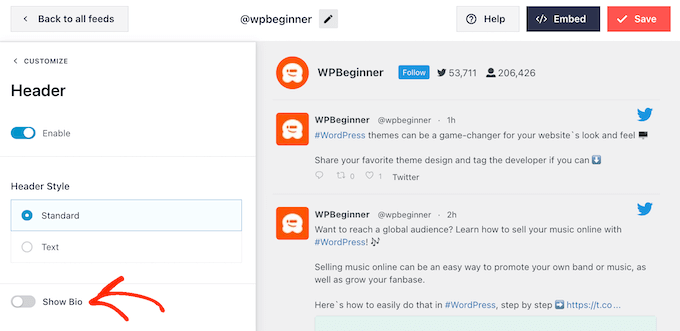
Another option is to select ‘Text,’ which adds a ‘We are on Twitter’ header to the feed.
You can replace this with your own messaging by typing it into the ‘Text’ box.
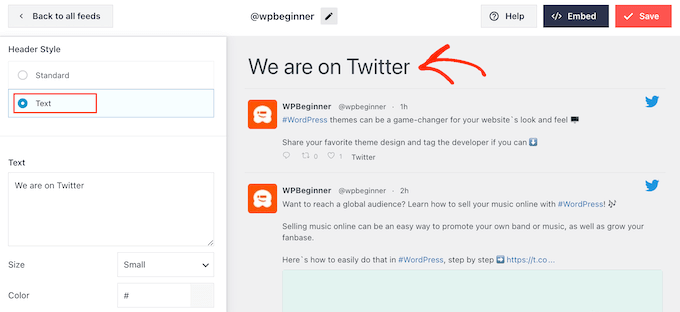
When you are happy with the messaging, you can change the header’s size and color.
After that, return to the main Smash Balloon settings screen and select ‘Tweets’. Here, you can choose between ‘Tweet Style’ and ‘Edit Individual Elements’.
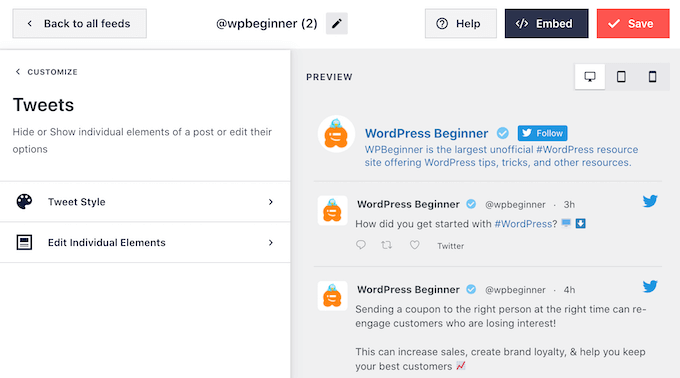
If you select ‘Tweet Style,’ then you can choose between boxed and regular layouts.
If you pick ‘Boxed’, then you can create a colored background for each tweet. You can also make the border radius larger to create curved corners or add a box shadow.

If you choose ‘Regular’, then you can change the thickness and color of the line that separates your different social media posts.
When you are happy with your changes, simply click on ‘Tweets’.
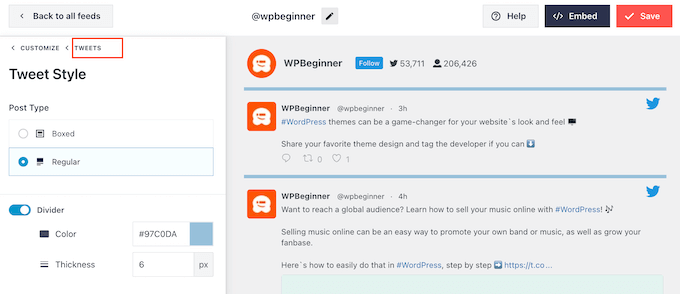
This takes you back to the previous screen.
This time, you can click on ‘Edit Individual Elements’.
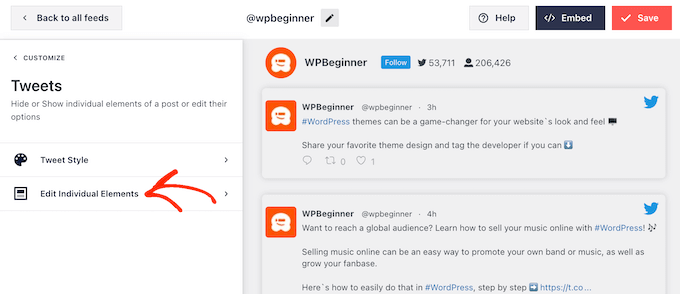
You will now see all the content that Twitter Feed Pro includes in each tweet, such as the author, tweet text, Twitter logo, and more.
To get as many retweets as possible, it’s a good idea to make the retweet icon stand out. To do this, click on the arrow next to ‘Tweet Actions’.
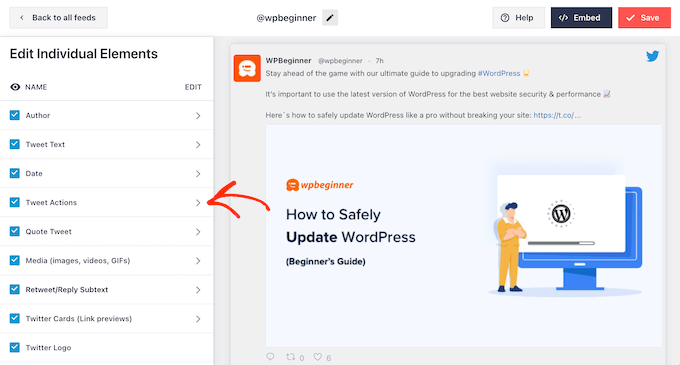
Here, you can make the tweet actions bigger using the ‘Size’ dropdown and change the color.
Just be aware that Smash Balloon will apply these changes to all the tweet actions and not just the ‘retweet’ icon.
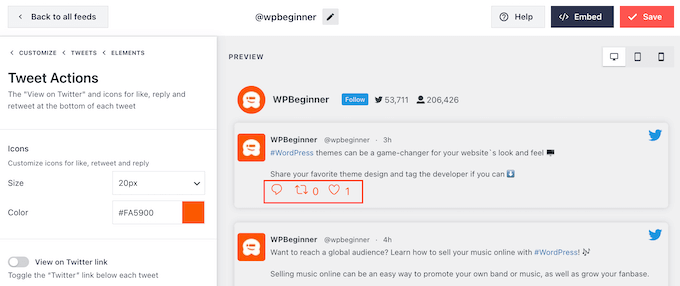
When you are happy with how the tweet actions look, just click on the ‘Elements’ text.
This will take you back to the previous screen.
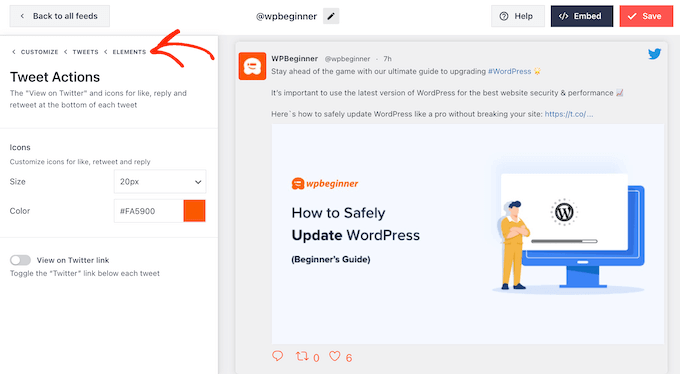
Simply repeat this process to customize any of the other individual elements.
You can also hide an element by unchecking its box.
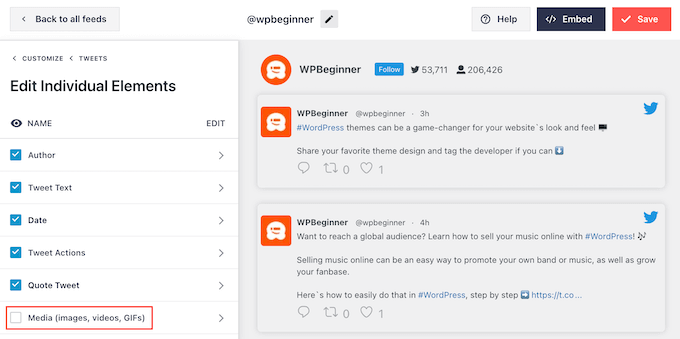
Hiding unnecessary content is another trick that can help the retweet action stand out.
When you are happy with how the tweets look, you can return to the main Smash Balloon settings screen and select ‘Load More Button.’
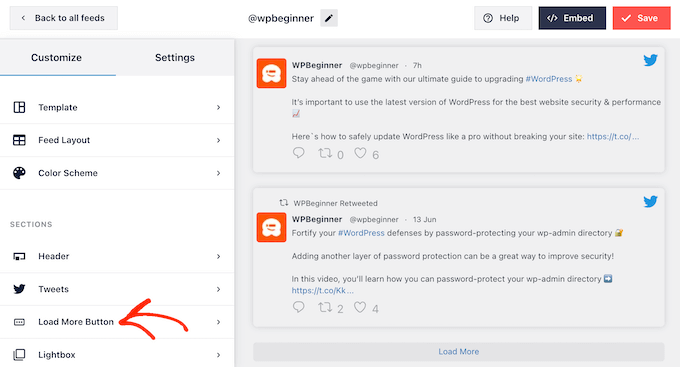
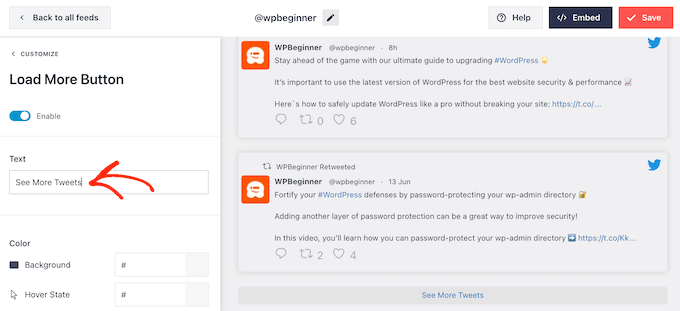
Since it’s such an important button, you may want to customize it by changing its background color, hover state, label, and more to match your site’s design.
You can also replace the default ‘Load More’ text with your own messaging by typing it into the ‘Text’ field.
Another option is enabling infinite scroll so that new tweets appear automatically when visitors reach the end of the feed. This encourages visitors to explore more of your tweets and may get you some extra retweets.
To enable this feature, simply click on the ‘Infinite Scroll’ slider so it turns from grey (disabled) to blue (enabled).
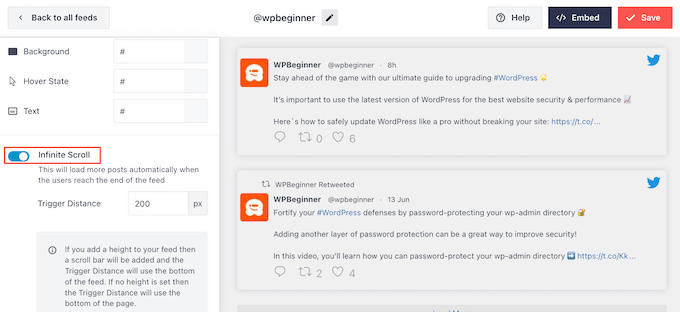
You can also change the ‘Trigger Distance’, which tells Smash Balloon when to load new tweets. However, the default settings should work well for most WordPress websites.
After that, the final option on the main Smash Balloon settings screen is ‘Lightbox’.
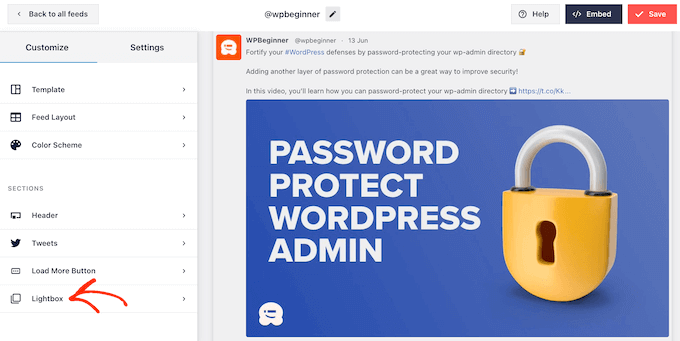
By default, Twitter Feed Pro allows visitors to scroll through the feed’s images and videos in a lightbox popup.
This can get you some extra retweets, as visitors can get a closer look at the feed’s images and watch your videos without leaving the website.
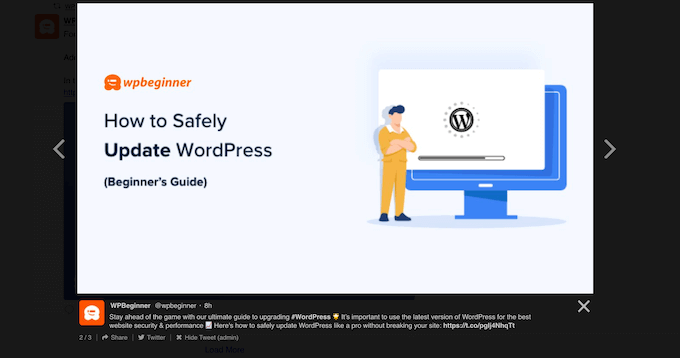
With that in mind, we recommend leaving the lightbox enabled.
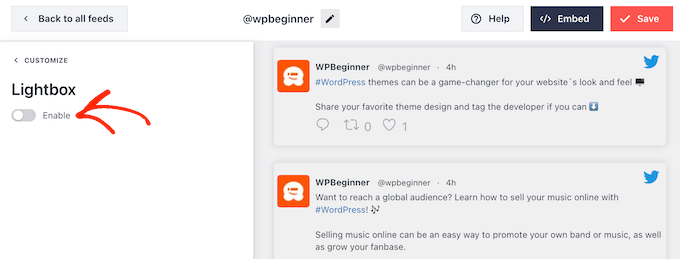
However, if you want to disable this feature, then simply click on the blue ‘Enable’ toggle so that it turns grey.
When you are happy with how the Twitter feed looks, don’t forget to click on ‘Save’. After that, you are ready to embed the Twitter feed and retweet buttons on your WordPress website.
Add Your Twitter Feed to WordPress
You can add the Twitter feed to your website using either a shortcode or the Twitter Feed block. Since it’s the easiest method, let’s first see how you can add the feed to any page or post using the Smash Balloon block.
If you have created more than one feed, then you will need to find the code for the feed you want to embed.
To get this information, go to Twitter Feeds » All Feeds and copy the code in the ‘Shortcode’ column. You will need to add this code to your site, so make a note of it.
In the following image, we will need to use [custom-twitter-feeds feed=2]

After that, simply open the page or post where you want to embed the Twitter feed. Then, click on the ‘+’ icon to add a new block and start typing ‘Twitter Feed’.
When the right block appears, click to add it to the blog post.
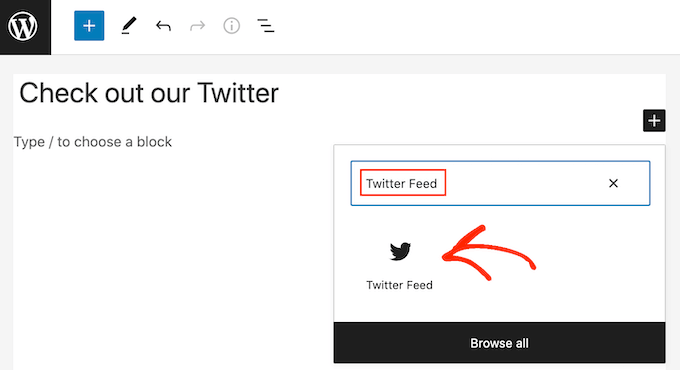
The block will show one of your Twitter feeds by default. If you want to use a different feed, then find ‘Shortcode Settings’ in the right-hand menu.
Here, simply add the shortcode and then click on ‘Apply Changes’.
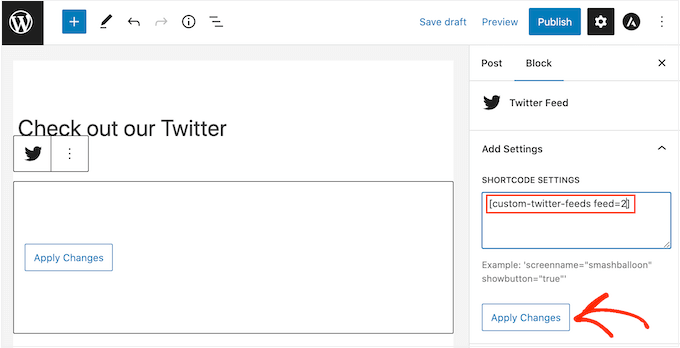
The block will now show your Twitter feed, and you can simply publish or update the post to make it live on your website.
Another option is to add the feed to any widget-ready area, such as the sidebar or similar section. This allows visitors to retweet your latest posts from any page of your website.
Simply go to Appearance » Widgets in the WordPress dashboard and then click on the blue ‘+’ button.
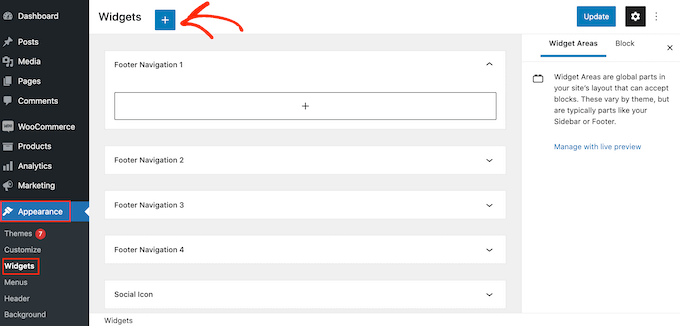
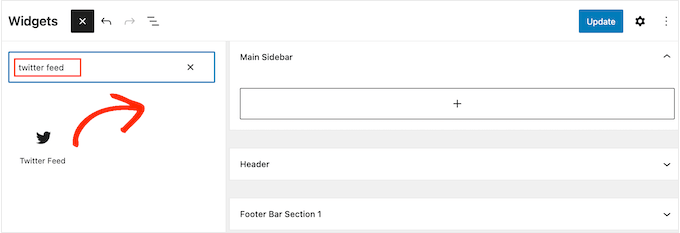
Once you have done that, you need to type in ‘Twitter Feed’ to find the right widget.
Then, just drag it onto the area where you want to show the feed and retweet buttons.
The widget will show one of the feeds you created using Smash Balloon.
To show a different Twitter feed instead, type the feed’s code into the ‘Shortcode Settings’ box and then click on ‘Apply Changes’.
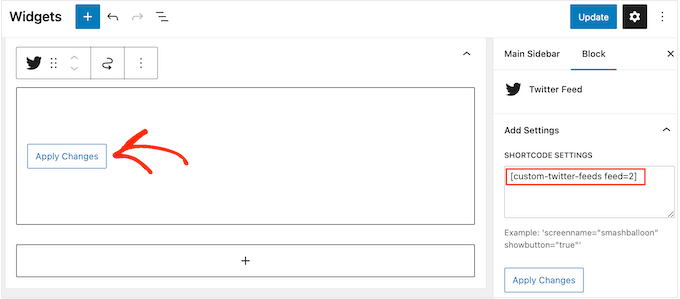
You can now click on the ‘Update’ button to make the widget live. For more information, please see our step-by-step guide on how to add and use widgets in WordPress.
Finally, you can embed the feed and retweet buttons on any page, post, or widget-ready area using a shortcode.
Simply go to Twitter Feed » All Feeds and copy the code in the ‘Shortcode’ column. You can now add the shortcode to any widget-ready area on your site.
For more information, please see our detailed guide on how to add a shortcode in WordPress.
Learn More Ways to Use Twitter in WordPress
Do you want to make the most out of your Twitter profile to promote your WordPress website? Or perhaps you want to add more Twitter content to your site? Check out these guides below:
- Beginners Guide on How to Add Twitter Cards in WordPress
- How to Fix Broken Twitter Card Images in WordPress
- How to Promote Your Twitter Page in WordPress with a Popup
- How to Display Twitter Followers Count and More in WordPress
- How to Add Pay With a Tweet Button for File Downloads in WordPress
We hope this article helped you add Twitter share and retweet buttons in WordPress. You may also want to check out our article on the latest social media statistics bloggers must know and our beginner’s guide on how to start a YouTube channel for your business.
If you liked this article, then please subscribe to our YouTube Channel for WordPress video tutorials. You can also find us on Twitter and Facebook.


Jiří Vaněk
I can only recommend buttons for Twitter and Facebook. They will increase your reach and possibly backlinks. Additionally, creating profiles for your website where people can find you and where you can provide more information is a great way to make yourself known. I have it implemented on my website as well; I would just appreciate some statistics. How many times has someone clicked on the button and made a tweet, and for which article, so I can have a better overview.
WPBeginner Support
To help track that we would recommend taking a look at our guide for how to track button and link clicks with MonsterInsights below:
https://www.wpbeginner.com/wp-tutorials/how-to-track-link-clicks-and-button-clicks-in-wordpress/
Admin
Jiří Vaněk
So, I understand it well that a similar thing cannot be done using Google Analytics, for example, and an external plugin such as Monster Sight is required for this? I ask because I try to use as few plugins as possible and use them for as many things as possible. That’s why I thought if I could solve a similar thing, for example, using Google Analytics.
WPBeginner Support
It is possible but you would need to manually set up the markup in Google Analytics to add to your button which is why we recommend the plugin
Konrad
Adding Twitter share and retweet buttons can indeed boost your social media presence. One thing to consider is the placement of these buttons for maximum engagement. It’s beneficial to conduct A/B testing to determine the most effective positions on your site. Additionally, make sure the buttons are clearly visible but not intrusive to the user experience.
THANKGOD JONATHAN
This post has opened my eyes.
I was reluctant to create a twitter account because I think I will not have the time to engage compared to other social sites I love using.
But now I thing I will give it a try after reading this article.
jafar
thank man
RandyDueck
Thanks for the quick response. I’m not a programmer, do you know where I can get a peice of code and paste it in? Re: Count, I’m thinking then that when testing, If I use the tweet button to post to post to my own page, then twitter doesn’t tink it’s legit? However, I have another twitter acc’t that I tried tweeting to and it didn’t increase. Is there a way I can test it to see that it’s working? How do I know it’s a legit tweet or not? I’m surpirsed that Twitter seems difficult compared to FB @wpbeginner
wpbeginner
@RandyDueck Twitter uses the new t.co shortner which only shorten links for their algorithm to make sure it is not SPAM… then it pastes the unshortened version… You have to utilize another API and write a bit of custom code to get the custom short URLs to work there…As far as the count, twitter button only shows count that it thinks are legit.
RandyDueck
Thanks for this great little code snippet. I want the twitter button to be in the post excerpt and below the title of the single-post page. the code works fine. gives the correct title etc. however, it does not shorten the link, and after tweeting, the tweet count doesn’t go up. the site is thinkactloveloseweight.com Thank your response
KatrinaMoody
Gretchen – all links should trace back to your permalink – so your permalink should be the source URL, not your short link … make sense? YOu can’t yet change the URL shortener if you use the official Tweet button ( I looked into it because I wanted to do a shortlink).
Adding this so long after the original was posted because others might have that question!
KatrinaMoody
I thought I would note that some themes change the value for the title and post url – meaning that the code will tweet with your code in quotes. I got a couple questions on Twitter over that one. I just found the different variables that worked for my site and replaced them. So …
Line three: data-url=””
was changed to %permalink% – which was my theme’s replacement
Line five: data-text=””
was changed to %post-title% – again my theme’s replacement
I wouldn’t have been able to do this without your tutorial! Thanks SOOOO much! You are now my go-to resource!
idowebmarketing
@wpbeginner @idowebmarketing Okay, there are two locations of this code, and I had only updated one!
wpbeginner
@idowebmarketing @wpbeginner data-via is the only thing that needs to be modified in order to make the change.
idowebmarketing
@wpbeginner @idowebmarketing Thanks – I added new blog posts to two of my blogs yesterday after implementing the updated code, however it still recommended wpbeginner on both. Is there any section of code that also needs to be updated?
wpbeginner
@idowebmarketing On old posts it takes twitter while to figure it out. On new posts it should be fine.
idowebmarketing
My blog is still recommending wpbeginner and I have updated the code. Here is the edited code:
<script src=”http://platform.twitter.com/widgets.js” type=”text/javascript”></script> <a href=”http://twitter.com/share” data-url=”<?php the_permalink(); ?>” data-via=”idowebmarketing” data-text=”<?php the_title(); ?>” data-related=”imnewsdaily:Daily updates from the internet marketing industry” data-count=”vertical”>Tweet</a>Any idea what I am doing wrong?
Richard
Thank you for posting this!! I have been trying to slove this problem for about three days now…
do you have the same code for the facebook like button?
Gretchen
I use the WP-generated shortlinks when tweeting about my posts, and have had troubles with those always showing in my Tweet count. The final bit of code on this site seems to work, though if you click to view the search results in Twitter it only shows the links to the actual permalink, not the links to the shortlink as well: http://bavotasan.com/tutorials/adding-tweet-button-wordpress/ It’s too bad WordPress and Twitter don’t count those as the same link somehow…
Zakir
I can add javascript in header but it will degrade YSlow rating, currently it is B rating. I really work hard to make B from D. I opened a ticket to twitter technical team, they just sent me email providing some links which may help me to get my answer or open a new ticket if not. Thats so stupid. Twitter people think we didn’t see other answers! thats so frustating. Linkedin doing quite well , their share button updates within a minute.
Deepanshu
hello sir sir how do i use this for pages ? i was able to do it for posts
Zakir
In my above mentioned website, i used your code, index.php, single.php and other php file within loop.
I can click the twitter tweet button and it shows count number, but if i refresh the page, that value goes away. Now after may be 1 hour if i check that article page, i can see the new count value. e.g. before i clicked the button it was 0, after almost 1 hour it shows 1. My question is why it took 1 hour to update. it should be updated immediately isn’t it?
Now in front page which index.php, i used the code and again i used in single.php. User clicks an article from index.php and comes article page which is in single.php. The problem: count value is not synchronising the count from the index.php to single.php. I check it later it is but after almost 1 hour. so it is synchronising after almost 1 hour.
Why? any idea.
Recently I changed the .htaccess file to add expire headers to get some speed. i am getting that but today i removed that line and back to default .htaccess file. Do you think its something with .htaccess where caching is controlled by hour, minutes, seconds, months or even year. Even though if I enable caching, the twitter java script which is twitter server can’t force to use caching.
Now I am not sure where I should look for to get immediate count value. client wants to see immediate count and synchronise with article page.
Please check the http://www.bizgene.com to get an idea.
Any clue or idea will be a great favour.
I used following code for tweet count button:
<a href="http://twitter.com/share" class="twitter-share-button"
data-url="”
data-via=”bizgene”
data-text=””
data-count=”horizontal”>Tweet
Zakir
Editorial Staff
Zakir, We think this is a common bug going on with twitter API. We have been noticing a similar thing with our tweetmeme button regarding the count. It synchornizes the count almost after 20 – 30 minutes. Perhaps try adding the script part in your head codes and then display the a href part where you want the button to display might help.
Admin
Simon
I don’t get it. Using the data url link/button above gives just a t.co link and nothing else. Has something changed there or why doesn’t it output the values?
Editorial Staff
Note, to get the_title(); or the_permalink(); you have to place this code inside the loop. If you place it outside a loop, then it will not give you a desired value.
Admin
coz
ARGH. This is what I tried but im replacing the greater-than/less-than symbols with brackets so it will hopefully show:
[?php the_title(); ?] #[?php the_category(‘,’); ?]
coz
um… last comment isn’t displaying the php… sorry. This is what i tried: (hopefully this will work)
#
coz
For DataText, im looking to add the title and category of the post as a hashtag. I can’t seem to figure out how to do it, being that I’m not too familiar with php.
I tried: >>> data-text=” #”
but that didn’t work. Any idea of how to do this?
S.Pradeep Kumar
Nice tutorial. Finally I implemented that button on my blog. It will be nice if you can make a tutorial on how to customize it. I hate the default color. : |
Calítoe.:. (Cristina MJ)
I’ve noticed that the count displays horizontally even if one specifies data-count=”vertical”. Does anyone know what’s wrong with that?
NG
I’m having the exact same problem. Any idea how to fix it?
Editorial Staff
Refresh the page… This usually happens when the twitter script is not loading fine. Try placing the twitter script part in the head section.
Admin
CharityHisle
I think I’ll stick to the tweetmeme version until the plugin is completely developed with all of the options for placement.
Rarst
There isn’t much sense in filling out every setting, most of them work just fine without being set and will pick things like current URL and page title by default.
Non-standard tag attributes will not validate (at least not as XHTML Transitional in my experience so far). Query arguments may not look as tidy, but they are more established and reliable.
Konstantin
Alternatively, you could use WordPress’ very own add_query_arg() function, to create the url.
Nice post though, and quick, too.
Editorial Staff
Yup, we had to put it out quick because a lot of our twitter users said they wanted it.
Admin
Amie
Is there any chance I don’t have “The Loop” because I keep looking for this (or even a part of it) in my index file and it’s not there. Gah, I was hoping this would be easy!
Editorial Staff
That really depends on what theme you are using. Every theme must have the loop to show the recent posts. You can try Otto’s plugin.
Admin
DJ NightLife
I used to have Topsy buttons… was about to switch for the official button but… It seems this version have a problem recognizing the real count of tweets. I had a post of 52 tweets and now it shows 8.
Otto
They’re only counting tweets since July.
BTW, the new tweet button is fully supported by my Simple Twitter Connect plugin for WordPress. Just so you know.
http://ottopress.com/wordpress-plugins/simple-twitter-connect/
Editorial Staff
Thanks Otto for updating your plugin. Your work is truly awesome Jut added the link in the post.
Admin
Ted Thompson
Helpful article, many thanks!
josemv
Excellent, thanx !
Any chance to include custom url shorteners, such as cli.gs or bit.ly ?
Editorial Staff
No, twitter is using their very own service to verify the quality of link that is being tweeted.
Admin