Did you know that you can use different domain names to direct visitors to specific pages on your WordPress site?
This handy feature lets you build targeted landing pages with unique web addresses. This can save you from having to manage multiple WordPress sites or pay for additional hosting accounts.
Now, we have run a lot of marketing campaigns over the years, and we have seen firsthand how valuable this can be for small business owners. It is a smart way to save time, reduce costs, and avoid technical headaches.
If you are interested in learning more, you are in the right place. In this article, we will show you how to make a great landing page, connect a new domain name to that page, and set up your domain and hosting correctly.
Why Add a Custom Domain for a WordPress Landing Page?
Landing pages are powerful tools for generating sales, growing email lists, promoting products, and more. Often, these pages share the same domain name as your main website, but there are times when a custom domain can be beneficial.
Let’s say you run a food blog called mycookingrecipes.com, where you share recipes.
Now, you want to branch out by offering online cooking courses. It is often best to keep your recipes and courses separate to avoid confusing your existing audience.
A custom domain can be your solution. Instead of creating an entirely new website, you can simply point a custom domain to a landing page for your courses within your existing site.
This lets you manage both online courses and recipes under the same WordPress installation, saving time on maintenance and helping you manage costs effectively.
The same concept applies if you’re a marketing agency developing landing pages for clients using platforms like Unbounce. A custom domain allows you to deliver all those pages from a single WordPress setup, streamlining your operations.
That being said, let’s take a look at how to easily add a custom domain alias to your WordPress landing page. You can use the quick links below to skip to a specific step:
Step 1: Get a Domain Name and WordPress Page Builder
First, you’ll need to make sure that your WordPress hosting company allows you to point multiple domains to the same WordPress website.
After that, you need a new domain name. We recommend using Domain.com as they are one of the best domain name registrars on the market. They have competitive pricing and you can use their domain names with any WordPress hosting company.

If you need tips on choosing a domain name, you can check out these guides:
- How to Choose the Best Domain Name (Tips and Tools)
- How to Check Domain Name Availability (Easy Domain Search Tools)
- Should You Choose a New Domain Extension for Your Website?
- How Much Does a Domain Name Really Cost? (Expert Answer)
Lastly, you’ll need SeedProd. It is the best WordPress page builder plugin on the market and comes with more than 300 templates and 90 blocks that you can simply drag and drop onto your landing pages.
It also lets you map a custom domain to any landing page.
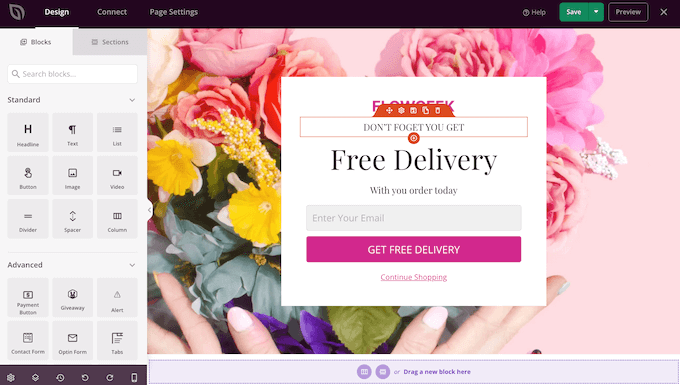
Note: There is a free version of SeedProd that allows you to create custom pages no matter your budget. However, we will be using the premium SeedProd plugin as it has an easy domain mapping feature.
Step 2: Create Your Landing Page in WordPress
To start, you’ll need to create a landing page on your existing WordPress website. In a later step, you’ll map a new domain name to this landing page.
First, install and activate the SeedProd plugin. For more details, see our step-by-step guide on how to install a WordPress plugin.
After activating the plugin, SeedProd will ask for your license key.

You can find this key under your account on the SeedProd website. After entering the information, simply click on ‘Verify Key.’
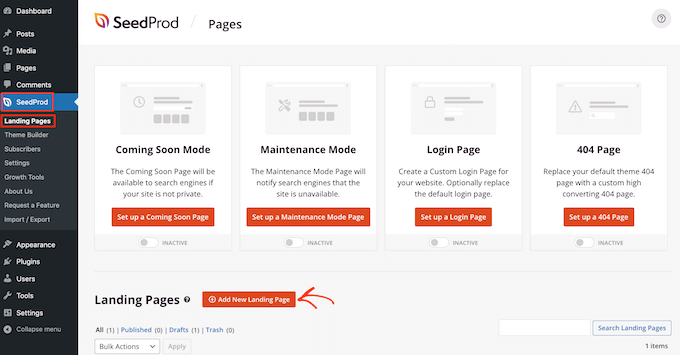
After that, go to SeedProd » Landing Pages and click on ‘Add New Landing Page.’
Choose a SeedProd Page Template
On the next screen, you can choose a template for your custom page in WordPress.
SeedProd’s templates are organized into different campaign types such as coming soon, webinar, and 404 page. You can click on the tabs at the top of the screen to filter templates based on campaign type.
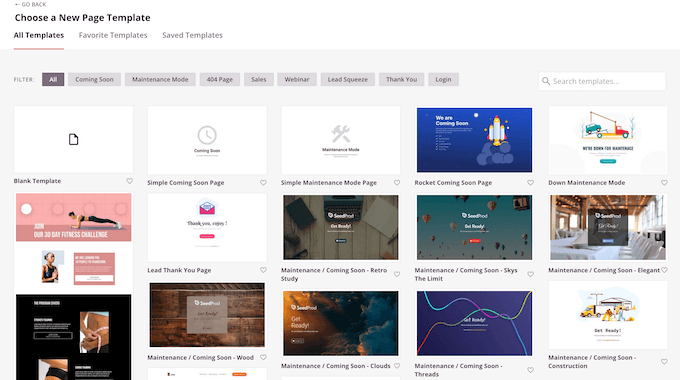
Since you’re creating a landing page, you may want to look at the ‘Sales’ or ‘Lead Squeeze’ template categories.
To preview a template, simply hover your mouse over that design and then click on the magnifying glass icon.
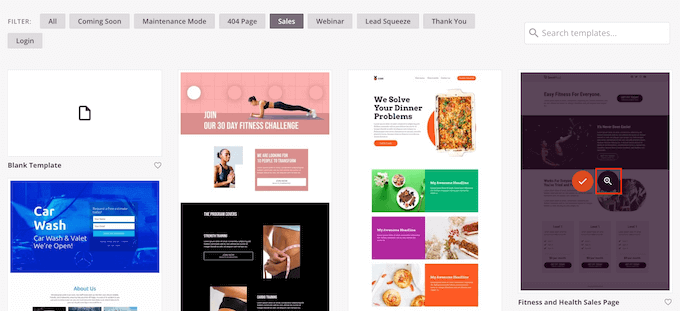
When you find a design you like, click on ‘Choose This Template.’ We’re using the ‘Masterclass Sales Page’ template in all our images, but you can use any template you want.
Create an SEO-Friendly Page Title
Next, go ahead and type in a name for your landing page. SeedProd will automatically create a URL based on the page’s title, but you can change this URL to anything you want.
To help search engines understand what this page is all about, you may want to add some relevant keywords, which can often improve your WordPress SEO.
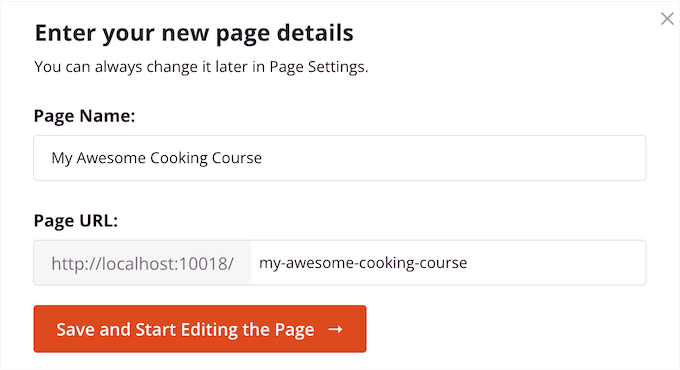
For more details, check out our article on what is a SEO-friendly URL structure in WordPress.
When you’re happy with the information you’ve typed in, click on the ‘Save and Start Editing the Page’ button.
Design Your Page Using SeedProd Blocks and Sections
This will launch the drag-and-drop page builder. On the right, you’ll see a live preview of your page. You will also see block settings on the left.

The page builder is super easy to use.
To customize a block, simply click to select it in the page editor. The left-hand toolbar will then show all the settings for that block. For example, here we’re changing the text inside a ‘Headline’ block.

You can format the text, change its alignment, add links, and more using the settings in the left-hand menu.
Don’t forget to follow headline writing best practices for landing pages. For more tips and tricks, check out our guide on how to use a headline analyzer tool to improve SEO titles in WordPress.
You can even add CSS animations and box shadows using the settings in the ‘Advanced’ tab.
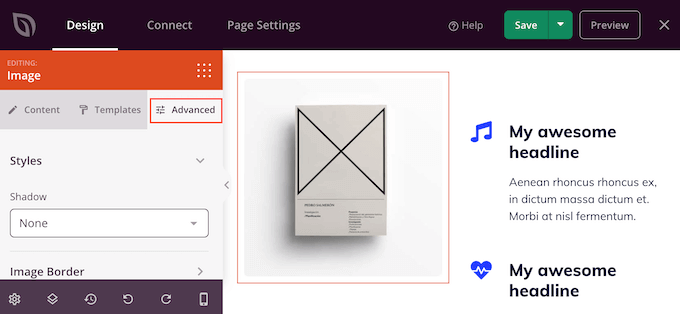
If you want to remove a block from your landing page, then simply click to select that block.
Then, click on the trash can icon in the mini toolbar.

To add more content, simply find the right block in the left-hand menu and then drag it onto the page layout.
Then, you can customize the block by following the same process described above.
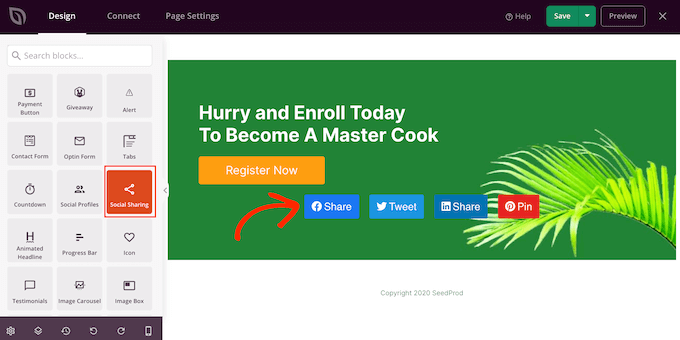
If you’re creating a landing page to sell products and services, then SeedProd also has a range of WooCommerce blocks that you can add to your design.
SeedProd also has ‘Sections,’ which are rows and block templates that are often used together, including headers, hero images, call-to-action buttons, and more.
To see all the available sections, simply click on the ‘Sections’ tab.
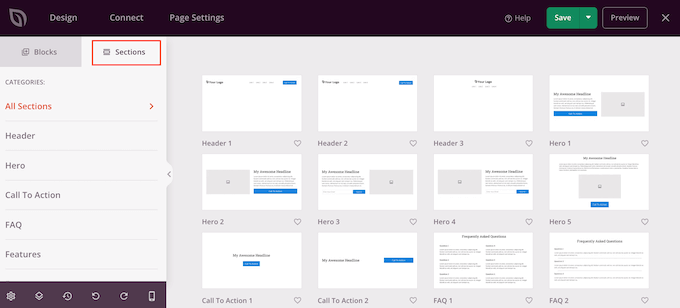
To preview a section, hover your mouse over it and then click on the magnifying glass icon.
When you find a section that you want to add to your landing page, simply move the mouse over it and then click on the little ‘+’ icon.
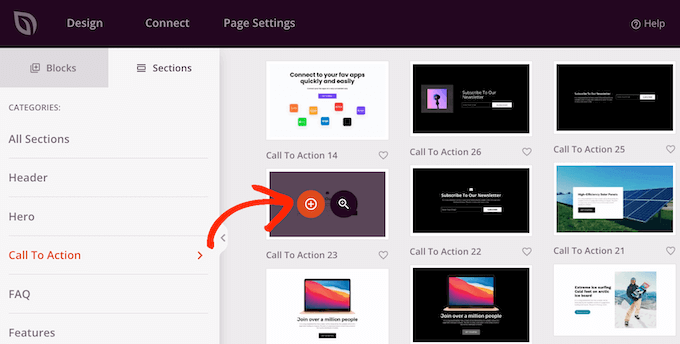
This adds the section to the bottom of your landing page. You can move both sections and blocks around your design using drag and drop, to create your perfect layout.
You can also change the font size, colors, background images, and more.
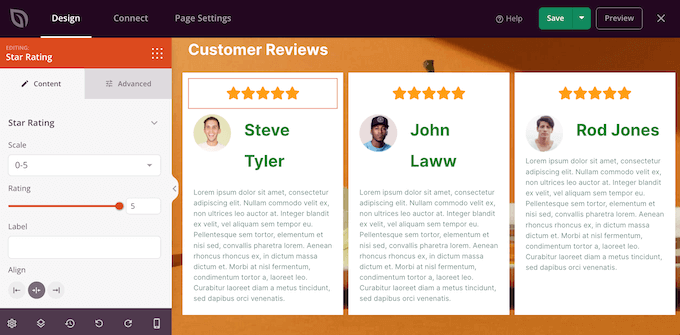
For more detailed instructions on how to design an eye-catching page, please see our guides on how to create a landing page with WordPress and how to create a sales page that converts.
Activate SeedProd’s Third-Party Integrations
If you’re creating a landing page to get more conversions, then SeedProd works with many popular third-party tools you may already be using. This includes top email marketing platforms, Google Analytics, and more.
To connect your landing page to your email marketing service, simply click on the ‘Connect’ tab. You can then hover your mouse over the email marketing service you use on your website, such as Constant Contact or Campaign Monitor.
Then, click on the ‘Connect’ button when it shows up.
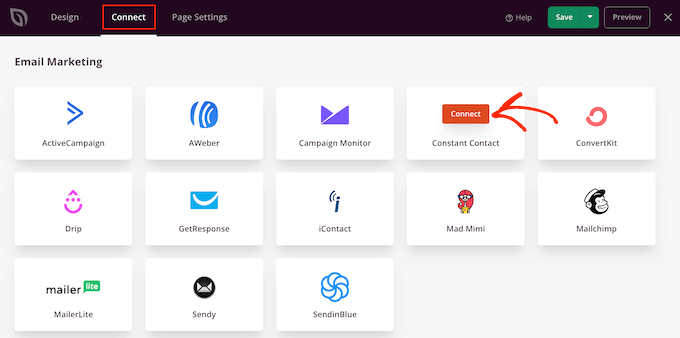
SeedProd will now show how to connect the page to your email marketing service.
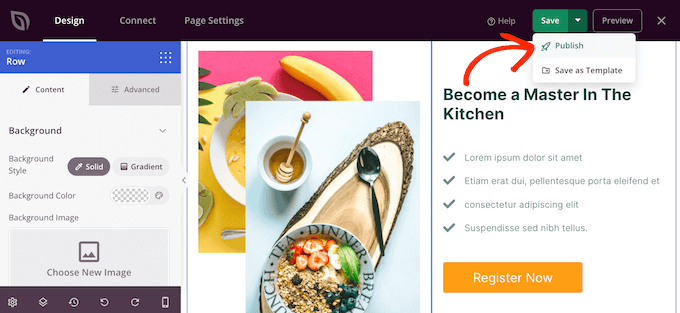
When you’re happy with how the page is set up, click on ‘Save’ and then select ‘Publish.’
Step 3: Add a Custom Domain to Your Landing Page
Now, it’s time to tell SeedProd to use a custom domain alias for this landing page.
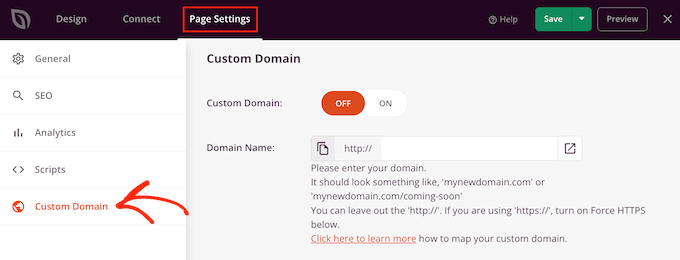
To do that, simply select ‘Page Settings’ and then click on ‘Custom Domain.’
After that, click the ‘On’ button next to ‘Custom Domain.’ You can now type in the domain name you want to use.
Does your domain provider also offer a free SSL certificate, such as SiteGround? Then make sure you click on the ‘Force HTTPs’ switch so that it turns orange.
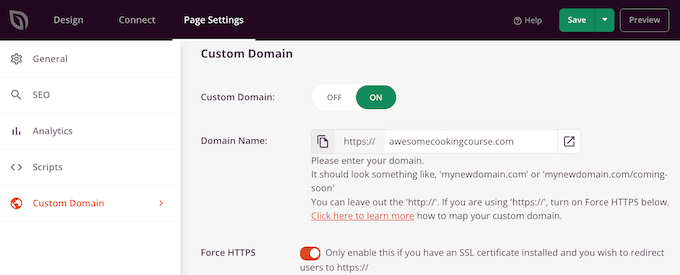
Don’t forget to click on the ‘Save’ button to store your changes.
At this point, if you visit your custom domain then you’ll get an error because the domain doesn’t point to your WordPress blog or website yet. Let’s change that.
Step 4: Point Your Custom Domain Alias to Your WordPress Hosting
To point your custom domain alias to your WordPress hosting provider, you’ll need to edit the DNS nameservers under your domain registrar account.
Nameservers tell the global domain name system where to look for a particular website. You can point a domain to your website by changing the domain nameserver.
You can find out what nameservers your hosting provider uses by contacting their support team. For example, Bluehost uses the following nameservers for most websites:
ns1.bluehost.com
ns2.bluehost.com
If you’re not sure what nameservers your hosting provider uses, then you can find that information in your customer dashboard or contact their support team. To help you get the information you need, check out our guide on how to properly ask for support and get it.
Make sure you write these nameservers down as you’ll need them in the next step.
For the sake of this guide, we’ll show you how to set up a custom alias for a domain registered at Domain.com by pointing it to Bluehost. The steps should be similar for most domain registrars, but you can always check your registrar’s documentation for more information.
First, you need to log in to your Domain.com account. After that, simply click on the ‘DNS & Nameservers’ link in the left-hand sidebar.
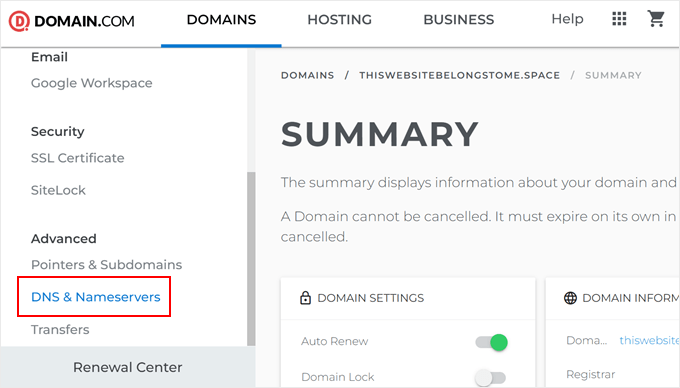
Before doing anything else, check the right domain is selected at the top of the screen, and change it if necessary. After that, scroll down to the DNS records section.
Here, click the three dots next to ‘ns1.domain.com’ and select ‘Edit.’
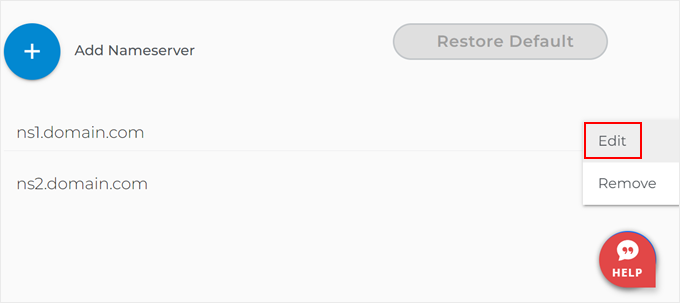
This opens an ‘Edit DNS Record’ popup.
Simply type the new nameserver in the appropriate field and then click on ‘Update Nameserver.’
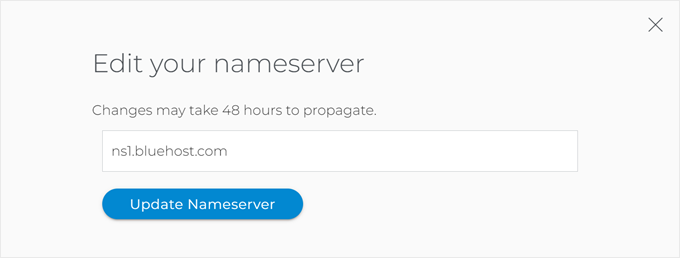
Repeat this process for the ns2.domain.com nameserver record.
Once you’ve done that, you’ll see your updated nameservers in the list.
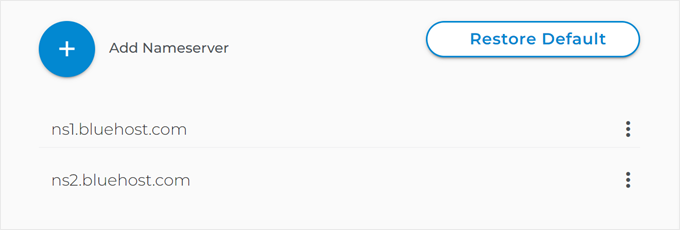
For more details, please see our guide on how to easily change DNS nameservers.
Step 5: Add a Custom Domain to Your Hosting Account
Now your custom domain is pointing to your WordPress hosting provider, it’s time to add the domain to your hosting account.
We’ll show you how to add a domain name in Bluehost. However, the process is similar for most hosting providers.
Simply log in to your hosting account dashboard and then go to the ‘Websites’ tab. Then, click the ‘Add Site’ button.
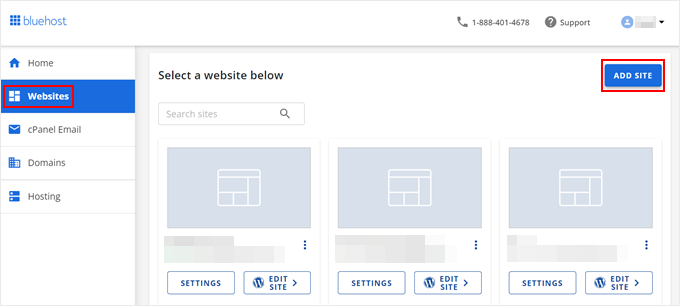
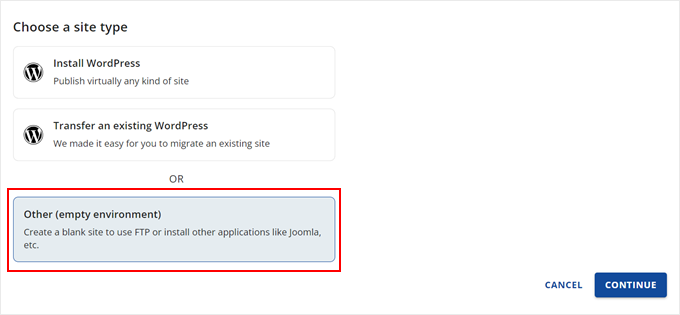
On the next screen, make sure to pick the ‘Other (empty environment)’ option. This option allows you to add an external domain name to your Bluehost account without creating a website for it.
Once done, just click ‘Continue.’
Now, you will type in your website title.
Feel free to skip this step and hit the ‘Continue’ button if you want.

Let’s go ahead and add your domain name.
Just type in your domain name that you registered elsewhere in the appropriate field. After that, just click the ‘Continue’ button.

Bluehost will then finish setting up and check if you have added their nameservers to your domain.
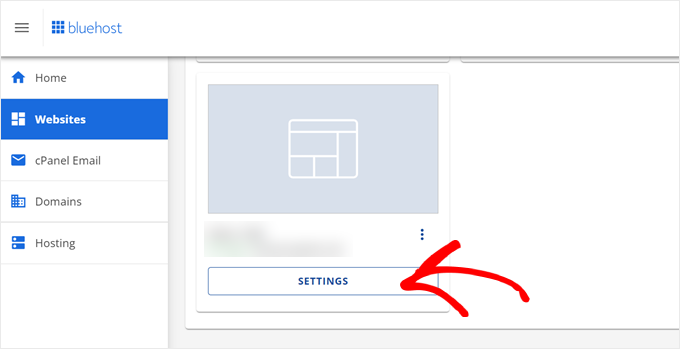
To see if Bluehost has finished setting up your domain name, just go to the ‘Websites’ tab and click the ‘Settings’ button on the domain you just added.
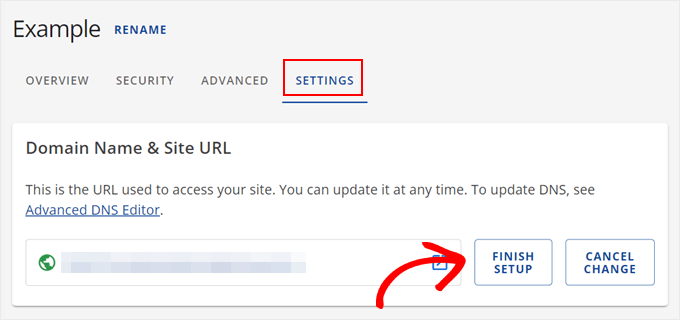
After that, just go to the ‘Settings’ tab.
If you see the ‘Finish Setup’ button, click on it.
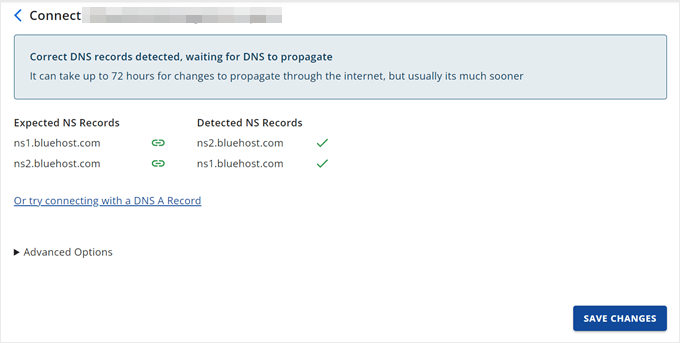
After clicking the ‘Finish Setup’ button, Bluehost will tell you that you need to add their nameservers to your domain registrar settings.
That said, even if you have added the nameservers, it may take up to 48-72 hours for your domain name to function correctly due to DNS propagation. You can learn more about this topic in our WordPress DNS configuration guide.
So just sit tight, click the ‘Save Changes’ button, and check this page regularly. If there’s a problem, you can reach out to your domain registrar or Bluehost for help.
As soon as that’s done, your landing page will be using the custom domain.
Try visiting this URL and you’ll see the landing page in action.

We hope this article helped you point your custom domain alias to your WordPress landing page. You may also want to see our guide on how to create a WordPress multisite with different domains and our list of tips for using Google Search Console to grow website traffic.
If you liked this article, then please subscribe to our YouTube Channel for WordPress video tutorials. You can also find us on Twitter and Facebook.


Have a question or suggestion? Please leave a comment to start the discussion.