
Changing a domain’s nameservers might feel like you are just one wrong click away from breaking your website. It is often the most stressful part of moving to a new web host.
You can think of nameservers as your website’s GPS. They simply tell visitors exactly where to find your site’s new home.
We have guided thousands of users through this exact process, and I can promise it is much easier than it sounds. We will show you how to update your settings with clear, step-by-step instructions.
Soon, you will be able to point your domain to a new host with complete confidence. First, let’s quickly cover what nameservers actually do.

TL;DR: Changing your domain’s nameservers helps point your website to a new hosting provider or a security service like Cloudflare. This guide walks you through the simple, step-by-step process for popular registrars like GoDaddy, Bluehost, and SiteGround. We also cover essential final steps and troubleshooting tips to ensure a smooth transition for your site.
What Are Nameservers?
Nameservers are part of the DNS system that help connect your domain name to the server where your website is hosted. They tell browsers where to find your site when someone types in your domain.
You can think of them like GPS for your domain. They guide visitors to the right place by linking your domain to the correct web hosting server.

When someone enters your domain name, the DNS system checks which nameservers are assigned and sends the request to your hosting provider.
For example, if your website is hosted on Bluehost, your nameservers might look like this:
ns1.bluehost.comns2.bluehost.com
These nameservers are managed by your hosting provider. They ensure your domain points to the right server, so your website loads for visitors.
Why and When Do You Need to Change Domain Nameservers?
There are a couple of key reasons why you may need to update your nameservers:
- You’re moving your website to a new hosting provider.
- You’re adding a web application firewall, like Cloudflare, to secure your site.
If you transfer your website to a new host, you’ll need to update your domain’s nameservers to direct visitors to your new hosting environment.
This step is important since your previous hosting provider will delete your site’s files once your plan ends. Without updating nameservers, visitors may not be able to access your website.
When setting up a web application firewall (WAF), many WordPress WAF plugins require you to direct your nameservers to them.
This setup is essential for WAFs like Sucuri or Cloudflare. You can think of them like a security bouncer at the door, filtering traffic at the DNS level to block malicious activity before it even reaches your web server.
Other than these situations, you’ll rarely need to change nameservers.
However, you may occasionally need to adjust other DNS records, such as updating MX records for a professional email setup. We recommend setting up a business email address after updating nameservers.
With that in mind, let’s explore how you can easily update your domain’s nameservers and point them to your new host.
Before You Begin: A Quick Checklist
Before you dive in, let’s make sure you have everything you need. A little preparation makes the whole process smooth and stress-free!
- ✅ Your New Nameservers: Find the nameserver addresses provided by your new web host. They are usually in your welcome email and look like
ns1.newhost.comandns2.newhost.com. - ✅ Domain Registrar Login: You’ll need the username and password for your domain registrar (the company where you pay for your domain name). Remember, this might be a completely different company from your old hosting provider.
- ✅ A Little Patience: Remember, these changes can take a few hours to go live across the internet. We recommend making this change when your website has the least amount of traffic.
Expert Tip: Before you change your nameservers, log in to your old host and note down any custom DNS records like MX, CNAME, or TXT. You’ll need to add these to your new host’s DNS settings to ensure services like your business email continue working without interruption.
How to Change Your Domain’s Nameservers
Changing your nameserver is quite simple and easy. The process may look a little different to you depending on your domain name registrar, but the basic steps are the same.
We will cover the instructions for changing your nameservers on several popular domain registrars and web hosting companies. You can use the quick links to jump to the section for your host:
- Changing Your Nameservers with Network Solutions
- Changing Your Nameservers with Bluehost
- Changing Your Nameservers with SiteGround
- Changing Your Nameservers with Hostinger
- Changing Your Nameservers with HostGator
- Changing Your Nameservers with GoDaddy
- Changing Your Nameservers with Namecheap
- Changing Your Nameservers with WordPress.com
- Final Steps After Setting Up Your Domain Nameservers
- Troubleshooting Domain Nameserver Issues
- Frequently Asked Questions
- Bonus Resources About Domains and Hosting
Before editing your nameservers, you need to know the new nameserver records to use. Your new web host should be able to tell you this.
Nameservers will usually look like ns1.newhost.com and ns2.newhost.com. Your new web host will give you at least two of these addresses to use.
It can take a few hours for nameserver changes to take effect. Please be patient if your website isn’t showing up at your domain right away.
Changing Your Nameservers with Network Solutions
Network Solutions is one of the oldest and most popular domain registrars. It’s easy to register a domain with Network Solutions and host it elsewhere.
Bonus: If you need to register a new domain name, then you can use our exclusive Network Solutions coupon and the promo code NAMEBOY during checkout to get a 67% discount.
To change your nameservers, you first need to log in to your Network Solutions account. After that, you need to click the ‘Domains’ menu item in the left-hand sidebar.
Then, click on the ‘Settings’ button next to your domain name.

On the next page, scroll down to the ‘Advanced Tools’ section and expand it to see your DNS records.
To change the domain nameservers, click on the ‘Manage’ link next to Nameservers (DNS).

This will bring up a popup that warns users that changing nameservers will disconnect Network Solutions services like email and website, and should only be done if you’re using a third-party provider.
Simply click on the ‘Continue’ button to proceed.

From here, you should see 2 NS records: ns1.worldnic.com and ns2.worldnic.com.
All you have to do is replace these existing nameservers with the new nameservers. Here, we’re using Bluehost’s nameservers:

Once you’ve added the new nameservers, click the ‘Save’ button to store your changes.
And that’s it. Network Solutions will now begin updating the DNS records to point your domain to its new home.
Changing Your Nameservers with Bluehost
Bluehost is a famous WordPress web hosting company. They are also a domain registrar. If you have a domain registered at Bluehost, it’s easy to change your nameservers.
First, you need to log in to your Bluehost account. Next, click the ‘Domains’ tab on the left-hand side. You should see your website domain(s) in a list. Simply click the domain name that you want to update.

This will bring you to the domain management area.
From here, scroll down to the Advanced Tools section and click to expand it.

Next, you need to click on the ‘Manage’ link next to the Nameservers (DNS) option.
This will bring up a warning popup.

Simply click ‘Continue’ to move forward.
Next, you will see the option to add your new nameservers.

After adding the new nameserver information, click on the ‘Save’ button to store your changes.
You’ve successfully updated your nameservers in Bluehost. Your domain will now start pointing to your new web host.
Changing Your Nameservers with SiteGround
SiteGround is a well-known premium WordPress hosting company. We use them to host the WPBeginner website.
They also offer domain name registration as part of their web hosting platform.
To change your nameservers in SiteGround, you first need to log in to your SiteGround account.
Next, click go to the Services » Domains page and click the ‘Manage nameservers’ link for your chosen domain.

In the popup window, simply delete the existing SiteGround nameservers and enter the new ones you want to use. Optionally, you can add a third and fourth nameserver.
Once you’re ready, go ahead and click the ‘Confirm’ button.

Your new nameservers will now be displayed, and SiteGround will begin pointing your domain to the new hosting provider.
Bonus: Want to host your website on SiteGround just like WPBeginner? They’re offering our users 83% off their web hosting with our exclusive SiteGround coupon. Discount is auto-applied when you click our Coupon link.
Changing Your Nameservers with Hostinger
Hostinger is one of the top WordPress hosting companies. They allow customers to register domain names as well.
To change your nameservers in Hostinger, log in to your account and click on ‘Domains’ at the top.

Next, you need to scroll down a little and click on the ‘Manage’ button next to your domain name.
After that, click on ‘DNS / Nameservers’ in the left column. You’ll now see the nameservers currently used by your domain name.

Click on the ‘Change Nameservers’ button to continue.
Then, click to select the Change Nameservers option and then enter your nameserver entries below.

Don’t forget to click on the ‘Save’ button to store your settings.
Hostinger will now update your domain’s nameservers and point them to your new hosting provider.
Changing Your Nameservers with HostGator
HostGator is another popular web hosting company and domain registrar.
To change your nameservers on HostGator, you need to log in to your HostGator account.
Next, you need to click the ‘Domains’ tab, and then click the name of your chosen domain to see further details.

You will now see an expanded details section below your domain name.
Here, you just need to click on the ‘Change’ link below your nameserver details.

You will now see two new boxes will appear for the nameservers.
You simply need to enter your nameservers in these boxes and press the ‘Save Name Servers’ button.

The boxes will then turn green to indicate that the nameserver change has been saved.
If you return to the domain overview, you will see your new nameservers in the list:

Congratulations, you have successfully changed nameservers on HostGator.
Bonus: Want to register a free domain name on HostGator? You can use our HostGator coupon to get 81% off HostGator’s hosting, plus a free domain name and SSL certificate.
Changing Your Nameservers with GoDaddy
GoDaddy is one of the best-known hosting and domain name companies.
To change your nameservers, you first need to log in to your GoDaddy account.
You should see your domains listed on the home page. Simply click the 3 vertical dots for your chosen domain and select the ‘Manage DNS’ option.

Next, you need to click the ‘I’ll use my own nameservers’ option and enter the nameservers that you want to use.
You can add more than 2 by using the ‘Add Nameserver’ button.

Once you’re done, just click the ‘Save’ button.
GoDaddy may bring up a warning prompt to confirm. Just check the box, and then go ahead and click the ‘Continue’ button.

GoDaddy will now save your changes and begin updating your nameservers across the internet.
Bonus: You can get 30% off GoDaddy hosting and get a free domain. For more details, check out our GoDaddy coupon page.
Changing Your Nameservers with Namecheap
Namecheap is another top-rated domain name company that offers great-value domains.
To change your nameservers, you first need to log in to your Namecheap account. Next, click the ‘Domain List’ tab and then click the ‘Manage’ button next to your chosen domain.

After that, you need to scroll down to the ‘Nameservers’ section of the page.
Here, you need to click on the dropdown list and select the ‘Custom DNS’ option.

Simply add in your nameservers here.
After adding nameserver entries, click the ‘check’ button to save your changes.

Your new nameservers will now be displayed in the list.
Namecheap will now start pointing your domain to your new hosting provider.

Changing Your Nameservers with WordPress.com
WordPress.com is a hosting service created by Automattic, the company led by WordPress co-founder Matt Mullenweg. It has several limitations, so users sometimes decide to migrate to a self-hosted WordPress.org website.
If you’re not clear on the difference between WordPress.com and WordPress.org, then you should check out our WordPress comparison chart.
We recommend that if you move away from WordPress.com to another WordPress hosting provider, then you transfer your domain to the new host. That way, your domain and hosting will be managed in the same place.
But in some situations, you won’t be able to do that. For example, if you recently registered your domain, then you won’t be able to transfer it for 60 days. In that case, you’ll need to change your nameservers on WordPress.com.
The first thing you need to do is log in to your WordPress.com account. After that, you should navigate to your My Sites » Upgrades » Domains page and then select the domain that you want to change.
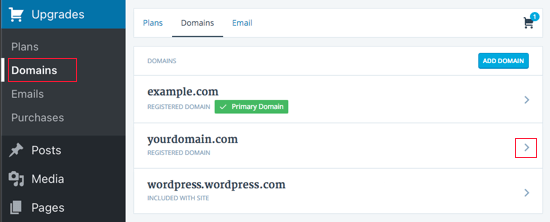
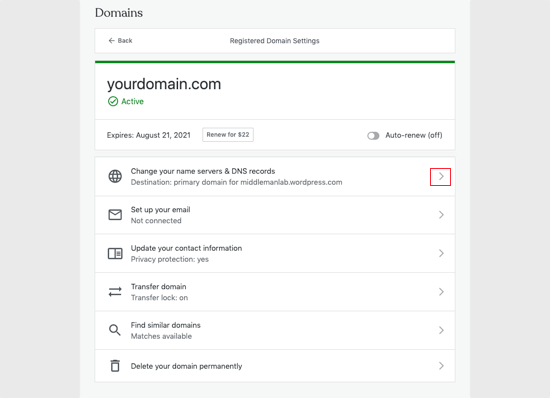
Having done that, you’ll see a list of all the actions you can perform on your domain.
You’ll need to select ‘Change Your Name Servers & DNS Records’ from the top of the list.
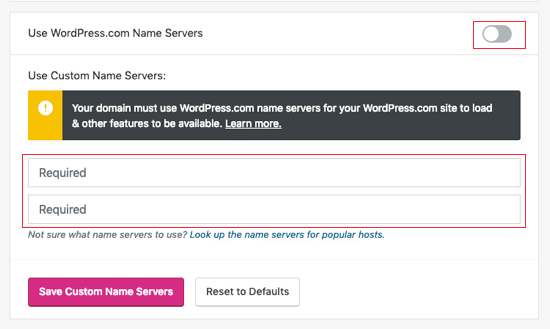
Next, you need to toggle the ‘Use WordPress.com Name Servers’ switch to the off position. You can now enter the nameservers you wish to use.
Finally, you should click the ‘Save Custom Name Servers’ button to save your settings.
That’s it. WordPress.com will now update your domain to point to your new web host.
Final Steps After Setting Up Your Domain Nameservers
Any domain nameserver changes can take a few hours to take effect worldwide, and full global propagation can sometimes take up to 48 hours. That’s because each internet service provider is required to clear their cache history and update the IP address to new records.
If this is your first time changing nameservers, then it’s important that you exercise patience. The changes will often not reflect right away.
Don’t worry, though. Your visitors will typically continue to see the old version of your website during this transition, so your site won’t just vanish from the internet.
If it’s been a few hours, and your nameserver changes are still not showing up, then you can try to flush your computer’s DNS cache.
Troubleshooting Domain Nameserver Issues
If your site or email isn’t working after changing nameservers, don’t worry. These are common issues, and most are easy to fix.
1. Site Still Offline?
DNS changes can take up to 48 hours to fully update across the internet. This delay is called propagation.
You can check the status of this process using a tool like DNSChecker.org. Just enter your domain name and press search. You should start to see green checkmarks appear next to locations worldwide as they update to your new nameservers. If you still see a lot of red X’s, it just means you need to wait a bit longer.
2. Email Stopped Working After Updating Nameservers?
This happens because your email service relies on specific DNS records (like MX records) to receive mail. When you change nameservers, you’re telling the internet to look for all your site’s records in a new place.
Think of it this way: changing your nameservers is like filing a change-of-address for your website’s ‘master address book.’
If you don’t copy all the important entries (like where to deliver email) to the new address book at your new host, services like your email won’t know where to go.
Copy your old DNS records to your new host or DNS provider. Your email service provider should give you the correct records to add.
3. Nameservers Didn’t Update?
Some registrars won’t apply changes unless you confirm them at the end. Look for a “Save” or “Confirm” button after entering your new nameservers.
If nothing changes after 48 hours, contact your registrar’s support team to double-check.
Frequently Asked Questions
Here are some quick answers to common questions users have when changing domain nameservers.
Will changing nameservers affect my website uptime?
If your new host is set up properly, your site won’t go offline. Some users may briefly see the old site during DNS propagation — that’s normal.
Can I revert the nameserver change?
You can switch back to your old nameservers anytime by updating them at your domain registrar. Just remember, it will take time to propagate again.
Do I need to update other DNS records when I change nameservers?
Your new DNS provider will now manage all DNS records. Be sure to copy over A, MX, CNAME, and TXT records to avoid email or site issues.
Can I speed up DNS propagation?
Not directly. But lowering your DNS TTL (Time to Live—a setting that tells servers how long to cache your information) before the switch can help changes spread faster. Raise it again after everything’s stable.
Can I host my domain and website with different companies?
Yes, absolutely. This is a very common practice. You can register your domain name with one registrar (like GoDaddy) and point its nameservers to a different company where your website is hosted (like SiteGround or Bluehost).
What is the ICANN 60-day transfer lock?
The Internet Corporation for Assigned Names and Numbers (ICANN) imposes a 60-day lock on new domain registrations or changes to a domain’s registrant contact information. This rule prevents unauthorized domain transfers, so you might need to change nameservers instead of transferring if you’re within this period.
Bonus Resources About Domains and Hosting
We hope this guide made it easier to understand how to change nameservers and point your domain to a new host. Getting comfortable with domain settings like nameservers is a big step toward managing your own website with confidence.
If you’re ready to explore more, here are some beginner-friendly guides we recommend:
- Beginner’s Guide: What is a Domain Name and How Do Domains Work?
- WordPress DNS Configuration Guide for Beginners
- When to Change Your WordPress Hosting (Signs to Watch)
- Do You Really Need Managed WordPress Hosting?
If you liked this article, then please subscribe to our YouTube Channel for WordPress video tutorials. You can also find us on Twitter and Facebook.
")
")


Thula G
How do you change nameservers without a host?
WPBeginner Support
If you do not have a hosting provider then your nameserver settings would be editable where you purchased your domain
Admin
Dayo Olobayo
Thanks to this informative guide, I now have a much better understanding of how nameservers work within the DNS system. The article mentions that it can take a few hours for the nameserver changes to propagate. Does that mean the website will be down during that period?
WPBeginner Support
Correct, to help mitigate that it would normally be a good idea to have a maintenance page on the old hosting if you are concerned about the nameservers.
Admin
Dennis Muthomi
I’d also recommend checking your site’s analytics to find a low-traffic window for making the nameserver changes.
That way, you minimize the number of visitors impacted during the transition period when the site may be unavailable or showing the maintenance page.
Mrteesurez
Thank you for this great article.
I like way you explained Nameserver and how it works in relationship with domain and hosting. Your explanation has made me understand the concept of Nameserver and it’s functions in DNS. I appreciate this guide.
THANKGOD JONATHAN
Thank you WPBeginner team for making this tutorial.
I just read your article about beginners guide to DNS and now learned how to changed them properly. Very interesting .
WPBeginner Support
You’re welcome
Admin
Lewis
Great article but I have one question. I changed my Nameservers from BlueHost to Cloudflare- I’m assuming I should still retain my hosting account Bluehost?
WPBeginner Support
CDNs like Cloudflare are not hosting so you would want to keep your hosting provider. You can see more about what a CDN is in our article below!
https://www.wpbeginner.com/showcase/best-wordpress-cdn-services/
Admin
Peter Terlick
Hi. Great article; thanks very much. One question though.
If I’m migrating from host A to host B, do I make the name server change on the old host A or the new host B (or both)?
WPBeginner Support
The change would be applied to Host A as host B would already be pointing toward itself by default normally.
Admin
Matt Enser
Thanks for this guide, but what is the next step to connect your domain after you set the name servers? I set the NS and then did the a records, but it isn’t working for me. Do you have a guide for after the name servers?
The site I am working on is hosted with siteground and the domain is at epiks.
WPBeginner Support
If your nameservers are pointing to your new host, you no longer have the old nameservers, and the domain is not pointing correctly, you would want to reach out to your hosting provider as sometimes something may be stuck on their end that needs to be updated.
Admin
Paul
Hey. Great content guys, one question though. Is changing wordpress.com to wordpress.org the same as changing it to only a .com name server?
WPBeginner Support
No, that is a bit more in-depth of a process, you can take a look at our guide on how to transfer your site below:
https://www.wpbeginner.com/wp-tutorials/how-to-properly-move-your-blog-from-wordpress-com-to-wordpress-org/
Admin
Paul
Is it ok to update my WP website on the new host while the DNS is propagating?
Scott
While waiting for nameservers to update, can I tell them the new domain name and ip address?
WPBeginner Support
If you wanted to see the new location before the nameservers update, you would need to edit your computer’s hosts file with the new IP address.
Admin
Christopher L. Scott
Thanks for this. I just switched from BlueHost over to WPengine and your article helped a lot. I’m a pastor so this techie stuff is hard for me. Thanks again for your article.
WPBeginner Support
Glad our guide was helpful
Admin