Recently, a reader asked how they could change the MX records for their site.
MX records (Mail Exchange records) are necessary for delivering emails to your business email address.
In this article, we will show how to easily change MX records for your WordPress domain name.

What Are MX Records and Why Change Them?
MX records (Mail Exchange records) are a special type of DNS record.
It tells the internet servers where to send emails coming to and from your website domain name.
If you are using an email service to create your business email address with your domain name, then you will need to change MX records.
For instance, if you want to use Google Workspace to create a professional email address with your domain name (such as name@yoursite.com), then you need to route all your emails through Gmail’s servers.
Similarly, if you want to use an SMTP service provider to send WordPress emails, then you’ll need to add MX records to send your emails using SMTP.
Important: Before you begin, you need the details for your new MX records. Your business email provider should be able to supply these.
For instance, you can look up Google’s MX records on their support page.
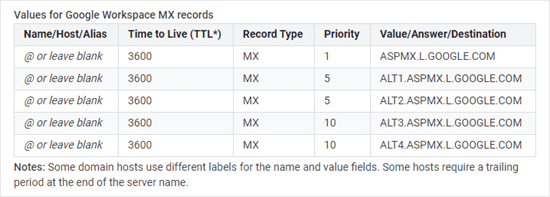
That being said, let’s look at how to change MX records for your WordPress website easily.
Since this is a comprehensive tutorial, we have added quick links so you can jump straight to the section you need:
Changing MX Records Using Domain.com
Domain.com is the best domain name registrar on the market.
If your domain name is registered with Domain.com, follow the instructions below.
Tip: Want to register a new domain for sending emails? Use our Domain.com coupon code to get a 25% discount.
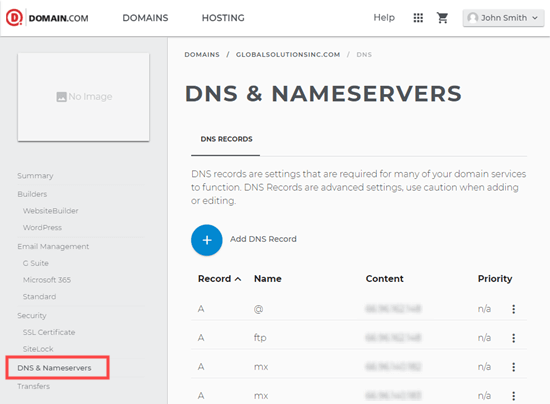
First, you need to sign in to your Domain.com account and click the ‘DNS & Nameservers’ link on the left-hand side.
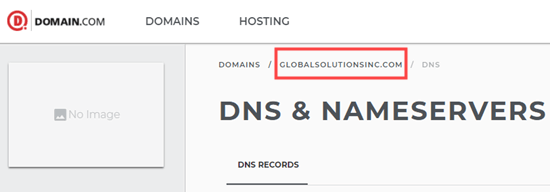
If you have multiple domains, then make sure the right one is selected in the breadcrumb navigation at the top of the screen.
You can see an example in our image below.
Next, scroll down the list of DNS records to find the MX entries for your domain.
You need to click the 3 vertical dots next to the first MX record and then click the ‘Edit’ link.

You will now see a popup where you are able to edit your MX record. Simply enter the new MX record in the Content box. We are using the G Suite MX record here.
You can leave the Name and Type set to their defaults.
After that, you need to enter the Content, TTL (Time To Live), and Priority as specified by Google Workspace (formerly G Suite) or your email host. Then, click the ‘Update DNS’ button.
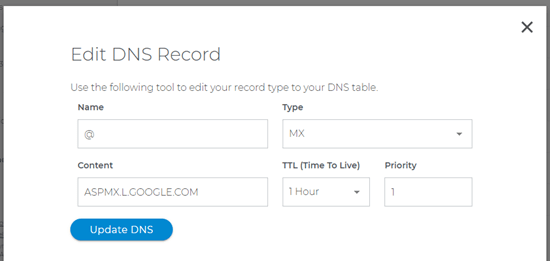
Repeat the process for the other MX entry using the same MX record. That’s ASPMX.L.GOOGLE.COM in our case.
You should see your changed MX records in the list.

Congrats, you have successfully updated MX records for your domain name on Domain.com.
Changing MX Records Using Bluehost
Bluehost is the best WordPress hosting company on the market. They offer free domain name registration on every website.
If you registered your domain name with Bluehost, then you can follow these instructions to add MX records to your domain name.
First, you need to log in to your Bluehost account and switch to the ‘Websites’ tab in the left sidebar.
After that, click on the ‘Settings’ button below your website.
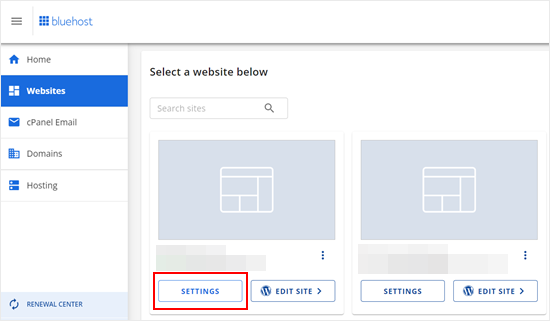
This will open your website settings.
From here, you need to switch to the Advanced tab. Scroll down to the cPanel section and click ‘Manage’ next to it.
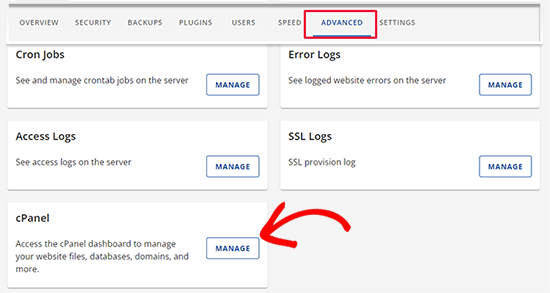
This will launch the cPanel area in a new browser tab.
Next, you need to scroll down to the Domains section and click the Zone Editor icon.
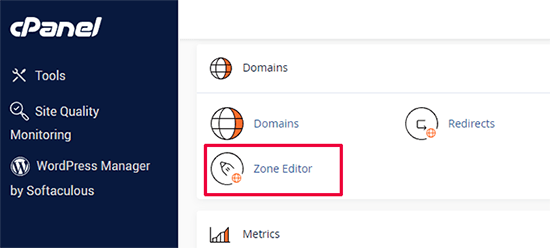
This will open the advanced DNS zone editor page.
You’ll now see a list of your domain names. Click on the ‘+MX Record’ button next to your domain.
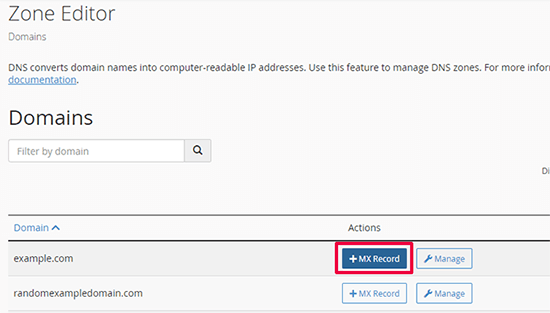
This will bring up a popup where you can add your MX record.
For priority, you can add 1 and for destination add the value or destination provided by your email service.
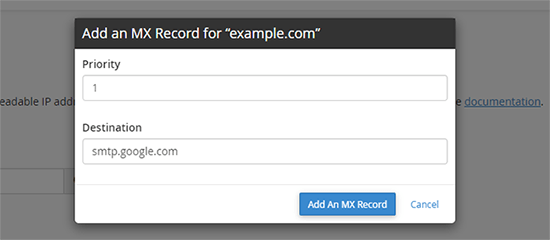
Click on the ‘Add An MX Record’ button to save your changes.
Repeat the process to add more MX record entries. You can give them different priority numbers if you want.
Changing MX Records Using Hostinger
Hostinger is one of the top WordPress hosting companies around. WPBeginner users can avail of our Hostinger coupon to get an exclusive discount on hosting with a free domain name.
If your domain is registered with Hostinger, then here is how to add MX records to your domain on Hostinger.
First, you need to log in to your account on the Hostinger website. From the hPanel dashboard, click on the ‘Domains’ tab at the top and click the ‘Manage’ button next to your domain name.
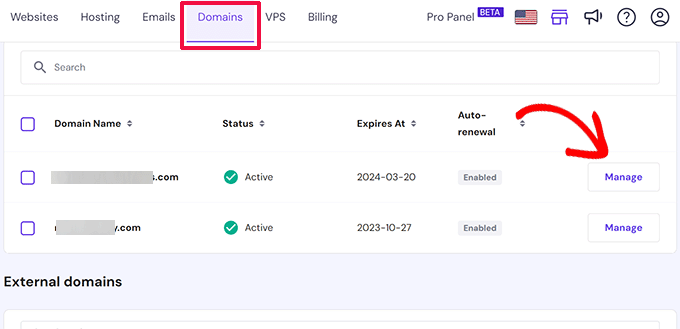
This will bring you to the domain management page.
From here, you need to click on the ‘DNS / Nameservers’ tab in the left column.
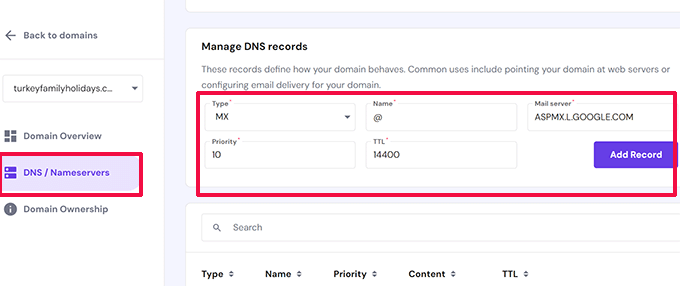
You will find the Add Record form in the Manage DNS Records section. Select MX for the record type and then add value information in the Mail server field.
Finally, click on the ‘Add Record’ button to save the MX record settings.
Changing MX Records Using SiteGround
SiteGround is a popular premium WordPress hosting company that we use for WPBeginner’s website hosting. You can get up to 83% off their hosting using our SiteGround coupon.
If your domain is registered with SiteGround, then you can follow the instructions below to update your MX records.
Adding MX Records in SiteGround Using Site Tools
First, you need to log in to your SiteGround account and go to Domains » DNS Zone Editor in your Site Tools dashboard.
From here, switch to the ‘MX’ tab to enter your MX record entries.
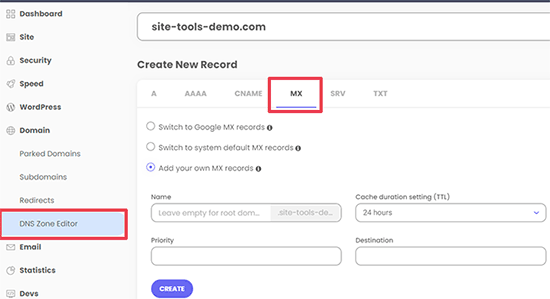
If you want to enter Google Workspace MX records, you can simply select ‘Switch to Google MX Records’.
Otherwise, you can select ‘Add your own MX records’ and then enter your record entries manually.
Don’t forget to click on the ‘Create’ button to save each entry.
Adding MX Records in SiteGround Using cPanel
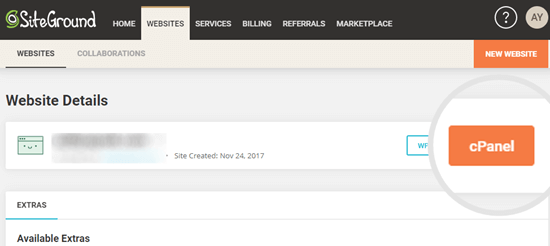
For some older accounts, SiteGround still offers the cPanel control panel. If you are using the older control panel, then simply switch to the ‘Websites’ menu and click on the ‘cPanel’ button.
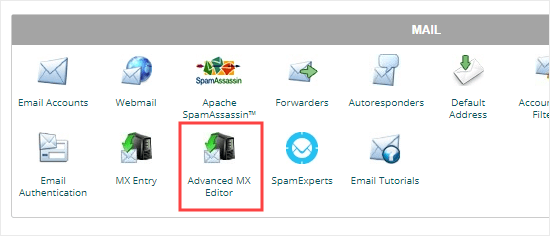
Next, scroll down to the Mail section of your cPanel.
Here, you need to click the ‘Advanced MX Editor’ button.
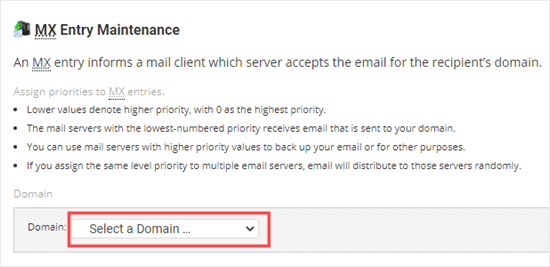
Now, you need to select your chosen domain from the dropdown list.
Simply click to select it.
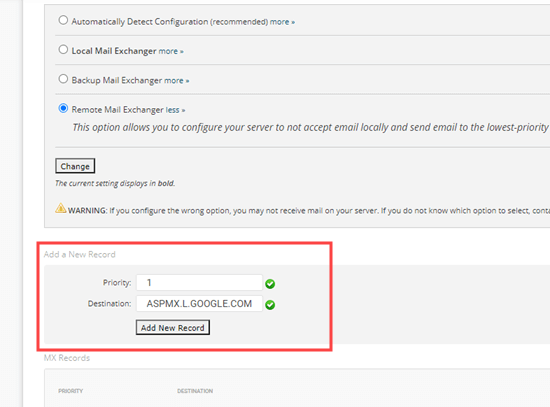
After that, you need to select the Remote Mail Exchanger option. Then, you can enter the Priority and Destination as specified by G Suite or your email service provider.
Simply click the ‘Add New Record’ button, and your MX record will be added.
Changing MX Records Using HostGator
HostGator is a large hosting company that many WordPress sites use. If you want to set up a HostGator account, then check out our HostGator coupon to get 71% off, plus a free domain and SSL certificate.
Note: You’ll need a hosting account with HostGator in order to update your MX records. You can’t change your MX records if you just have a domain registered there.
If you registered your domain and have a hosting account with HostGator, then you can follow the instructions below to update your MX records.
First, you need to log in to your HostGator account. Then, click the ‘Hosting’ tab in your sidebar.
Below your domain’s name, click on the ‘cPanel’ link.
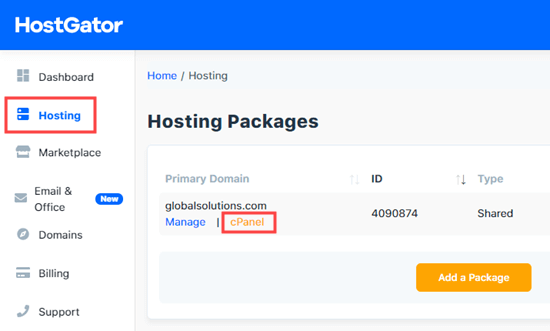
Now, cPanel will load in a new tab.
First, click on the Email link on the left-hand side. This will jump you down to the Email section of the page, where you need to click on the ‘MX Entry’ button.
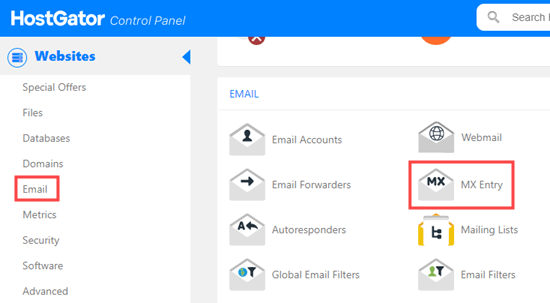
Next, scroll down the MX Records page to the MX Records section.
Simply click ‘Edit’ next to the existing record.

Now, you can change the priority to 1 and the destination to ASPMX.L.GOOGLE.COM in the boxes that appear below the original record.
Click the ‘Edit’ button to save those changes.
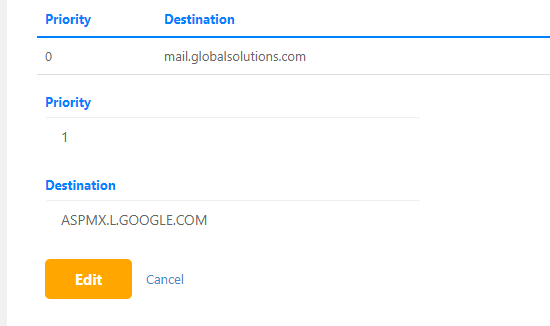
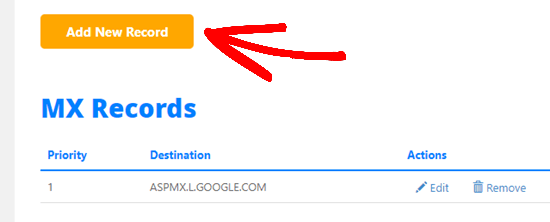
You will then see the new record listed.
You can also add new MX records using the ‘Add New Record’ button above this.
Changing MX Records Using GoDaddy
GoDaddy is a popular web hosting and domain name company. They are offering WPBeginner readers hosting for just $2.99/month plus a free domain. You can find out more details when you use our GoDaddy coupon.
If you registered your domain with GoDaddy, then you can follow the instructions below to update your MX records.
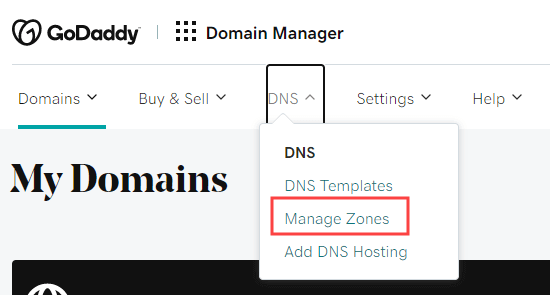
First, log in to your GoDaddy account. Next, click the ‘DNS’ dropdown in the navigation menu and select ‘Manage Zones’.
Next, you need to search for the domain you want to use. This domain needs to be one you’ve already registered with GoDaddy.
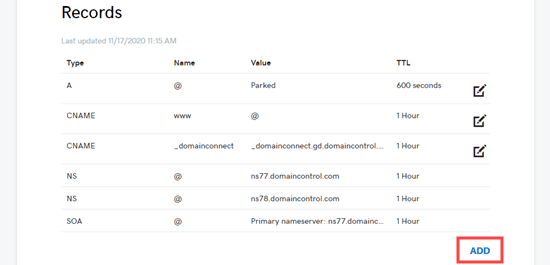
Once you’ve selected your domain, scroll down the page to see a list of records. Here, you need to find and edit your MX records. If you don’t have any MX records, then simply click the ‘Add’ button below the list.
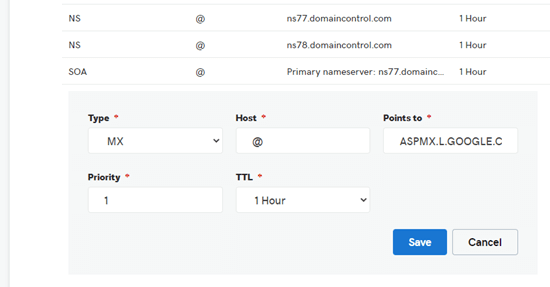
Next, select MX from the Type dropdown list. You should then enter the details of your first MX record. For G Suite, those details are:
- Host: @
- Points to: ASPMX.L.GOOGLE.COM
- Priority: 1
Go ahead and click the ‘Save’ button to save your MX record.
You will then see your record in the list.
To add another MX record, simply click the ‘Add’ button again.

Changing MX Records Using Namecheap
Namecheap is another popular domain name registration company offering great value domains.
If you registered your domain with Namecheap, then just follow the instructions below to update your MX records.
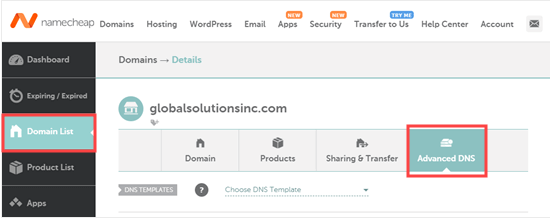
First, go ahead and log in to your Namecheap account. After that, you need to go to Domain List » Advanced DNS.
Next, scroll down the page to the Mail Settings section.
Here, you need to click the dropdown link and select ‘Custom MX’.
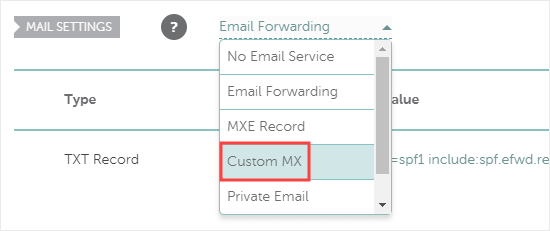
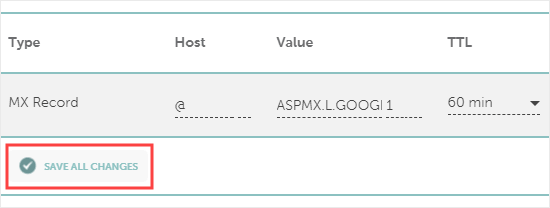
Now, you can enter the details for your MX record. For G Suite, those are:
- Host: @
- Mail Server: ASPMX.L.GOOGLE.COM
- Priority: 1
- TTL: 60
Then, simply click the ‘Save All Changes’ button to save your new MX record.
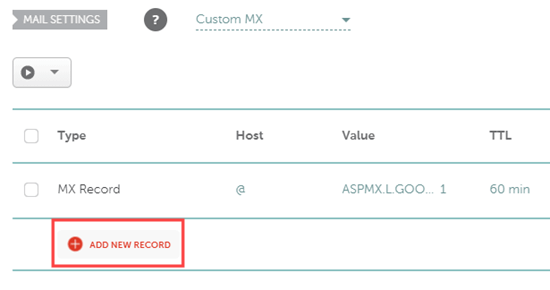
You can go ahead and add more records, too, using the ‘Add New Record’ button.
Just follow the same process we just covered.
Final Steps After Setting Up Your MX Records
After setting your MX records, make sure you follow any other steps for setting up your email or SMTP account correctly. For help with Google Workspace (formerly G Suite), check out our step-by-step instructions on setting up a professional email address with Gmail and Google Workspace.
Next, you may need to set up your WordPress site to send email using your email / SMTP service provider.
To do that, you’ll need the WP Mail SMTP plugin. It allows you to easily route all your WordPress emails using SMTP without any complicated setup.
For detailed instructions, take a look at our ultimate guide on setting up WP Mail SMTP with any host.
We hope this article helped you learn how to change MX records for your WordPress site. You might also like our article on how to create an email newsletter and how to add website push notifications in WordPress to communicate with your customers.
If you liked this article, then please subscribe to our YouTube Channel for WordPress video tutorials. You can also find us on Twitter and Facebook.


Syed Balkhi says
Hey WPBeginner readers,
Did you know you can win exciting prizes by commenting on WPBeginner?
Every month, our top blog commenters will win HUGE rewards, including premium WordPress plugin licenses and cash prizes.
You can get more details about the contest from here.
Start sharing your thoughts below to stand a chance to win!
THANKGOD JONATHAN says
Please do I also need to change MX records if I use SMTP plugin like WP email SMTP? I can see it mentioned somewhere in the post.
Jiří Vaněk says
I don’t know if I just missed it somewhere, but it’s good to note that @ is here as a wildcard instead of a domain name. Many people don’t know this. That is, @ is filled in instead of the domain name. Just that info.