We’ve worked with various WordPress websites over the years. And even after all the new developments in block editing, some people still prefer classic widgets. Many popular plugins also continue to offer widgets instead of blocks for their functionality.
You may be wondering how to use these legacy widgets in WordPress’s modern block-based environment. Whether you’re using an older plugin or prefer classic widgets, we’ll show you how to make them work in today’s WordPress.
In this article, we’ll show you how to convert a WordPress widget to a block effectively. We’ll cover both classic and block-based themes, ensuring you can use your preferred widgets regardless of your setup.
We will cover the following topics in this guide:
- What Is the Difference Between a WordPress Widget and a Block?
- Can a WordPress Widget Be Simply Converted to a Block?
- How to Add Widgets to Your Classic Theme's Sidebar in WordPress
- How to Add Widgets to Your Block Theme's Sidebar in WordPress
- How to Add Widgets to Your Post Content in WordPress
- Learn More Tricks to Use WordPress Blocks and Widgets
💡 Want to future-proof your website and make sure it always works with the latest WordPress versions? Let our team at WPBeginner Pro Services handle the technical updates and maintenance for you, so you can focus on growing your business.
What Is the Difference Between a WordPress Widget and a Block?
A WordPress widget is a content element that you can add to widget-ready areas, which are sections that are not considered part of the main page or post content.
These typically include a sidebar, footer, header, and other sections that your WordPress theme considers widget-ready.

Technically, WordPress block works the same way. But how a block differs from a widget depends on whether you are using a classic or block WordPress theme.
If you use a classic WordPress theme, then WordPress blocks are content elements you add to the main page or post area.
On the other hand, block WordPress themes no longer have a separate widget editor. This means all of the content elements you add, regardless of whether it’s in the header, in the page itself, or wherever, are called WordPress blocks.
In version 5.8, WordPress introduced a new block-based widget editor. This makes adding visual widgets like social media feeds and social icons much easier.
But what if you still rely on a legacy widget that has not been upgraded to a WordPress block? Luckily, you can still use it.
We will show you how to easily add legacy widgets to a widget-ready area and other parts of your page. The method you use depends on whether you are using a classic theme or a block theme.
But first, let’s take a brief look at the difference between widgets and blocks from a developer’s point of view.
Can a WordPress Widget Be Simply Converted to a Block?
If you are a developer who created a legacy widget for WordPress, then you may be wondering whether you can convert it into a new block widget.
While widgets and blocks look similar, they are actually quite different. For example, they are coded using completely different programming languages. Widgets are written in PHP, and blocks are written in JavaScript.
This means that there is no simple way to convert a widget into a block.
But that’s not a problem. Your existing widget will continue to work with new versions of WordPress. If you don’t plan to update your widget code, then you can leave it as it is.
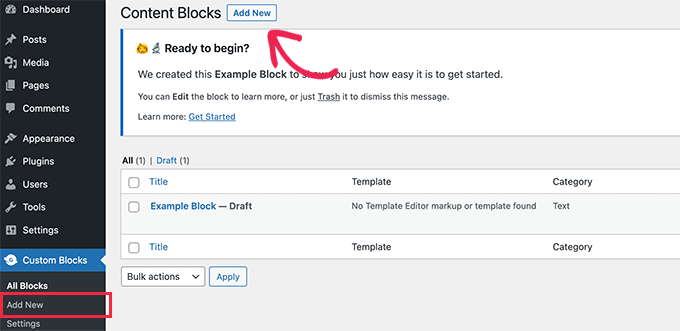
However, if you want to continue adding new features to your widget, then it’s best to create a new block to replace the legacy widget. You can follow our guide on how to create a custom WordPress block.
How to Add Widgets to Your Classic Theme’s Sidebar in WordPress
If you are using a classic theme, then you can add classic widgets to your sidebar or other widget-ready areas of your WordPress website by using the Legacy Widget.
Note: If you see Appearance » Edit instead of Appearance » Widgets, then you are using a block theme. You’ll need to follow the next method below.
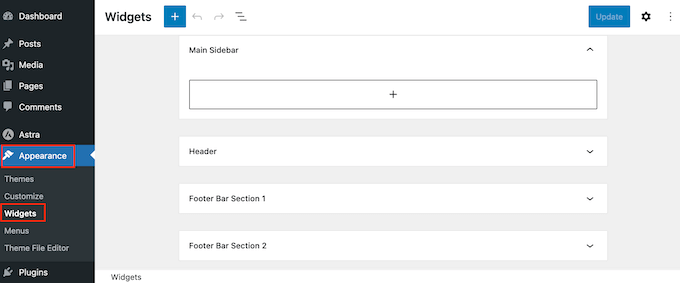
First, you need to navigate to Appearance » Widgets in your WordPress admin area.
Next, you should click the ‘+ Add Block’ button. From the popup, you need to click the ‘Legacy Widget’ icon.
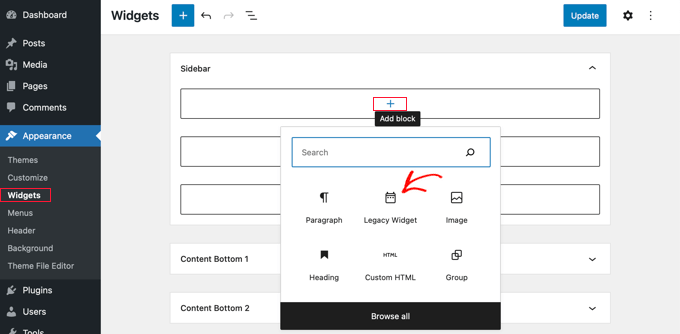
Now, you can select the widget you wish to use from the dropdown menu.
Just click on it.
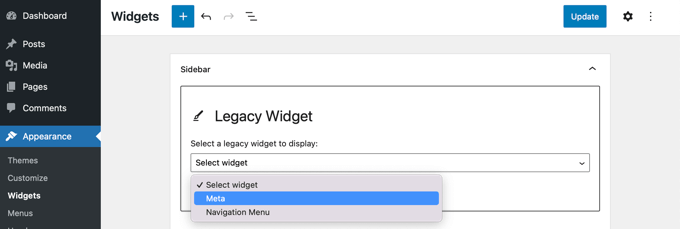
The widget will be added to your sidebar.
Make sure you click the ‘Update’ button at the top of the screen to save the new widget.

To learn more, see our step-by-step guide on how to add and use widgets in WordPress and how to add WordPress widgets in accessibility mode.
How to Add Widgets to Your Block Theme’s Sidebar in WordPress
Block themes, such as the default Twenty Twenty-Five theme, let you use the Full Site Editor in WordPress. Full Site Editing offers custom blocks for styling your website’s theme but doesn’t include the legacy widget by default.
That means you won’t be able to access legacy widgets from the Full Site Editor. Plus, when you switch from a classic theme to a block theme, any legacy widgets you were using are not migrated over.
In this case, we recommend doing one of the following:
- Switch to a plugin that offers block functionality to future-proof your website. As WordPress continues to evolve toward a block-first approach, using block-compatible plugins ensures long-term compatibility with your site.
- If you must use legacy widgets, you can add widget support using a plugin like X3P0 Legacy Widget.
If you want to follow the second suggestion, then simply install and activate the X3P0 Legacy Widget plugin. For more details, see our step-by-step guide on how to install a WordPress plugin.
Note: You will notice that the plugin hasn’t been tested with the latest WordPress versions. That said, we have tried the plugin, and it’s the only one that works best for this tutorial.
You can read our piece about using untested plugins to get more information. If you find a better plugin, don’t hesitate to let us know in the comments!
Upon activation, the plugin will add the Legacy Widget to the Full Site Editor. This will allow you to use legacy widgets with newer themes.
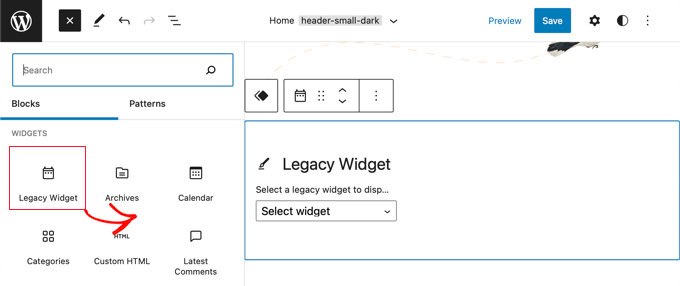
Once you are happy with adding the widget, you can click the ‘Save’ button to make the changes official.
How to Add Widgets to Your Post Content in WordPress
One of the great things about the WordPress block content editor is you can add widgets beyond widget-ready areas, like inside the post or page.
When you are in the content editor, go ahead and click the ‘+ Add Block’ button at the top of the screen.
Next, scroll down to the ‘Widgets’ section and find the widget that you want to add to the content. You can then drag the widget onto your post.
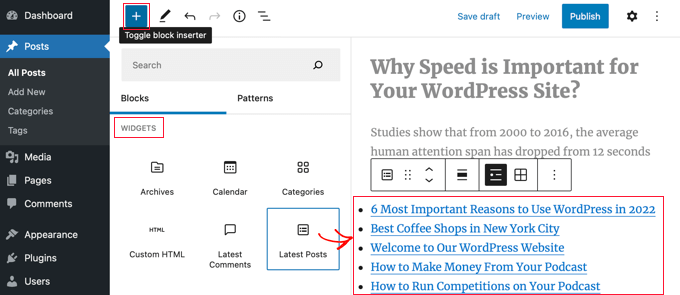
You can customize the widget by using the Settings panel on the right of the screen.
Once you’re done, simply publish or update your blog post or page.
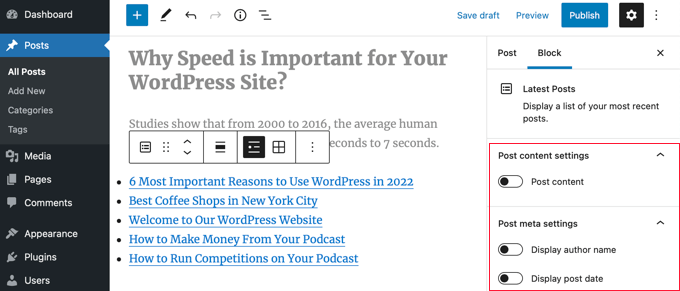
To learn more, see our guide on how to add WordPress widgets in post and page content.
Learn More Tricks to Use WordPress Blocks and Widgets
Now that you’re more familiar with widgets and blocks in WordPress, you may want to learn more ways to make the most of them. Here are some articles you can check out to get started:
- How to Create a Reusable Block in WordPress Block Editor (Gutenberg)
- Beginner’s Guide: How to Use WordPress Block Patterns
- How to Create a Sticky Floating Sidebar Widget in WordPress
- How to Hide a WordPress Widget on Mobile (Easy for Beginners)
- How to Add Custom Styles to WordPress Widgets
- How to Show or Hide Widgets on Specific WordPress Pages
We hope this tutorial helped you learn how to convert a WordPress widget into a block. You may also want to check out our guide on how to display different sidebars for each post and page in WordPress and the best Gutenberg-friendly WordPress themes.
If you liked this article, then please subscribe to our YouTube Channel for WordPress video tutorials. You can also find us on Twitter and Facebook.


Have a question or suggestion? Please leave a comment to start the discussion.