At WPBeginner, we know how challenging it is to manage a multi-author website. But we’ve found a great editorial and publishing workflow plugin to make your processes smoother. This way, you can simply focus on growing your blog.
Having a smooth editorial workflow won’t just save you time and reduce confusion. It can also improve the quality of your content and help you publish more consistently. When everyone knows what they need to do and when, your whole team becomes more efficient.
In this article, we will show you how to improve your editorial workflow in multi-author WordPress blogs.
Why Is a Clear Editorial Workflow Important for WordPress Sites?
If you accept guest posts or manage a multi-author WordPress blog, then a clear editorial workflow can help you publish more posts and improve the quality of your blogs.
When you have a clearly defined editorial workflow, all of your content creators will know exactly what they need to do next. This can improve productivity and help you avoid confusion and communication problems.
In this way, you can grow your WordPress blog without any extra time and effort. In fact, a streamlined editorial workflow can save you time, so you will be free to focus on other tasks, such as building an email list where you can promote your blogs or post on social media.
Now, let’s look at some of the different ways you can improve your editorial workflow. You can use the quick links below to jump to a specific topic:
- Use PublishPress Pro to Improve Your Editorial Workflow
- Define the Stages of Your Workflow With Custom Statuses
- Add Editorial Comments to Your Blog Post Drafts
- Add Editorial Metadata to Your Blog Posts
- Manage Your Editorial Content Calendar
- Add a Pre-Publish Content Checklist
- Set a Minimum Word Count for Blog Posts
1. Use PublishPress Pro to Improve Your Editorial Workflow
The best way to improve the WordPress editorial workflow is by using PublishPress Pro. This plugin allows you to create a content calendar and custom post statuses, add editorial comments, set up email notifications, and more.
We’ll talk more about these features throughout the article.
Note: There’s also a free version of PublishPress Planner that allows you to fine-tune your workflow no matter what your budget is.
However, in this guide, we will be using the premium, version as it has extra features, including the ability to set up Slack notifications and send reminder notifications. You can learn more in our detailed PublishPress review.
The first thing you need to do is install and activate the PublishPress plugin. For more details, see our step-by-step guide on how to install a WordPress plugin.
With that done, go to Planner » Settings and select the ‘License’ tab.
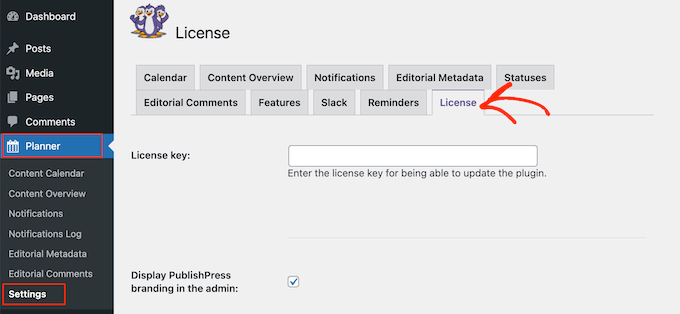
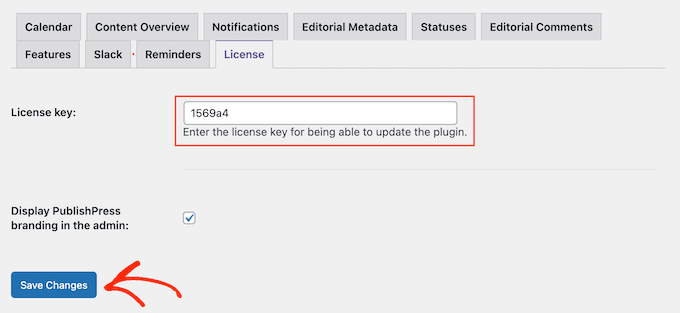
Now, add the license key to the ‘License Key’ field. You will find this information under your account on the PublishPress website.
With that done, just click on ‘Save Changes.’
2. Define the Stages of Your Workflow With Custom Statuses
Post statuses organize your articles based on where they are in the editorial workflow.
WordPress has a few default statuses, such as ‘Drafts,’ ‘Pending Review,’ and ‘Published.’ However, when working on a multi-author WordPress blog, you may need to add some extra post statuses.
PublishPress automatically adds the following custom statuses to your website:
- Pitch – This allows authors to submit topics and ideas directly from the WordPress admin dashboard.
- Assigned – The post is assigned to a specific author. In this way, you can avoid multiple people working on the same post simultaneously.
- In progress – An author is working on the article. This is useful during initial research and drafting.
- On Hold. You have no plans to publish this post at the current time.
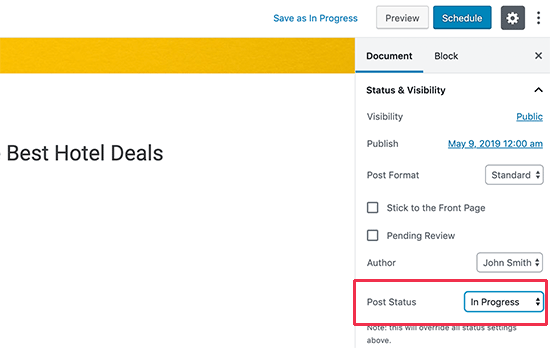
You can change a post’s status using the ‘Post Status’ dropdown menu in the WordPress block editor.
You can also change a post’s status by going to Posts » All Posts.
Here, simply hover over the WordPress blog you want to update, and click on the ‘Edit’ link when it appears.
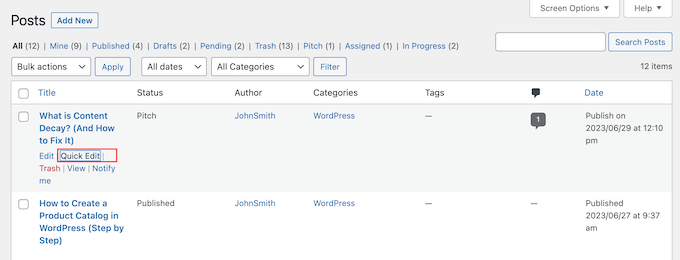
In the ‘Quick Edit’ settings, open the ‘Status’ dropdown menu and choose the status you want to use.
Then, simply click on ‘Update.’

You can also create your own custom statuses using PublishPress. For example, you might create a ‘User Submitted’ status or a ‘Not suitable’ status for guest blogs that don’t quite fit your WordPress website.
For detailed instructions, please see our guide on how to add custom post status for blog posts in WordPress.
3. Add Editorial Comments to Your Blog Post Drafts
When you are working with a team, communication is crucial. There are lots of team communication tools that can help you collaborate, but PublishPress lets you leave editorial comments directly inside the WordPress dashboard.
Editors can open any page or post and then click on the ‘Add an editorial comment’ button.
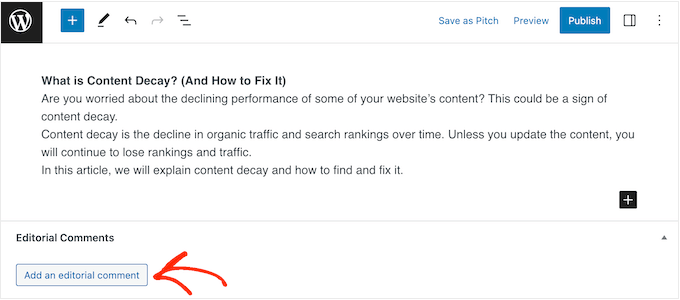
This opens a text editor where the editor can type in their feedback.
They can also upload files. For example, you might upload a PDF file containing all the resources the author should use for the post.

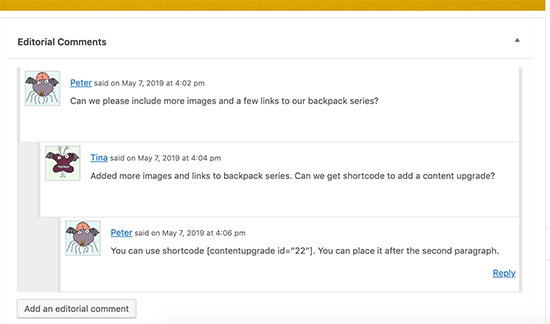
After posting the comment, authors and other users can respond to it.
In this way, authors and editors can have a private discussion directly inside the WordPress admin dashboard.
By default, site admins will get a notification every time someone adds an editorial comment. However, you may want to send the notification to the post’s author, too.
To do this, simply go to Planner » Notifications.
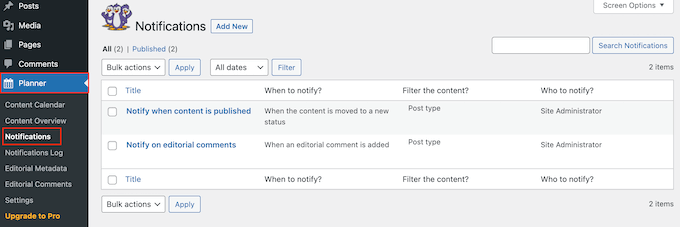
Here, you can see that PublishPress Planner emails the site administrator when new content is published and when editorial comments are added to a post.
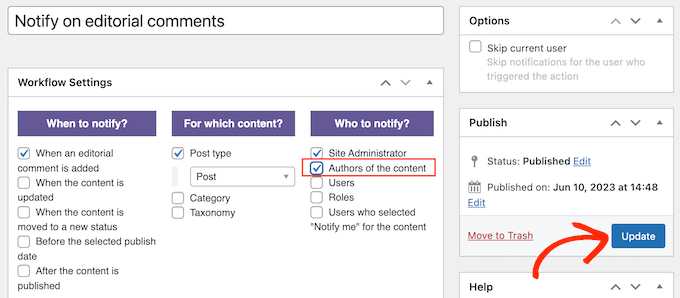
Simply hover your mouse over the ‘Notify on editorial comments’ rule and click on the ‘Edit’ link when it appears.

This rule is already set up, so you can simply check the box next to ‘Authors of the content.’
With that done, just click on ‘Update’ to save your changes.
To learn more about these settings, please see our complete guide on how to get email notifications for posts in WordPress.
Alternatively, if you’re used to working in Google Docs, you may want to add a Google Docs-style collaboration feature to your WordPress site.
4. Add Editorial Metadata to Your Blog Posts
PublishPress also allows you to add metadata to your blog posts so editors and authors can share information.
By default, it adds ‘First Draft Date’ and ‘Assignment’ metadata fields to the WordPress content editor.
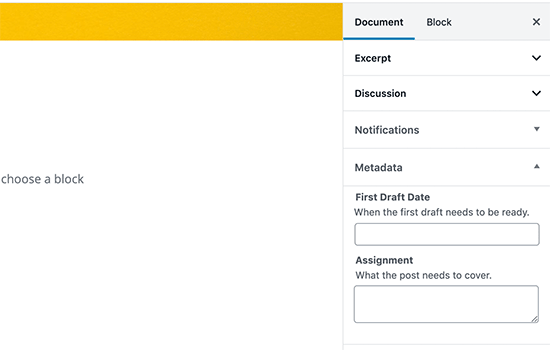
You may want to add your own metadata fields. For example, you might add a ‘Final Draft Due Date’ or ‘Client Brief’ field.
To add your own editorial metadata fields, go to Planner » Editorial Metadata in the WordPress dashboard, then click on ‘Add New.’

You can now type in a name and a description for the metadata field.
This will be visible in the WordPress post editor, so you will want to use something that’s clear, helpful, and descriptive.
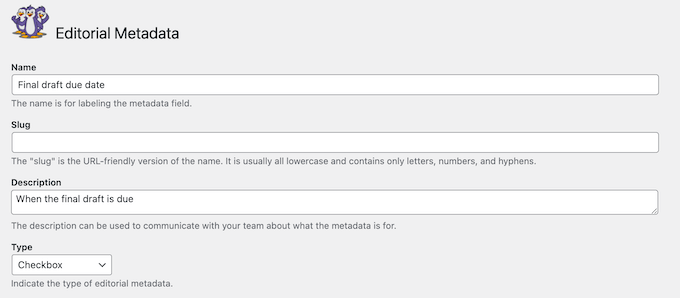
Next, open the ‘Type’ menu and choose how the metadata will look in the post editor.
For example, you can add it as a checkbox, dropdown menu, text field, and more.
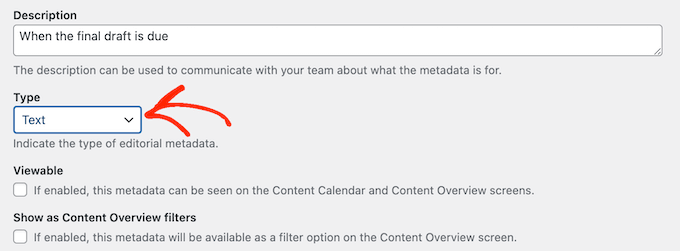
There are some more settings you can look through, but this is all you need to create custom editorial metadata.
When you are happy with the information you have entered, just click on ‘Add New Metadata Term.’

Now, this metadata will appear in the WordPress content editor.
5. Manage Your Editorial Content Calendar
A content calendar helps you schedule all your content, even when you’re working with multiple authors and guest bloggers. It also provides an overview of the publication schedule so you can be sure you’re posting everything on time and as planned.
Many editorial teams use Google Calendar or other task management tools like Asana. However, PublishPress allows you to see and manage the editorial calendar directly inside the WordPress admin area. In this way, you can be confident that all users have access to the content calendar.
To see this calendar, simply go to Planner » Content Calendar.
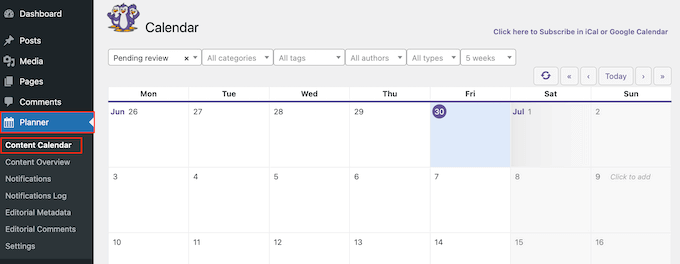
The calendar shows all the scheduled posts, their progress status, and more.
To add a post to the schedule, simply hover over any date and then give it a click. This opens a popup where you can type in some information about the blog you plan to publish.
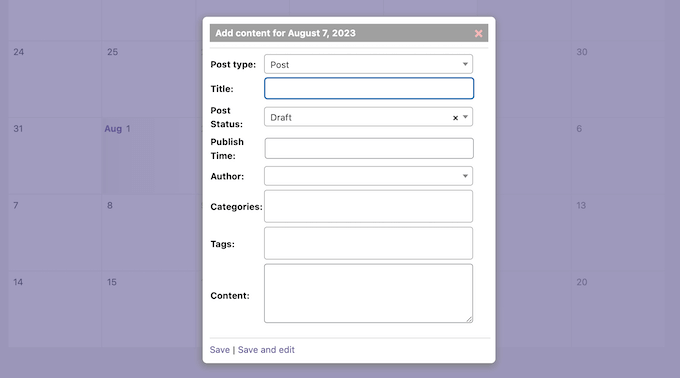
After entering this information, you can click on ‘Save’ to add it to the schedule. Another option is to select ‘Save and edit,’ which schedules the post and creates a new draft so you can start working on the post straight away.
Simply repeat these steps to add more content to the calendar.
After adding all your posts, you can change their dates by simply dragging and dropping them into a new spot.
You can also use PublishPress to automatically schedule posts for publishing or future updates. For more information, you can check out these guides:
- How to Auto-Schedule Your WordPress Blog Posts
- How to Automatically Schedule Content Updates in WordPress
6. Add a Pre-Publish Content Checklist
PublishPress has created a free PublishPress Checklists plugin that allows you to add a pre-publish checklist to the post editor. This allows authors to see all the tasks they need to complete before submitting the post for review.
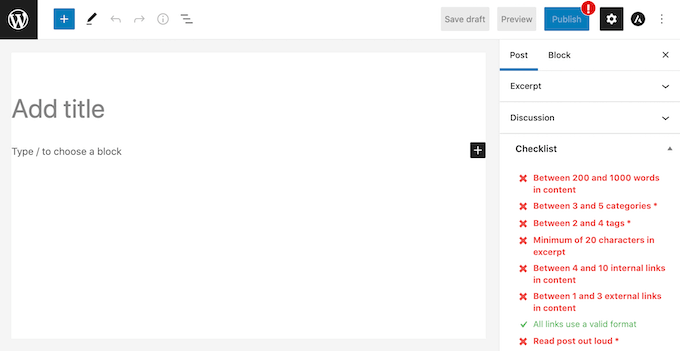
You can make these tasks recommended or required, which means authors can’t mark a post as ‘pending review’ without completing these tasks.
If the user clicks on the ‘Publish’ button without completing all ‘Required’ tasks, then WordPress will show a ‘Please complete the following tasks before publishing’ message.

For step-by-step instructions, please see our guide on how to add a blog post checklist to the WordPress editor.
7. Set a Minimum Word Count for Blog Posts
When you have many authors writing for your blog, it can be hard to keep all the content at the same quality level.
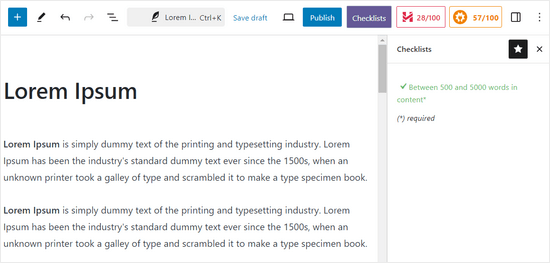
One easy way to help with this is by setting a minimum word count for posts. Having a minimum word count helps make sure topics are covered well, thereby giving more value to your readers.
PublishPress Checklists can also be used for this exact purpose. Besides setting a minimum word count, you can also add user roles that need to be excluded from the requirement.
For more information, check out our step-by-step guide on how to set a minimum word count for WordPress posts.
Discover More Tips to Manage a Multi-Author Blog
If you want to learn more ways to manage multiple authors, editors, and contributors in your WordPress blog, then check out these articles below:
- How to Limit Authors to Their Own Posts in WordPress Admin
- How to Let Contributors Edit Their WordPress Posts After Being Approved
- How to Set Maximum Number of Tags for WordPress Posts
- How to Require Featured Images for Posts in WordPress
- How to Add an Author’s Photo in WordPress
- How to Prevent Authors From Deleting Posts in WordPress
- How to Allow Editors to Only Edit Certain Pages in WordPress
- How to Email Authors When Articles Are Published in WordPress
We hope this article helped you improve your editorial workflow in multi-author WordPress sites. You may also want to see our ultimate list of the best blogging niches that will make you money and our expert picks of the best writing assistants for WordPress.
If you liked this article, then please subscribe to our YouTube Channel for WordPress video tutorials. You can also find us on Twitter and Facebook.


Dennis Muthomi
The custom post statuses feature has been a game-changer for managing multiple client blogs.
After implementing a similar workflow system for a marketing agency, we saw a 40% reduction in revision cycles and much clearer communication between teams.
One additional tip: create a status specifically for “Client Review” when managing client blogs – it helps prevent premature publishing and keeps stakeholders in the loop.
The PublishPress Pro solution described here would have saved us weeks of trial and error in setting this up.
Jiří Vaněk
After setting up MemberPress, we are now working on the website as a team of several people, and this article is the golden grail of information on how to improve our processes and synchronize our work. So many ideas and insights all at once. Awesome. I will definitely share this article with my colleagues on the website, and we will discuss how to enhance our workflows.
John Carter
What about coschedule?
GNFB
floundering! Searching for the abilty to either a. have all posts created default to draft. or B Control posts publish/draft option controlled by category sent to any help welcome as you guys seem to have most of the answers
WPBeginner Staff
Set the post status to Assigned under the Publish meta box on the post editor screen. Then click on the screen options on the top right corner of screen an check the box next to author. Scroll down and you will see authors meta box below the post editor. Select the author you want the post assigned to and update the post.
Dok Simon
Thanks for your candid reply, well appreciated !
Dok Simon
About the Editorial Metadata can I use it to assign post to a specific Author…… ??
If yes , how do I do that ??
Karma Bennett
This looks like an almost ideal solution, as we now juggle three plugins to do what this one plugin does. The only thing is that if our editor is going to switch again, the plugin will need to replace Google Doc’s commenting. That is, I’m looking for a solution that allows one to post comments within the text, not beneath it.
I’ve found a post it notes plugin that does that, but it does so on the front end, such that the notes show up in the preview window. That seems counter-intuitive to me, since I’m rarely looking at the preview while editing.
If anyone could shed some light on this, I’d appreciate it.
Jess
Any other plugins similar to EditFlow? It breaks both MailPoet and WP Editorial Calendar. Both of which I love.
Syed Balkhi
Yes, if you have notifications turned on, then the moment you assign to the writer or change status, the writer will be notified.
Mike M
Hi, I am the adviser of my school’s online newspaper, and I am using EditFlow on my Word Press site. Is it possible for writers to access the notifications part of this plugin after they save a story? I would like for them to be able to click on the section editor’s name so that editor will receive an e-mail notifying him or her that a story is ready for editing. Thanks!
WPBeginner Staff
We use EditFlow and we don’t think it slows down our site. Besides EditFlow mostly works on the backend so it should not have any effect on the frontend of your site.
Hilary Rowland
I found that EditFlow slows my site down considerably. I used a P3 plugin speed tester and it’s the one plugin that slows my site down by several seconds of loading. Hopefully they’ll fix this because it’s great otherwise. Does anyone know an alternative that’s fast loading??
Joe
Thank you for the quick outline. I was scratching my head on how to use edit flow. Upon first glance after install, it does not flow