Do you want to let contributors edit their WordPress posts after being approved?
By default, contributors and guest bloggers can’t edit their published posts. This can cause problems if contributors need to quickly edit a typo, fix wrong information, or update a post to keep it relevant and helpful.
In this article, we will show you how to let contributors edit their posts after being approved.
Why Let Contributors Edit Their Posts After Being Approved?
If you run a multi-author WordPress blog, then people with the contributor role can write posts and submit them for review. Anyone with the administrator or editor user role can then review these posts and publish them.
Once a post is live, the contributor cannot edit it. This can cause problems if contributors need to rewrite their own posts to keep them up to date or fix errors.
By allowing trusted contributors to edit their posts, you can improve the editorial workflow and save your editors a ton of time.
With that being said, let’s see how you can allow contributors to edit their published posts on your WordPress site. Simply use the quick links below to jump straight to the method you want to use:
Method 1: Let Contributors Edit Their Published Posts With WPCode (Quick and Easy)
The easiest way to allow contributors to edit their published posts is by adding custom code in WordPress.
Often, you will find guides with instructions to edit your site’s functions.php file. However, small typos or mistakes in the code can cause many common WordPress errors or even break your site completely.
You will also lose the custom code when you next update your WordPress theme.
With that being said, we recommend using WPCode. It’s the best code snippets plugin and allows you to add code to WordPress without putting your site at risk.
First, you will need to install and activate the free WPCode plugin. For more information, see our step-by-step guide on how to install a WordPress plugin.
Once the plugin is activated, go to Code Snippets » Add Snippet.
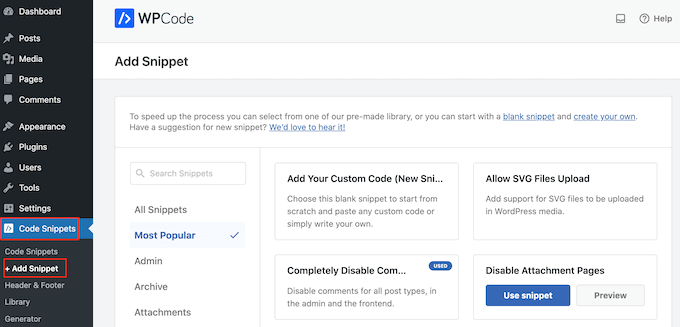
Here, you will see all the pre-made snippets you can add to your site. This includes a snippet that allows you to completely disable comments, upload file types that WordPress doesn’t usually support, disable attachment pages, and much more.
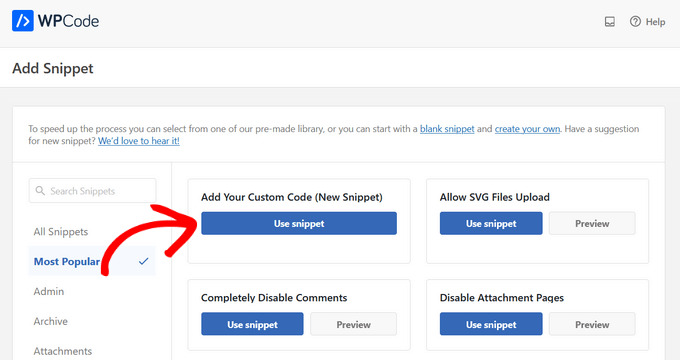
On the next screen, you need to hover your mouse over the ‘Add Your Custom Code (New Snippet)’ option and click the ‘Use snippet’ button when it appears.
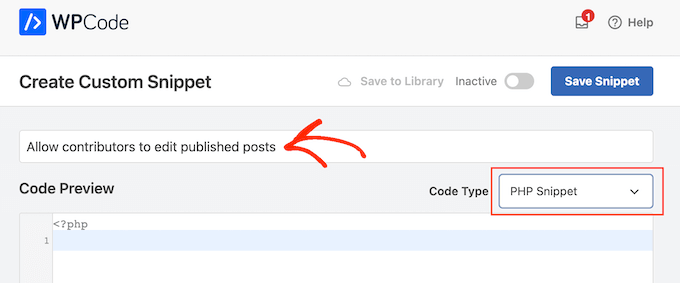
On the next screen, type in a title for the code snippet. This is just for your reference, so you can use anything you want.
Then, open the ‘Code Type’ dropdown and choose ‘PHP Snippet.’
With that done, simply paste the following into the code editor:
// get the "contributor" role object
$obj_existing_role = get_role( 'contributor' );

// add the "Edit published posts" capability
$obj_existing_role->add_cap( 'edit_published_posts' );
After that, you must scroll down the page to the ‘Insertion’ section.
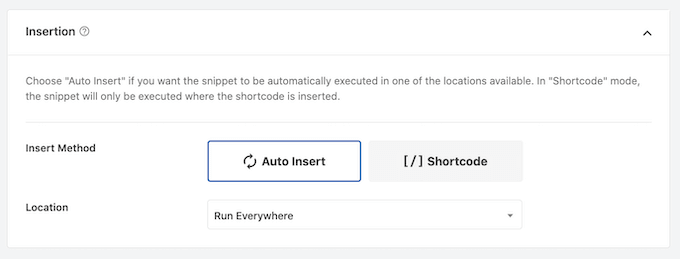
If isn’t already selected, then simply click on ‘Auto Insert’ and then select ‘Run Everywhere’ in the dropdown menu.
Finally, scroll to the top of the screen and click on the ‘Inactive’ slider so that it shows ‘Active.’
Then, just click the ‘Save Snippet’ or ‘Update’ button to make the code snippet live.
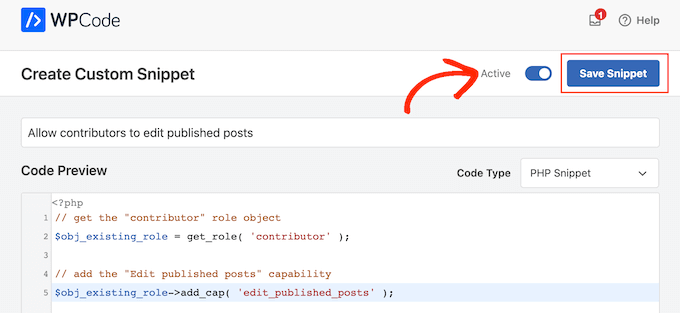
Now, anyone with the contributor role will be able to edit their published posts on your WordPress website.
Method 2: Let Any User Role Edit Their Published Posts With PublishPress
Do you want to give contributors other capabilities, too? For example, you may want to allow contributors to edit and delete their published posts.
You may even want to add or remove capabilities from other users.
If you want complete control over user permissions, then we recommend using PublishPress Capabilities. This plugin allows you to add and remove capabilities from any use role, including WordPress contributors.
The first thing you need to do is install and activate the PublishPress Capabilities plugin. For more details, see our step-by-step guide on how to install a plugin in WordPress.
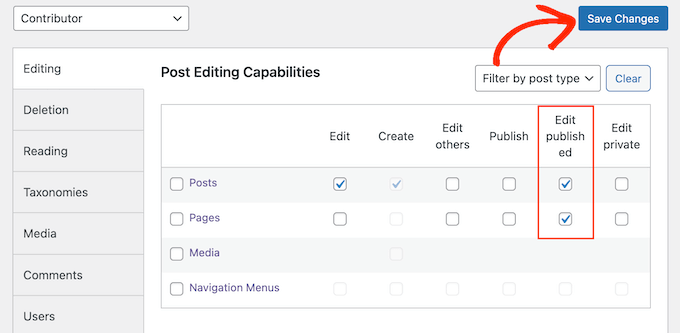
Upon activation, you need to visit Capabilities » Capabilities in the WordPress admin area. At the top of the screen, open the ‘Capabilities’ dropdown and choose the ‘Contributor’ user role.
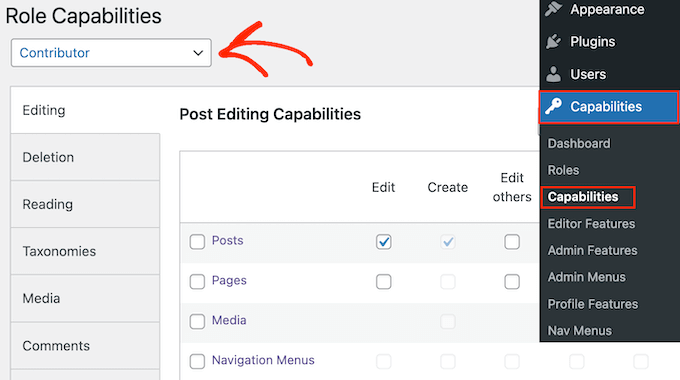
You can now select the ‘Editing’ tab.
Here, you can see that the contributor doesn’t have permission to edit published pages and posts on your WordPress blog.
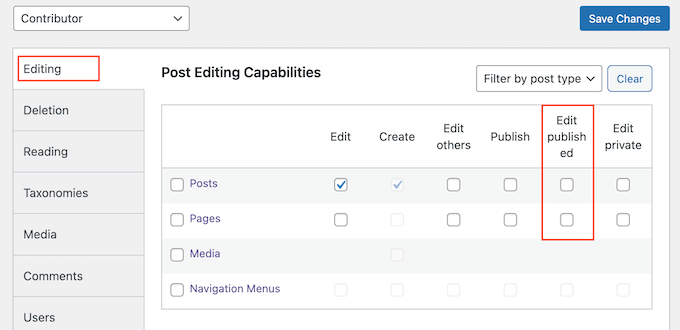
To grant them permission, select the ‘Posts’ or ‘Pages’ checkboxes, depending on the published content they need to edit.
You can now add or remove more capabilities by following the same process described above. When you’re happy with how the contributor role is set up, click the ‘Save Changes’ button.
Once done, contributors will be able to edit their published posts in the WordPress dashboard.
Now, you can switch between user accounts and check that contributors have the option to edit their published posts.
If you want to remove this permission at any point, then simply repeat the above steps. However, this time uncheck the ‘Edit published’ boxes.
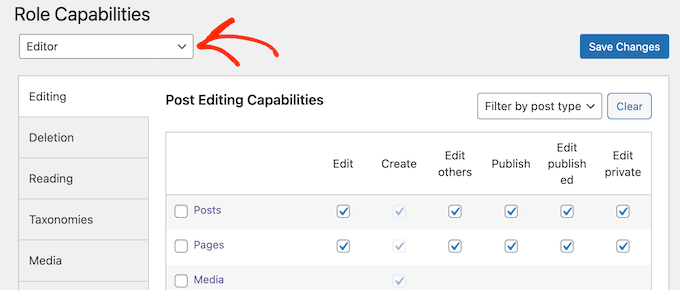
You can also edit the capabilities of other WordPress user roles using the PublishPress Capabilities plugin. Simply repeat the steps described above, but this time select a new user role from the ‘User Capabilities’ dropdown menu.
Learn More Ways to Customize User Roles and Permissions
Want to add or customize your user role capabilities to your specific needs? Check out these WordPress tutorials to get started:
- How to Add or Remove Capabilities to User Roles in WordPress
- How to Add an SEO Editor Role in WordPress
- How to Allow Blog Users to Moderate Comments in WordPress
- How to Restrict WordPress Pages by User Role
- How to Allow Editors to Only Edit Certain Pages in WordPress
- How to Limit the Author Role to Their Own Posts in WordPress Admin
We hope this article helped you learn how to let contributors edit their posts after being approved. You may also want to see our guide on how to make money online blogging with WordPress or see our expert picks for the best contact form plugins for WordPress.
If you liked this article, then please subscribe to our YouTube Channel for WordPress video tutorials. You can also find us on Twitter and Facebook.


Syed Balkhi says
Hey WPBeginner readers,
Did you know you can win exciting prizes by commenting on WPBeginner?
Every month, our top blog commenters will win HUGE rewards, including premium WordPress plugin licenses and cash prizes.
You can get more details about the contest from here.
Start sharing your thoughts below to stand a chance to win!
Joe Barrett says
Where do you put this code if you won’t lose data when updating a theme and don’t want a plugin? Function.php or config.php?
WPBeginner Support says
You would need to create a child theme and add the code to the child theme’s functions.php. We have a guide you can follow below for creating a child theme.
https://www.wpbeginner.com/wp-themes/how-to-create-a-wordpress-child-theme-video/
Admin
Jiří Vaněk says
Is it possible to enable this at the level of specific accounts? For example, would I allow this option only for long-term contributors and not those who are on the site for a short time? Or is it only at the role level and not at the individual account level?
WPBeginner Support says
You would need to create a role for what you are wanting to achieve
Admin
Jiří Vaněk says
I understand, so I assume that a new user role will be created in WordPress (something like editor-senior and editor-junior) and I will continue based on these roles?
WPBeginner Support says
You would need to create the role and add the permissions based on the role.