Do you want to add an SEO editor role in WordPress?
If you have hired an SEO specialist to work on your website, then adding them as an SEO editor is the safest way to give them access to your WordPress website.
In this article, we will show you how to easily add an SEO editor role in WordPress.

Why Add an SEO Editor Role in WordPress?
WordPress comes with a user role management system that defines what a user can and cannot do on your website. You can assign different user roles to your team members depending on their job descriptions.
By adding an SEO Editor / Manager role to your WordPress website, you will be providing secure access to the SEO features and tools to some specific members of your team.
An SEO Editor role has access to the SEO settings for all your posts and pages. This allows them to optimize posts for SEO and work on search engine rankings.
An SEO Manager tends to have access to sitewide SEO settings, including sitemaps, redirects, local SEO, and more.
By default, WordPress doesn’t offer either the SEO Editor or SEO Manager user roles.
However, you can easily add these roles by using the All in One SEO for WordPress. It is the best WordPress SEO plugin on the market and lets you optimize your WordPress site like a pro.
It also comes with powerful access control features that enable you to safely give your SEO team limited access to your website.
That being said, let’s take a look at how to easily add an SEO editor or manager user role in WordPress:
Video Tutorial
If you’d prefer written instructions, then just keep reading.
How to Add SEO Editor / Manager User Roles in WordPress
First, you need to install and activate the All in One SEO for WordPress plugin. For more instructions, please see our step-by-step guide on how to install a WordPress plugin.
Note: AIOSEO also has a free version. However, you’ll need the premium plan of the plugin to unlock the SEO editor and manager user roles.
Upon activation, the plugin will launch the setup wizard, which will walk you through the setup. If you need help, then you can follow our tutorial on how to set up All In One SEO in WordPress.
Now, you can simply add a new user to your WordPress site by visiting the Users » Add New page, or you can edit an existing user account by visiting the Users » All Users page from your WordPress dashboard.
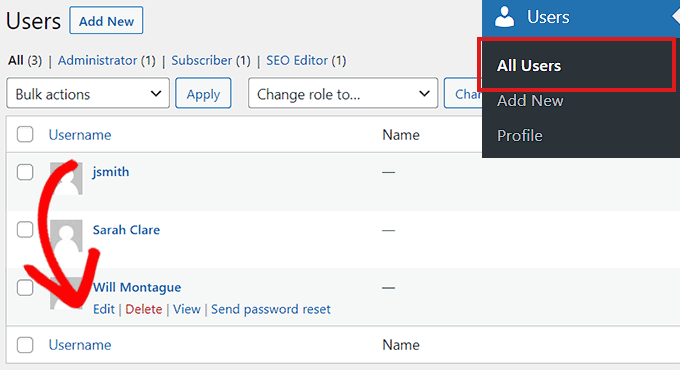
After that, simply click on the ‘Edit’ link under the user account that you want to change.
On the Edit User screen, scroll down to the Role option and select ‘SEO Editor’ or ‘SEO Manager’ as the new user role from the dropdown menu.
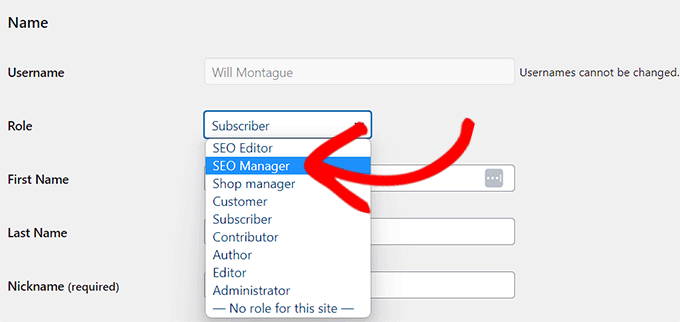
Don’t forget to click on the ‘Add / Update User’ button to save your changes.
These users will now be able to access SEO features based on the user role assigned to them.
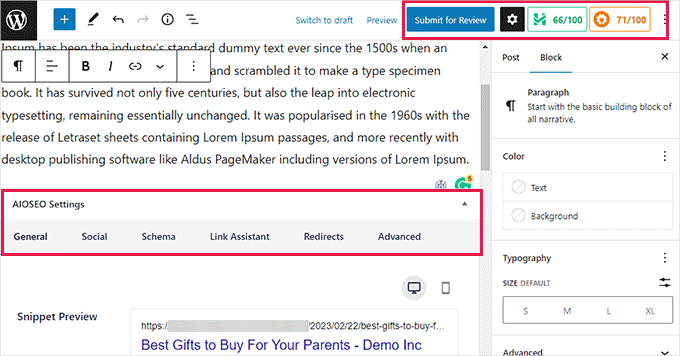
For instance, SEO Editor will be able to see and edit SEO settings for a post or page by simply opening them in the WordPress editor.
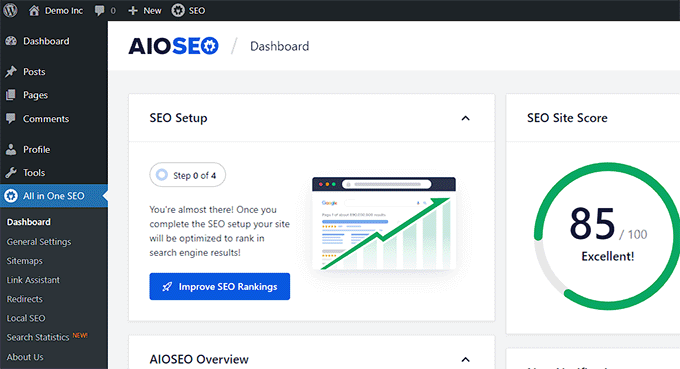
On the other hand, a user with the SEO Manager role will also be able to view the general SEO settings in the WordPress admin sidebar.
They will be able to make changes to sitewide SEO settings that may affect your entire WordPress website.
How to Customize SEO User Roles in WordPress
By default, All in One SEO selects the best access control settings for each SEO user role.
However, sometimes you may want to add or remove permissions from the SEO editor or Manager user roles.
All in One SEO lets you customize SEO user roles so that you can select which options they’ll have access to.
For this, head over to the All in One SEO » General Settings page from the WordPress dashboard and switch to the ‘Access Control’ tab.
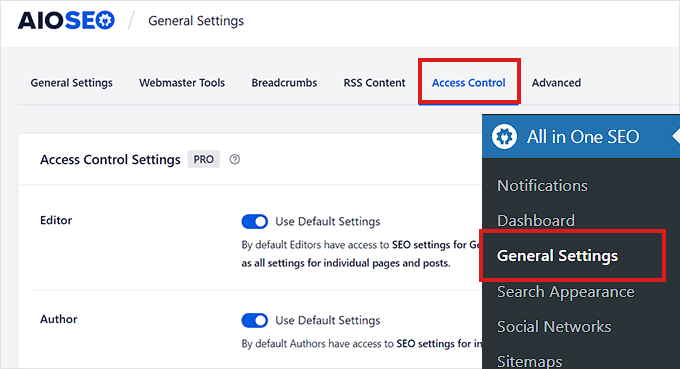
Caution: Be very careful when giving a user role access to any option in the General SEO Settings. These options may allow them to apply SEO changes that will affect your entire website.
From here, scroll down to the ‘SEO Editor’ option and toggle the switch next to the ‘Use Default Settings’ option.
This will reveal the default settings that All in One SEO has chosen for the SEO Editor role.
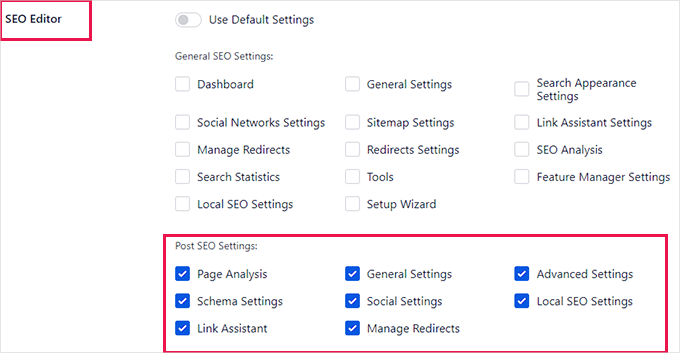
As you can see, by default, the SEO editor user role only has access to Post SEO Settings.
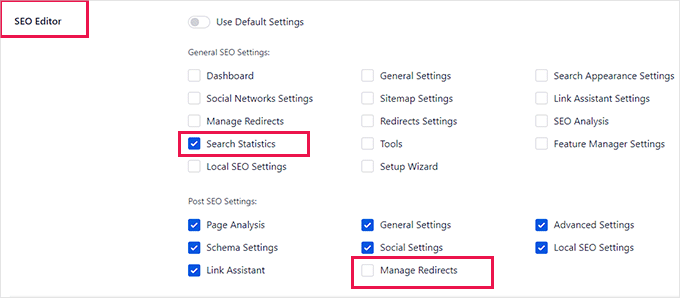
From here, you can check or uncheck items to provide a specific level of access to the SEO editor.
For instance, you can remove access to the Manage Redirects option or give them access to the Search Statistics feature.
Similarly, if you want to change settings for the SEO Manager user role, then you will need to switch off the ‘Use Default Settings’ toggle next to the SEO Manager option.
This will reveal the default settings that All in One SEO has chosen for the SEO manager user role.
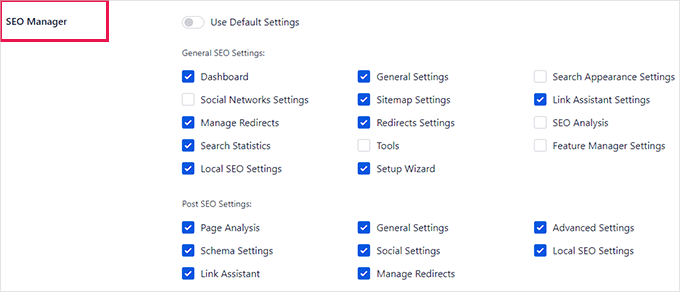
By default, the SEO manager user role has access to several options under the General SEO settings as well as all the options under the Post SEO settings.
You can change that by selecting the checkbox for the items that you want them to have access to or unchecking to remove access from specific items.
Once you are finished, don’t forget to click on the ‘Save Changes’ button to store your settings.
You have now successfully changed the control settings for the SEO editor and manager role in WordPress.
Bonus: How to Track SEO Changes Made in WordPress
Once you’ve assigned SEO editor roles for your WordPress site, you can use All in One SEO’s SEO Revisions feature to easily track the SEO changes your team makes.
Simply go to any page or post and scroll to the ‘AIOSEO Settings’ section at the bottom. Then, click on the ‘SEO Revisions’ tab.
From there, you can see the SEO changes that have been made in chronological order, along with what user made the changes.
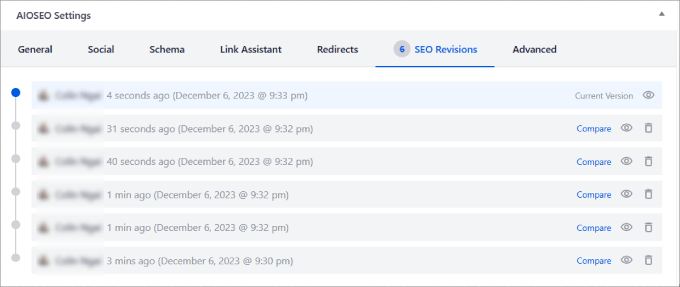
You can also view the revision, compare the changes made between two revisions, add annotations and notes, revert to the previous version in 1-click, and more.
This makes it super easy to manage SEO changes made by other editors and track whether the changes have a positive or negative impact on your search engine rankings.
For more details, see our guide on how to track SEO changes on your WordPress site.
We hope this article helped you learn how to add an SEO Editor role in WordPress. You may also want to see our ultimate WordPress SEO guide for beginners and our top picks for the best WordPress plugins for small businesses.
If you liked this article, then please subscribe to our YouTube Channel for WordPress video tutorials. You can also find us on Twitter and Facebook.


Syed Balkhi says
Hey WPBeginner readers,
Did you know you can win exciting prizes by commenting on WPBeginner?
Every month, our top blog commenters will win HUGE rewards, including premium WordPress plugin licenses and cash prizes.
You can get more details about the contest from here.
Start sharing your thoughts below to stand a chance to win!