
When I first started building WordPress websites, I didn’t realize how useful a contact form could be. It’s not just a way for people to reach you. It also keeps your email address private, cuts down on spam, and makes it easier to stay organized.
Once I added a proper contact form, everything felt smoother. Visitors could get in touch without hassle, and I could manage messages all in one place.
That’s why I use WPForms. It’s simple, reliable, and takes care of the details so you can focus on your website.
In this guide, I’ll show you how to create a professional contact form in WordPress using WPForms. 🚀

Why Add a Contact Form in WordPress?
Adding a contact form to your WordPress site is a simple way to make it easier for people to reach you. Instead of copying your email address and opening their mail app, visitors can just send a message right from your website.
I’ve seen how something this small can make a big difference.
When people can easily ask questions, request quotes, or share feedback, your site feels more approachable. And you’re more likely to start real conversations and new business opportunities.
Here are a few key benefits of adding a contact form to your WordPress site:
- Cut down on spam and stay organized — A contact form helps block most automated spam that targets public email addresses, so you only get genuine messages.
- Ask for the right details upfront — You can display fields for things like position and experience level for job application forms, or product type and quantity for order forms. This helps you understand what visitors need and respond more effectively.
- Get more leads without losing visitors — People are much more likely to fill out a quick form than leave your site to send an email, especially on mobile devices.
- Look more professional — A simple, well-designed contact form feels more trustworthy than just posting your email address.
- See what people care about most — Forms help you spot patterns, like which pages visitors contact you from or what topics they ask about. This can help you adjust your content and make your site work better for your audience.
The best part? WordPress makes it simple to add professional contact forms without any coding knowledge. For more advanced form strategies, check out our ultimate guide to using WordPress forms.
With that said, I’ll walk you through how to add a contact form in WordPress.
Here’s a quick overview of what I’ll cover in this guide:
- Step 1: Install and Activate the WPForms Plugin
- Step 2: Select the Simple Contact Form Template
- Step 3: Customize Your Contact Form
- Step 4: Set Up Contact Form Notification and Confirmation
- Step 5: Test Your New Contact Form
- Step 6: Embed Your Simple Contact Form on a WordPress Page
- Bonus Tip: Set Up WordPress Form Tracking to Improve Conversions
- FAQs: Creating and Adding Contact Forms in WordPress
- Video Tutorial: How to Create Contact Forms in WordPress
- Further Reading for Using Forms in WordPress
Step 1: Install and Activate the WPForms Plugin
For creating contact forms in WordPress, I recommend WPForms, which is the best contact form plugin for WordPress. It’s easy to use, yet powerful enough to handle just about anything you need.
I’ve personally used it on many sites over the years, and it’s always been reliable. Plus, we also use it to create our contact form here at WPBeginner.
See our detailed WPForms review to learn more about the plugin.
💡 Note: WPForms comes in both free and Pro versions. The WPForms Pro version includes over 2,000 form templates, conditional logic, and priority support.
But if you just need a basic contact form, WPForms Lite works perfectly, and you can upgrade later if you need more features
To get started, you need to go to the WPForms website to sign up for an account.
Just click on the ‘Get WPForms Now’ button, choose a plan, and complete the registration process. This will bring you to the WPForms dashboard, where you can access your WPForms Pro zip files and license key.
From here, you can then go to your WordPress admin area to install and activate the WPForms plugin.
To do this, simply navigate to Plugins » Add New Plugin.
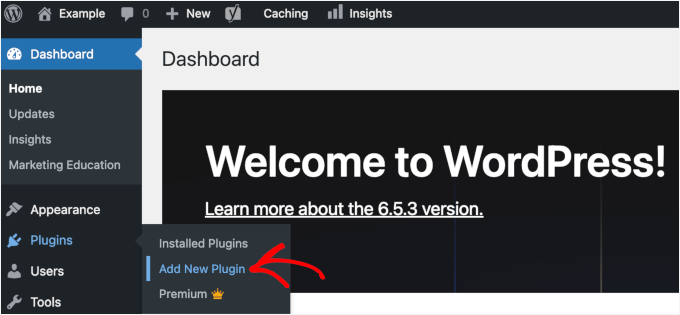
On the next screen, I recommend using the search bar to quickly find the WPForms plugin.
Click the ‘Install Now’ button on the search result, and then ‘Activate.’ If you want more detailed instructions, you can check out our guide on how to install a WordPress plugin.

If you’ve purchased WPForms Pro, you’ll also need to activate your license key.
After installing the plugin, go to WPForms » Settings in your admin dashboard and enter your license key. This unlocks the Pro features and ensures you’ll get regular updates and support.
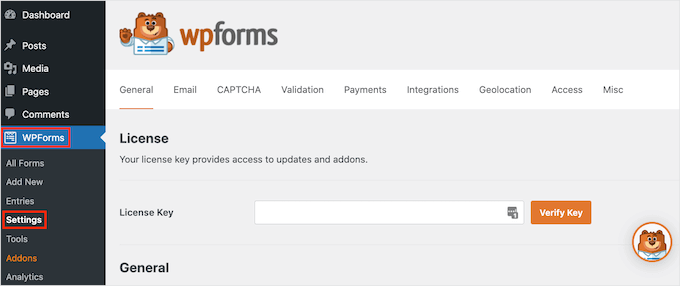
Once it’s activated, you’ll see a new WPForms menu in your WordPress dashboard.
Step 2: Select the Simple Contact Form Template
Now that you have activated WPForms, you are ready to create a contact form in WordPress.
When you first access WPForms, the setup wizard will guide you through creating your form.
If you don’t see a setup wizard, you can navigate to WPForms » All Forms in your WordPress admin panel and then click the ‘Add New’ button.
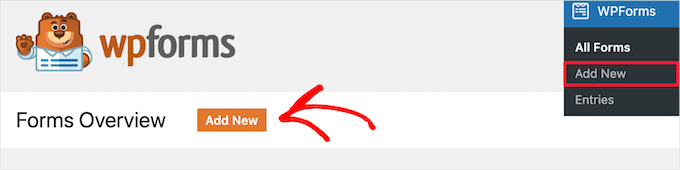
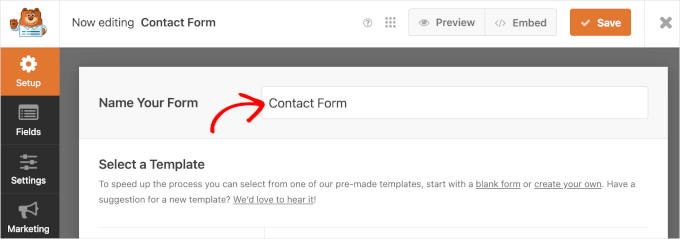
This will take you to the Setup page, where you can start by giving your form a descriptive name like “Contact Form” or “Get in Touch.”
This is for your reference only, but having clear names helps you stay organized if you create multiple forms later.
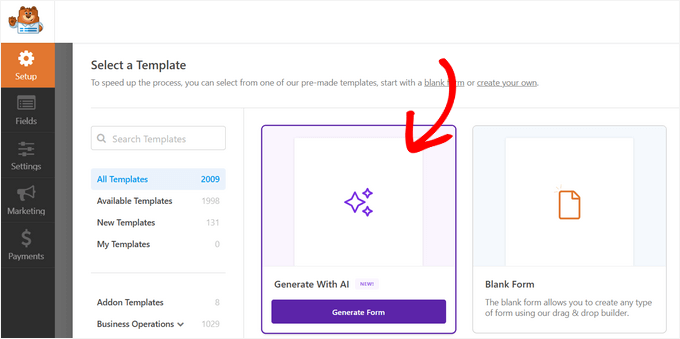
Next, you’ll choose how you will build your contact form:
- Start from scratch – Build your form on a blank canvas for complete control over the layout and fields.
- Use a pre-made template – With WPForms Pro, you get access to over 2,000 ready-made templates you can customize in minutes. WPForms Lite comes with over 60+ free form templates.
- Generate a form with AI – Let the WPForms AI Form Builder create a customizable form for you. Just describe what you need in a simple prompt, and it’ll handle the setup automatically.
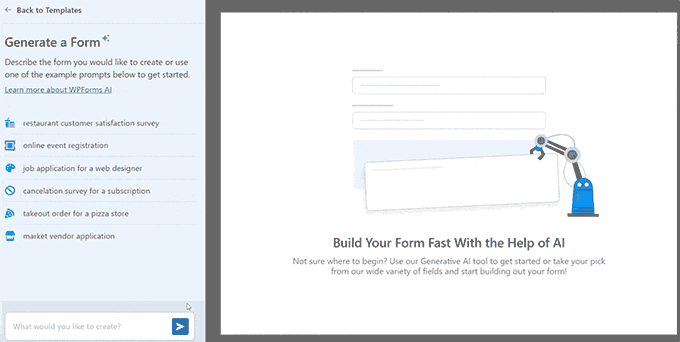
If you want to use WPForms AI, you can hover over the ‘Generate With AI’ box and click the ‘Generate Form’ button.
On the next screen, you can either select from the available prompt examples or add your own custom prompt for the AI.
It will then generate the form for you, which you can see in the preview area.
🧑💻 Insider Tip: In addition to the AI-powered form builder, WPForms also has:
- AI Choices: Automatically generate options for fields like multiple choice, radio buttons, checkboxes, and dropdown menus.
- AI Calculations: Instantly generate AI-powered calculation formulas for fields like sales tax, eliminating the need for manual calculations.
Note that these are Pro features available with WPForms’ paid plans.
For this guide, though, I’ll show you the steps using the ‘Simple Contact Form’ template. It includes all the essential fields most websites need.
While you’re browsing the templates, you might notice other popular options that could be useful for your site:
- User Registration Forms — Perfect for membership or community sites that let users sign up and create accounts.
- Online Order Forms — Great for restaurants, online shops, or service providers who want to take product or custom orders directly on their site.
- Booking Forms — Ideal for consultants, salons, or rental businesses that need to schedule appointments or reservations.
- Survey Forms — Handy for collecting customer feedback or running quick polls.
- Conversational Forms — Offer a modern, chat-like experience that boosts engagement and completion rates.
Once you’ve found the template you want to work on, you can hover over it and click ‘Use Template.’

This will take you to the WPForms drag-and-drop editor.
Step 3: Customize Your Contact Form
Now comes the fun part: making your contact form work precisely how you want it.
WPForms’ drag-and-drop builder makes this incredibly easy, even if you’ve never built a form before. Here, you can see the customization options on the left and the form preview on the right.
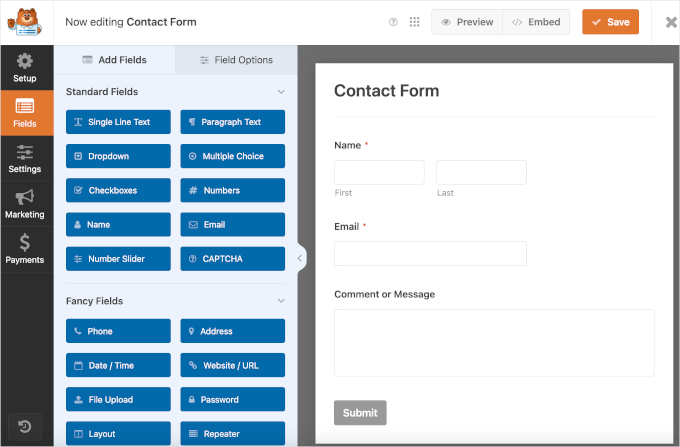
Now, you may notice that the Simple Contact Form template includes the Name, Email, and Comment or Message fields.
You can rearrange fields by dragging them up or down to change their order. This flexibility means you can collect exactly the information you need without overwhelming visitors.
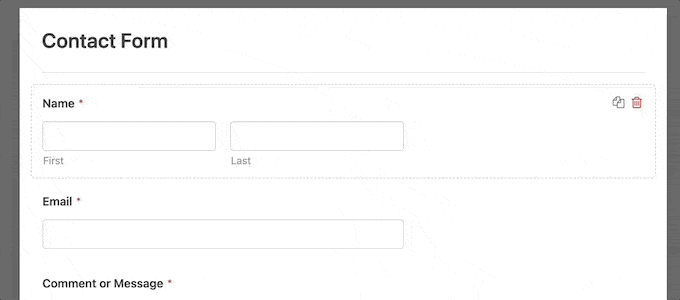
Then, for each of those fields, you can click on it to modify its settings, change the label text, or mark it as required.
Here, I changed the Email field’s label to Email Address and enabled the email confirmation feature. This allows users to check if they have added the correct email.

To add new fields, simply drag them from the left panel onto your form. Here are some popular field additions I recommend considering:
- Phone Number field — Useful if you prefer calling leads back directly
- Dropdown menu — Great for categorizing inquiries (like “Sales,” “Support,” or “General Question”)
- Checkbox field — Perfect for newsletter signups or consent confirmations
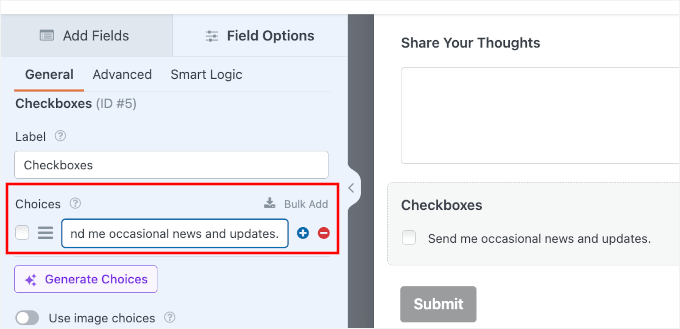
Including a checkbox with a label like “Subscribe to our newsletter” or “Send me occasional news and updates” is a smart move. It helps you grow your email list while visitors are already engaged with your contact form.
Keep in mind that you will also need to connect your form to an email marketing service. For details, see our tutorial on how to use your contact form to grow your email list.
🧑💻 Pro Tip: If you’re using your contact form to collect subscribers, this step is crucial. It helps you get clear consent from users before sending them regular updates, which also keeps your site compliant with privacy laws like GDPR.
To add this, simply drag the Checkbox field and drop it into your form preview.

In the customization panel, you can remove the other two default choices by clicking the ‘–’ button.
Then, add your message to the remaining choice box.
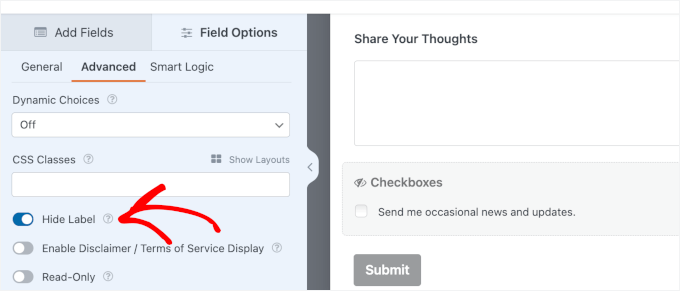
Next, you’ll want to hide the ‘Checkbox’ label.
By hiding it, only your intended “Send me occasional news and updates” text appears next to the checkbox, keeping the form clean and easy to read.
To do that, you can switch to the ‘Advanced’ tab and toggle on ‘Hide Label.’
For Pro users, WPForms offers other powerful advanced options that can make your forms even more effective:
- Conditional Logic — Show or hide fields based on previous answers.
- File Upload fields — Let visitors attach documents or images.
- Payment fields — Accept payments directly through your form.
When you’re satisfied with your form fields and layout, click the ‘Save’ button.
🧑💻 Pro Tip: When you’re customizing, remember that less is often more. A shorter form is less intimidating and can lead to more submissions. I recommend only asking for the information you absolutely need.
Step 4: Set Up Contact Form Notification and Confirmation
Now that you have created your contact form, it’s essential to properly configure the form notification and form confirmation options.
Here’s a quick breakdown of each setting:
- Form notification is the email you get after someone submits the contact form on your WordPress blog.
- Form confirmation is what your website visitor sees after they submit the form. This can be a simple thank you message, a follow-up page where you’ve uploaded downloadable PDFs, or anything you’d like.
The good news is that WPForms automatically configures your form notifications right out of the box. This means you’ll start receiving email alerts as soon as someone submits your contact form, without any additional setup required.
That said, you still can configure these settings to cater to your needs.
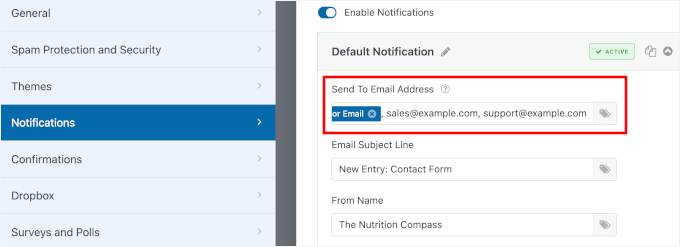
So, let’s go to Settings » Notifications. By default, you’ll see that WPForms sends notifications to your WordPress admin email address.
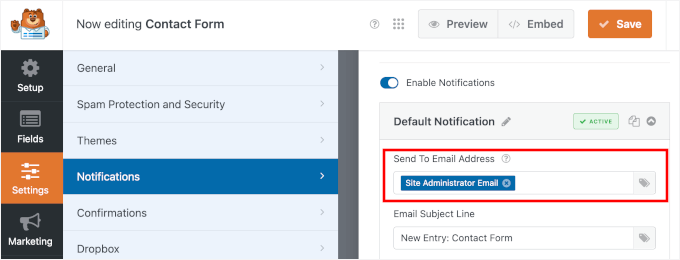
You can also send notifications to multiple email addresses, so different team members get the correct inquiries. For example, sales messages can go to your sales team, while support requests go to customer service.
When adding email addresses, just be sure to separate each with a comma.
Learn more about this in our guide on how to create a contact form with multiple recipients.
On this page, you can also see other customization fields. For example, the ‘Email Subject Line’ is pre-filled with your form name. While the ‘From Name’ field is automatically populated with your site name.
Don’t forget to click the ‘Save’ button if you make changes here.
🧑💻 Pro Tip: If you’re having trouble receiving form submissions, see our guide on how to fix WordPress not sending email issues. It shows you how to use WP Mail SMTP, the best SMTP plugin for WordPress, to make sure your emails are delivered reliably every time.
Next, let’s switch to the ‘Confirmation’ tab to choose how visitors know you’ve received their message.
WPForms gives you three main options:
- Show a message — Display a thank-you message right on the same page.
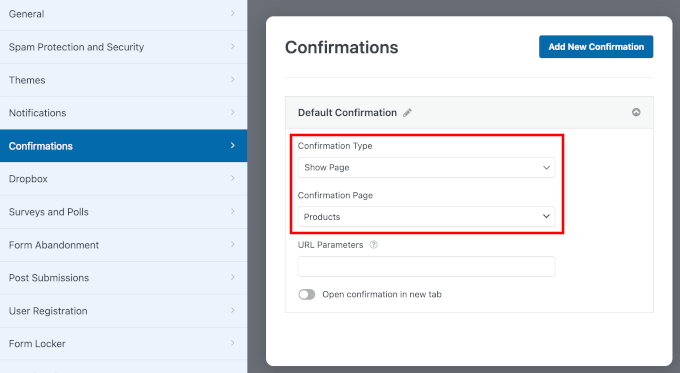
- Show page — Send users back to the previous page or any existing page on your site, such as a custom thank-you page.
- Go to URL (Redirect) — Send visitors to any URL, on or off your site.
I recommend using a custom message for most simple contact forms since it’s immediate and doesn’t require visitors to load a new page.
If this sounds good to you, you can select ‘Message’ from the confirmation type dropdown and write your custom message in the available field.
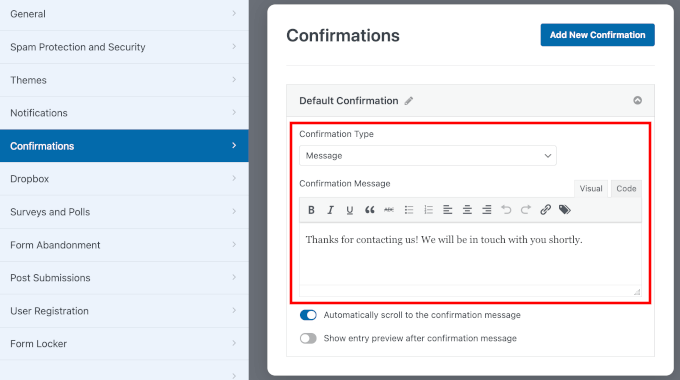
Now, a great confirmation message doesn’t just say ‘thanks’ – it sets expectations. You can try something like: ‘Thanks for contacting us! We’ve received your message and will get back to you within 1-2 business days.’
This reassures the user that their submission was successful and informs them when to expect a response. Plus, it helps make your business feel more responsive and trustworthy.
However, redirecting users to a special page works well if you want to show related content, offer a free resource, or track conversions in Google Analytics.
And for service-based businesses, you might send users to a page that explains your typical response time and next steps.
Online stores, on the other hand, can redirect to product pages or special offers to keep the engagement going.
If you make any changes here, then make sure to click the ‘Save’ button.
Step 5: Test Your New Contact Form
Once you’ve set up your contact form, it’s time to give it a quick test.
At the top of the WPForms builder, you can click the ‘Preview’ button to see how your form will look to visitors.
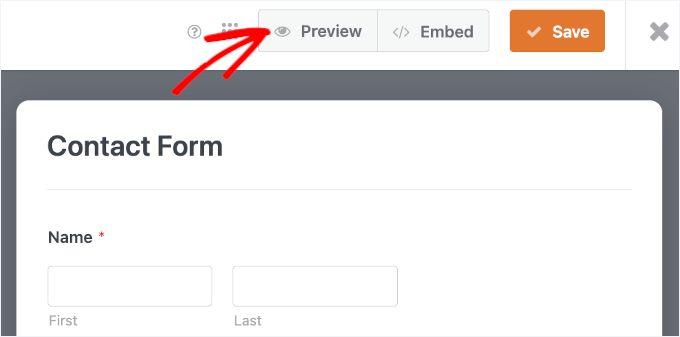
On the preview screen, let’s first check that all your fields show up correctly and are easy to understand.
Then, go ahead and fill out the form using some test information. You can try skipping a required field or typing your email address incorrectly to make sure the form validation works as it should.
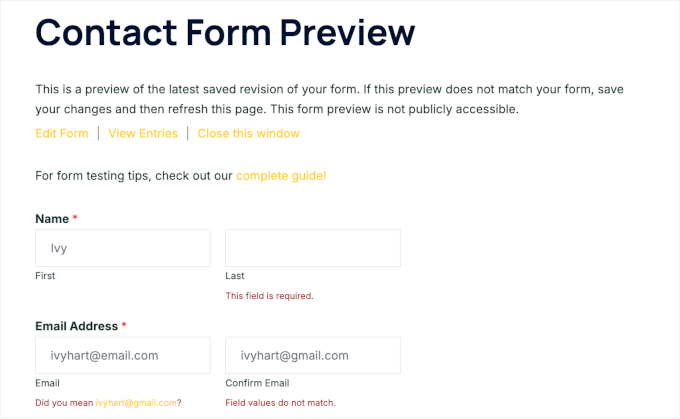
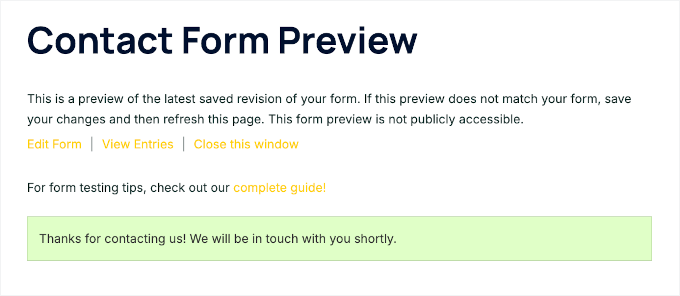
When everything looks good, click ‘Submit’ to see your thank-you message or confirmation page appear as expected.
Here’s what it looks like on my demo site:
Step 6: Embed Your Simple Contact Form on a WordPress Page
Now that everything is set up, it’s time to make your contact form live on your WordPress website. WPForms makes this step incredibly straightforward with its built-in embedding feature.
To get started, go ahead and click the ‘Embed’ button at the top of the form builder.

This will show you an Embed in a Page popup.
Here, you can choose between ‘Select Existing Page’ and ‘Create New Page.’
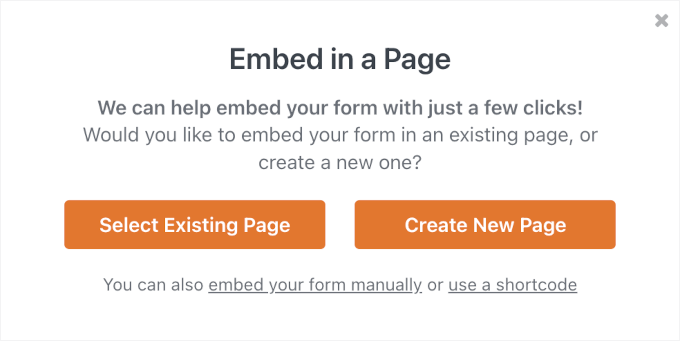
For a brand new contact page, you can select the ‘Create New Page’ option.
After that, type in a page name like “Contact Us” or “Get in Touch,” and then click ‘Let’s Go!’.

WPForms will then create the page and automatically embed your form in one smooth step. You can then write all the content you need to add context, preview the page, and publish it.
If you already have a Contact page on your site, you can simply choose ‘Select Existing Page.’
Then, in the next popup, you’ll choose where you want to add the contact form from the dropdown menu and click ‘Let’s Go!’.

This will open the page’s content editor.
From here, you can click ‘+’ to add the WPForms block.
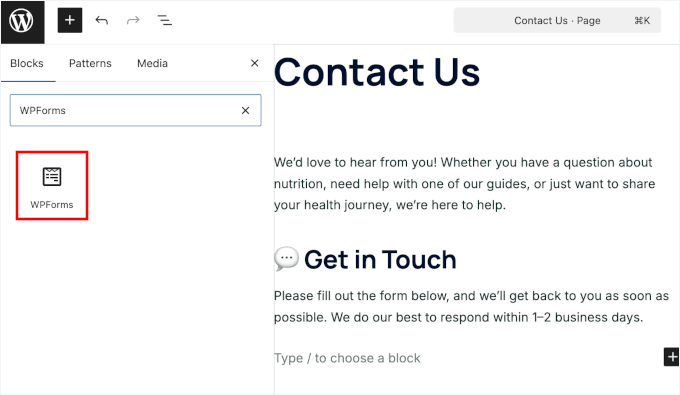
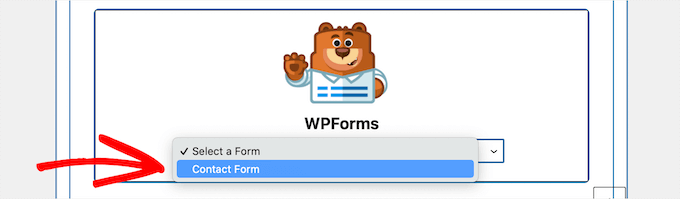
Next, you’ll see the WPForms block added to your editor.
Simply click on the dropdown and choose the form you want to add.
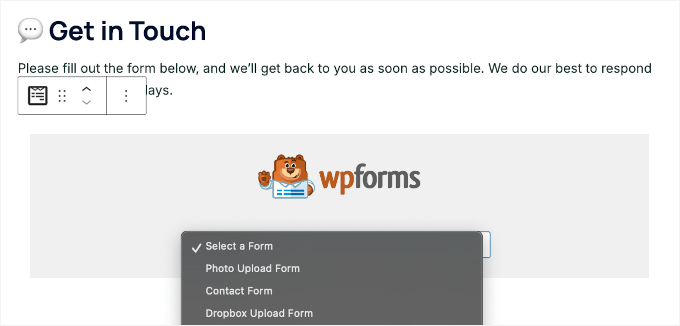
WPForms will then load your contact form preview inside the block editor.
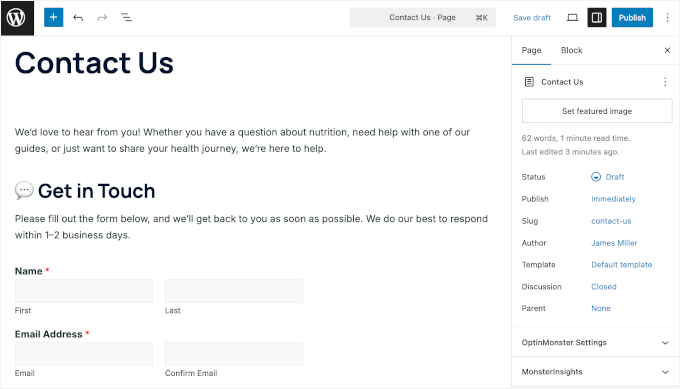
Before publishing, you can preview the page to see how it looks. Most modern WordPress themes will display the form nicely without any additional styling needed.
That said, you can also apply a theme to your form. For more information about this, see our guide on how to style and customize your WordPress form.
When you’re happy with everything, you can click the ‘Publish’ or ‘Update’ button to save your form. Then, you can visit your website to see it in action.
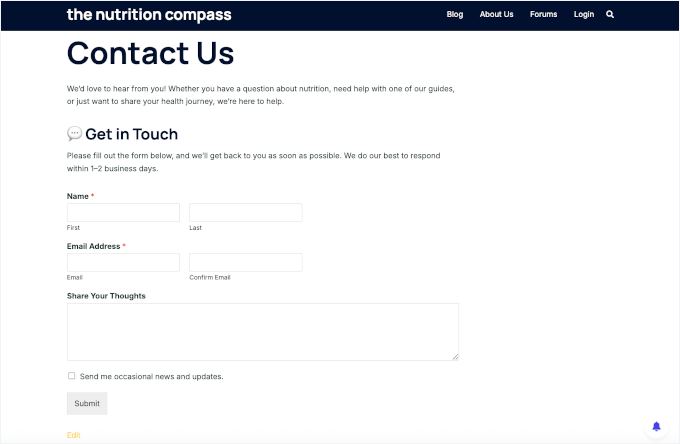
Here’s what the form looked like on a sample WordPress contact page:
For more details, see our guide on how to embed forms in WordPress.
Show Your Contact Form Across Your Site
For even better visibility, consider adding your contact form to your website’s sidebar or any other widget-ready area in your WordPress theme. This gives visitors easy access to contact you from any page on your site.
To do this, you need to go to Appearance » Widgets and then click the ‘Plus’ add block icon in the widget area you want to add your form.
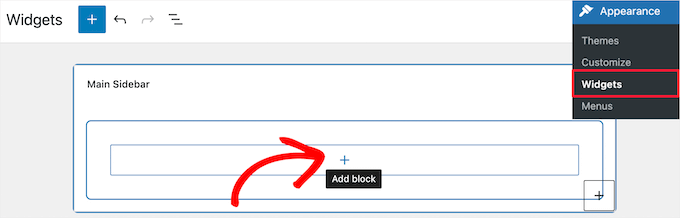
Next, let’s search for ‘WPForms.’
Then, you can click on the ‘WPForms’ block to add it to your sidebar.

After that, you need to select your contact form from the drop-down.
This will automatically load a preview of your form.
Next, let’s click the ‘Update’ button to save your changes.
Now, you can visit your site to see your contact form live in your sidebar or other widget area.

To learn more about widgets, see our guide on how to add and use widgets in WordPress.
Add Your Contact Form Using a Shortcode
WPForms also comes with a WordPress contact form shortcode.
You can use this by visiting WPForms » All Forms and then copying the shortcode next to your form.

Then, all you need to do is open up the page where you want to add it and click the ‘Plus’ add block button and search for ‘Shortcode’.
Next, let’s click the ‘Shortcode’ block.
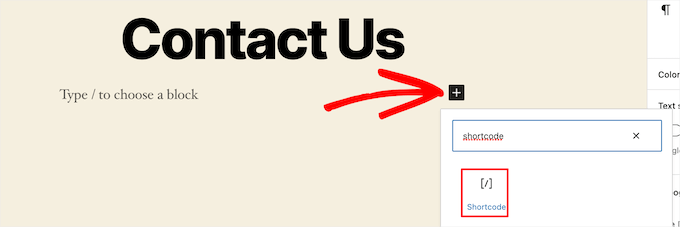
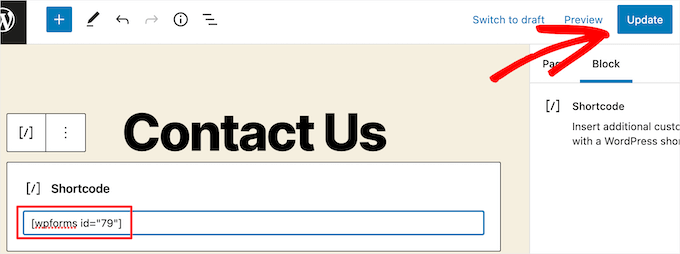
In the block, go ahead and paste the shortcode that you copied above into the box.
After that, you can click on ‘Update’ or ‘Publish,’ and your contact form will be live on your website, just like above.
To learn more about shortcodes, you’ll want to see our ultimate guide on how to add a shortcode in WordPress.
🔗 Alternative: If you’d like more advanced features or added flexibility, you can check out Formidable Forms. For a detailed comparison of top solutions, see our guide on the best contact form plugins for WordPress.
Bonus Tip: Set Up WordPress Form Tracking to Improve Conversions
Once your contact form is up and running, the next step is to understand how it’s performing so you can make it even better.
By tracking your forms, you can see, for example, which ones get the most submissions, where your visitors come from, and which pages encourage them to reach out.
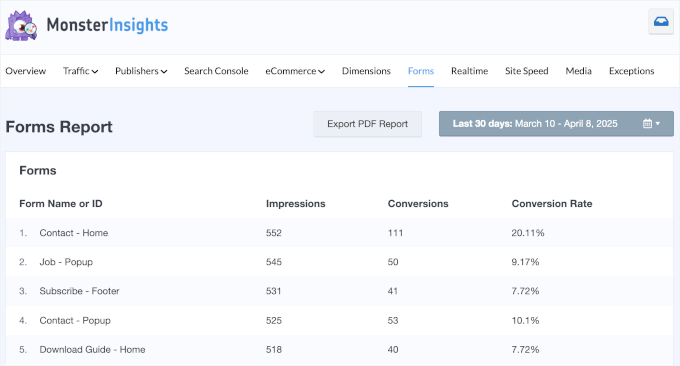
This information helps you improve forms that aren’t doing as well, reduce form abandonment, and fine-tune your marketing to reach the right audience.
For instance, you might find that visitors from social media are more likely to submit your contact form than those from search engines. Or that people who visit your About page first are more likely to get in touch.
Insights like these show you where to focus your time and effort.
Form tracking can also help you spot technical issues early. If submissions suddenly drop, you’ll know it’s time to check whether your form or website is having problems.
The good news is that setting up form tracking is easier than you might think, especially with the right tools and guidance.
To get started, you can follow our step-by-step tutorial on how to set up WordPress form tracking in Google Analytics.
FAQs: Creating and Adding Contact Forms in WordPress
What’s the best contact form plugin for WordPress?
WPForms is my top pick for the best WordPress contact form plugin. It’s beginner-friendly, easy to use, and packed with helpful features and addons. You can easily build any type of form using its AI tools and drag-and-drop builder.
If you’re looking for more advanced options, Formidable Forms and Gravity Forms are great alternatives for things like multi-page forms or complex calculations.
How can I add a fillable form to my website?
The easiest way is to use a form builder plugin like WPForms. Once you install and activate it, you can choose a template, customize the fields, and then embed the form on any page or post using a shortcode or block.
Where does data from my WordPress contact form go?
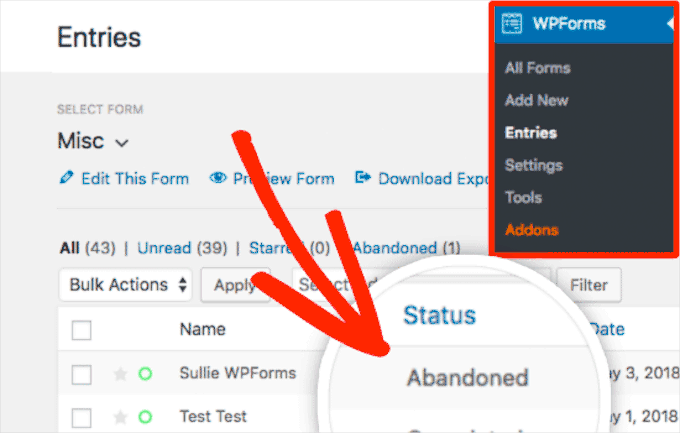
That depends on the plugin you’re using. With WPForms, all form entries are saved inside your WordPress dashboard under WPForms » Entries, and you can also get them sent directly to your email. This way, you never miss a message from a visitor.
Why isn’t my WordPress contact form working?
Common reasons for contact forms not working include incorrect email settings, plugin conflicts, or missing SMTP configuration. If you’re not receiving emails, I recommend using WP Mail SMTP to make sure messages from your forms are delivered properly.
Can I add a contact form in WordPress without using a plugin?
Yes, but it involves adding custom HTML and PHP code to your theme files, which isn’t ideal for beginners. You’d also have to manage things like spam filtering, email delivery, and form styling yourself – and that can get time-consuming fast.
Using a plugin like WPForms is much safer and more reliable since it handles all of that for you automatically.
Video Tutorial: How to Create Contact Forms in WordPress
If you learn by watching, you’ll enjoy our video tutorial on how to create a contact form in WordPress:
Further Reading for Using Forms in WordPress
I hope this article helped you create a simple contact form in WordPress.
To help you get even more out of your WordPress contact forms and website, here are some related guides that build on what you’ve just learned:
- How to Create a Secure Contact Form in WordPress
- How to Use Dynamic Field Population in WordPress to Auto-Fill Forms
- How to Add Save & Continue Functionality in WordPress Forms
- How to Block Contact Form Spam in WordPress
- How to Let Users Take Live Photos and Videos in Your WordPress Forms
- How to Export WordPress Form Entries to CSV and Excel
- WordPress Form Does Not Work: Troubleshooting Tips
If you liked this article, then please subscribe to our YouTube Channel for WordPress video tutorials. You can also find us on Twitter and Facebook.
")


Tersugh Joshua
Would this work if I’m using a locally hosted website for my wordpress like I use WAMP?
WPBeginner Support
Yes, you can still set this up the contact form even when using local hosting
Admin
Will Beadenkopf
I used the basic contact form from WPForms on my wife’s blog and website, but we get more spam replies from people trying to sell something than we do real replies.
Can we put more validation in the basic form, or do we have to go to the Pro version?
WPBeginner Comments
The free version of WPForms has a couple CAPTCHA options available. These can be very powerful in blocking spam.
Jiří Vaněk
I use WP Forms since I won a full license in your giveaway. I’ve never won anything before, and then I received a full license for WP Forms from you for free. I have to say, it’s a great plugin.
WPBeginner Support
Glad you liked the plugin
Admin
susan
Hello, I followed the steps howevert he contact page does not appear on the webite. How should I proceed as I have attempted it numerous times now.
WPBeginner Support
If you mean the page that you added the contact form to is not on your menu, then we would recommend taking a look at our article below for how to create and manage your menu:
https://www.wpbeginner.com/beginners-guide/how-to-add-navigation-menu-in-wordpress-beginners-guide/
Admin
Bryan
Hello, thanks for the help. You mentioned that the email address can be changed. Can you please share how this is done and where?
Thanks
Karolina
I followed all the steps but for whatever reason, this form doesn’t work. I uninstalled and installed it few times. I followed exactly as on video but when sending a test contact form I don’t receive any emails or notifications.
WPBeginner Support
If you’re not receiving emails on your site, we would recommend following our guide below as it is more than likely due to how WordPress sends emails than the form itself:
https://www.wpbeginner.com/plugins/how-to-send-email-in-wordpress-using-the-gmail-smtp-server/
Admin
Eric
I followed your video to put a contact form on my site and you made it easy and enjoyable. I noticed that you had your address and contact information on the side. How do I put my contact information there? Thank you in advance.
Eric
WPBeginner Support
If you mean from the video, we placed another block on the page and manually added the text
Admin
Natalia
hi, how to edit buttons and typeface in the form?
WPBeginner Support
It would depend on the form plugin you decide to use and there are different locations for that customization.
Admin
Amaka obi
I fid all these but when I tried to test it, I didn’t get any notification in my mail from my website. Please what could be the cause?
Thank you
WPBeginner Support
For the most common reason, it would be due to how WordPress sends emails, you can get around this issue by following our guide below:
https://www.wpbeginner.com/plugins/how-to-set-up-wp-mail-smtp-with-any-host-ultimate-guide/
Admin
Saiqa
Thank you so much! it really helped me:)
WPBeginner Support
Glad our guide was helpful
Admin
JITEN PATIL
Thanks! this plugin is nice. i am using it and it is very simple & easy to build forms in less time.
WPBeginner Support
Glad you found the plugin helpful
Admin
Brian Leggero
Wow! It sure doesn’t get any easier than that!
Great instructions! Nice slow talking too, easy to understand.
Keep up the GREAT work!
WPBeginner Support
Thank you, glad you found our guide helpful
Admin
Geoff Anderson
I’ve installed WPForms Lite and activated it but it doesn’t show up in the side menu bar in Wordpress. I can see it in the Plugins but I don’t have an option to select settings just deactivate.
So I’m unable to access the plugin at all. Any suggestions?
Cheers, Geoff
WPBeginner Support
You may want to try reinstalling the plugin in case there was a hiccup with your download. Otherwise, please reach out directly to WPForms’ support and they would be able to assist.
Admin
Flora tony
please when i click on submit, i go to my mail and i dont see any mail
i have tried it several times
WPBeginner Support
For not receiving emails there are a few possible reasons, to start we would recommend ensuring your site is using SMTP by following our guide below:
https://www.wpbeginner.com/plugins/how-to-send-email-in-wordpress-using-the-gmail-smtp-server/
Admin
Daniel Putman
I am getting very frustrated with your tutorials. They seem to be out of date because the view that I get is different than what you are showing. Please update these tutorials.
WPBeginner Support
This article is up to date, you may want to ensure you are not on WordPress.com, we cover the difference between WordPress.com and WordPress.org on our article below:
https://www.wpbeginner.com/beginners-guide/self-hosted-wordpress-org-vs-free-wordpress-com-infograph/
Admin
Court
This no longer works as your need a business plan to have a contact form.
WPBeginner Support
That is for WordPress.com, our tutorials are for WordPress.org. We cover the difference between the two in our article below:
https://www.wpbeginner.com/beginners-guide/self-hosted-wordpress-org-vs-free-wordpress-com-infograph/
Admin
Court
Thanks for the clarification!!
WPBeginner Support
You’re welcome
Chris
I just installed WPForms and created a contact form for my website.
When I visit the contact page, I see two contact forms; the one from WPForms and another one. I don’t have any other form plugin except WPForm.
How can I resolve this?
WPBeginner Support
By default, WordPress does not have a contact form tool, you would want to check through your plugins again for plugins that add a contact form tool.
Admin
Chris
I later found out that the problem was from my theme. I contacted support and they gave me a code to disable it.
Thanks for your feedback.
Marguerite F Cleveland
I have my form set up but when I test it in my site and click the submit button nothing happens. I set it up using the block editor.
WPBeginner Support
If you mean you did not receive an email then it is likely due to how WordPress is sending the emails, we would recommend setting up SMTP to help ensure you receive any messages from your site by following our guide here:
https://www.wpbeginner.com/plugins/how-to-send-email-in-wordpress-using-the-gmail-smtp-server/
Admin
Luz Manalo-Cruz
Hi. I am unable to add the contact form in Pages. When I click on Pages in my dashboard, there is no Add Forms field. Is there another way? I am on localhost.
WPBeginner Support
You’re likely using the block editor, you would want to check for the WPForms block to add the form to your page
Admin
Luz Manalo-Cruz
That worked, thanks!
WPBeginner Support
Glad we could help
Sakshi Kaushik
I have installed the WPforms plugin. but where do i check my form entries from? I am unable to see the entries that my viewers are giving. Please help.
WPBeginner Support
Under the WPForms menu item, there should be entires as an option. If you are unable to see the entires, you would want to reach out to WPForms’ support and they would assist with your specific issue.
Admin
Adepoju Olaide
Thanks for this post. i hope this would work for me!
WPBeginner Support
You’re welcome, our guide should work for every WordPress.org site so it should work for you as well
Admin
Ainjel M
Great post! Thank you. Was so simple!
WPBeginner Support
You’re welcome, glad we could simplify the process for you
Admin
Jennifer Preissler
I am using divi theme and I am not finding the add form button…
WPBeginner Support
If you are editing a post/page with the block editor you would want to add the WPForms block instead of looking for a button
Admin
santoshrana
informative detail. That list has helped a lot in my task.
WPBeginner Support
Glad our guide could help
Admin
brenda s
I need help, I have created a form and would like to know how I can receive the information once submit button is pressed, where does my information go.
WPBeginner Support
It would depend on what form you are using but the default is to email the submissions to the email under Settings>General
Admin
beth pross
I have made my contact form too many times to count. I have tried to upload it also several times. it will be in the preview. It will NOT publish.
I have followed your directions every time. I have invested over ten hours on this one edit.
What am I doing wrong?
WPBeginner Support
It would depend on which plugin you’re using. If you reach out to your contact form plugin’s support they should be able to assist with what the issue could be.
Admin
Ranojit Kumar
Thanks for this post.
WPBeginner Support
You’re welcome
Admin
Kathy Rowland
Thanks for the great tutorial! Off to update and activate my Contact Form. Let the emails begin
WPBeginner Support
You’re welcome, glad you liked our article
Admin
Jochen Gererstorfer
Do we have to install another plugin, if we upgrade from the lite version to WPForms Pro?
WPBeginner Support
When you add your license key the lite version should replace itself with the pro version for you.
Admin
Kathleen
This is great…sounds easy enough. I’m going to try it with my granddaughters website. Thanks…
WPBeginner Support
You’re welcome, glad our guide is helpful
Admin
Burhan
The contact form is one of the must have elements of a website.
This article is all you need to learn making the best and proffessional contact form.
WPBeginner Support
Thank you for your recommendation of our article
Admin
Henry Bartimus
when I click “confirmation and an empty box opens with no content, thank you
WPBeginner Support
That’s quite strange, you could start by disabling your other plugins to see if it is a plugin conflict. Otherwise, please reach out to WPForms’ support directly and they should be able to assist with the issue
Admin
Susan
I’ve installed WP forms Lite, but can’t see the configuration options anywhere in settings – there isn’t much at all there. Any clues?
WPBeginner Support
It would depend on what specific option you’re looking for as some options are in the forms themselves. If you reach out to the plugin’s support they can help point you to what you’re looking for
Admin
Greg
I created the Simple contact form and the problem I am having is the email that is sent goes into the Junk Email folder. I have tried adding the domain and sender as safe but it still goes to Junk Email. How can I stop this?
WPBeginner Support
If you’re sending emails using SMTP such as the method in our article: https://www.wpbeginner.com/plugins/how-to-send-email-in-wordpress-using-the-gmail-smtp-server/
You may want to reach out to the support for your email provider to see if there is a setting on their end that could be causing this.
Admin
Clement
Great tutorial for anyone who wants to create a contact form in an easy-to-follow manner
WPBeginner Support
THank you
Admin
Khan
Nice post Bro. I want to ask, does this form comply with GDPR?
WPBeginner Support
For specifics on GDPR compliance when creating a form, you would want to take a look at: https://www.wpbeginner.com/plugins/how-to-create-gdpr-compliant-forms-in-wordpress/
and
https://www.wpbeginner.com/beginners-guide/the-ultimate-guide-to-wordpress-and-gdpr-compliance-everything-you-need-to-know/
Admin
Jess
Hi there, thank you for your insightful articles, they have helped me a lot!
I am wondering if you know how to insert a code that allows the user to remove a file that has been uploaded to a Contact 7 form? Say it was uploaded by mistake and they want to remove it and try again. At the moment my form doesn’t allow me to delete any uploaded files… Appreciate your help.
WPBeginner Support
For a question specific to contact form 7, you would want to reach out to the plugin’s support and they should be able to assist.
Admin
Eucharia
Thanks for the wonderful article, I have been following it to create my site but I have problem with adding my Form to the contact page. When I click on add page it opens a bar to add title but I don’t see the add form option. I have not been able to add my contacts form to my contacts page.
Please I need you to help me. Thanks
John
When I make a new page, I don’t see an “add form” button. This is WP 5.0.2, freshly reset.
WPBeginner Support
For the new blocks editor you would want to add a WPForms block and that would allow you to add the form
Admin
Himanshu
Thank you for your hard work and the videos. I learn a lot from your videos. However, one thing I noticed consistently is that often you skip some steps or zip past a simple action that confuses the newcomers, especially when you are ‘WPbeginner’ instructors. Example. While tutoring the making of a Contact Us form, before publishing/updating it, you zipped past the text We’d Love to Hear From You text. This is the text you entered but did not show and that confused me a lot as to how come that text did not show up in my form because I have been following you step by step to create the form on my new website while I am watching your video. I went back and forth and created 4 forms to no avail–the text just would not show up. Then I said to my self, what the heck! and entered it on my own and proceeded to remaining video. I noticed the same issue in your other videos as well. Could you be a little slower and specific? Please note, this is not a criticism; this is a constructive suggestion. You folks do a great job and without you, I would not have my website created on my own and I would not be writing to you here. Thanks a million for doing this
WPBeginner Support
Hi Himanshu,
Thank you for your kind feedback, we really appreciate it. We are aware of the issue you are referring to, and our team is continuously working on improving the videos. We will put more effort into it.
Meanwhile, if you are unable to follow instructions shown in a video or one of our tutorials, then please do not hesitate to ask us. You can do so by leaving a comment or sending us a message using the contact form on our website. We try our best to answer all user questions.
Admin
Brenda Donovan
The simple form is all I need and it looks good and is looking good on cell phone too.
I set the reCaptcha up but it doesn’t show up on the contact page where the form code is.
Is there a short code for that also? and if so where in the settings is it?
Thanks…
WPBeginner Support
Hi Brenda,
No, you will need to setup recaptcha in plugin settings.
Admin
Michel Kapteijns
Hello,
I followed al the steps, I see the contact form on my site. I can fill in a message, and after I submit the message I neatly see the ‘thank you’ message. Butt.. I do nog receive the mesage in my e-mail account. What am I doing wrong?
Thank you very much for your answer on this.
Regards, Michel
WPBeginner Support
Hi Michel,
Please see our article on how to fix WordPress not sending email issue.
Admin