Do you want to use dynamic field population in WordPress to auto-fill forms on your website?
Dynamic field population allows you to automatically fill form fields based on user selection, query strings, or field type. This makes your forms smart, saves users time, delivers a better user experience, and ultimately improves the form completion rate.
In this article, we will show you how to use dynamic field population in WordPress to auto-fill forms.

What Is Dynamic Field Population?
Dynamic field population is a technique that allows website owners to automatically fill form fields based on user selection, form type, query strings, or conditional logic.
For example, an eCommerce store can create a form where the product field in the form is dynamically populated using existing products in WooCommerce or any other eCommerce software.
Similarly, a real estate website can automatically populate listings, agents, and property type fields in their appointment and lead generation forms.
Advanced users and developers can also use URL parameters to dynamically fill out form fields using smart links from email newsletters or other website interactions.
Having said that, let’s take a look at how to easily use the dynamic field population in WordPress.
How to Use Dynamic Field Population in WordPress
First, you need to install and activate the WPForms plugin. For more details, see our step-by-step guide on how to install a WordPress plugin.
WPForms is the best WordPress contact form plugin on the market. It allows you to easily create online forms using a simple drag-and-drop tool.
It also comes with dynamic field population, conditional logic, and advanced form fields. Together, these features allow you to create smarter and more interactive forms on your website.
You can see our complete WPForms review for more details.
Upon activating the plugin, you need to visit the WPForms » Settings page to enter your license key. You can find this information under your account on the WPForms website.
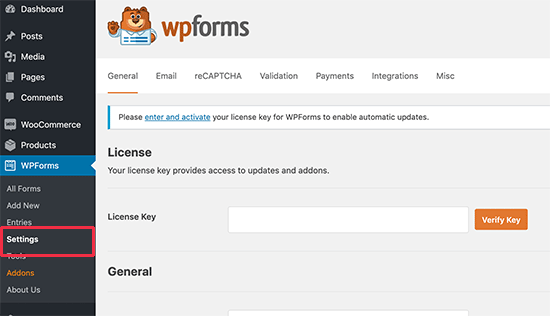
Next, you need to visit WPForms » Add New to create your first form.
You’ll be asked to provide a name for your form and then select a template to start.
There are numerous form templates to choose from. For this tutorial, we will use the Billing / Order Form template.
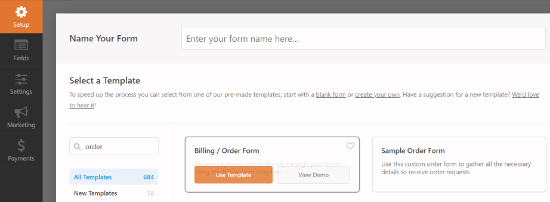
WPForms will now load your form with pre-selected fields. You can click to edit form fields or use the drag-and-drop feature to move them up and down. You can also add and remove form fields with just a click.
Let’s add a new form field to populate it with dynamic choices.
You can add a dropdown, multiple-choice, or a checkbox field to your form to use dynamic choice options. Simply click on a field from the left column and drag it to add it to your form.
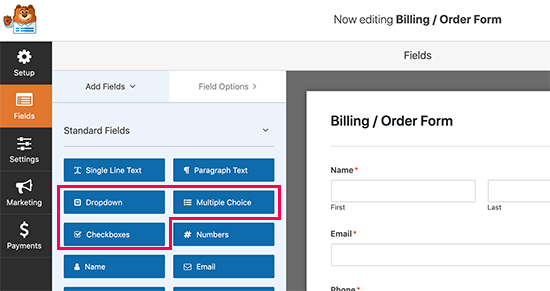
Next, you can click to edit the form fields.
Simply switch to the Advanced menu from the left column.
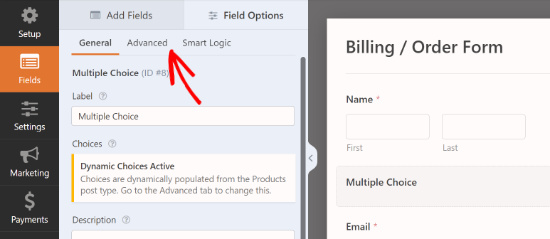
From here, you need to select ‘Dynamic Choices’.
WPForms supports post types and taxonomies registered on your WordPress site.
For the sake of this tutorial, we will select ‘Post Type’ as the Dynamic Choices and ‘Products’ as the Dynamic Post Type Source.
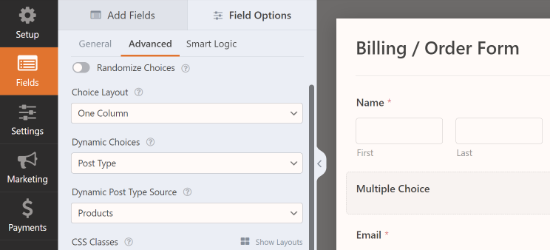
WPForms will now automatically load and display the fields in the form preview.
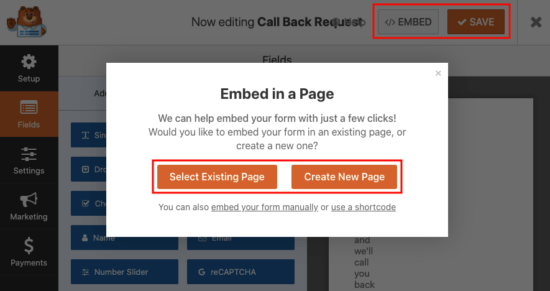
To embed the form, simply click the ‘Embed’ button at the top of the form builder. From here, you can select an existing page to embed the form or create a new page.
Alternatively, you can use the WPForms block to add the form to a WordPress post or page. Go ahead and edit the post or page where you want to add the form.
Once you are in the WordPress content editor, add the WPForms block to your post edit area. After that, just select the form you created earlier from the drop-down menu.

You can now save your post or page.
Next, visit your website to see your form with dynamic field values in action.

Automatically Fill Form Fields Using URL Parameters
WPForms also allows you to dynamically fill form fields using URL parameters. This feature allows you to create smart links that automatically pass down information to the form and fill it in for your users to submit.
First, you need to create a new form or edit an existing one in WPForms. Once you are done creating your form, switch to the Settings tab in the left column and then select the ‘General’ tab.
On this screen, you need to click the toggle for the ‘Enable Prefill by URL’ option.
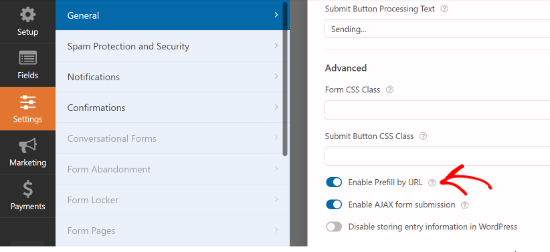
You can now save your form and exit the form builder. Your form is now ready to dynamically populate fields using URL parameters.
Creating Links with URL Parameters
WPForms accepts dynamic form fields passed through URL parameters in a specific format.
https://example.com/contact/?wpf15_1=value
Let’s break it down.
- The part of the URL before the question mark ‘?’ is the URL of the page that has your form. For example, your contact form page.
- ?wpf – Indicates the start of the WPForm form field parameters.
- 15 – Is the ID of your form
- _1 – Is the field ID
- =value – = Indicates the start of the value you want to pass to the form followed by the actual field value.
Here is an example of a URL where we are passing a product title as a text field to a feedback form.
https://example.com/contact/?wpf15_2=Vintage%20Flower%20Vase
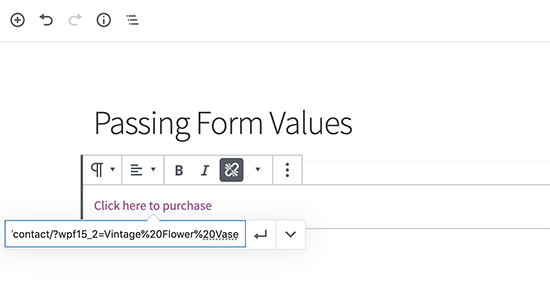
Notice how we have used %20 to indicate spaces between words in the product title.
Finding Form and Field IDs in WPForms
In order to create URL parameters, you will need to know the form and field IDs. Here is how you can find these values.
Simply edit your form, and you will see the form ID in your browser’s address bar.
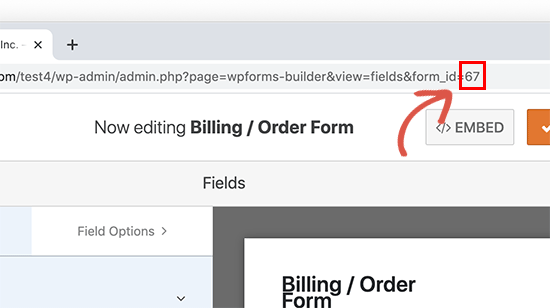
Similarly, in order to find the form field ID, you need to just click to edit it.
You will see form field properties in the left column, along with the field ID at the top.
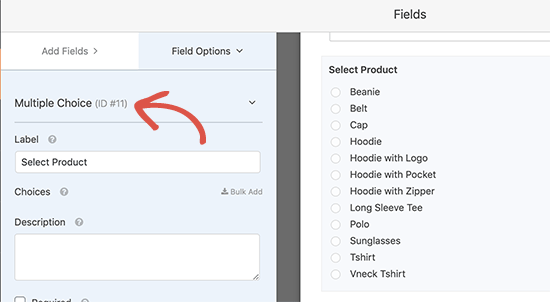
Now, what if you wanted to pass a value to a subfield?
Simply add the subfield identifier after the field ID in your URL like this:
https://example.com/contact/?wpf15_3_city=london
For more details, you can see WPForms developer documentation, which shows more examples of using different parameters for all types of form fields.
You can now use this feature in combination with your CRM software or email marketing service to send smart form links to your users. Most marketing platforms come with their own personalized MERGE tags that you can add in the smart URL to automatically fill in personal information in the form.
You can also use the dynamic field population feature with other form plugins like Formidable Forms, Gravity Forms, or others. However, we recommend using WPForms because it makes the whole process easy, and we know it well because we built the product.
For complete details, please see our comparison between WPForms vs Formidable Forms vs Gravity Forms.
We hope this article helped you learn how to use the dynamic field population in WordPress to auto-fill forms. You may also want to see our article on how to track and reduce form abandonment in WordPress and our expert picks for the best live chat software for small businesses.
If you liked this article, then please subscribe to our YouTube Channel for WordPress video tutorials. You can also find us on Twitter and Facebook.


Syed Balkhi says
Hey WPBeginner readers,
Did you know you can win exciting prizes by commenting on WPBeginner?
Every month, our top blog commenters will win HUGE rewards, including premium WordPress plugin licenses and cash prizes.
You can get more details about the contest from here.
Start sharing your thoughts below to stand a chance to win!
David R says
Hi, Great article!
I was wondering if this will work with a QR code. In other words, can I create a QRcode from this URL with all form field parameters, and when scanned, will it direct the user to the page and fill in all fields?
Thank you.
WPBeginner Support says
As long as it keeps the URL parameters it should work
Admin