For businesses offering services or products with variable pricing structures, a well-designed ‘request a quote’ form can be a game changer.
This functionality allows potential customers to conveniently request quotes tailored to their specific needs. This improves communication efficiency and ultimately generates leads that can translate into increased sales and business growth.
Our team has written hundreds of articles to help boost sales in your store and understand the importance of crafting effective request a quote forms to enhance user experience.
In this article, we will show you how to easily create a request a quote form in WordPress, step by step.

What Is a Request a Quote Form, and Why Create One in WordPress?
A ‘Request a Quote’ form allows your customers to contact you with their specific information to get pricing based on their requirements.
For instance, if you have a WordPress website for providing gardening services, then your rates may vary depending on lawn size, job type, and time.
Similarly, if you sell products in bulk in your WooCommerce store, then you may be able to adjust pricing based on the customer’s order.
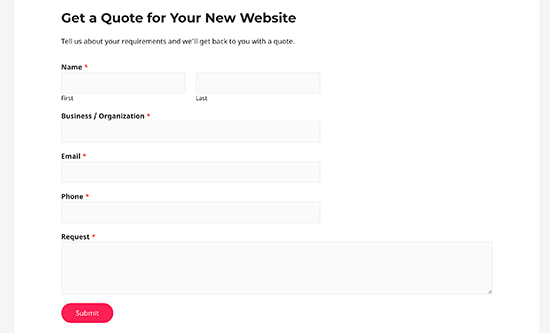
A request a quote form basically allows you to collect all the customer information you need to offer them accurate pricing for the job.
This provides a dedicated channel for communication between potential customers and your business, saving time and improving customer experience.
Quote request forms typically see higher conversions because users don’t need to enter payment details right away. This helps you generate more leads and make more sales.
That being said, let’s take a look at how to easily create a request a quote form in WordPress.
Video Tutorial
If you’d prefer written instructions, then just keep reading.
How to Create a Request a Quote Form in WordPress
You can easily create a request for a quote form in WordPress using WPForms. It is the best WordPress contact form plugin on the market that is used by over 6 million websites.
This plugin allows you to easily make any kind of form using a simple drag-and-drop form builder right inside your WordPress site.
First, you need to install and activate the WPForms plugin. For more details, see our step-by-step guide on how to install a WordPress plugin.
Note: You can also use WPForms Lite, which is completely free, to create a request a quote form in WordPress. However, we will be using the premium plan of the plugin for this tutorial.
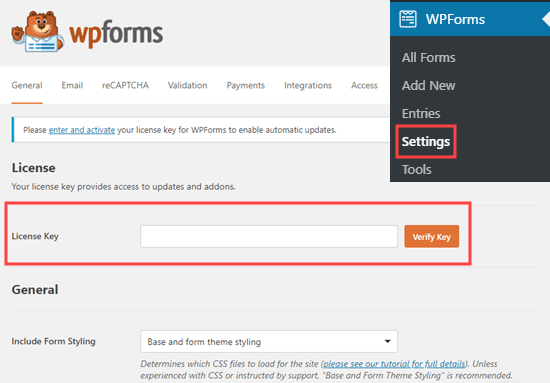
Upon activation, head over to the WPForms » Settings page from the WordPress admin sidebar to enter your license key.
You can find this information in your account on the WPForms website.
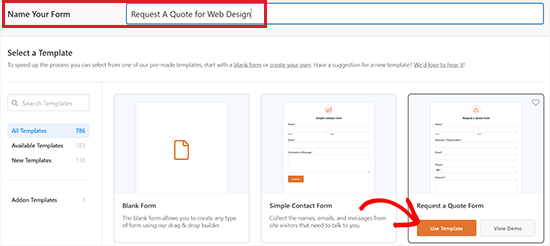
Next, you need to visit the WPForms » Add New page from the WordPress dashboard.
This will direct you to the ‘Select a Template’ page. Here, you can start by typing a name for the form you are about to create.
Once you’ve done that, locate the ‘Request A Quote Form’ template and click the ‘Use Template’ button under it.
This will launch the WPForms drag-and-drop form builder on your computer screen.
Here, you will notice that the available form fields are in the left column, and a form preview is displayed in the right corner of the screen.
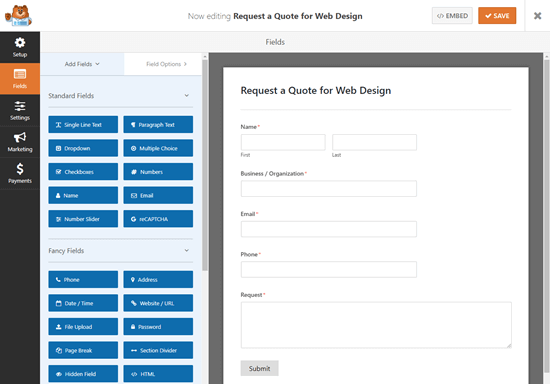
Now, by default, the request a quote form template already comes with a built-in name, email, phone, business, and request fields.
However, you can easily drag and drop additional form fields from the sidebar on the left into the form preview.
For example, you can add the checkboxes field to your form to provide some choices for a question to users.
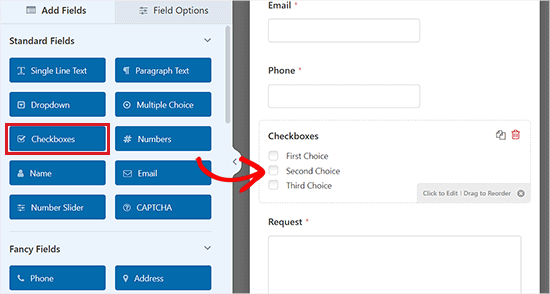
Once you’ve done that, you can also configure the individual form field settings by clicking on them. This will open up the ‘Field Options’ tab in the left column of the screen.
From here, you can change the label, description, field size, placeholder text, and format and even enable smart conditional logic for the field.
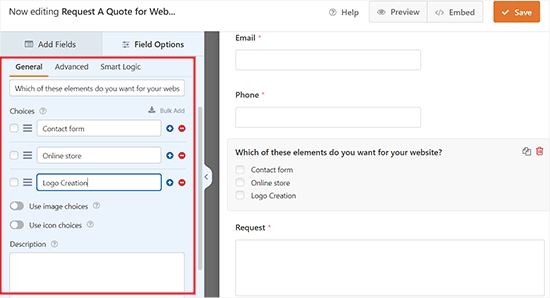
You can also toggle the ‘Required’ switch to active. This way, users won’t be able to submit a form without filling in that specific field.
Once you are finished creating your form, don’t forget to click the ‘Save’ button at the top to save your changes.

Adding Your Request a Quote Form to Your Website
Now that you have created your Request a Quote form, it is time to add it to your WordPress site
First, you need to open up a new or existing page/post where you want to add the form from the admin area.
Once you are there, click the ‘Add Block’ (+) button at the top left corner of the screen to open up the block menu.
From here, locate and add the WPForms block to the page/post. After that, select the request a quote form that you created from the dropdown menu in the block itself.
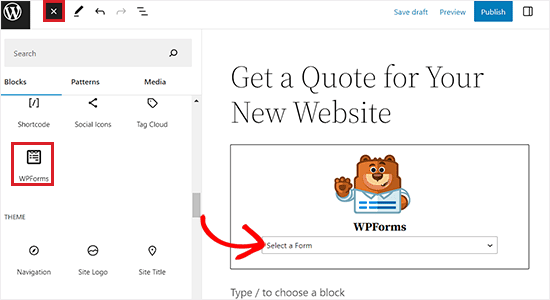
Finally, click the ‘Publish’ or ‘Update’ button to save your changes.
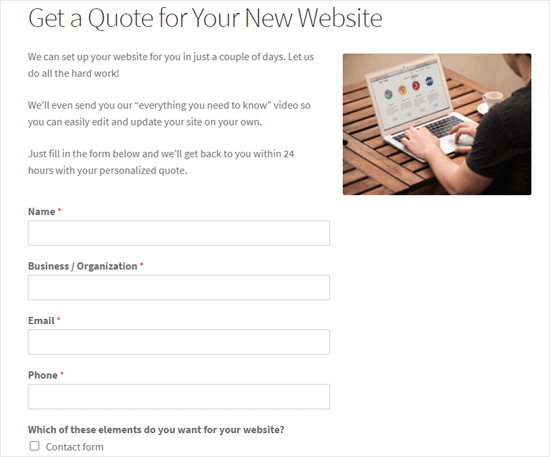
Now, you can visit your WordPress website to view the request a quote form.
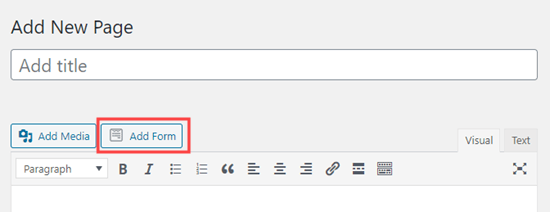
Tip: If you are using the classic editor, then you can easily add the form by clicking the ‘Add Form’ button.
This will open up the ‘Insert Form’ prompt, where you can choose a form to add from the dropdown menu.
Changing the Confirmation Message and Notifications for Your Form
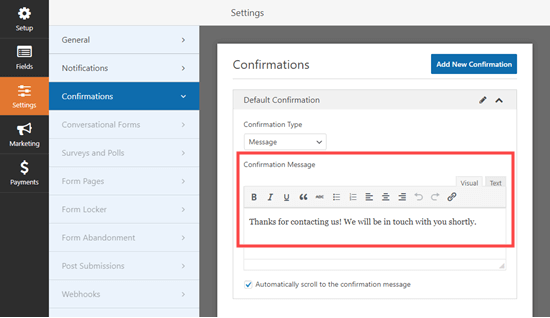
When a potential customer requests a quote, they will see the default confirmation message: ‘Thanks for contacting us! We will be in touch with you shortly.’
However, you can easily change this confirmation message to your liking.
To do this, head over to the WPForms » All Forms page from your WordPress admin sidebar and click the ‘Edit’ link under the request a quote form that you created earlier.
This will launch the WPForms form builder on your screen. Next, you have to click on the ‘Settings’ button in the left column and switch to the ‘Confirmations’ tab.
You will now see a confirmation message box where you can edit and customize the default message.
Don’t forget to click the ‘Save’ button at the top of the screen after making changes.
You can also change the email notification message sent by your form. This is the message that the admin or users receive upon form submission.
To do this, switch to the ‘Notifications’ tab from the left column.
Once you are there, you’ll notice that the ‘Send To Email Address’ setting defaults to {admin_email}. This means that you’ll receive an email every time a user submits the request a quote form on your website.
If you want to send a confirmation email to the users as well, then you have to expand the ‘Show Smart Tags’ option above the ‘Send To Email Address’ field.
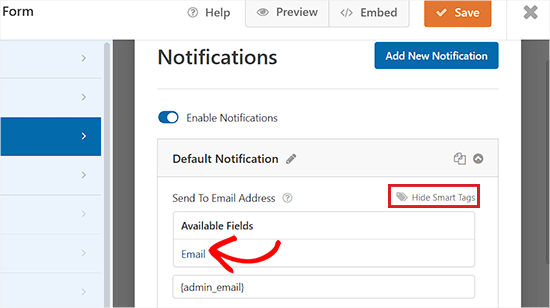
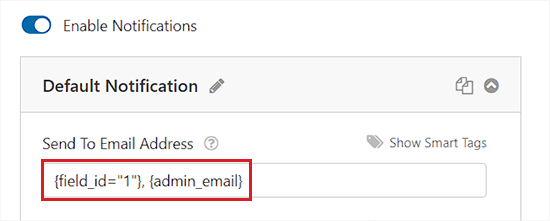
Next, simply add the email smart tag to the field by clicking on it. Now, the form submission notification email will also be sent to users.
Keep in mind to separate both the smart tags in the ‘Send To Email Address’ field with a comma.
Tip: If you are not getting emails from your form, then you may need to see our tutorial on how to fix WordPress not sending emails issue.
After that, you can change the subject line and the From Name in the email by scrolling to these fields and typing a subject line of your choice.
You can even draft your own form submission confirmation message in the ‘Message’ field.
For more detailed instructions, you may want to see our beginner’s guide on how to send confirmation emails after WordPress form submission.
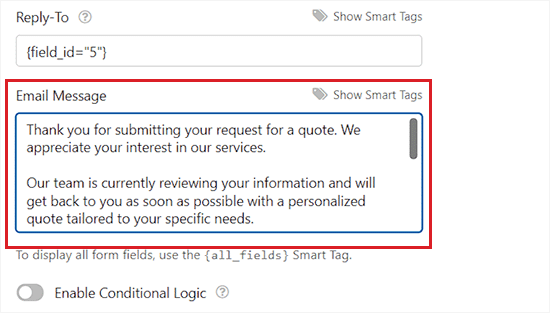
Additionally, you can also send multiple notifications from your form. This lets you send an email to your customer to automatically confirm the details of what they’ve requested.
Once you are done, click the ‘Save’ button at the top to store your form settings
Bonus: Get More Leads by Offering a Free Quote
WPForms makes it super easy to create a request a quote form in WordPress. However, you may need to give your customers a nudge in the right direction to fill in the form.
This is where OptinMonster comes in.
It is the best lead generation and conversion optimization software on the market that helps you turn abandoned website visitors into subscribers and customers.

The tool helps you convert more users by nudging them to perform the desired action, like filling out a form, joining your email list, or buying a product.
It comes with beautiful popups, powerful on-site targeting, countdown timers, floating bars, and more. All of these features help you bring in more leads and customers to grow your business.
We hope this article helped you learn how to create a request a quote form in WordPress. You may also want to see our beginner’s guide on how to choose the best domain registrar and our expert picks for the best email marketing services to help grow your business.
If you liked this article, then please subscribe to our YouTube Channel for WordPress video tutorials. You can also find us on Twitter and Facebook.


Syed Balkhi says
Hey WPBeginner readers,
Did you know you can win exciting prizes by commenting on WPBeginner?
Every month, our top blog commenters will win HUGE rewards, including premium WordPress plugin licenses and cash prizes.
You can get more details about the contest from here.
Start sharing your thoughts below to stand a chance to win!
Jiří Vaněk says
I came across this link in another article of yours. Since I have the WPForrms plugin, I am interested in all its options. I’m still amazed at what this plugin can do and I never thought it could even do a quote. So far, I have dealt with this quite unprofessionally using an ordinary contact form. Thanks for your effort and all the articles about WPForms. Since I use it, these tutorials are very useful for me.