Effective communication is key to building trust and creating positive user experiences on any WordPress website. One important part of this is sending confirmation emails after form submissions.
Confirmation emails serve many purposes. They reassure users that their message has been received successfully, reduce anxieties around form submissions going unnoticed, and potentially provide additional details or next steps.
We’ve been working with contact forms for a long time, and we also make sure to follow up on any reader questions that we receive. And in this article, we will show you how to easily send confirmation emails to your users after a WordPress form submission (step by step).
Why Set Up Automated Confirmation Emails in WordPress?
Confirmation emails are sent when a user fills out a contact form or another form on your WordPress website.
Sending an automated confirmation email builds trust and credibility with your audience. It also assures your users that their actions, such as signing up for a newsletter or creating an account, have been completed.
There are a lot of good reasons to set up WordPress form confirmation emails:
- Open a line of communication with your subscribers.
- Provide valuable follow-up information, like links, login credentials, and tutorials.
- Confirm email newsletter subscription and start an autoresponder sequence.
- Reduce spam and fake accounts being created on your website by verifying the user’s email address.
- If you have an online store, this gives you a chance to offer an upsell or cross-sell.
Having said that, let’s see how to easily send confirmation emails after form submission in WordPress.
How to Send Confirmation Emails After WordPress Form Submission
You can easily send confirmation emails after WordPress form submission by using the WPForms plugin.
It is the best WordPress contact form plugin on the market that is used by over 6 million websites.
We have used it at WPBeginner to create all kinds of forms and have always had a wonderful experience. For more information, see our complete WPForms review.
First, you need to install and activate the WPForms plugin. For detailed instructions, see our beginner’s guide on how to install a WordPress plugin.
Note: If you’re on a budget, you can use the free version of WPForms to set up email confirmation. It also offers features like Stripe payments and spam protection.
However, the Pro version will give you access to even more features like conditional logic forms, 2,000+ templates, integration with email marketing tools, and more.
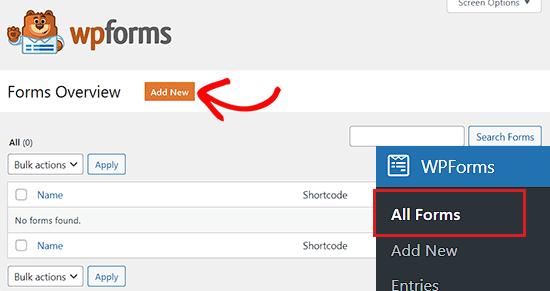
Upon activation, head over to the WPForms » All Forms page from the WordPress admin sidebar and click the ‘Add New’ button.
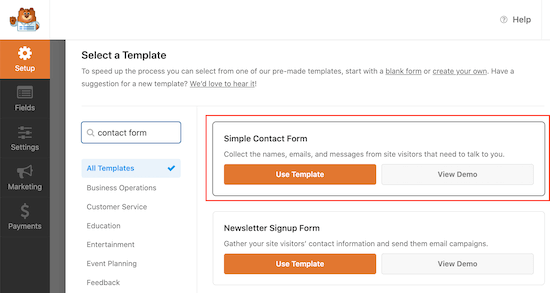
This will take you to the ‘Select a Template’ page, where you can start by typing a name for the form that you’re creating.
Next, select a form template. For this tutorial, we will use the ‘Simple Contact Form’ template to create a form.
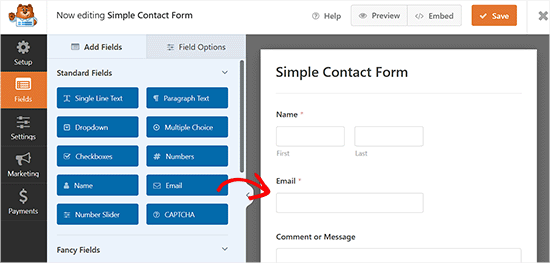
Once you have made your choice, the WPForms form builder will be launched on your screen.
From here, you can drag and drop different form fields from the sidebar on the left into the form preview on the right.
For detailed instructions, you may want to see our tutorial on how to create a WordPress contact form.
Now that you have created a form, it’s time for you to set up a WordPress confirmation email. This email will be sent out automatically and inform your users that their form submission was successfully received.
To do this, you have to switch to the ‘Settings’ tab from the left column in the form builder.
Once you are there, simply open up the ‘Notifications’ tab. Here, you need to make sure that the ‘Enable Notifications’ toggle is turned on.
If you turn this toggle off, then you won’t be able to send confirmation emails to your users.
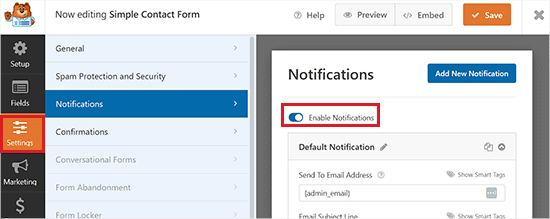
Next, you must choose who you are going to be sending the confirmation emails to.
By default, the ‘Send To Email Address’ is set to the admin email Smart Tag {admin_email}. This is the email you used to set up your WordPress blog.
It means that whenever a user submits their form, you will receive a confirmation email to your business email address.
To ensure that the confirmation emails are also delivered to your users, you will need to add a new smart tag to the email field.
To do this, simply click on the ‘Show Smart Tags’ option that’s directly above the ‘Send to Email Address’ field.
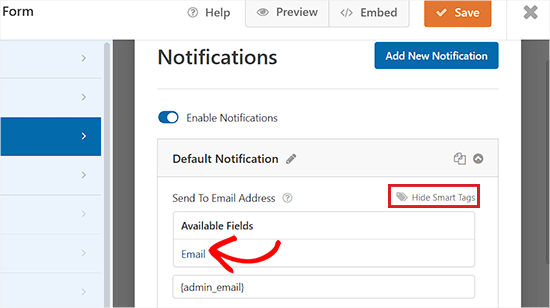
This will display the available smart tags, where you must select the ‘Email’ option. This tags your user’s email address in the ‘Send To Email Address’ field.
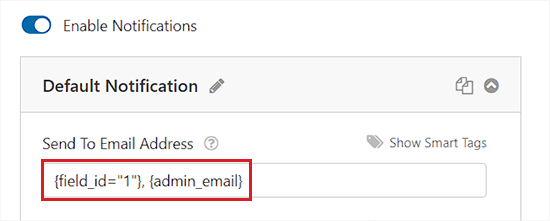
WPForms will now send confirmation emails to the email address that your users will enter in their forms.
Keep in mind that you will need to separate both the smart tags in the field with a comma.
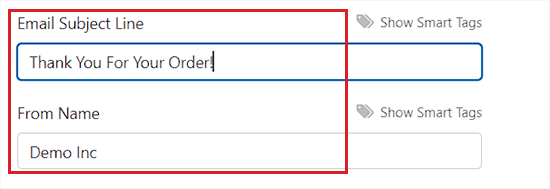
Next, it’s time to change the subject line of your email.
The default email subject line is ‘New Entry’. However, you can easily change this line by typing something else that will make more sense to your users.
For example, if you have a WooCommerce store and are sending an order confirmation email, then you can change the subject line to “Thank You for Your Order!”.
After that, you must change the ‘From Name’ for your confirmation email.
This is the name that will be used to show users who sent them the confirmation email. It makes sense to type your company or website name in this field.
Next, you have to fill in the ‘From Email’ field. This will be the email address from where you will be sending the confirmation emails to your users.
By default, the email address in this field is the same as your admin email, and we recommend you leave this setting as it is.

After that, you will want to change the ‘Reply-To’ field so your users can respond to your automated email.
If you leave this blank, then the email will be the same as the default admin email. This will be the email address where you will receive replies to the confirmation emails sent to the users.
It’s not necessary to change it, but there are some situations where you will want the Reply-To email to be different than your standard admin email address.
For example, if you have a photography website and you have a form for new clients to request a quote, then you may want these emails to go to a different email address.

Once you have done that, scroll down to the ‘Email Message’ section.
You can now write out the email that will be sent to everyone who submits this form on your website. Plus, you can change the appearance of your plain text emails by adding HTML.
Other than that, you can also include the {all_fields} Smart Tag, which will add the user-submitted information to the email.
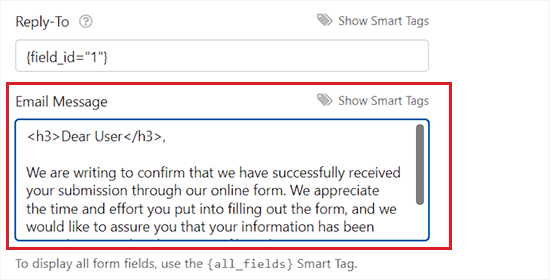
Once you are done, don’t forget to click the ‘Save’ button at the top to store your settings.
You have now successfully added a confirmation email for form submission in WordPress.
Add the Form to a WordPress Page
After setting up the confirmation email for a form, you should add the form to a WordPress page.
First, you need to open an existing or new page from the WordPress admin sidebar.
Once you are there, click the add block (+) button at the top left corner of the screen to open the block menu.
From here, locate and add the WPForms block to the block editor.
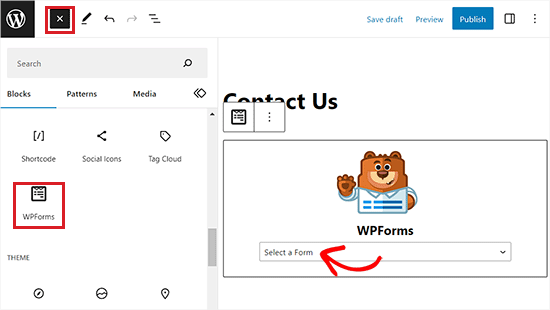
After that, select the form that you just created from the dropdown menu in the WPForms block.
Finally, click the ‘Publish’ or ‘Update’ button to save your changes.
Users will now be able to fill out and submit the contact form you created on your website.
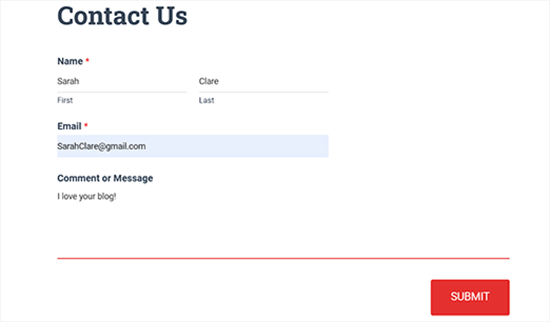
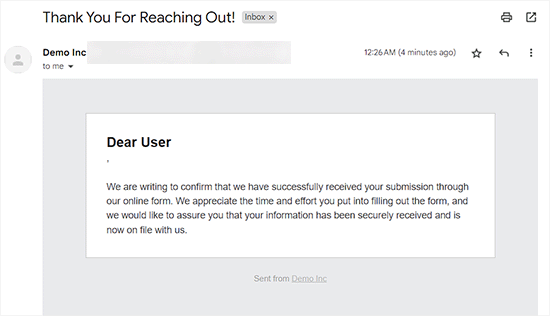
Upon form submission, users will also receive a confirmation email to their email addresses.
This is how the confirmation email created with WPForms looked in our demo.
Bonus: Troubleshoot the WordPress Not Sending Email Issue With WP Mail SMTP
A huge issue that a lot of WordPress users experience is when their website stops sending WordPress emails.
WordPress uses PHP to send emails, which can be falsely flagged as spam. If this happens to your emails, they will never reach your users’ inboxes or could end up in the spam folder.
That is why we recommend always using SMTP for sending emails in WordPress. An SMTP plugin adds another level of verification and sends emails via an official mail server.
We recommend using WP Mail SMTP, which is the best WordPress SMTP plugin on the market that can easily connect with any SMTP service of your choice, including SendLayer, Brevo, or MailGun.
Several of our partner brands are now using it to send emails and have noticed a significant improvement in deliverability. Their emails no longer land in spam but consistently reach customers’ inboxes. To learn more, see our WP Mail SMTP review.
It also integrates with WPForms, which makes it super easy and safe to send emails directly to your users’ inboxes.
For more instructions, see our tutorial on how to use a free SMTP server to send WordPress emails.
Video Tutorial
If you don’t like written instructions, then you can watch our video tutorial instead:
We hope this article helped you learn how to send confirmation emails after a WordPress form submission. You may also want to see our best practices for contact form design with examples and our ultimate guide to using WordPress forms.
If you liked this article, then please subscribe to our YouTube Channel for WordPress video tutorials. You can also find us on Twitter and Facebook.


kzain
Thanks for this super helpful tutorial on sending confirmation emails after WordPress form submission! I’ve been trying to improve my form follow-up process, and this guide made it easy to set up. I appreciate the step-by-step instructions and the plugin recommendations – it’s saved me so much time. Your tip on customizing the email content to match my brand’s voice is particularly valuable. Thanks for helping me enhance my user experience and build trust with my audience. Your tutorials are always so clear and actionable, WPBeginner – keep up the fantastic work!
Jiří Vaněk
I completely forgot about this in my contact form. WpForms is really great in this regard.