
It is incredibly frustrating to pour your heart into a blog post only to see it buried on the tenth page of Google. It hurts to see your work go unnoticed when you know your content is great.
I have optimized countless WordPress sites, and I know exactly how confusing search engine rules can feel at first. Thankfully, the Yoast SEO plugin turns that complex process into a simple, easy-to-follow checklist.
This popular tool sits right inside your WordPress editor and guides you through optimizing every post. It takes the guesswork out of ranking higher and getting the traffic you actually deserve.
In this tutorial, I will show you exactly how to install and configure Yoast SEO on your website.

You can use the quick links below to quickly navigate through this article:
- Why Install Yoast SEO on Your WordPress Site?
- Step 1: Install and Activate Yoast SEO Plugin
- Step 2: Import Your SEO Data (If Needed)
- Step 3: First-Time Setup
- Step 4: Connect Yoast SEO to Search Engines
- Step 5: Setting Up Yoast Preferences
- Step 6: Using Yoast SEO Tools
- Step 7: Integrating with Other Platforms
- Step 8: Refining Content With Yoast SEO
- Step 9: Monitoring and Measuring SEO Success
- Frequently Asked Questions About Setting Up and Using Yoast SEO
- Additional Resources for WordPress SEO
Why Install Yoast SEO on Your WordPress Site?
Yoast SEO is one of the most popular WordPress plugins because it helps you improve your website’s search engine rankings. It turns complicated search engine optimization (SEO) tasks into simple, actionable steps, making it perfect for beginners.
Here are the main benefits of using Yoast:
- Optimize for search engines: Yoast helps you optimize your page titles and meta descriptions to improve your visibility in search results.
- Get real-time feedback: The plugin gives you actionable tips and analysis right inside the WordPress editor, so you know exactly what to fix.
- Improve readability: It also checks your content’s readability, helping you write posts that are easy for both visitors and search engines to understand.
- Automate technical SEO: Yoast automatically handles technical tasks like creating XML sitemaps and adding structured data, which helps search engines crawl your site more effectively.
- Track your progress: The plugin uses simple red, orange, and green lights to show you how well each page is optimized.
A Quick Note on Our SEO Setup: While Yoast SEO is a great tool for beginners, we use All in One SEO (AIOSEO) on WPBeginner.
As our site grew, we found that AIOSEO’s more advanced features gave us the extra control and performance we needed. We believe in being transparent about the tools that power our own business.
- Learn about why we switched to All in One SEO for our own sites.
- See our detailed comparison between Yoast SEO and AIOSEO.
Step 1: Install and Activate Yoast SEO Plugin
First things first, let’s install the plugin. The great news is that the free version of Yoast SEO is incredibly powerful and offers many features to significantly improve your site’s SEO.
In this guide, I’ll be walking you through the setup using this free version.
As your website grows, you can always upgrade to Yoast SEO Premium to unlock advanced features like multiple focus keywords, internal linking suggestions, and 24/7 support. But for now, let’s get the free version up and running.
Important Note: If you’re currently using another WordPress SEO plugin (such as RankMath or SEOPress), it’s important to deactivate it before installing Yoast. Running two SEO plugins at the same time can cause conflicts and harm your site’s SEO.
You can deactivate your old plugin from the Plugins » Installed Plugins page in your WordPress dashboard. Don’t worry, deactivating your old plugin for a few minutes while you set up Yoast won’t harm your search engine rankings.
Once that is done, you can install and activate Yoast SEO. The process takes just a few minutes, and you will find detailed guidance in our beginner’s guide to installing WordPress plugins.
Step 2: Import Your SEO Data (If Needed)
If you were using another SEO plugin before installing Yoast, you’ll want to import your existing SEO data (like post titles and descriptions). However, if this is your first time using an SEO plugin on this site, you can safely skip this step and move on to step 3.
This import process makes sure you don’t lose months or years of SEO work you’ve already done. Yoast will transfer your existing titles, meta descriptions, and other optimization settings.
Backing Up Before Import
Before importing any data, make sure you create a backup of your WordPress database using a plugin like Duplicator or UpdraftPlus. This gives you a safety net in case anything goes wrong during the transfer process.
Since your SEO data is saved in your site’s database, creating a quick backup gives you a safety net in case anything goes wrong during the transfer process.
Here at Awesome Motive, we use Duplicator across many of our partner companies for reliable site backups and migrations. It provides great peace of mind.
I always recommend this step when making significant changes to SEO settings. It takes just a few minutes, but it can save you hours of work if something goes wrong.
For step-by-step instructions, see our ultimate guide on how to back up your WordPress site.
Running the Import Process
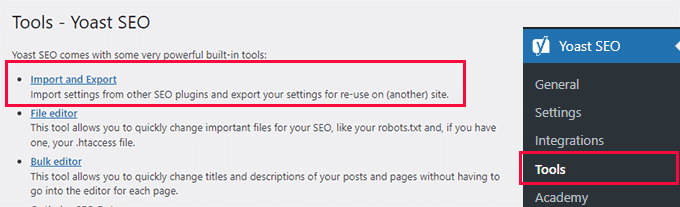
After creating the backup, you need to navigate to Yoast SEO » Tools in your WordPress dashboard. This new menu item appeared after activating the plugin in the previous step.
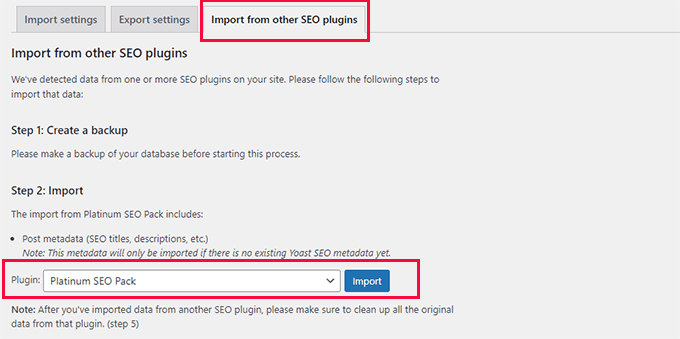
Next, click on the ‘Import and Export’ link to access Yoast’s data transfer options. Here you’ll find a list of supported SEO plugins that Yoast can import data from.
Then you can select your current SEO plugin from the available options and click the ‘Import’ button.
Yoast supports importing from popular plugins, including RankMath, SEOPress, and others.
The import process typically takes just a few minutes, depending on how much content you have. You’ll see a progress bar showing the transfer status, and Yoast will tell you when the import is complete.
Keep your old SEO plugin installed but deactivated until you’ve verified everything has imported correctly. This way, you can easily switch back if needed without losing any data.
Cleaning Up the Old Plugin’s Data
Once you’re sure that everything looks good, you can return to the ‘Import’ tab.
You’ll need to select your previous SEO plugin under ‘Step 5: Clean up’ and then click the ‘Clean up’ button.
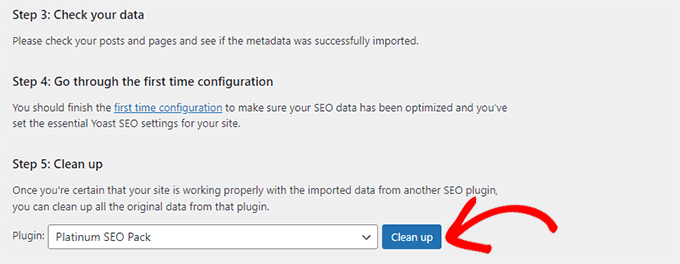
This will clean up the database and delete the old plugin’s data. After that, you can safely deactivate and delete your old SEO plugin.
Step 3: First-Time Setup
With Yoast SEO installed, it’s time to configure the basic settings that will optimize your entire website.
Unlike older versions of Yoast that launched an automatic setup wizard, the current version uses a First-time Configuration page that you need to access manually.
This process sets up the foundation for your site’s SEO. It only takes about 10-15 minutes, but it makes a huge difference in how search engines understand and display your content.
Navigate to Yoast SEO » General » First-time Configuration in your WordPress dashboard. This page contains several sections that help Yoast understand your website and optimize it properly.

SEO Data Optimization
The first step is to click the ‘Start SEO data optimization’ button. This allows Yoast to crawl your existing content and analyze your site’s current SEO status.
Be patient during this process. It can take several minutes if you have a lot of content. Yoast is reviewing your posts, pages, and other content to provide more targeted optimization suggestions.
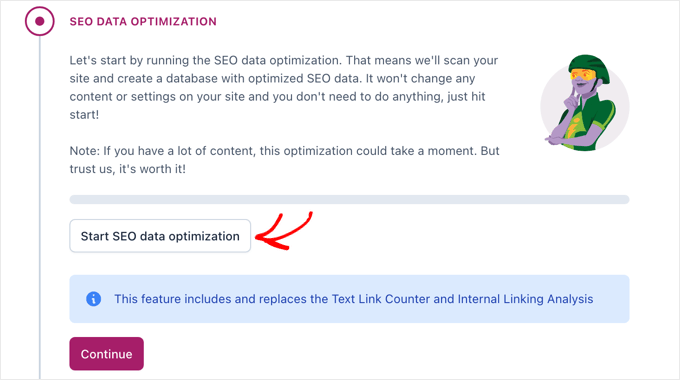
You’ll see a progress indicator while Yoast works.
Once complete, you can click the ‘Continue’ button. The plugin will better understand your site’s content and can provide more accurate SEO recommendations.
Site Representation
Next, you’ll specify whether your site represents a person or an organization.
This choice affects how search engines display your site in search results and helps with structured data.
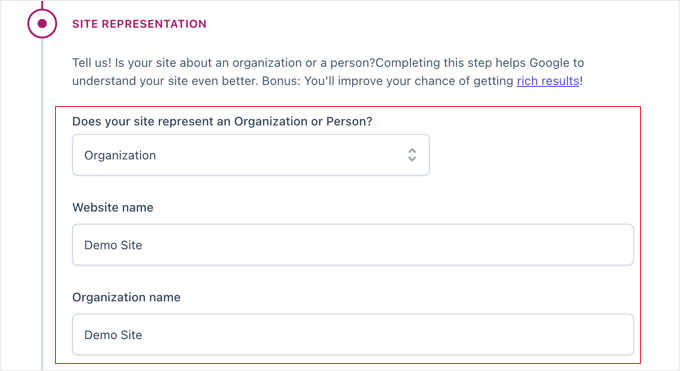
If you’re a business, freelancer, or company, select ‘Organization’ and enter your business name. If it’s a personal blog or portfolio, choose ‘Person’ and select your user profile from the dropdown menu.
Upload your company logo or personal photo when prompted. This image can appear in search results and social media shares, so choose something professional and recognizable.
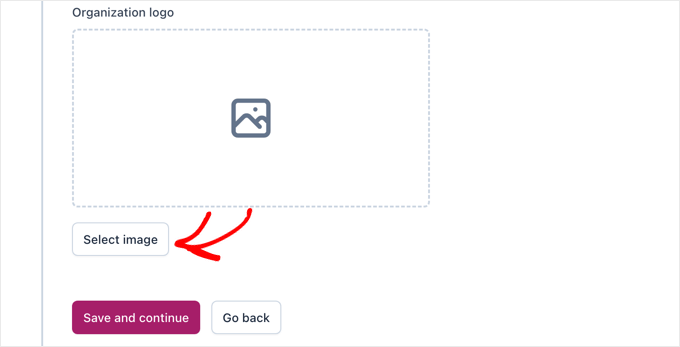
When you’re finished, you can click the ‘Save and continue’ button to save your settings and move on to the next section.
Social Media Profiles
You can add links to your social media profiles in this section.
Yoast uses these links to create structured data that helps search engines connect your website to your social presence.
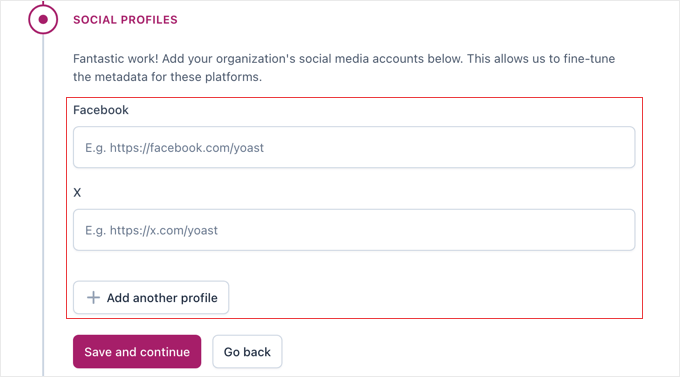
Include your main social profiles like Facebook, Twitter, Instagram, LinkedIn, or YouTube. You don’t need to add every social account. Focus on the platforms where you’re most active.
Once this is done, click the ‘Save and continue’ button.
Personal Preferences
Finally, choose your data tracking preferences.
Yoast offers to collect anonymous usage data to improve their plugin, but this is entirely optional.

I recommend reviewing these privacy settings carefully and choosing what you’re comfortable with.
You can always change these preferences later in the main settings.
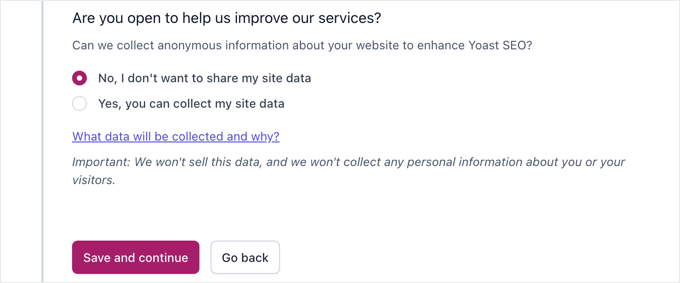
Don’t forget to save your settings once you have finished. After this, you will see a confirmation that the first-time configuration process is complete.
Step 4: Connect Yoast SEO to Search Engines
Connecting Yoast SEO to search engines like Google and Bing helps verify that you own your website and can access valuable SEO data. This connection also enables additional features and more accurate tracking of your site’s performance.
These connections are optional but highly recommended. They unlock insights about how your content performs in search results and can help identify SEO issues early.
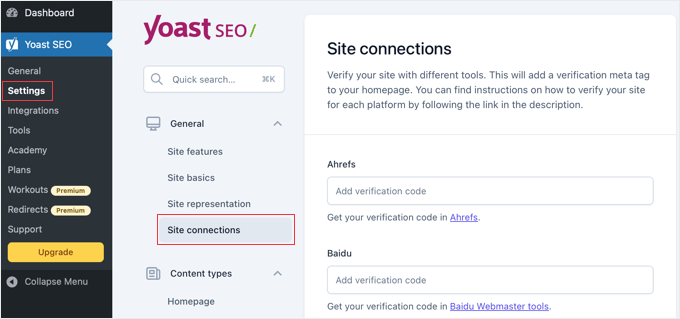
Navigate to Yoast SEO » Settings in your WordPress dashboard. Look for the ‘Site Connections’ section, where you can add verification codes from various search engines.
Connecting to Google Search Console
Google Search Console is the most important connection to set up. It shows you which keywords bring visitors to your site, identifies crawling errors, and provides performance data.
If you don’t already have a Google Search Console account, visit Google Search Console and add your website. During the setup process, Google will provide you with a verification code.
If you already have a Search Console account, then you can find your existing verification code by logging into your Google Search Console account.
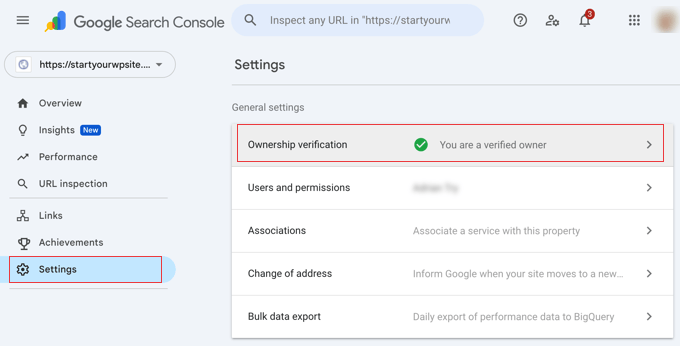
From the left-hand menu, navigate to Settings » Ownership verification.
Click on the ‘HTML tag’ method to reveal your code. It’s the string of letters and numbers inside the content="" attribute.

Copy this verification code and paste it into the appropriate field in Yoast’s Site Connections section. Click ‘Save Changes’ to establish the connection.
You can verify if a new connection is working by returning to Google Search Console. It should show your site as verified within a few minutes.
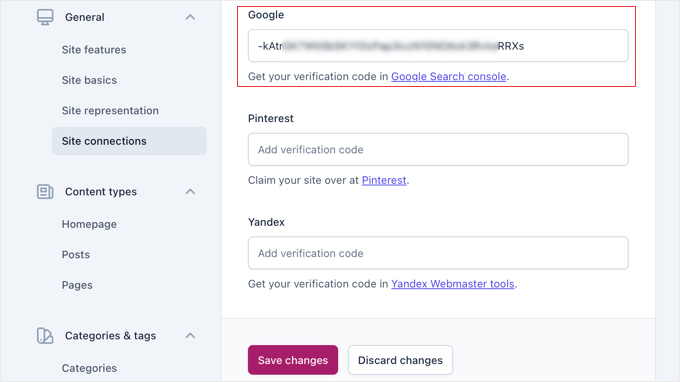
Adding Other Search Engines
While Google is the most important, you can also connect to Bing Webmaster Tools for additional search engine coverage. The process is similar: get your verification code from Bing and add it to Yoast’s settings.
Some users also connect to Yandex if they have international traffic, particularly from Russia. Again, the process involves getting a verification code and adding it to the appropriate field.
These connections confirm that you own your website and allow Yoast to provide better SEO insights.
Step 5: Setting Up Yoast Preferences
Now it’s time to configure Yoast’s core settings to match your website’s needs. These settings control how your content appears in search results and which SEO features are active on your site.
This section contains several important tabs that affect your entire website. Take your time here. Getting these settings right from the start saves you from having to fix issues later.
General Site Features
Navigate to Yoast SEO » Settings » Site Features to access the main feature controls.
This is where you’ll enable or disable Yoast’s various SEO tools.
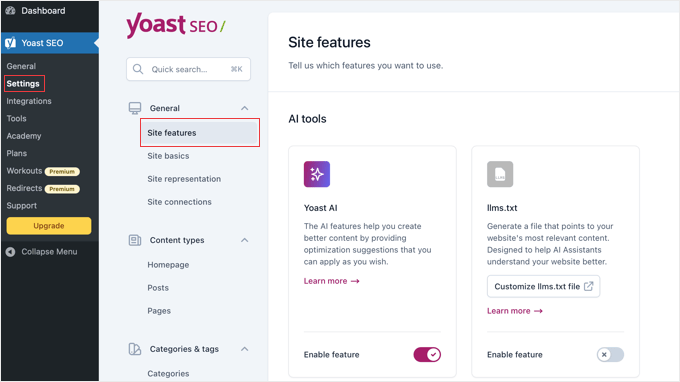
I recommend enabling the following features:
- SEO Analysis: Gives you real-time feedback and suggestions to improve your content for search engines.
- Readability Analysis: Helps make your content easier for both visitors and search engines to read and understand.
- Inclusive Language Analysis: Offers tips to make your writing more accessible to a wider audience.
- XML Sitemaps: Automatically creates a map of your website to help search engines find and index your content.
- AI optimization (llms.txt): This feature creates a special file on your site, similar to a
robots.txtfile, but specifically for AI crawlers like ChatGPT. It tells these AI bots whether they can use your content for training, giving you more control. We strongly recommend keeping this enabled.
Content Types & Search Appearance
This is a super important step. Here, you’ll create templates for how your content looks in Google search results and on social media. By setting smart defaults now, you save a ton of time later.
In the WordPress menu, navigate to Yoast SEO » Settings. Find the Content Types section and click on it to expand the options.
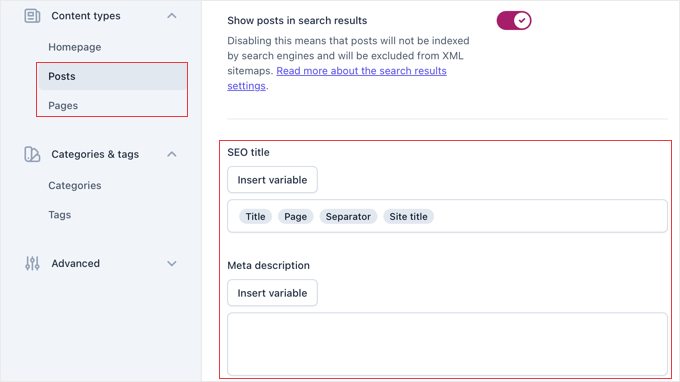
This will reveal settings for your Homepage, Posts, Pages, and any other custom post types you have. Let’s focus on the most important ones.
Click on ‘Posts’ to set the global defaults for every new blog post you write. You’ll see a section for ‘Search appearance’.
- SEO title: This is the template for your article titles on Google. Yoast uses variables like
Title,Separator, andSite titleto automatically build this. The default setting is usually perfect to start with. - Meta description: We recommend using the
Excerptvariable here as a safe fallback. However, you should still aim to write a unique, custom meta description in the Yoast metabox for every post you publish.
If you have the premium version of Yoast SEO, you can also scroll down to the ‘Social appearance’ section to set a default template for how your posts look when shared on platforms like Facebook and X (formerly Twitter).
The ‘Pages’ settings are identical, and the Yoast defaults are a great choice for most sites.
Categories & Tags
The ‘Categories & Tags‘ section controls how your taxonomy pages appear in search results.
These are the archive pages that show all posts in a specific category or with a particular tag.
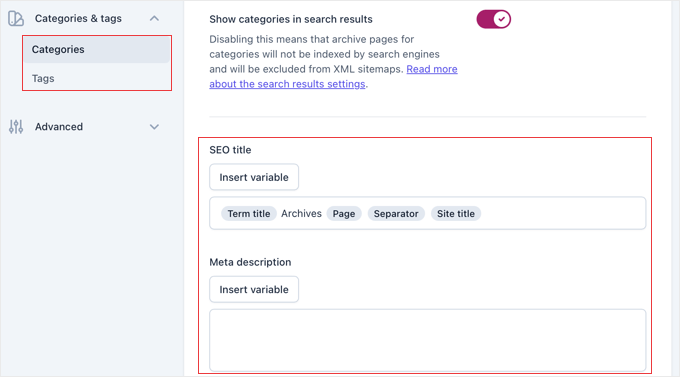
For most websites, I recommend keeping categories visible in search results. However, you should consider hiding your tag pages from search engines if you use lots of different tags.
This is because multiple tag archive pages can sometimes show the exact same list of posts, which search engines might see as duplicate content.
Customize the meta titles and descriptions for these taxonomy pages using Yoast’s variable system. This ensures each category page has unique, descriptive information in search results.
Advanced Settings
In the ‘Advanced’ section, you’ll find settings for more technical SEO elements.
The ‘Crawl optimization’ configuration here lets you control how search engines crawl your site.
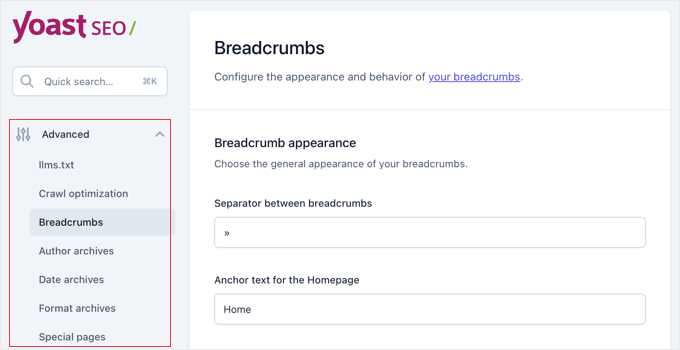
I also recommend enabling breadcrumbs if your theme supports them. They improve site navigation and help search engines understand your content structure. Breadcrumbs also appear in search results, making your listings more informative.
Review the other advanced options, but be cautious about changing settings you don’t fully understand. The default configurations work well for most WordPress sites.
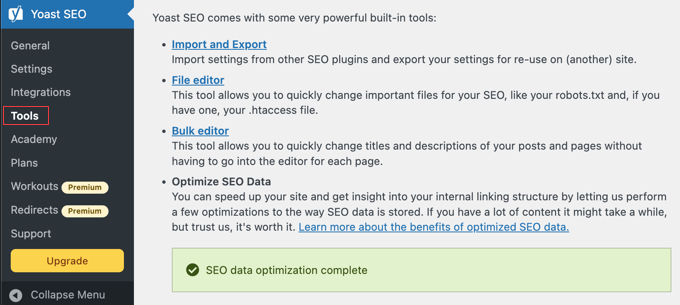
Step 6: Using Yoast SEO Tools
Yoast SEO includes several powerful tools that help you manage your site’s SEO more efficiently. These tools save time and give you direct access to important files that affect search engine crawling and indexing.
You can access these tools by navigating to Yoast SEO » Tools in your WordPress dashboard. This section contains utilities that would otherwise require FTP access or technical knowledge to use.
Bulk Editor
The Bulk Editor is a huge time-saver when you need to update SEO titles and meta descriptions for multiple posts or pages. Instead of editing each piece of content individually, you can make changes from one central location.
This tool displays all your content in a searchable table format. You can filter by content type, search for specific posts, and edit titles or descriptions directly in the interface.
The Bulk Editor is especially helpful when optimizing an existing website with a lot of content. You can quickly identify pages with missing meta descriptions or titles that need improvement.
In the ‘Title’ tab, you will find a blank field in the ‘New Yoast SEO Title’ column where you can add your new SEO title for that blog post.
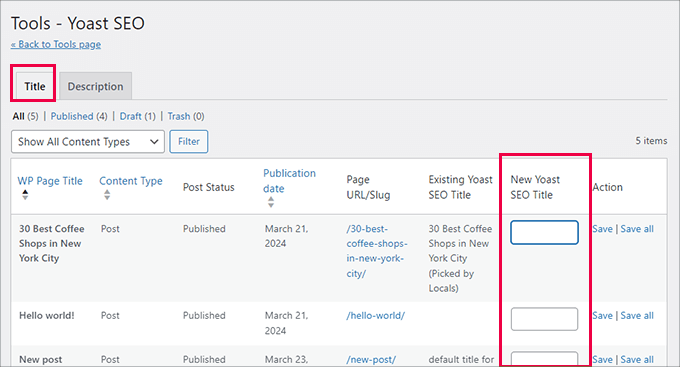
For example, if you need to add ‘Holiday Sale’ to the end of 10 different blog post titles, you can use the Bulk Editor to update them all from a single screen. It is a huge time-saver!
To add descriptions, you must switch to the ‘Description’ tab.
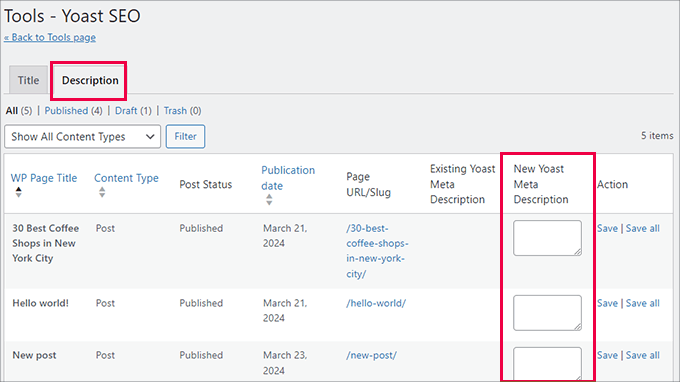
Changes made in the Bulk Editor save automatically, so you can work through your content efficiently without constantly clicking save buttons.
Import and Export
We already used the Import feature in Step 2, but this section also includes export options. You can export your Yoast settings to use on other websites or create backups of your configuration.
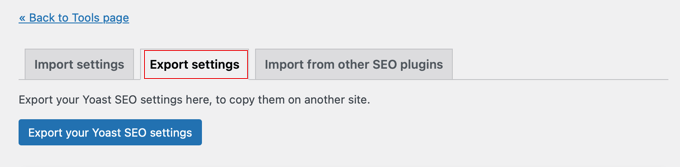
This is particularly useful if you manage multiple websites and want to maintain consistent SEO settings across all of them. Export your settings from one site and import them to others for quick setup.
File Editor
The File Editor tool is a powerful feature that lets you modify important SEO files directly from your WordPress dashboard, without using FTP or your hosting control panel.
Note: If you don’t see the File Editor option, don’t worry! Many managed WordPress hosting providers disable this feature for security reasons, or you may be on an NGINX server that doesn’t use .htaccess files.
The File Editor tool is a powerful feature that lets you modify important SEO files directly from your WordPress dashboard, without using FTP or your hosting control panel.
The two main files you can edit here are:
- robots.txt: This file gives instructions to search engine crawlers about which pages on your site they should or shouldn’t crawl.
- .htaccess: This is a server configuration file. Advanced users can edit it to create redirects, block bad bots, and more.
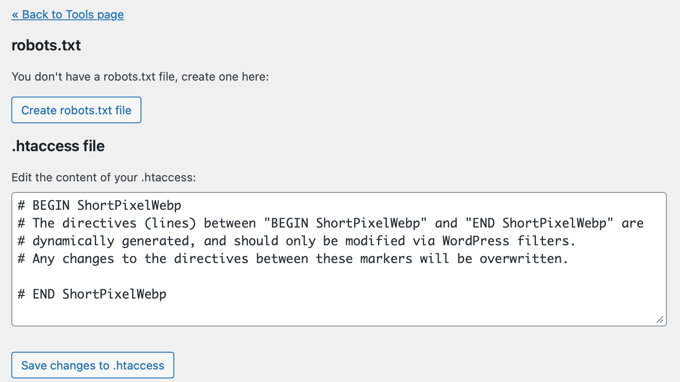
Warning: Be extremely careful when using the File Editor. A small mistake, especially in the .htaccess file, can make your entire website inaccessible. We recommend that beginners avoid editing this file unless following a specific, trusted tutorial.
Always make a full backup of your site before making any changes here.
Step 7: Integrating with Other Platforms
Yoast SEO works seamlessly with many popular tools and platforms to improve your SEO. These integrations can help you research keywords, track rankings, and get deeper insights into your website’s performance.
Setting up these connections is optional, but they can significantly improve your SEO workflow and results. Most integrations are straightforward to configure and provide immediate value.
Recommended SEO Integrations
Navigate to Yoast SEO » Integrations to see available connections.
Here you’ll find options to connect with professional SEO tools that complement Yoast’s built-in features.
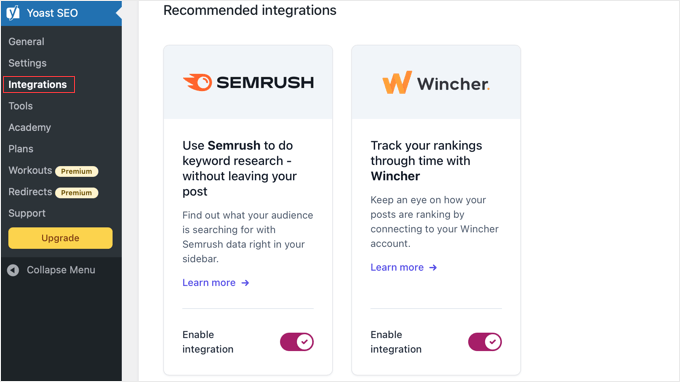
- Semrush: Helps with keyword research by showing you related keywords and search data right in the WordPress editor.
- Wincher: Tracks your keyword rankings, so you can see how your content is performing in search results over time.
Each integration requires you to connect your account to that service. Just follow the on-screen instructions to authorize the connection and start using the service.
Plugin-Specific Integrations
Yoast SEO also offers enhanced integrations with popular WordPress plugins to extend functionality beyond basic SEO.
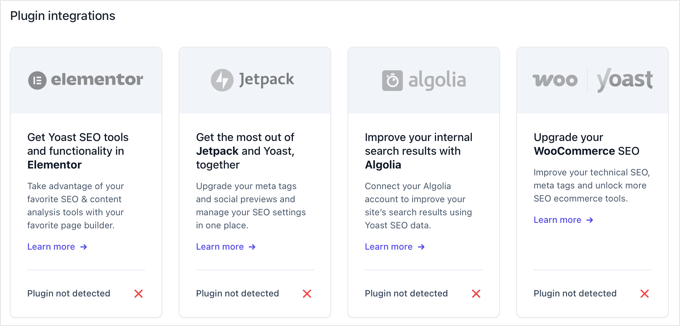
If you run an online store, the WooCommerce SEO integration provides specialized optimization for product pages, categories, and shopping-related schema markup.
For page builder users, Yoast integrates smoothly with Elementor and other visual builders. You can access Yoast’s SEO features while designing pages, making sure optimization doesn’t get forgotten.
Plus, many membership, eCommerce, and content management plugins have specific Yoast integrations. Check the Integrations tab to see if any of your existing plugins offer enhanced Yoast functionality.
Schema API Connections
Yoast’s Schema API allows other plugins to add structured data that integrates with Yoast’s schema output. This prevents conflicts and ensures clean, valid, structured data on your pages.
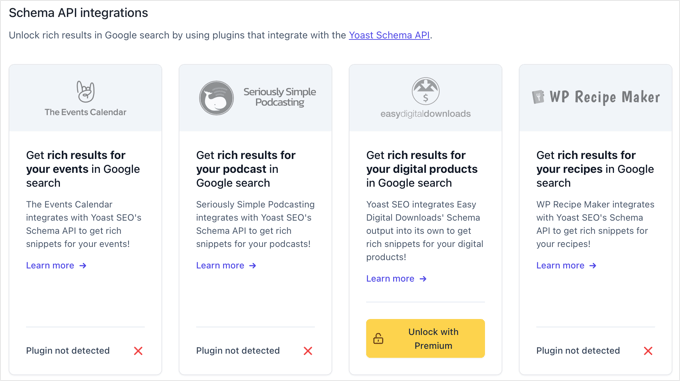
Popular plugins like recipe cards, event managers, and review systems often connect through Yoast’s Schema API. This integration happens automatically when you install compatible plugins.
You don’t need to configure these schema connections manually. They work behind the scenes to improve your search results with rich snippets and additional information.
Step 8: Refining Content With Yoast SEO
Now that your site-wide settings are configured, it’s time to optimize individual posts and pages using Yoast’s powerful content analysis tools.
This is where you can turn good content into search engine-optimized content that ranks better.
Every time you create or edit content in WordPress, you’ll use Yoast’s SEO metabox to fine-tune your optimization. This process becomes second nature once you understand the key elements.
When you edit a post or page, you’ll find the Yoast SEO settings in a panel. If you’re using the modern Block Editor (Gutenberg), the Yoast settings will appear in the right-hand sidebar.
If you’re using the older Classic Editor, you’ll find a ‘Yoast SEO’ metabox below your main content area.
Using the Yoast SEO Metabox
When editing any post or page, scroll down below the content editor to find the Yoast SEO metabox. If you’re using the Gutenberg editor, you might find it in the sidebar panel instead.
The metabox contains several tabs, but you’ll primarily work with the SEO tab for basic optimization. This is where you’ll input your focus keyphrase, the main keyword you want this content to rank for.
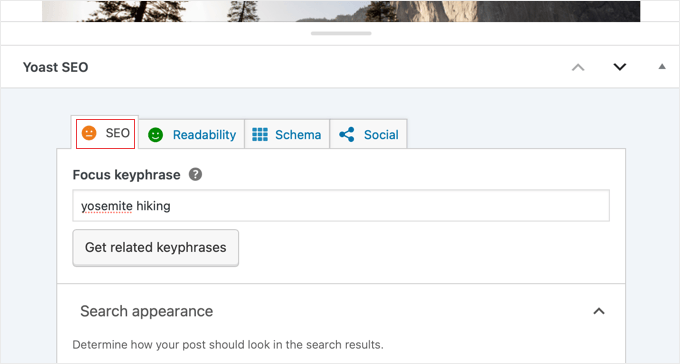
Choose your focus keyphrase carefully. It should be something people actually search for, relevant to your content, and not too competitive for your site’s authority level.
After entering your focus keyphrase, Yoast will analyze your content and provide a traffic light system: red means needs improvement, orange means good, and green means excellent.
SEO Analysis Features
You can find the SEO analysis tool by scrolling down the SEO tab. This examines dozens of factors to help you optimize your content.
It checks if your focus keyphrase appears in important places like the title, headings, and throughout the content.
The free version provides a powerful analysis based on a single focus keyphrase. If you upgrade to Yoast Premium, you can unlock advanced features like analyzing your text for multiple keyphrases, synonyms, and related terms.

You’ll see specific suggestions for improvement, such as ‘Add your focus keyphrase to the SEO title’ or ‘Use your keyphrase in a subheading.’ You can address these suggestions to improve your optimization score.
Don’t worry too much about achieving a perfect green light. Focus on the suggestions that make the most sense for your content. Sometimes, a good orange score is better than forcing keywords where they don’t belong naturally.
The analysis also checks technical elements like title length, meta description length, and internal linking. These factors help search engines understand and display your content properly.
Readability and Accessibility
Switch to the Readability tab to access Yoast’s readability analysis.
This tool helps make your content more accessible and easier to understand for your audience.
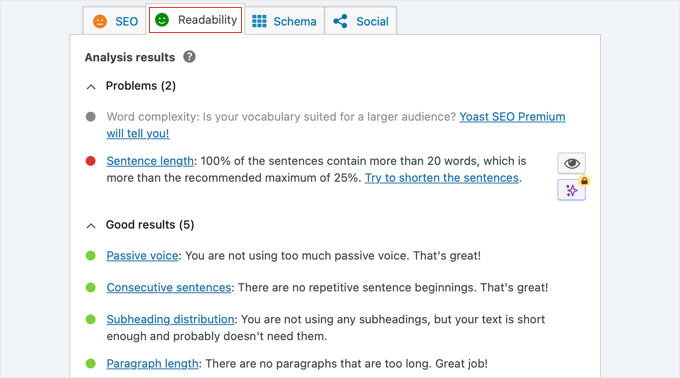
The readability analysis checks factors such as sentence and paragraph length, the use of transition words, and the use of the passive voice. These elements affect how easily people can read and understand your content.
Improving readability often leads to better user engagement metrics, which can indirectly help your search rankings. People stay on pages longer when the content is easy to read and understand.
Just remember, you are writing for humans first! It is okay to have an orange readability score if changing the text would make it sound robotic or unnatural.
If you enabled the Inclusive Language analysis feature in Step 5, you’ll also see suggestions for making your content more inclusive and accessible to diverse audiences.
Social and Schema Optimization
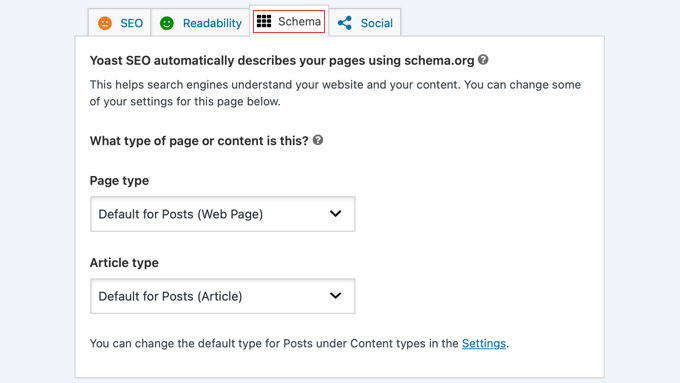
The Schema tab allows you to override default structured data settings for individual posts.
Most users won’t need to adjust these settings, but they’re available for advanced customization when needed.
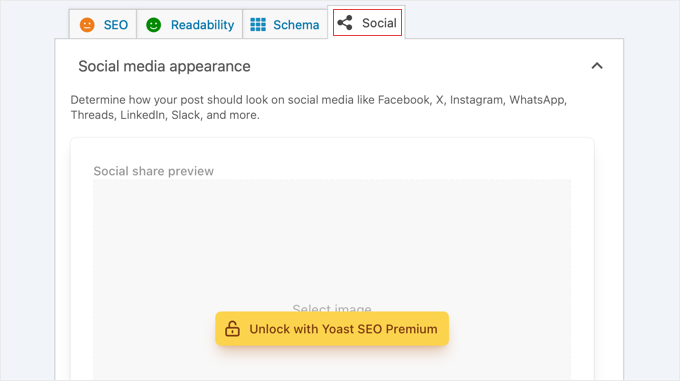
The Social tab lets you customize how your content appears when shared on social media platforms. You can write specific titles and descriptions for Facebook and Twitter. Premium users can also upload custom images.
These social media optimizations don’t directly affect search rankings, but they can increase click-through rates and social engagement, which may have indirect SEO benefits.
Step 9: Monitoring and Measuring SEO Success
After setting up and optimizing your content with Yoast SEO, you will need to track your progress and measure the results. Monitoring your SEO performance helps you understand what’s working and where you need to make improvements.
The key is setting up the right tracking tools and knowing which metrics actually matter. Let’s look at the easiest ways to track your site’s success! 📈
Google Search Console Integration
Google Search Console is your most important SEO monitoring tool, and it works perfectly with Yoast SEO. If you connected it in Step 4, you should now start seeing valuable data about your site’s search performance.
Visit Google Search Console and select your website to access performance reports. The Performance section shows which keywords bring visitors to your site and how often people click on your search results.
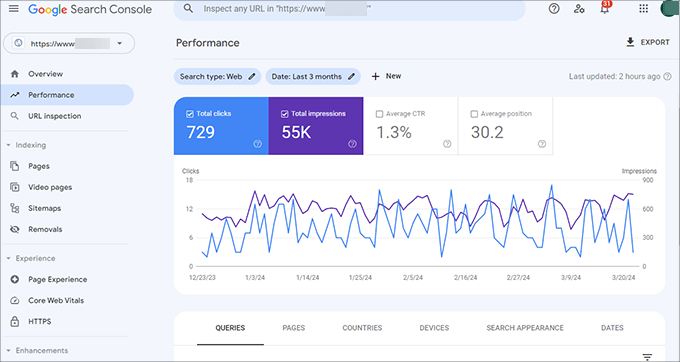
Pay attention to your click-through rates (CTR) for different pages. If you see pages with high impressions but low CTR, those are good candidates for optimizing titles and meta descriptions.
The Coverage section will show you any indexing problems, crawl errors, or pages that search engines can’t access. You will need to address these issues quickly to make sure that all your optimized content can be found in search results.
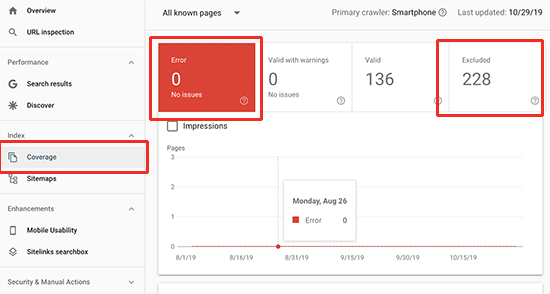
I also recommend submitting your XML sitemap to Google Search Console if you haven’t already.
Yoast automatically generates this at /sitemap_index.xml. Just paste this URL into the Sitemaps section of Search Console.
WordPress Analytics Setup
While Search Console shows how people find your site, Google Analytics reveals what they do after they get there. For WordPress users, I recommend installing MonsterInsights to view analytics data directly in your dashboard.
We use MonsterInsights here on WPBeginner because it makes analytics easy. It brings the most important data from Google Analytics right into our WordPress dashboard.
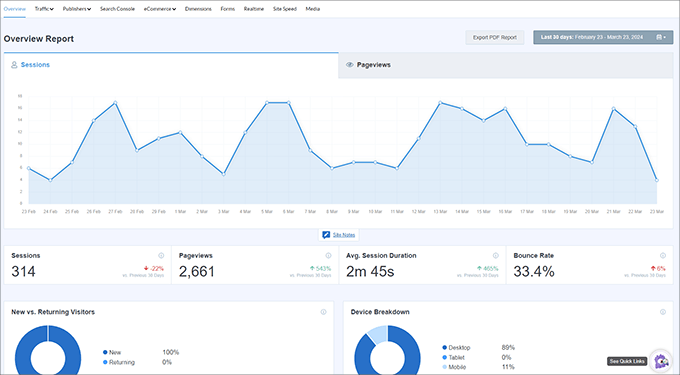
Track metrics like organic traffic growth, time on page, and bounce rate for your optimized content. These engagement signals help you understand if your SEO efforts are attracting the right audience.
You can also set up goals in Google Analytics to track conversions from organic search traffic. This helps you measure the business impact of your SEO work, not just traffic increases.
Rich Results Validation
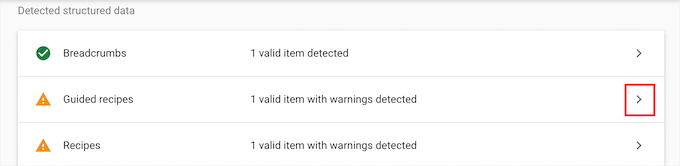
You can use Google’s Rich Results Test tool to make sure that your schema markup is working correctly.
Simply enter any page URL from your site to see what structured data Google can detect.
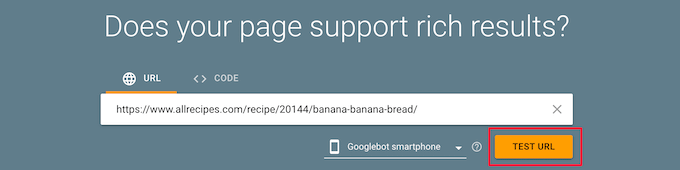
Yoast SEO automatically generates schema markup for different content types, but it’s worth checking that everything appears correctly. Proper schema can lead to rich snippets in search results, which improve click-through rates.
If you notice schema errors in the Rich Results Test, you will need to review your Yoast settings or check for conflicts with other plugins that might be adding duplicate structured data.
Ongoing SEO Maintenance
SEO isn’t a one-time setup. Instead, it requires ongoing attention and optimization.
I recommend reviewing your Search Console data every month to identify new opportunities and potential issues.
You should also update your content regularly based on performance data. If certain pages aren’t ranking as well as expected, you may need to optimize them again.
I also recommend keeping Yoast SEO updated to the latest version to ensure you have access to new features and improvements. The plugin team regularly releases updates that can enhance your site’s SEO performance.
Finally, consider running quarterly SEO audits. This process will allow you to review your most important pages, update outdated content, and refresh optimization based on new keyword opportunities you discover in Search Console.
Frequently Asked Questions About Setting Up and Using Yoast SEO
Even after following this complete setup guide, you might have questions about how Yoast SEO works or run into specific situations that need clarification.
These frequently asked questions address the most common concerns beginners have when getting started with Yoast SEO.
How do I install Yoast SEO plugin in WordPress?
You can install Yoast SEO by going to Plugins » Add New in your WordPress dashboard, searching for ‘Yoast SEO’, and clicking ‘Install Now’ followed by ‘Activate’.
The plugin will then appear as a new ‘Yoast SEO’ menu item in your dashboard, where you can configure all the settings.
Is the Yoast SEO plugin free?
Yoast SEO offers a comprehensive free version that includes all the essential SEO features most websites need. The free version provides SEO analysis, readability checking, XML sitemaps, and basic optimization tools that work perfectly for beginners and small websites.
How do I know if Yoast SEO is working correctly?
You can verify Yoast SEO is working by checking that the SEO metabox appears when editing posts or pages, confirming your XML sitemap is accessible at /sitemap_index.xml, and seeing SEO titles and meta descriptions display properly in search results. Google Search Console will also show indexing data if your sitemap is submitted correctly.
Why should I disable author archives on a single-author blog?
On a single-author blog, the author archive page is often identical to your main blog page, which can create duplicate content issues for search engines.
You can prevent this by going to Yoast SEO » Settings » Advanced » Author archives and disabling the feature. This tells search engines not to index these pages, resolving the duplication problem.
Additional Resources for WordPress SEO
I hope this article helped you to fully configure and optimize Yoast SEO.
Just remember that Yoast SEO is a tool, not a magic solution. Focus on creating high-quality, valuable content that genuinely helps your audience. This remains the foundation of good SEO.
Now, you may be ready to learn about additional resources and strategies that can take your WordPress SEO to the next level:
- For a deeper dive into WordPress SEO beyond just plugin setup, check out our comprehensive Ultimate WordPress SEO Guide for Beginners (Step by Step). This guide covers advanced SEO strategies. While it’s aimed at AIOSEO users, many of the principles work hand-in-hand with your Yoast setup.
- Our guide on the Best Yoast SEO Alternatives For WordPress explores other powerful SEO solutions you might consider for different needs.
- For transparency about our own SEO plugin choice, read about the Reasons Why We Switched From Yoast to All in One SEO. This detailed case study explains our decision-making process and might help you evaluate your long-term SEO strategy.
- You can also check out our comprehensive Yoast Review: Is It The Right WordPress SEO Plugin For You? for an in-depth analysis of the plugin’s strengths and limitations.
- Finally, our detailed comparison Yoast SEO vs All in One SEO – Which is the Best WordPress SEO Plugin? will help you decide if it’s the right fit for your needs.
If you liked this article, then please subscribe to our YouTube Channel for WordPress video tutorials. You can also find us on Twitter and Facebook.


")
Prateek
thanks For This Wpbegginers
jackson
\my yoast is written on the dash board
The following file(s) is/are blocking your XML sitemaps from working properly:
/home/hanseltr/public_html/sitemap.xml
Either delete them (this can be done with the “Fix it” button) or disable Yoast SEO XML sitemaps.
WPBeginner Support
It seems that another plugin has added a sitemap.xml file to your website. You can need to find out which plugin added it and disable the plugin. Alternately, you can connect to your website using FTP and then locate the sitemap.xml file and delete it manually.
Admin
Anubhav
So here is my issue. When I am sharing my website on facebook, it automatically shows a thumbnail of a random shop product and a random product description. I did make that change under Social->Facebook and added the appropriate image and description, still nothing has changed. What am I doing wrong? Thanks in advance.
alison
will this plugin properly work with Genesis theme?
WPBeginner Support
Yes, it will.
Admin
janel zamoras
How about simply read theme?
Bisham
How to solve 500 internet sever error
Raja Sharma
Simply check Your htaccess file For Any Wrong Code
danu adji
please help, why the blog description still does not appear, whereas I had to apply the existing arrangements in this article
Tara
I’ve just got wordpress, the free version which says you can’t add plugins.
Can you confirm that if I upgrade wordpress then I will be able to use yoast SEO?
I can’t seem to find that piece of information!
Thanks
Tara
WPBeginner Support
It seems like you are using WordPress.com. Please see our guide on the difference between self hosted WordPress.org vs free WordPress.com blog.
Admin
Tara
Yes i have wordpress.com free
and I have a domain and google apps
… and I really don’t know what these do! The google apps – is that just email management, or are they my domain (website)?
I’d like to migrate to wordpress.org but don’t want to pay for web hosting twice
please advise, thanks!
Tara
I mean is google apps hosting my website?
Praveesh
Hi Tara,
Got your Query resolved?
jasmine
thanks for the detailed tutorial.
i would really appreciate if you share FREE video sitemap creator.
Ahmed Nasr
Your comment is awaiting moderation.
Hi, thank you for this post
i have one question
i’m using Yoast plugin in my site but i want to entry meta code
meta name=”Googlebot-News” content=”noindex, nofollow”
to some posts to Exclude it from Google News
how can i do it
WPBeginner Support
You can use Insert Headers and Footers plugin for that and add this code in the header section of your website.
Admin
Josh
For XML Sitemaps (Step 8), should we disable the ThirstyLink options?
Brenda
Thank you SO much! For reasons like this article, you are the first “assignment” I give new clients when they are WordPress users.
Google wants me to verify all the versions of my URL (http, https, www, -www). Where would I put the verification codes for all these different versions? Different “alternative methods”?
Many thanks indeed!
WPBeginner Support
You can add multiple meta tags, or verifcation through file uploads.
Admin
Jaswinder
I am using All in One Seo Pack.
Actually I tried both, but I like All in one Seo Pack more than Yoast Seo.
Louay
Hi,
Great info.
How do add og:image for the home page?
thanks
cheers
Nicole
Thanks so much for your help!
I have installed Yoast on my wordpress site however am still battling with trying to clear up my ‘tags’ pages on Google. How would I go about this? I think that the numerous tag pages relating to my site might be related as to why Google Adsense keeps getting disapproved. Please could you advise me? Nicole
Thanks so much
Rashed
thanks
your post is more descriptive for the beginner which seo plugin is the best for seo ultimate or yoast please suggest me which one should i use
Rithika
Thanks for sharing information on Yoast ,but as i am using genesis theme for my blog, So is there any extra features you know which is not there in genesis .because these features are i think there in genesis.
Thank You..!
Rithika
WPBeginner Support
We use Genesis Framework on WPBeginner, but we still use WordPress SEO. While the SEO features in Genesis are quite adequate, Yoast SEO is a much more powerful and robust solution. As soon as you activate Yoast SEO plugin, Genesis will automatically hide all its SEO settings.
Admin
sugiharto
thanks for your info, can ask related Yoast SEO
am install Yoast SEO plugin win my blog, but i chek in google have problem in Robots.txt fetch and Search Console – Yoast SEO code is different in my google webmaster hot to fix it
thanks
Emily Johns
Thanks For Sharing This. but in Yoast SEO plugin, we can put only one Keyword and in All in One SEO, we can put as many we want, so Here I am confused that which one is exactly the best. Does Yoast plugin drive more traffic to my blog than All in One SEO????
Val Archer
Hi – I installed yoast and am trying to find a box where I can enter each post’s meta tag description. You mention:
>On each post and page editor page, you will see this new box called WordPress SEO that has tons of fields like SEO Title, Meta Description
I have “Yoast SEO” checked in ‘Screen Options.’ Below my post window is Yoast SEO with 3 icon options: Content, Advanced, Social.
Under ‘Content” is “Snippet Editor”, ‘Focus Keyword’ and ‘Content Analysis.’ Content Analysis complains “No meta description has been specified” BUT I can NOT find a box/field anywhere for me to enter the meta description. You say “tons of fields” but I see only these 3 under Content.
Please can you tell me where I can enter the meta description uniquely for each post? Thank you! Alternatively, do you have any code for functions.php that will add a meta description box to the post edit window? So in the dropdown under Custom Fields, I’ll see “Description” and can give it a value there? Then I can uninstall yoast because I really don’t like it.
WPBeginner Support
Yoast SEO has changed the meta box UI since we last updated this article. The description field is in the snippet editor just below the title. You can edit the title by clicking on it. If the description field below it is empty then just click on the empty area below the title and it will become editable. You can then enter your post’s description.
Admin
Val Archer
That’s funny. I definitely don’t have any empty area below title. Will email you a .jpg
Ayoola Abolaji
Thank you so much. this is the best SEO walk through I’ve found so far
Peter Wright
Great post – certainly has helped tweak my Yoast plugin
febx
Thank you for the post, It will help all of those newbie bloger included me
Patrik
Hi,
How do I set up Yoast SEO plugin to work with Advanced Custom Fields?
I have searched all around the web and can not find any help/tutorial or information about how to get Yoast SEO Wordpress plugin to work with other fields in WordPress, in this case I have a website (or several) that use Advanced Custom Fields to store a lot of content and Yoast can not sense these fields. Yoast have an extra plugin for this (what I’ve understand): YoastSEO.js , but I have no idea how to get this to work.
1. How do I set up YoastSEO.js plugin (is it a plugin?) to work with Advanced Custom Fields in WordPress.
Would you at wpbeginner be able to write a proper bulletproof tutorial for dummies about this?
Regards,
Patrik from Sweden
WPBeginner Support
We will try. Meanwhile you can try support forums for Yoast SEO plugin on WordPress.org.
Admin
Kelsey
Hi! Great Post.
I just downloaded Yoast SEO onto my website, but I now have a message that says this:
Your theme contains a meta description, which blocks Yoast SEO from working properly, please delete the following line, or press fix it:
<meta name="description" content="”>
Warning!
The Header and Footer plugin(s) might cause issues when used in conjunction with Yoast SEO.
Both Yoast SEO and Header and Footer create OpenGraph output, which might make Facebook, Twitter, LinkedIn and other social networks use the wrong texts and images when your pages are being shared.
It then has a button that says to deactivate my header and footer.
I do have a header and footer plugin by Stefano Lissa. Will I mess up my website if I deactivate the header and footer?
Thanks!
WPBeginner Support
You will need to deactivate header and footer plugin. We cannot say what kind of effect it will have on your site. If you were just using it to add Facebook open graph meta data, then you can do that in Yoast SEO.
Admin
Akshay Hiremath
In the google search results I want my organic listing to appear like a box with product name & prices in it. Saw this on the search results and want to apply the same for my business.
Please Help me with this.
Jiten
Hey Sayed / Editorial Team,
I am using All in One SEO plugin, since 2 years for my health blog. I am getting good visitors. I want to change the plugin to SEO by Yoast. Will it affect my rankings? Do i need to rewrite all Meta Title & Description again if I uninstall the older and activate Yoast SEO plugin?
Awaiting for your reply.
Thanks,
Jiten
WPBeginner Support
No it should not affect your rankings. Yoast SEO has built-in importer, that brings all your All in One SEO settings into Yoast. Simply go to SEO » Tools » Import/Export and then click on import from other plugins tab. You will find the option to import from All in One SEO plugin.
Admin
Mikael Andersen
Have you checked all the new rewievs in the plugins reviews. Until 3 days ago I would recommend Yoast SEO. Today I am about to find another plugin, because of all the bugs in the newest update and because a lot of functionality is away and instead you will find a lot of buttons for paid extenstions.
Mikael Andersen
Hi
After Yoast have made a bunch of errors in their new update, can you then recommend an alternative Seo plugin, that is a bit similar to Yoast plugin.
Zuber Shaikh
Dear Sir,
I can use this tool in my website and also all my Wordpress Clients Sites. Really Good tools. I m Web Developer and also Internet Marketer last 4+ Years.
Thanks Regards
i m Zuber
thousan
Hi Wpbeginner support team. I am a newbie to wordpress and website. I have a website on a free hosting service and I did install SEO by yoast and I tried to config the setting as in your video. Yet I still can not find my website and my content in google search result. I don’t know what wrong with this. I hope you can help me to solve this problem.
bisot
it help me to deal with the setting , thank you verymuch
sumit
Do we need to remove tag and categories from sitemap.
JC
Great tip. I switched from All in one SEO to Yoast and keep trying to optimize this tool.
Hari
how to optimze a .net website
Jitendra Mahato
Hi there,
I have installed this plugin in my site before 1 year but there is one problem us my site. There is working very good in my site as well. But the breadcrumb is working just in the post or page. It is not working in the google search engine snippet like other. May i why? it there something special to do for that…… I want to have displayed breadcrumb in search engine…….. . I am waiting for your response.
Jitendra
WPBeginner Support
It is upto Google to decide whether or not they will show breadcrumbs with a result.
Admin
bhaskar
thank u
brian
thank you for your instructions.
in this document you wrote, “The next option is to remove stop words from permalinks. Stop words are common words used in plain language. Yoast believes that by removing these, you will create cleaner URLs. While it does make the URLs smaller, we disagree with Yoast. This is why we have left it unchecked.”
But, the screenshot indicates that the, “Remove stop words from slugs” is checked.
If possible, can you please clarify if you meant it is advisable to leave it checked (default) or remove the check?
thank you.
WPBeginner Support
We have it unchecked.
Admin
brian
thank you!
Marcia
I just watched the video and feel like I went through a maelstrom. It was so fast that it raised my blood pressure trying to keep up with it. Therefore, it wasn’t very useful to me. I’m not a beginner. Were I a beginner, it would have been even worse for me. Thank heavens for the printed words that follow it!
Anna A.
Hi. Great article! I am just a little confused on 1 thing. I will have a blog with categories. Under each post I will have tags for them. The tags will then become the archived pages for the posts. My question is for these archived pages, will Yoast have the correct canonical? Or will I need to go and manually change something there to refer it back to my category page??
sai krishnan
i am getting this error on installing the plugin please help
Installing Plugin: Yoast SEO 2.3.2
Downloading install package from https://downloads.wordpress.org/plugin/wordpress-seo.2.3.2.zip…
Unpacking the package…
Installing the plugin…
Destination folder already exists. /home/content/p3pnexwpnas08_data01/85/2727085/html/wp-content/plugins/wordpress-seo/
Plugin install failed.
WPBeginner Support
Seems like you have either already installed the plugin or a previous installation failed to complete. Go to the plugins page and see if you have WordPress SEO or Yoast SEO plugin installed. If it is already installed, then you just need to activate it. If you cannot see it on the plugins page, then connect to your website using an FTP client and go to /wp-content/plugins/ directory. Delete the WordPress-SEO folder.
Admin
Nelbin
I am getting this error message when I try to upload the plugin
‘The package could not be installed. PCLZIP_ERR_BAD_FORMAT(-10): invalid archive structure.’
Please help.
Thank you!
Bj aka Bill Brown
You make no mention of the noodp or noydir.
What is your opinion on using / not using these?
WPBeginner Support
We don’t think that these settings are relevant or affect most sites. However, both of them are harmless if you want to opt-out from ODP or Yahoo Directory descriptions.
Admin
Sacha
Very, very helpful post a video WPBeginner.
I have been using All in One SEO Pack plugin for a long time a finally decided to switch and I’m pleased I did.
Rich
Help me please. I’m another beginner. Them main advertising content of my website is the photos in my gallery showing the work that we can do (a picture paints a thousand words), but the images do not show up in Google. Looking in the Sitemaps it appears that the images are listed with a value of zero. I have done much internet searching and can find nothing conclusive. I am using Nextgen Gallery.
Any help appreciated
WPBeginner Support
Perhaps switching to a more SEO friendly gallery plugin would help. Please take a look at Envira Gallery
Admin
Kregg Hill
Question? On the “Edit Page” tab, Yoast SEO section, under “Page Settings” there are 5 Tabs…one of which is SEO where there is a place to input “Keywords”. Is this essentially where you add all keywords for that page, and if so, can you add long tail keywords, is there a comma required after each entry, and is there a lmit to how many search keywords or terms you can add there?
Sorry, I’m a newby!
WPBeginner Support
You can add keywords relevant to that page under keywords option.
Admin
Jennifer McNeil
Dear WPBEGINNER SUPPORT,
Well, I must say that your tutorial was very comprehensive and most informative!
Now all we have to find out is if it all actually works, since I have been ‘fighting’ with our Website,, since last November, trying to get it to rank even a little bit! From all the numerous scans I have done with endless software, it is full of flaws and errors (apparently many of them in the actual code of the THBusiness theme we are using). Will following all your instructions in this tutorial fix these problems, or do I need to look elsewhere for remedies?
Also, all Pages are showing absolutely horrible Google Page Speed Testing too. All are in the 30’s and 40’s for both Desktop and Mobile and we can’t figure out why!
If you have any suggestions at all, I’d sure be open to receiving them, as admittedly, I am a bit of a greenhorn. Many thanks in advance.
Very best regards,
Jennifer McNeil
WPBeginner Support
If you believe that the problem is with your WordPress theme’s code, then we would recommend you to consider changing your WordPress theme. You can also temporarily disable all plugins on your site, and switch to a default WordPress theme like Twenty Fifteen. After that test your Google Page speed. If this improves performance significantly then it is your theme or one of the plugin’s fault. To further analyze, you can turn on your plugins one by one, take Google page speed score after each plugin. Do the same for your theme. This way you can find out whats causing low page speed score. Hope this helps.
Admin
Riju
Nicely composed post about seo by Yoast. It will help all of those newbie bloger included me, who like to add this powerhouse seo plugin on their wordpress blog. Now it’s look like that I can easily proceed to setup Yoast. Let’s see…..
Thanx…..
Manoela
Hey!
Following this tutorial, I’ve just migrated from All in One SEO to Wordpress SEO by Yoast! I simply love the analysis function, but there’s something I’m missing: can’t I set keywords for my posts and pages? Isn’t that worse for my SEO? I thought it was a good way of getting the post found by robots. What would you recommend?
Thanks a lot.
Manoela
WPBeginner Support
Actually the author of Yoast’s WordPress SEO plugin believes that Meta Keywords are no longer important for SEO. However, we believe that even if they are not important, they are still pretty harmless. If you want to use them on your posts and pages while using WordPress SEO plugin, this is what you need to do.
Go to SEO » Titles & Metas and click on the Other tab. Check the box next to ‘Use meta keywords tag?’ option and click on the save changes button. You will now see the meta keywords field in the WordPress SEO metabox below the posts and pages.
Admin
Ibn Adam
Thank you for the post. Webmaster Tools and Titles & Metas sections helped!
kim
Just want to say THANK YOU! Absolute a life saver for this learning lady!
Ralph D. Klonz
Yoast is used so much out in SEO Land, but this is really the best how to if seen so far. Have watched a many videos but your blog drives it home. There are still some thing I don’t fully understand. But that’s not the plugin, it’s my limitations.
Tommy
Hi guys!
I have a problem after editing posts using yoast plugin. I can’t then see what I saw before, i.e. my post with gallery only – I can only edit it in text mode. everything else is disabled, and even invisible.
Same issue with sites – only text editor possible.
Any ideas?
Cheers,
Tommy