Vi state chiedendo come installare e configurare correttamente il plugin Yoast SEO in WordPress?
Yoast SEO è un popolare plugin SEO per WordPress che offre una buona serie di funzioni per ottimizzare il vostro sito web per i motori di ricerca come Google.
Tuttavia, molti principianti non hanno familiarità con il gergo SEO e trovano difficile decidere quali opzioni del plugin attivare.
In questa guida vi illustreremo la configurazione completa del plugin Yoast SEO in WordPress per dare al vostro sito web una spinta SEO.

Nota: per il sito WPBeginner siamo passati da Yoast SEO a All in One SEO, perché ha funzioni molto più potenti. AIOSEO è utilizzato da oltre 3 milioni di siti web; per maggiori dettagli, potete seguire la nostra guida su come installare e configurare AIOSEO.
Ecco gli aspetti che tratteremo in questo articolo:
- Yoast SEO Features
- How to Install Yoast SEO Plugin
- How to Set Up WordPress SEO Plugin by Yoast
- Import your SEO Data
- Run the First-Time Configuration Wizard
- Yoast SEO Settings – Site Basics
- Site Connections
- Content Types
- Categories & Tags
- Advanced Settings
- Tools
- Integrations
- Optimizing Your Posts and Pages With Yoast SEO
- Optimizing Taxonomies for SEO (Categories and Tags)
- Optimizing eCommerce Products
- Monitoring and Tracking SEO Performance
- Conclusion
Caratteristiche di Yoast SEO
Yoast SEO è uno dei più popolari plugin SEO per WordPress, con molti strumenti e funzioni integrate. Ecco una rapida panoramica di alcune di queste funzioni:
- Modificare il titolo SEO e la meta descrizione del post su base individuale.
- Supporto di titoli e meta-descrizioni per le tassonomie (ad esempio, categorie e tag).
- Anteprime dei risultati di ricerca di Google.
- Test sulle parole chiave.
- Meta robots configuration:
- Aggiungere facilmente i meta-tag noodp e noydir.
- È possibile noindicare o nofollow facilmente le pagine, le tassonomie o gli archivi.
- Configurazione del piè di pagina/intestazione RSS.
- Supporto delle briciole di pane, con titoli configurabili.
- Sitemaps XML avanzate.
- Editor .htaccess e robots.txt.
- Capacità di verificare Google Search Console, Yahoo Site Explorer e Bing Webmaster Tools.
- Supporto del markup Schema.
Inoltre, la versione premium di Yoast SEO offre ancora più funzioni:
- Un gestore di redirect che consente di impostare facilmente i redirect.
- Possibilità di utilizzare più parole chiave.
- Suggerimenti per il collegamento interno.
- Possibilità di esportare le parole chiave di interesse.
- Video tutorial che spiegano le diverse funzioni.
- Assistenza prioritaria.
Per i pro e i contro del plugin e per un’analisi dettagliata, potete consultare il nostro confronto tra Yoast SEO e All in One SEO.
Come installare il plugin Yoast SEO
La prima cosa da fare è installare e attivare il plugin Yoast SEO. Per maggiori dettagli, consultate la nostra guida passo passo su come installare un plugin di WordPress.
Dopo l’attivazione, noterete una nuova voce di menu denominata Yoast SEO.
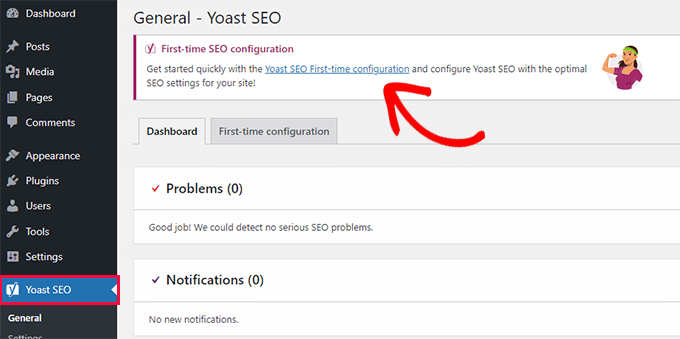
Facendo clic su di esso, verrà richiesto di eseguire la procedura guidata “Prima configurazione”.
È sufficiente fare clic sul link per eseguire la prima configurazione guidata.
Come impostare il plugin WordPress SEO di Yoast
Yoast SEO è dotato di una configurazione guidata di base che vi guiderà attraverso l’impostazione iniziale.
Se lo state configurando su un nuovo sito web WordPress, potete saltare il passaggio 1 ed eseguire direttamente il passaggio 2 della prima configurazione guidata.
Tuttavia, se state impostando Yoast SEO su un sito web esistente in cui avete precedentemente utilizzato un altro plugin SEO per WordPress, dovete prima importare i dati SEO esistenti.
Cominciamo.
Passo 1: Importare i dati SEO
Se state impostando Yoast SEO su un nuovo sito web o blog WordPress, potete saltare questo passaggio.
Altri utenti che stanno installando il plugin su un sito web esistente potrebbero aver utilizzato qualche altro plugin di WordPress per la SEO, come All in One SEO for WordPress, RankMath o un framework di tema come Genesis per gestire i dati SEO.
Se si desidera utilizzare correttamente Yoast SEO, è necessario assicurarsi che tutti i dati SEO precedenti siano stati trasportati prima di disattivare l’altro plugin.
Fortunatamente, Yoast SEO è dotato di una funzionalità integrata di importazione/esportazione dei dati SEO.
Andate alla pagina “Strumenti ” di Yoast SEO e fate clic sul link “Importa ed esporta”.

Si accede così allo strumento di importazione/esportazione.
Da qui, è necessario passare alla scheda “Importazione da altri plugin SEO”.
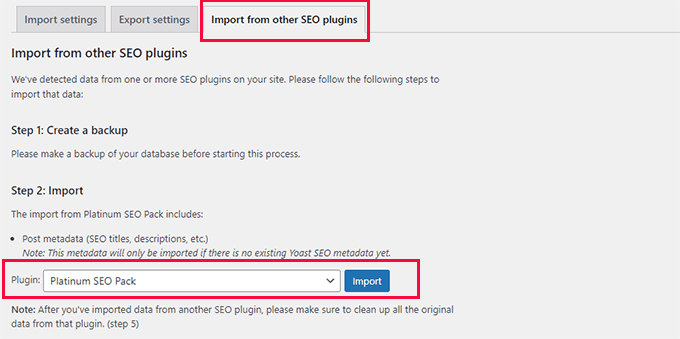
Per prima cosa, si consiglia di creare un backup completo del database. Si consiglia di utilizzare il plugin Duplicator, che è il modo più rapido per eseguire un backup completo del database.
Nota: esiste anche una versione gratuita di Duplicator, in grado di svolgere il proprio lavoro. Ma per i backup automatici, l’archiviazione sicura su cloud e altre funzioni, si consiglia di passare a un piano a pagamento.
In “Fase 2: Importazione”, scegliere il plugin SEO utilizzato in precedenza dal menu a discesa.
A questo punto, basta fare clic sul pulsante “Importa” per recuperare i dati SEO.
Quindi, è possibile modificare un post o una pagina del blog e scorrere fino alla sezione Yoast SEO. Lì si può vedere se il plugin ha importato correttamente i dati SEO, come il titolo e la meta descrizione.
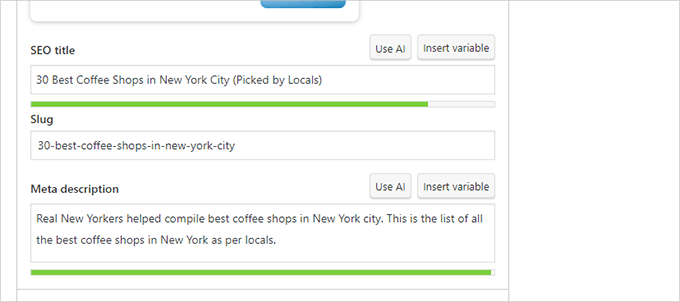
Se tutto sembra a posto, si può tornare alla scheda “Importa”.
Il passaggio 4 chiede di eseguire la prima configurazione guidata. Vi mostreremo come farlo nella fase successiva di questa guida.
Successivamente, passare nuovamente alla scheda “Importazione”.
È necessario selezionare il plugin SEO precedente in “Fase 5: Pulizia” e poi fare clic sul pulsante “Pulisci”.
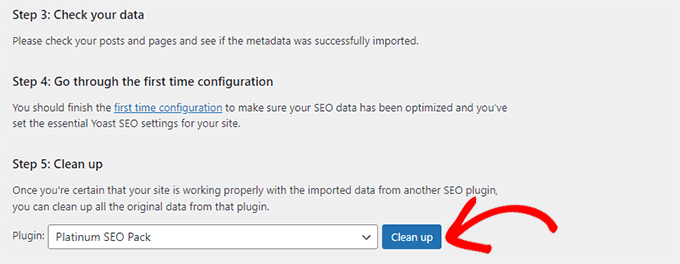
In questo modo si pulisce il database e si cancellano i dati del vecchio plugin. Dopodiché, si può tranquillamente disattivare ed eliminare il vecchio plugin SEO.
Passo 2: Esecuzione della prima configurazione guidata
Yoast SEO è dotato di una procedura guidata per la prima configurazione. Per eseguirla, andare alla pagina Yoast SEO ” Generale e passare alla scheda “Prima configurazione”.
L’avvio della configurazione guidata consente di impostare alcune impostazioni SEO di base per il sito web.
Il primo passo della procedura guidata è “Ottimizzazione dei dati SEO”. Fare clic sul pulsante “Avvia ottimizzazione dati SEO” per eseguire l’analisi.
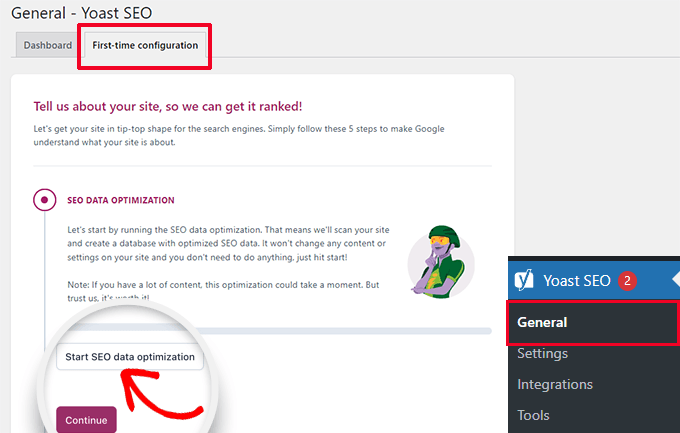
Non preoccupatevi perché il processo di ottimizzazione non modificherà alcun contenuto del vostro sito web.
Una volta terminato il processo di ottimizzazione dei dati, è sufficiente fare clic sul pulsante “Continua” per procedere.
Successivamente, vi verrà chiesto di fornire informazioni sul vostro sito web. Tra queste, se si tratta di un’organizzazione o di una persona, il nome del sito web, il nome dell’organizzazione e il logo dell’organizzazione.
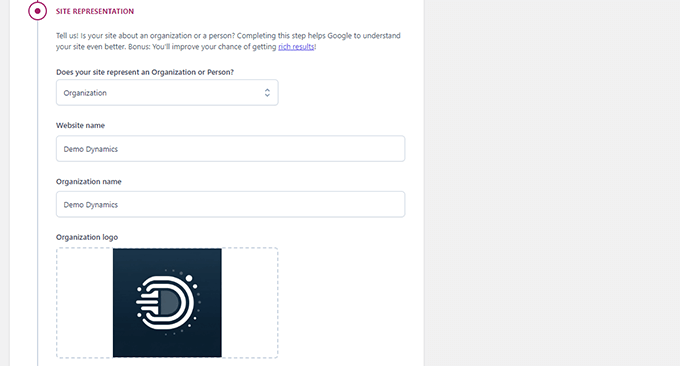
Dopo aver inserito queste informazioni, è necessario fare clic sul pulsante “Salva e continua”.
Questo vi porterà alla fase successiva.
Qui è necessario inserire i profili sociali associati all’organizzazione o all’azienda che sta dietro al sito web.
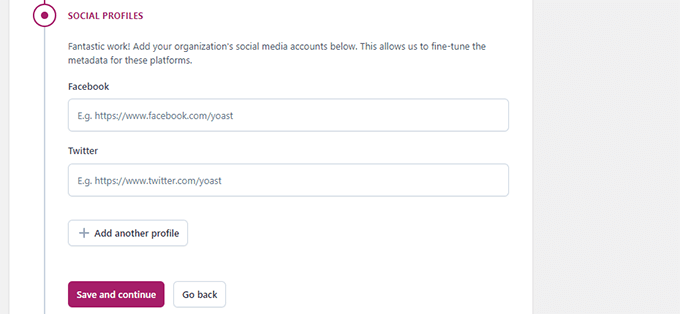
Dopo aver inserito i profili sociali, fare clic sul pulsante “Salva e continua”.
Successivamente, vi verrà chiesto di inserire il vostro indirizzo e-mail per ricevere la newsletter settimanale di Yoast SEO.
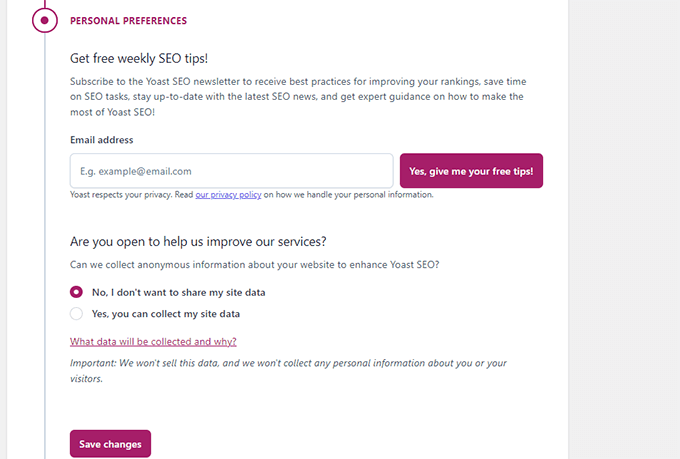
Vi verrà inoltre chiesto di scegliere se accettare o meno il tracciamento dei dati di utilizzo.
Potete selezionare “No” se non vi sentite a vostro agio nel condividere i vostri dati di utilizzo con l’azienda che si occupa di Yoast SEO.
A questo punto, fare clic sul pulsante “Salva e continua”.
È tutto. L’installazione guidata è stata eseguita con successo.

Successivamente, vi guideremo attraverso il resto delle impostazioni del plugin. Questo vi aiuterà a configurare il plugin in modo corretto per ottenere vantaggi SEO ottimali.
Passo 3: Impostazioni di Yoast SEO – Nozioni di base del sito
Per prima cosa, è necessario impostare le impostazioni di base dell’aspetto SEO. Andate alla pagina Yoast SEO ” Impostazioni e passate alla scheda “Fondamenti del sito”.
Qui è possibile modificare il titolo del sito, aggiungere un titolo alternativo (facoltativo), fornire una tagline e scegliere un separatore di titolo.
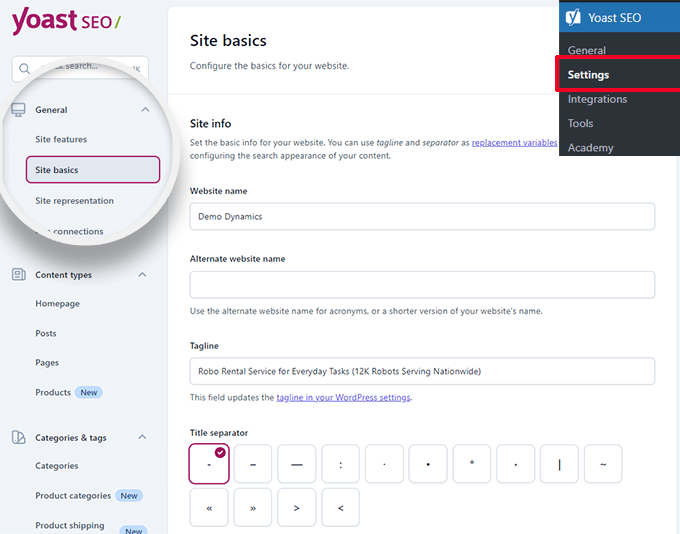
Il separatore del titolo appare nella barra del titolo del browser. È possibile sceglierne uno qualsiasi, ma il simbolo del trattino è quello più comunemente utilizzato.
Di seguito, è possibile fornire un’immagine del sito. Le dimensioni consigliate per questa immagine sono 1200 x 674 pixel.
Questa immagine verrà utilizzata quando il vostro sito web verrà condiviso su Internet (non i singoli articoli, che possono avere le proprie immagini di condivisione sociale).
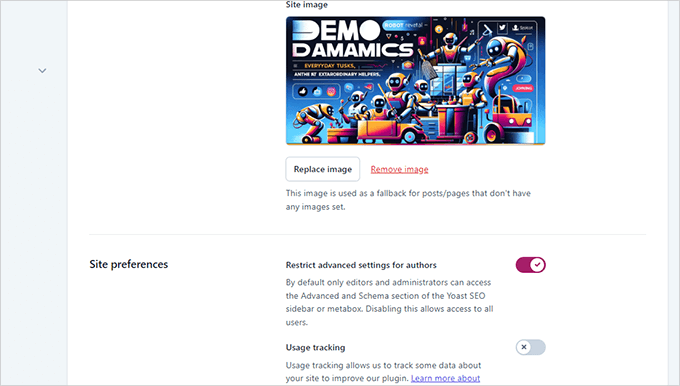
In “Preferenze del sito”, assicurarsi che l’opzione accanto a “Limita le impostazioni avanzate per gli autori” sia attivata.
Questo assicura che gli autori non possano impostare redirect o bloccare i motori di ricerca quando lavorano su un articolo (i redattori e gli amministratori del sito possono comunque accedere a queste opzioni).
Non dimenticate di salvare le modifiche una volta terminate.
Passo 4: Collegamenti al sito
Il passo successivo consiste nell’aggiungere il vostro sito web ai motori di ricerca. Tutti i principali motori di ricerca consentono agli utenti di inserire i propri siti web e di monitorarne l’indicizzazione e le prestazioni.
Per maggiori dettagli, consultate la nostra guida completa a Google Search Console per saperne di più su questi strumenti.
Yoast SEO semplifica la verifica del vostro sito web con tutti i principali motori di ricerca.
Innanzitutto, è necessario iscriversi al programma Webmaster Tools di ciascun motore di ricerca. Successivamente, vi verrà chiesto di aggiungere un meta tag per verificare la proprietà del vostro sito web.
Ora, andare alla pagina Yoast SEO ” Impostazioni e aprire la scheda Generale ” Connessioni al sito.
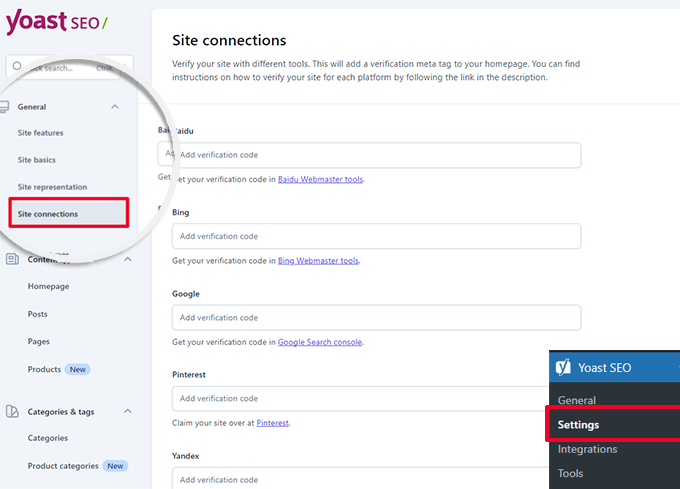
È sufficiente aggiungere il meta-codice ricevuto dai diversi motori di ricerca nei rispettivi campi e non dimenticare di salvare le modifiche.
Passo 5: Tipi di contenuto
Successivamente, è necessario passare alla scheda “Tipi di contenuto” nelle impostazioni di Yoast SEO.
Da qui è possibile impostare le opzioni predefinite per la visualizzazione dei diversi tipi di contenuto nei risultati di ricerca.
1. Homepage
Per prima cosa, è necessario inserire un titolo e una descrizione SEO per la pagina iniziale.
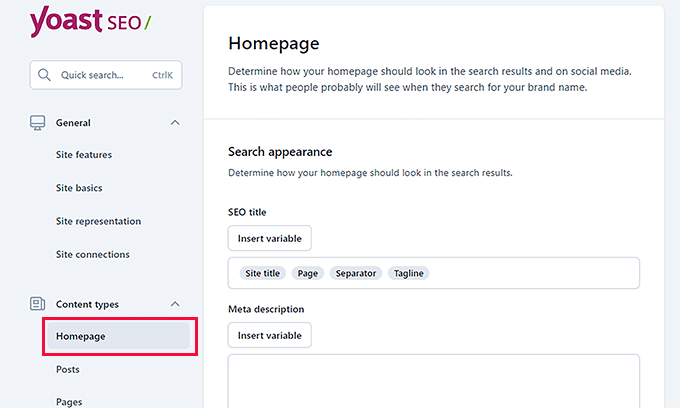
Se si utilizza una homepage personalizzata in WordPress, Yoast SEO utilizzerà il titolo e la descrizione SEO della homepage personalizzata.
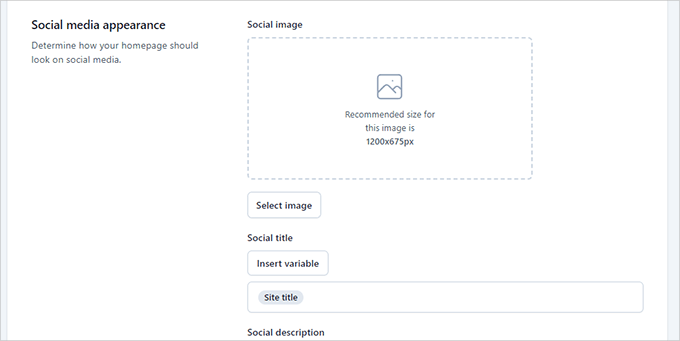
Al di sotto, è possibile fornire un’immagine per i social media. Opzionalmente, è possibile fornire anche una descrizione e un titolo separati per la condivisione sui social.
2. Messaggi
Successivamente, passare alla scheda “Messaggi” sotto Tipi di contenuto.
Da qui, assicurarsi che la levetta accanto all’opzione “Mostra i post nei risultati della ricerca” sia attivata.
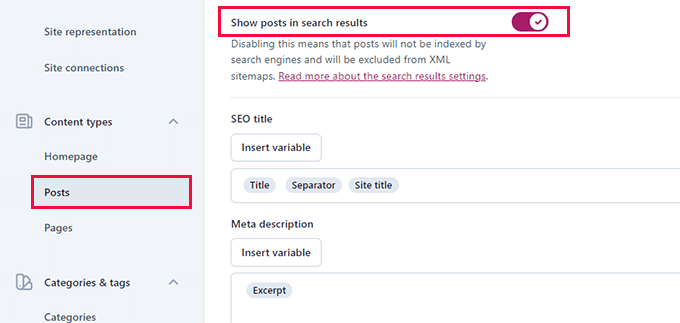
In basso, è possibile utilizzare le variabili per impostare un formato predefinito per i titoli SEO dei post. Questo è utile se si hanno vecchi post senza titolo SEO o se si dimentica di scrivere manualmente un titolo SEO per un post.
Nel campo Meta description, aggiungere %excerpt come variabile predefinita.
3. Pagine
Quindi, passare alla scheda “Pagine” e assicurarsi che la levetta accanto all’opzione “Mostra pagine nei risultati di ricerca” sia attivata.
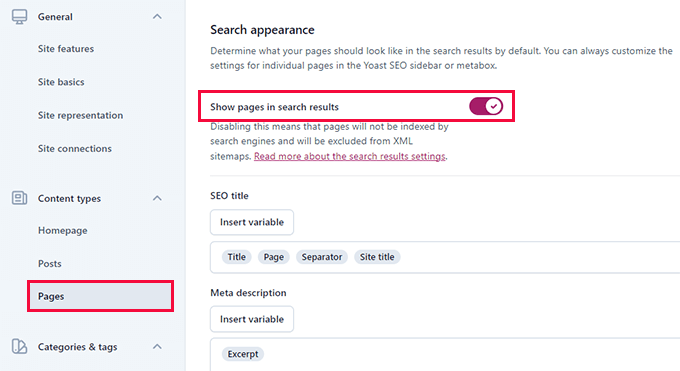
Di seguito, è possibile utilizzare il pulsante “Inserisci variabile” per impostare uno schema di titoli SEO predefinito per le pagine.
Nel campo della meta descrizione, è necessario utilizzare %excerpt per selezionare Excerpt come meta descrizione predefinita.
Passo 6: Categorie e tag
Successivamente, è necessario configurare l’opzione di ricerca predefinita per le categorie e i tag.
Passate alla scheda “Categorie” e assicuratevi che l’opzione “Mostra categorie nei risultati di ricerca” sia attivata.
Di seguito, è necessario fornire un meta-titolo predefinito per le categorie, utilizzando le variabili.
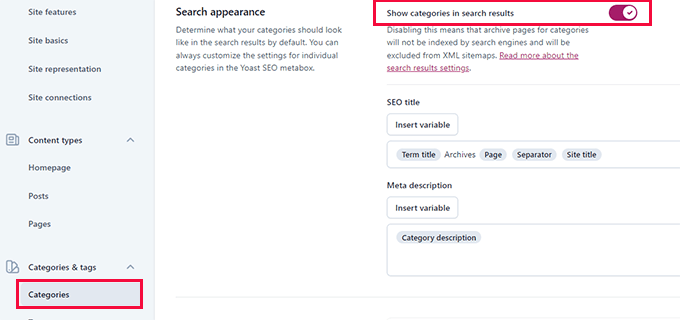
Per la meta descrizione, si può usare %category description come meta descrizione predefinita per le categorie.
Passare quindi alla scheda “Tag” e ripetere la stessa procedura.
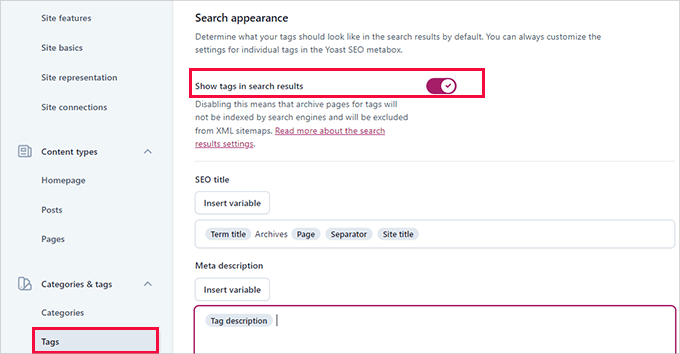
Per la meta descrizione, si dovrebbe usare %tag description come meta descrizione predefinita per le categorie.
Passo 7: Impostazioni avanzate
Questa parte delle impostazioni di Yoast SEO offre funzioni SEO avanzate e tecniche.
Consentono di ottimizzare ulteriormente il sito web ripulendolo dalle opzioni indesiderate e facilitando la scansione dei contenuti da parte dei motori di ricerca.
1. Ottimizzazione del crawl
Il proprietario di un sito web desidera che Google effettui il crawling di un maggior numero di pagine. Tuttavia, WordPress genera diverse pagine e feed RSS che non sono importanti per il vostro sito web, ma che consumano molto del budget per il crawling.
L’ottimizzazione del crawl consente di risolvere questo problema. Per maggiori dettagli su questo argomento, consultate la nostra guida sulla risoluzione del problema del crawl budget SEO in WordPress.
La prima opzione è “Rimuovere i metadati indesiderati”. Si tratta di dati che WordPress aggiunge a ogni pagina del sito e che in parte vengono strisciati dai motori di ricerca.
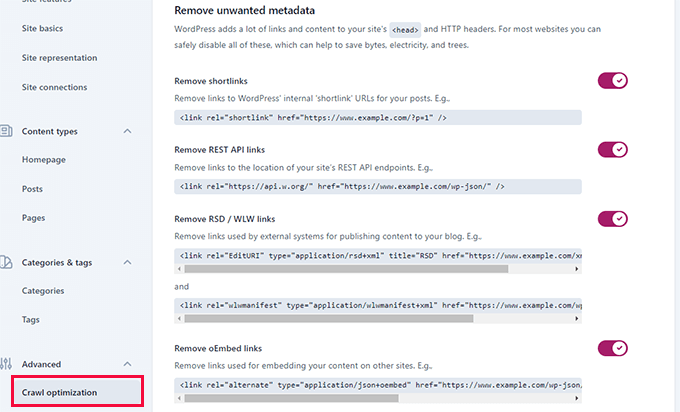
Il plugin fornisce una descrizione accanto a ciascuna opzione. È possibile attivare la levetta per rimuovere ogni voce.
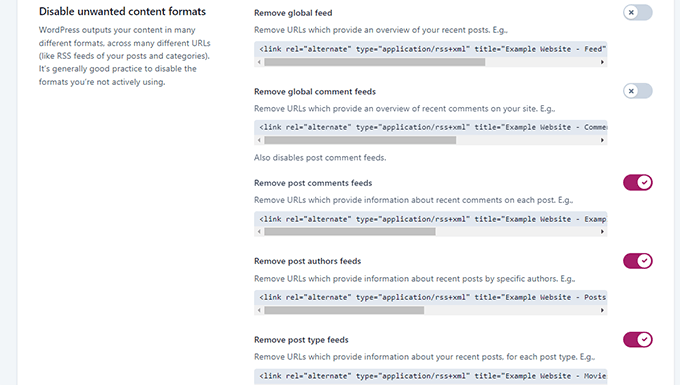
Quindi, scorrete verso il basso fino alla sezione “Disabilita i formati di contenuto indesiderati”. Da qui è possibile disabilitare i feed RSS indesiderati generati da WordPress.
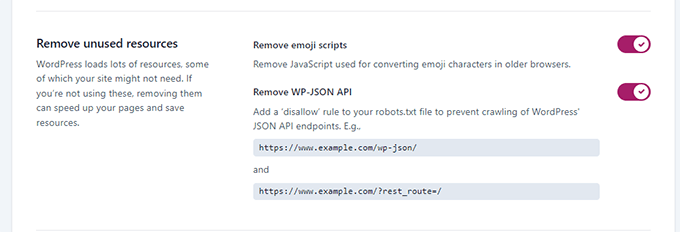
Infine, è possibile disattivare le risorse inutilizzate, come lo script emoji, utilizzato solo per i browser più vecchi.
Si possono anche disabilitare i punti finali dell’API WP-JSON.
2. Pangrattato
Lebriciole di pane sono ottime per il linking interno, perché definiscono un percorso chiaro o un sentiero verso la pagina in cui ci si trova. Queste briciole di pane appaiono anche nei risultati di ricerca, dando al vostro sito un ulteriore vantaggio.

Le impostazioni predefinite di Yoast SEO sono altamente ottimizzate e dovrebbero funzionare per la maggior parte dei siti web.
Tuttavia, se volete cambiare qualcosa, procedete pure con le modifiche.
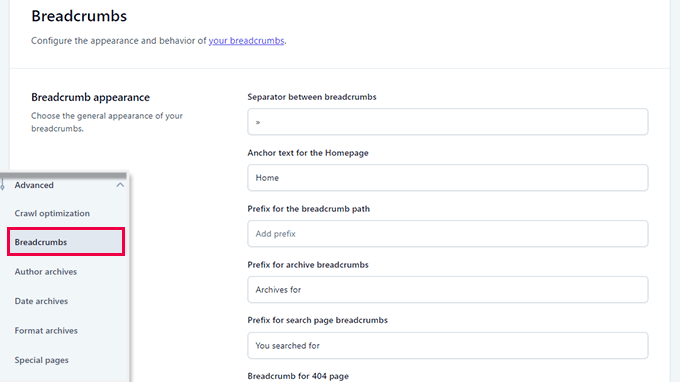
Successivamente, scorrere fino alla sezione “Come inserire le briciole di pane nel tema”.
Qui è possibile attivare la levetta accanto all’opzione “Abilita le briciole di pane per il tema”.

Suggerimento: Per migliorare la navigazione delle briciole di pane, potete consultare All in One SEO per WordPress. Avrete il pieno controllo di come vengono visualizzate le briciole di pane e potrete creare modelli di briciole di pane personalizzati per le vostre esigenze specifiche.
Date un’occhiata al nostro tutorial su come visualizzare i link di navigazione breadcrumb in WordPress.
3. Archivio degli autori
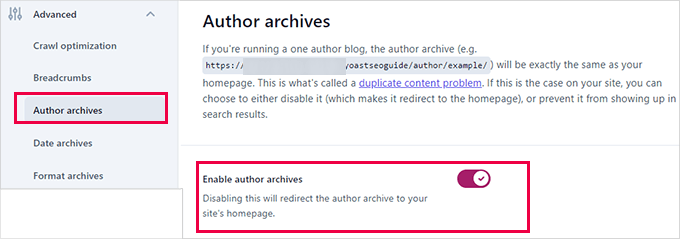
L’opzione successiva nelle impostazioni avanzate è “Archivi autore”.
Se si gestisce un blog con un solo autore, è necessario disabilitare gli archivi degli autori. Questo è importante perché gli archivi del blog e gli archivi degli autori avranno esattamente lo stesso contenuto.
Pertanto, i motori di ricerca potrebbero penalizzare il vostro sito web per contenuti duplicati o di bassa qualità se non disabilitate questi archivi.
4. Archivio delle date
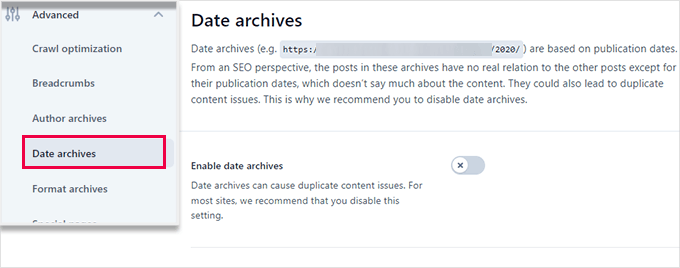
WordPress crea anche archivi basati su date. Questo crea ulteriori problemi di contenuti duplicati.
In Archivi data, è possibile disattivare l’interruttore accanto all’opzione “Abilita archivi data”. In questo modo si disabilitano gli archivi, si migliora il crawl budget e si evitano i contenuti duplicati.
5. Archivi di formato
Iformati dei post sono funzioni del tema WordPress che consentono agli sviluppatori di aggiungere il supporto per diversi formati. Questi possono essere utilizzati da un tipo di post per scopi di stile e aspetto.
Tuttavia, questa funzione non ha preso piede e molti temi WordPress moderni non aggiungono il supporto per il formato dei post.
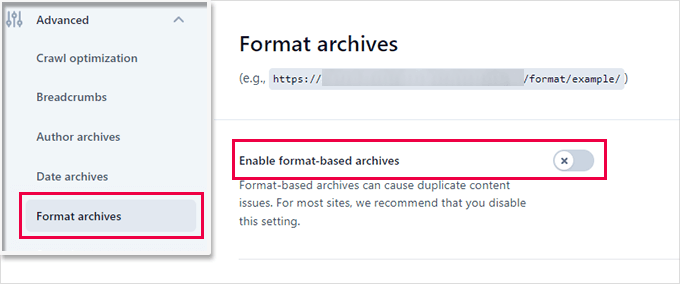
Questi formati di post hanno URL distinti in WordPress, che possono essere caricati dai motori di ricerca.
È possibile disattivare in modo sicuro questi URL andando alla scheda Avanzate ” Formattazione degli archivi.
6. Pagine speciali
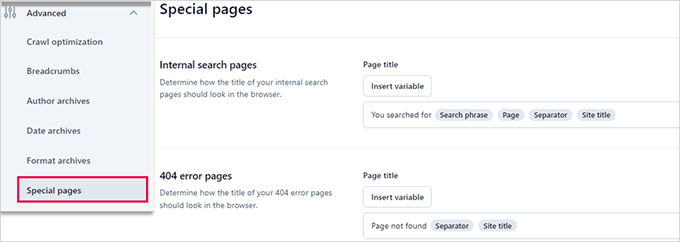
Qui è possibile fornire un titolo SEO per le pagine interne come la pagina dei risultati di ricerca di WordPress o la pagina di errore 404.
7. Pagine multimediali
WordPress crea una pagina di allegati quando si carica un’immagine o un file multimediale in un post o in una pagina.
Questa pagina visualizza solo quella particolare immagine o file multimediale con poche o nessuna informazione. Questo spreca il budget per il crawling, aggiunge pagine a basso contenuto al sito e ha un impatto negativo sulla SEO.
Nella scheda Avanzate ” Pagine multimediali, è necessario disabilitare queste pagine.
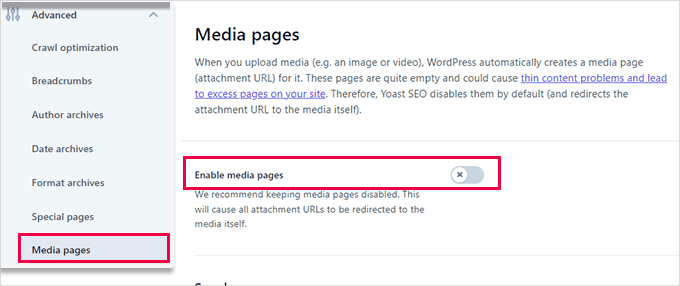
Quando si disattivano le pagine multimediali, Yoast SEO reindirizza automaticamente gli utenti al file multimediale invece che alla pagina dell’allegato.
8. RSS
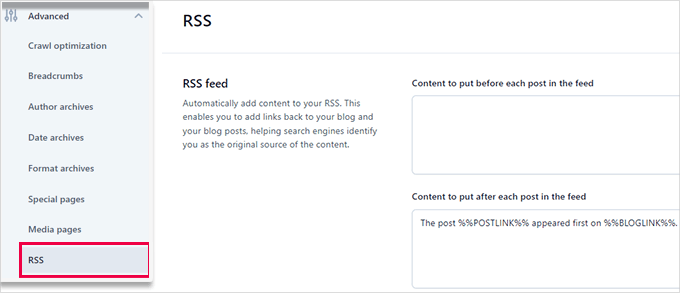
Yoast SEO consente di aggiungere contenuti ai feed RSS. Per impostazione predefinita, aggiunge un link alla fine di ogni elemento del feed RSS al vostro sito web.
Si può lasciare così com’è, oppure si può aggiungere qualsiasi cosa si voglia qui, e apparirà nel feed RSS.
Bonus: Scoprite altri suggerimenti per ottimizzare il vostro feed RSS di WordPress.
Fase 8: Strumenti
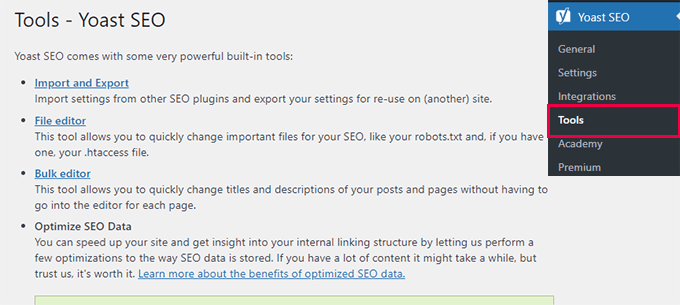
Yoast SEO è dotato di strumenti integrati che consentono di eseguire operazioni avanzate. La maggior parte dei principianti potrebbe non aver bisogno di utilizzare questi strumenti. Tuttavia, vi mostreremo ogni strumento e le sue funzioni.
Per prima cosa, è necessario andare alla pagina Yoast SEO ” Strumenti per vedere gli strumenti disponibili.
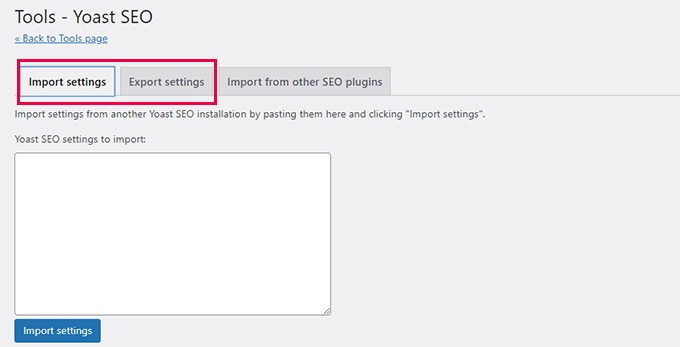
1. Importazione ed esportazione
Abbiamo mostrato come utilizzare questo strumento per importare dati SEO da altri plugin SEO nel passo 1 di questa guida.
Tuttavia, questo strumento può essere utilizzato anche in altri modi. Ad esempio, è possibile utilizzarlo per importare ed esportare le impostazioni del plugin Yoast SEO e utilizzarle su un altro blog o sito web WordPress.
2. Editor di file
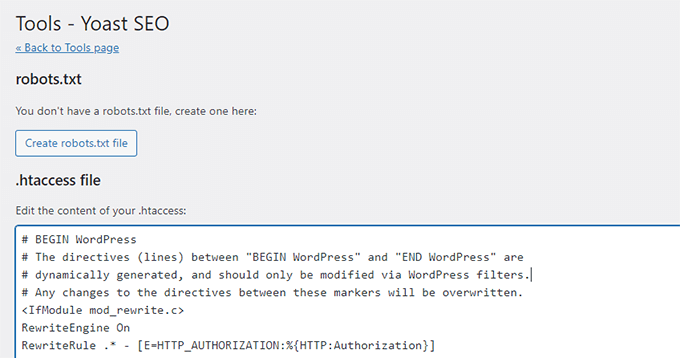
Man mano che il vostro sito WordPress cresce, vi capiterà spesso di imbattervi in tutorial che vi chiedono di aggiungere del codice al file .htaccess o al file robots.txt del vostro sito.
Entrambi sono file di configurazione e hanno un enorme impatto sulla SEO del vostro sito web. Yoast SEO consente di modificare entrambi i file direttamente dall’area di amministrazione di WordPress.
3. Editor di massa
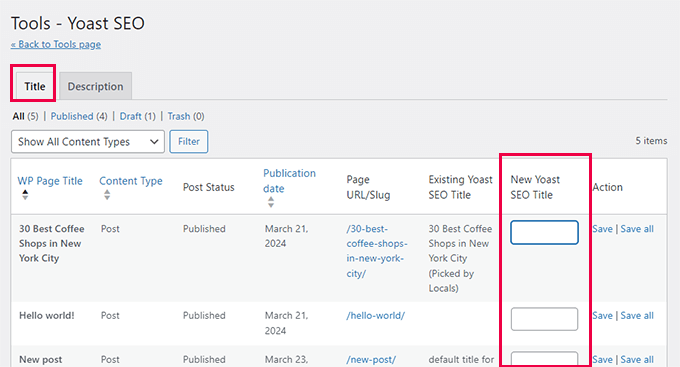
Lo strumento di editor di massa di Yoast SEO consente di aggiungere rapidamente titoli e descrizioni SEO per tutti i post e le pagine del blog.
Nella scheda “Titolo”, troverete un campo vuoto nella colonna “Nuovo titolo Yoast SEO”, dove potrete aggiungere il vostro nuovo titolo SEO per quel post del blog. Dopodiché, fate clic sul link “Salva” per memorizzare le modifiche.
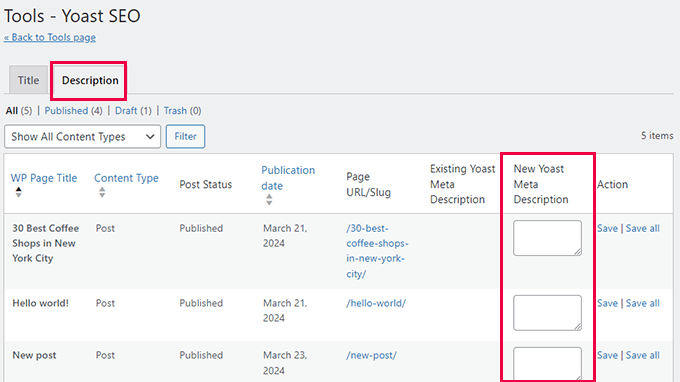
Per aggiungere le descrizioni, è necessario passare alla scheda “Descrizione”.
Anche in questo caso, è possibile aggiungere una descrizione per ogni post o pagina del blog e salvarla.
Fase 9: Integrazioni
Yoast SEO ha stretto una partnership con un paio di piattaforme SEO premium per fornire ulteriori funzionalità. Include due integrazioni gratuite: Semrush e Wincher.
Queste integrazioni sono attivate per impostazione predefinita nella pagina Yoast SEO ” Integrazioni.
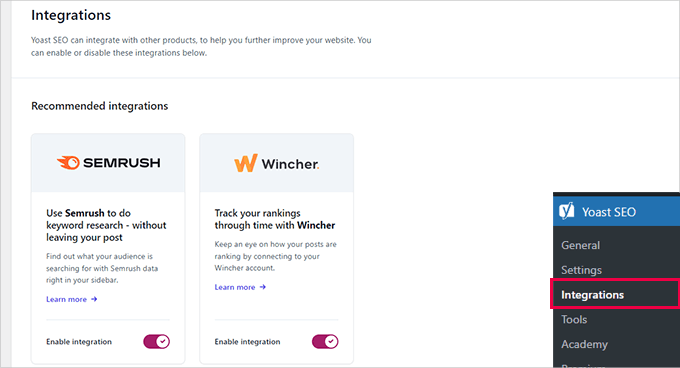
Nota: per utilizzare entrambi i servizi è necessario creare un account gratuito, che offre solo funzioni limitate.
In basso, troverete le integrazioni con altri plugin premium di WordPress.
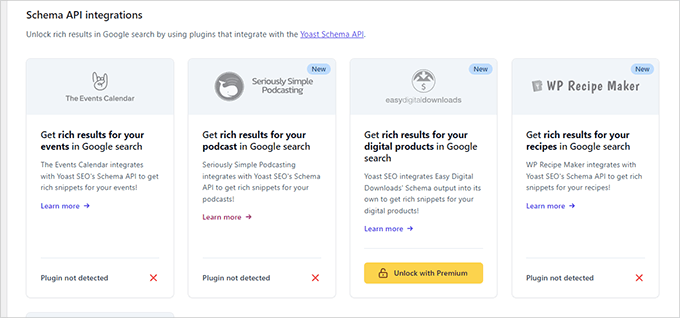
Ad esempio, se utilizzate Easy Digital Downloads, potete sbloccare l’integrazione aggiornando Yoast SEO Premium.
Passo 10: Ottimizzare i post e le pagine con Yoast SEO
La semplice installazione e configurazione di questo plugin non è sufficiente. Per massimizzare i vantaggi di Yoast SEO, è necessario personalizzare le impostazioni per ogni singolo post.
Vediamo di massimizzare i benefici ottimizzando ogni post/pagina di WordPress.
È sufficiente modificare qualsiasi post o pagina per notare un nuovo riquadro di Yoast SEO sotto l’editor del post.
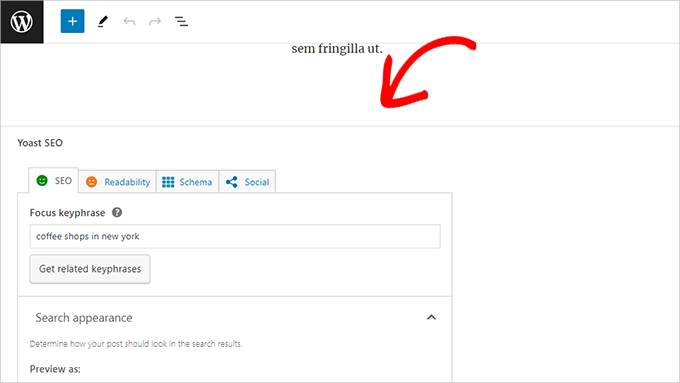
Si può iniziare aggiungendo una ‘Focus keyphrase’ o parola chiave. Si tratta della parola chiave principale che i vostri utenti digiteranno nei motori di ricerca per trovare il post.
Successivamente, Yoast SEO verificherà il contenuto del post per la SEO e l’analisi della leggibilità. È possibile visualizzare l’analisi per migliorare ulteriormente l’articolo.
A volte, il titolo del post e il titolo SEO potrebbero non coincidere. Ogni volta è necessario scrivere una descrizione SEO personalizzata, perché il generatore di estratti prende in considerazione solo il primo paragrafo, che potrebbe non essere il più importante.
Suggerimento: Il rapporto di analisi SEO e leggibilità di Yoast SEO è molto utile per migliorare i contenuti. Tuttavia, non stressatevi per questo, altrimenti potreste passare più tempo a seguire l’analisi invece di creare contenuti migliori per i vostri utenti.
Per saperne di più sull’ottimizzazione on-page, consultate il nostro articolo su come ottimizzare i post del blog per la SEO.
Fase 11: Ottimizzazione delle tassonomie per la SEO (categorie e tag)
Come per i post e le pagine, è possibile sovrascrivere il titolo e le meta descrizioni SEO per le pagine di categoria, tag e archivio autori.
È sufficiente visitare la pagina Messaggi ” Categorie e fare clic sul link “Modifica” sotto ogni categoria.
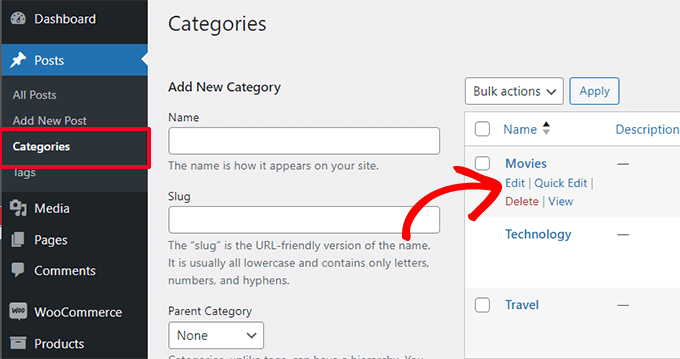
Nella pagina di modifica della categoria, scorrete fino in fondo e vedrete il meta box di Yoast SEO.
Da qui è possibile fornire un titolo SEO e una meta descrizione per la categoria.
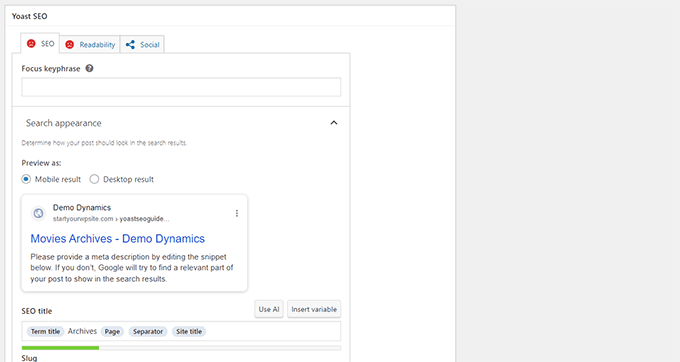
È possibile farlo per tutte le categorie, i tag e gli archivi personalizzati della tassonomia.
Correlato: Consultate la nostra guida sulla SEO delle tassonomie per approfondire chi siamo per ottimizzare le pagine delle categorie di WordPress.
Fase 12: Ottimizzazione dei prodotti eCommerce
Yoast SEO fornisce un supporto di base per i negozi online e i siti di commercio elettronico che utilizzano WooCommerce.
Ciò consente di ottimizzare le pagine dei prodotti proprio come i post e le pagine dei blog.
Quando aggiungete un nuovo prodotto al vostro sito web, troverete tutte le opzioni SEO dell’eCommerce. Potete anche modificare un vecchio prodotto e ottimizzarlo inserendo una parola chiave, un titolo SEO, una descrizione SEO e altro ancora.
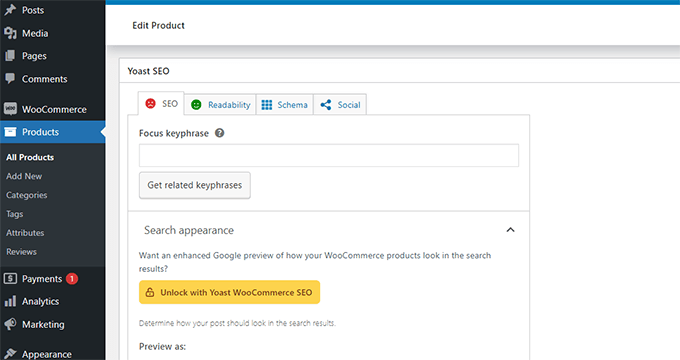
Se si utilizza WooCommerce, è necessario acquistare il componente aggiuntivo Yoast WooCommerce SEO per estendere le funzionalità dell’e-commerce.
Alternativa: All in One SEO for WordPress offre un supporto completo per l’e-commerce anche con il piano base, che parte da 49 dollari.
Fase 13: Monitoraggio e monitoraggio delle prestazioni SEO
Dopo aver configurato con successo Yoast SEO, è importante iniziare a monitorare le prestazioni.
Innanzitutto, è necessario aggiungere il sito WordPress a Google Search Console.
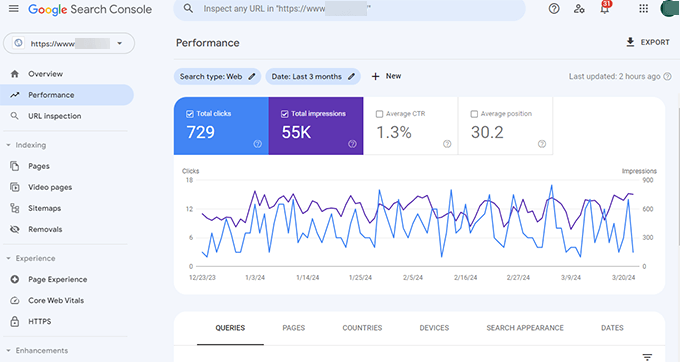
Questo mostra l’andamento del vostro sito web nelle ricerche, le parole chiave per le quali vi state posizionando e le pagine che non stanno andando bene.
Successivamente, è necessario installare Google Analytics in WordPress in modo da poter visualizzare i dati del sito web dalla dashboard di WordPress.
Il modo più semplice per farlo è utilizzare MonsterInsights. Il programma collega il vostro sito WordPress a Google Analytics e vi mostra quanto traffico state ricevendo e cosa fanno gli utenti quando si trovano sul vostro sito.
Soprattutto, mostra i rapporti di Google Analytics all’interno di WordPress e in un formato leggibile dall’uomo.
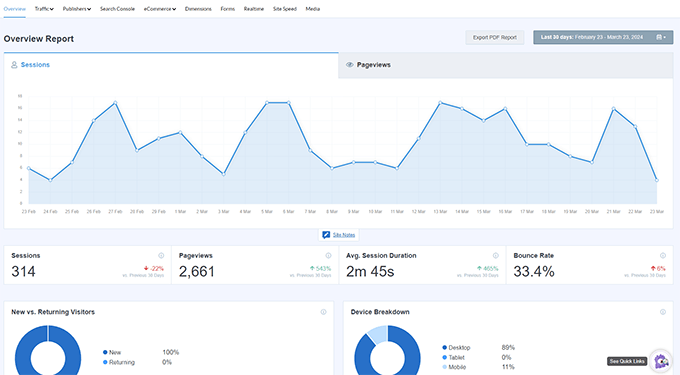
Questo vi aiuta a capire il vostro pubblico di riferimento e a prendere decisioni intelligenti per far crescere la vostra attività e migliorare la SEO.
Conclusione
Yoast SEO è un ottimo plugin SEO per WordPress. Tuttavia, manca di alcune funzioni che potrebbero davvero aiutarvi a portare la vostra SEO a un livello superiore.
Per questo motivo vi consigliamo di utilizzare All in One SEO per WordPress (lo usiamo su tutti i nostri siti web, compreso WPBeginner). È ricco di funzioni, tra cui un assistente ai link, statistiche SEO, sitemap XML avanzate e molto altro.
Per maggiori dettagli, date un’occhiata alla nostra recensione dettagliata di All in One SEO con pro e contro.
Speriamo che questo articolo vi abbia aiutato a configurare correttamente Yoast SEO. Potreste anche seguire la nostra guida all’ottimizzazione della velocità di WordPress, dato che la velocità è un importante fattore di ranking nella SEO, oppure consultare la nostra selezione dei migliori temi WordPress per esperti SEO.
Se questo articolo vi è piaciuto, iscrivetevi al nostro canale YouTube per le esercitazioni video su WordPress. Potete trovarci anche su Twitter e Facebook.


Prateek
thanks For This Wpbegginers
jackson
\my yoast is written on the dash board
The following file(s) is/are blocking your XML sitemaps from working properly:
/home/hanseltr/public_html/sitemap.xml
Either delete them (this can be done with the “Fix it” button) or disable Yoast SEO XML sitemaps.
WPBeginner Support
It seems that another plugin has added a sitemap.xml file to your website. You can need to find out which plugin added it and disable the plugin. Alternately, you can connect to your website using FTP and then locate the sitemap.xml file and delete it manually.
Admin
Anubhav
So here is my issue. When I am sharing my website on facebook, it automatically shows a thumbnail of a random shop product and a random product description. I did make that change under Social->Facebook and added the appropriate image and description, still nothing has changed. What am I doing wrong? Thanks in advance.
alison
will this plugin properly work with Genesis theme?
WPBeginner Support
Yes, it will.
Admin
janel zamoras
How about simply read theme?
Bisham
How to solve 500 internet sever error
Raja Sharma
Simply check Your htaccess file For Any Wrong Code
danu adji
please help, why the blog description still does not appear, whereas I had to apply the existing arrangements in this article
Tara
I’ve just got wordpress, the free version which says you can’t add plugins.
Can you confirm that if I upgrade wordpress then I will be able to use yoast SEO?
I can’t seem to find that piece of information!
Thanks
Tara
WPBeginner Support
It seems like you are using WordPress.com. Please see our guide on the difference between self hosted WordPress.org vs free WordPress.com blog.
Admin
Tara
Yes i have wordpress.com free
and I have a domain and google apps
… and I really don’t know what these do! The google apps – is that just email management, or are they my domain (website)?
I’d like to migrate to wordpress.org but don’t want to pay for web hosting twice
please advise, thanks!
Tara
I mean is google apps hosting my website?
Praveesh
Hi Tara,
Got your Query resolved?
jasmine
thanks for the detailed tutorial.
i would really appreciate if you share FREE video sitemap creator.
Ahmed Nasr
Your comment is awaiting moderation.
Hi, thank you for this post
i have one question
i’m using Yoast plugin in my site but i want to entry meta code
meta name=”Googlebot-News” content=”noindex, nofollow”
to some posts to Exclude it from Google News
how can i do it
WPBeginner Support
You can use Insert Headers and Footers plugin for that and add this code in the header section of your website.
Admin
Josh
For XML Sitemaps (Step 8), should we disable the ThirstyLink options?
Brenda
Thank you SO much! For reasons like this article, you are the first “assignment” I give new clients when they are WordPress users.
Google wants me to verify all the versions of my URL (http, https, www, -www). Where would I put the verification codes for all these different versions? Different “alternative methods”?
Many thanks indeed!
WPBeginner Support
You can add multiple meta tags, or verifcation through file uploads.
Admin
Jaswinder
I am using All in One Seo Pack.
Actually I tried both, but I like All in one Seo Pack more than Yoast Seo.
Louay
Hi,
Great info.
How do add og:image for the home page?
thanks
cheers
Nicole
Thanks so much for your help!
I have installed Yoast on my wordpress site however am still battling with trying to clear up my ‘tags’ pages on Google. How would I go about this? I think that the numerous tag pages relating to my site might be related as to why Google Adsense keeps getting disapproved. Please could you advise me? Nicole
Thanks so much
Rashed
thanks
your post is more descriptive for the beginner which seo plugin is the best for seo ultimate or yoast please suggest me which one should i use
Rithika
Thanks for sharing information on Yoast ,but as i am using genesis theme for my blog, So is there any extra features you know which is not there in genesis .because these features are i think there in genesis.
Thank You..!
Rithika
WPBeginner Support
We use Genesis Framework on WPBeginner, but we still use WordPress SEO. While the SEO features in Genesis are quite adequate, Yoast SEO is a much more powerful and robust solution. As soon as you activate Yoast SEO plugin, Genesis will automatically hide all its SEO settings.
Admin
sugiharto
thanks for your info, can ask related Yoast SEO
am install Yoast SEO plugin win my blog, but i chek in google have problem in Robots.txt fetch and Search Console – Yoast SEO code is different in my google webmaster hot to fix it
thanks
Emily Johns
Thanks For Sharing This. but in Yoast SEO plugin, we can put only one Keyword and in All in One SEO, we can put as many we want, so Here I am confused that which one is exactly the best. Does Yoast plugin drive more traffic to my blog than All in One SEO????
Val Archer
Hi – I installed yoast and am trying to find a box where I can enter each post’s meta tag description. You mention:
>On each post and page editor page, you will see this new box called WordPress SEO that has tons of fields like SEO Title, Meta Description
I have “Yoast SEO” checked in ‘Screen Options.’ Below my post window is Yoast SEO with 3 icon options: Content, Advanced, Social.
Under ‘Content” is “Snippet Editor”, ‘Focus Keyword’ and ‘Content Analysis.’ Content Analysis complains “No meta description has been specified” BUT I can NOT find a box/field anywhere for me to enter the meta description. You say “tons of fields” but I see only these 3 under Content.
Please can you tell me where I can enter the meta description uniquely for each post? Thank you! Alternatively, do you have any code for functions.php that will add a meta description box to the post edit window? So in the dropdown under Custom Fields, I’ll see “Description” and can give it a value there? Then I can uninstall yoast because I really don’t like it.
WPBeginner Support
Yoast SEO has changed the meta box UI since we last updated this article. The description field is in the snippet editor just below the title. You can edit the title by clicking on it. If the description field below it is empty then just click on the empty area below the title and it will become editable. You can then enter your post’s description.
Admin
Val Archer
That’s funny. I definitely don’t have any empty area below title. Will email you a .jpg
Ayoola Abolaji
Thank you so much. this is the best SEO walk through I’ve found so far
Peter Wright
Great post – certainly has helped tweak my Yoast plugin
febx
Thank you for the post, It will help all of those newbie bloger included me
Patrik
Hi,
How do I set up Yoast SEO plugin to work with Advanced Custom Fields?
I have searched all around the web and can not find any help/tutorial or information about how to get Yoast SEO WordPress plugin to work with other fields in WordPress, in this case I have a website (or several) that use Advanced Custom Fields to store a lot of content and Yoast can not sense these fields. Yoast have an extra plugin for this (what I’ve understand): YoastSEO.js , but I have no idea how to get this to work.
1. How do I set up YoastSEO.js plugin (is it a plugin?) to work with Advanced Custom Fields in WordPress.
Would you at wpbeginner be able to write a proper bulletproof tutorial for dummies about this?
Regards,
Patrik from Sweden
WPBeginner Support
We will try. Meanwhile you can try support forums for Yoast SEO plugin on WordPress.org.
Admin
Kelsey
Hi! Great Post.
I just downloaded Yoast SEO onto my website, but I now have a message that says this:
Your theme contains a meta description, which blocks Yoast SEO from working properly, please delete the following line, or press fix it:
<meta name="description" content="”>
Warning!
The Header and Footer plugin(s) might cause issues when used in conjunction with Yoast SEO.
Both Yoast SEO and Header and Footer create OpenGraph output, which might make Facebook, Twitter, LinkedIn and other social networks use the wrong texts and images when your pages are being shared.
It then has a button that says to deactivate my header and footer.
I do have a header and footer plugin by Stefano Lissa. Will I mess up my website if I deactivate the header and footer?
Thanks!
WPBeginner Support
You will need to deactivate header and footer plugin. We cannot say what kind of effect it will have on your site. If you were just using it to add Facebook open graph meta data, then you can do that in Yoast SEO.
Admin
Akshay Hiremath
In the google search results I want my organic listing to appear like a box with product name & prices in it. Saw this on the search results and want to apply the same for my business.
Please Help me with this.
Jiten
Hey Sayed / Editorial Team,
I am using All in One SEO plugin, since 2 years for my health blog. I am getting good visitors. I want to change the plugin to SEO by Yoast. Will it affect my rankings? Do i need to rewrite all Meta Title & Description again if I uninstall the older and activate Yoast SEO plugin?
Awaiting for your reply.
Thanks,
Jiten
WPBeginner Support
No it should not affect your rankings. Yoast SEO has built-in importer, that brings all your All in One SEO settings into Yoast. Simply go to SEO » Tools » Import/Export and then click on import from other plugins tab. You will find the option to import from All in One SEO plugin.
Admin
Mikael Andersen
Have you checked all the new rewievs in the plugins reviews. Until 3 days ago I would recommend Yoast SEO. Today I am about to find another plugin, because of all the bugs in the newest update and because a lot of functionality is away and instead you will find a lot of buttons for paid extenstions.
Mikael Andersen
Hi
After Yoast have made a bunch of errors in their new update, can you then recommend an alternative Seo plugin, that is a bit similar to Yoast plugin.
Zuber Shaikh
Dear Sir,
I can use this tool in my website and also all my WordPress Clients Sites. Really Good tools. I m Web Developer and also Internet Marketer last 4+ Years.
Thanks Regards
i m Zuber
thousan
Hi Wpbeginner support team. I am a newbie to wordpress and website. I have a website on a free hosting service and I did install SEO by yoast and I tried to config the setting as in your video. Yet I still can not find my website and my content in google search result. I don’t know what wrong with this. I hope you can help me to solve this problem.
bisot
it help me to deal with the setting , thank you verymuch
sumit
Do we need to remove tag and categories from sitemap.
JC
Great tip. I switched from All in one SEO to Yoast and keep trying to optimize this tool.
Hari
how to optimze a .net website
Jitendra Mahato
Hi there,
I have installed this plugin in my site before 1 year but there is one problem us my site. There is working very good in my site as well. But the breadcrumb is working just in the post or page. It is not working in the google search engine snippet like other. May i why? it there something special to do for that…… I want to have displayed breadcrumb in search engine…….. . I am waiting for your response.
Jitendra
WPBeginner Support
It is upto Google to decide whether or not they will show breadcrumbs with a result.
Admin
bhaskar
thank u
brian
thank you for your instructions.
in this document you wrote, “The next option is to remove stop words from permalinks. Stop words are common words used in plain language. Yoast believes that by removing these, you will create cleaner URLs. While it does make the URLs smaller, we disagree with Yoast. This is why we have left it unchecked.”
But, the screenshot indicates that the, “Remove stop words from slugs” is checked.
If possible, can you please clarify if you meant it is advisable to leave it checked (default) or remove the check?
thank you.
WPBeginner Support
We have it unchecked.
Admin
brian
thank you!
Marcia
I just watched the video and feel like I went through a maelstrom. It was so fast that it raised my blood pressure trying to keep up with it. Therefore, it wasn’t very useful to me. I’m not a beginner. Were I a beginner, it would have been even worse for me. Thank heavens for the printed words that follow it!
Anna A.
Hi. Great article! I am just a little confused on 1 thing. I will have a blog with categories. Under each post I will have tags for them. The tags will then become the archived pages for the posts. My question is for these archived pages, will Yoast have the correct canonical? Or will I need to go and manually change something there to refer it back to my category page??
sai krishnan
i am getting this error on installing the plugin please help
Installing Plugin: Yoast SEO 2.3.2
Downloading install package from https://downloads.wordpress.org/plugin/wordpress-seo.2.3.2.zip…
Unpacking the package…
Installing the plugin…
Destination folder already exists. /home/content/p3pnexwpnas08_data01/85/2727085/html/wp-content/plugins/wordpress-seo/
Plugin install failed.
WPBeginner Support
Seems like you have either already installed the plugin or a previous installation failed to complete. Go to the plugins page and see if you have WordPress SEO or Yoast SEO plugin installed. If it is already installed, then you just need to activate it. If you cannot see it on the plugins page, then connect to your website using an FTP client and go to /wp-content/plugins/ directory. Delete the WordPress-SEO folder.
Admin
Nelbin
I am getting this error message when I try to upload the plugin
‘The package could not be installed. PCLZIP_ERR_BAD_FORMAT(-10): invalid archive structure.’
Please help.
Thank you!
Bj aka Bill Brown
You make no mention of the noodp or noydir.
What is your opinion on using / not using these?
WPBeginner Support
We don’t think that these settings are relevant or affect most sites. However, both of them are harmless if you want to opt-out from ODP or Yahoo Directory descriptions.
Admin
Sacha
Very, very helpful post a video WPBeginner.
I have been using All in One SEO Pack plugin for a long time a finally decided to switch and I’m pleased I did.
Rich
Help me please. I’m another beginner. Them main advertising content of my website is the photos in my gallery showing the work that we can do (a picture paints a thousand words), but the images do not show up in Google. Looking in the Sitemaps it appears that the images are listed with a value of zero. I have done much internet searching and can find nothing conclusive. I am using Nextgen Gallery.
Any help appreciated
WPBeginner Support
Perhaps switching to a more SEO friendly gallery plugin would help. Please take a look at Envira Gallery
Admin
Kregg Hill
Question? On the “Edit Page” tab, Yoast SEO section, under “Page Settings” there are 5 Tabs…one of which is SEO where there is a place to input “Keywords”. Is this essentially where you add all keywords for that page, and if so, can you add long tail keywords, is there a comma required after each entry, and is there a lmit to how many search keywords or terms you can add there?
Sorry, I’m a newby!
WPBeginner Support
You can add keywords relevant to that page under keywords option.
Admin
Jennifer McNeil
Dear WPBEGINNER SUPPORT,
Well, I must say that your tutorial was very comprehensive and most informative!
Now all we have to find out is if it all actually works, since I have been ‘fighting’ with our Website,, since last November, trying to get it to rank even a little bit! From all the numerous scans I have done with endless software, it is full of flaws and errors (apparently many of them in the actual code of the THBusiness theme we are using). Will following all your instructions in this tutorial fix these problems, or do I need to look elsewhere for remedies?
Also, all Pages are showing absolutely horrible Google Page Speed Testing too. All are in the 30’s and 40’s for both Desktop and Mobile and we can’t figure out why!
If you have any suggestions at all, I’d sure be open to receiving them, as admittedly, I am a bit of a greenhorn. Many thanks in advance.
Very best regards,
Jennifer McNeil
WPBeginner Support
If you believe that the problem is with your WordPress theme’s code, then we would recommend you to consider changing your WordPress theme. You can also temporarily disable all plugins on your site, and switch to a default WordPress theme like Twenty Fifteen. After that test your Google Page speed. If this improves performance significantly then it is your theme or one of the plugin’s fault. To further analyze, you can turn on your plugins one by one, take Google page speed score after each plugin. Do the same for your theme. This way you can find out whats causing low page speed score. Hope this helps.
Admin
Riju
Nicely composed post about seo by Yoast. It will help all of those newbie bloger included me, who like to add this powerhouse seo plugin on their wordpress blog. Now it’s look like that I can easily proceed to setup Yoast. Let’s see…..
Thanx…..
Manoela
Hey!
Following this tutorial, I’ve just migrated from All in One SEO to WordPress SEO by Yoast! I simply love the analysis function, but there’s something I’m missing: can’t I set keywords for my posts and pages? Isn’t that worse for my SEO? I thought it was a good way of getting the post found by robots. What would you recommend?
Thanks a lot.
Manoela
WPBeginner Support
Actually the author of Yoast’s WordPress SEO plugin believes that Meta Keywords are no longer important for SEO. However, we believe that even if they are not important, they are still pretty harmless. If you want to use them on your posts and pages while using WordPress SEO plugin, this is what you need to do.
Go to SEO » Titles & Metas and click on the Other tab. Check the box next to ‘Use meta keywords tag?’ option and click on the save changes button. You will now see the meta keywords field in the WordPress SEO metabox below the posts and pages.
Admin
Ibn Adam
Thank you for the post. Webmaster Tools and Titles & Metas sections helped!
kim
Just want to say THANK YOU! Absolute a life saver for this learning lady!
Ralph D. Klonz
Yoast is used so much out in SEO Land, but this is really the best how to if seen so far. Have watched a many videos but your blog drives it home. There are still some thing I don’t fully understand. But that’s not the plugin, it’s my limitations.
Tommy
Hi guys!
I have a problem after editing posts using yoast plugin. I can’t then see what I saw before, i.e. my post with gallery only – I can only edit it in text mode. everything else is disabled, and even invisible.
Same issue with sites – only text editor possible.
Any ideas?
Cheers,
Tommy