


Rich snippets are the extra visual details that appear beneath a search result, such as star ratings, recipe cook times, or event dates. They make your listing stand out and give readers a reason to click your result instead of the plain links around it.
These details come from schema markup, a small piece of code you add to your WordPress site that tells search engines what your content actually is. Once Google can read it, it can display your page in a richer, more useful format.
In this guide, we’ll walk you through how to add rich snippets in WordPress. This will include everything from the different types of snippets available to step-by-step instructions for the most common ones, including recipes, events, FAQs, videos, products, and local business listings.
What Are Rich Snippets?
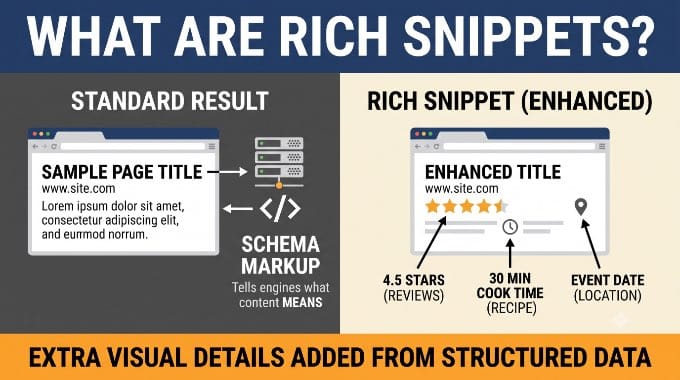
Rich snippets are the extra visual details that appear beneath a page title and URL in Google search results.
While a standard result shows a title, a URL, and a short description, a rich snippet might show star ratings and review counts for a product, a cooking time and calorie count for a recipe, an event date and location, or a question answered directly in the results.

These enhancements come from structured data, which is also called schema markup, that you add to your WordPress site. Schema markup is a standardized vocabulary of code maintained by Schema.org. It tells search engines not just what your content says, but what it means.
When Google reads code on your page that identifies it as a recipe and lists the cook time, ingredients, and nutrition information, it can use that data to build a rich snippet in search.
There are three main ‘languages’ or formats for writing schema markup: Microdata, RDFa, and JSON-LD. Google highly recommends sticking to just one: JSON-LD.
It’s the easiest format to work with because you can add it as a standalone script without touching your post’s visible HTML. It’s also the format most WordPress schema plugins use by default.
You may also come across the term ‘rich results’, which is Google’s broader current term covering rich snippets, carousels, and Knowledge Panels. In everyday use, most people treat ‘rich snippets’ and ‘rich results’ as interchangeable, and this guide uses both.
Why Use Rich Snippets on Your WordPress Site?
Beyond making your content easier for search engines to understand, rich snippets give readers a reason to click your result instead of the plain blue link next to it.
This helps to make your posts and pages stand out more in the search results, which can improve your organic click through rate and help you increase your blog traffic.
Plus, rich snippets are not just for review sites or recipes. You can use rich snippets for events, products, people, how tos, videos, music, apps, articles, blog posts, and much more.
Types of Rich Snippets in WordPress
Different schema types unlock different rich results in Google.
Here’s a quick overview of the most useful types for WordPress sites.
| Schema Type | What Google Can Show | Best For |
|---|---|---|
| Article / Blog Post | Top Stories carousel, publication date, author markup | News sites, editorial blogs |
| Product | Price, star ratings, availability | WooCommerce stores, product review pages |
| Recipe | Recipe card with image, cook time, calories, star rating | Food blogs, cooking sites |
| FAQ | No rich result (FAQ rich result retired by Google in 2026); FAQPage markup still valid | Pages with a structured list of Q&As |
| HowTo | No rich results (Google retired this in 2023) | Step-by-step tutorials |
| Event | Name, date, location, and tickets in Google Events and Maps | Event organizers, venues, conferences |
| Review / Aggregate Rating | Star ratings in search results | Review sites, product roundups |
| Local Business | Business name, hours, address, and phone in local results | Businesses with a physical location |
| Video | Thumbnail and duration badge; Video carousel | Tutorial sites, video creators |
| Course / Software App | Course listing or app details in search | E-learning sites, software reviewers |
Adding schema markup to your website doesn’t guarantee that Google will display it. Google may choose not to for some searches.
However, adding the schema markup helps Google understand your content and makes it more likely to display rich snippets.
Now, let’s show you how to add rich snippets to WordPress. Simply use the quick links below to jump straight to the method you want to use:
- Adding Rich Snippets Using a WordPress Plugin
- Adding Article Schema in WordPress
- Adding Recipe Schema in WordPress
- Adding Event Schema in WordPress
- Adding FAQ Schema in WordPress
- Adding Video Schema in WordPress
- Adding Product Schema (GTIN, ISBN, MPN) in WordPress
- Adding Local Business Schema for Multiple Locations
- Adding How-To Schema in WordPress
- Adding Schema Markup With AIOSEO's AI Generator
- Adding Rich Snippets by Adding Code to WordPress
- Best Practices for Rich Snippets
- Testing Your Schema Markup for Rich Snippets
- Troubleshooting: Why Isn't My Rich Snippet Showing?
- Frequently Asked Questions About Rich Snippets
- Additional Resources
Adding Rich Snippets Using a WordPress Plugin
WordPress lets you add schema markup to a website by hand, which we will show you how to do later in this guide. It works, but writing and maintaining that code for every post is fiddly and easy to get wrong, and a single typo can stop your rich snippets from appearing.
That’s why for most users, we recommend using an SEO plugin instead. It generates clean, valid schema markup for you and lets you manage every schema type directly from WordPress.
We use All in One SEO for WordPress (AIOSEO) on all of our own websites to manage schema markup and general SEO settings.

The free version of AIOSEO supports dynamic schema markup, meaning that it will automatically add relevant schema to your pages. Upgrading to the paid plugin gives you access to a schema generator, where you can choose from specific schema templates or add a custom type.
The first thing you need to do is install and activate the AIOSEO plugin. For more details, see our beginner’s guide on how to install a WordPress plugin.
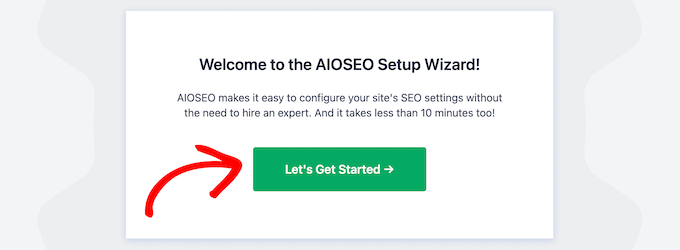
Upon activation, you’ll immediately be taken to the AIOSEO setup wizard. You need to click the ‘Let’s Get Started’ button.
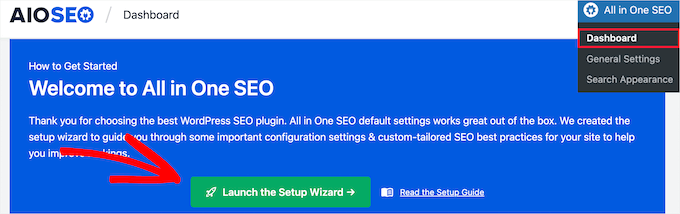
If the setup wizard doesn’t immediately show up, then simply go to All in One SEO » Dashboard.
From here, you can click the ‘Launch the Setup Wizard’ button. This will walk you through the steps of setting up the plugin for your website.
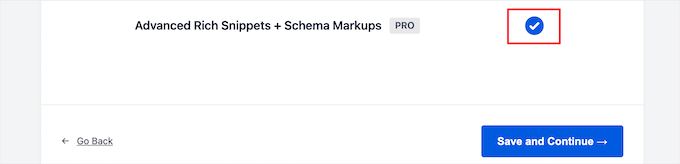
As you go through the setup wizard, you’ll need to activate the ‘Advanced Rich Snippets + Schema Markups’ addon.
Simply check the box so that it turns blue, then click the ‘Save and Continue’ button.
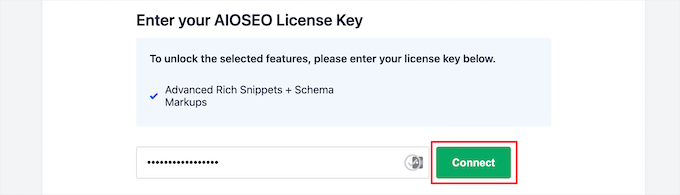
On the final screen, you need to enter your license key and then click the ‘Connect’ button.
You can find this information on your account page on the AIOSEO website.
For more details, see our ultimate guide on how to set up AIOSEO for WordPress correctly.
After that, you can go to AIOSEO » Search Appearance in your WordPress admin panel, and then click on the ‘Content Types’ tab.

Then, you can set the schema markup type for your posts and pages.
Simply click the ‘Schema Markup’ menu option, then you can choose the schema type from the dropdown.
Clicking on any schema type will show you the fields available for it. The Catalog also includes additional types such as Web Page, Profile, and Software App, which you can add the same way.
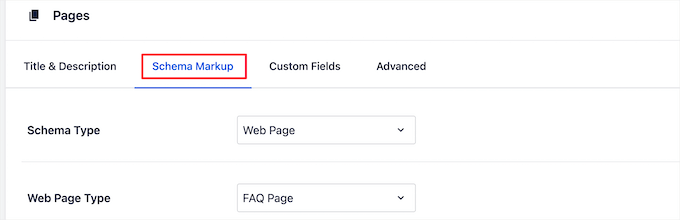
These settings will be the default settings when you add a new blog post. However, you can change these on an individual post basis too.
Below the post schema markup, you can also control the default schema for your pages.
Simply select the ‘Schema Type’ from the drop-down. Then, you’ll have additional options for the schema type you select.
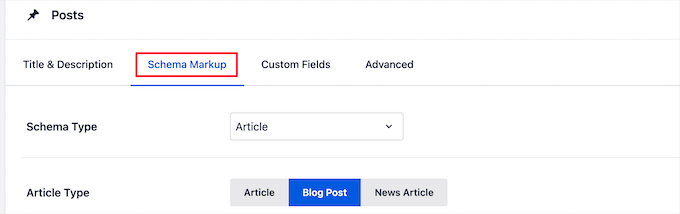
Once you’re finished making changes, click the ‘Save Changes’ button before you leave the page.
Now, you can add schema information to your individual posts and pages, so they’ll display unique rich snippets in the search results.
To do this, simply open up a blog post and scroll down below the post editor. Here you’ll see a meta box called ‘AIOSEO Settings’.
You need to click the ‘Schema’ tab and then click on the ‘Generate Schema’ button.
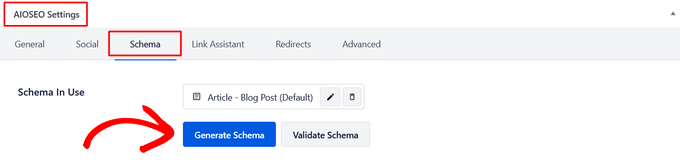
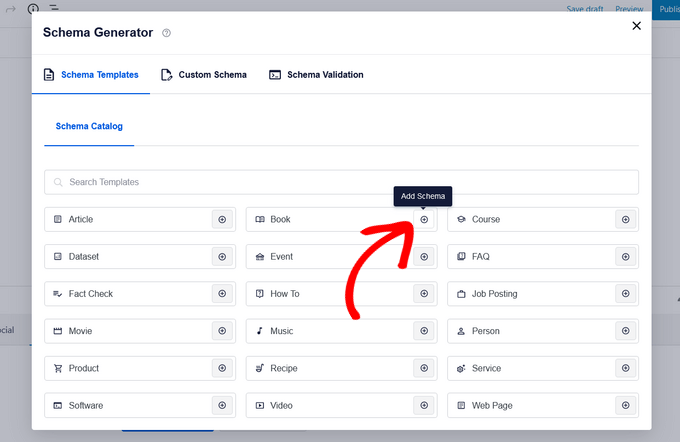
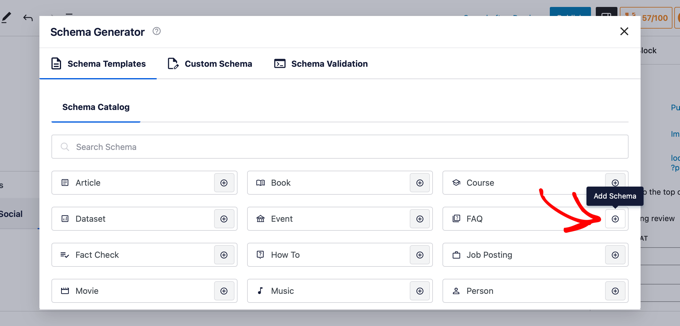
This will open up the Schema Catalog.
Simply click the ‘Add Schema’ button next to the type of schema you want to add, and the schema template will be added to your post so you can fill out your specific details.
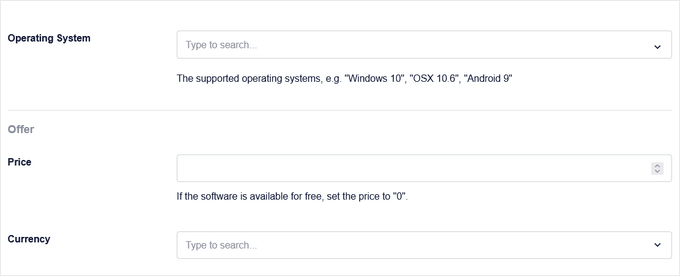
Now, there will be different fields available to fill out, based on the option you select.
For example, the ‘Software’ schema type includes fields for the name, operating system, price, description, review, and more.
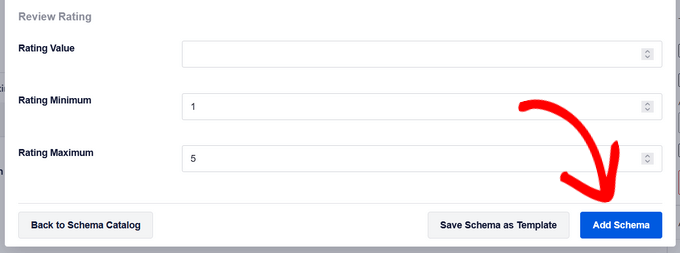
Once you’re finished, click the ‘Add Schema’ button.
Don’t forget to click ‘Update’ or ‘Publish’ on the post to save your changes as well.
The same process applies to pages. Open any page in the editor, scroll to ‘AIOSEO Settings’, click the ‘Schema’ tab, and follow the same steps as above.
Once AIOSEO is configured, you can add schema for your specific content type. Use the jump links below to go straight to the type you need:
- Article Schema — for blog posts, news articles, and editorial content
- Recipe Schema — for food blogs and cooking sites
- Event Schema — for concerts, conferences, and local events
- FAQ Schema — for pages with a list of questions and answers
- Video Schema — for pages where video is the primary content
- Product Schema (GTIN / ISBN / MPN) — for product pages and WooCommerce stores
- Local Business / Multiple Locations Schema — for businesses with physical locations
- How-To Schema — for step-by-step tutorials and guides
If you’d prefer to let AI handle the schema type selection for you, skip ahead to the AI Schema Generator section.
Adding Article Schema in WordPress
Article schema (and its sub-type BlogPosting) marks up news articles, blog posts, and editorial content. Google can use it to include your content in the Top Stories carousel, display a publication date next to your result, and verify author identity.
AIOSEO applies Article schema to all WordPress posts by default, so you may already have this in place. To confirm or adjust it, open the post’s ‘Schema’ tab.
You’ll see the Article schema entry already listed. Click the pencil icon to edit the fields if needed, then click ‘Update Schema’.
If you publish a mix of content types, check each post type’s default in AIOSEO » Search Appearance under the ‘Content Types’ tab. You can set different defaults for posts, pages, and custom post types.
Adding Recipe Schema in WordPress
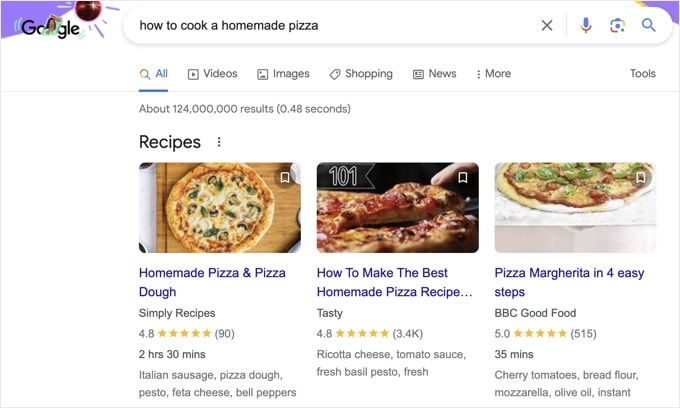
Recipe schema produces a rich result card showing your dish thumbnail, cooking time, calorie count, and star rating before users even click your link.
This makes it one of the highest click-through schema types for food sites.
Optional: Set Recipe as the Global Default for Posts
If your entire site is a recipe blog, you can tell AIOSEO to apply Recipe schema to all posts by default.
Go to AIOSEO » Search Appearance and click the ‘Content Types’ tab.
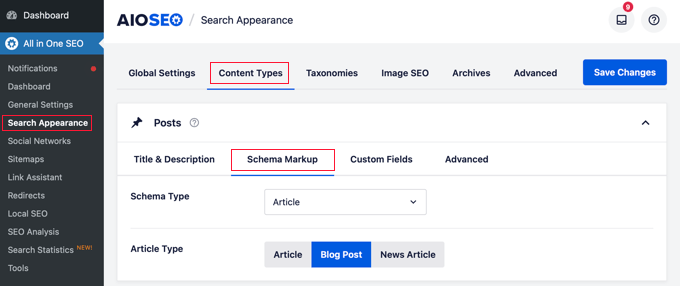
Under Posts, click the ‘Schema Markup’ tab.
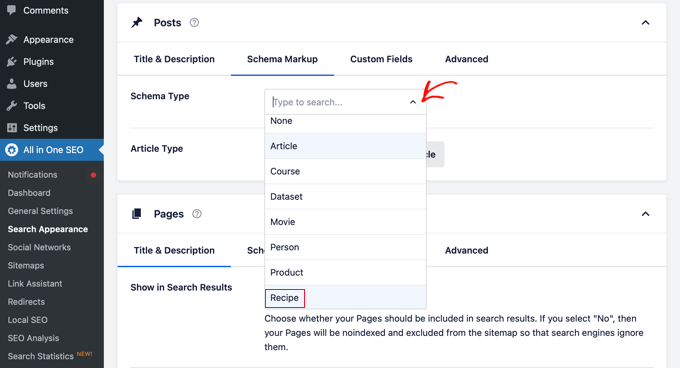
Set the ‘Schema Type’ dropdown to ‘Recipe’, then click ‘Save Changes’.
If you only want Recipe schema on specific posts rather than all posts, skip this step and add it post-by-post using the Schema tab in the editor.
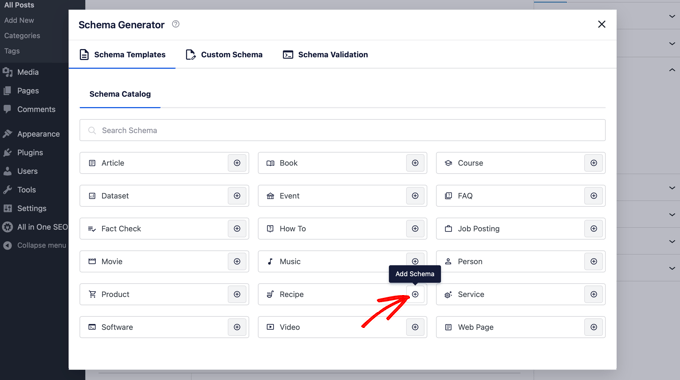
In the Schema Catalog (see above), find the ‘Recipe’ option and click its ‘Add Schema’ button.
This opens the Recipe schema form where you can fill in all your recipe details for Google.
Fill in the following fields:
- ‘Name’ — the dish name (defaults to post title)
- ‘Description’ — a short description of the dish
- ‘Author’ — the recipe creator’s name
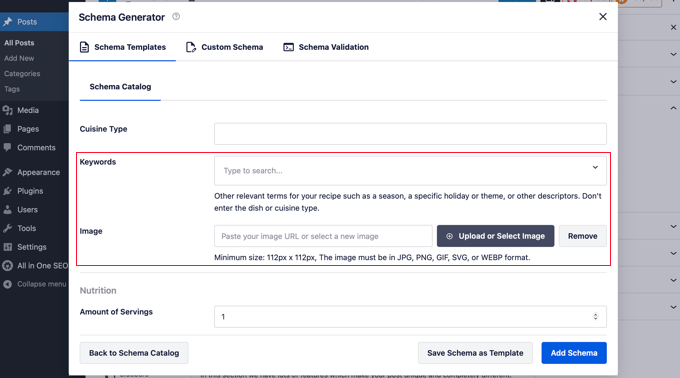
- ‘Keywords’ — seasonal or holiday terms to help your recipe appear in relevant searches
- ‘Image’ — the recipe photo that Google will show in the rich result
- ‘Dish Type’ and ‘Cuisine’
- ‘Preparation Time’, ‘Cooking Time’, and ‘Total Time’
- ‘Recipe Yield’ — number of servings
- ‘Ingredients’ — one per line
- ‘Calories’
- ‘Instructions’ — step-by-step cooking directions
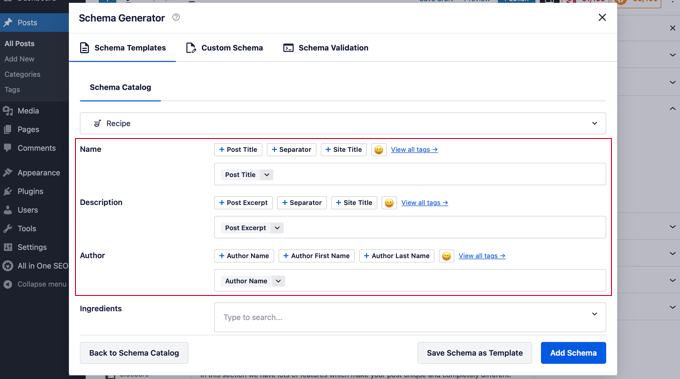
Continue scrolling to fill in the ‘Keywords’ and ‘Image’ for your recipe.
The ‘Image’ field is required. Google will not display your recipe in the rich result card without it.
Keep scrolling to complete the remaining fields.
These include ‘Ingredients’, ‘Calories’, and step-by-step ‘Instructions’.
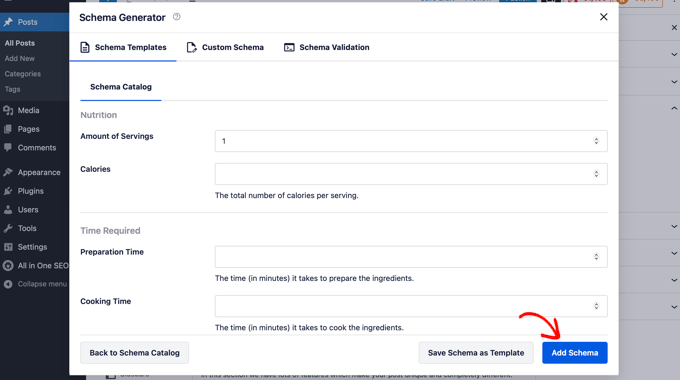
Tip: Google requires only the recipe name and at least 1 image for the recipe rich result card. The other fields (author, preparation time, cooking time, and a list of ingredients) are strongly recommended and make a richer, more complete listing more likely.
When all fields are filled in, click ‘Add Schema’. Then click ‘Update’ or ‘Publish’ on the post to save your changes.
Adding Event Schema in WordPress
Event schema tells Google your event’s name, date, time, location, and ticket information.
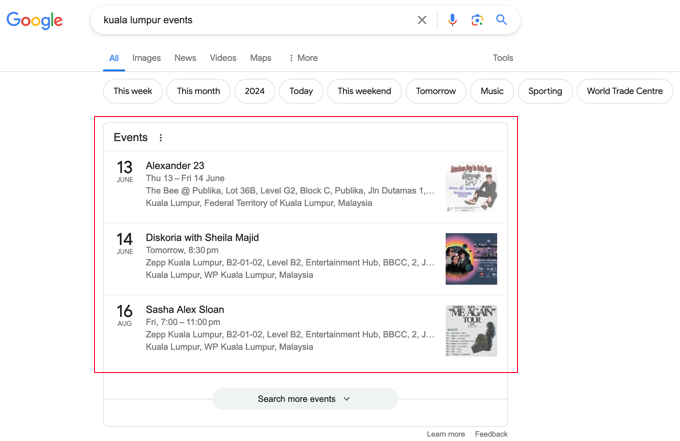
Important: Google requires each event to have its own unique URL. Do not add event schema to a page that lists multiple events, only to a page dedicated to a single event.
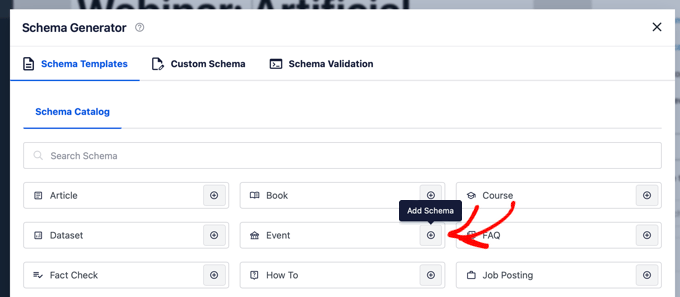
In the Schema Catalog (see above), find ‘Event’ and click its ‘Add Schema’ button.
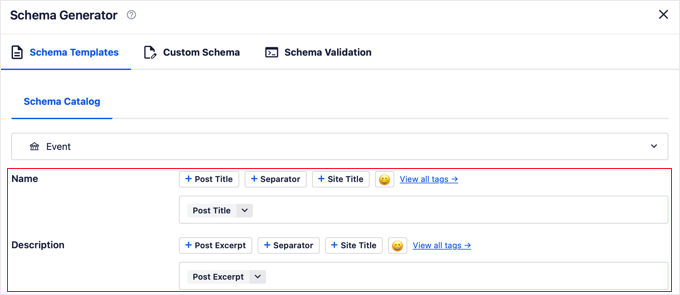
Fill in the event ‘Name’. It defaults to the post title, which you can keep or replace.
Add a compelling ‘Description’. This often appears directly in Google’s search results, so write it to encourage clicks rather than using the default post excerpt.
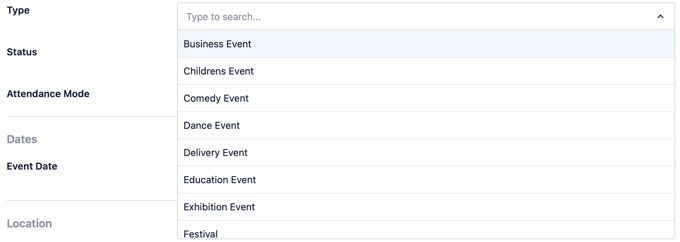
Select the ‘Event Type’ from the dropdown.
Options include BusinessEvent, MusicEvent, and SportsEvent.
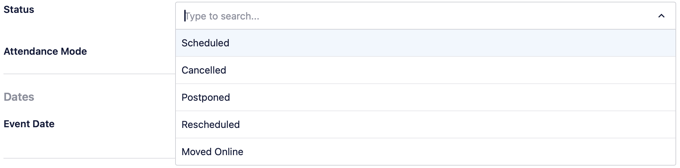
Set the ‘Event Status’ to ‘Scheduled’.
You can update this later to Cancelled, Postponed, or Rescheduled if circumstances change.
Choose the ‘Attendance Mode’: Online, Offline (in person), or Mixed.
For online events, leave the Location section blank.
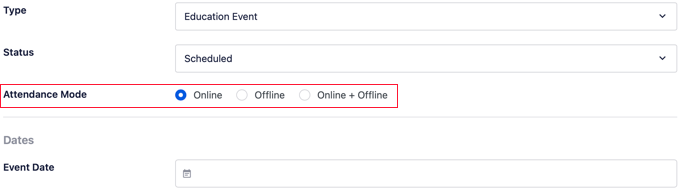
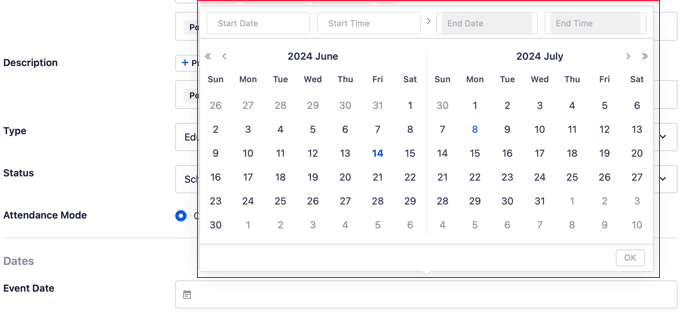
Click the ‘Event Date’ field.
A calendar appears — click the start date, then the end date (click the same date twice for single-day events), then click OK.
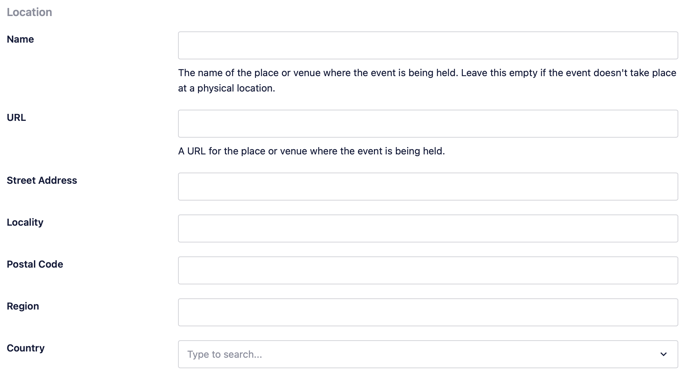
Fill in the venue ‘Name’ and ‘URL’, then complete the address fields.
An accurate address is important because Google uses it to place your event on Maps and to match it with location-based searches.
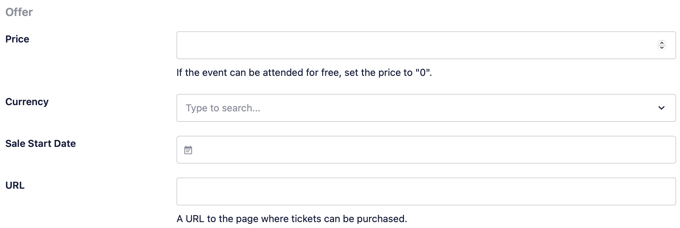
Now look at the ‘Offer’ section.
You’ll need to enter the ticket price (enter 0 for free events), the sale start date, and the URL where tickets can be purchased.
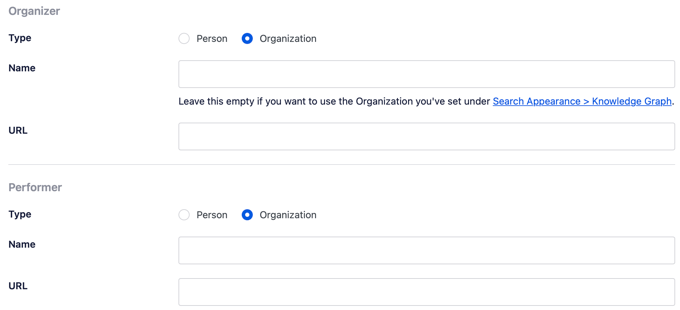
Enter the ‘Organizer’ details (person or organization, name, and website).
If the event is a performance, fill in the ‘Performer’ section too.
Add an ‘Event Image’. This is what Google shows next to your listing.
Use an image at least 1920px wide (Google’s recommended size; the minimum is 720px). A 16:9 or 1:1 aspect ratio works best.
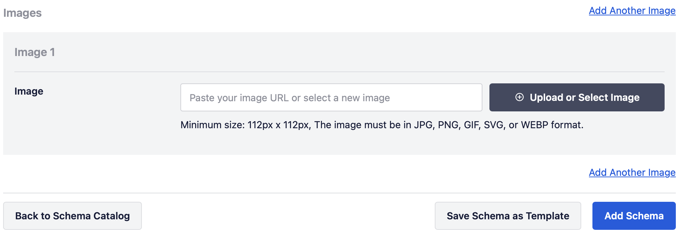
Click ‘Add Schema’, then click ‘Update’ or ‘Publish’ on the post.
Adding FAQ Schema in WordPress
FAQ schema marks up a list of questions and their answers.
Since 2026, FAQ schema no longer produces a rich result in Google Search. But the FAQPage markup itself is still valid. Google and other search engines can still read it to understand your questions and answers.
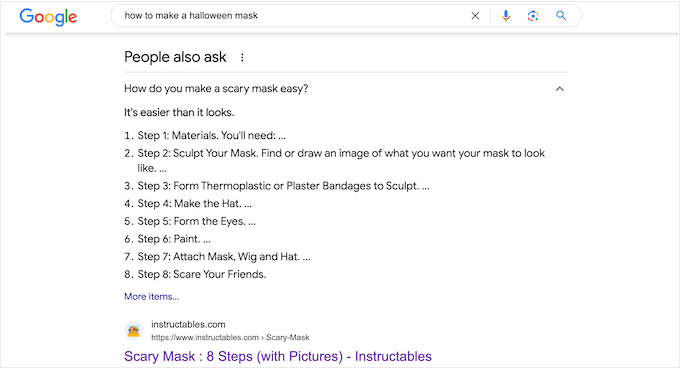
Google’s People Also Ask box pulls questions from across the web, so a clear, well-answered question on your page can still show up there. That comes from the quality of your content, not from the FAQ schema.
Google’s FAQ Schema Guidelines
Before adding FAQ schema, make sure your content meets these requirements:
- Only use FAQ schema when your page has a list of questions with their own answers. If you have a single question, use Q&A schema instead.
- The questions and answers in your schema must be visible in the body of the page, not hidden.
- If the same Q&A appears more than once on the page, add schema to only one instance.
- Do not use FAQ schema for advertising purposes or content that is violent, obscene, or illegal.
In the Schema Catalog (see above), find ‘FAQ’ and click its ‘Add Schema’ button.
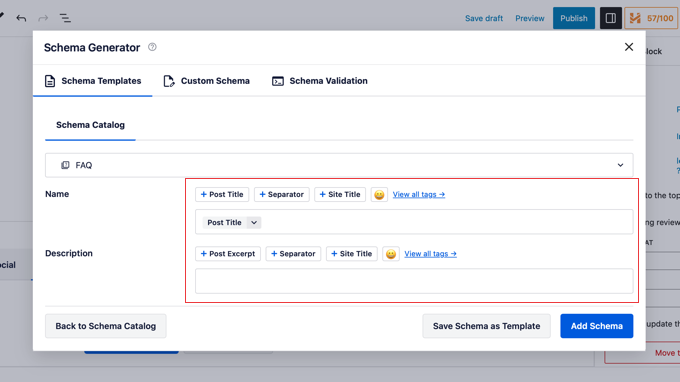
Optionally add a page ‘Name’ at the top of the form.
You can also fill in the ‘Description’ field to add context for the FAQ section.
Scroll down to the ‘Question’ and ‘Answer’ fields and fill in your first FAQ pair.
Click ‘Add Another Question’ to add more pairs.
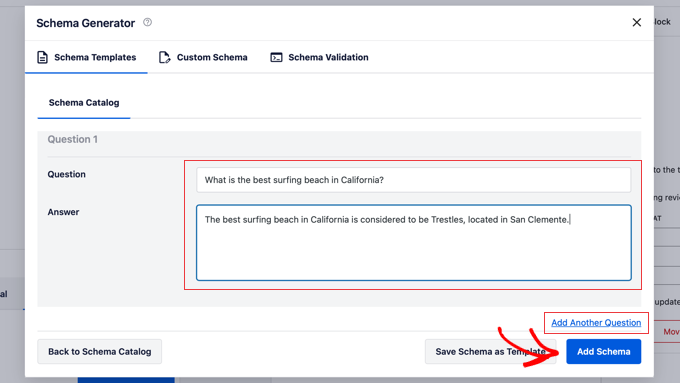
When all your Q&As are entered, click ‘Add Schema’, then ‘Update’ or ‘Publish’ the post.
Adding FAQ Schema Without a Plugin
You can also add FAQ schema manually using the FAQPage JSON-LD Schema Generator.
Enter your questions and answers on the left side, and the schema code updates in real time on the right.
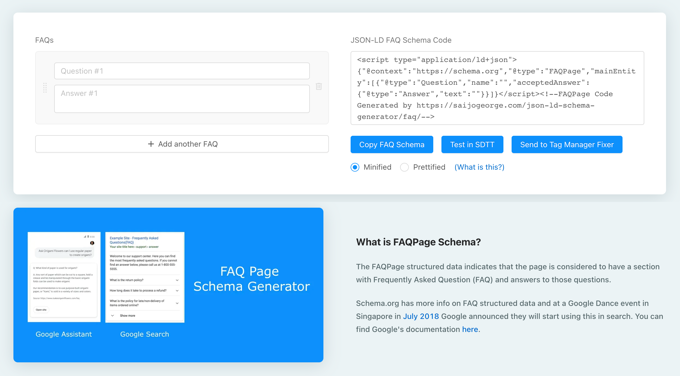
Type each question in the ‘Question’ field and the corresponding answer in the ‘Answer’ field.
Click ‘Add Question’ to add more pairs.
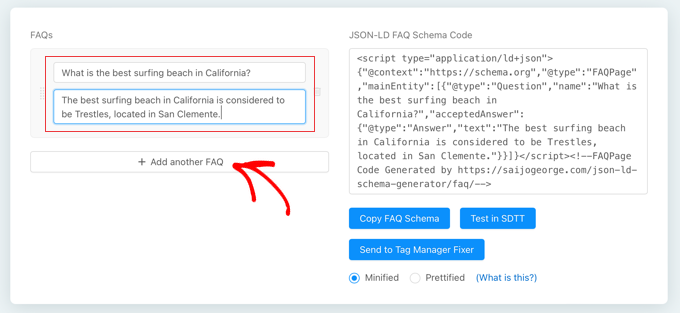
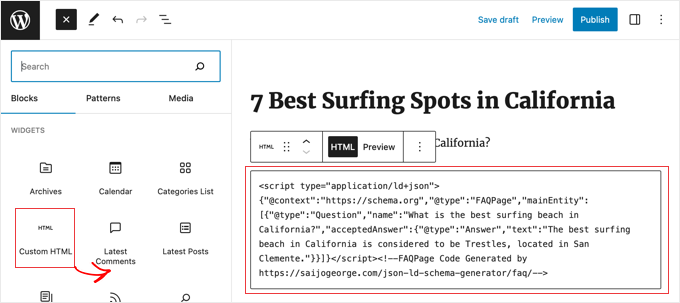
Click ‘Copy FAQ Schema’, then paste the code into a ‘Custom HTML’ block at the bottom of your post in the WordPress block editor.
Place the Custom HTML block anywhere in the editor. Google reads the schema code from the page source regardless of where it sits in the post.
Adding Video Schema in WordPress
Video schema (VideoObject) tells Google the title, description, thumbnail, and duration of your video.
Google can show a thumbnail and duration badge in search results and may feature your video in the Video carousel. This is particularly valuable for tutorial sites and video creators.
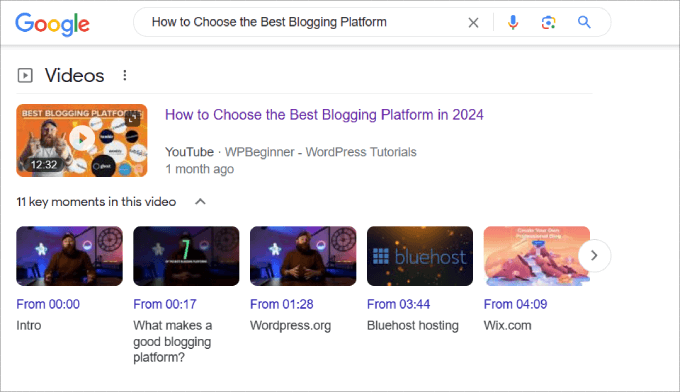
Step 1: Enable Video Sitemaps
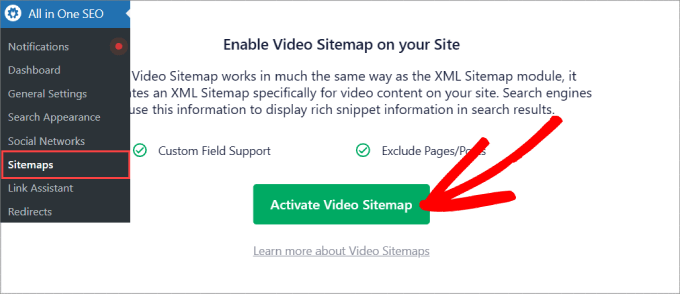
Before adding schema, you should enable a video sitemap.
This helps Google find and index your videos, while schema makes them eligible for rich results. Go to All in One SEO » Sitemaps and click ‘Activate Video Sitemap’.
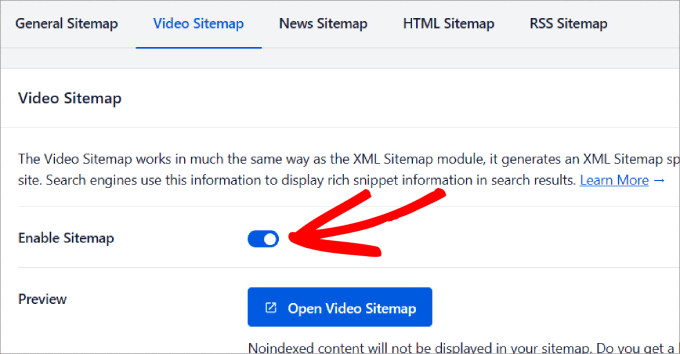
Under the ‘Video Sitemap’ tab, confirm that ‘Enable Sitemap’ is toggled on.
Click ‘Save Changes’ to activate the sitemap.
Step 2: Add Video Schema to Your Post
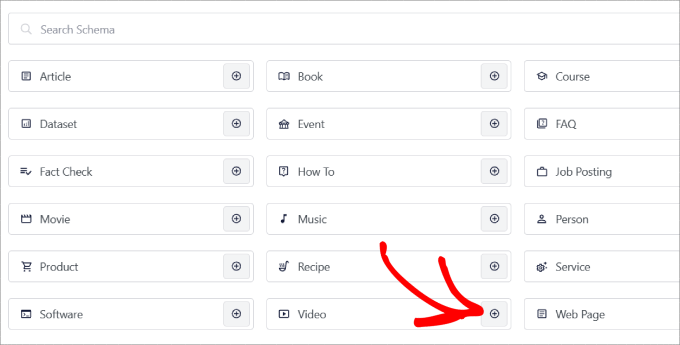
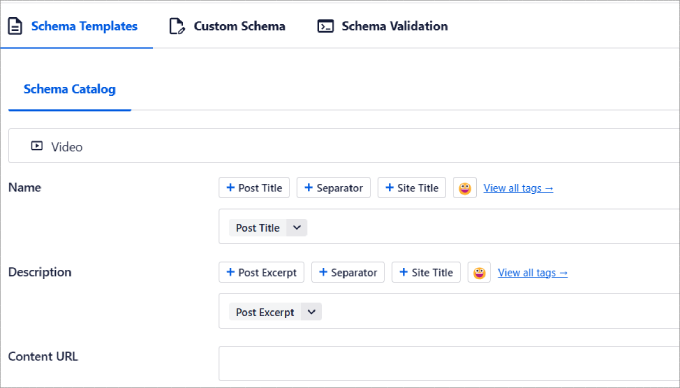
Open the post or page that contains your embedded video and go to the Schema Catalog.
Click the ‘+’ icon next to ‘Video’.
Fill in the video details:
- ‘Name’ — your video’s title
- ‘Description’ — a brief description of the video content
- ‘Content URL’ — the direct URL of the video file
- ‘Embed URL’ — the video hosting platform URL (YouTube, Vimeo, Wistia, etc.)
- ‘Upload Date’ — when the video was published
- ‘Family-Friendly’ — toggle this if appropriate
- ‘Thumbnail URL’ — a clear thumbnail image URL
- ‘Duration’ — the length of the video in ISO 8601 format (e.g. PT5M30S for 5 minutes 30 seconds)
If you have a transcript for your video, add it to the post body. Google can index transcript text to understand your video’s content, which can improve its visibility in search.
Pay particular attention to the ‘Thumbnail URL’ and ‘Upload Date’. Both are required for Google to display your video in rich results and the Video carousel.
Click ‘Add Schema’, then ‘Update’ or ‘Publish’ the post. If you publish videos regularly, you can also click ‘Save Schema as Template’ to reuse these settings.
Manual Method: Add Video Schema With Code
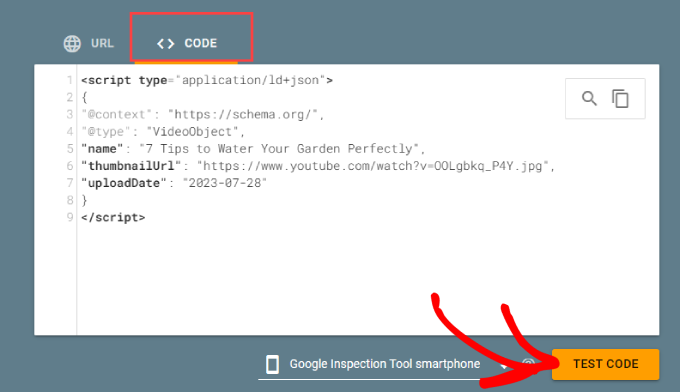
If you prefer to add video schema manually, copy this JSON-LD template into a text editor and replace the placeholder values with your actual video data:
<script type="application/ld+json">
{
  "@context": "https://schema.org/",
  "@type": "VideoObject",
  "name": "Name of the Video",
  "description": "A brief description of what your video is about.",
  "thumbnailUrl": "https://example.com/thumbnail.jpg",
  "uploadDate": "2026-01-28",
  "contentUrl": "https://example.com/video.mp4"
}
</script>
Paste the completed code into a ‘Custom HTML’ block in your post, then click ‘Update’ or ‘Publish’.
Validate it using the ‘Code’ tab of the Rich Results Test before publishing.
Adding Product Schema (GTIN, ISBN, MPN) in WordPress
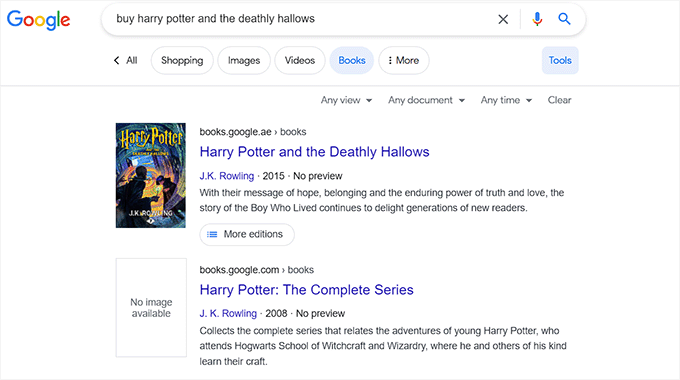
Product identifiers, such as GTIN (Global Trade Item Number), ISBN (International Standard Book Number), and MPN (Manufacturer Part Number), give search engines precise data about your products.
When included in Product schema, they improve your chances of appearing in Google Shopping and product-specific searches.
Method 1: Add Product Schema to a Post or Page
Use this method if you are reviewing or selling a single product on a standard blog post and do not use WooCommerce.
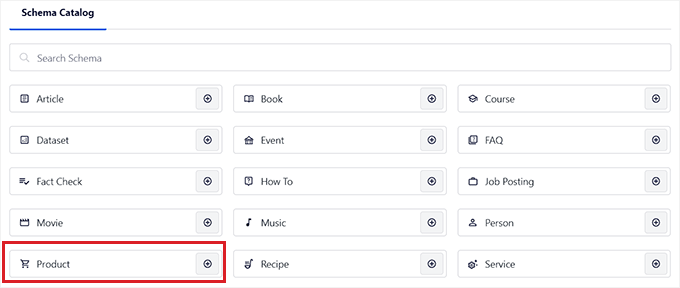
In the Schema Catalog (see above), click the ‘+’ button next to ‘Product’.
Fill in the product name, description, brand, SKU, and image.
Then scroll down to the ‘Identifiers’ section and enter your GTIN, ISBN, or MPN.
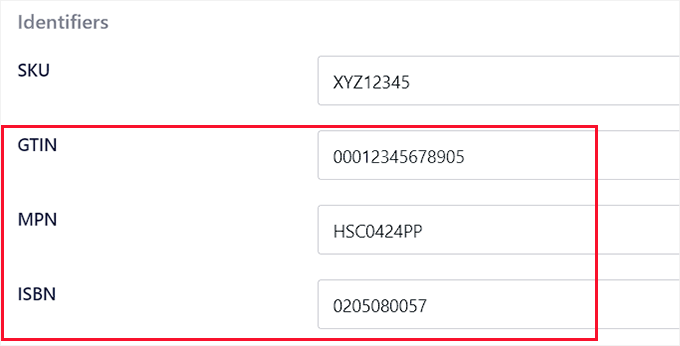
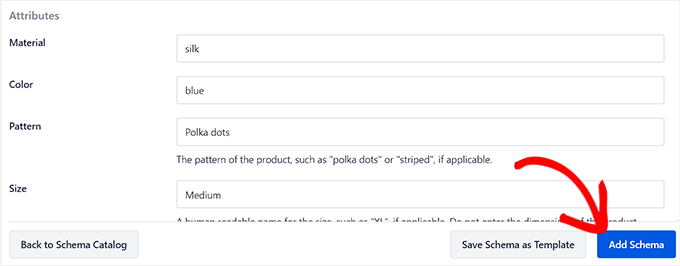
Continue scrolling to add price, attributes, reviews, and shipping destination.
Click ‘Add Schema’, then ‘Update’ or ‘Publish’.
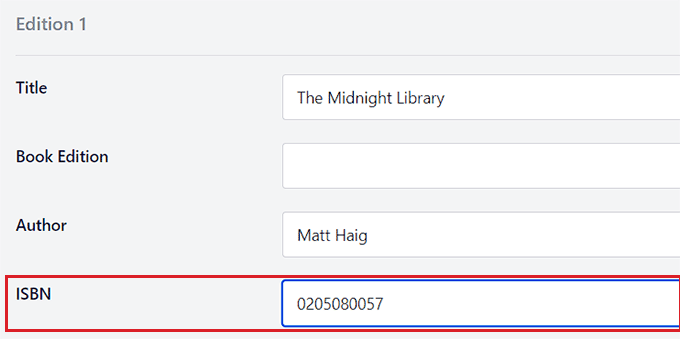
If you sell books, select ‘Book’ from the Schema Catalog instead of Product. Fill in the title, author, description, and image.
In the ‘Editions’ section, enter the ISBN. Click ‘Add Schema’.
Method 2: Add Product Identifiers to WooCommerce Products
If your store uses WooCommerce, AIOSEO integrates directly with the WooCommerce product editor.
Go to Products » All Products and click ‘Edit’ on any product.
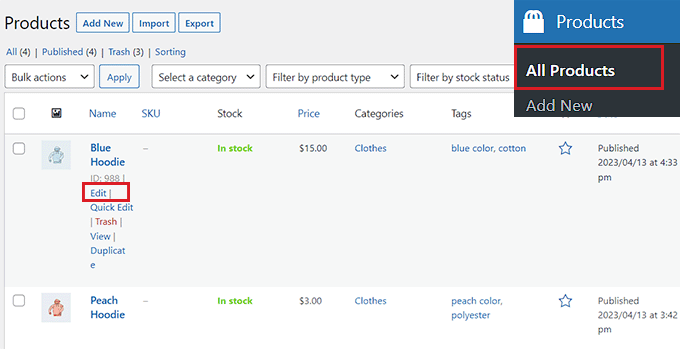
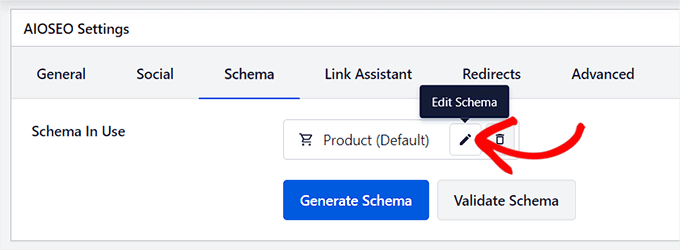
Scroll to ‘AIOSEO Settings’ at the bottom of the product editor. Click the ‘Schema’ tab — you will see that Product schema is already active by default.
Click the ‘Edit’ (pencil) button to open the Product schema form.
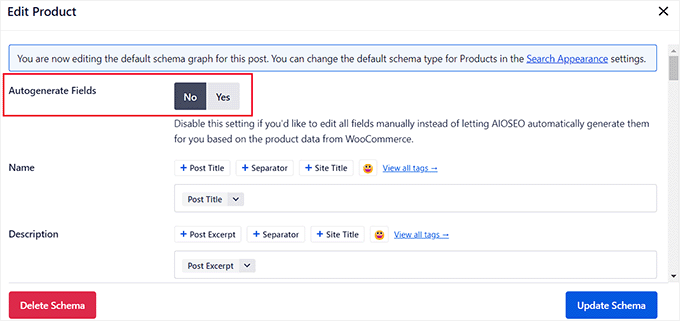
The ‘Autogenerate Fields’ toggle is On by default. AIOSEO automatically pulls the product name, description, and price from your WooCommerce product data.
You can leave it on, or switch it to No to fill fields manually.
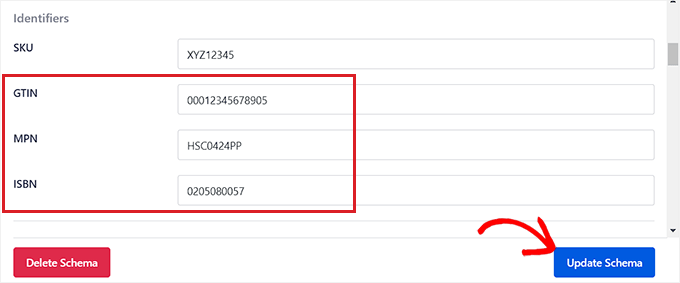
Scroll to the ‘Identifiers’ section and add your GTIN, ISBN, or MPN. Add any other attributes, shipping destinations, or reviews.
Click ‘Update Schema’, then click ‘Update’ on the product.
Bonus: Add Your Products to Google Shopping
Once your GTIN, ISBN, or MPN schema is in place, you can use those identifiers to list your products in Google Shopping. This is a virtual marketplace where searchers can compare and buy products from different vendors.
See our full guide on how to automatically add WordPress products in Google Shopping for step-by-step instructions.
Adding Local Business Schema for Multiple Locations
LocalBusiness schema tells Google your business name, address, phone number, hours, and website URL in a machine-readable format.
For businesses with multiple branches, AIOSEO’s Local SEO addon creates a dedicated location page for each branch, so each one can rank for its specific area and services.

Note: This section uses the AIOSEO Local SEO addon, which is different from the Schema Catalog flow used in other sections. You will activate a separate module and create dedicated location pages, not add schema to existing posts.
Step 1: Activate the Local SEO Addon
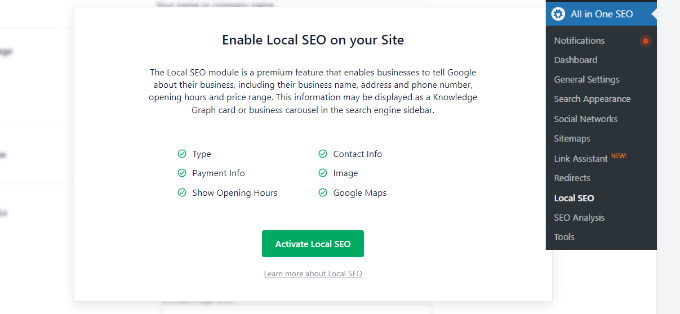
In your WordPress dashboard, go to All in One SEO » Local SEO and click ‘Activate Local SEO’.
Step 2: Enable Multiple Locations
Once the addon is active, click the ‘Multiple Locations’ toggle to enable it.
This adds a new ‘Locations’ menu item to your WordPress admin sidebar. It works just like Posts or Pages.
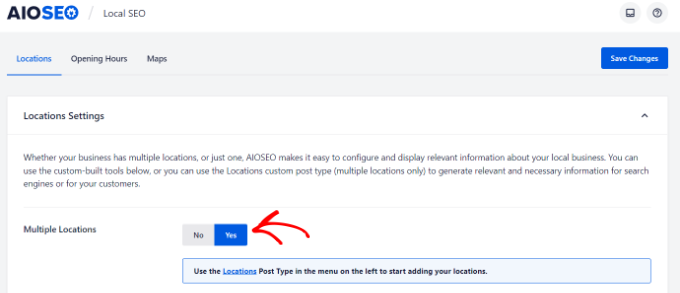
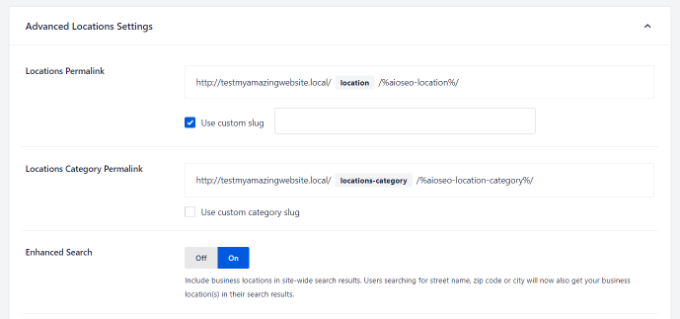
Scroll down to ‘Advanced Settings’ to configure the permalink slug for your locations (default: yourdomain.com/locations/). You can also enable ‘Enhanced Search’ to include location pages in your site’s search results.
Click ‘Save Changes’ when you are done.
Step 3: Configure Opening Hours
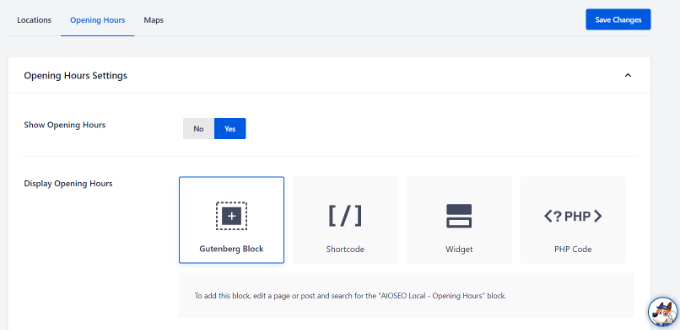
Click the ‘Opening Hours’ tab to set your business hours.
These apply globally to all locations by default, but individual locations can override them.
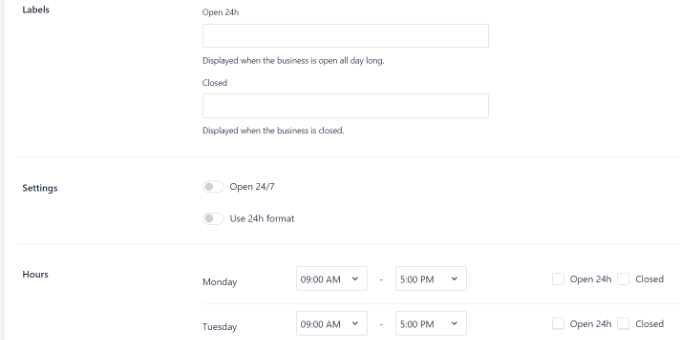
Click the toggles for each day to enable it.
Then, set the opening and closing times in the fields that appear.
Step 4: Add Your Business Locations
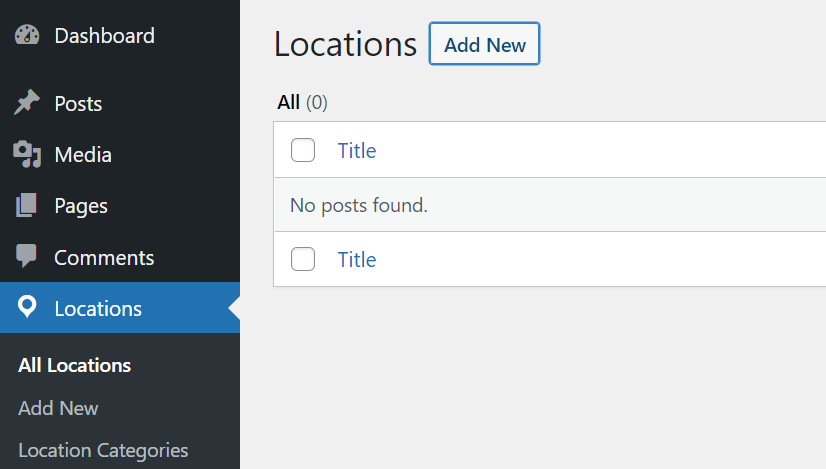
Go to Locations » Add New from your dashboard.
Each location gets its own URL and schema markup.
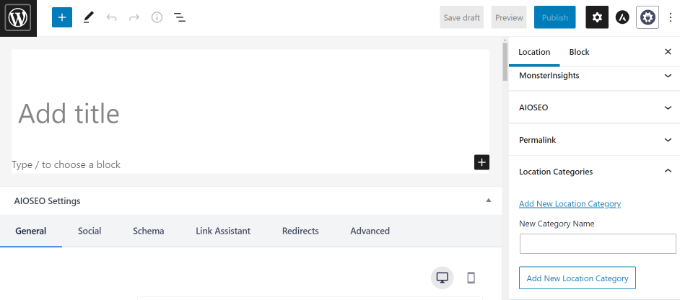
Give the location page a title (e.g., the branch name or city). Add a description in the content area.
Then scroll down to the ‘AIOSEO Local Business’ meta box to enter the location’s schema details.
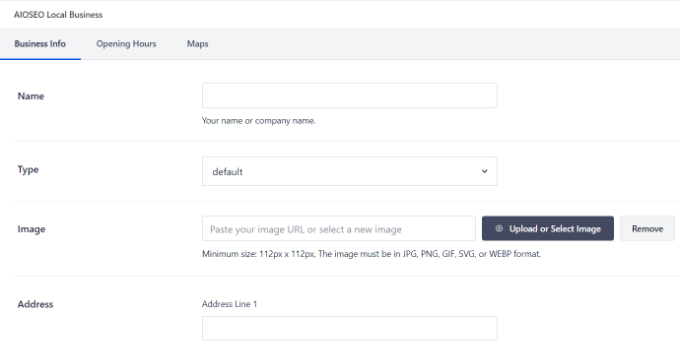
In the ‘Business Info’ section, enter the business name, type (industry), image, address, phone number, payment info, and area served.
Make sure the name, address, and phone number match exactly what you have on your Google Business Profile. Consistency across both is important for local search.
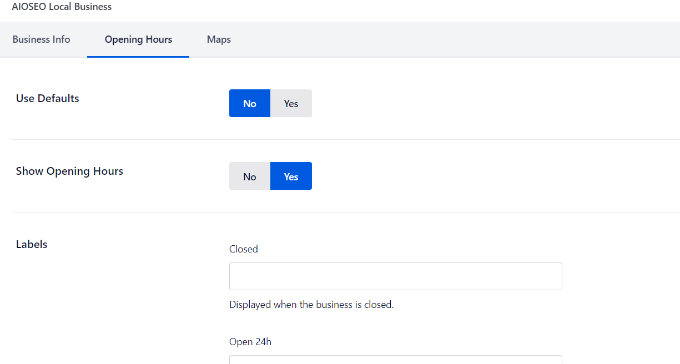
Switch to the ‘Opening Hours’ tab in the meta box if this location has different hours from your global default.
Disable ‘Use Defaults’ and set the location-specific times.
Switch to the ‘Maps’ tab to configure the map display style and custom pin marker.
Note: For the map to display correctly on the front end, you must first configure a valid Google Maps API key in the main Local SEO settings.
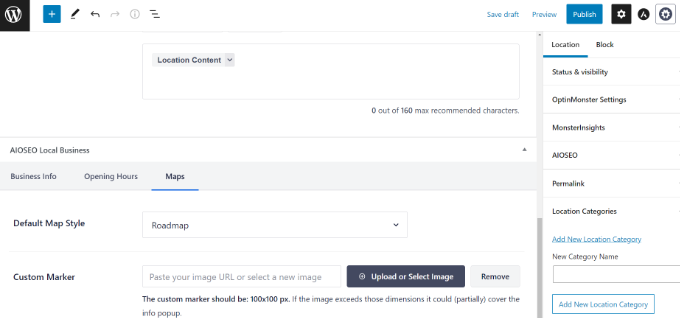
Click ‘Publish’ on the location page. Then, repeat for each additional location.
Adding How-To Schema in WordPress
How-To schema marks up step-by-step tutorials, giving search engines structured data about your task name, required supplies, estimated time, and each individual step.
Note that Google retired the How-To rich result on desktop and mobile in August 2023, so this schema will not produce a visual enhancement in standard Google search results.
But the markup is also valid structured data that AI-powered search features can read.
Google’s How-To Schema Guidelines
Before adding the schema, check that your content meets these requirements:
- Content must be step-by-step instructions for completing a task.
- Do not use How-To schema for recipes, use Recipe schema instead.
- All steps in the schema must be visible on the page, you cannot hide content in schema that users cannot see.
- No advertising, no obscene, violent, or illegal content.
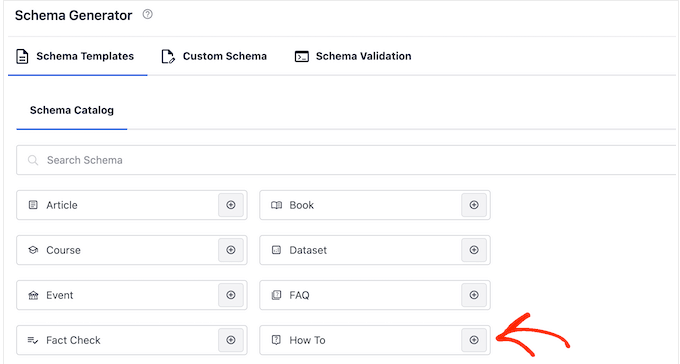
In the Schema Catalog (see above), click the ‘+’ icon next to ‘How-To’.
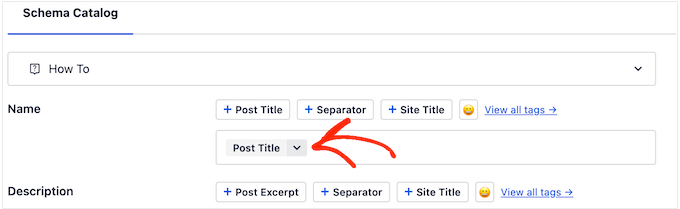
Fill in the ‘Name’ (the task title).
By default AIOSEO adds a Post Title smart tag. You can keep it or replace it with a custom title if the how-to procedure has a different name than the post.
Add a ‘Description’. This appears below the title and above the steps in some rich results, so write it to introduce the guide to potential readers.
A well-written description also gives Google’s AI Overviews useful context about the scope of your tutorial.
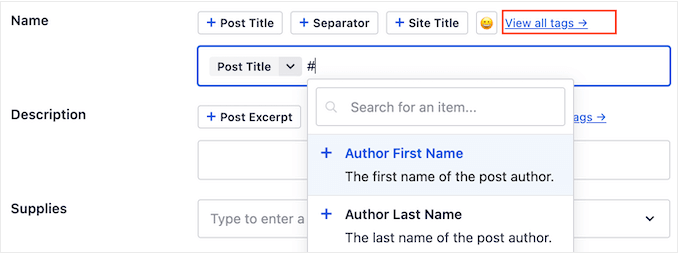
In the ‘Supplies’ field, list any specialist equipment or materials readers will need.
Press Enter after each item to add it to the list.
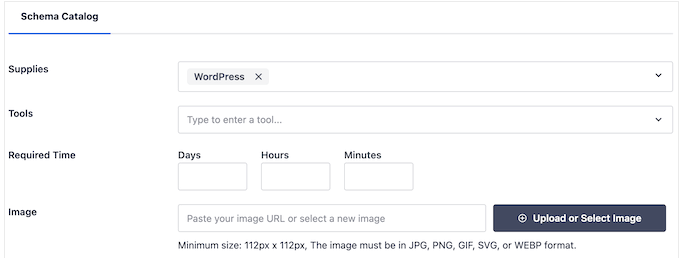
In the ‘Tools’ field, list any reusable equipment readers will need to complete the guide. Press Enter after each item.
Note that Tools differ from Supplies. Supplies are materials consumed during the task, while Tools are items the reader will use and keep.
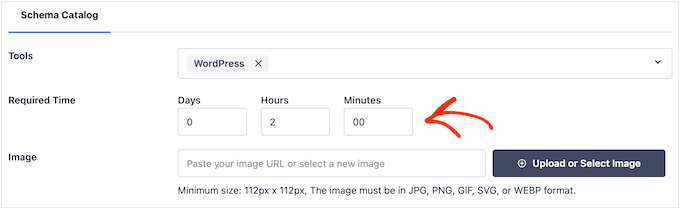
In the ‘Total Time’ fields (Days, Hours, Minutes), enter how long it will take to complete the guide.
Be accurate because searchers use this to decide whether to attempt the tutorial now or come back when they have more time.
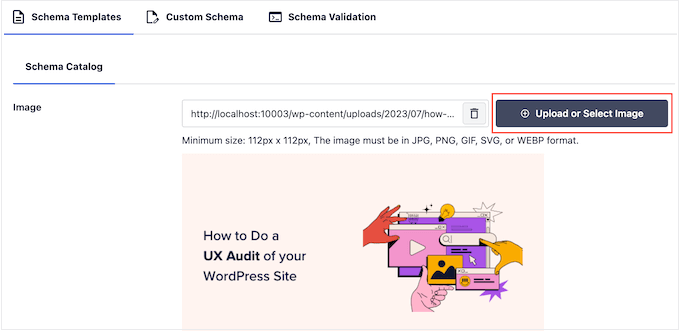
Optionally upload a ‘Final Result’ image showing what readers will end up with after completing your guide.
This image must also appear somewhere visible on the page because schema cannot reference images that are hidden from visitors.
If readers will need to spend money to complete the guide, enter the amount in the ‘Price’ field (numbers only, no currency symbol) and select the currency from the dropdown.
Leave this blank if there is no cost associated with completing the tutorial.
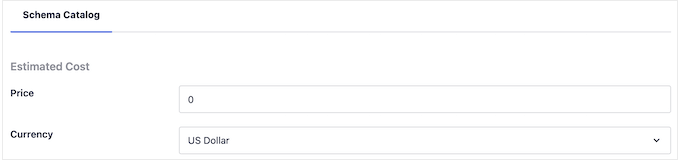
Now add each step. For each step, enter a title and the instructions in the Description field.
Keep each step focused. Include only what is needed to complete that specific step, not background information or summaries.
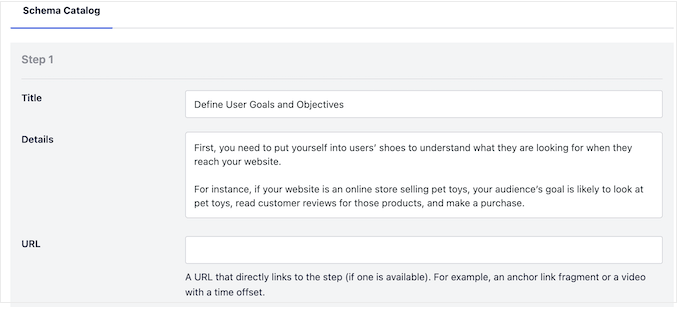
If you use anchor links in your article (e.g., a table of contents where each step is a numbered section), then add the step’s anchor URL in the ‘URL’ field.
This links each schema step directly to the corresponding section on the page.
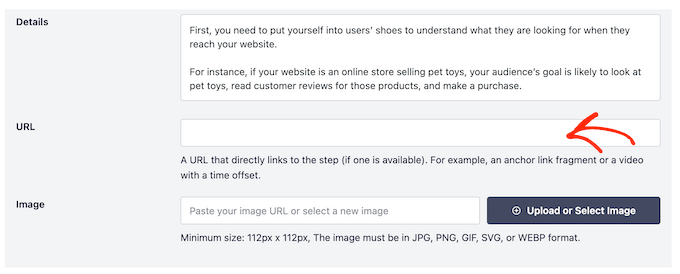
Each step also has an ‘Image’ field. Add a screenshot or photo that shows the reader what to do in that step. Google requires each step to have its own unique image, so do not reuse the same Final Result image across multiple steps, as this violates Google’s guidelines.
Finally, click ‘Add Schema’, then ‘Update’ or ‘Publish’ the post.
Adding Schema Markup With AIOSEO’s AI Generator
AIOSEO also includes a built-in AI Schema Generator that can create schema markup for you automatically. Instead of selecting a type and filling in each field by hand, you describe what you need or let AIOSEO read your content, and it produces the structured data for you.
The feature is available on the Basic plan and above, and each generation uses approximately 25 AI credits.
To use it, open the post or page in the WordPress editor, scroll to ‘AIOSEO Settings’, and click the ‘Schema’ tab.
Click ‘Generate Schema’ to open the Schema Catalog, where you will find the option to use the AI Generator.
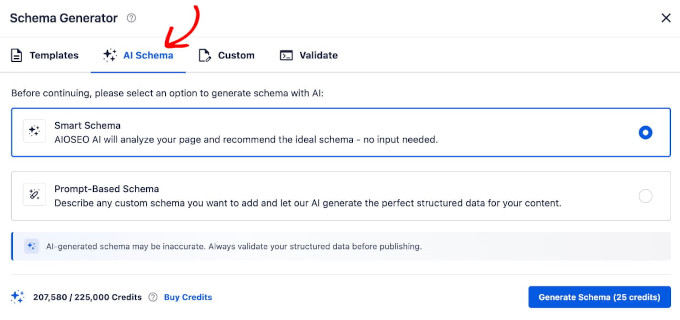
Smart Schema
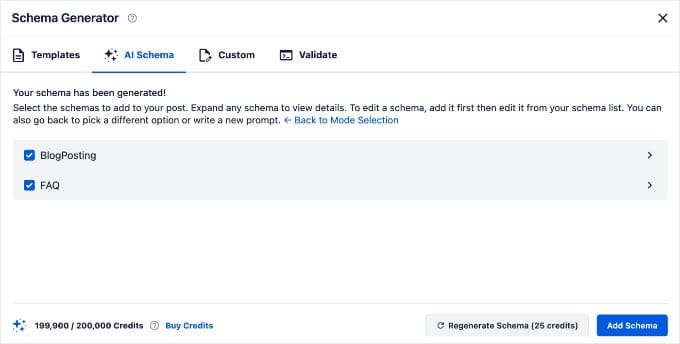
Choose ‘Smart Schema’ and AIOSEO will read your post title, body content, and context to recommend the most appropriate schema types for the page.
Review the recommendations, check the types you want to apply, and click ‘Add Schema’.
Prompt-Based Schema
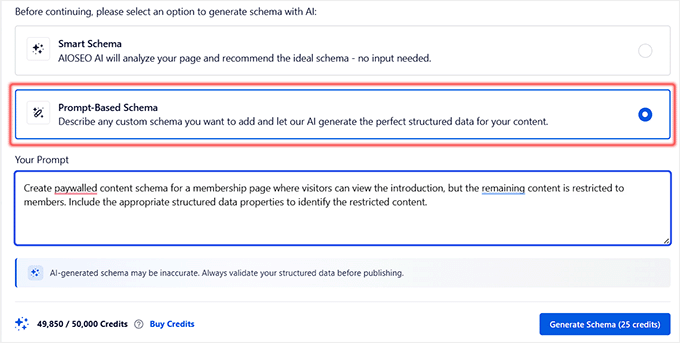
Choose ‘Prompt-Based Schema’ if you want to specify the schema type yourself. Type a description of what you need, such as ‘Add FAQ schema for the questions on this page’, and AIOSEO generates the markup based on your instructions.
This method is useful when Smart Schema does not recommend the type you need, or when you want to target a specific schema type on a page that covers multiple topics.
Important: AI-generated schema can contain inaccuracies. Before publishing, click ‘Test with Google’ in the ‘Schema’ tab to validate your markup in Google’s Rich Results Test, and correct any errors it flags.
Once you are satisfied with the result, click ‘Update’ or ‘Publish’ to save your changes. The generated schema appears in the ‘Schema’ tab alongside any other schema already added to the page, and you can edit individual fields at any time using the pencil icon.
Adding Rich Snippets by Adding Code to WordPress
Another way to add rich snippets to WordPress is by manually adding code to your site.
The easiest free way to do this on a per-post basis is by using the built-in WordPress block editor. If you haven’t worked with code before, then see our guide on how to copy and paste code in WordPress.
Google recommends JSON-LD as the schema format (the same format the plugin methods above use).
In the steps below, you will add it directly inside your post using a Custom HTML block. If you want to inject it into your site’s header instead, see the WPCode option at the end of this section.
Unless you are an advanced developer, we don’t recommend writing this code from scratch. Instead, you can use a free tool like the Schema Markup Generator by dentsu.
Simply select the type of schema you want (like an Article, Event, or FAQ), fill out the form fields, and the tool will automatically write the correct JSON-LD code for you.
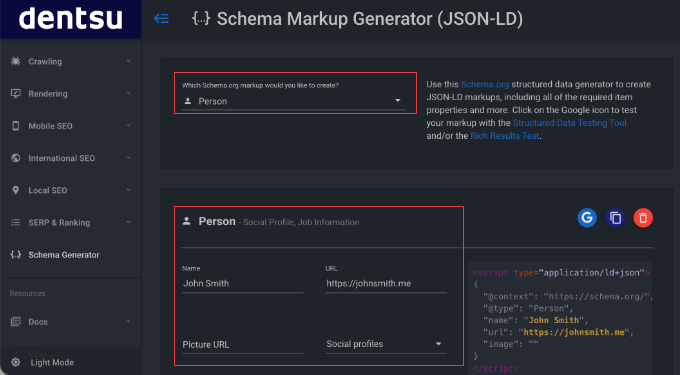
Once generated, your code will look something like this example for a ‘Person’ schema:
<script type="application/ld+json">
{
  "@context": "https://schema.org",
  "@type": "Person",
  "name": "John Smith",
  "jobTitle": "Support Technician",
  "image": "https://www.example.com/johnsmith.jpg",
  "url": "https://www.example.com"
}
</script>
Now, you need to add this specific code to your chosen WordPress post. Here is exactly how to do it using a Custom HTML block.
First, open the specific WordPress post or page where you want to add the rich snippet in the block editor.
Next, click the ‘+’ add block icon anywhere in your content area and select the ‘Custom HTML’ block.
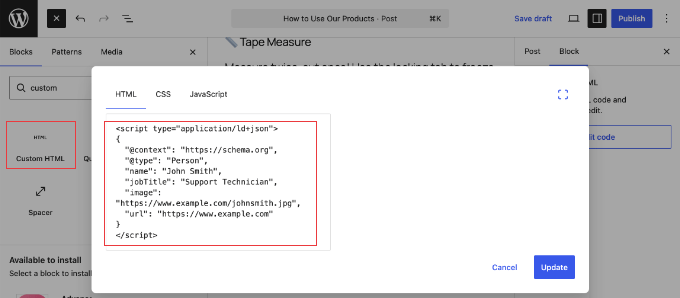
Go ahead and paste your generated JSON-LD script directly into the HTML box.
Finally, click ‘Update’ or ‘Publish’ to save your post.
Don’t worry about where you place this block in your content. Google’s bots will still easily find and read the schema code, but it will remain completely invisible to your human visitors.
If you have the free WPCode plugin installed, you can also paste this script directly into the ‘WPCode – Page Scripts’ meta box below your editor to inject it into the page header.
If you want to learn more about the specific technical requirements for different formats, you can refer to Google’s Developer resource on structured data or the extensive documentation on Schema.org.
Best Practices for Rich Snippets
Following Google’s structured data guidelines keeps your site eligible for rich results and protects it from manual penalties.
Here are the most important rules to keep in mind after you’ve added schema markup:
- Monitor your performance in Google Search Console. Search Console lists your detected schema types, so you can see how many pages are eligible for rich results and spot any warnings or errors. Checking this report after your initial setup, and periodically after that, is the best way to catch issues before they affect your rankings.
- Only mark up content that is visible on the page. Your schema should describe information readers can actually see, so don’t add it for content that is hidden, inside an unopened tab, or not on the page at all. If your structured data claims a product has dozens of five-star reviews but none appear on the page, Google may flag it as misleading and remove your rich result eligibility.
- Keep your markup accurate and up to date. If you change a product’s price, add new reviews, or move an event’s date, update your schema to match. Structured data that contradicts your page content can trigger errors in Google Search Console’s Rich Results report and reduce how often your snippets appear.
- Don’t use schema to misrepresent your content. Google prohibits adding schema types that don’t match your actual content, aggregating third-party reviews without permission, or using rich snippets to make promotional content look editorial. Violations can result in a manual action that removes your rich result eligibility entirely.
Testing Your Schema Markup for Rich Snippets
Whether you used a plugin or added code manually, it’s a great idea to test your setup to make sure Google can read it correctly.
Google provides two free tools for this, each with a different purpose.
1. Check Eligibility with the Rich Results Test
This is the most important tool for most users. It checks if your page is eligible for the special visual enhancements (rich results) that Google can display in search results.
To use it, head over to the Rich Results Test tool. Enter the URL of your post or page and click ‘Test URL’.
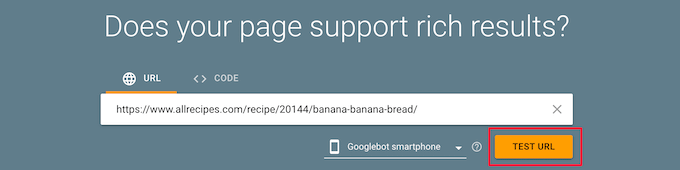
If you are writing your own JSON-LD code manually (Method 2), then you can paste your raw code directly into the ‘Code’ tab of the Rich Results Test. This lets you catch errors before you even publish the post.
The tool will analyze your page and tell you which rich result types it found and whether they are valid. This is the best way to confirm that your recipe, review, or FAQ schema is working correctly.
2. Validate Your Code with the Schema Markup Validator
This is a more technical tool that checks if your schema code is written correctly according to the official Schema.org standards. It validates all types of schema, not just the ones that create rich results.
You can find it by going to the Schema Markup Validator. Just like before, enter your URL and click ‘Run Test’.
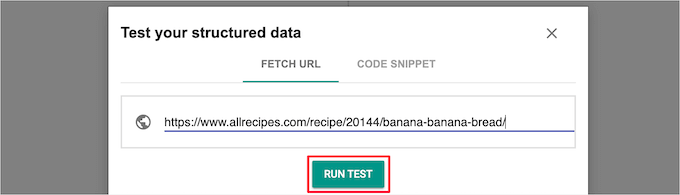
The validator will show you all the schema it found on the page and point out any errors or warnings in the code itself.
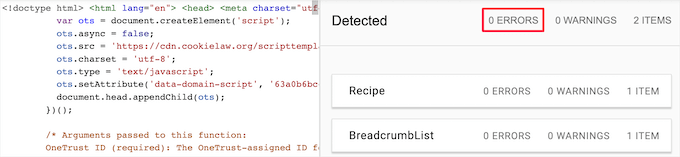
Your goal here is to see ‘0 Errors’ to ensure your code is clean.
Troubleshooting: Why Isn’t My Rich Snippet Showing?
If your schema passes both testing tools but your rich snippet still isn’t appearing in search results, there are a few common explanations.
Google Hasn’t Recrawled Your Page Yet
After you add or update schema markup, Google needs to crawl and reindex your page before any changes appear in search.
This can take anywhere from a few days to several weeks, depending on your site’s crawl frequency. You can speed this up by submitting your URL through the URL Inspection tool in Google Search Console.
If you use a caching plugin or CDN, then also clear your cache after updating schema. A cached page can prevent Google from seeing your latest changes even after it crawls.
Search Console Is Reporting Errors on Your Pages
Even if the testing tools show valid schema, Search Console may be flagging errors or warnings across a broader set of your pages.
Go to Search Console and look under Enhancements for the schema types you’ve added. Any errors there will prevent rich results from displaying.
Your Page May Not Meet Google’s Content Quality Threshold
Google applies a content quality standard to rich results.
Pages with thin, low-quality, or spammy content are less likely to receive rich snippets even when the schema markup is technically valid. Improving the overall depth and quality of the page is the best fix in this situation.
Frequently Asked Questions About Rich Snippets
We know that learning about schema markup and rich snippets can bring up a few questions. Below are answers to some of the most common ones we hear from our readers.
1. What are rich snippets in WordPress?
Rich snippets are visually enhanced search results that show extra information pulled from your website’s structured data (schema markup). This can include star ratings, prices, cooking times, or event dates, making your listing more attractive and informative to users.
2. How long does it take for rich snippets to appear in search results?
There is no exact timeframe. Google needs to recrawl your site first, which can take a few days to several weeks (see the Troubleshooting section above).
3. Does adding schema markup guarantee I will get rich snippets?
No. Correct schema makes your site eligible, but Google makes the final call on whether to display rich snippets.
4. What is the best way to add rich snippets: a plugin or manual code?
For the vast majority of WordPress users, using a plugin like All in One SEO is the best method. It’s much easier, safer, and eliminates the risk of making coding errors that could break your site.
The manual code method is only recommended for advanced users who are comfortable writing JSON-LD and injecting code into their site headers using a plugin like WPCode.
5. What types of content benefit most from rich snippets?
Recipe sites, product pages, and review content tend to see the greatest click-through improvements from rich snippets because their schema types produce highly visual results.
Events and courses also benefit because the additional context (date, price, provider) is exactly what searchers need before clicking.
Blog posts and standard articles can gain through Article schema as well, particularly when eligible for the Top Stories carousel.
6. Why aren’t my rich snippets showing in search results?
Usually Google hasn’t recrawled the page yet, or there are validation errors or content-quality issues. See the Troubleshooting section above to diagnose it.
Use the Rich Results Test and check your Search Console Rich Results report to diagnose the specific issue.
7. Can I use multiple schema types on one page?
Yes. Google supports multiple schema types on a single page. For example, a recipe article might include both Recipe schema and Article schema. A local business website might include LocalBusiness schema on every page plus Product schema on individual product pages.
All in One SEO’s Schema Catalog lets you add and manage multiple schema types on any post or page from a single interface.
8. Do I need event schema for virtual or online events?
Yes. Set the attendance mode to Online and add the webinar link, so people can find your virtual events in search.
9. Can I add multiple events to a single page?
No. Google requires each event to have its own unique URL, so create a dedicated page per event.
10. Does FAQ schema still work after Google’s 2023 update?
Google fully retired the FAQ rich result in May 2026. The markup is still valid structured data that helps AI-powered search features understand your Q&As, but it will not add a visual enhancement to your listing. See the FAQ Schema section above for full details and guidelines.
11. Is FAQ schema different from Q&A schema?
Yes. Use FAQ schema (FAQPage) when your page contains a list of questions with answers written by the site owner. Use Q&A schema (QAPage) when users can submit their own answers to a question, such as on a forum or support board.
12. What is GTIN, and how is it different from a SKU?
A GTIN (Global Trade Item Number) is a universal product identifier recognized by Google. A SKU is an internal inventory code specific to your store. For Google Shopping, GTINs, ISBNs, and MPNs are what matter. SKUs are internal codes and do not improve Google Shopping visibility.
13. Do I need local business schema if I already have a Google Business Profile?
You should have both. Your Google Business Profile controls what appears on Google Maps, while local business schema on your website tells search engines about your business in a machine-readable format.
Additional Resources
Now that you know how to add rich snippets, you may find these other guides helpful for improving your site’s SEO and user experience:
- Best Schema Markup Plugins for WordPress – Our expert picks of the top plugins to help you add different types of schema to your site.
- How to Add Schema Markup in WordPress and WooCommerce – A broader look at schema markup across your entire WordPress and WooCommerce site.
- How to Automatically Add WordPress Products in Google Shopping – Use your product schema identifiers to list products in Google’s shopping marketplace.
- The Ultimate WordPress Local SEO Guide – A complete guide to local search visibility, covering Google Business Profile, local citations, and schema.
If you liked this article, then please subscribe to our YouTube Channel for WordPress video tutorials. You can also find us on Twitter and Facebook.




Jiří Vaněk
I discovered markup schema or rich snippets thanks to wpbeginner and thanks to AIO SEO. I can confirm that my SEO and rankings have improved significantly since then. You will really improve your positions if you use them.
Moinuddin Waheed
Thanks for the post I have seen rich snippets many times and have thought of how to add but was not aware of the steps of adding it.
Adding Snippets is a good way to add more information for search bots and increase seo.
As we can add code to the WordPress for rich snippets, I think it would be simpler and better if we would be able to add through wpcode and then use inside posts and pages through some logic.
is there a way we can add rich Snippets using wpcode and how?
WPBeginner Support
We do not have a beginner friendly way we would recommend using WPCode at the moment.
Admin
Jiří Vaněk
It makes no sense at all because every article is different. I personally create snippets exactly according to the article thanks to the AIO SEO plugin. I will add everything I need. How To, Video, FAQ and I mix it up. It takes a little time, but the result is perfect and you can see it in the results.
Blair
Thanks for posting I was interested how to add Rich Snippets into posts or page now I can understand how to do it right.
WPBeginner Support
Glad to hear our article was helpful!
Admin
Anu
Thanks for sharing this article, this is really helpful for me.
WPBeginner Support
You’re welcome, glad our guide was helpful
Admin
Mike Jagger
this is a great share, thanks.
WPBeginner Support
You’re welcome, glad you like our tutorial
Admin
mike
been looking for something like this. thought would have hire a developer initially
thanks.
WPBeginner Support
You’re welcome, glad our content could be helpful
Admin
Stine Mari
So many great tips, I have a few things to improve on now.
Purnendu Mukherjee
Hi, is this plugin can be used with Yoast SEO Plugin or it is also a substitute of Yoast?
charles finni
Hey I am trying to do google’s sitelink in my website can you please help with that
Prajakta Patil
Hi,
I added rich snippet plugin into my website
It is a recipe website. I have installed the plugin and activated. I filled all the boxes. When i tested it in google, i got warning to fill ratings. I looked upon the rating option and didn’t find anything for recipe
What should i do in this case?
Thanks in advance.
WPBeginner Support
Hi Prajakta,
You can try WordPress post ratings plugin or you can try reaching out to plugin author and see if they have a solution.
Admin
Harman
Hello,
Is this plugin compatible with SEO Yoast Premium and Newspaper Theme?
Thanks
Antje
I programmed it without plugin. After acualisation and switching between visuell and text(Code) view my code was gone.
Do you have any suggestions?
Rahul
How i get Google rating in Google Search?
Matus
Why aren’t you using this on your website? Is it not recommended anymore?
Ringo
I see that Google add highligher in Google search console, are they the same thing?
Sergey
Tell me please, is it necessary first to clean the old structured data, which are available on my website, and then install the plugin All In One Schema.org Rich Snippets?
Or can I install the plugin All In One Schema.org Rich Snippets on top of structured data, which are now on my website?
Sergey
Hello! I have the plugin All In One Seo Pack on my site. Please tell me, could this be the conflict All In One Seo Pack with All In One Schema.org Rich Snippets? Could it be that both plugins are used on the website?
Thank you.
WPBeginner Support
Both plugins should work well together.
Admin
Sergey
Thank you!
John C
Is there anyway to get rid of the box it creates on the page?
kiran
There is way to remove the box but it will harm your google ranking.
You should rather use your child theme style.css to make it look good on your page.
or use chile theme functions.php to place it in correct place.
Pravin Nath.K
can i add rich snippets using yoast seo plugin?
Ambily
As others above are complaining, I don’t want anyone to see this box
Raj
How to add rich snippets without this plugin??? I used this plugin but it leaves that box below the content which is visible for the traffic and I don’t want anyone to see this box… I’m really looking forward for your answer
Adriano
I don’t want that box neither, did you find a solution?
Brian
One problem. The recommended plug in has not been updated for a year. Just an FYI.
Brian
WPBeginner Support
It is now updated and compatible with the latest WordPress version.
Admin
shamsher khan
Informative Article i m going to install this plugin on my domain
Marcelo
And… will it work well “teaming” with any other SEO plugins like Yoast’s? I can recall Yoast plugins add plenty of mata tags but still don’t add Rich Snippets.