
We’ve been running WPBeginner’s video portal for years now, offering free WordPress video tutorials to millions of users.
What started as a simple way to help beginners learn WordPress has grown into a full-fledged academy with dozens of courses. We cover everything from setting up a site to mastering advanced plugins.
By managing our own membership platform, we’ve learned exactly what works and what doesn’t. That’s how we know the best way to build a successful WordPress membership site.
The best part? You don’t need advanced tech skills or a big budget to make it happen. We’ve found the perfect combination of tools to make it easy.
In this ultimate guide, we’ll show you step by step how to create a WordPress membership site. Let’s get started. 🙌

Why Start a Membership Website?
A membership website helps you build a strong community, create a steady source of income, and connect more deeply with your audience. It gives you a direct way to share your expertise and offer exclusive value to your most loyal followers.
Here’s why:
- Create Predictable Revenue: Unlike one-time sales, memberships generate recurring income, making your business more stable and scalable.
- Gain More Control: You have full control over your content and earnings. You don’t have to rely on social media algorithms or inconsistent ad revenue to grow your business.
- Increase Audience Engagement: By offering premium perks, you keep people engaged and coming back for more. This turns casual visitors into dedicated members.
- Build a Loyal Community: You can create a private space with members-only forums, content, and live events. This sense of exclusivity builds strong loyalty to you and your brand.
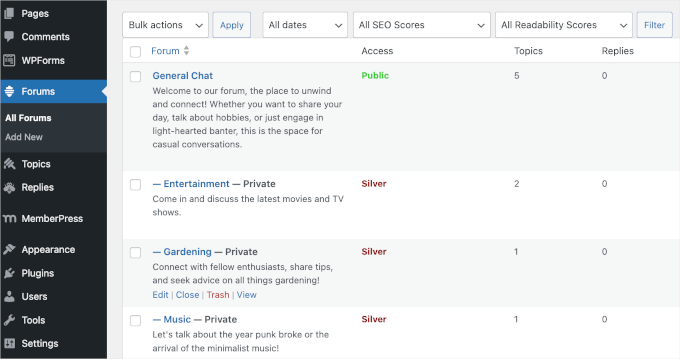
So let’s say you run a lifestyle website. You could share free articles or videos on your blog, but reserve your in-depth guides, behind-the-scenes content, and discussion forums for subscribers.
Inside those forums, members could chat about new movie releases, exchange gardening tips, or collaborate on music projects (anything relevant to your niche). This helps you create an active, supportive community that keeps them coming back month after month.
While it takes time and effort to get started, the right tools can turn your site into a scalable and rewarding way to make money online.
What Do You Need to Start a WordPress Membership Website?
You will need the following three things to get started:
- A domain name. This will be your website’s address (For example, wpbeginner.com).
- A web hosting account. This is where your WordPress website files are stored.
- A membership plugin. This will convert your regular website into a membership platform.
Out of all the platforms and website builders, WordPress makes it super easy for anyone to build their membership website and start selling with little to no technical skills.
You can set up a fully functional membership website with WordPress in less than 30 minutes, and we will walk you through every step of the process.
Below are the steps we will cover to help you make a powerful membership website with WordPress:
- Step 1: Getting Started With a WordPress Membership Site
- Step 2: Choosing a WordPress Membership Plugin
- Step 3: Setting Up Your WordPress Membership Website
- Step 4: Add a Payment Method
- Step 5: Creating Membership Levels
- Step 6: Restrict Access to Membership Plans
- Step 7: Adding Members-Only Content
- Step 8: Create a Pricing Page
- Step 9: Add Sign-up and User Login Forms
- Step 10: Customizing Membership Email Templates
- Step 11: Viewing Reports to Grow Your Membership Website
- Bonus Tip 🧑💻: Taking Your Membership Site to the Next Level
- FAQ: Creating a WordPress Membership Site
- Essential WordPress Guides
Step 1: Getting Started With a WordPress Membership Site
This first step covers setting up your website’s essential foundation: securing a domain name, choosing web hosting, and installing the WordPress software.
We recommend using the self-hosted WordPress.org version because it gives you unrestricted access to all the features and tools that you need. To learn more, see our complete comparison of WordPress.com vs. WordPress.org.
For a self-hosted WordPress site, you’ll need a WordPress hosting account, a domain name, and an SSL certificate.
Typically, a domain name costs around $14.99 / year, web hosting costs around $7.99 / month, and an SSL certificate costs around $69.99 / year.
If you are just starting out, these startup costs can add up quickly.
That’s why we highly recommend using Bluehost. They are an officially recommended WordPress hosting provider and one of the biggest hosting companies in the world.

Plus, they’ve agreed to give our readers a free domain name, an SSL certificate, and a generous discount on web hosting.
Basically, you can get all of the above for as little as $2.99 per month.
✏️ Note: At WPBeginner, we believe in full transparency. If you sign up with Bluehost using our referral link, then we will earn a small commission at no extra cost to you (in fact, you will save money and get a free domain + SSL certificate).
We would get this commission for recommending just about any WordPress hosting service, but we only recommend products that we use personally and believe will add value to our readers.
Once your membership website starts growing, or if you already have a large member base, we recommend using Rapyd Cloud. It’s designed specifically for high-performance on websites with many users, such as membership websites, online course portals, and social media sites.
Once you have signed up for hosting and set up your domain name, it’s time to install WordPress. With Bluehost, WordPress comes pre-installed.
Most other WordPress hosting companies offer a 1-click WordPress installation option. If you are using a different hosting provider, then see our guide on how to install WordPress, which covers every major hosting provider.
After that, you need to finish building your website. For detailed instructions, see our step-by-step guide on how to start a WordPress website, and you’ll be up and running in no time.
Step 2: Choosing a WordPress Membership Plugin
There are plenty of free and paid WordPress membership plugins that you can use. To learn more, see our complete comparison of the best WordPress membership plugins.
To choose the right plugin, you need to decide what kind of membership website you want to build. Here’s a quick comparison of our top recommendations:
| Plugin | Best For | Key Feature |
|---|---|---|
| WPForms | Building powerful and custom user registration and login forms for your membership site. | User Registration addon and subscription support. Full WPForms review. |
| Thrive Apprentice | A powerful WordPress plugin for selling subscriptions to online courses. | A visual builder for creating courses and digital product combos. Full Thrive Apprentice review. |
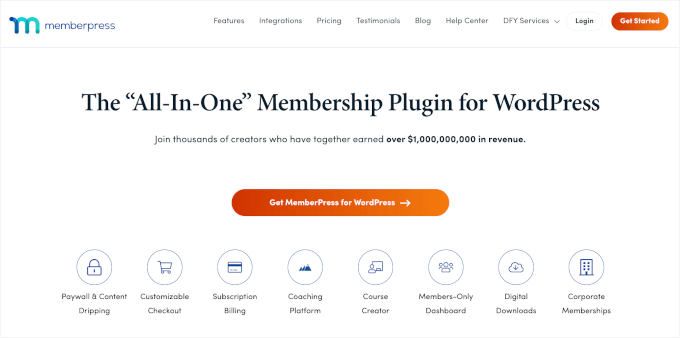
| MemberPress | The best, all-in-one membership plugin for exclusive content. | Content restriction, multiple membership tiers, and course builder. Full MemberPress review |
For this guide, we will be using MemberPress because it is the most comprehensive solution for creating a powerful membership site. Additionally, it has helped entrepreneurs earn over $1,000,000,000 in revenue.
At WPBeginner, we also use it to build our video course website, and it’s been working exceptionally well.

It comes with advanced membership features that allow you to accept payments, add membership levels, create gated content, restrict access based on different membership levels, build online courses, run members-only events, and more.
With that in mind, let’s start setting up your WordPress membership website.
Step 3: Setting Up Your WordPress Membership Website
We are choosing MemberPress as our membership because it has all the features we mentioned above, and we even use it to power our own video site. It also works perfectly with third-party plugins necessary for the growth of your business.
The first thing you need to do is get a MemberPress account. On the MemberPress website, click the ‘Get MemberPress for WordPress’ button, choose a plan, and follow the on-screen instructions to complete checkout.
After signing up, download your MemberPress zip file, copy your license key, and store the key somewhere safe, like a password manager.
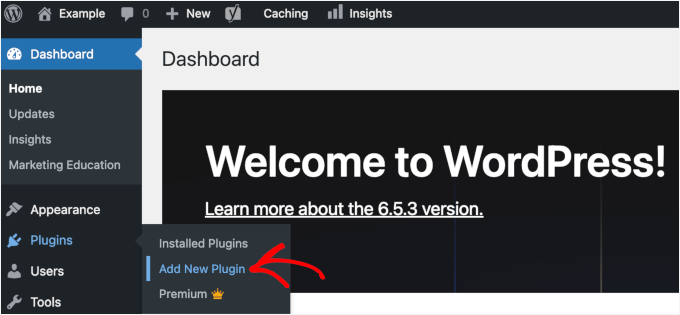
Now, you can install and activate the MemberPress plugin. In your WordPress admin area, go to Plugins » Add New Plugin.
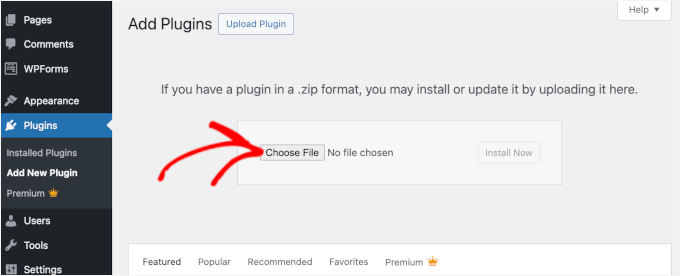
On the next screen, you can click ‘Upload Plugin.’
From here, you can click the ‘Choose File’ button to upload the MemberPress zip files and click ‘Install Now.’ For more details, see our step-by-step guide on how to install a WordPress plugin.
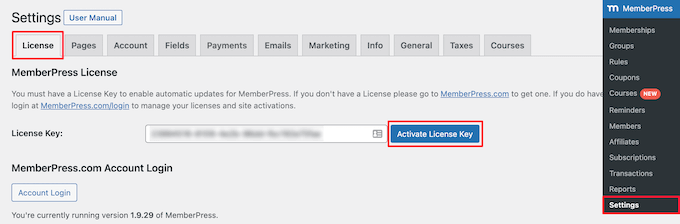
Upon activation, you need to go to the MemberPress » Settings page and click on the ‘License’ menu option.
Simply enter your license key and hit the ‘Activate License Key’ button.
With that done, you can proceed to the next step for configuring the plugin settings.
Step 4: Add a Payment Method
In this step, the first thing you need to set up is a payment gateway, as it enables you to accept payments on your membership site.
From the Settings page, switch to the ‘Payments’ tab and then click the ‘Add Payment Method’ button.
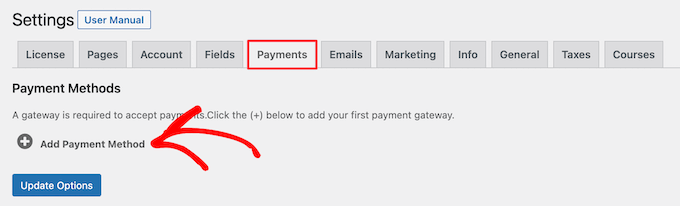
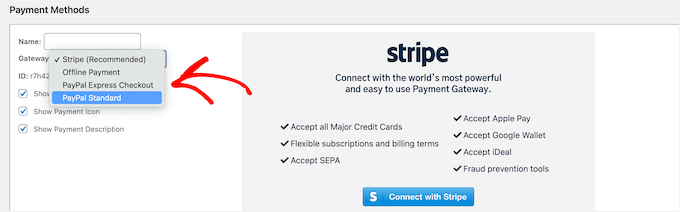
This brings up a dropdown menu where you can choose a payment method and connect different payment processors.
MemberPress supports popular payment gateways like PayPal (Standard, Express, and Pro), Stripe, and Authorize.net.
You need to select a payment method from the ‘Gateway’ drop-down and provide the required credentials.
You can also add multiple payment methods by clicking on the ‘Add Payment Method’ button to add another payment method.
We typically use 2 options: Stripe for credit cards and PayPal as a secondary option because some users prefer PayPal over giving out credit card details.
Both are excellent choices for beginners because they are widely trusted around the world. They also handle all the complex security and payment processing for you.
Don’t forget to click the ‘Update Options’ button at the bottom of the page to save your settings.
Step 5: Creating Membership Levels
The next step is to create the different membership levels that your users can purchase. Each level can offer different pricing, perks, and content access. For example, you could create:
- A ‘Silver Plan’ that gives members access to your premium blog posts.
- A ‘Gold Plan’ that includes everything from the Silver Plan, plus access to your video tutorials and members-only events.
You can even create a free membership plan to give users a sample of what you offer.
To create a membership level, you need to go to the MemberPress » Memberships page and click on the ‘Add New’ button at the top.
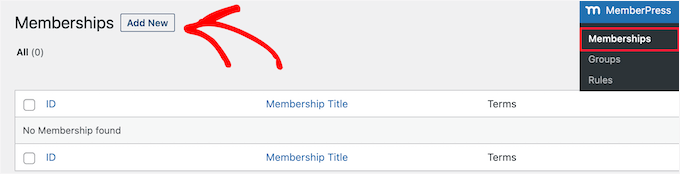
On the next page, enter a title for this particular membership plan and then provide the plan details in the post editor.
You will need to set the pricing and expiration for this plan under the ‘Membership Terms’ section.
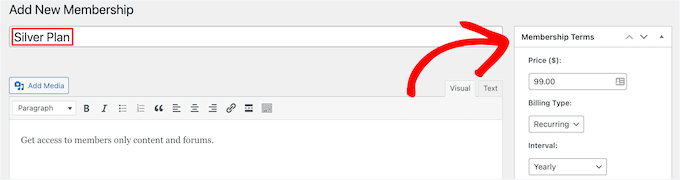
MemberPress also allows you to accept recurring payments by setting the billing type to ‘Recurring.’
In the example above, we have created a yearly membership plan.
🧑💻 Expert Tip: You can also create a free plan for new members to try out before upgrading to a paid plan.
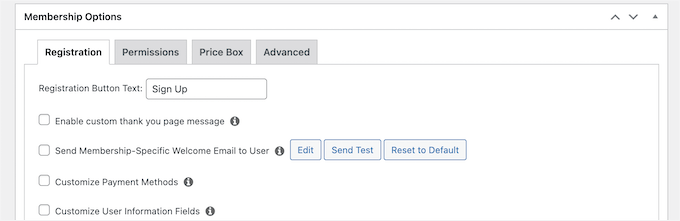
Next, scroll down to the Membership Options meta box located below the post editor. This is where you can customize permissions and membership options for this particular plan.
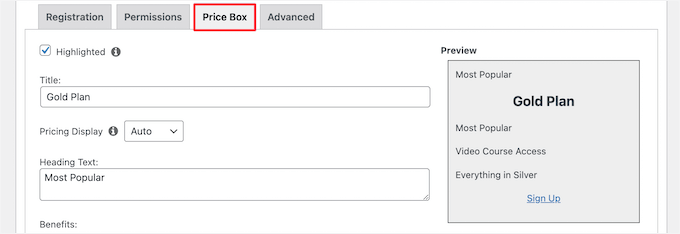
Next, click the ‘Price Box’ menu tab.
Here, you can add information that will appear on the pricing page, like a headline and plan benefits.
Once you are satisfied with the new membership plan, you can click on the ‘Publish’ button to make it available.
Go ahead and repeat this process to create as many membership plans as you need.
Step 6: Restrict Access to Membership Plans
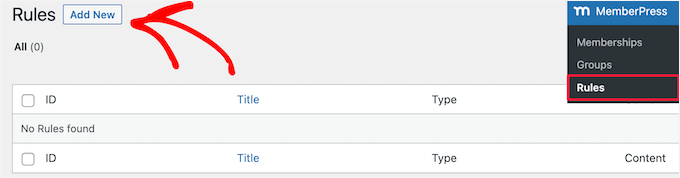
The next step is to select which content will be available to different membership plans. MemberPress makes content restriction very easy by allowing you to control access using ‘Rules.’
You can set up rules by visiting the MemberPress » Rules page and clicking on the ‘Add New’ button at the top.
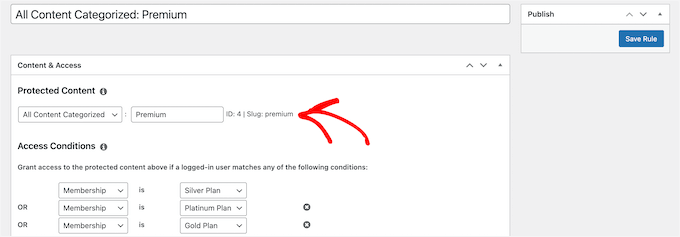
The rules edit page allows you to select different conditions and associate them with a membership plan.
You can choose which type of content will be available to which users. For example, you can select all content that matches a particular tag or category to be available only to members with the Silver subscription plan.
In this guide, we’ve made content with the ‘Premium’ category available to all paid membership plans.
You can also create more specific rules. For example, a single post or page, child pages, or a specific URL.
Below the rules editor, you’ll see the drip content and expiration options.
Drip content allows you to release content gradually to users instead of giving it all at once. The expiration option makes the content unavailable after a defined period.
To learn more, see our guide on how to automatically drip content on your WordPress site.
If you are not sure, then you should leave them unchecked.
Once you are satisfied, go ahead and click on the ‘Save Rule’ button to save your rule settings. Then, simply repeat the process to create more rules as needed.
Step 7: Adding Members-Only Content
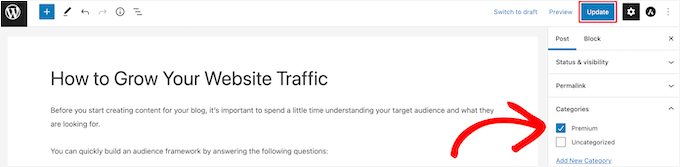
MemberPress makes it super easy to create members-only content using Rules. In our example, we created a rule that restricted all content in the ‘Premium’ category.
Now, all we need to do is create our paid content and add it to the ‘Premium’ category.
MemberPress also adds a ‘MemberPress Unauthorized Access’ meta box below the content editor.
This allows you to select what logged-out users (non-members) will see when they reach this content.
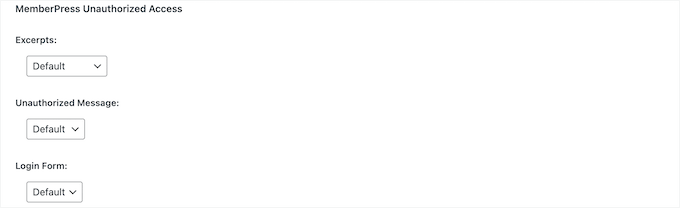
You can use the global default settings, or you can show excerpts, a login form, or a custom message.
Additionally, your unauthorized access message actually offers a great marketing opportunity. Instead of a generic Content Locked message, you can use it to encourage sign-ups.
For example, you can write a custom message like, ‘Whoops! This exclusive guide is just for our members. Join today to unlock this post and get access to all our premium resources!’ You can even include a link directly to your pricing page.
Once you have added members-only content, you can go ahead and click the ‘Publish’ or ‘Update’ button.
Now, only users who have the right membership level will be able to view your content.
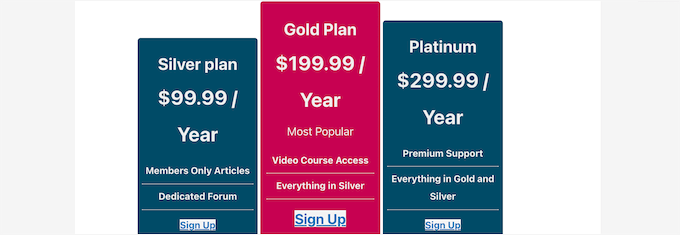
Step 8: Create a Pricing Page
The pricing page is where your users will see when they want to sign up for a membership plan.
On this page, users can select a membership plan and then move to the payment page. Users who try to access the restricted or paid areas of your website will also be redirected to this page.
You can configure this by going to the MemberPress » Groups page and clicking on the ‘Add New’ button at the top.
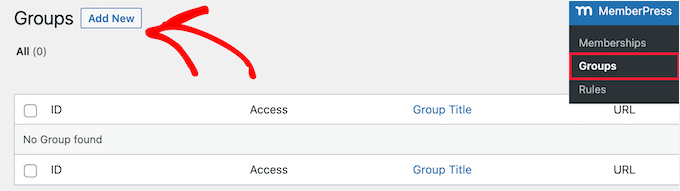
First, enter a title for the group plan page. This will also be the title for the plans page that users will see.
Next, go down to the ‘Group Options’ meta box and add memberships that you want to display on the page.
Simply click the ‘Plus’ button to add multiple memberships.
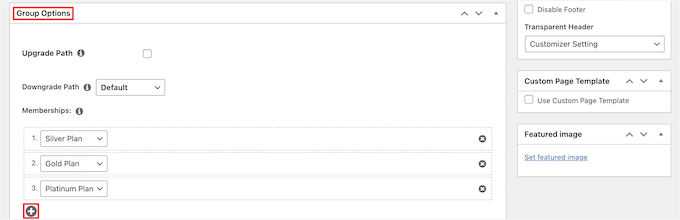
You can also select a theme for the pricing table. MemberPress comes with a few ready-made templates to choose from.
Simply select a template from the ‘Pricing Page Theme’ dropdown.
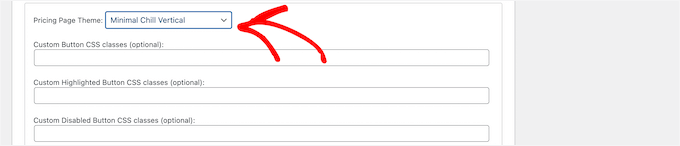
You can also add custom CSS to completely customize your membership pricing table.
Once satisfied, click on the ‘Publish’ button to make your plan publicly visible. And to preview your pricing page, click on the ‘View Group’ link after publishing it.
Redirect Users to the Pricing Page
Now that we have the pricing page ready, the next step is to redirect unauthorized users to the pricing page.
To do that, first, you need to visit the MemberPress » Groups page and copy the URL next to the group you created in the previous step.

After that, go to MemberPress » Settings page.
From here, switch to the ‘Pages’ menu tab.
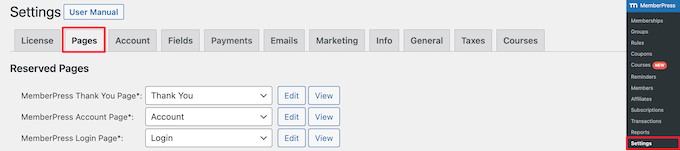
Then, scroll down to the ‘Unauthorized Access’ section.
You need to check the box next to the ‘Redirect unauthorized visitors to a specific URL’ option and then paste the group URL you copied earlier.
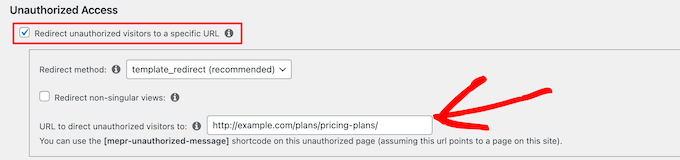
Click on the ‘Update Options’ button to save your settings.
Now, unauthorized users will be redirected to the pricing plans page when they try to access a members-only area.
Step 9: Add Sign-up and User Login Forms
Now that you have everything set up, it is time to allow your users to easily find the client portal on your website.
First, you need to add a user login form so that members can sign in to their accounts.
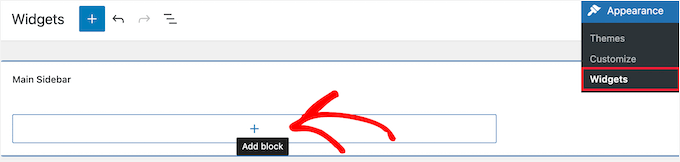
To do this, you’ll add a login form to one of your theme’s widget-ready areas, like the sidebar. (In modern WordPress, you add content to these areas using blocks.)
Let’s start by going to Appearance » Widgets. Then, in your chosen widget area, like ‘Sidebar,’ click the ‘+’ add block icon.
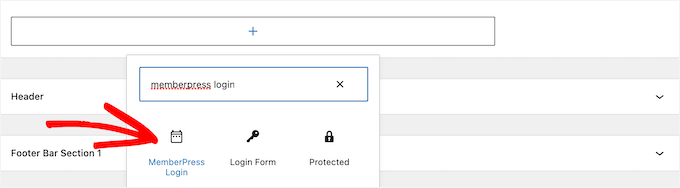
Then, search for ‘MemberPress login’ and then click the block.
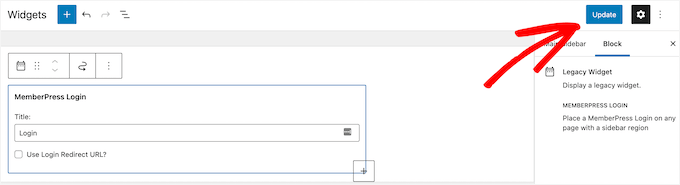
This will automatically add the membership login form to your sidebar.
Make sure to click ‘Update’ to save your changes and make your login form live.
You can add the login widget to any widgetized area of your site. For more details, see our guide on how to add and use widgets in WordPress.
Next, you’ll be adding the pricing page link to the navigation menu so that new users can select a plan and register. This will allow you to display the Pricing link across your website, including the homepage.
You can do this by visiting the Appearance » Menus page in your WordPress admin area. From the left column, you need to click on the ‘Custom Links’ tab to expand it.
Then, enter the URL for your pricing page and enter text into the ‘Link Text’ box.
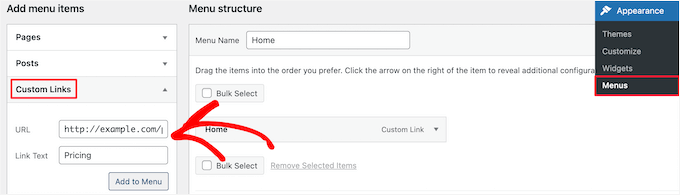
Next, click on the ‘Add to menu’ button.
The pricing plan page will then appear in the right column.
You can drag and drop to rearrange its position in the menu. You can also edit it and change the link text.
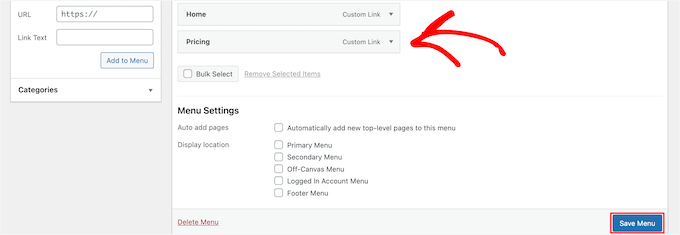
Don’t forget to click on the ‘Save Menu’ button to store your changes.
To learn more about menus, see our guide on how to add a navigation menu in WordPress.
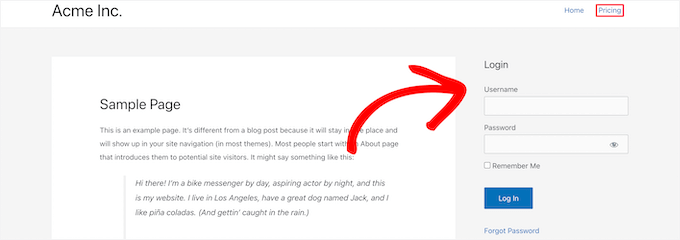
You can now log out of the WordPress admin area and visit your website to see your login form and registration link in action.
✏️ Note: Many membership websites use page builder plugins like SeedProd to create landing pages for their plans. With features like pricing tables and testimonials, it makes designing stunning pages for membership products easier.
Some of our partner brands have built their entire websites with SeedProd, and they’ve been thrilled with the results. To learn more, see our complete SeedProd review.
Step 10: Customizing Membership Email Templates
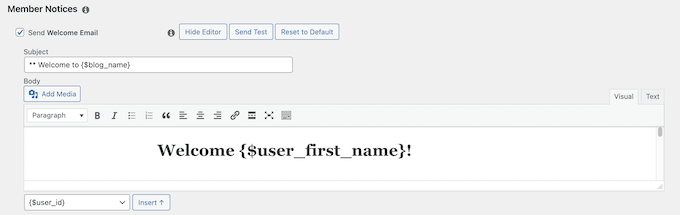
Your WordPress membership plugin will send several email notifications to members. MemberPress allows you to edit those emails easily without leaving the WordPress dashboard and make changes to include your branding.
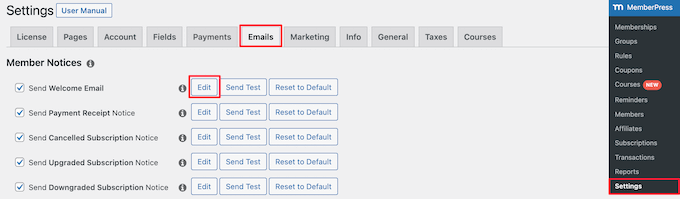
Simply go to the MemberPress » Settings page and click on the ‘Emails’ tab.
From here, you can manage email notifications sent by MemberPress. You will see all the email notifications sent by MemberPress to members as well as Administrators.
Click on the ‘Edit’ button to customize any of these notices.
You can use a simple text editor to edit the email message with basic formatting options.
There are also smart tags you can use to insert dynamic items like names, usernames, membership levels, and more.
Make sure that you click on the ‘Send Test’ button to send yourself a couple of test notifications. This will ensure that MemberPress can send email notifications.
If you are having trouble receiving email notifications, then see our guide on how to fix the WordPress not sending email issue.
Step 11: Viewing Reports to Grow Your Membership Website
To grow any business, you will need data to make informed decisions. MemberPress comes with built-in reports to see how your membership website is doing.
Simply go to the MemberPress » Reports page to view your reports and sort them by monthly, yearly, or all-time data.
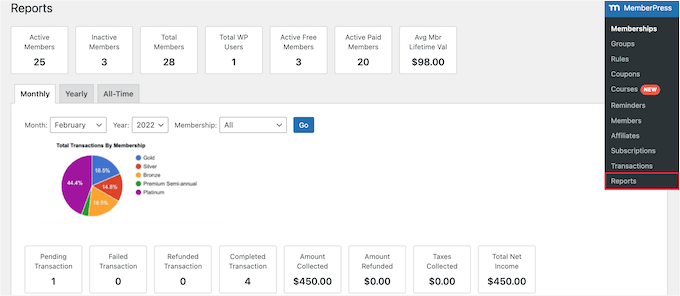
It will show you the number of active, inactive, free, paid, and total members. It will also show you the average member’s lifetime value and other data.
You can scroll down to see more charts and click on a date to view transactions.
However, the most important metric for judging a membership website’s success is user engagement.
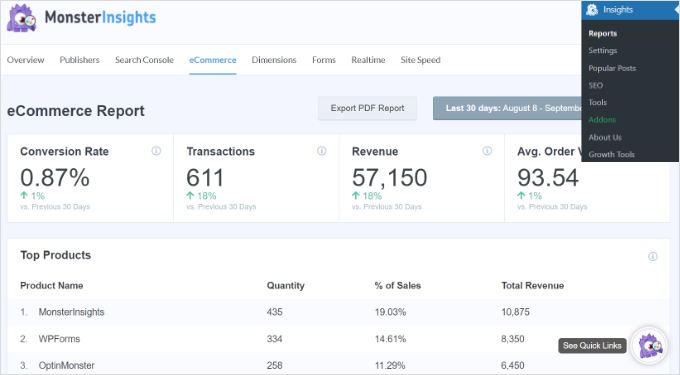
This is where you’ll need Google Analytics. It allows you to see where your users are coming from and what they do when they are on your website.
MonsterInsights, the best analytics solution for WordPress, offers a complete MemberPress integration that makes it easy to track your user and member engagement.
We use it on our website and appreciate the conversion tracking for forms, buttons, and marketing campaigns. It also has detailed stats on visitor demographics, most visited pages, and bounce rates.
For more information about the tool, check out our in-depth MonsterInsight review.
And for detailed instructions, you can see our guide on how to track user engagement in WordPress with Google Analytics.
Bonus Tip 🧑💻: Taking Your Membership Site to the Next Level
MemberPress is a powerful WordPress membership plugin. It allows you to easily create a successful membership site with features like podcast memberships, video memberships, coupon customizations, online communities, and group memberships.
On top of that, the MemberPress AppKit addon lets you build a fully branded iOS and Android app for your membership site without writing a single line of code. Members can access your content with a single tap from their phone, and you gain a powerful new channel to reach them through push notifications.
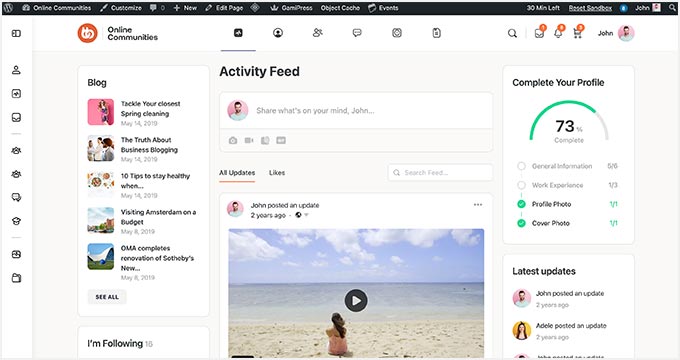
You can also use it alongside BuddyPress to add social media networking capabilities to your membership site.
What’s more, teachers and educators can offer online courses with memberships.
MemberPress comes with the Courses addon, which simplifies course creation with a builder based on the WordPress block editor. This makes it easy to set up sections, edit lessons, and manage your courses.
It also includes more addons to boost students’ learning experience:
- Quizzes – Create quizzes to test students’ knowledge and encourage self-learning.
- Assignments – Allow students to submit tasks and projects for review.
- Gradebook – Track student progress and manage grades efficiently.
- CoachKit – Offers unlimited coaching programs, client milestones tracking, group learning with a cohort system, and calendar integration for scheduling sessions.
🚨 Alternative: Looking for other options for your online course? Check out our handpicked list of the best LMS plugins for WordPress. Our recommendations are backed by real-world experience and thorough testing!
FAQ: Creating a WordPress Membership Site
Before wrapping up, here are some of the most commonly asked questions about building a membership website asked by our users:
1. Can I make a membership website with WordPress?
Yes, you can make a membership website with WordPress using a WordPress membership plugin like MemberPress.
This allows you to add all the necessary functionality required to build a membership site, including payment gateways, subscription levels, membership groups, and more.
2. Can I make a membership website using WooCommerce?
Yes, you can create a membership site with WooCommerce by using a special membership extension. However, for an all-in-one solution that’s often simpler for beginners, a dedicated plugin like MemberPress is a great choice.
As we showed in this guide, MemberPress handles everything from creating membership levels and restricting content to accepting payments directly through Stripe and PayPal. This way, you don’t need to install WooCommerce.
3. Do membership websites make money, and are they profitable?
Yes, membership websites make money and are a profitable online business model successfully used by thousands of businesses. Just last year, MemberPress customers sold more than $1 billion USD in subscriptions.
4. Which is the best platform to build a membership website?
WordPress with MemberPress is the best platform to build a membership website.
It’s easy to use, low-cost, requires fewer technical skills, and has multiple payment options. All while offering access to cutting-edge marketing and conversion optimization tools.
Essential WordPress Guides
We hope this article helped you learn how to set up your WordPress membership website. If you found this helpful, here are some other resources to grow and manage your WordPress membership site more effectively:
- 📑 Best Membership Site Examples – Our handpicked list of the best membership sites built on WordPress.
- 📨 Email Marketing 101 – A step-by-step guide to building an email list in WordPress and why it’s beneficial for your membership program.
- 🎨 Best Membership Site Themes – A list of the best WordPress themes perfect for your membership site.
- 🔧 Essential WordPress plugins – Our expert picks of the must-have WordPress plugins for all business websites.
- 🌐 WordPress SEO guide – The ultimate guide to SEO best practices to grow your traffic and improve search engine rankings.
- ⚡ WordPress Speed and Performance – The ultimate guide on how to speed up WordPress and boost performance.
- 🛡️ WordPress Security Guide – This step-by-step guide will help improve your WordPress website’s security.
- 🚫 Common WordPress errors – The ultimate list of common WordPress errors and how to fix them.
If you liked this article, then please subscribe to our YouTube Channel for WordPress video tutorials. You can also find us on Twitter and Facebook.

")


Dennis Muthomi
Excellent guide on setting up membership sites!
I particularly appreciate how MemberPress makes it easy to replicate rules across different membership levels – it’s been a time-saver when setting up tiered access for various clients.
The clear instructions about rule creation will definitely help others avoid common pitfalls.
Jiří Vaněk
I have been using MemberPress for a short time and have created a multi-user website with it. It’s a great plugin, but its complexity can make it challenging to fully navigate after a short period. I keep discovering new features that can either be improved or implemented. Thank you for this article, as I learned new things about this plugin that I can now enhance or configure. It’s important for me to make the most of the plugin’s potential since I already have it. These articles are very helpful in that regard.
Moinuddin Waheed
I congratulate you Mr. Jiri Vanek for your decision to try out memberpress plugin for making membership based website.
As you will use it, you will find it very powerful and features rich.
As for the dashboard is concerned, it will make sense once you fully utilise all the features there and I am sure you will appreciate the science behind the minimalist dashboard approach.
There is a very enthusiastic team of developers behind this plugin which regularly conducts different training and awareness sessions.
This gives a hope of continued growth of this plugin.
Toni Odugbesan
Thank you for the article very insightful. What is the best way to enable the members of the member portal to monitor their used and unused member benefits?
WPBeginner Support
It would depend on the plugin you’re using and the benefits, we would recommend reaching out to the support for the plugin you use and they can help you set up something for tracking benefits.
Admin
Caroline
Thank you for your resource. In Step 9 about 1/2 way down, it says, ‘enter URL for the pricing page’. Where would I find this please? Also do you have instructions for a Free Membership? I am doing one for a sample to help promote my main Membership. Thank you.
WPBeginner Support
You would want to take a look at step 8 for creating the pricing page and finding its URL. For a free membership option, you can see the price for a membership to $0 on your site
Admin
Giulia
Great read,
A question, is there an option for users to contact each other once they pay the membership?
WPBeginner Support
For having users message each other, you would want to look into a social media plugin like BuddyPress that we cover in our guide below:
https://www.wpbeginner.com/plugins/how-to-turn-your-wordpress-site-into-a-social-network/
Admin
John
Thanks this but I want to ask can I add any other payment gateway apart from the one’s you listed above?
Jorge
Amazing article. I would like to ask if it is possible to have your custom database connected to the membership plugins.
WPBeginner Support
You would need to reach out to the support for the membership plugin you are planning to use for what connection options are available.
Admin
Abel
Do memberpress accept square payment?
By the way amazing article.
WPBeginner Support
You would want to reach out to the plugin’s support for their current integrations or if they have plans to add an integration.
Admin
Dev
Can I add signup fee in memberpress with monthly recurring plan ?
WPBeginner Support
There is the option in MemberPress to enable recurring payments.
Admin
Desmond
What if I don’t want to make the whole of my site a membership site but I want to sell a course as just a part of what I do?
WPBeginner Support
You would want to take a look at LMS plugins for that, we have a few we would recommend below:
https://www.wpbeginner.com/plugins/best-wordpress-lms-plugins-compared/
Admin
Camila
Hey!
Would this WP subscription website have a mobile version?
Lmk please
WPBeginner Support
If your theme is responsive there would be a mobile view
Admin
Karin Mainwaring
I’d never have thought, when I tasked myself with building a website, that I would fall in love with it.
I had a vague idea of how “Memberships” could be useful. But I had no formed concept (nor indeed how to begin expressing aforesaid vague concept) until I stumbled into WPBeginners.
This article has really helped.
Thank you.
WPBeginner Support
Glad our article was helpful
Admin
MIya
Hello,
I was wondering if when using a website builder in Wordpress, is one able to use any other Wordpress plugin?
WPBeginner Support
You can still use other plugins when using a page builder plugin
Admin
Akib Kazi
I have used this article in many different ways and it has been very helpful. I am making decent income and an really pleased with the results. Thank You WPbeginner.
WPBeginner Support
Glad our guide was helpful
Admin
Adelani Daniel
Please with this plugin can I have in each members account a rewarding section that anytime dey click a news that will be rewarded with some amount or points?
WPBeginner Support
The closest recommendation we have at the moment would be our guide here: https://www.wpbeginner.com/plugins/add-points-system-ignite-user-engagement/
Admin
Bill
I just purchased a hosting package through your affiliate link with BlueHost. I had already purchased my domain through GoDaddy a day or two ago. I am completely unable to find a way to map that domain over to my WordPress site – any help?? The tutorial on WordPress doesn’t work because there’s no option for “domain” under the “manage” tab on the left…any help??
WPBeginner Support
You would want to reach out to GoDaddy for their current methods to change your nameservers
Admin
Zach
Should I build my website on wordpress.org first, before adding these plugins and going through the membership process?
WPBeginner Support
Yes, you would want your WordPress.org site before adding these plugins.
Admin
Yao
Very good poste!! Thank you so much!!
WPBeginner Support
You’re welcome
Admin
Hossein shekofteh
Hi there.
How can I add other methods of payment in this plugin. I want add some Iranian payment to it?
WPBeginner Support
You would want to reach out to the plugin’s support and they will let you know if there is a built-in method or the way to add a custom method.
Admin
Yogeswarachary
Thanks for your support sir, really it’s a helpful article for me.great job and best team.thankyou sir.
WPBeginner Support
You’re welcome
Admin
Cory Hall
Great article. I am interested in migrating to a WP membership site from another subscription based web platform, and I would like to know what I can use for a temporary domain name until the WP site is all done and ready. Also, what is the easiest way to migrate all the members and their recurring payments to the WP platform. I use Stripe with the other platform.
Thanks in advance for your help.
WPBeginner Support
You would want to reach out to your host if they have a temporary domain or you could use a local installation: https://www.wpbeginner.com/how-to-install-wordpress/#installlocal
You would want to reach out to the support for the membership plugin you are planning to use for what options they have available to import users
Admin
debay
You can also use the subdomain of you present site to install the WordPress before going live
ril
im looking for membership plugin that will prevent non login/registered user to access the all site url and the source url of iframe. hope to get recommendation here. thank you
WPBeginner Support
It would depend on what you mean, you may want to look into s2members for having multiple membership levels and you could prevent right clicks for hiding the url of your iframe.
Admin
Luis Restrepo Silva
Great article. Very clear and well explained. Good job!
WPBeginner Support
Thank you
Admin
Esdon
Hello WPBeginner team, thanks a lot for this vivid description, everything has been highlighted to details. Awesome! Looking forward to setting up my membership website with a lot of ease. Regards.
Yezmin
Thank you! Great article!
Gerardo
Hi, great article, thanks for sharing. Just wanted to know if these plugins allow the members to sell their own digital goods (ex: mp3 files) , like a small stores inside my website, with their own links and nice page, under my domain. Thanks!!
Erik
This is similar to my question.
I want to make a membership site.
The members should have the possibility to make their own presentation site at a special area of the external site.
A bit like soundCloud.com
What kind of plugin do I need to set this up in WordPress?
Best wishes,
Erik
Joseph
Thanks for the write-up.
Please, how can I get a membership plugin that can accept payment gateways from Nigeria, since PayPal and other major payment gateways are not active in our country? I really need it urgently for my website.
Thanks.
WPBeginner Support
Hi Joseph,
You will need to find a WordPress plugin that lets you accept payments using a payment service available in your country. You can then manually verify a payment, and invite a user to create a membership account.
Admin
Bala Selvam
Hey for the Pricing Plan part I was not able to get that page to work, it isn’t showing anything and I tried everything that you showed in this article is there anything that I was missing?
Or could you go over that real quick with the just the written steps?
Josh Anozie
Thank you for this wonderful information, I am glad to see this! My question is this : if I want the members of my site to each a referral link which they can use to bring in new members and they will get commission for that, how can I achieve this?
I look forward to seeing your reply!
Thanks Again.
WPBeginner Support
Hi Josh,
You can do that by running your own affiliate program.
Admin
Starchitect
Please how can this be done and can it be done with WordPress.org
And also the site that allows coupons and members can have their own account
Please reply
WPBeginner Support
Hi,
Yes it can be done using WordPress.org. See our article on how to build a membership website using WordPress.
Joseph
Hi Josh, I am from Nigeria and I want to set up a membership website that can accept a payment gateway from Nigeria. Please, how can I do it? Which plugin do you recommend and, which one are you using? Thanks.
Josh Anozie
Hi Joseph,
That’s what am working bro, once I get it, I will let you know here.
Polunio
Thanks for this. I have learn a lot from this site.
Just a question, if i want to add membership site on my existing blog, it will not affect my existing content if i installed the membership plugins?
or much better if i purchase new domain and link to my current website?
Thanks in advance and more power.
WPBeginner Support
Hi Polunio,
No, it will not affect your existing content. It is up to you to decide, depending on your business goals and how you want to manage your membership website.
Admin
Johnnyboy Lamarre
It would be nice if you made a Vid of the ( membership Article ) above. Its much more easy when you can see it being done .
Best of luck.
WPBeginner Support
Hello,
Thank you for the feedback. We will soon add the video version of it. Meanwhile, you can subscribe to our YouTube Channel for more WordPress video tutorials.
Admin
Rahat Hameed
Don’t You Have A Video Version For This Article? If You have, please link me to that.
Thanks