If you run a WordPress blog, you’ve probably seen this happen: a reader searches for a post you know exists, but the default search shows unrelated results — or nothing at all. It skips key content, feels inconsistent, and doesn’t give you much control.
On top of that, the built-in search box is pretty plain. Maybe you want it to look cleaner, place it in a specific spot, or include things like pages, products, or custom post types. But WordPress doesn’t offer those options by default.
The good news is that creating a custom search form is much easier than most people expect. We’ve tested different solutions – plugins, custom code, and everything in between – to figure out what actually works
In this guide, we’ll show you step by step how to build a search experience that actually helps visitors find what they need.

Why Create a Custom Search Form for WordPress?
WordPress comes with a built-in search feature, but it doesn’t search all types of content, such as comments, product reviews, or custom post types.
This can prevent visitors from finding what they’re looking for, including products they may want to buy in your online store.
You may also want to prioritize certain content so that it appears higher in the search results. For example, you may want to show your site’s latest posts at the top of the search results page or display your most popular WooCommerce products.
With that in mind, we’ll show you how to customize the WordPress search form. We cover a lot of ground in this post, so simply use the quick links below to jump straight to the section you want to read:
- Step 1: Install and Activate a Search Plugin
- Step 2: Create a Custom WordPress Search Algorithm
- Step 3: Create a Custom Search Form For Your WordPress Website
- Step 4: Add the Custom Search Form to Your WordPress Site
- Bonus Tip: Optimize Your Custom WordPress Search Form 📈
- FAQ: Creating a Custom WordPress Search Form
- Next Steps for Improving Your WordPress Search
Ready? Let’s jump right in!
Step 1: Install and Activate a Search Plugin
The easiest way to improve the default WordPress search algorithm is by using SearchWP.
SearchWP is the best WordPress search plugin. It’s easy to use and gives you complete control over your site’s search algorithm, so you can help visitors find what they’re looking for fast. It also searches content that WordPress ignores by default.
For more information, you can see our complete SearchWP review, where we talk about all of its features.
To start, let’s create a SearchWP account. On the SearchWP website, click the ‘Get SearchWP Now’ button and follow the on-screen instructions to complete the signup process.

With that done, you’ll land on your SearchWP account dashboard.
Here, you’ll find a SearchWP Pro zip file and license key. You might want to keep this tab open as you’ll need it in the following step.
Now, go to Plugins » Add New Plugin in your WordPress admin area to install and activate the SearchWP plugin.
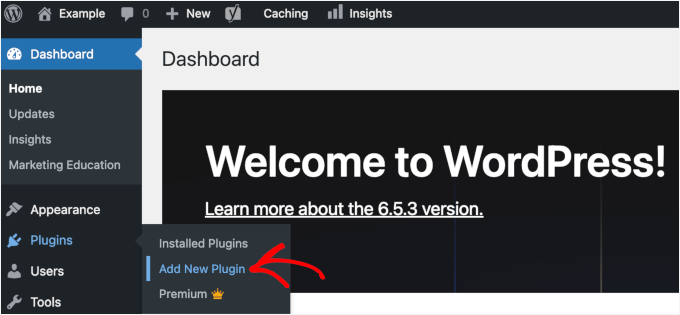
On the next screen, you can enter “SearchWP” into the search bar to quickly find it.
In the search result, click on ‘Install Now’ and then ‘Activate’ when you see it.
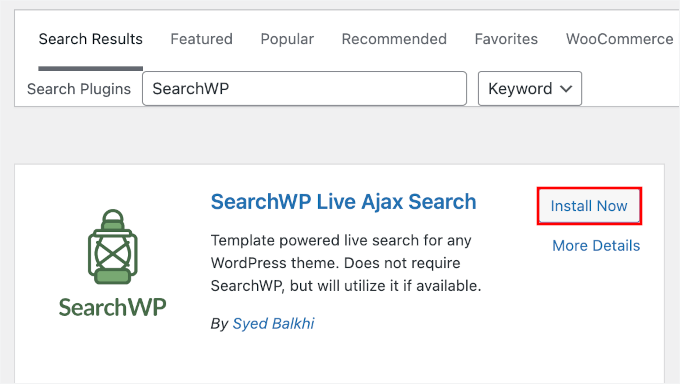
For more details, see our step-by-step guide on how to install a WordPress plugin.
Upon activation, you’ll need to verify your licence key. Go to SearchWP » Settings and then click on the ‘General’ tab.
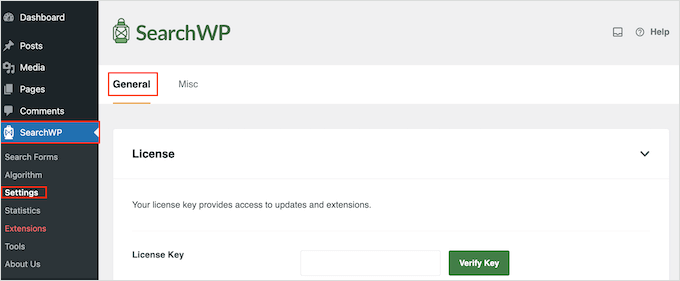
Here, you need to enter your license key in the ‘License Key’ box. You can find this information in your account on the SearchWP site.
Once you’re done, go ahead and click the ‘Verify Key’ button.
Step 2: Create a Custom WordPress Search Algorithm
After activating the plugin, you can fine-tune how SearchWP indexes, searches, and ranks your content. You can think of this as creating a custom Google search algorithm that’s just for your WordPress blog or website.
To start, you’ll want to head over to SearchWP » Algorithm.
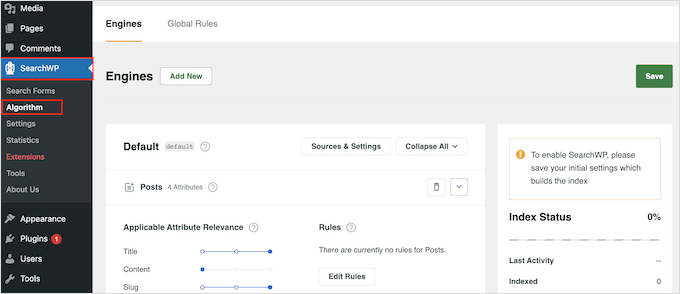
Here, you’ll see sections for the different content types that SearchWP searches by default, including pages, posts, and media files.
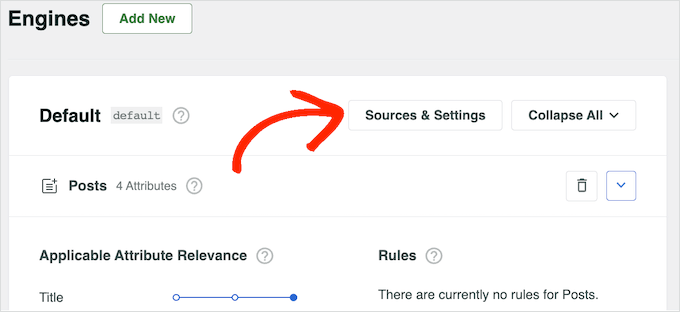
To include more content types in the search results, you can click the ‘Sources & Settings’ button.
A popup will appear showing all the different content types SearchWP can search, including the ability to make blog comments searchable.
Depending on the WordPress plugins you’ve installed, you may see some extra options. For example, if you’re using WooCommerce, then you can include ‘Products’ in the SearchWP search results.
See our guide on how to make a smart WooCommerce product search to learn more about it.
Simply check the box next to each content type you want to include in the search results.
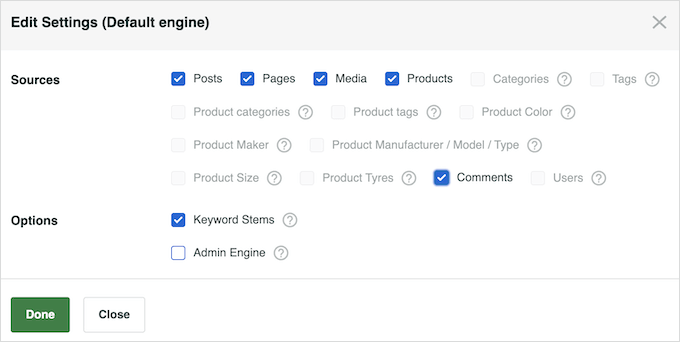
In the settings panel, you will also see the ‘Keyword Stemming’ option checked by default. This means SearchWP may include results that don’t have the same ending as the search term.
For example, if you search for ‘run,’ then keyword stemming will include ‘running’ and ‘runners’ in the results.
This can help show relevant results to visitors, so we recommend leaving the ‘Keyword Stems’ box checked. However, you can uncheck it if you want to show only the exact matches.

When you’re happy with your selections in the popup, go ahead and click ‘Done.’
You’ll now see a section for all the sources you selected.
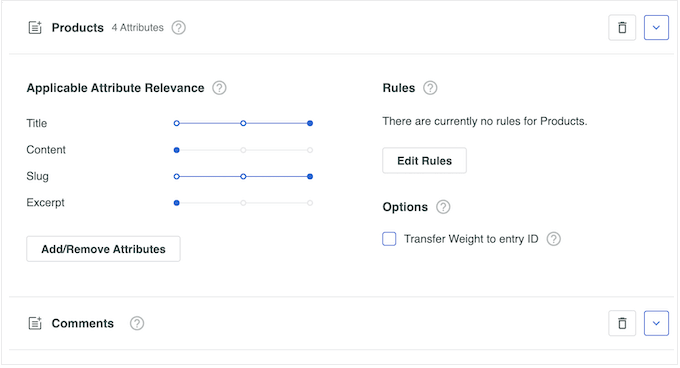
Each section has its own ‘Applicable Attribute Relevance’ sliders.
This controls how much weight SearchWP gives to each attribute when creating the search results.
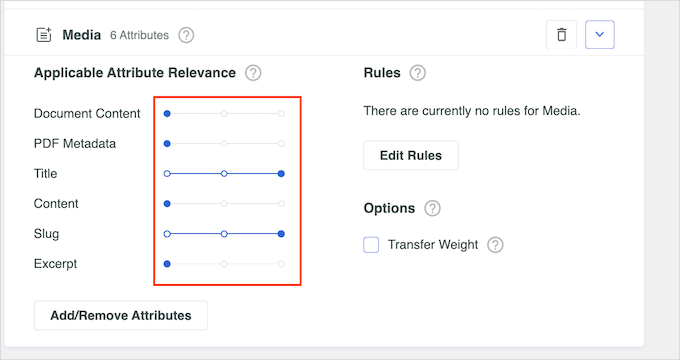
Content that matches an attribute with high relevancy will appear higher in the search results. By contrast, content that matches an attribute that has less relevance will appear lower in the user’s search results.
To give an attribute greater weight, simply move its slider to the right.
In the following image, the search engine will place more value on matches in the post title than on matches in the post’s content.
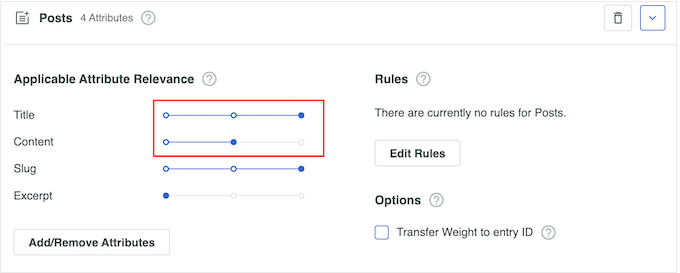
Every WordPress website is unique, so you may want to experiment with different relevancy settings to see what produces the most accurate and helpful search results.
For example, if you’ve uploaded your menu as a PDF on your restaurant website, then this is important content, and you’ll typically want to show it in the search results.
If you use them, you can also make custom fields searchable on your WordPress site.
You can also create rules to determine whether certain content is included or excluded from the search results. For example, if you have an online marketplace, then you may want to exclude the account page, checkout page, and thank you page.
Simply click the ‘Edit Rules’ button in the section where you want to create the rule. In the following image, we’re adding a new rule to the ‘Posts’ section.
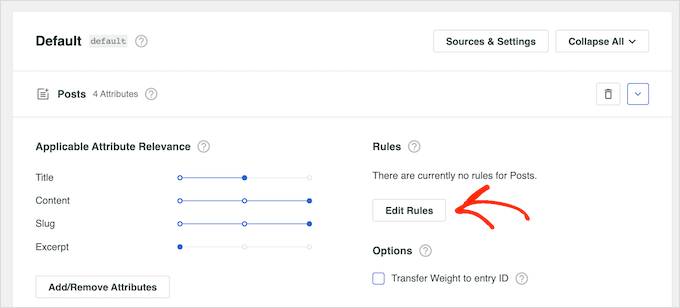
This opens a popup where you can configure the search engine rules.
To create your first rule, you’ll want to click the ‘Add Rule’ button.

You can now choose the content you want to include or exclude from relevant search results.
Simply open the first dropdown menu and choose either ‘Only show entries if’ or ‘Exclude entries if,’ depending on the kind of rule you want to create.
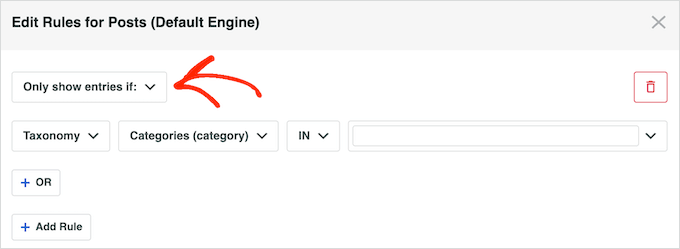
You can now use the remaining settings to specify the content you want to include or exclude. For example, if you wanted to include or exclude a specific category, then you’d type in the category name.
You can also type in any custom taxonomies you want to exclude or include.
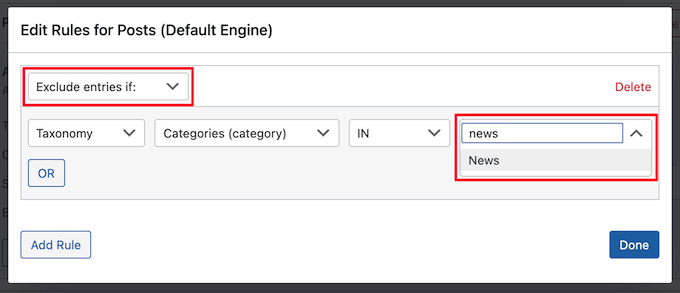
To exclude or include specific post tags from the search results, simply open the dropdown menu and select ‘Tags.’
Then, you can go ahead and type in the tag’s name.
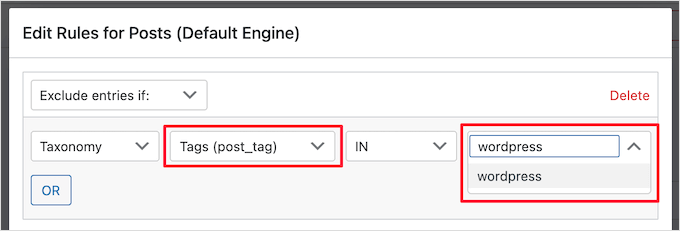
To add another rule, just click the ‘Add Rule’ button and repeat the same process described above. When you’re happy with how the rules are set up, make sure to click ‘Done.’
If needed, you can continue creating rules for other content types, such as media and pages, by scrolling to their sections and clicking their ‘Add Rule’ buttons.
When you’re happy with the search algorithm’s setup, you’ll want to scroll to the top of the page and click the ‘Save’ button.
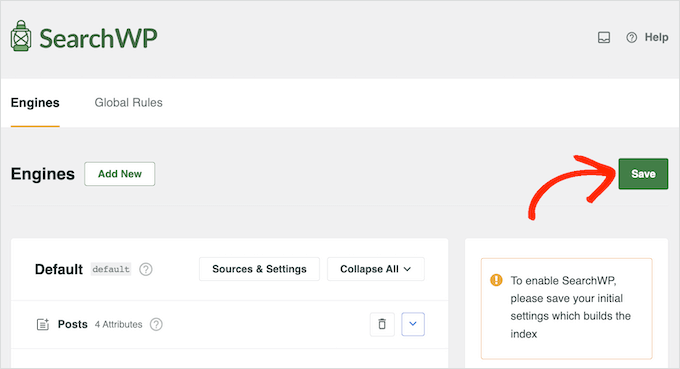
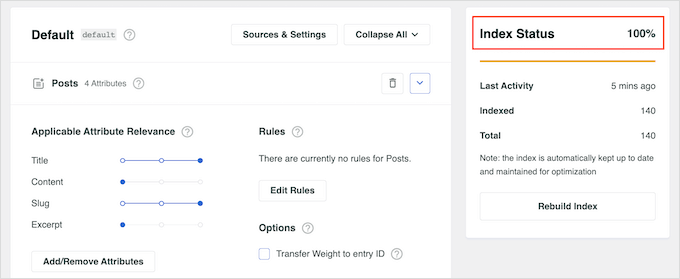
SearchWP will now rebuild the index. Depending on your WordPress hosting provider and the size of your site, this may take a few minutes.
As soon as you see ‘Index Status 100%,’ you’ll know that SearchWP has added all your content and rules to the search index.
Step 3: Create a Custom Search Form For Your WordPress Website
By default, all the search forms on your WordPress website will use the new SearchWP algorithm you configured in the previous section. This means that visitors will start seeing more accurate and relevant results straight away.
However, for even better results, you may want to create advanced search forms for different kinds of content. For example, you might create a smart WooCommerce product search form that searches only within specific product categories.
You can also create an advanced search form specifically for custom post types. For example, we’ve created a custom post type search form for our ‘Deals’ and ‘Glossary’ pages.

Each form will override the default WordPress search behavior, so you can create as many different forms as you want with unique settings.
To get started, you’ll want to head over to SearchWP » Search Forms and click the ‘Add New’ button.
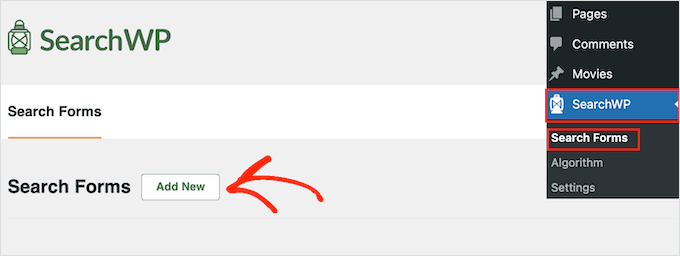
This creates a new search form that is ready for you to customize.
For example, if you run a review website, you might create a form that searches only product review posts and ignores other content like blog posts and media. This can help visitors find what they’re looking for faster.
Now, you can give the form a unique name by clicking on the small pencil icon next to ‘Search Form 1’.
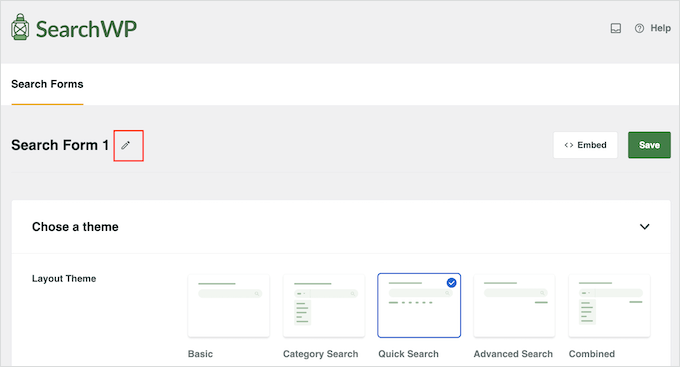
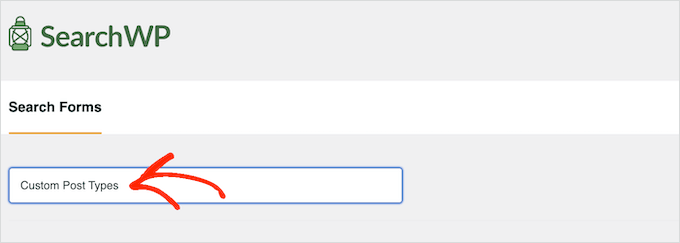
On the next screen, you can go ahead and type in a name for the custom search form.
This is just for your reference, so you can use anything that helps you identify the form in the WordPress dashboard.
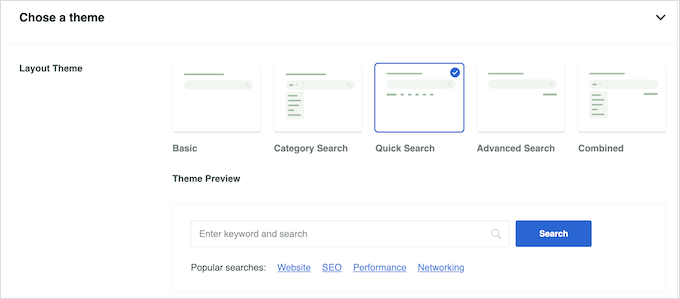
After that, you can choose a layout using the ‘Layout Theme’ thumbnails.
Some of these layouts are designed for specific types of search forms. For example, if you create a form that searches by category in WordPress, then ‘Category Search’ already has many of the settings you need.

Simply click on the different themes to see a preview of how this form will look on your website. After making your decision, let’s scroll to the ‘Custom Styling’ section.
The settings you see may vary depending on the layout theme you selected. For example, if you selected ‘Quick Search,’ then the ‘Quick Search’ setting will be enabled by default.
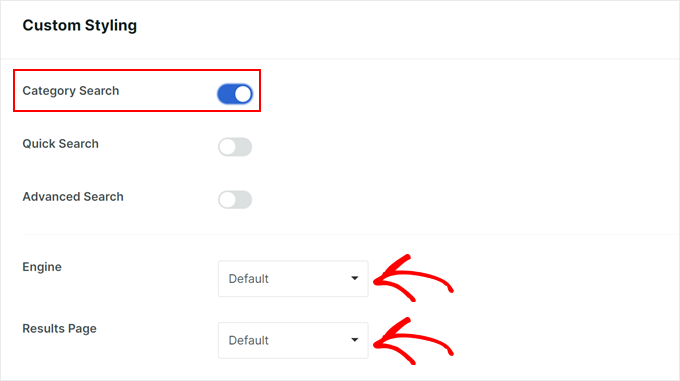
You can disable and enable the different options using their toggles. The preview will update automatically as you make changes, so you can see what works best for your website.
Depending on your layout and the kind of form you want to create, you may need to toggle some of the ‘Custom Styling’ settings on or off. For example, if you want to create a form that searches by category, then click to enable the ‘Category Search’ toggle.
Also, make sure to select the custom search engine you created earlier in the ‘Engine’ menu. As for the ‘Results Page,’ you can use the default WordPress version or create a custom search results page.
By default, SearchWP will search all the media, pages, and posts on your WordPress website. If you’ve created any custom post types, you can include them in the search results using the ‘Type of search’ field.
Simply type in each custom post type that you want to include. When the right custom post type appears, go ahead and click to add it to the search.
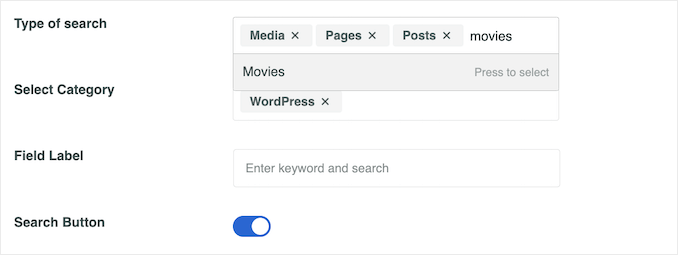
If you want to exclude pages, posts, or media from the search results, then just click the small ‘X’ next to ‘Media,’ ‘Pages,’ or ‘Posts’ in the ‘Type of search’ field.
After that, you’ll want to find the ‘Select Category’ field and type in each category that you want to include in the search results.
For example, if you run an online store, then you may want to create forms that search specific product categories. On WordPress blogs, you may want to include only specific content categories in the search form.

By default, SearchWP will show a generic ‘Enter keyword and search’ message before the visitor enters a search query.
You can replace this with your own messaging by typing into ‘Field Label.’

If you want to allow visitors to filter their search results using factors like the author, post type, and tag, then you will need to click to enable the ‘Advanced Search’ toggle.
After that, you can scroll to the ‘Advanced Search Filter/s’ field.
By default, SearchWP allows visitors to filter their results using ‘Authors,’ ‘Post Types,’ and ‘Tags.’

To remove any of these filters, just click its ‘X’ button. If you want to add more filters, simply type their names into the field.
Then, when the right option appears in the dropdown, just give it a click.
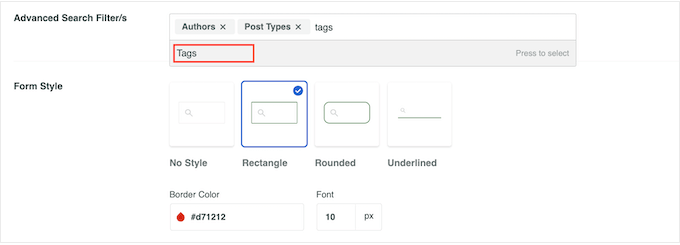
When you are happy with these settings, you can move on to the ‘Form Style’ section.
Here, you can choose between different form styles, add a border, and change the font size.
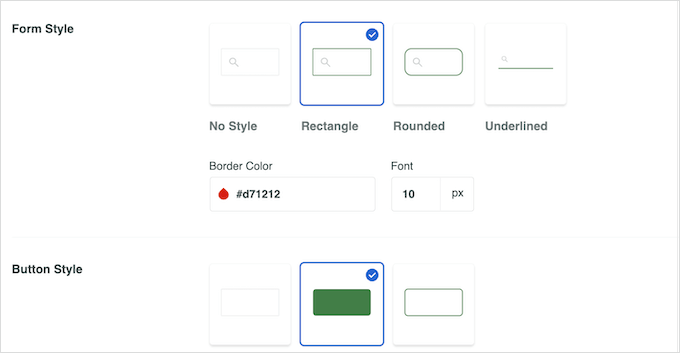
Under ‘Button Style,’ you can customize the ‘Search’ button that appears in the form.
There are additional settings you can use to change how the form looks and behaves. However, this is all you need to create an advanced custom search form.
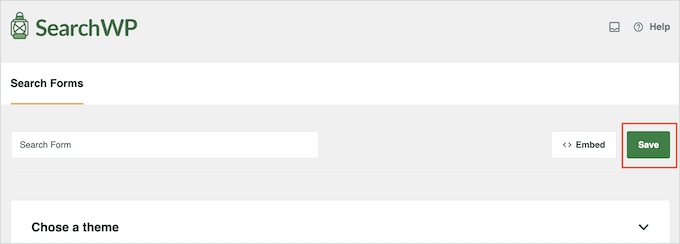
When you’re happy with the way the form is set up, scroll to the top of the screen and click ‘Save’ to store your settings.
To create more custom search forms with unique settings, simply repeat the exact same process described above.
Step 4: Add the Custom Search Form to Your WordPress Site
You can add an advanced search form to any page, post, or widget-ready area using the ‘Search Form’ block.
As an example, let’s see how you can add a search form to a post.
Simply open the post in the WordPress content editor and click the ‘+’ icon. Then, type in ‘Search Form.’
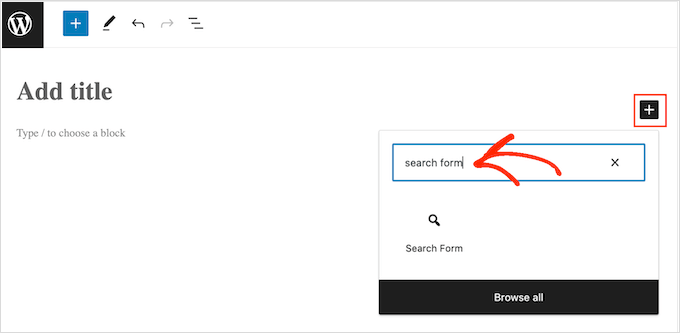
When the right block appears, give it a click to select it.
You can now open the ‘Select a Form’ dropdown and choose the form you want to use.
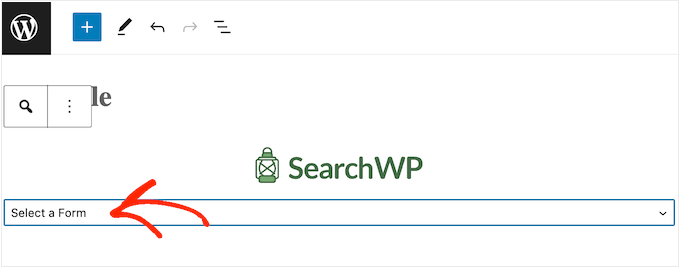
When you are ready to make the search form live, go ahead and click on either ‘Update’ or ‘Publish.’
Now, simply visit this page or post to see the search form in action.
For more details, you might want to check out our guide on how to add a search form to a WordPress post.
To add a search form to a widget-ready area, you’ll need to head over to Appearance » Widgets. Here, simply click the ‘+’ block icon in the area where you want to show the search form.

Then, let’s type in ‘Search Form.’
When the right block appears, simply give it a click to add it to the widget-ready area.
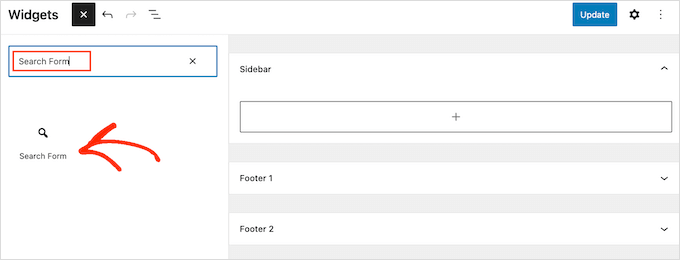
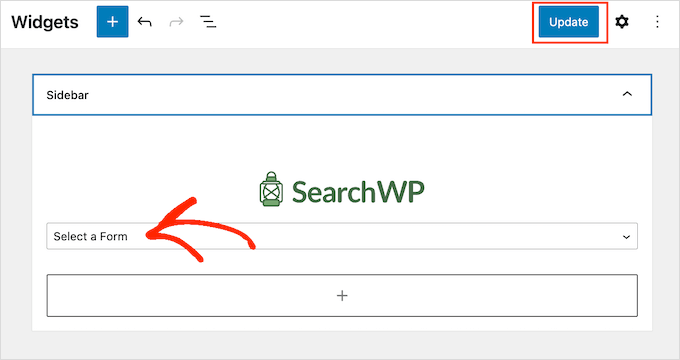
You can now open the dropdown menu and choose the search form that you want to use.
When you are finished, don’t forget to click the ‘Update’ button to make the search form live.
For more detailed instructions, please see our guide on how to add and use widgets.
If you want to insert the search form into your navigation menu, read our article on adding a search bar to the WordPress menu.
Bonus Tip: Optimize Your Custom WordPress Search Form 📈
Now that you know how to create a custom search form for your WordPress site, let’s look at some easy ways to improve it for a better user experience.
Option 1: Adding Live Ajax Search to a Custom Search Form
Many online marketplaces and websites use live Ajax searches. This automatically shows possible search results as the user types in the custom form, similar to how search engines such as Google work.

With the Ajax live search, you can show relevant results without even reloading the page. This makes it a great choice if you sell digital downloads or physical products online, as shoppers can instantly see products that match their search query.
The easiest way to add Ajax live search to WordPress is by using SearchWP Live Ajax Lite Search. This free plugin automatically adds instant search to your website and works perfectly with any WordPress theme.
The first thing you need to do is install and activate the plugin. For more details, see our step-by-step guide on how to install a WordPress plugin.
Upon activation, the default WordPress search form will automatically use the Ajax live search feature. If you visit your site and start typing into the search bar, then you’ll see instant search in action.
For more detailed instructions, please see our guide on how to add live Ajax search to your WordPress site.
Option 2: Using Advanced Settings for SearchWP
Next, it’s a good idea to enable some advanced settings that make it easier for users to find what they’re looking for.
To do this, you’ll want to go to SearchWP » Settings and scroll to the ‘General Settings’ section.
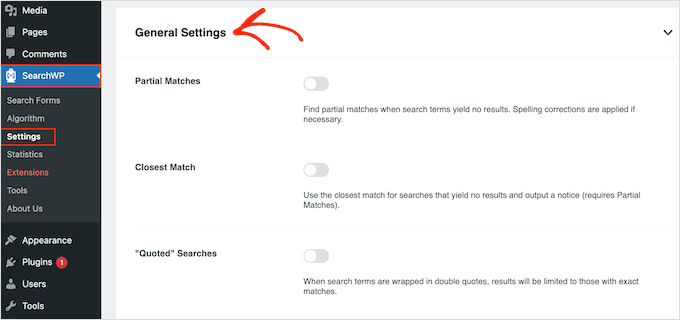
Here, you can activate any of the following settings:
- Partial matches. With this setting enabled, SearchWP will display results that aren’t an exact match for the visitor’s search query. This is also known as fuzzy search.
- Closest match. After enabling partial matches, you can also show the closest matches when a search has no results.
- “Quoted” searches. This allows visitors to search for exact phrases using quotes.
- Highlight terms. Automatically highlight the search terms to help visitors find what they’re looking for.
Option 3: Measuring Search Results and Improving Conversions
To help you fine-tune your website’s search, it’s a good idea to monitor how visitors are using the search feature.
This allows you to see what’s working and what’s not on your WordPress site so you can continually improve your search experience and help visitors find what they’re looking for.
This data can even help you generate blog post ideas by showing the content that visitors are already searching for.
To see the search history and most popular search terms, simply select ‘Statistics’ in the left-hand menu.
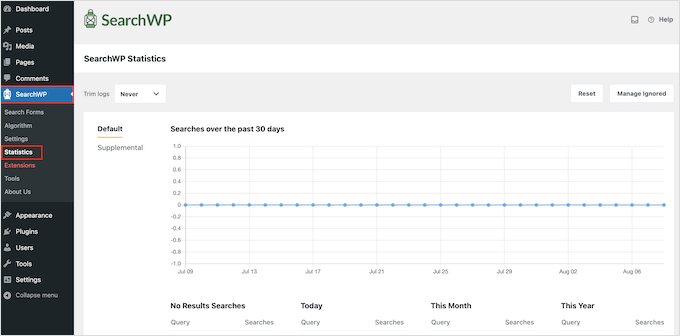
We also have a guide on how to see search analytics in WordPress if you want to learn more.
FAQ: Creating a Custom WordPress Search Form
Here are answers to some of the most common questions we hear from our readers about creating custom WordPress search forms:
Can I make WordPress search pages, products, or custom post types?
Yes. With the right tools (like SearchWP) or code, you can include anything in your search, pages, WooCommerce products, tags, categories, custom fields, or any custom post types you use.
Do I need coding skills to create a custom search form?
Not necessarily. Plugins like SearchWP and WPCode let you build and customize your search form without writing code. But if you prefer a manual approach, you can also use a custom searchform.php template.
Can I customize where the search box appears on my site?
Absolutely. You can place the search box in your header, sidebar, footer, or inside a page or post using a shortcode or widget. Most WordPress themes also support search blocks in the content editor.
Can I track what my site visitors search for?
Yes. Many search plugins include search analytics so you can see what visitors are looking for and which searches return no results. This helps you improve your content and user experience.
Next Steps for Improving Your WordPress Search
That’s all! We hope this tutorial helped you learn how to create a custom WordPress search form.
If you found this helpful, you may also want to see our guides on:
- How to Create a Live Autocomplete Search in WordPress
- How to Make Blog Post Comments Searchable
- How to Add Multilingual Search in WordPress
- How to Add PDF Indexing and Searching in WordPress
- How to Add Voice Search Capability to Your WordPress Site
If you liked this article, then please subscribe to our YouTube Channel for WordPress video tutorials. You can also find us on Twitter and Facebook.


Erik
Can the search function be configured to search one or more specific pages or exclude one or more pages, not posts?
WPBeginner Support
Yes, you can customize where the plugin searches on your site
Admin
Jiří Vaněk
I have a technical blog where I write articles, and what’s great is that users contribute valuable content through comments. Sometimes, very important insights come up there that aren’t directly in the articles. It was a big issue for me that users couldn’t search for these insights on the website because they are crucial for understanding the context of the articles or for further information retrieval. Search WP could elegantly solve this problem. Thanks for the great tip. It’s sad that WordPress itself doesn’t natively support this.
Ralph
On my very technical blog I have seen a lot of specific searches in analytics and knew people can’t find what they want, because it is just not in the title. It is in the content itself and built in wordpress search wasn’t good with that.
Luckily I received searchWP when buying my theme and things got better. Thanks to this guide I will set it up even better for maximum results. This will definitely help pleasing my readers.
WPBeginner Support
Glad our guide could help!
Admin