WooCommerce has a built-in search feature, but it’s not very good at finding products. By replacing it with a smarter and faster search tool, you can improve the user experience and drive more sales in your WooCommerce store.
A powerful search functionality helps customers find exactly what they are looking for, reducing frustration and increasing the likelihood of purchase.
Over the years, we have used SearchWP in our eCommerce stores to provide an intuitive search experience for our customers. This powerful plugin has improved site navigation, resulting in higher engagement rates and increased conversions.
In this article, we will show you how to make a smart WooCommerce product search for your online store. Since we have hands-on experience with this topic, you can rest assured we will only give you reliable advice.

Why Add a Smart WooCommerce Product Search to Your Store?
WooCommerce has a built-in product search, but it is very limited.
By default, it does not look for matches in product attributes, reviews, custom fields, or the product description. This can stop shoppers from finding products they want to buy on your online store, so you get fewer sales.
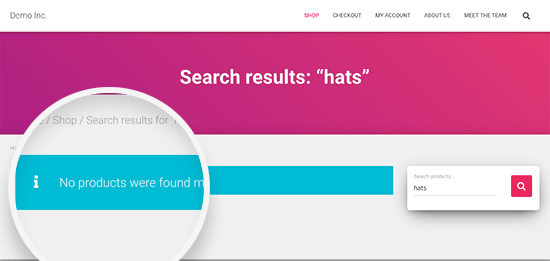
It’s also very slow, so impatient shoppers may leave your site.
Luckily, there are some excellent WooCommerce plugins that allow you to show more helpful search results, fetch them faster, and get more sales.
That being said, let’s take a look at how to easily add a smart WooCommerce product search feature to your online store.
How to Make a Smart WooCommerce Product Search
The easiest way to create a smart WooCommerce product search is by using SearchWP.
SearchWP is the best WordPress search plugin that allows you to search content that WordPress ignores by default. For example, you can make blog comments searchable or add PDF indexing and searching to your website.
You can also create your own relevance scale and adjust the algorithm without writing any code. In this way, you can show the right search results to the right people at the right time.
It also comes with a WooCommerce integration so you can improve the WooCommerce product search and include product attributes, tags, and more in the search results.
You can see our complete SearchWP review for more details.
How to Set up SearchWP
The first thing you need to do is install and activate the SearchWP plugin. For more details, see our step-by-step guide on how to install a WordPress plugin.
Upon activation, visit the SearchWP » Settings page from the admin sidebar and click on the ‘General’ tab.
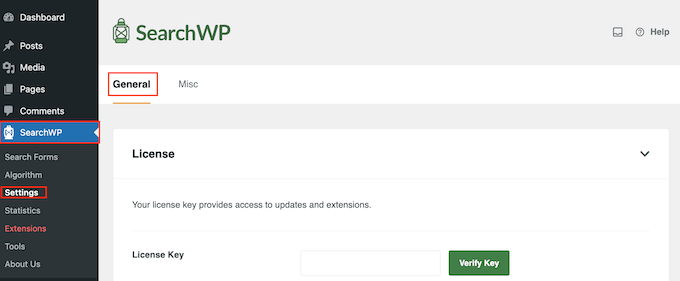
Here, you have to enter your license key. You can find this information in your SearchWP account or by checking your purchase confirmation email.
Once you’re done, make sure to click the ‘Verify Key’ button.
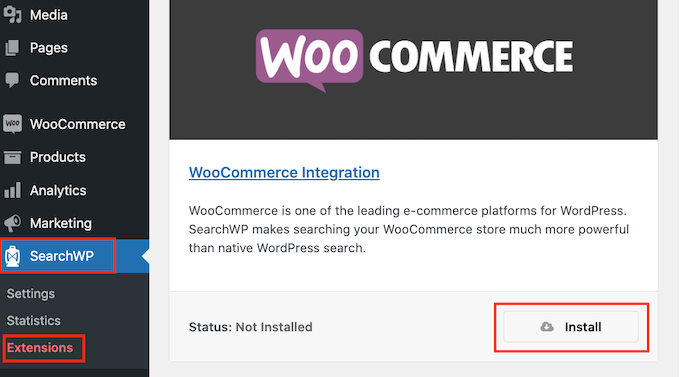
Next, you need to install and activate the WooCommerce Integration extension. In your WordPress dashboard, go to SearchWP » Extensions.
Here, find the WooCommerce Integration extension and click on its ‘Install’ button.
Creating a Custom WooCommerce Search Algorithm
Once you have the extension, you’re ready to create a custom search engine for your WordPress blog. This gives you a complete understanding of the content that SearchWP looks at and how it shows the results to shoppers.
To get started, go to SearchWP » Algorithm. Then, click on the ‘Sources & Settings’ button.
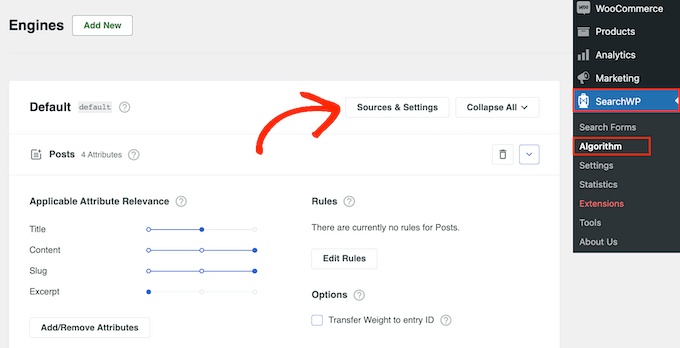
This will open a popup where you can tell SearchWP what content to include in its searches. For example, you might exclude pages from the WordPress search results or include custom post types.
To improve the WooCommerce search, check the box next to ‘Products.’
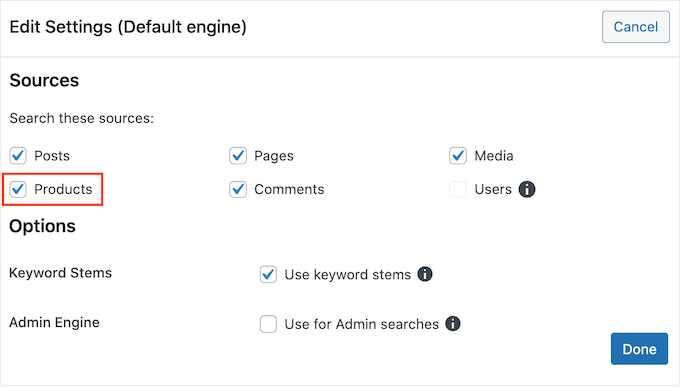
WooCommerce product reviews are stored as comments. If you want to make reviews searchable, then you’ll need to check the ‘Comments’ box too.
After that, click on the ‘Done’ button to close the popup. Now, if you scroll down, you’ll see a new ‘Products’ section.
By default, SearchWP will look at the product title, content (description), slug, and excerpt (short description) for matches. Depending on how your online marketplace is set up, you may want to search for other content, such as custom product attributes and tags.
To do this, click on the ‘Add/Remove Attributes’ button.
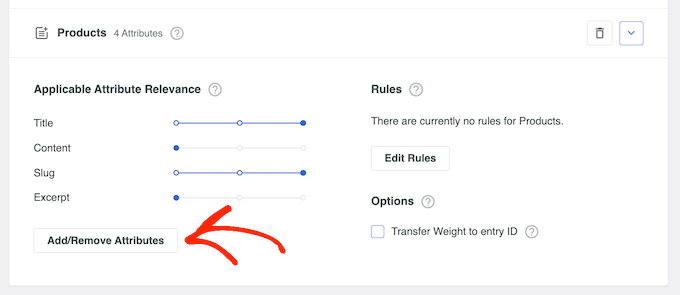
This will open a popup where you can check different boxes or select custom fields and taxonomies. If you enabled ‘Comments’ in the previous step, then you can also check the box next to ‘Reviews.’
In the following image, we’ve added ‘color’ and ‘size’ as searchable custom fields, as well as product tags and categories in the taxonomies field.
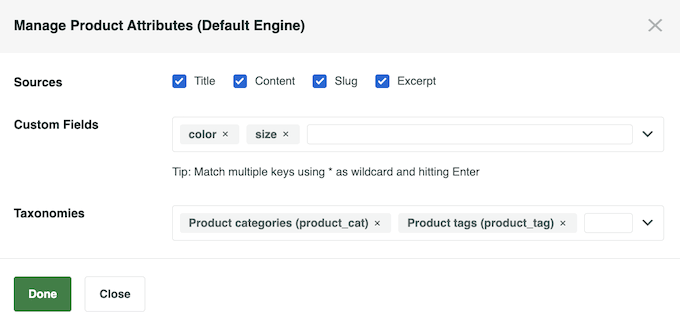
When you’ve selected all the product attributes you want to use, click on ‘Done.’
With that done, you’ll see that each attribute has its own ‘Applicable Attribute Relevance’ slider. This controls how SearchWP ranks the products when building its search results page in WordPress.
If an attribute has a high relevancy, then it’ll have a bigger impact on the search results. For example, if you want a product’s title to carry more weight than the product slug, then you’ll need to adjust the slider accordingly.
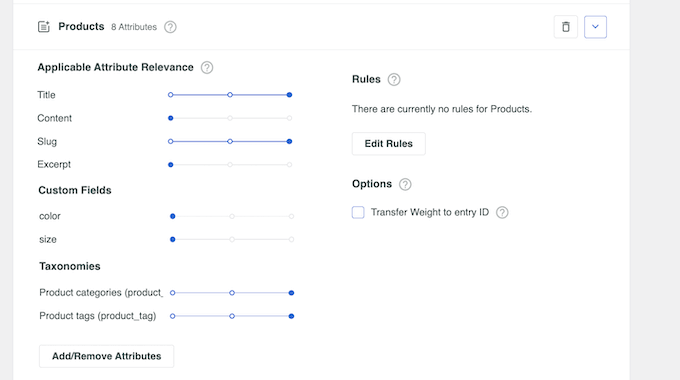
When you’re happy with how the smart product search is set up, scroll to the top of the screen and click the ‘Save’ button.
SearchWP will now rebuild the index.
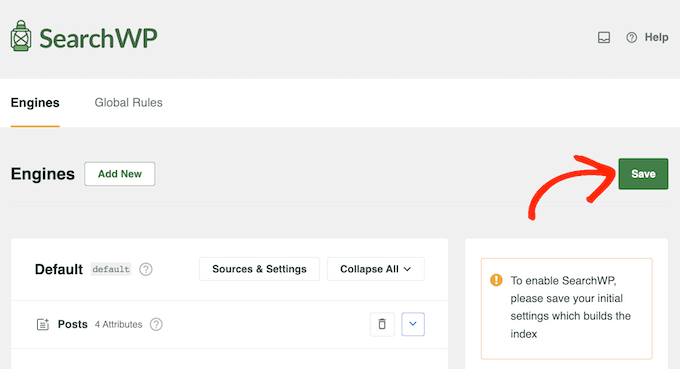
Depending on the speed of your Internet connection and your WordPress hosting provider, this may take a few minutes.
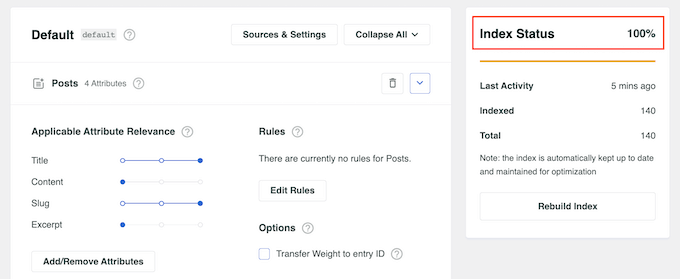
As soon as you see ‘Index Status 100%,’ you’ll know that SearchWP has added all your product data to its search index.
If your WooCommerce theme already has a search box, then you don’t need to make any changes. SearchWP will start delivering more relevant product search results right away.
However, if your theme doesn’t have a search box, then you’ll need to add a search bar to the WordPress menu.
After that, head over to your store and try out the search feature. You should notice that it’s returning more accurate and helpful search results.
By default, SearchWP will include all matching products in its search results. However, you may want to specify which products it should display. For example, you might only show products that are on sale or come with free shipping, as this can get you more conversions.
To learn more, please see our guide on how to customize the WooCommerce product search results page.
Frequently Asked Questions
How do I create a product filter in WooCommerce?
You can create product filters with the YITH WooCommerce Ajax Product Filter plugin. This plugin allows you to select parameters to improve the customer experience, such as product categories, tags, attributes, reviews, or price ranges.
For more details, check out our tutorial on how to filter WooCommerce products.
You can also learn more about the plugin by reading our complete YITH WooCommerce Ajax Product Filter review.
Can I customize the WooCommerce product page?
You can customize WooCommerce product pages by downloading specific extensions or adding custom code. While those are great options, we believe the best way to customize the WooCommerce product page is with SeedProd. It is the best drag-and-drop WordPress page builder with over 300 professionally-designed templates.
Best of all, they come with WooCommerce templates and eCommerce blocks that allow you to easily create a high-converting online store.
For more details, check out our tutorial on how to customize WooCommerce product pages with no code.
We hope this article helped you learn how to easily make a smart WooCommerce product search for your online store. You may also want to check out our tutorials about how to upsell products in WooCommerce and how to add a search toggle effect in WordPress.
If you liked this article, then please subscribe to our YouTube Channel for WordPress video tutorials. You can also find us on Twitter and Facebook.


Dennis Muthomi
Love this article on WooCommerce product search!
Well as an online store owner I know how important a good search function is for customer satisfaction and conversions. I especially loved your explanation of SearchWP’s features, especially the ability to include product attributes, tags and reviews in search results.
And not forgetting the section on creating a custom search algorithm. Being able to adjust the relevance scales for different product attributes is a total game changer for tailoring search results to your business needs.
THanks for this
kzain
The default WooCommerce search can be clunky for customers, especially with a large product catalog. The idea of a smarter search with features like autocomplete and product filtering sounds amazing.
I especially like the recommendation for the SearchWP plugin. Having search that extends beyond just titles seems super valuable.
Going to try this out on my store and see if it improves the customer search experience. Thanks for the tips!