Over the years, we’ve received a lot of questions asking about custom fields and how users can make the most of them on their WordPress website.
Custom fields are a handy WordPress feature that allows you to add extra data and information to your posts and pages. Many popular WordPress plugins and themes use custom fields to store important data.
We have experience with WordPress custom fields. In this article, we will show you how to use WordPress custom fields with some tips, tricks, and hacks.

Since this is a long article, we have added a table of contents for easier navigation. Just use the quick links below to jump to the section you want to read:
- What Are WordPress Custom Fields?
- Adding Custom Fields in WordPress
- Displaying Custom Fields in WordPress Themes
- Troubleshooting: Can't Find Custom Field in Dropdown on Post Edit Screen
- Creating a User Interface for Custom Fields Using Advanced Custom Fields
- How to Hide Empty Custom Fields With Conditional Statements
- Adding Multiple Values to a Custom Field
- How to Search Posts by Custom Field in WordPress
- Displaying Posts With a Specific Custom Key
- How to Add Guest Author Name Using Custom Fields
- How to Display Contributors to an Article Using Custom Fields
- How to Display Custom Fields Outside the Loop in WordPress
- Display a Custom Header, Footer, Sidebar Using Custom Fields
- Manipulating RSS feed Content With Custom Fields
- How to Manipulate RSS Feed Title With Custom Fields
- How to Set Expiration Date for Posts in WordPress Using Custom Fields
- How to Style Individual Posts Using Custom Fields
What Are WordPress Custom Fields?
WordPress custom fields are metadata used to add extra information to the post or page you are editing.
By default, when you write a new post, page, or any other content type, WordPress saves that content in two different parts.
The first part is the body of your content that you add using the WordPress content editor.
The second part is the information about that content. For example, the title, author, date, time, and more. This information is called metadata.
A WordPress website automatically adds all the required metadata to each post or page you create. You can also create and store your own metadata by using custom fields.
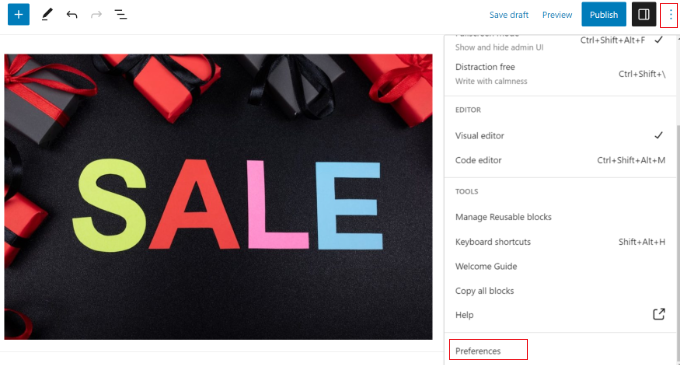
By default, the custom fields option is hidden on the post edit screen. To view it, you need to click on the three-dot menu in the top-right corner of the screen and select ‘Preferences’ from the menu.
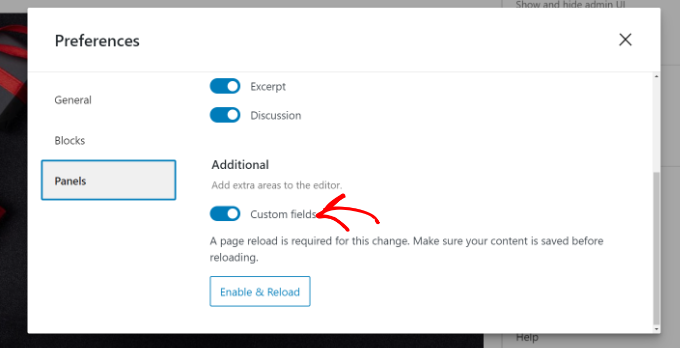
This will open a popup where you need to switch to the ‘Panels’ tab and then enable the ‘Custom fields’ option.
After that, simply click on the ‘Enable & Reload’ button to reload the post editor.
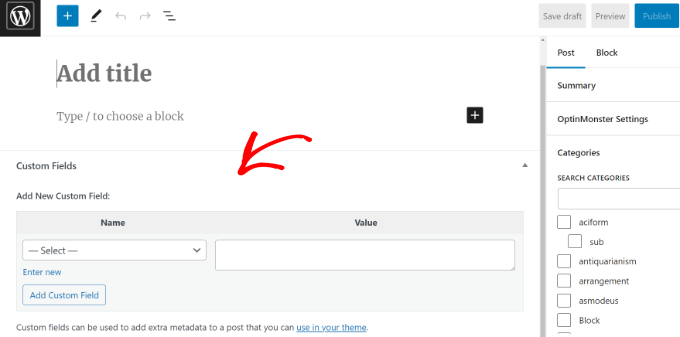
The post editor will reload, and you will be able to see the Custom Fields panel below the content editor.
Custom fields can be used to add any information related to the post, page, or other content type. This meta information can then be displayed in your theme.
However, to do that, you will need to edit your WordPress theme files.
Note: This tutorial is recommended for users who are already familiar with editing theme files. It is also helpful for aspiring WordPress developers who want to learn how to properly use custom fields in their own themes or plugins.
Having said that, let’s take a look at how to add and use custom fields in WordPress.
Adding Custom Fields in WordPress
First, you need to open a post or page in the block editor so that you can add custom fields. Then, you must go to the Custom Fields meta box.
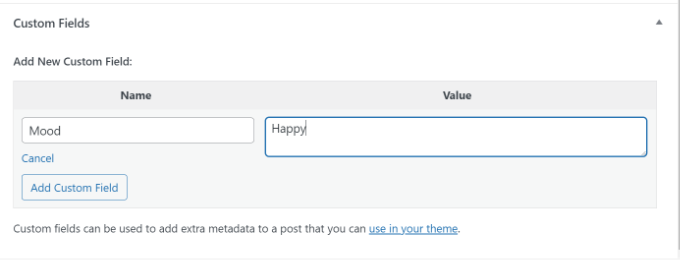
Next, you need to provide a Name for your custom field and then enter its Value. Click on the ‘Add Custom Field’ button to save it.
The field will be stored and displayed in the Custom Fields meta box like this:
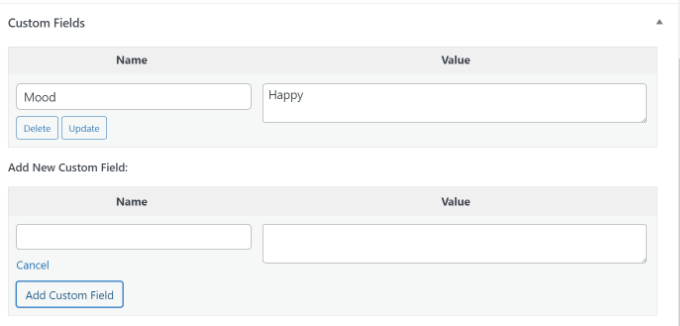
You can edit this custom field any time you want and then just click on the ‘Update’ button to save your changes. You can also delete it if you don’t want to use it anymore.
Now, you need to save your post to store your custom field settings.
Displaying Custom Fields in WordPress Themes
To display your custom field on your website, you will need to edit your WordPress theme files and code snippets.
We don’t recommend directly editing the theme files because the slightest mistake can break your website. An easier way to do this is by using WPCode.
It is the best code snippet plugin for WordPress that lets you add custom code and manage snippets from your WordPress dashboard.
If you haven’t done this before, then we also recommend reading our guide on how to copy and paste code in WordPress.
First, you will need to install and activate the free WPCode plugin. For more details, please see our beginner’s guide on how to install a WordPress plugin.
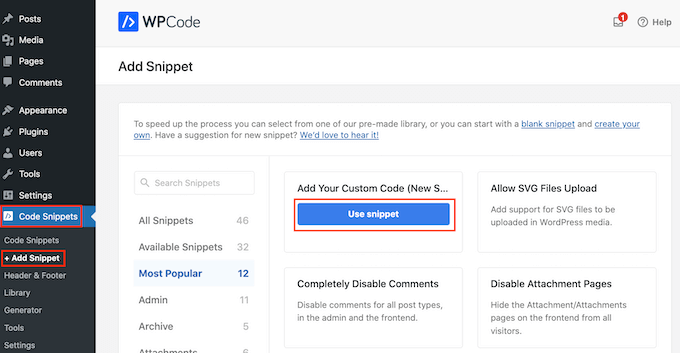
Upon activation, you will need to go to Code Snippets » + Add Snippet from the WordPress dashboard and select the ‘Add Your Custom Code (New Snippet)’ option.
Now you need to copy this code to add to your theme files:
<?php echo get_post_meta($post->ID, 'key', true); ?>
Don’t forget to replace key with the name of your custom field.
Next, you must enter the code into the ‘Code Preview’ area and change the Code Type to ‘PHP Snippet’.
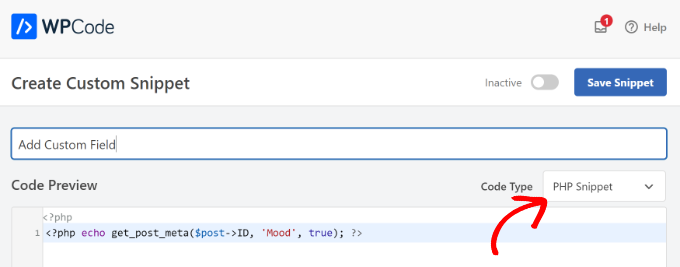
For example, we used this code in our demo theme:
<p>Today's Mood: <?php echo get_post_meta($post->ID, 'Mood', true); ?></p>
From here, you can scroll down to the Insertion section.
Here, you can select where the code will run. By default, WPCode will Auto Insert the code and run it everywhere on your website.
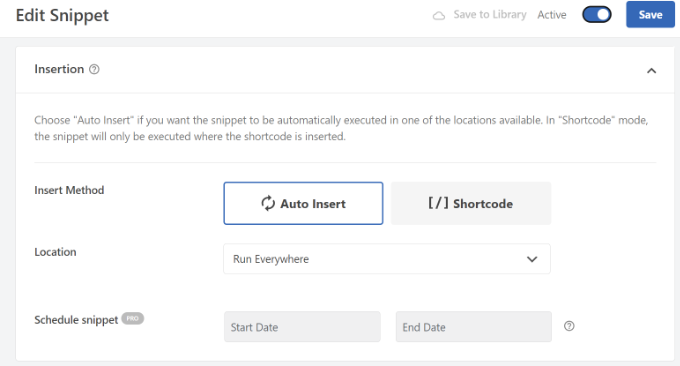
However, you can change this and select where you would like the custom field to appear.
For example, we will choose the ‘Page Specific’ tab and select the ‘Insert Before Post’ option. This way, the custom field will appear at the beginning of the blog post.

You can now save your changes and visit the post where you added the custom field to see it in action.
You can use this custom field in all your other WordPress blog posts as well.
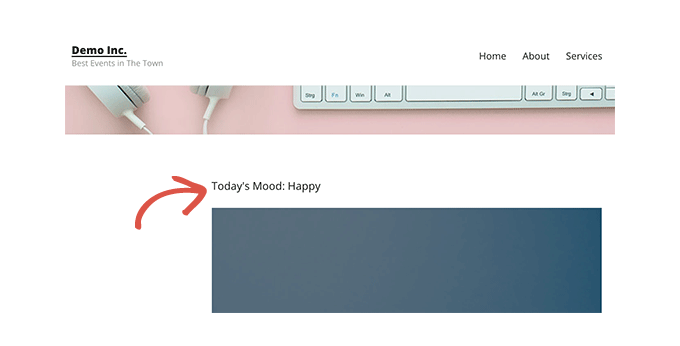
You can also easily adjust the custom field for different blog posts. Simply create a new post or edit an existing one.
Then, go to the Custom Fields meta box, select your custom field from the dropdown menu, and enter its Value.
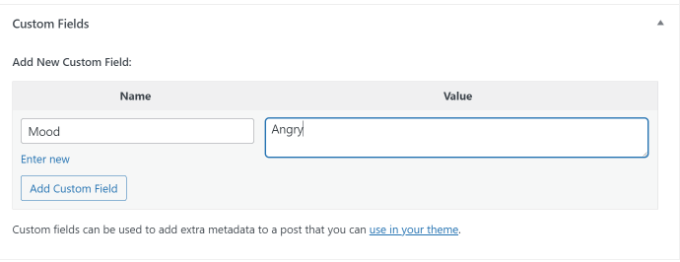
Once you are done, simply click the ‘Add Custom Field’ button to save your changes and then publish or update your post.
Troubleshooting: Can’t Find Custom Field in Dropdown on Post Edit Screen
By default, WordPress only loads 30 custom fields in the dropdown menu on the post-edit screen.
If you are using WordPress themes and plugins that already use custom fields, then those might appear first in the dropdown menu, and you won’t be able to see your newly created custom field.
To fix this issue, you will need to add the following code to your theme’s functions.php file or by using WPCode (recommended):
add_filter( 'postmeta_form_limit', 'meta_limit_increase' );
function meta_limit_increase( $limit ) {
    return 50;
}
The above code will change that limit to 50. If you still can’t see your custom field, then you can try increasing that limit even further.
Creating a User Interface for Custom Fields Using Advanced Custom Fields
As you can see, once you add a custom field, you will have to select the field and enter its value each time you write a post.
If you have many WordPress custom fields or multiple authors writing on your website, then this is not an ideal solution.
Wouldn’t it be nice if you could create a user interface where users can fill in a form to add values to custom fields?
In fact, this is what so many popular WordPress plugins already do.
For example, the SEO title and meta description box inside the popular All in One SEO plugin is a custom meta box:
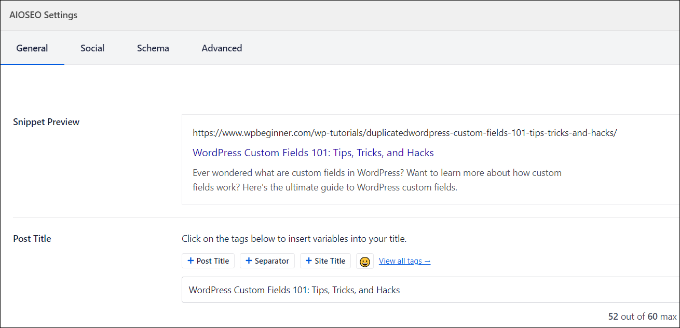
The easiest way to create a user interface for adding custom fields is by using the Advanced Custom Fields plugin.
The first thing you need to do is install and activate the Advanced Custom Fields plugin. For more details, see our step-by-step guide on how to install a WordPress plugin.
Upon activation, you need to visit the ACF » Field Groups page and click on the ‘Add New’ button.
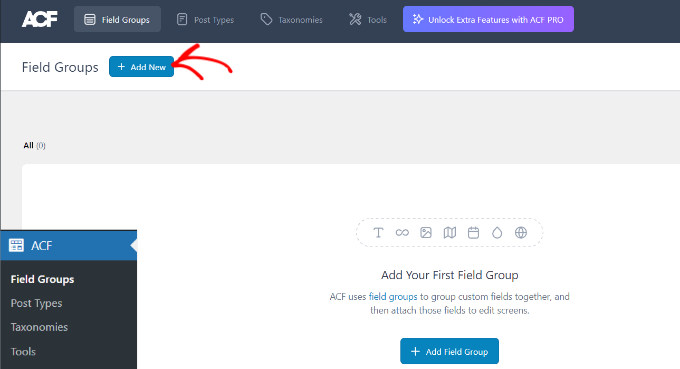
A field group is like a container with a set of custom fields. It allows you to add multiple panels of custom fields.
Now, you need to provide a title for your field group and click the ‘+ Add Field’ button in the top-right corner.
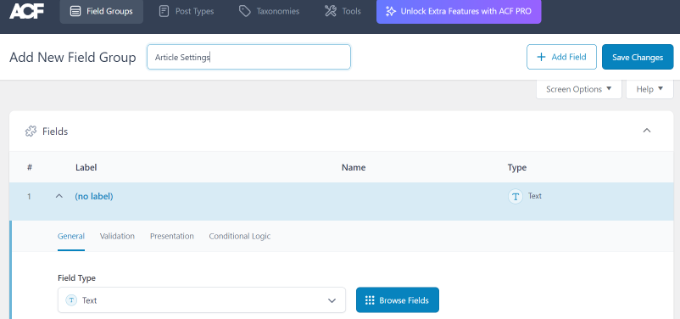
You can now select a field type.
Advanced Custom Fields allows you to create all sorts of fields, including text, image upload, number, dropdown, checkboxes, and more.
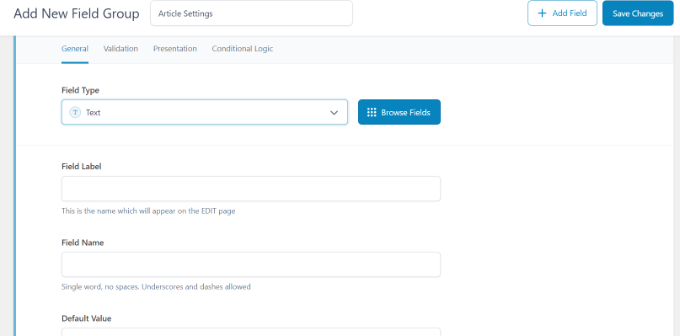
Next, you can scroll down to see other options for that particular field, like field name, field label, and default value. You can change them to your own requirements.
You can also add multiple fields to your field group if you want. Once you are finished, just click on the ‘Save Changes’ button.
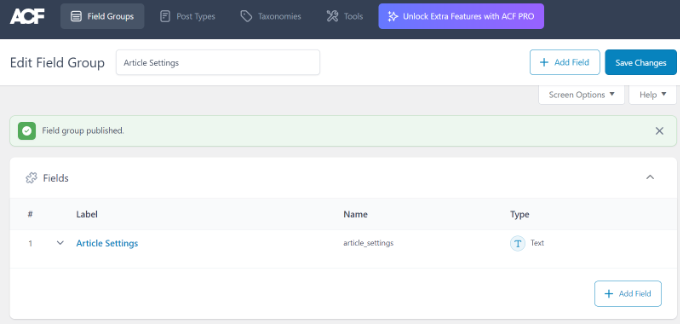
Next, edit a post or create a new one, and you will see a new panel with your WordPress custom fields below the content editor.
For detailed step-by-step instructions, you can see our guide on how to add custom meta boxes in WordPress posts and post types.
How to Hide Empty Custom Fields With Conditional Statements
So far, we have covered how to create a custom field and display it in your theme.
Now, let’s see how to check that the custom field is not empty before displaying it. To do that, we will modify our code to first check if the field has data in it:
<?php

$mood = get_post_meta($post->ID, 'Mood', true);

if ($mood) { ?>

<p>Today's Mood: <? echo $mood; ?></p>

<?php

} else {
// do nothing;
}

?>
Don’t forget to replace Mood with your own custom field name.
Adding Multiple Values to a Custom Field
Custom fields can be reused in the same post to add multiple values. You just need to select the field again and add another value to the ‘Value’ box.
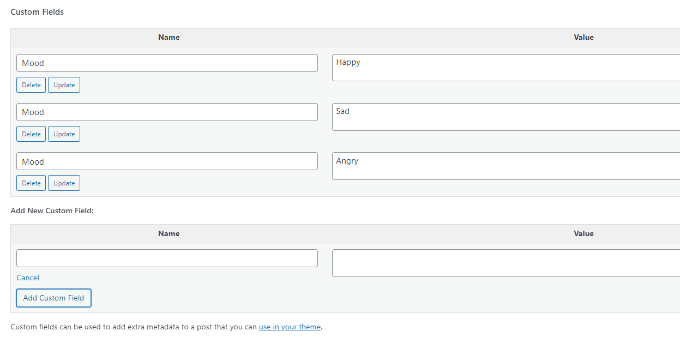
However, the code we have used in the above examples will only be able to show a single value.
To display all values of a custom field, we need to modify the code and make it return the data in an array. You will need to add the following code to your theme file:
<?php
$mood = get_post_meta($post->ID, 'Mood', false);
if( count( $mood ) != 0 ) { ?>
<p>Today's Mood:</p>
<ul>
<?php foreach($mood as $mood) {
            echo '<li>'.$mood.'</li>';
            }
            ?>
</ul>
<?php
} else {
// do nothing;
}
?>
Again, don’t forget to replace Mood with your own custom field name.
In this example, you will notice that we have changed the last parameter of get_post_meta function to false. This parameter defines whether the function should return a single value or not. Setting it to false allows it to return the data as an array, which we then display in a foreach loop.
How to Search Posts by Custom Field in WordPress
WordPress’s default search doesn’t work with any custom fields on your website. It only uses the content to find the post you or your visitors are looking for on your site.
However, SearchWP changes that by improving your WordPress search. It’s the best WordPress search plugin that goes beyond using the post content and indexes everything, including WordPress custom fields, PDF documents, custom tables, text, files, and more.
You can adjust the search algorithm without editing code using SearchWP. Simply install the plugin and then head over to SearchWP » Algorithm from your WordPress admin area.
After that, you need to go to the ‘Engines’ tab and then adjust the Attribute Relevance slider. This will change the importance given to each attribute during a search.
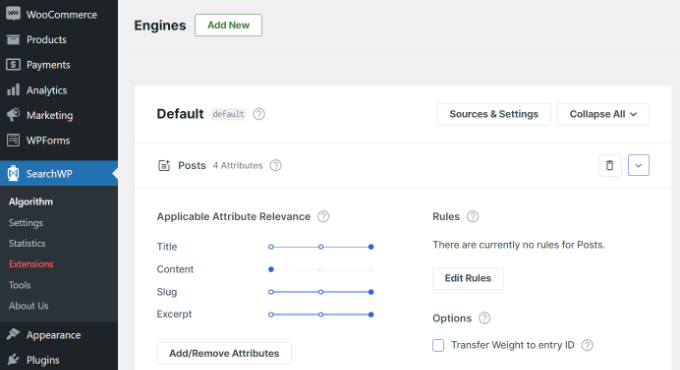
For instance, you can set the Custom Fields slider to maximum and adjust sliders for other attributes accordingly. This way, SearchWP will give preference to data in custom fields when searching for content in WordPress.
Another advantage of using SearchWP is that it works with some of the most popular custom field plugins, including Advanced Custom Fields (ACF), Meta Box, and Pods.
For more details, you can read our beginner-friendly guide on how to improve WordPress search with SearchWP.
Displaying Posts With a Specific Custom Key
WordPress allows you to display posts with custom keys and their values. For example, if you are trying to create a custom archive page to display all posts with specific custom keys, then you can use the WP_Query class to query posts matching those fields.
You can use the following code as a starting point:
$args = array(
    'meta_key'   => 'Mood',
    'meta_value' => 'Happy'
);
$the_query = new WP_Query( $args );

<?php
// the query
$the_query = new WP_Query( $args ); ?>

<?php if ( $the_query->have_posts() ) : ?>

    <!-- the loop -->
    <?php while ( $the_query->have_posts() ) : $the_query->the_post(); ?>
        <h2><?php the_title(); ?></h2>
        <?php the_content(); ?>

    <?php endwhile; ?>
    <!-- end of the loop -->

    <!-- pagination here -->

    <?php wp_reset_postdata(); ?>

<?php else : ?>
    <p><?php _e( 'Sorry, no posts matched your criteria.' ); ?></p>
<?php endif; ?>
Don’t forget to replace meta_key and meta_value parameters with your own values.
How to Add Guest Author Name Using Custom Fields
Do you want to add a guest post but don’t want to add a new user profile just for that post? An easier method is adding a guest author name as a custom field.
To do this, you will need to add the following code to your theme’s functions.php file or use WPCode (recommended):
add_filter( 'the_author', 'guest_author_name' );
add_filter( 'get_the_author_display_name', 'guest_author_name' );
function guest_author_name( $name ) {
global $post;
$author = get_post_meta( $post->ID, 'guest-author', true );
if ( $author )
$name = $author;
return $name;
}
For more details, please see our guide on pasting snippets from the web into WordPress.
This code hooks a function to the_author and get_the_author_display_name filters in WordPress.
The function first checks for the guest author’s name. If it exists, then it replaces the author’s name with the guest author’s name.
Now, you will need to edit the post where you want to display the guest author’s name. Go to the Custom Fields meta box, add your guest author name, and finally click on the ‘Add Custom Field’ button.

For more details, see our article on how to rewrite guest author names with custom fields in WordPress.
How to Display Contributors to an Article Using Custom Fields
On many popular blogs and news sites, many authors contribute to writing a single article. However, WordPress only allows a single author to be associated with a post.
One way to solve this problem is by using the Co-Authors Plus plugin. To learn more, see our guide on how to add multiple authors to a WordPress post.
Another method is adding contributors as a custom field.
First, you need to edit the post where you want to display co-authors or contributors. Then, scroll down to the Custom Fields meta box and add author names as co-author custom fields.
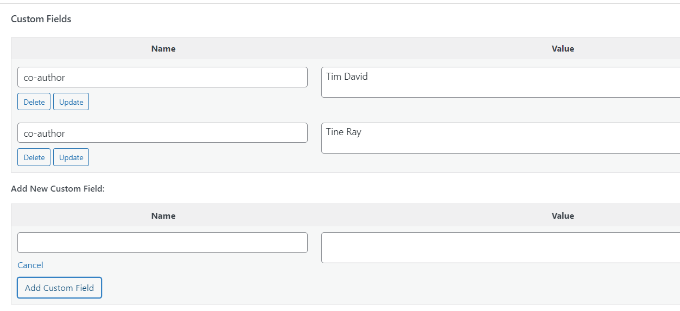
Now, you need to add this code to your theme files where you want to show co-authors:
<?php

$coauthors = get_post_meta($post->ID, 'co-author', false);
if( count( $coauthors ) != 0 ) { ?>
<ul class="coauthors">
<li>Contributors</li>
<?php foreach($coauthors as $coauthors) { ?>
           <?php echo '<li>'.$coauthors.'</li>' ;
            }
            ?>
</ul>
<?php
} else {
// do nothing;
}
?>
To display author names separated by commas, you can add the following custom CSS:
.coauthors ul {
display:inline;
}
.coauthors li {
display:inline;
list-style:none;
}
.coauthors li:after {
content:","
}
.coauthors li:last-child:after {
    content: "";
}
.coauthors li:first-child:after {
    content: ":";
}
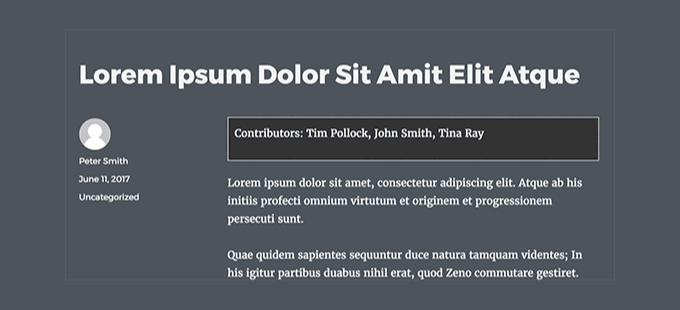
This is how it looked on our demo site.
How to Display Custom Fields Outside the Loop in WordPress
What if you need to show custom fields in the sidebar of a single post?
To display the custom fields outside the WordPress loop, you can add the following code to your theme files:
<?php
global $wp_query;
$postid = $wp_query->post->ID;
echo get_post_meta($postid, 'key', true);
wp_reset_query();
?>
Don’t forget to replace key with your custom field name.
Display a Custom Header, Footer, Sidebar Using Custom Fields
Usually, most WordPress themes use the same header, footer, and sidebar on all pages.
There are also many ways to show different sidebars, headers, or footers for different pages on your website. You can see our guide on how to display a different sidebar for each WordPress post or page.
One way to do this is by using custom fields. Just edit the post or page where you want to show a different sidebar and then add the sidebar as a custom field.
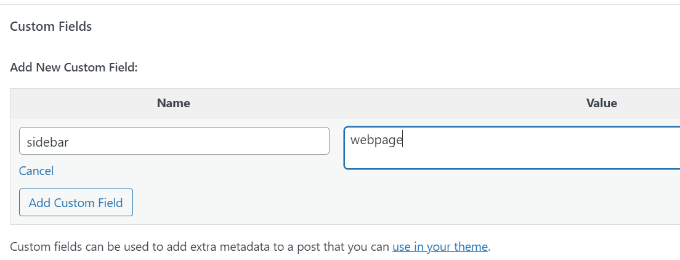
Now, you need to edit your WordPress theme file, such as single.php, where you want to display a custom sidebar. You will be looking for the following code:
<?php get_sidebar(); ?>
Replace this line with the following code:
<?php
global $wp_query;
$postid = $wp_query->post->ID;
$sidebar = get_post_meta($postid, "sidebar", true);
get_sidebar($sidebar);
wp_reset_query();
?>
This code simply looks for the sidebar custom field and then displays it in your theme. For example, if you add webpage as your sidebar custom field, then the code will look for a sidebar-webpage.php file to display.
You will need to create the sidebar-webpage.php file in your theme folder. You can copy the code from your theme’s sidebar.php file as a starting point.
Manipulating RSS feed Content With Custom Fields
Want to display additional metadata or content to your RSS feed users? Using custom fields, you can manipulate your WordPress RSS feed and add custom content into your feeds.
First, you need to add the following code to your theme’s functions.php file or use WPCode (recommended):
function wpbeginner_postrss($content) {
global $wp_query;
$postid = $wp_query->post->ID;
$coolcustom = get_post_meta($postid, 'coolcustom', true);
if(is_feed()) {
if($coolcustom !== '') {
$content = $content."<br /><br /><div>".$coolcustom."</div>
";
}
else {
$content = $content;
}
}
return $content;
}
add_filter('the_excerpt_rss', 'wpbeginner_postrss');
add_filter('the_content', 'wpbeginner_postrss');
Now, just create a custom field called ‘coolcustom’ and add any value you like. You can use it to display advertisements, images, text, or anything you want.
For more details, please see our guide on how to copy and paste code from the web into WordPress.
How to Manipulate RSS Feed Title With Custom Fields
Sometimes, you may want to add extra text to a post title for RSS feed users. For example, this can be handy if you are publishing a sponsored post or a guest post.
First, you need to add the following code to your theme’s functions.php file or use WPCode to add the custom code snippet without breaking your website:
function wpbeginner_titlerss($content) {
global $wp_query;
$postid = $wp_query->post->ID;
$gpost = get_post_meta($postid, 'guest_post', true);
$spost = get_post_meta($postid, 'sponsored_post', true);

if($gpost !== '') {
$content = 'Guest Post: '.$content;
}
elseif ($spost !== ''){
$content = 'Sponsored Post: '.$content;
}
else {
$content = $content;
}
return $content;
}
add_filter('the_title_rss', 'wpbeginner_titlerss');
Next, you need to edit the post where you want to display the extra text in the title field.
Then, add guest_post and sponsored_post as custom fields.
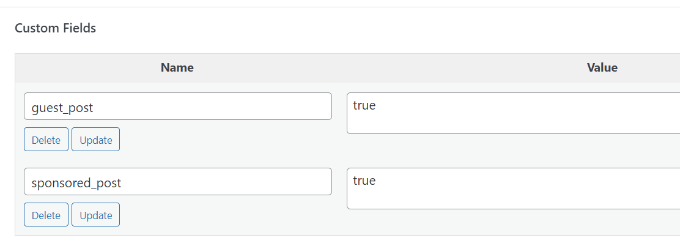
If either of these two custom fields is found with a value “true”, then the code will add the appropriate text before the title. This technique can be used in many ways to fit whatever you like.
Want to learn more cool RSS feed hacks? See our guide on how to add content and manipulate your WordPress RSS feeds.
How to Set Expiration Date for Posts in WordPress Using Custom Fields
Want to set an expiration date for some posts on your WordPress site? This comes in handy when you want to publish content only for a specific period, like running surveys or limited-time offers.
One way to do this is by manually removing the post content or by using a plugin like Post Expirator.
Another option is using custom fields to automatically expire posts after a specific time. You will need to edit your theme files and modify the WordPress loop like this:
<?php
if (have_posts()) :
while (have_posts()) : the_post();
$expirationtime = get_post_meta($post->ID, "expiration", false);
if( count( $expirationtime ) != '' ) {
if (is_array($expirationtime)) {
$expirestring = implode($expirationtime);
}

$secondsbetween = strtotime($expirestring)-time();
if ( $secondsbetween >= 0 ) {
echo 'This post will expire on ' .$expirestring.'';
the_content();
} else {
echo "Sorry this post expired!"
}
} else {
the_content();
}
endwhile;
endif;
?>
Note: You will need to edit this code to match your theme.
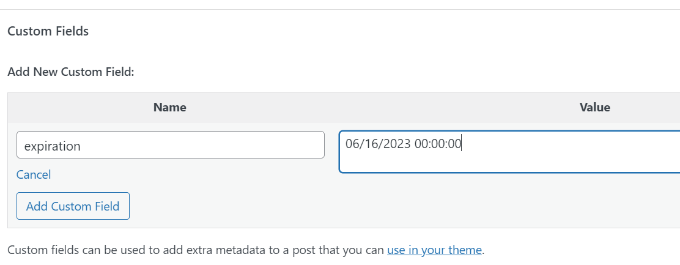
After adding this code, you can add the expiration custom field to the post you want to expire. Make sure you add the time in this format: mm/dd/yyyy 00:00:00.
How to Style Individual Posts Using Custom Fields
Want to change the look of an individual post using CSS? WordPress automatically assigns each post its own class, which you can use to add custom CSS.
However, by using custom fields, you can add your own custom classes and then use them to style posts differently.
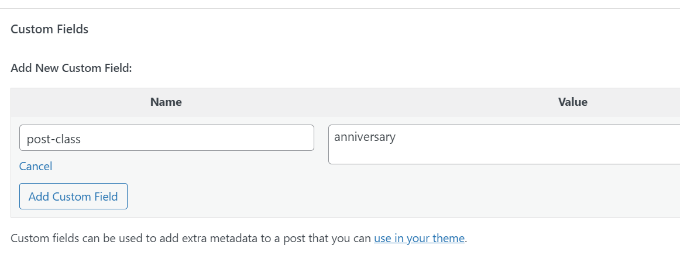
First, you need to edit a post that you would like to style differently. Go to the Custom Fields box and add the post-class custom field.
Next, you need to edit your WordPress theme files and add this code at the beginning of the WordPress loop:
<?php $custom_values = get_post_meta($post->ID, 'post-class'); ?>
Now, you need to find the line with the post_class() function.
Here is how it looked in our demo theme:
<article id="post-<?php the_ID(); ?>" <?php post_class(); ?>>
You must change this line to include your custom field value like this:
<article id="post-<?php the_ID(); ?>" <?php post_class($custom_values); ?>>
Now if you examine the post’s source code using the Inspect tool, then you will see your custom field CSS class added to the post-class.
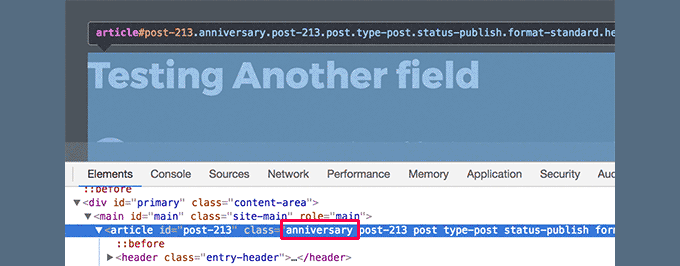
You can now can use this CSS class to add custom CSS and style your post differently.
We hope this article helped you learn more about WordPress custom fields. You may also want to see our guide on how to add custom fields automatically on post publish and the best WordPress page builder plugins to help you design your website the way you want.
If you liked this article, then please subscribe to our YouTube Channel for WordPress video tutorials. You can also find us on Twitter and Facebook.


Syed Balkhi says
Hey WPBeginner readers,
Did you know you can win exciting prizes by commenting on WPBeginner?
Every month, our top blog commenters will win HUGE rewards, including premium WordPress plugin licenses and cash prizes.
You can get more details about the contest from here.
Start sharing your thoughts below to stand a chance to win!
kzain says
I was trying to find something that would actually explain to me what are custom fields and man This article does it incredibly well.
The step-by-step guide is great, but to me, it felt a little overwhelming cause all of the information was a lot for me. Overall, a great resource for beginners and pros alike! I have a quick question though. How to add a custom field for an image? BIG thank you.
WPBeginner Support says
The simplest way to add that would be to use the Advanced Custom Fields plugin.
Admin
Moinuddin Waheed says
This is hands down the most detailed illustration about the custom fields in WordPress.
I have used many custom fields but never knew what exactly it was and how it was behind the scene.
This guide is very relevant and helpful for me to increase my understanding about the custom fields.
Thanks wpbeginner for this tutorial.
Jiří Vaněk says
Custom fields in WordPress are still something I know of, vaguely understand how it works, but I’ve never really delved into it. Whenever I read guides on discussion forums, many people refer to it. This guide will finally help me to get started, study this topic better, and fully engage with it.
WPBeginner Support says
Glad we could help clear this up
Admin
Himanshu Gautam says
I have done the same
but every theme has different files.
so its works well after putting the code in meta.php to display all the custom meta fields on the posts page.
but on another website with a different theme, I can not understand where to place the code.
WPBeginner Support says
If it is not working with a specific theme then we would recommend reaching out to that theme’s support and they can normally assist with how it would work with their theme.
Admin
Peter says
Is it also possible to use custom field values in functions.php?
For example a true/false value to avoid enqueuing a special script which i just want to use at special posts/pages?
WPBeginner Support says
Yes, you could do that if you wanted.
Admin
Tony says
If i use custom fields to store data for CF7 such as the email address related to an individual branch page, do i need to alter or add anything into the theme folders? I dont want to display this content in the page, but have it available for use by CF7……if that makes sense.
WPBeginner Support says
You would want to reach out to the plugin’s support for how to set that up. By default, your theme wouldn’t display that data.
Admin
Tamer Ziady says
Is there a way to force custom fields? I.E. if a post doesn’t have a specific field filled out; can the author be told they have to fill out this field?
WPBeginner Support says
While we don’t have a recommended method at the moment, we will be sure to take a look.
Admin
Mike Claggett says
What are you using to build the Table of Contents” on this page?
Are you doing it manually or are you using a plugin.
It’s SUPER COOL – I LUV It.
Thanks for all your hard work.
MC
WPBeginner Support says
We are creating it manually at the moment
Admin
SK says
Hi,
I had the Custom field installed on WordPress 4.3. Due to there is a need to upgrade of WordPress to latest version, after done the upgrade, the Custom Fields seems does work properly. I saw the menu, but in Post or Page I went to screen option i cant see the tick for custom field.
WPBeginner Support says
If you’re using the block editor then you would want to click the verticle ellipsis, go to options, and there you can enable the custom fields the same as you would for screen options.
Admin
Ian says
Hi,
For Manipulating RSS feed Content with Custom Fields, and for other changes, when you say add the following code in your theme’s functions.php file, where exactly are you adding this? I am in Edit Themes and have gone under functions.php and see the code but am clueless on where to add the above example for instance.
WPBeginner Support says
You can add it wherever you like in the file but we normally recommend the end of your functions.php so you can easily remove it should you want in the future
Admin
Dionisis says
What if we would like to add a custom field to the post title?
For example if we would like to add a date at the right of the title?
( i am using forms with custom fields for my visitors that’s why i need a custom field in the title)
WPBeginner Support says
For how to set something like that up, you would want to check the displaying custom fields section in the article here: https://www.wpbeginner.com/wp-tutorials/wordpress-custom-fields-101-tips-tricks-and-hacks/#displaycustomfields
Admin
Norman Murray says
Excellent article with many useful illustrative examples
WPBeginner Support says
Thank you
Admin
Jasmine says
Hi, I want to create a form that will ask users different questions and then have the following page show up with a sidebar menu customized to the answers that the user put in the form. Is this possible with custom fields?
WPBeginner Support says
That is possible but it will likely require custom coding or a custom plugin to set up user-specific displays
Admin
Bill says
Custom Fields DO NOT SHOW in my screen options drop-down. I am running WP 5.2.3 and the Twenty Nineteen theme. Thus, I cannot get to step one. How do I fix this? Thank you.
WPBeginner Support says
For the block editor, screen options would be under the three dots in the top right, then go to options
Admin
Hasse says
What´s the best way to automatically assign a custom field value from the unique blog post ID? The users shouldn´t be able to see or change it. It´s just used for matching data in the text step.
WPBeginner Support says
It would depend on what your goal is with the custom field value. Custom fields are normally for editing content on a post by post basis. If you need the id while editing a post you should be able to get it from the url of the post if you’re using it while editing a specific post: https://www.wpbeginner.com/beginners-guide/how-to-find-post-category-tag-comments-or-user-id-in-wordpress/
Admin
Trang says
Thank you, I’ve spent half a day looking for a way to add a subtitle section without using a plugin. It turns out that I can do that with the custom field.
WPBeginner Support says
You’re welcome, glad our guide could help
Admin
Guilherme R. C. says
I am new to WordPress, and this article has helped me to understand this tool a little more, very easy to follow.
This is great. Thank you!
WPBeginner Support says
Glad our article could help
Admin
Moxet Khan says
One of the most comprehensive article over custom field, highly appreciate the step by step explanation.
Yogesh Gautam says
Thanks WP Beginner!
I was looking for a way to embed a javascript as a custom field in header of specific posts. I didn’t found any accurate and satisfying method to do so.
Thankfully your post helped me to do it in a sec.
Thanks once again!
Arqam Saleem says
This article is really fantastic, please tell me one more thing. How to add custom field for an image ??
Sally Bowles says
Just want to say a BIG THANK YOU!!!!
Tamie says
I want to add a counter to my blog to track the number of visitors, how do I do this?
WPBeginner Support says
Hi Tamie,
Please see our guide on how to install Google Analytics in WordPress.
Admin
Charles says
i want display some custom-fields in all posts that they are in one category.
can I do it? would you help me?
Krish says
I want to place a counter displaying number of posts in a category on Homepage section.
Is that possible with custom fields.
Bob says
Hi there,
Very interesting article indeed…
Actually i need some help related to this subject if possible of course..
1- I have a WordPress website
2- I want user to have a section called my vehicles as part of their profile
3- Users can add or remove vehicles
4- Vehicle record is of 3 related fields : Year / Make / Model
5- The above 3 fields data can be collected from the Carquery API WP by placing short codes in any page as per their instructions.
I am stuck in how to make this process :
1- A user will open a page called my vehicles
2- He can add / remove / edit vehicles
———————————————————————————————————
I don’t mind if there any other way available to achieve what i am looking for..
Thank you in advance…
Jeff Cohan says
Great subject nicely covered!
I’m confused, however, as to why, In the “Set Expiration Date for Posts…” example, the third parameter of get_post_meta() is set to false (NOT single value), and then the code uses implode() to concatenate expiration values if there are multipies. Shouldn’t there be (at most) ONLY ONE expiration value per post? And if there WERE multiples, wouldn’t the implode() function generate an unusable time value?
James Shapiro says
Great article! Any chance you can go into this much depth for adding user fields to the users data base and then using this data for conditional displays at the site? Thanks….
WPBeginner Support says
Hi James,
Please see our guide on how to add additional user profile fields in WordPress.
Admin
Nazgyl says
This article is awesome! thank you for this.
What if I want to have a custom field, and the values are preset and displayed to the author as a dropdown, or a multiselect.
Is that achievable? Would you kindly share a code snippet?
Editorial Staff says
Yes you can most definitely do that with Advanced Custom Fields plugin mentioned above in the article.
Admin