WordPress comes with a standard registration form by default.
However, you may want to allow users to share their social media profiles. Or you might want them to submit their business phone number when registering. You can do all this by adding more profile fields.
Doing this will help you gather specific data to support your website’s goals, whether it’s for a membership site, an online course, or a community forum.
In this article, we will show you how to easily add additional user profile fields in WordPress registration forms.

Why Add Additional User Profile Fields in WordPress Registration?
By adding more user profile fields to your WordPress website’s registration form, you can collect extra information from users. This can help you improve marketing campaigns, personalize content, or learn more about your audience.
For example, you can ask your users to provide their phone numbers or social media profiles when registering on your WordPress site.
This way, you will be able to send targeted SMS messages to your users or ask them to promote your WordPress blog on their social media accounts.
All these extra fields can be handy if you run a membership website or allow users to sign up as subscribers to your blog. They can also be helpful if you want to store extra contact information for the other writers on your multi-author blog.
That being said, let’s see how to easily add additional user profile fields in WordPress. For this tutorial, we will be discussing two methods, and you can use the links below to jump to the method of your choice:
Method 1: Add Custom User Profile Fields Using Advanced Custom Fields (Recommended)
The best way to add extra user profile fields in WordPress is to use the Advanced Custom Fields plugin. It lets you choose from multiple fields and customize them to fit your needs.
First, you need to install and activate the Advanced Custom Fields plugin. For more details, see our step-by-step guide on how to install a WordPress plugin.
Once you activate the plugin, simply go to the ACF » Field Groups page from the WordPress admin sidebar and click the ‘+ Add Field Group’ button.
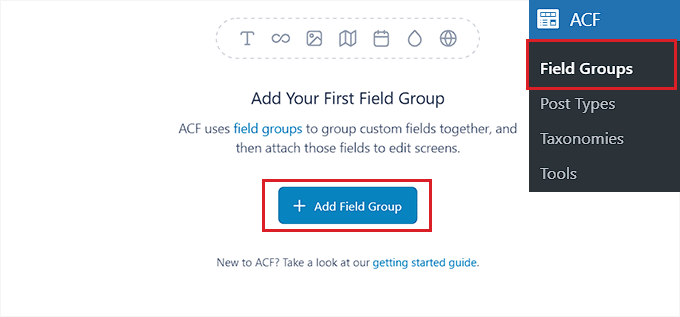
This will take you to a new page where you can start by typing a name for the field group.
Keep in mind that this will be the name of the entire field group and not the individual user’s field.
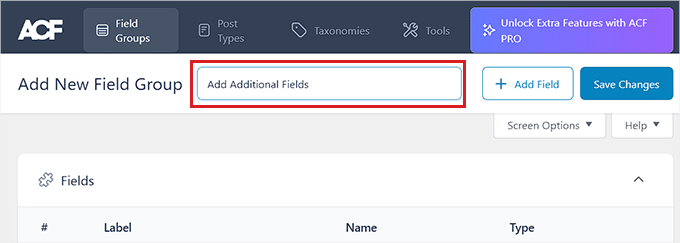
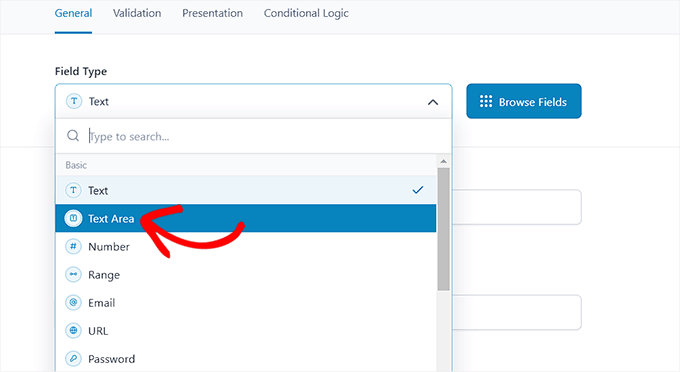
After that, scroll down to the ‘Fields’ section and choose a field type from the dropdown menu.
For example, if you want users to provide their phone number upon registration, then you can choose the ‘Number’ option. Alternatively, if you want users to provide their social media profiles, then you can pick the ‘Text’ option.
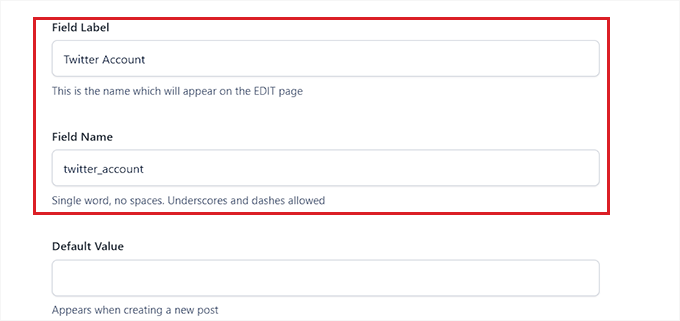
Once you have done that, just type the name of your field into the ‘Field Label’ option. For instance, if you want users to provide their Twitter handle before registering, then you can enter that into the field.
The plugin will then automatically generate a field name according to your label name.
Next, you need to switch to the ‘Validation’ tab at the top. Here, you can make the field required by toggling the switch.
This way, users won’t be able to register on your WordPress site without filling in the additional field.
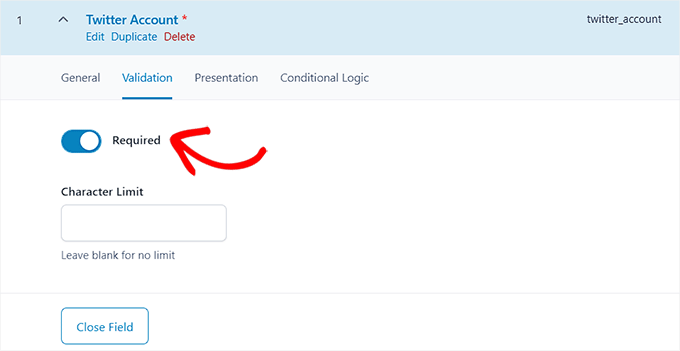
After that, you can even set a character limit for your custom field.
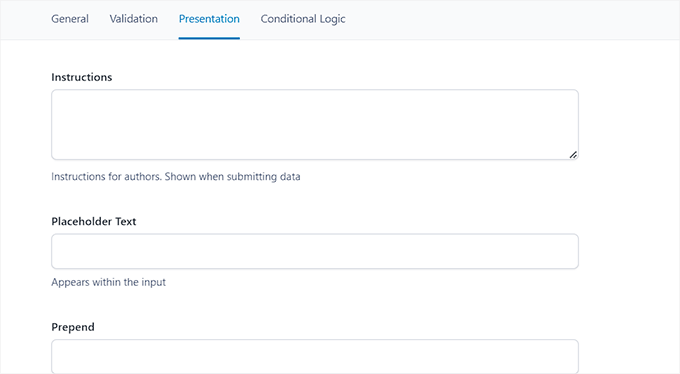
Now, switch to the ‘Presentation’ tab at the top.
Once you are there, you can add placeholder text, instructions, and wrapper attributes for your additional user profile field.
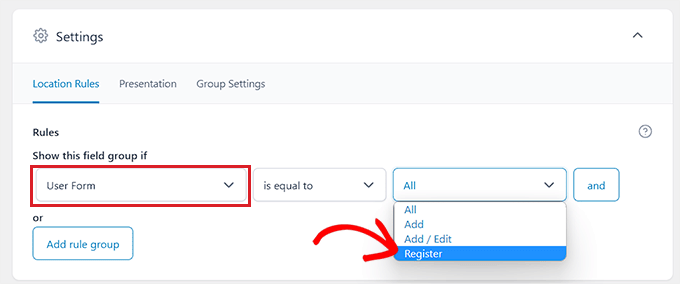
Next, scroll down to the ‘Settings’ section and make sure that the ‘Location Rules’ tab is selected. Here, you need to set up conditional logic for your custom field so that it will only be displayed for your WordPress site registration form.
To do this, select the ‘User Form’ option from the dropdown menu in the left corner of the screen. After that, choose the ‘Register’ option from the dropdown menu in the right corner.
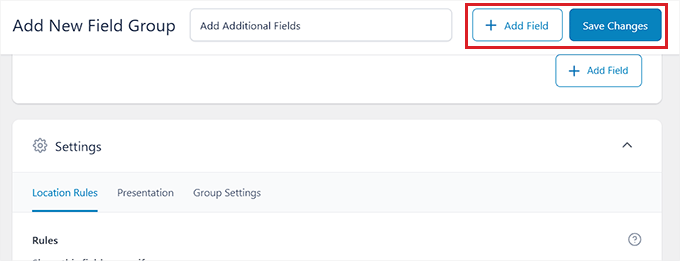
Finally, click the ‘Save Changes’ button at the top of the screen to store your settings.
If you want to add another additional field, then you can also click the ‘+ Add Field’ button.
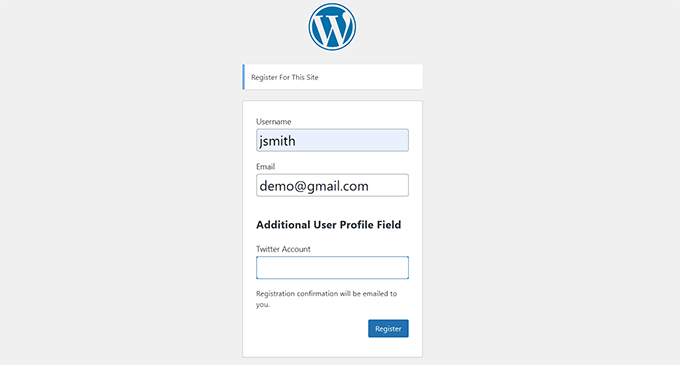
Now visit your user registration page to view the additional user profile field in action.
This is how it looked on our demo website.
Method 2: Add Additional User Profile Fields With Profile Extra Fields (Easy & Simple)
This method lets you quickly and easily add extra fields to user profiles and user registration forms in WordPress. It is a little less flexible, but it gets the job done.
First, you need to install and activate the Profile Extra Fields plugin. If you are not sure how to do this, then you can check out our full guide on how to install a WordPress plugin.
Once the plugin is activated, it is time to create some additional user profile fields to use on your registration forms.
We are going to create a phone number field as an example, but you can add as many of these fields as you want.
First, visit the Profile Extra Fields » Add New page from the WordPress admin sidebar. From here, type the name of the field next to the ‘Name’ option.
For example, if you are creating a field for users to submit their phone number, then you can type ‘Phone Number’ as the field name.
After that, select a field type from the dropdown menu. If you are adding a social media profile field, then you can use the ‘Text Field’ option.
However, if you want a field for phone numbers, then you need to select that option from the dropdown menu.
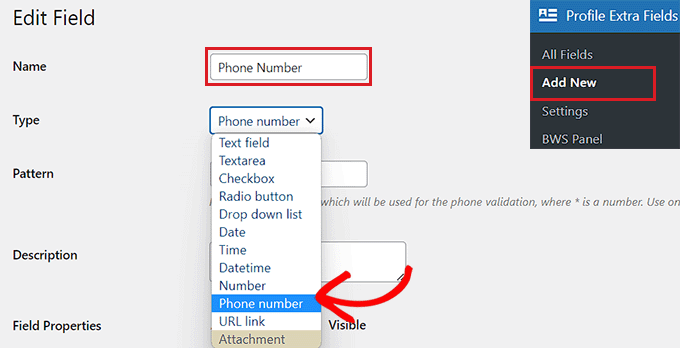
After that, you can also type a pattern for your phone number field or add a description for it.
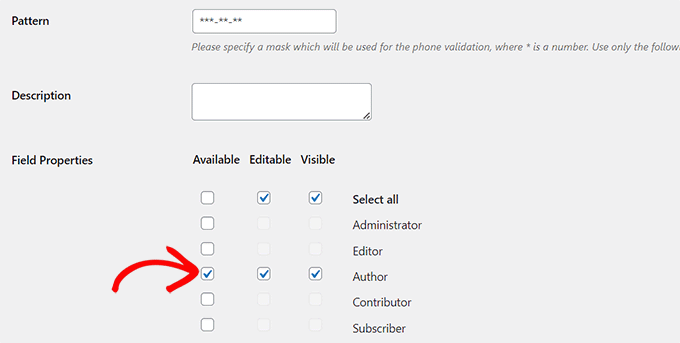
Next, scroll down to the ‘Field Properties’ section and check the boxes for the user roles you want this field to be displayed for.
For instance, if you want this field to be displayed for all the authors registering on your WordPress site, then you can check the box next to this user role.
You can choose as many user roles as you want.
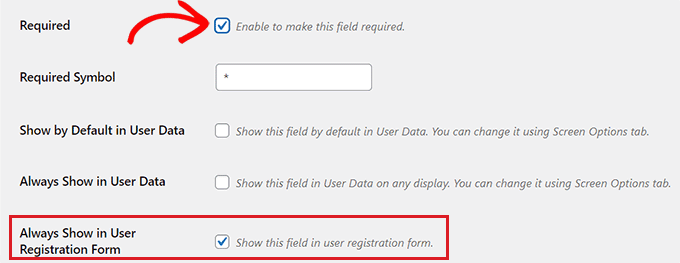
After that, you can also check the ‘Required’ box if you do not want users to register without filling in this field on the form.
Make sure that the ‘Always Show in User Registration Form’ box is checked so that your user field will be displayed in the form.
Finally, click the ‘Save Changes’ button to store your settings.
Now, you will need to go to your WordPress dashboard to change some settings for new registrations.
Head to the Settings » General page in your WordPress admin area and then check the membership box so that anyone can register on your website.
Next, you need to make sure that the default role is set to the role which you have added extra fields for. After that, click the ‘Save Changes’ button to store your settings.

This way, you can control the level of access new users have, and this will force the registration form to show the fields you selected earlier in this tutorial.
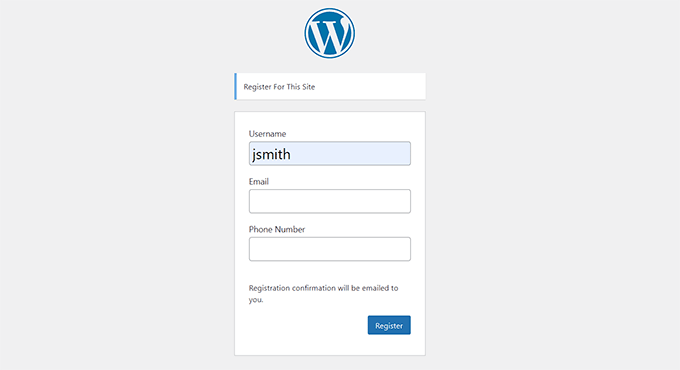
Here’s what the default registration form looked like on our demo website.
Bonus: Make a Custom User Registration Form in WordPress
The methods in this tutorial have shown you how to add extra user profile fields to the default WordPress registration form.
However, if you would like to create a custom user registration form in WordPress, then you can also easily do that by using the WPForms plugin.
In our opinion, it is the best WordPress form plugin. We have used it to create contact forms and annual surveys. To learn more about our experience, see our complete WPForms review.
It lets you easily design your user registration form using a drag-and-drop editor. It also integrates seamlessly with plugins like Advanced Custom Fields, so you can easily insert additional user profile fields.
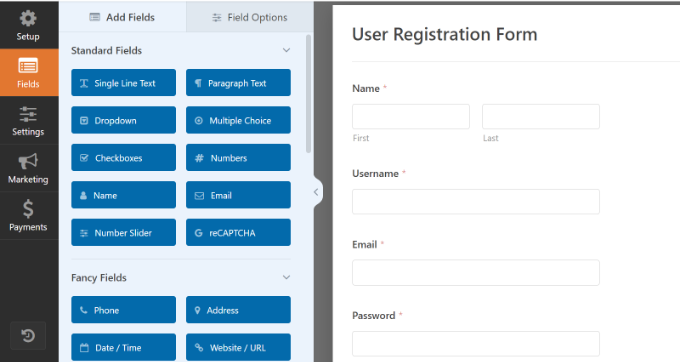
For detailed instructions, please follow our tutorial on how to create a custom user registration form in WordPress.
We hope this tutorial helped you learn how to add additional user profile fields in WordPress registration. You may also want to see our beginner’s guide on how to create a custom WordPress login page and our comparison of the best front-end posting plugins for WordPress.
If you liked this article, then please subscribe to our YouTube Channel for WordPress video tutorials. You can also find us on Twitter and Facebook.


Dennis Muthomi
One thing I’d add is to carefully consider which fields are truly necessary, as too many can deter sign-ups. It might be helpful to discuss how to prioritize which custom fields to include based on different website goals.
Good resource WPBeginner!
Jiří Vaněk
Thank you for the guide. It’s great to have the option to add things like age and geolocation to the registration form, which interest me about the users. It makes it easier to identify the target audience and tailor the website design or content topics accordingly. Awesome.
BTW: I know I can find out a lot more in Google Analytics, but I’m still navigating through it. Are you planning to write an article with a detailed description of Google Analytics? If so, I haven’t found it yet.
WPBeginner Support
We don’t have a guide for Google Analytics at the moment but we would recommend taking a look at MonsterInsights to help with understanding Google’s data
Admin
Othman Deraz
I am looking for a free question and answer plugin that can add additional information to the user profile.
Such as weight, height and preferences.
Thank you!
Jonathan Kotwicki
Need some advice here….how can I export the custom user registration fields into an excel sheet or something like that? I.e. if users say “how they heard about us”, how can I go back and view that information for a large number of users without having to individually go into each user profile?
Thank you very much for any help!
-Jon
Gabrielle
Hi everyone, i like to build stuff for WP without using external plugins, so i build my own. I sucesfully added social media fields to all users > user profile form.
But i’ve stuck in adding dropdown menu for country.
Is there any WooCommerce specialist here?
There is dropdown functionality inside class-wc-countries.php file, and i’am dying to add the same dropdown menu in registration form and on user profile form.
Of course this is taken for woocommerce, but how to extract this code to work with WC deactivated ?
Sorry for my poor English.
leev
great plugin, but how do i get the extra field to display in the author.php
RunDEv
This is a great plugin!
However, I’ve probably found a bug.
I’m using WP 4.1.2 with Cimy User Extra Fields, but uploaded files are not showing up in the user’s profile and fields.
Note: I can only upload files in the backend of WP.
Who has the solution? Or is there a better and fully working alternative?
Thank You!
WPBeginner Support
If you think you have found a bug in the plugin, then please reach out to plugin authors using the support tab on the plugin website.
Admin
Antok Prima
I have follow all tutorial and prepare data for country, region/province & city. But I don’t how to make it selectable from dropdown list.
Any sugestion how to solve this?
Thanks
Anon
And how can I check (either with php or js) if certain user matched following option in his profile? (I want to display info regarding of matched on/off option)
Syaifuddin Hamzah
I just found this tutorial and it really save me lots of time for my new project. I used Oi Frontend Profile to enable users to update their profile details including the fileds created by Cimy User Extra Fileds (CUEF) on frontend. It works until one of my user complaining that once he click update profile, the fields created by CUEF is gone and not updated. Only default WP fields is updated.
I looked around and found other developer with the same issue here: https://stackoverflow.com/questions/11874083/wordpress-edit-user-and-cimy-user-extra-fields. He found a way to fix the bug by adding “cimy_uef_” to the front of fields name. I just dont understand what he meant by adding “cimy_uef_” to the front of fileds name. Where/how should I add “cimy_uef_” to fix this? Please help. Thanks.
Lalit Nagrath
i have just added a new custom field but how do i make it as required?
Syaifuddin Hamzah
I guess uncheck the “Can be empty” checkbox will make it required.
SaWKaT
Yes this plugin is so good and easy to use. But I do not understand how to show an extra-field in a page. Have any short code? Can anyone help me?
wuha
get_cimyFieldValue($curauth->ID, ‘value’
David
This plugin is the worst user friendly plugin ever
Editorial Staff
Would love to see your review in the WordPress.org repository. Please highlight specific issues and perhaps give pointers, so the plugin author can improve the issues. Simply saying it is worst user friendly plugin ever doesn’t really help anyone
Admin
Mike
From what I’ve seen the plugin author doesn’t respond well to criticism or help requests…
The documentation needs a lot of work, but the plugin itself is largely quite functional. In the end I had to come up with a slightly hacky javascript solution to apply a placeholder attribute to fields generated by the plugin, but it did what I needed.
David
Lol, i didnt have time, anyways here is a better plugin than cimy and does the same thing.
http://wordpress.org/plugins/register-plus-redux/
Do a review on it.
Zeeshan
Thanks for it, wonderful article.
Mike
Great article, very helpful! Do you know if it’s possible to add the HTML5 placeholder attribute to text fields generated by this plugin?
Editorial Staff
No entirely sure. Please contact the plugin developer for that.
Admin
Adrian
Great article, thank you!
If besides extra user fields, you’re looking also for front-end login, registration and edit profile functionality, then Profile Builder may be an alternative worth looking into: http://wordpress.org/extend/plugins/profile-builder/
Evelyn
Thanks for another great post! This is the most valuable page I follow!
Karen F
Thanks for the great plugin info. I hope you won”t be recommending Code Canyon / Envato – premium plugins. I’ve just had the nasty experience of purchasing one of their products. Before getting to download it the developer took it down & Envato told me that I had to deal with the developer who never answered my email. Envato does not stand by it’s customers despite collecting 50% of purchase fees! Wow. That was money down the drain.