Custom post types offer a great way to create dynamic WordPress content beyond standard posts and pages. Imagine seamlessly adding products, reviews, recipes, and more, all tailored to fit your website’s needs.
Whether you’re running an eCommerce store, a review site, or a food blog, custom post types can help you organize your content precisely the way you want.
But where do you start? Navigating the ins and outs of custom post types can be intimidating, especially if you’re new to WordPress.
To help you get started and make the most of this powerful feature, we’ve curated a list of the 12 most useful WordPress custom post types tutorials. Our expert tips will guide you in creating content that stands out and engages your audience.

What Are Custom Post Types in WordPress and Why Use Them?
Custom post types are content on your WordPress site that are not the default posts and pages. They’re often added to a WordPress site using custom code or plugins.
For example, you can create custom post types for portfolios, testimonials, and products. Many WordPress plugins also use custom post types to store data on your website.
Custom post types can help you:
- Enhance readability. By categorizing content types separately, you make it easier for your audience to find what they’re looking for. Besides improving readability, custom post types can boost your site’s overall user experience.
- Improve content management. Custom post types enable you to manage different types of content with dedicated sections in your WordPress admin.
- Boost SEO. Structured content can improve SEO by helping search engines understand your site’s layout and content.
If you run an online store, you can use custom post types to manage products, orders, and customer reviews.
On a review site, custom post types let you separate different types of reviews, such as books, movies, or technology gadgets, to maintain an organized site.
Custom post types are super handy for food blogs, too. They let you easily organize your recipes with separate sections for ingredients, preparation steps, and nutritional information.
Now, the big question is: how can you use custom post types on your WordPress website?
As the largest free WordPress resource site for beginners, we’ve written a lot about custom post types over the years. In the following sections, we’ll walk you through the most useful custom post types tutorials.
Here’s a quick overview of all the topics we will cover:
- Decide Whether You Need A Custom Post Type
- Create Custom Post Types in WordPress
- Create a Custom Post Types Archive Page
- Add Custom Post Types to Your Main RSS Feed
- Make a Separate RSS Feed for Each Custom Post Type
- Include Custom Post Types in Search Results
- Create a Search Form for Custom Post Types
- Add Categories to a Custom Post Type
- Add Sticky Posts for Custom Post Types
- Add User Submitted Content to Custom Post Types
- Switch or Convert Custom Post Types
- Add Custom Meta Boxes for Post Types
Ready? Let’s jump right in.
1. Decide Whether You Need A Custom Post Type
Before you start creating custom post types or taxonomies on your WordPress site, it’s important to evaluate your needs. However, the built-in WordPress posts and pages can sometimes handle your content requirements without the extra complexity of custom types.
With the help of built-in categories and tags, you can sort your content in many different ways.
For example, with pages, you can set up a hierarchical layout of content with child pages. You can also set up subcategories.
Using the default WordPress features makes content management easier in many ways. For example, a custom post type wouldn’t appear on your blog page or in your post’s RSS feeds.
After looking at the default options, you may find that you don’t need custom post types after all.
If you are unsure, then refer to this guide about when you need a custom post type or taxonomy in WordPress.
2. Create Custom Post Types in WordPress
Once you decide that you do need a custom post type, you’ll need to create it. You can do this with a plugin or manually by using code.
The Custom Post Type UI plugin makes it easy to create custom post types and is recommended for most users. To get started, you can navigate to ‘Edit/Add Post Types.’
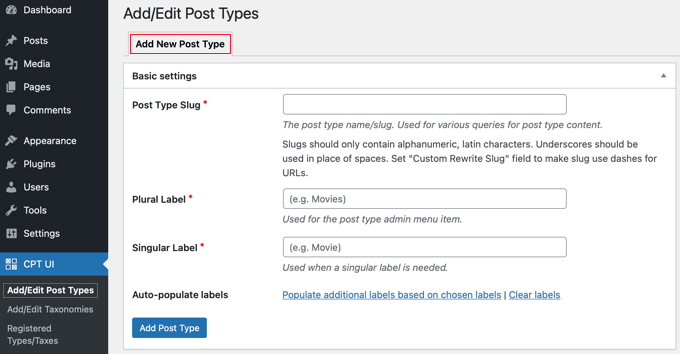
Alternatively, you can add a custom post type by pasting a code snippet into your theme’s functions.php file. The advantage of this method is your custom post types won’t disappear if the plugin is deactivated, but it’s only suitable if you’re comfortable handling code.
To learn more, see our guide on how to create custom post types in WordPress.
3. Create a Custom Post Types Archive Page
Adding custom post types in WordPress has become very easy, thanks to the Custom Post Type UI plugin. However, many beginners have trouble displaying them on their websites.
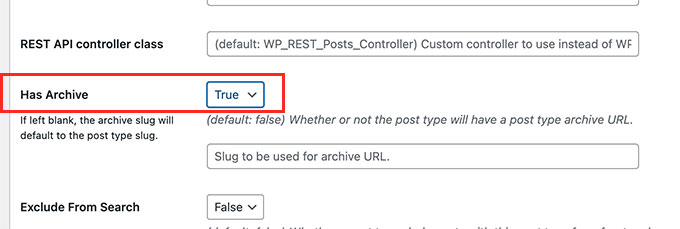
To add a custom post type archive page, you first need to make sure that archives are enabled for your custom post type. In most cases, they are, but if not, you can enable them in Custom Post Type UI’s advanced options or by using code.
Now, you can visit the custom post-type archive page.
Let’s say your custom post type is called ‘movies’, and you have SEO-friendly permalinks enabled. Then, your post-type archive will be located at:
http://www.example.com/movies/
You’ll need to replace ‘example.com’ with your own domain name and ‘movies’ with your custom post type name.
You can now add this archive page to your navigation menu. You can also customize it by adding a custom template to your WordPress theme or using a theme builder like SeedProd.
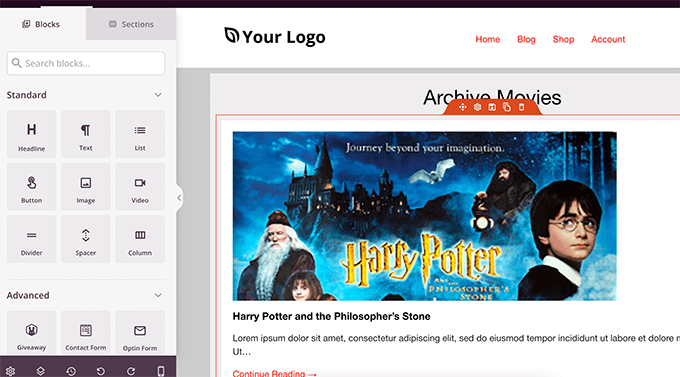
We show you how to do all of these things step by step in our guide on how to create a custom post types archive page in WordPress.
4. Add Custom Post Types to Your Main RSS Feed
By default, WordPress only includes your blog posts in your site’s main RSS feed. This means that your custom post-type content won’t be visible to your main RSS feed subscribers.
You can include all publicly available post types in your main RSS feed by modifying your theme’s functions.php file. However, we don’t recommend this method because it’s not very beginner-friendly.
The easier and safer alternative is to use WPCode. This plugin lets you add custom code snippets without directly editing your theme files and potentially breaking your website.
To get started, let’s make sure you have WPCode installed and activated on your WordPress website. If you need help, then you can see our guide on how to install a WordPress plugin.
Upon activation, you’ll want to navigate to Code Snippets » + Add Snippet. Then, you can copy the following code and paste it into the field:
function myfeed_request($qv) {
if (isset($qv['feed']))
$qv['post_type'] = get_post_types();
return $qv;
}
add_filter('request', 'myfeed_request');
For more details, see our guide on how to add custom post types to your main WordPress RSS feed.
5. Make a Separate RSS Feed for Each Custom Post Type
WordPress automatically generates separate RSS feeds for different archive pages of your website, including custom post types.
Let’s say your website has a custom post type called ‘movies.’ We’ve already seen that you can view all content created in that post type by visiting the post type archive page:
https://example.com/movies
To view the RSS feed, all you need to do is add /feed/ to the custom post-type archive URL.
https://example.com/movies/feed/
Alternately, you can also view the feed by adding the post type parameter to your main WordPress RSS feed. For example:
https://example.com/feed/?post_type=movies
Now that you know how to access the RSS feeds for any custom post type on your website, you can use that URL to create links to your custom post type feeds.
For instance, you may want to display an icon or plain text link on the custom post-type archive page so that your visitors can easily subscribe to those posts.

To learn how to do that, you can see our guide on how to make a separate RSS feed for each custom post type in WordPress.
6. Include Custom Post Types in Search Results
By default, WordPress will never show custom post types in its on-site search results. That means your visitors may miss out on some great content, and you’ll miss out on extra page views.
The easiest way to include custom post types in WordPress search is with the SearchWP plugin. It’s easy to use and lets you search content not included in the default WordPress search.
To include custom post types in your searches, simply click on the plugin’s ‘Sources & Settings’ button. Here, you can put a checkmark next to each post type you wish to include in search results.
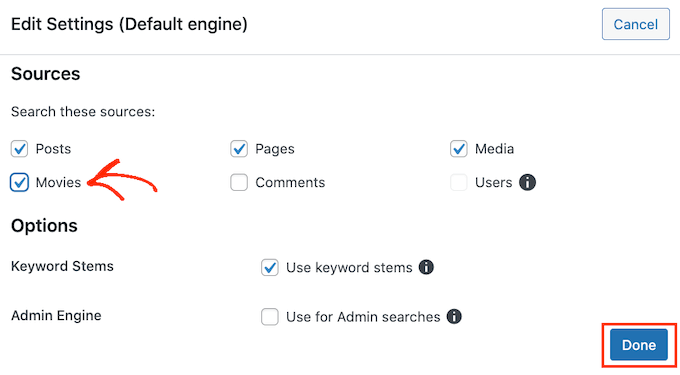
You can also choose how important each custom post type is when displaying search results and customize the search engine in other ways.
To learn how, you can see our step-by-step guide on how to include custom post types in WordPress search results.
7. Create a Search Form for Custom Post Types
You can also create a custom search form that only shows results from your custom post type. For example, if you have a custom post type called ‘movies,’ then you can create a special movie search form that only returns movies in the search results.
This kind of custom search helps your visitors view more pages and spend more time on your website. This will give off positive WordPress SEO signals like lower bounce rate and increased dwell time.
You can create an advanced search form for custom post types using the SearchWP plugin. It allows you to create a second search engine that will only search your custom post type. You can then create a custom search form that you can add to your posts or sidebar.
For more details, see our guide on how to create an advanced search form in WordPress for custom post types.
8. Add Categories to a Custom Post Type
By default, WordPress categories can only be used to organize posts, not custom post types.
You could create a custom taxonomy to organize your custom posts, but what if you want to use the same categories you use for your blog posts?
The easiest way to associate your custom post type with categories is the Custom Post Type UI plugin. It adds a ’Taxonomies’ area in the settings for each custom post type.

Simply check the ‘Categories (WP Core)’ box, and you will be able to use categories to organize your custom post types.
Check out our guide on how to add categories to a custom post type in WordPress to learn more.
9. Add Sticky Posts for Custom Post Types
The sticky posts feature in WordPress allows you to add featured posts. By default, it only works for blog posts and not for custom post types.
You can enable sticky posts for your custom post types as well by installing the Sticky Posts – Switch plugin. You simply check the box next to the custom post types that you wish to support this feature.
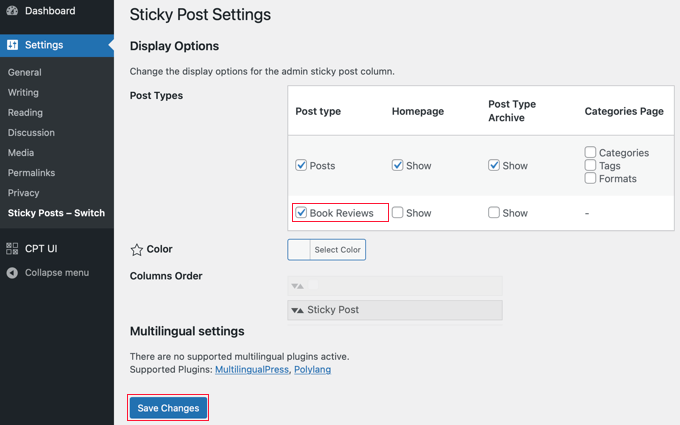
Now, when you visit the admin page for that custom post type, you will notice a new column where you can make posts sticky.
All you need to do is click the star next to the posts you wish to feature.
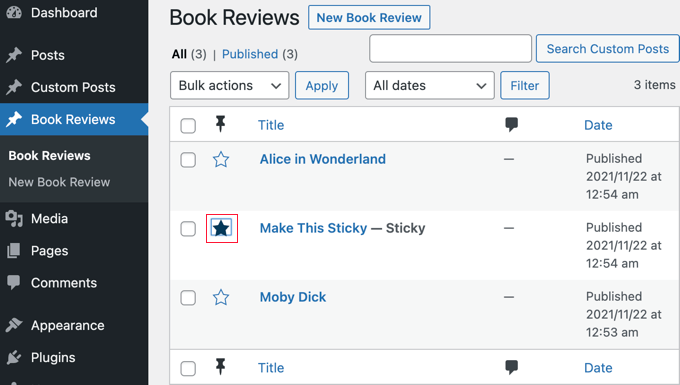
These sticky posts will be shown on your WordPress homepage. To display sticky posts on your custom post-type archive page, you’ll need to add some code to your theme files.
You’ll find all the details in our guide on how to add sticky posts in WordPress custom post type archives.
10. Add User Submitted Content to Custom Post Types
You may want to allow users to submit content for custom post types on your site, such as movie reviews or recipes. This is an easy way of adding extra content to your site.
One way to do this is by giving users access to your WordPress admin area and assigning them the author user role. Alternatively, you can add a submission form to your website.
You can do that using the WPForms plugin. Note that you will need the Pro version to access the post submissions addon and use the ‘Blog Post Submission Form’ template to create the form easily and quickly.
By default, user-submitted posts are saved as ‘Drafts’ pending review. You can change the post type in the form’s settings so content is submitted to a custom post type instead.
For more details, you can visit our how to allow users to submit posts to your WordPress site guide.
11. Switch or Convert Custom Post Types
You may come across situations where you will have to merge or convert custom post types. For example, you want to move items from one post type to another.
To do this, simply install and activate the Post Type Switcher plugin. Upon activation, you should go to the custom post type admin page and select the posts you want to move.
When you bulk edit the posts, you will notice a new drop-down menu allowing you to change the post type for each item.
You can learn more in our guide on how to switch or convert custom post types in WordPress.
12. Add Custom Meta Boxes for Post Types
Custom meta boxes allow you to add custom fields to the WordPress post editor screen. This way, you can create additional input fields for your post types.
The easiest way to create custom meta fields in WordPress is to use the Advanced Custom Fields plugin. Simply click the ‘Add New’ button on the Custom Fields page.
After that, you should follow the on-screen instructions to create a group of custom fields to add to your custom post type.
For further details, see our step-by-step guide on how to add custom meta boxes in WordPress posts and post types.
We hope this tutorial helped you learn some cool tricks for custom post types in WordPress. You may also want to see our guide on how to create a custom home page in WordPress or check out our list of the best related posts plugins for WordPress.
If you liked this article, then please subscribe to our YouTube Channel for WordPress video tutorials. You can also find us on Twitter and Facebook.


Syed Balkhi says
Hey WPBeginner readers,
Did you know you can win exciting prizes by commenting on WPBeginner?
Every month, our top blog commenters will win HUGE rewards, including premium WordPress plugin licenses and cash prizes.
You can get more details about the contest from here.
Start sharing your thoughts below to stand a chance to win!
Jiří Vaněk says
Thank you for the overview. I’m still learning and familiarizing myself with custom post types as many people have referred to them when I needed to solve something. Each article like this one immensely helps me further my understanding of the concept and potential of custom post types.
Mensah Ernest says
thanks for this helpful article. I really appreciate
WPBeginner Support says
Glad our article was helpful!
Admin
abolfazl says
thanks a lot so helpful
Scott R. Godin says
One thing I see missing from many tutorials is the part where you add a Custom Options/Settings page to your Custom Post Type so you have a set of global settings that are specific to that post type (rather than a general admin settings page) and intended to be used only by that post type.
most of the tutes I’ve found in this regard stop at echo ”; echo ‘Here is where the form would go if I actually had options.’; echo ”;
and naturally that’s one of the things I’m most interested in (the other being in how you use the settings within your post type’s shortcode or widget)
Sam says
how to enable disquss comment on costum post type?
Phil Long says
I was wondering how ti implement many to many relationships between custom taxonomies and whether facetted search plugins support them?
Sydney says
If you want to implement many to many relationship, you are stretching wordpress too far. You will get better mileage with a framework like rails, djangoor express
Alicia St Rose says
One can never stretch WordPress too far. It’s not just for blogging anymore.
yudayuda says
wp-types supports many-to-many relationships – and it’s free
Prateek says
I want to know How can we exclude a custom post type from our rss feed..All my download pages are showing up in the rss feed..
Wondell says
How can I get WordPress posts to behave like Facebook and other social networks where you can just take a web link and paste it in the message field and in a matter of sections it will show a thumbnail or other information from the site?
Bjarni says
Hi WpBeginner, by chance dod you use CPT UI plugin on this site?
CPT UI plugin looks good, save having to manual set this up in a site that needs CPT and Taxonomies.
Phil Hoyt says
good read, I use CTP’s on a daily basis and relationships between the two can be tricky, I’ve used Post2Posts and Advance Custom Fields also has some Relationship values, but usually leave me with some features to be desired. I look forward to trying CPT-onomies.
Mark says
CPT UI can be a little tricky. CPT-onomies works pretty well too. They both take a little patience and digging to find out how they works. I was able to create a movie site importing from omdb. It would add the actors, etc as taxonomies (wp_add_object_terms & wp_set_object_terms) then used ACF to use that information. An example would be an actors page (cpt-axonomy) and selecting the movies they have been in.