Adding your WooCommerce store to Facebook can open up new opportunities for your business. It lets you showcase products to a broader audience and drive more traffic to your online store.
However, setting up a Facebook store can be tricky if you’re unfamiliar with the process. If you don’t follow the proper steps, you might face integration issues or miss out on features that could boost sales.
But don’t worry. We’ve researched a lot of tools to help you do this without unnecessary headaches, and we’ve found the perfect plugin.
Facebook for WooCommerce allows you to sync products between your WooCommerce store and Facebook. It helps you set up a Facebook shop quickly so your customers can browse and even purchase products directly from your Facebook page.
In this guide, we’ll walk you through the process of connecting your WooCommerce store to Facebook, step by step.
Why Add Your WooCommerce Store to Facebook?
According to our marketing research report, Facebook has over 2.9 billion monthly active users, making it the most popular social network in the world.
By adding your products to Facebook, you can promote your online store to millions of people and increase sales.
After connecting your WooCommerce store to Facebook, anyone who visits your page can click on a new ‘Shop’ tab and see all your WooCommerce products.
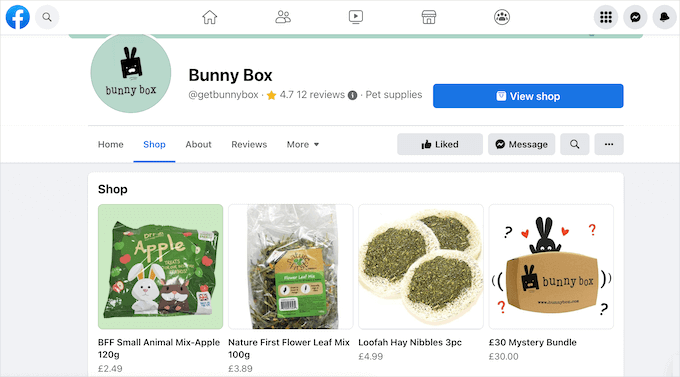
If Facebook users see a product they like, then they can click it to see more information without ever leaving Facebook.
Depending on how your site is set up, you might encourage people to view this product on your website or even allow them to check it out on Facebook.

This is a great way to expose your Facebook followers to your WooCommerce store and build stronger customer relationships.
You might even hide the WooCommerce content on your WordPress website.
This approach allows you to use your WordPress blog for content while using Facebook to sell products.
With that in mind, here’s a quick overview of all the steps for adding your WooCommerce store to Facebook:
Ready? Let’s jump right in!
How to Add Your WooCommerce Store to Facebook (Step by Step)
The best way to add your online store to Facebook is by using the Facebook for WooCommerce plugin. This plugin allows you to sync your WooCommerce products with your Facebook page, create Facebook ads inside the WordPress dashboard, and more.
In the following sections, let’s see how you can add your WooCommerce store to Facebook step-by-step.
How to Connect Your WordPress Website to Facebook
First, you need to install and activate the Facebook for WooCommerce plugin. For more details, see our step-by-step guide on how to install a WordPress plugin.
Upon activation, go to Marketing » Facebook and then click the ‘Get started’ button.
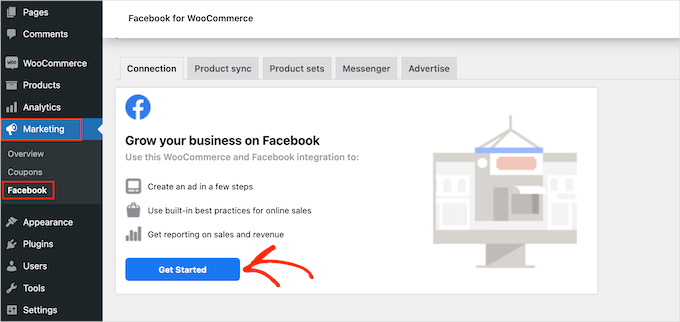
This will take you to a screen where you can connect your Facebook page and WooCommerce online store.
Simply select the Facebook account that you want to link to WooCommerce.
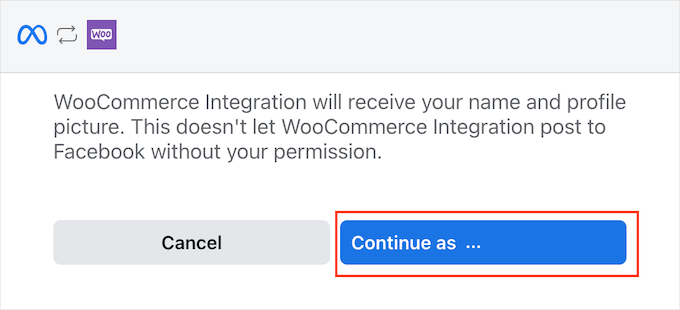
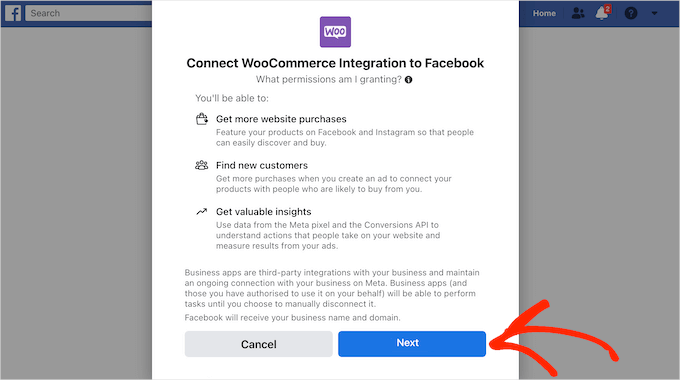
On the next screen, you’ll see some information about everything you can do after connecting WooCommerce and Facebook.
After reading this information carefully, you can click the ‘Next’ button.
Choose a Facebook Business Manager
Facebook will now show some default settings, including the catalog it will use to manage your WooCommerce inventory.
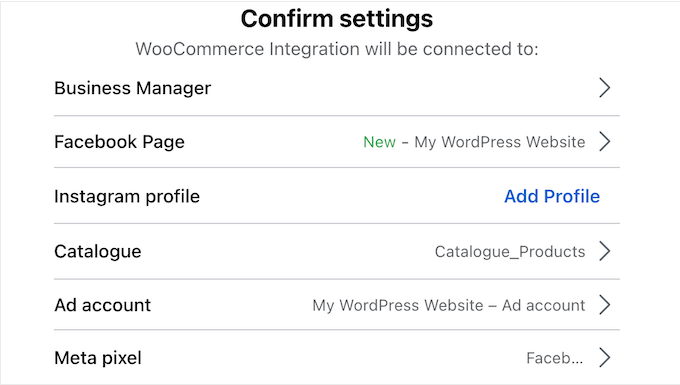
You may need to change some or all of these default settings by clicking on each option and then following the onscreen instructions.
Let’s start by clicking on ‘Business Manager.’
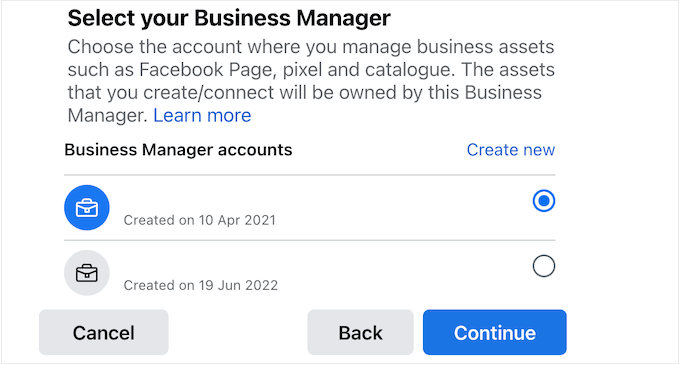
The business manager is a separate profile that allows you to manage the business assets connected to your Facebook account.
If you don’t already have a business manager, then you’ll want to click on ‘Create New’ and follow the onscreen instructions to create an account.
If you already have a business manager profile, then you can select the radio button next to that account and then click ‘Continue.’
As soon as that’s done, you can confirm the Facebook page where you’ll show your WooCommerce products.
To do this, let’s click on the arrow next to ‘Facebook Page.’
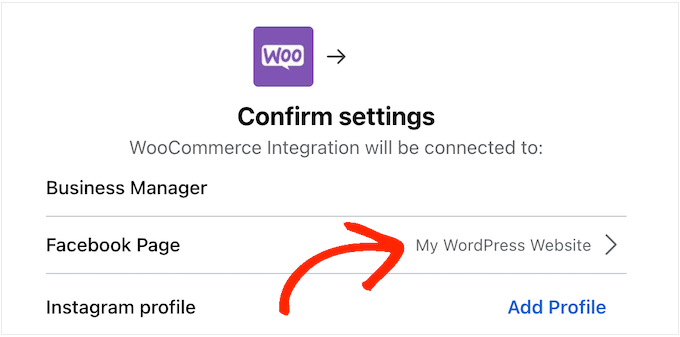
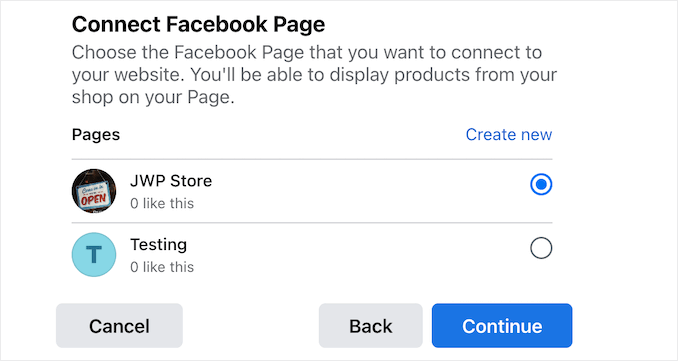
You’ll now see a list of all the pages associated with your Facebook account.
Simply select the page you want to use, and then click ‘Continue.’
Connect to Instagram Business (Optional)
If you have an Instagram Business profile, then you may want to connect Facebook for WooCommerce to this account.
This allows you to manage both your Facebook and Instagram pages from the same Business Manager account, which is Meta’s online dashboard. This can make it easier to run advertisements and sell products on Instagram.
For more information on how to drive sales from Instagram, please see our guide on how to add Instagram shoppable images in WordPress.
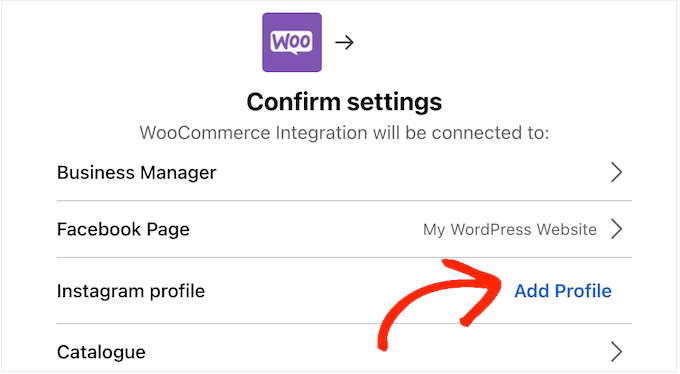
To link Facebook for WooCommerce to your Instagram account, you can click ‘Add Profile’ next to ‘Instagram Profile.’
You’ll now see a list of all your Instagram pages.
Simply click to select the page you want to use and then on ‘Continue.’
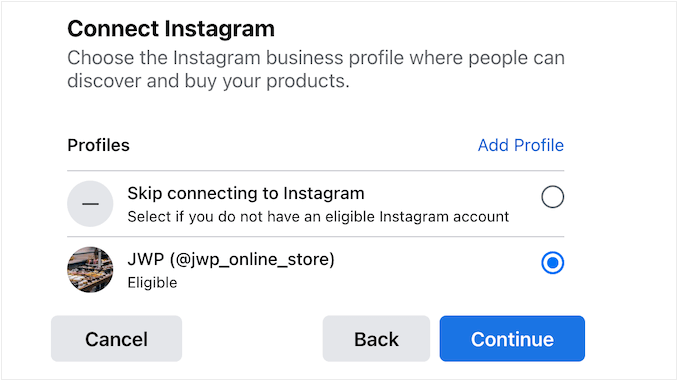
If you don’t have an Instagram Business account, then you can select ‘Skip connecting to Instagram’ instead. With that done, go ahead and click on ‘Continue.’
Choose a WooCommerce Product Catalog
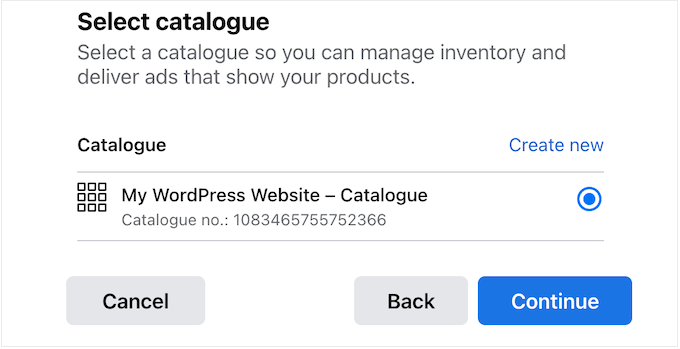
After that, you’ll need to choose the WooCommerce product catalog that you want to use. A catalog is simply a container for all the products you want to show on Facebook.
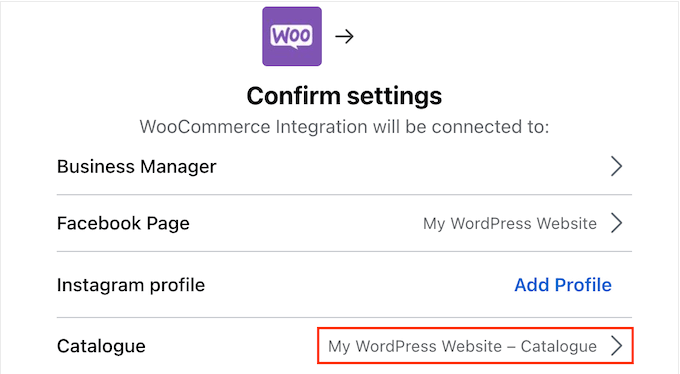
You can create multiple catalogs for different types of items, but we recommend using a single catalog as this makes it easier to manage your inventory.
If you do want to divide your inventory into different groups, then you can always create collections or sets, which are groups of related items from the same catalog. We will cover these later in this guide.
With that in mind, go ahead and select an existing catalog, and then click ‘Continue.’
Create or Choose a Facebook Ad Account
After that, you can choose the ad account that you’ll use to run advertisements on Facebook and Instagram.
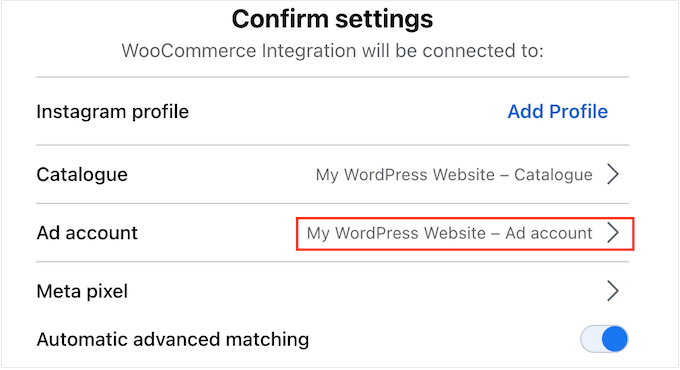
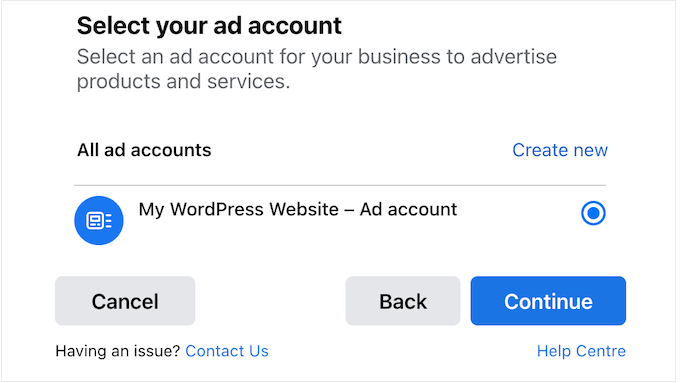
Note: You can’t use a personal ad account with a business manager profile. If you need to set up a compatible Facebook ad account, then simply click on ‘Create new’ and then follow the onscreen instructions.
After that, just select the ad account that you want to use for your Facebook and Instagram advertisements and click on ‘Continue.’
Set Up the Meta Pixel
Next, you need to select a Meta Pixel. This retargeting pixel helps you:
- Manage your inventory
- Set up WooCommerce conversion tracking, and
- Show personalized content to different users.
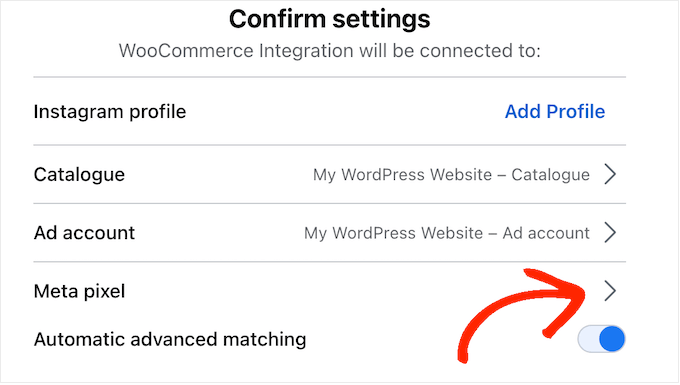
If you haven’t created a Pixel yet, then click on the arrow next to ‘Meta pixel’ and follow the onscreen instructions.
Once you’ve done that, select the radio button next to the Pixel you want to use and click on the ‘Continue’ button.
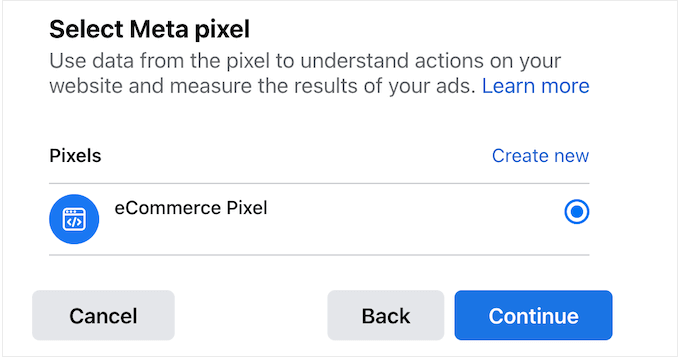
For more information, please see our guide on how to add a pixel in WordPress.
Review your Facebook for WooCommerce Settings
Now, you’ll see a popup with all your chosen settings.
At this point, we recommend enabling automatic advanced matching, allowing you to match visitors to your WordPress website with people on Facebook.
This is another way to show personalized content to your Facebook users and often improves the accuracy of your conversion tracking.
With that in mind, we recommend clicking to enable the ‘Automatic advanced matching’ slider.
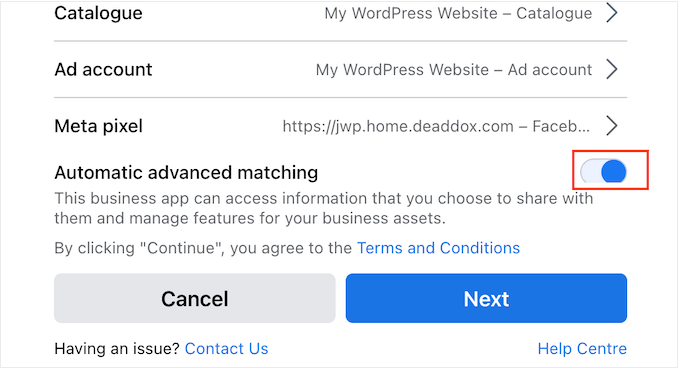
You can then click on the ‘Next’ button.
You’ll now see some information about the data the plugin can access and the actions it’ll be able to perform. You can click to disable the different toggles, but this may stop the integration from working properly.
That said, we recommend leaving all the toggles enabled. When you are happy with how the permissions are set up, you can click on ‘Next.’
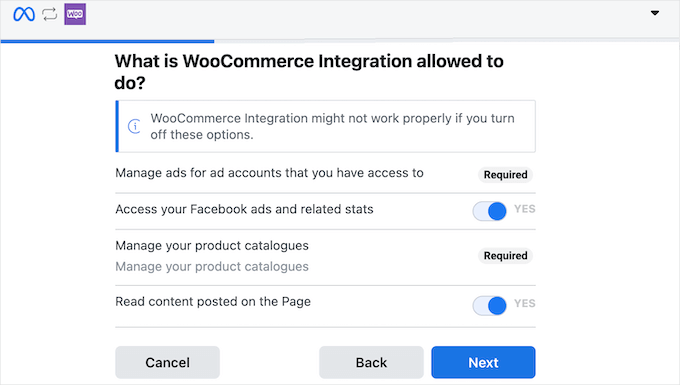
The plugin will now connect your online store and Facebook page.
After a few moments, you’ll see a ‘You’re all set’ message. Go ahead and click on ‘Continue’ to finish the setup process.
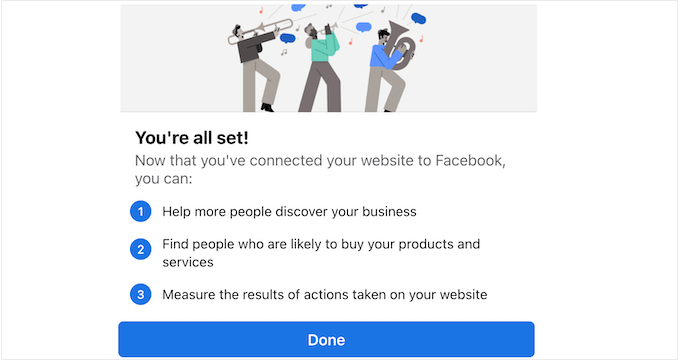
Add WooCommerce Products to Your Facebook Page
Now you’ve successfully connected your online marketplace and Facebook page, there are lots of ways to use this new integration.
However, most business owners will want to promote their WooCommerce products on social media by creating a Facebook shop.
Choose a WooCommerce Product Catalog
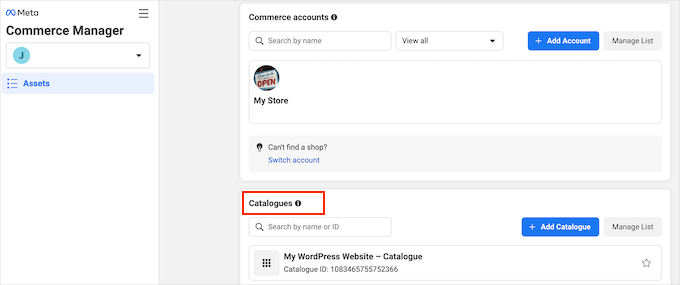
To start selling products on Facebook, you’ll need to head over to the Facebook Commerce Manager. Under ‘Catalogues,’ you can select the product catalog you want to use in your Facebook shop.
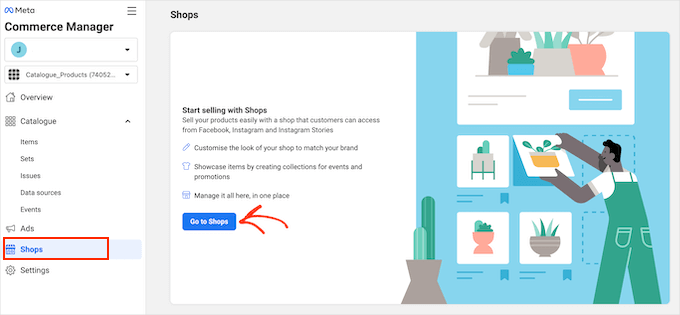
In the left-hand menu, let’s navigate to the ‘Shops’ section.
Once inside, you’ll want to click the ‘Go To Shops’ button.
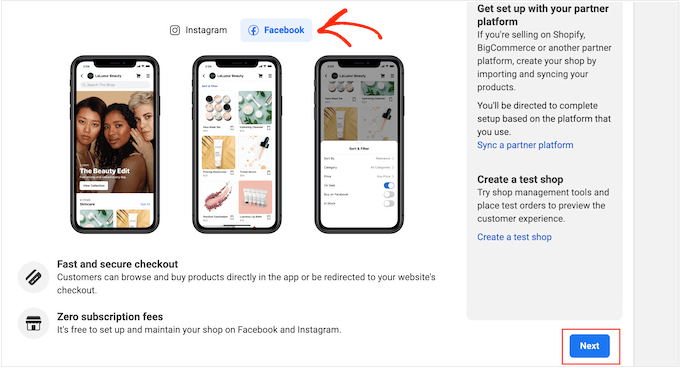
On this screen, you’ll need to select ‘Facebook.’
Then, go ahead and click on ‘Next.’
Select a Checkout Method
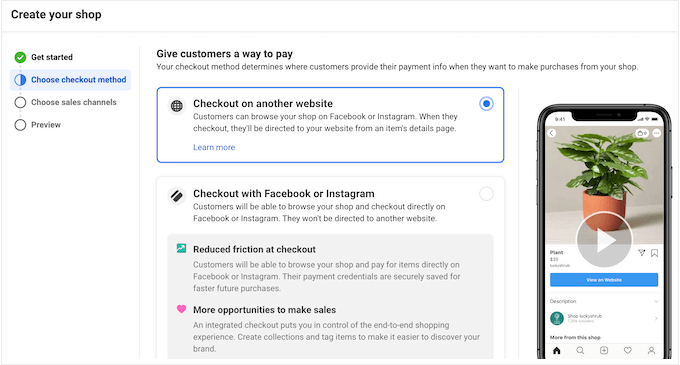
You now need to choose a checkout method for your Facebook store.
By default, ‘Checkout on another website’ is selected. This means customers can browse all your products on Facebook, but they’ll need to visit your site to make a purchase.
If you want to use a different checkout method, then you can click on the ‘Change’ link next to ‘Checkout Method.’

You’ll now see a few different options.
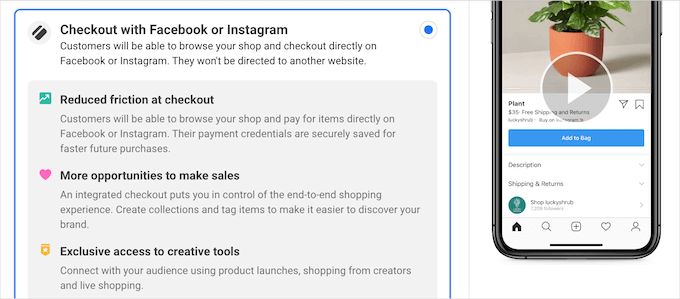
To start, you can allow customers to checkout on Facebook. This removes a lot of friction from the shopping experience, particularly if the person has saved their payment or delivery information to Facebook.
However, Meta does charge an extra selling fee, which is 5% per shipment, or a flat fee of $0.40 for shipments of $8.00 or less.
Facebook checkout is also only available to businesses in the US, so you’ll need a US bank account and business address.
Finally, this method means shoppers can buy products without visiting your site directly, which isn’t ideal if you are trying to increase your traffic.
It might also be a problem if you make money online by showing ads to shoppers.
With that in mind, if you do want to use Facebook checkout, then you can select ‘Checkout with Facebook or Instagram.’
Another option is to allow customers to checkout with Facebook Messenger or WhatsApp.
This will add a ‘Message’ button to the product listings inside your Facebook store.
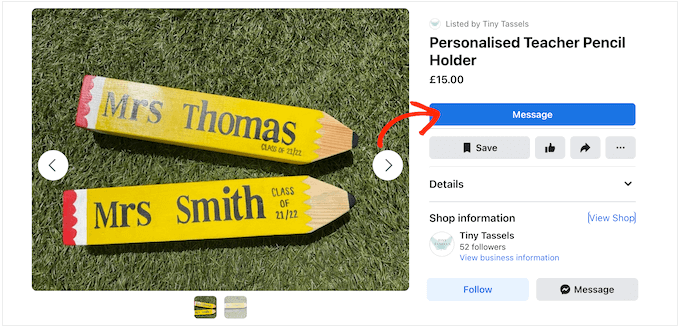
Clicking on this button will open either Facebook Messenger or WhatsApp, with some suggested questions.
The following image shows an example of how this might look in the Facebook Messenger live chat software.
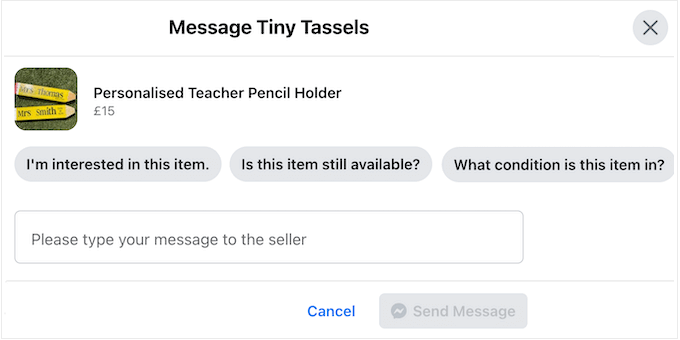
Note that this option doesn’t come with a checkout method, so you’ll need to set up your own WooCommerce payment gateway.
To use this method, all you have to do is select the radio button next to ‘Checkout with messaging.’

After making your selection, you can go ahead and click on ‘Next.’
Set the Facebook Shop Locations
From here, Facebook may ask you to confirm the page and catalog you want to use. Simply make your selection and then click ‘Next.’

After that, you can expand the dropdown menu to select the locations where you deliver. Just be aware that Facebook Shops isn’t available in every country or region.
After making your selection, you can click ‘Next.’
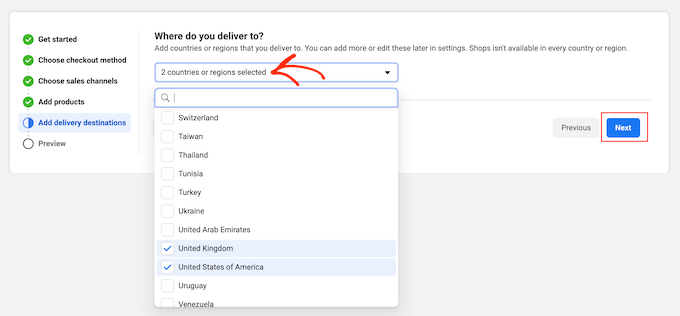
On the next screen, you’ll need to enter your business email address.
Confirm Your Facebook Store Settings
Facebook will now show all your settings, so take a few moments to review them. You should also read the Seller Agreement carefully.
If you’re happy to go ahead, then you can check the box next to ‘Seller Agreement’ and then click on ‘Finish setup.’

After a few moments, you’ll see a popup asking you to start the verification process. As part of this process, Facebook will collect information about you and your business.
To get started, let’s click on ‘Start Verification.’
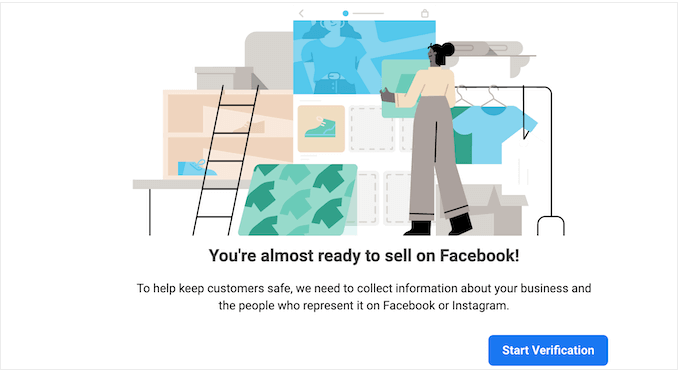
You can now follow the onscreen instructions to verify your identity and business. As soon as you’ve passed the checks, you’ll be ready to start selling on Facebook.
How to Manage Your Facebook Page and Store Using WordPress
Facebook for WooCommerce adds a new area to the WordPress dashboard where you can see information about your Facebook store, update your inventory, create advertisements, and more.
To take a look, you can go to Marketing » Facebook in the WordPress dashboard.
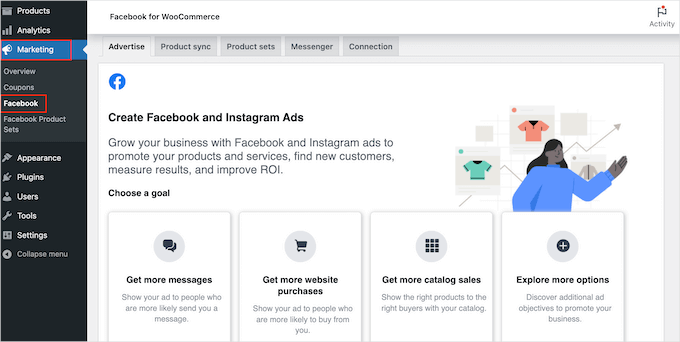
If you want to create adverts to run on Facebook or Instagram, then you can select the ‘Advertise’ tab.
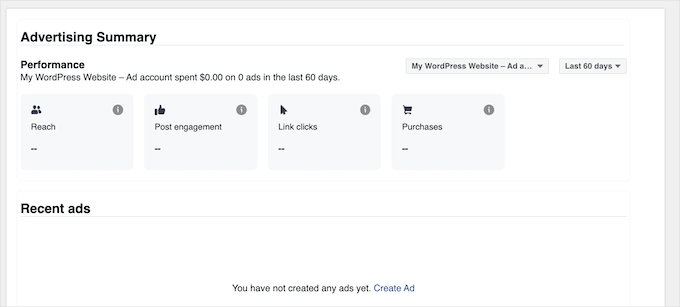
This area also shows statistics about any ads you’ve already run, including the number of clicks and conversions.
In the ‘Product Sync’ tab, you can specify which WooCommerce products to sync with Facebook. For example, you can exclude specific categories and tags from the product sync.
You can also choose whether to sync each product’s standard description or short product description in WooCommerce.
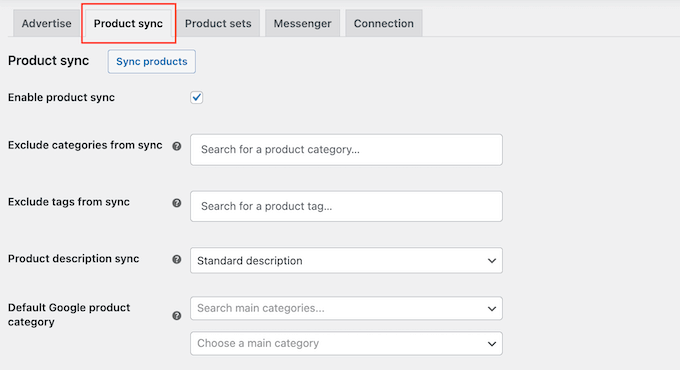
If you edit any of these settings, then you’ll want to click on ‘Sync products’ to make the changes live on your Facebook page.
In the ‘Product Sets’ tab, you can create and manage your product sets. Similar to WordPress categories and tags, product sets help to organize your products. You can also use product sets to create carousel ads.
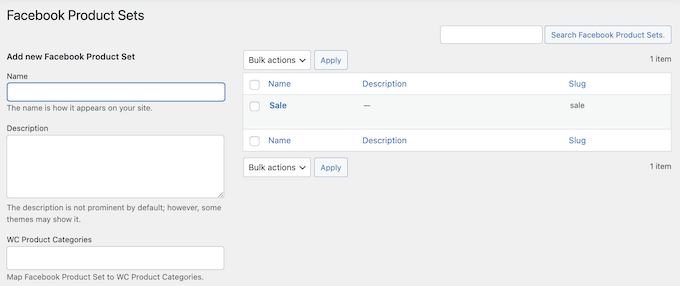
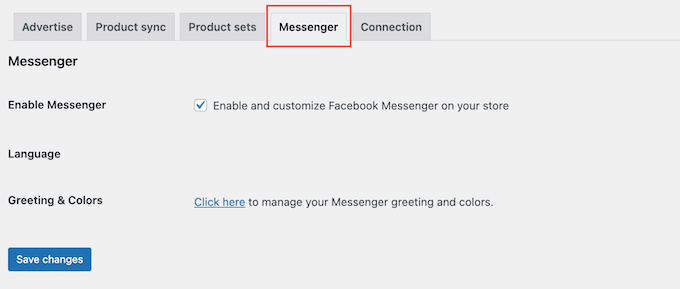
Next is the ‘Messenger’ tab, which allows you to enable Facebook Messenger for your online store. Live chat is a great way to communicate with potential customers and resolve any problems they may be having.
In this way, Messenger can improve your customer service and get you more sales. That said, we recommend checking the ‘Enable Messenger’ box and then selecting ‘Save Changes.’
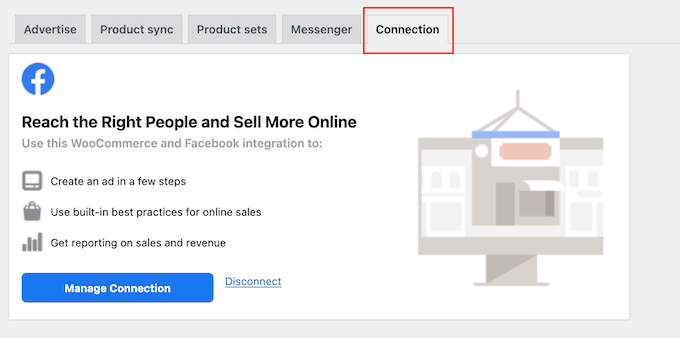
Finally, you can see all the information about your Facebook integration by selecting the ‘Connection’ tab. Here, you’ll see data about the page that’s connected to your WooCommerce store, your Meta Pixel, your ad manager account, and more.
On this screen, you can also debug or disconnect the connection. This is useful if you are having problems with Facebook for WooCommerce or want to connect to a different Facebook page.
Bonus Tip: Must-Have Plugins to Grow Your WooCommerce Store
After you’ve added your WooCommerce store to Facebook, you’ll probably be looking for ways to get more sales and customers.
To help you out, here’s our expert pick of the best WooCommerce plugins for your store.
1. OptinMonster
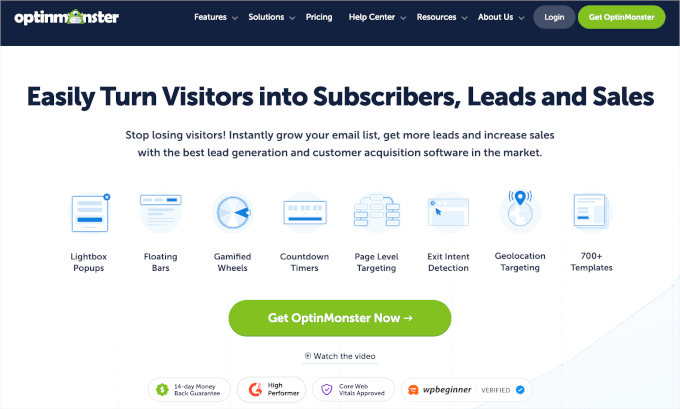
OptinMonster is the best lead generation software on the market. With this tool, you can easily convert abandoning website visitors into email subscribers and then into paying customers.
The drag-and-drop builder lets you create campaigns to get more sales, reduce cart abandonment, show personalized messages to potential leads, grow your email list, and more.
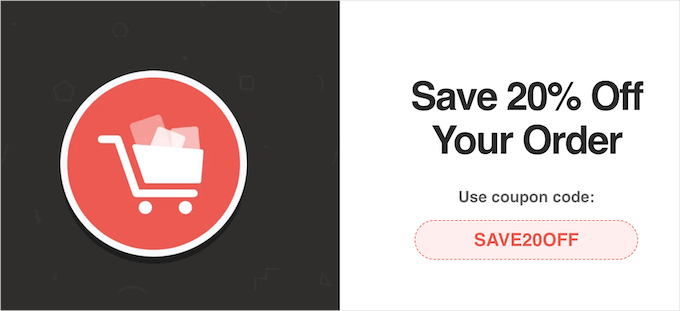
You can even create floating bars to highlight your sales, announce free shipping, showcase your special offers, and a lot more.
2. All-in-One SEO
All in One SEO is the best SEO plugin on the market, used by over 3 million websites. It lets you simply optimize your WooCommerce store and products to improve your search engine rankings without having to learn complicated SEO techniques and jargon.
You can simply type information about your products into AIOSEO.
AIOSEO can also create an advanced XML sitemap for your products to help search engines find and index your products in the search results.
Rich snippets schema markup is also included, which will help your product listings stand out in the search results and bring you even more traffic.
AIOSEO will automatically add the Product schema to your WooCommerce products and the data from your WooCommerce product listing, such as pricing, stock availability, and more.
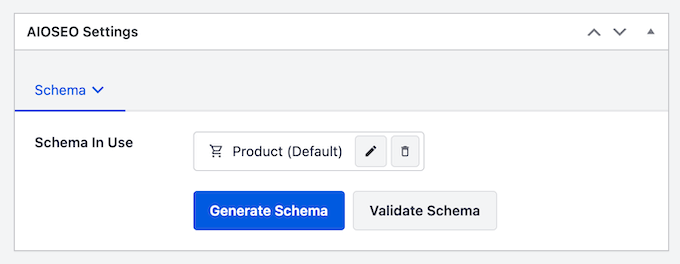
If you want, then you can even add other important information such as brand, material, color, and pattern.
For more information, please see our guide on how to add schema markup in WooCommerce.
3. MonsterInsights
Google Analytics is a must-have for any online store owner. However, it can be difficult for beginners to set up and use.
That’s where MonsterInsights comes in.
MonsterInsights is the best Google Analytics solution for WooCommerce. It has advanced reports and monitoring that let you easily track how people find your products and the actions they take once they arrive at your store.
MonsterInsights will even show all this information inside the WordPress dashboard.
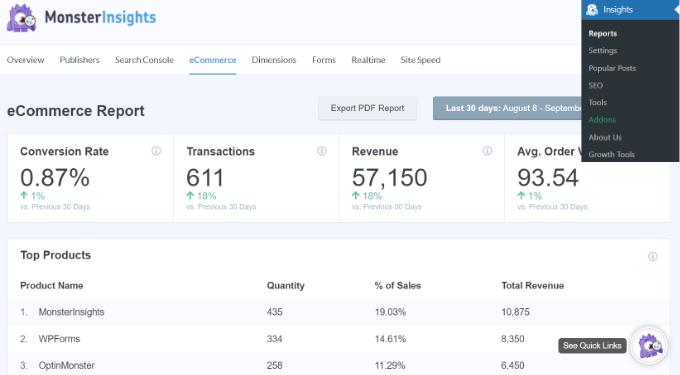
Plus, you can track your WooCommerce customers in Google Analytics to create a personalized shopping experience.
For more details, you can see our guide on how to set up WooCommerce conversion tracking.
4. SeedProd
SeedProd is the best WordPress page builder plugin on the market. It lets you customize your WooCommerce product pages with a drag-and-drop builder.
SeedProd has more than 200 professionally-designed templates and over 90 blocks that you can add to your online store. It even has many eCommerce blocks that you can use to:
- Create custom WooCommerce thank you pages
- Custom checkout pages, and much more.
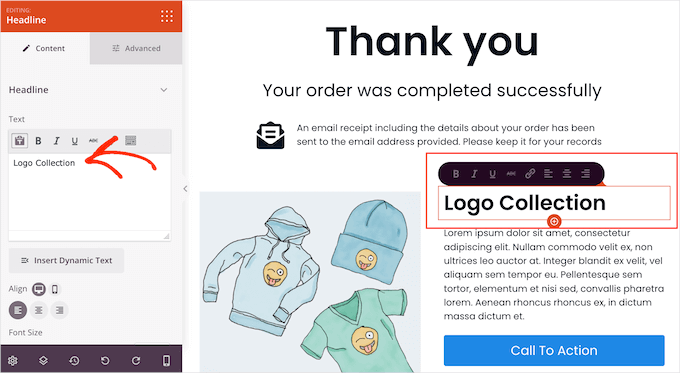
SeedProd works with any WooCommerce theme to customize your store in any way you want.
We hope this article helped you add your WooCommerce store to Facebook. You may also want to see our guide on how to plan a holiday sale for your WooCommerce store and our expert picks for the best WooCommerce spin-a-wheel coupon plugins.
If you liked this article, then please subscribe to our YouTube Channel for WordPress video tutorials. You can also find us on Twitter and Facebook.


Rinto George
Great write-up. This helped me to set up my company’s facebook shop easily.