We’ve often found that the default WordPress admin dashboard doesn’t align with a site’s branding. You may want to offer your users and clients a more polished experience than the default WordPress admin area.
White labeling lets you replace the default WordPress branding with your own. This includes updating the logo, colors, and other elements to match your brand’s identity.
We have seen how white labeling can improve the WordPress backend. It’s especially useful for agencies and developers managing multiple client sites.
In this guide, we’ll show you how to easily white-label your WordPress admin dashboard. No coding skills are required, and the steps are simple to follow.
What Is White Labeled WordPress? When Do You Need It?
WordPress is the most popular website builder, powering over 43% of all websites on the Internet. Despite its popularity, many non-tech-savvy users still aren’t familiar with it.
When working with clients, we’ve often encountered people who just want a simple way to manage their website. They’re not interested in navigating themes, plugins, updates, or security. Instead, they need an intuitive interface that makes updates effortless.
White labeling the WordPress admin area solves this problem. It lets you replace the default WordPress branding with your own and remove unnecessary items. This creates a streamlined, branded interface tailored for your clients or team.
White labeling only changes the back end of a WordPress site. It won’t affect the front end or how your website looks to visitors.
Tip: Interested in a fully customized website design instead? Check out our WordPress Website Design service. Our professional team will create a bespoke design tailored to your brand for a small fee.
Now, let’s explore how you can white-label the WordPress admin dashboard easily and effectively.
White Labeling WordPress Admin Dashboard
The best way to white-label your site’s admin area is to use the White Label CMS plugin. This free WordPress plugin lets you customize the login page, add your branding, edit the dashboard, control which menus your clients can see, and more.
Why we recommend White Label CMS:
- It is extremely easy to use, and no coding is required.
- Free plugin with extensive features.
- Provides a comprehensive white labeling solution.
To get started, first, you need to install and activate the White Label CMS plugin. For more details, see our step-by-step guide on how to install a WordPress plugin.
Upon activation, you need to visit Settings » White Label CMS from your WordPress dashboard to configure the plugin settings.
Let’s dive deeper into the different options available under each section and how to properly configure them.
Replace WordPress Branding With Your Own Brand
We’ve customized the WordPress admin branding many times for client projects. It’s an excellent way to create a more professional and personalized experience.
You can start by replacing the default WordPress site’s branding with your custom logo and other branding elements.
The first step is managing the WordPress logo and links in the admin bar. You can choose to show or hide the logo and links or even remove the WordPress version number from the footer for a cleaner look.
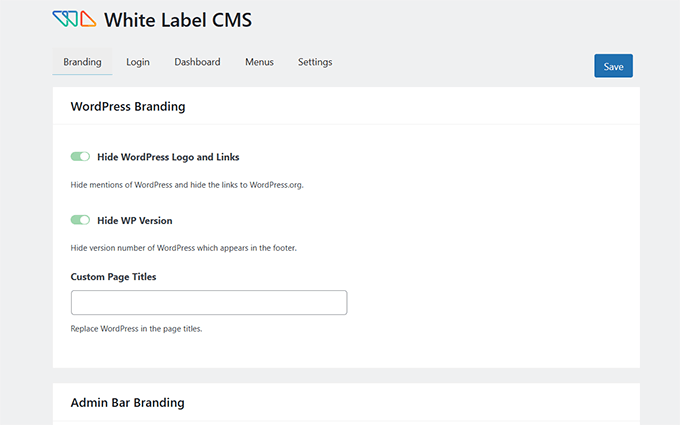
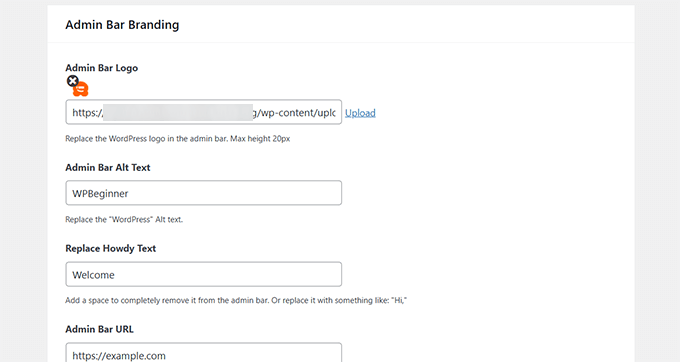
Next, upload your custom logo to replace the WordPress logo in the admin bar. This small change makes a big difference in aligning the dashboard with your brand.
With the plugin, you can also replace the ‘Howdy’ text in the admin bar and swap the WordPress.org URL with a custom link that fits your needs.
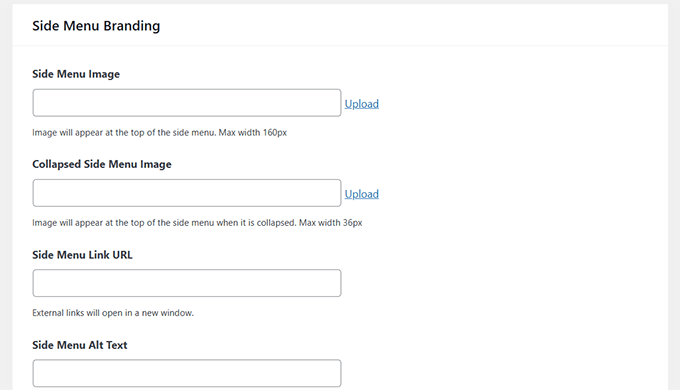
You can further customize the side menu branding in the admin panel.
This includes adding a custom side menu image, an image for the collapsed menu, and configuring links and alt text for these images.
Lastly, you can brand the Gutenberg editor by changing the exit button. You can replace it with a custom icon, admin bar logo, or even your own logo for a seamless experience.
The plugin also lets you add custom branding to the footer of your admin panel. You can include a footer image, text, a custom URL, and even your own HTML code.
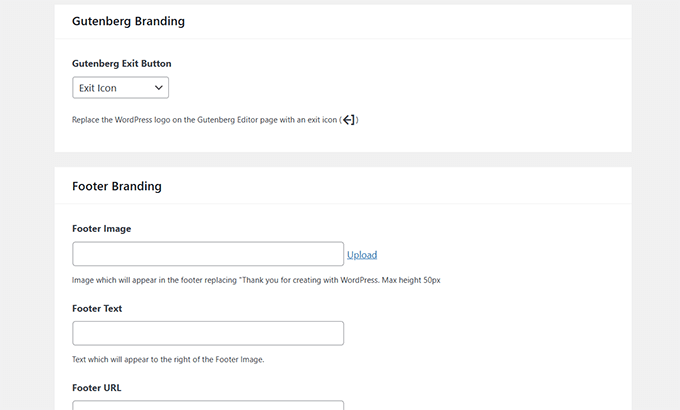
Once you’ve completed these steps, save your changes to apply your custom branding.
Here’s a preview of how these branding changes will look in your WordPress dashboard:

White Label the WordPress Login Page
Next, you can go to the ‘Login’ tab in White Label CMS and change what the login screen will look like.
To start, you can upload a login logo and a retina login logo. There are also options to define the logo’s width, height, and bottom margins and add background color.
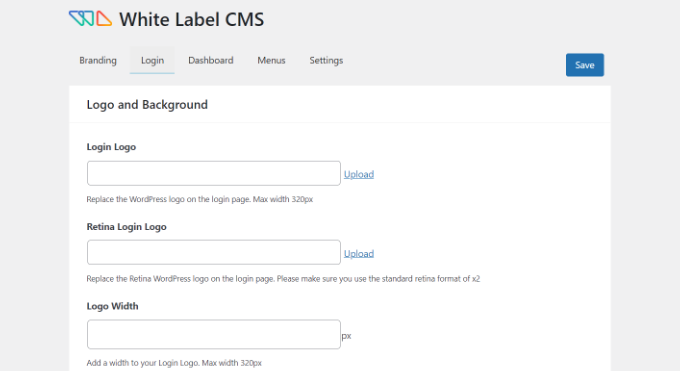
If you scroll down, there are more settings to change the background image and its position.
You can also enable the option to make the background image appear as a full screen on the login page for your WordPress website.
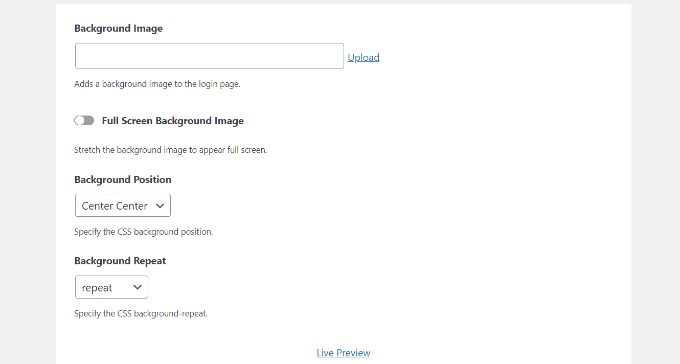
After making these changes, you can click the ‘Live Preview’ button at the bottom.
This will show you what your changes will look like in real time. Once you’re satisfied with the edits, simply save them.
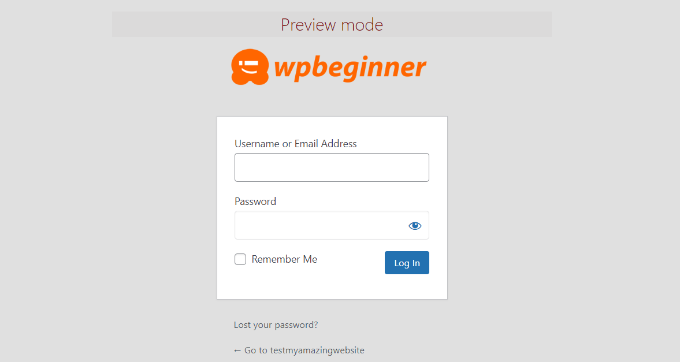
The White Label CMS plugin gives you simple options to customize the login page.
However, if you’d like more control over its design, then we recommend using a drag-and-drop page builder like SeedProd or Thrive Architect, both of which come with beautiful login page designs and templates.
You can see more in our guide on how to customize the login page in WordPress.
White Label the WordPress Dashboard Panels
The main WordPress admin screen is called the dashboard. This is what users usually see when they log in to WordPress.
It contains default panels showing different information about the website.
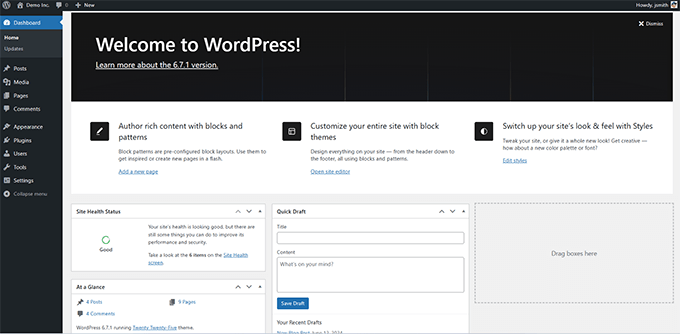
There is usually quite a lot of information, and many users don’t know what they are supposed to do with it.
White Label CMS allows you to customize this section and make it look cleaner. To start, simply click on the ‘Dashboard’ tab, and you will see options to show and hide each panel.
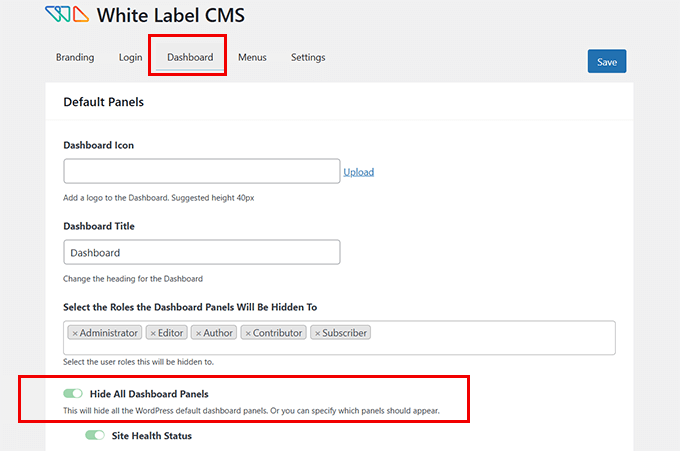
You can add dashboard icons, change the heading for the dashboard, and select WordPress user roles that can view the dashboard panel.
If you scroll down, there are more options.
For instance, you can enable the ‘Add Your Own Welcome Panel’ option.
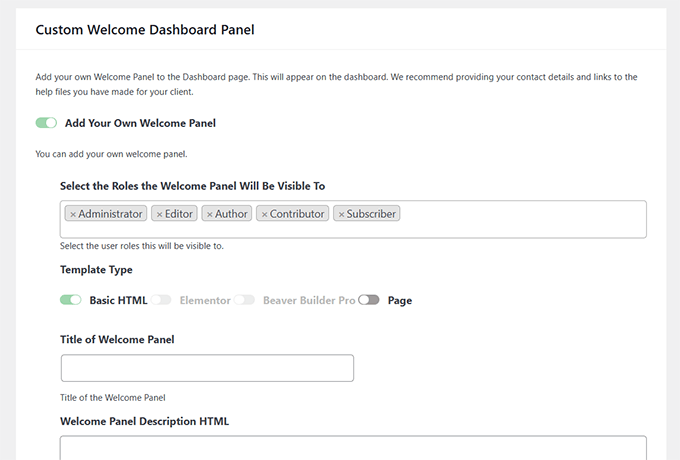
When you’re done, don’t forget to save your changes.
Hide Specific Menu Items in the WordPress Admin
Next, you can head over to the ‘Menus’ tab in White Label CMS.
Here, you can hide different admin menu items for all user roles except the White Label CMS admins and super admins.
If you are using a bunch of plugins on the site, then those plugins will probably add their own menus as well. This could make your admin menu quite long. Many of your clients or users will probably not need these menus.
Using the plugin, you can hide these menus by enabling the ‘Want to hide menus for your clients’ option.
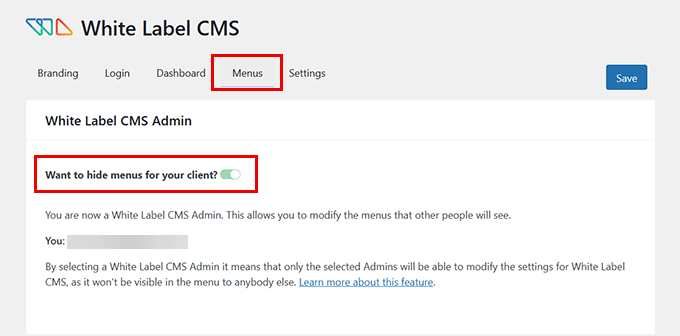
After that, you can scroll down and see different menus to hide.
For each menu, there are sub-menu items that you can see by clicking the blue downward arrow icon.
To hide a menu, simply click the toggle, which will be hidden for different user roles in WordPress.
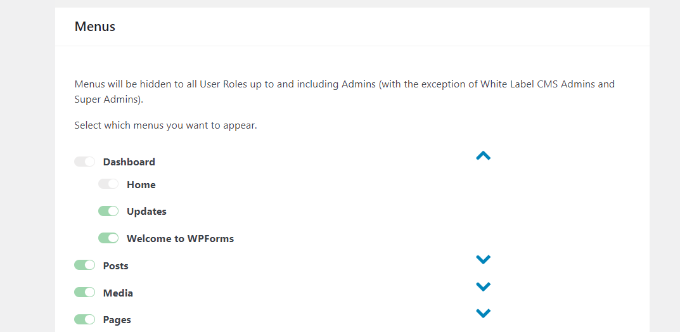
There are also admin bar menus that you can hide using the plugin.
When you’re done, go ahead and save your changes.
Customize WordPress Admin Settings
Lastly, you can go to the ‘Settings’ tab in the White Label CSS plugin.
In this section, you’ll get options to hide the front-end admin bar, help box, and other screen options.
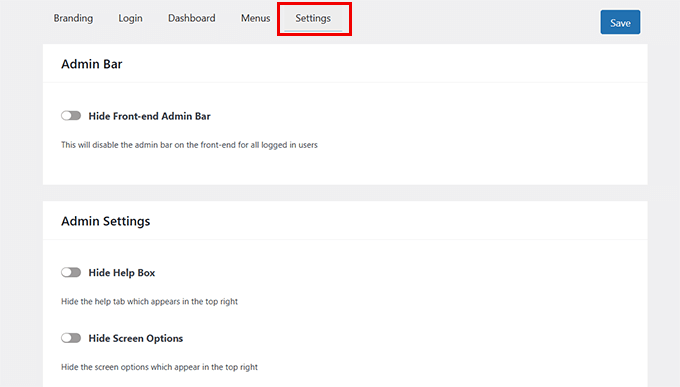
You can also turn off nag messages that appear at the top of the page in your WordPress dashboard. These are messages like rating the plugin or upgrading to a pro plan.
By removing them, you can keep your admin panel clean and clutter-free for your clients.
Other than that, the plugin lets you add custom CSS for the admin and custom editor stylesheet.
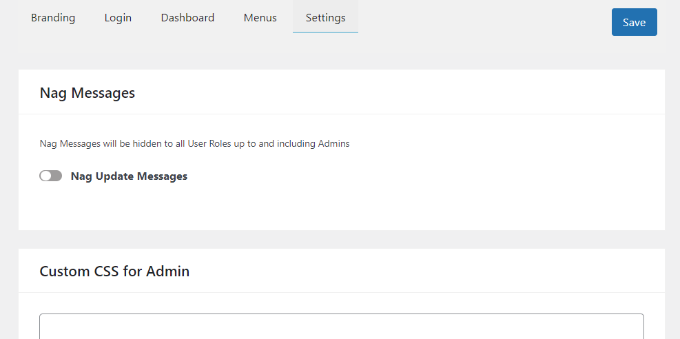
Once you’ve made the changes, simply click the ‘Save’ button.
Note: If you’re doing work-for-hire and will not be managing your client’s sites on a regular basis, then we DO NOT recommend hiding admin menus or disabling the admin nags.
Only do that if you’re going to be regularly updating and managing the website.
Bonus Resources
The following are a few helpful resources that will help you further customize the WordPress admin dashboard:
- Vital Tips to Protect Your WordPress Admin Area (Updated)
- Plugins and Tips to Improve WordPress Admin Area
- How to Add Dark Mode to Your WordPress Admin Dashboard
- How to Add a Notification Center in WordPress Admin
We hope this article helped you learn how to white-label your WordPress admin dashboard. You may also want to see our guide on how to white-label WordPress development and our picks of the best web design software.
If you liked this article, then please subscribe to our YouTube Channel for WordPress video tutorials. You can also find us on Twitter and Facebook.


Kzain
this is good to read, if this applies to all users then I can unhide menus in admin areas for administrators right?.
WPBeginner Support
Yes, you can specify which roles the sections are hidden from and you can exclude the admin user role.
Admin
Mrteesurez
Indeed the article is quite demanding and the plugin is great.
At this point, I have a question.
Is it possible to hide the plugin whitelabel CMS it self from the admin. Or do we handover the project to the client when they might see the plugin itself ?
WPBeginner Support
If the client is an admin on the site they would see the options for the plugin in case there is a need to debug the plugin.
Admin
Samuel
for most clients that I have worked with they don’t want to get involved in all the setting and technicalities of plugin. they just want an easy way to update their content and use other functionalities that their site may offer. I found out assigning user roles that allow them to do what they need to do without interfering with the setting of the site is best.
This could include hiding some plugin from them in their alotted roles. I hope this may solve your question here.
Moinuddin Waheed
I have been thinking for whitelabellig option for wordpress dashboard for a long time as it becomes very difficult for me to hand over the dashboard to clients which they don’t make any sense of.
I didn’t know that such option exists and there is already a plugin for that.
i will explore this plugin for my clients websites.
I have a query regarding posts and pages menu options.
I want to show them only these two options so that they can write posts.
can we give these two options in the middle of dashboard after tweaking all other whitelabellig options like hiding side nenu?
WPBeginner Support
If you want to limit access, that would be editing permissions instead of white labeling. You can see more on permissions in our article below:
https://www.wpbeginner.com/beginners-guide/wordpress-user-roles-and-permissions/
Admin
Moinuddin Waheed
I have gone through the article and found that the custom role assigning is what I need for my certain clients.
This helps in preventing doing any extra work that might cause problems in the wordpress website.
I really appreciate your reply and time. thank you.
David
Excellent article!
I appreciate your skills. Thanks for sharing.
WPBeginner Support
Glad you liked our article
Admin
Hjan
Hi,
I was wondering if it is possible to change the link in the custom login logo. Right now, the client´s logo links to the clients web page. But it would be nice to have the option to change this link to something else.
WPBeginner Support
If you wanted a different login page, you would want to take a look at our guide below:
https://www.wpbeginner.com/plugins/how-to-create-custom-login-page-for-wordpress/
Admin
KcBlaQ
I got value from this, thanks alot
WPBeginner Support
You’re welcome, glad it was helpful
Admin
Brett
Under the section “Admin Settings” about allowing users to use /login as their WordPress login URL, how do you disable Permalinks so it does not redirect to /wp-login.php ? Mine keeps redirecting…
Jeff
Excuse my ignorance, but this is just for the admin panel right? If I use this plugin, things like ‘Powered by Wordpress’ will still appear on the front end?
WPBeginner Support
Hi Jeff,
Yes. Powered by link is displayed on the front end by your WordPress theme.
Admin
Polly Gras
How can I hide the name of the wp theme I am using?
Polly Gras
What a waste of time.
Obviously nobody ever looks at this Page!!
Ewan
So when the plugin is installed, do the changes apply to all users – including the administrator? or is there someway to limit it to certain user types?
WPBeginner Support
The branding part applies to all users. However, you can choose to unhide menus in admin areas for administrators.
Admin
Muhammad Sadiq
This is a great Blogs post its very Knowledgeable topic to highlight, and some great information that you have shared with us Syed Balkhi.
Marcelo
A comparison with Adminimize would be really nice, since both looks like having the same features, and this one seems to have copied it from Adminimize
WPBeginner Support
Please take a look at our Adminimize tutorial.
Admin