Do you want to create a video gallery in WordPress?
By default, WordPress lets you embed videos in your posts and pages. However, adding lots of videos will slow down your website and take up lots of space on your hosting server.
In this article, we’ll show you how to easily create a professional-looking YouTube video gallery that won’t affect your website’s performance.

Why Create a Video Gallery in WordPress?
People love watching videos. In fact, according to our ultimate list of blogging statistics, posts with videos also get 83% more traffic than those without videos.
If you run an online store, then videos can even get you more sales. According to experts, 88% of people have bought a product or service after watching a video.
By default, WordPress lets you add videos to posts, pages, and widget-ready areas such as the sidebar. However, it’s difficult to create a nice gallery layout using the built-in WordPress blocks and tools.
WordPress also isn’t optimized to host and play videos. Uploading lots of videos to your website often means longer loading times and a poor visitor experience, so you should never upload videos directly in WordPress.
Instead, we recommend using a video hosting platform like YouTube. Once you have a YouTube channel, you can embed all your videos in WordPress without affecting your website’s performance.
With that being said, let’s see how you can create a video gallery in WordPress.
How to Install a Video Gallery Plugin
The easiest way to add a YouTube video gallery to your WordPress website is by using the Smash Balloon YouTube Feed plugin. It’s the best YouTube video gallery plugin for WordPress, used by over 1.6 million websites.
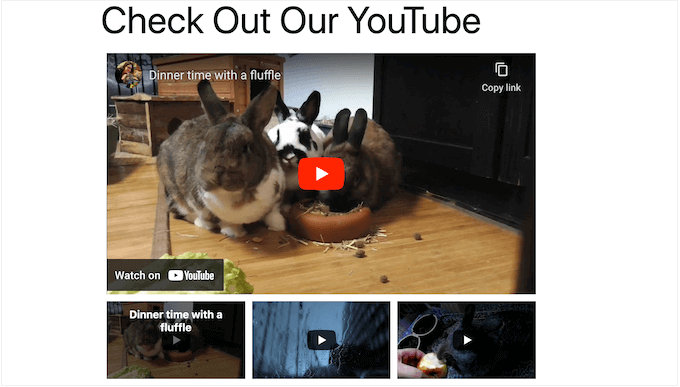
Note: There’s a YouTube Feed Free Plugin that allows you to show the latest videos from your YouTube channel in WordPress. However, we’ll use the Pro version as it allows you to embed YouTube playlists, favorites, live streams, and more.
If you already have a YouTube channel, then you can easily embed all your videos in WordPress. If you don’t have a channel, then you’ll need to create one and upload all the videos you want to embed on your WordPress website.
After that, you’re ready to install and activate the Smash Balloon YouTube Feed plugin. For more details, see our step-by-step guide on how to install a WordPress plugin.
Upon activation, go to YouTube Feed » Settings and enter your license key into the ‘License Key’ field.
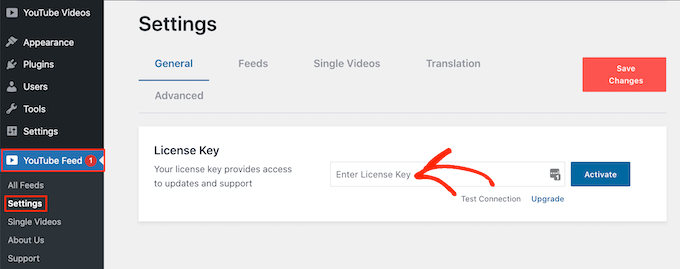
You’ll find this information under your account on the Smash Balloon website.
After entering the key, click on the ‘Activate’ button.
How to Connect Your WordPress Website to YouTube
Once the plugin is active, you can go ahead and connect it to your YouTube channel. On the YouTube Feed » Settings screen, select the ‘Add Source’ button.
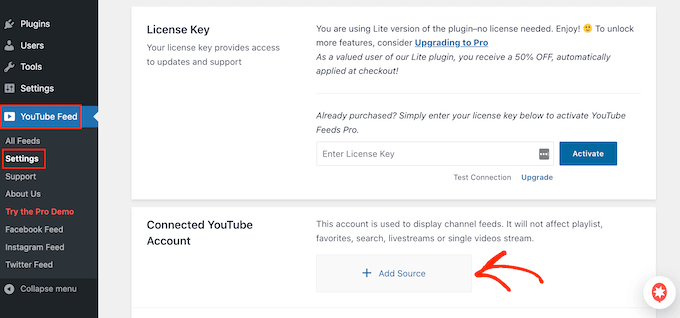
On the next screen, go ahead and click on ‘Connect to YouTube Through Google.’ Smash Balloon will now show all your Google accounts.
You can either choose an account from the list or click on ‘Use another account.’
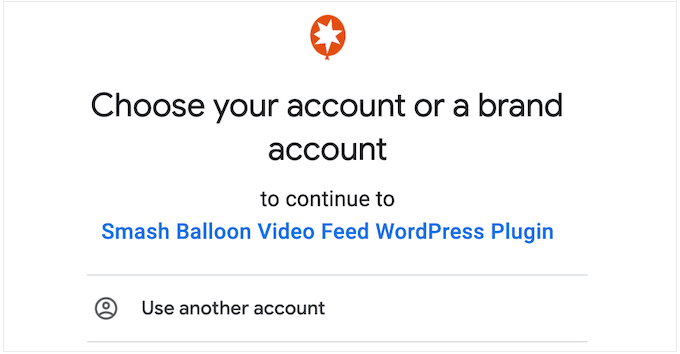
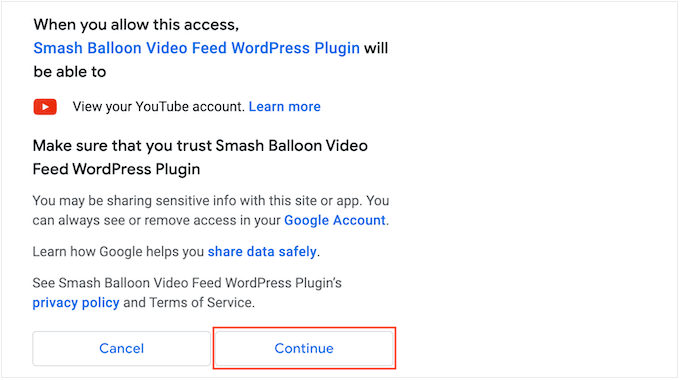
After that, you’ll see a warning that Smash Balloon will have access to your YouTube channel.
If you’re happy to go ahead, then click the ‘Continue’ button.
Smash Balloon will now ask for the ID or username of your YouTube channel.
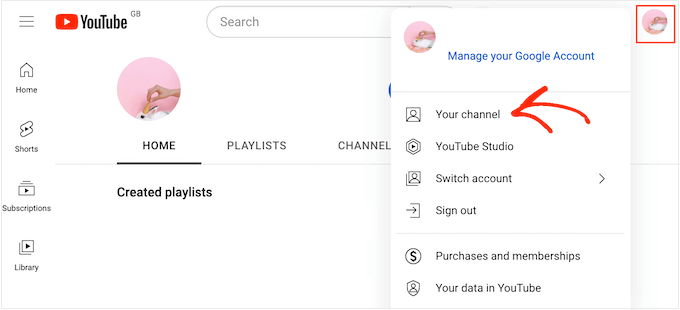
To get this information, go to the YouTube website and then click on your profile picture in the upper-right corner. After that, select ‘Your channel.’
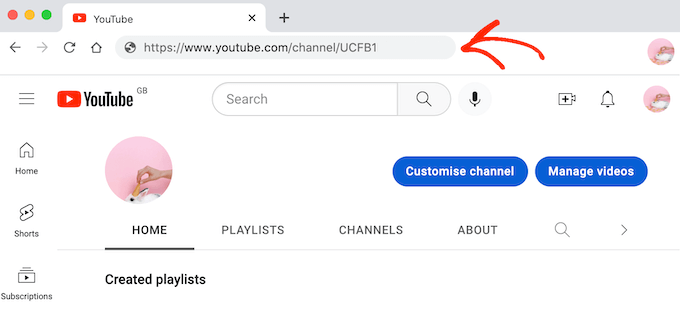
Now, look at the address bar. If you see some text after ‘user/’, then this is your YouTube channel username.
If you see ‘channel/’ and then a string of numbers and letters, then this is the channel ID.
Just copy the value and switch back to your WordPress dashboard.
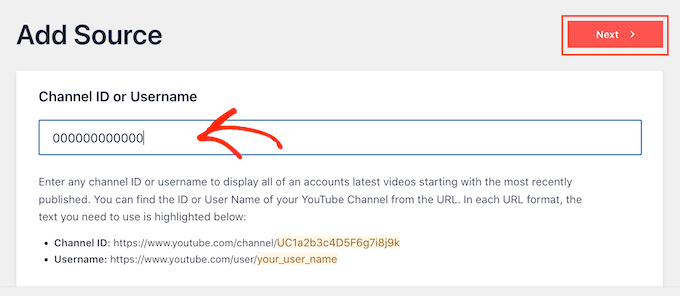
Here, paste the information into the field that shows ‘Enter Channel ID or Username’ by default. When you’re ready, click on ‘Next.’
Create a YouTube API Key
At this point, you’ll see the following message: No API Key Entered.
To avoid any disruptions, we also recommend creating a YouTube API key and adding it to the plugin’s settings.

In a new tab, go to the Google Console and sign in using your Google account.
Once you’re logged into the console, click on the dropdown menu in the toolbar. By default, this shows the name of your latest Google Console project, so you may see different text.
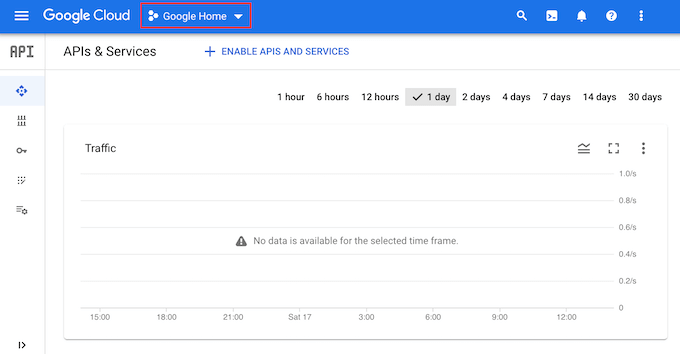
If this is your first time logging into the Google Cloud Console, then you’ll need to accept the terms and conditions when prompted.
With that done, click on ‘New Project.’
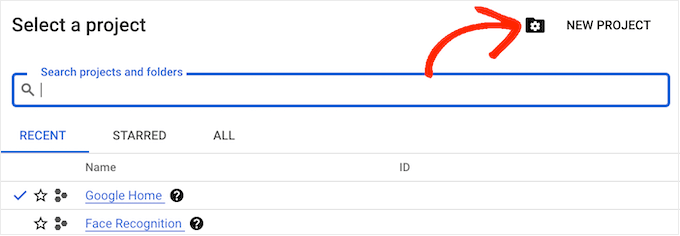
You can now type in a name for the project. This is just for your reference, so you can use anything you want. After that, click on ‘Create.’
In the toolbar, click on the ‘Search’ icon and then type in ‘YouTube Data API.’ Under ‘Marketplace,’ find the YouTube Data API and give it a click.
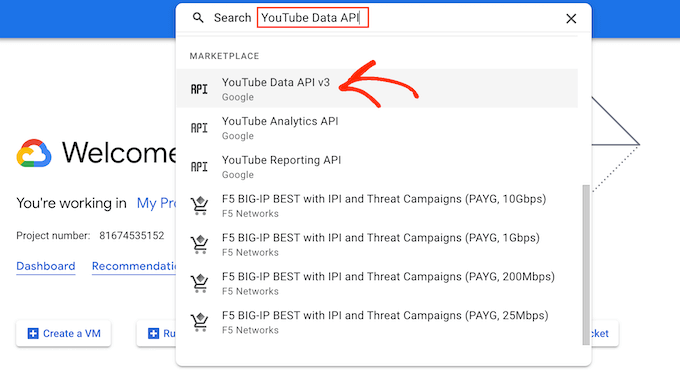
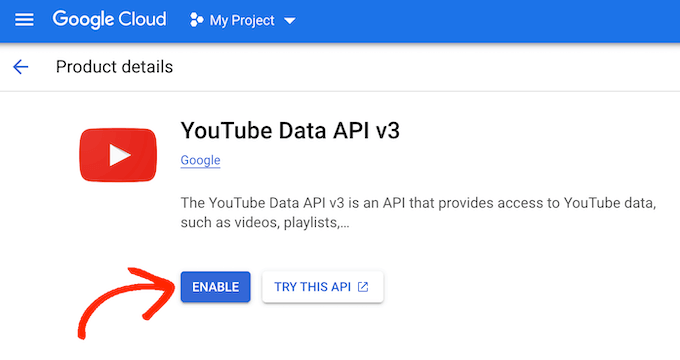
This takes you to a screen where you can enable the YouTube API key.
To do this, click on the ‘Enable’ button.
In the left-hand menu, select ‘Credentials.’
Then, click on ‘Create Credentials.’
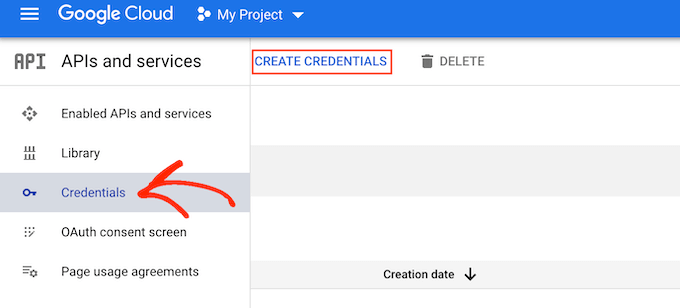
In the dropdown menu that appears, click on ‘API key.’
After a few moments, you’ll see an ‘API key created’ message. You’ll need to add this information to the Smash Balloon plugin, so make a note of it.
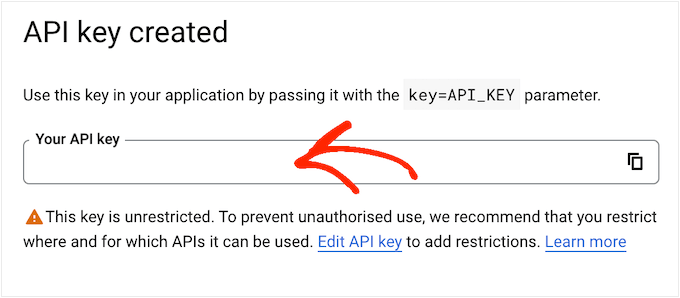
All API keys are unrestricted by default. To stop other people from using the key without your permission, it’s a good idea to restrict it by clicking the ‘Edit API Key’ link.
This opens a screen showing all your keys. Simply click on the YouTube key we just created.
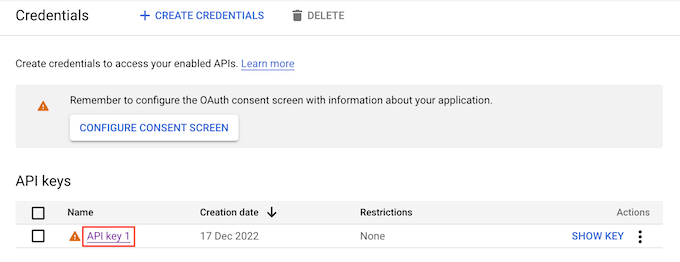
Note: If you closed the popup by accident, then don’t panic. You can reach the same screen by selecting ‘Credentials’ from the left-hand menu. Similarly, if you didn’t record the API key, then simply click on ‘Show Key’ to see your credentials.
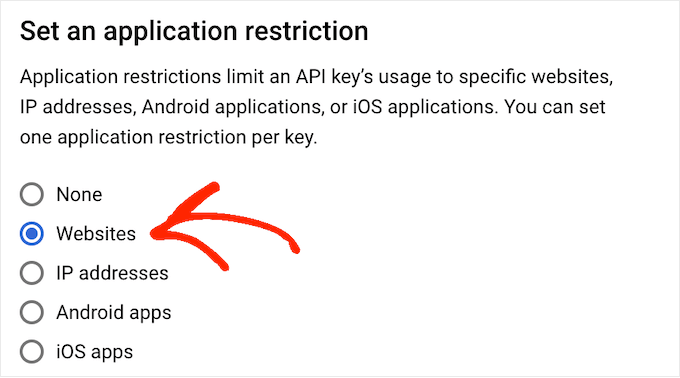
Under ‘Set an application restriction’ select the ‘Websites’ option.
Under ‘Website Restrictions,’ click on ‘Add.’
You can now type in your WordPress website’s address and click on ‘Done.’
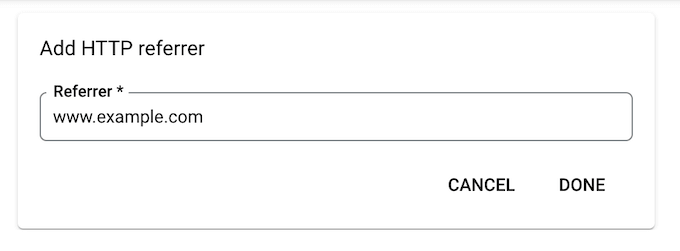
To help Feeds for YouTube access the API, you’ll also need to type in www.googleapis.com and then click on ‘Done.’
Under ‘API restrictions,’ click the radio button next to ‘Restrict key.’
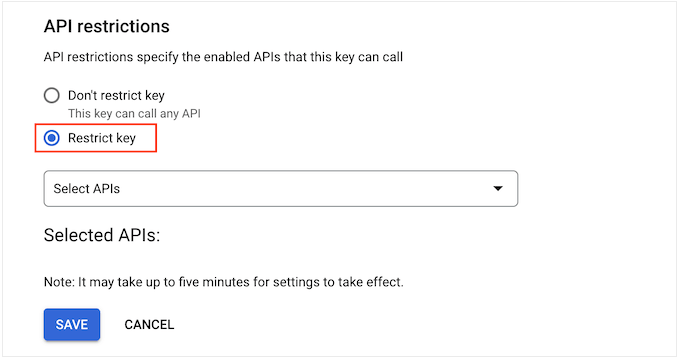
With that done, click on the ‘Select APIs’ dropdown menu and check the box next to ‘YouTube Data API.’
After that, click on ‘OK.’
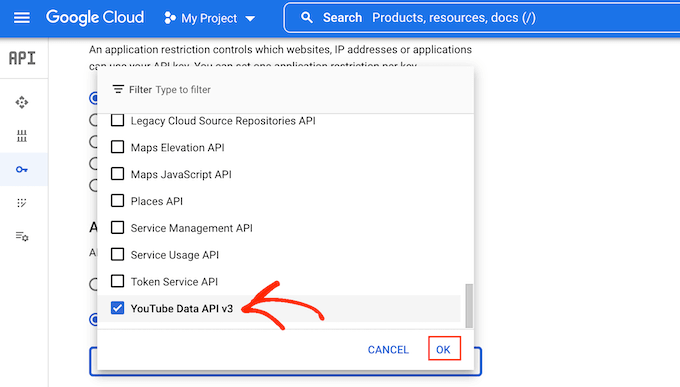
When you’re happy with how the API key is set up, click on the ‘Save’ button.
You’re now ready to add the API key to your WordPress website. Switch back to the WordPress dashboard and go to YouTube Feed » Settings.
Here, paste the key into the ‘API Key’ field and then click on ‘Add.’

How to Create a Video Gallery in WordPress
Now you’ve connected WordPress and YouTube, it’s easy to show the latest videos from your YouTube channel in WordPress.
Simply go to YouTube Feed » All Feeds and then click on ‘Add New.’
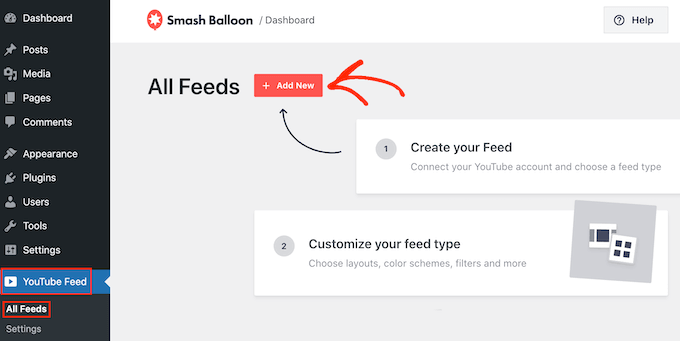
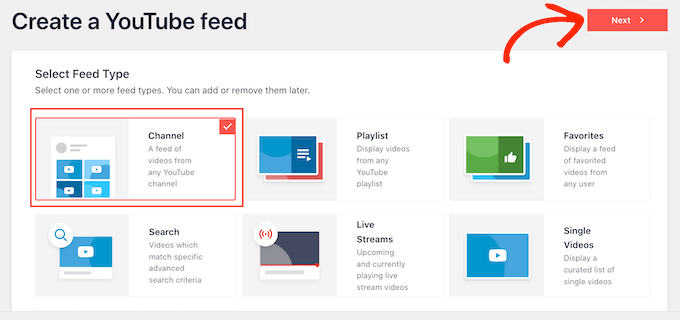
Smash Balloon YouTube Feed Pro lets you embed all different kinds of YouTube content, including playlists, live streams, and single videos.
You can even create a social wall by combining posts from multiple social platforms. For example, you can embed Facebook status posts, display tweets, display Instagram photos, and show YouTube videos, all in one gallery.
To create a YouTube gallery, select ‘Channel’ and then click on ‘Next.’
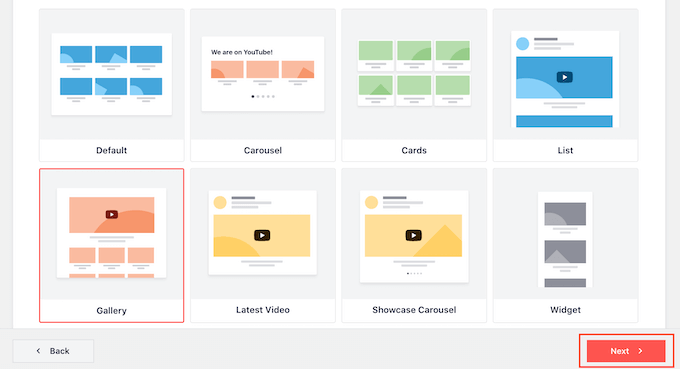
Your next task is choosing the template you’ll use as the starting point for your YouTube video feed. All of the templates are fully customizable, so you can fine-tune the design depending on how you want the gallery to look.
To create a video gallery, select the ‘Gallery’ template and then click on ‘Next.’
Smash Balloon will now go ahead and create a YouTube gallery. This is a good start, but you may want to fine-tune how the videos look on your WordPress blog or website.
How to Customize Your YouTube Gallery
Every time you create a new feed, Smash Balloon takes you to the editor automatically. Here, you’ll see a preview of the gallery to the right, and some settings to the left.
Most of these options are self-explanatory, but we’ll quickly cover some key areas.
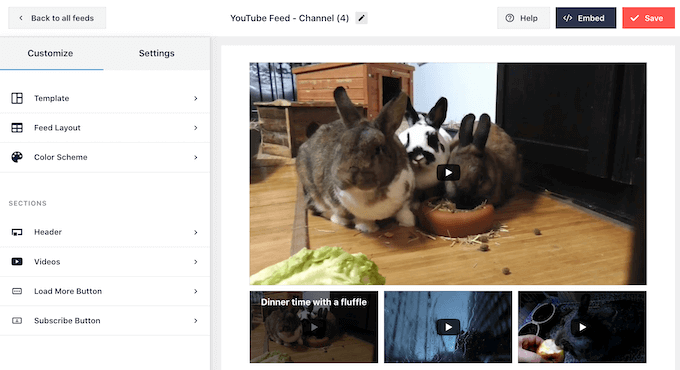
If you are not happy with how the feed looks, then you can try a different template by clicking on the ‘Template’ menu option.
Then, select the ‘Change’ button.
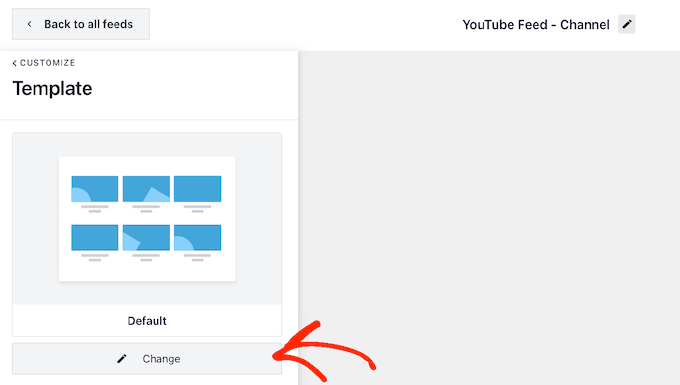
This opens a popup showing all the different templates you can use.
Simply click the template you want to use, and then click on ‘Update.’
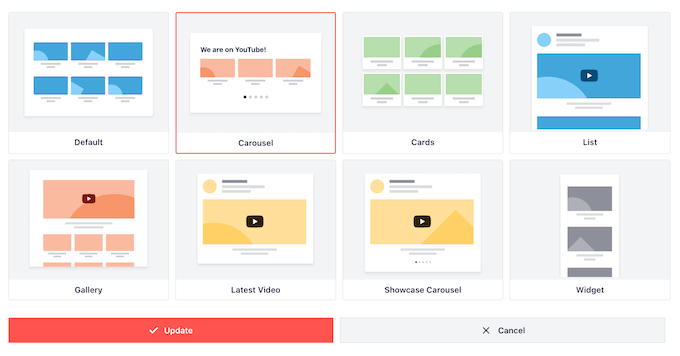
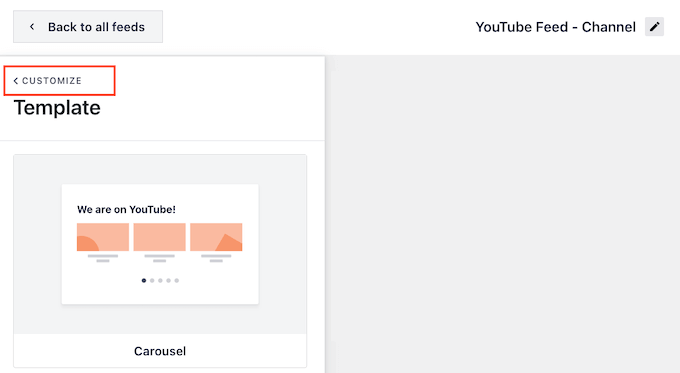
After that, click on the ‘Customize’ link.
This takes you back to the main Smash Balloon settings screen.
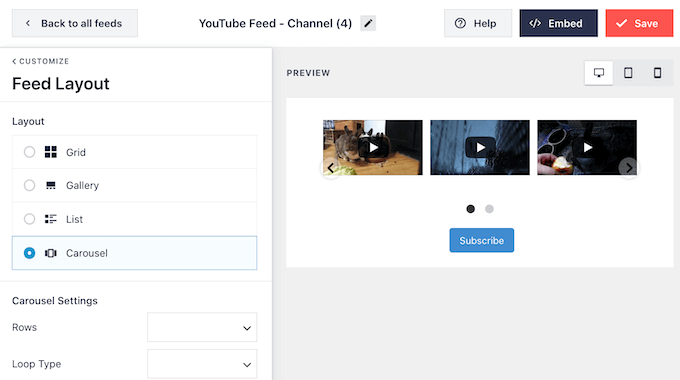
Next, you can change how your videos are displayed by clicking on ‘Feed Layout.’
On this screen, you can switch between grid, gallery, list, and carousel layouts.
Depending on the layout you choose, you may get access to some extra settings.
For example, if you select ‘List’, then you can change the number of videos that Smash Balloon shows and create more space between the YouTube videos.
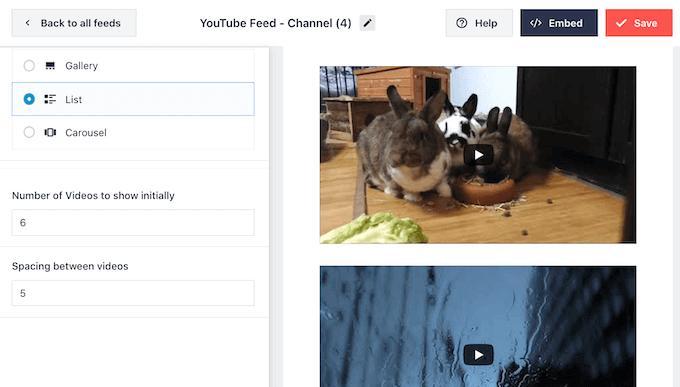
As you make changes, the preview will update automatically, so you can try different settings to see what looks the best for your video gallery.
Social media statistics show that 90% of consumers watch videos on their mobile devices, and 70% of people visit YouTube using a smartphone or tablet. With that in mind, you’ll want to make sure the video gallery looks just as good on mobile as it does on desktop.
You can preview how your feed will look on desktop computers, tablets, and smartphones using the row of buttons in the upper-right corner.
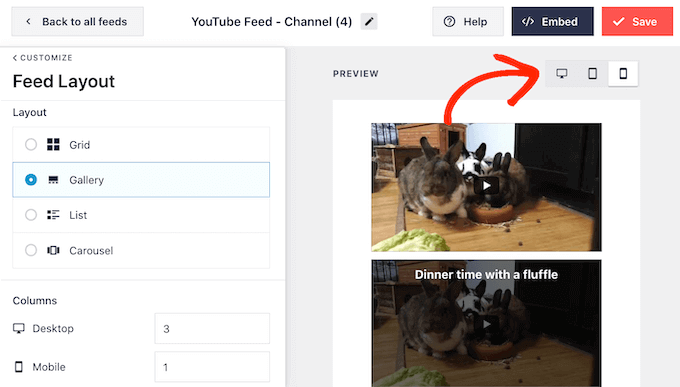
After testing the mobile version of your WordPress website, you may want to change the number of videos you show on smartphones and tablets. This can help your gallery fit comfortably on smaller tablet and smartphone screens.
If you’re using the Gallery layout, then Smash Balloon already shows a different number of columns on mobile devices and desktop computers.
To change the default settings, simply type new numbers into the ‘Columns’ section.
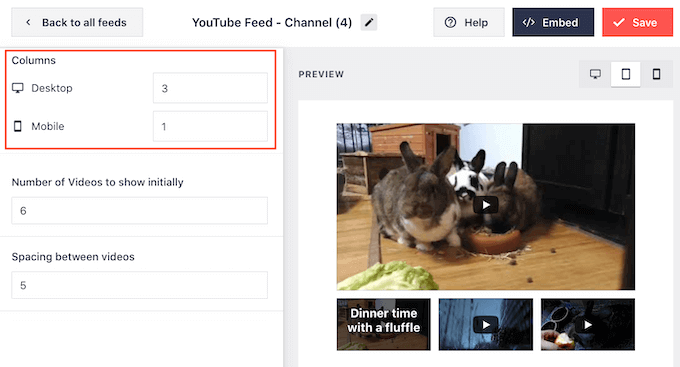
When you’re happy with the changes, click on ‘Customize’ to return to the main Smash Balloon settings screen.
You’re now ready to explore the next option, which is ‘Color Scheme.’
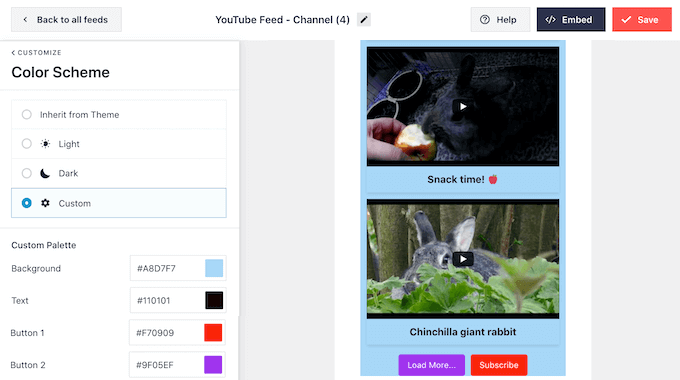
By default, Smash Balloon uses the same color scheme as your WordPress theme. However, you can switch to a ‘Light’ or ‘Dark’ color scheme if you prefer.
You can even create your own color scheme by selecting ‘Custom’ and then using the settings to change the link color, text color, change the background color, and more.
Next, you may want to add a header above the video gallery. This header shows your YouTube profile picture and channel name, so visitors can see exactly where the content comes from.
To add a header section, click on ‘Header’ in the left-hand menu.
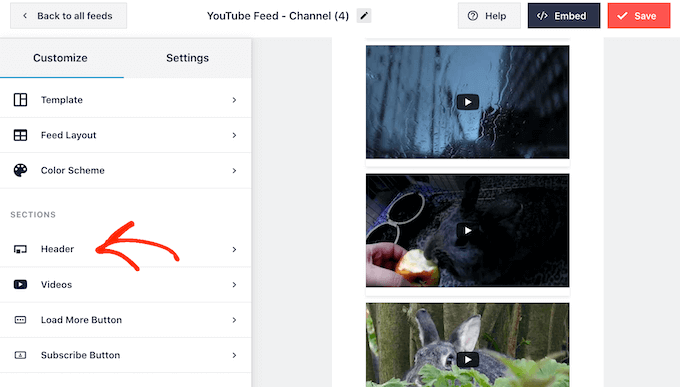
On this screen, click on the ‘Enable’ slider to turn it from grey to blue.
After adding a header section, you can use the controls to switch between standard and text header styles.
If you choose ‘Text’, then you can change the text color and font size. By default, this header shows the message ‘We are on YouTube.’ You can replace this with your own messaging by typing it into the ‘Text’ box.
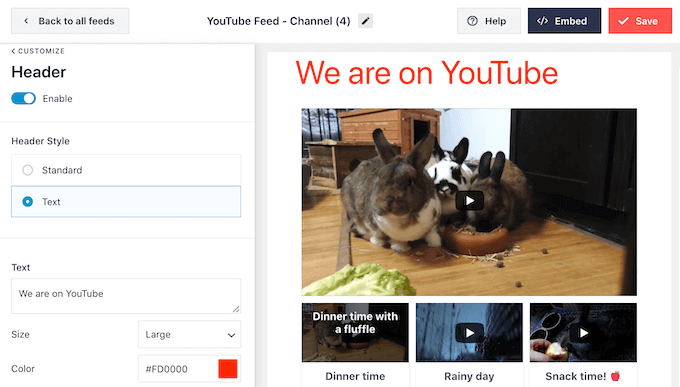
When you’re happy with how the header looks, the next settings screen is ‘Videos.’
This takes you to a new screen where you can fine-tune how each video looks by default, when a visitor hovers over it, and when it’s playing. Let’s look at each option in turn.
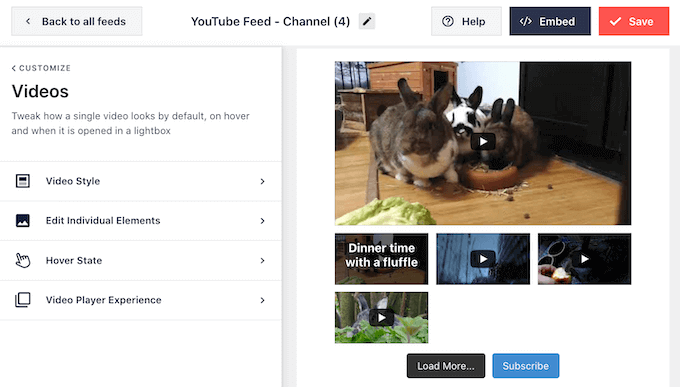
In ‘Video Style,’ you can switch between boxed and regular layouts.
If you choose ‘Boxed’, then can change the background color, add a box shadow, or increase the border-radius to create curved corners.
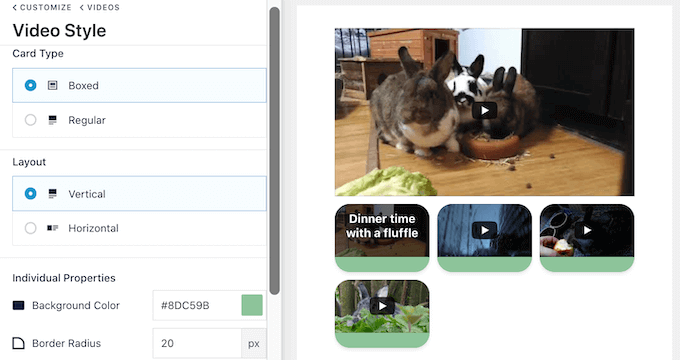
You can also choose whether to show the videos in a horizontal or vertical layout.
When you’re happy with your changes, click on the ‘Videos’ link. This takes you back to the previous screen, where you can select ‘Edit Individual Elements.’
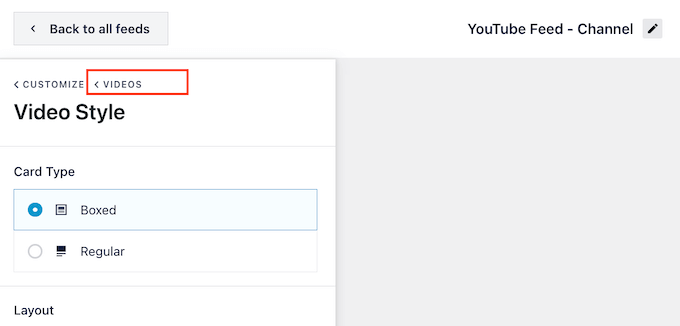
Here, you can add and remove different elements from each video.
For example, you can customize the video title, description, and date.
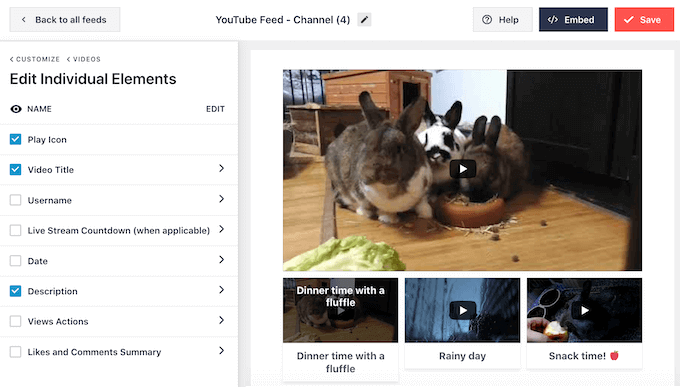
You can also change the color and size of any individual YouTube element by clicking on that element’s name.
Some elements have extra settings. For example, if you select ‘Description’, then you can set the maximum number of characters that Smash Balloon will show.
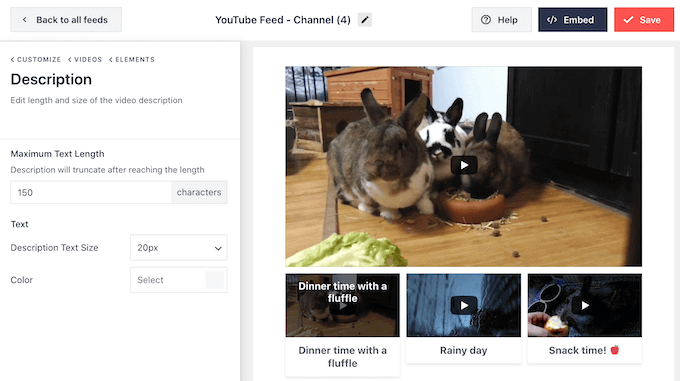
When you’re finished, you can move on to the ‘Hover State’ settings.
Here, you can change the content that appears when visitors hover the mouse over a video.
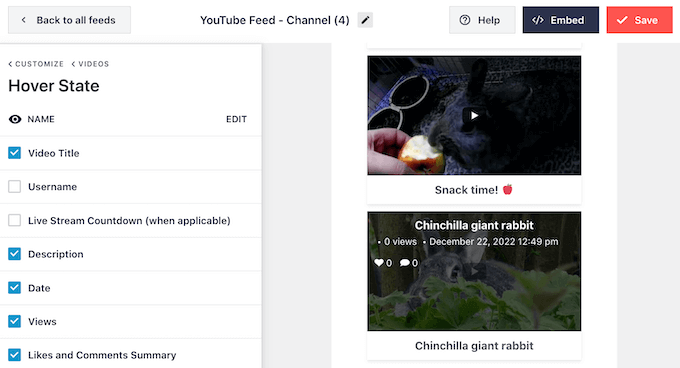
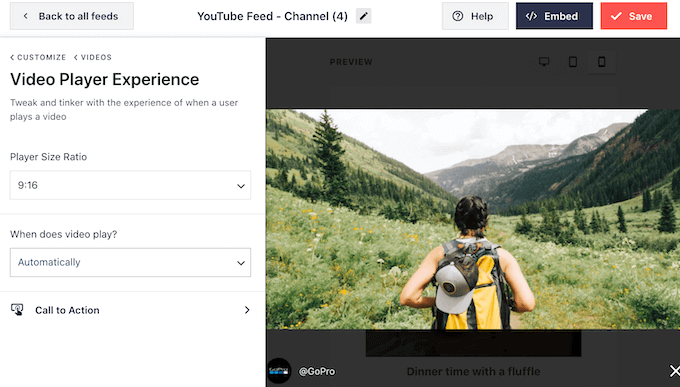
When a visitor clicks on a video, it’ll start playing in an embedded video player. You can change how the player acts and looks by clicking on ‘Video Player Experience.’
Here, you can change the player’s aspect ratio, and choose whether the video should start playing automatically or wait until the visitor clicks the play button.
If you select ‘Call to Action’, then you can change what happens when the video finishes or the visitor pauses playback.
By default, Smash Balloon tries to get more engagement on your YouTube channel by showing related videos. You may want to show a custom link instead. For example, if you run a WooCommerce store then you might link to your most popular WooCommerce products.
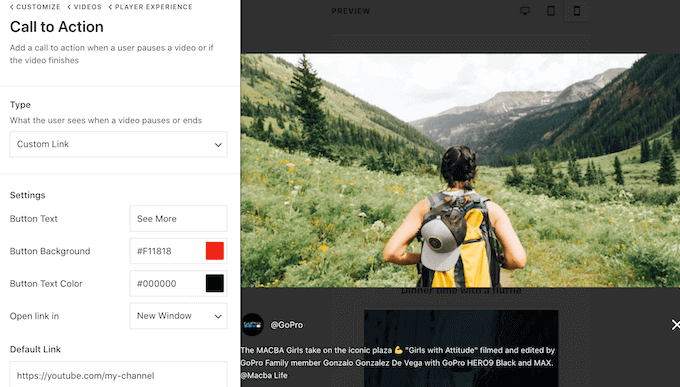
When you’re happy with the player, you can click on ‘Customize’ to return to the main Smash Balloon editor screen.
After that, select the ‘Load More Button’ option from the left-hand menu.
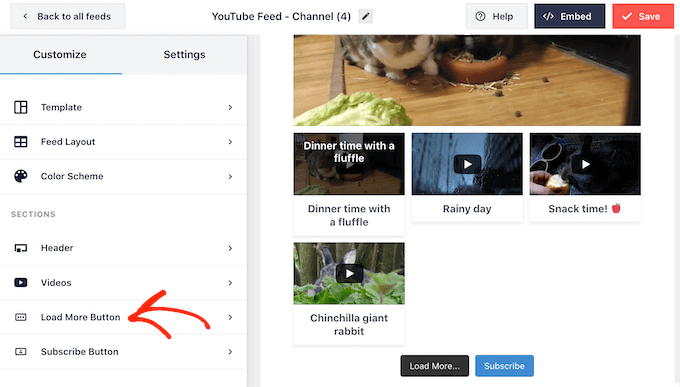
The ‘Load More’ button gives visitors an easy way to scroll through more of your videos. This can get you more engagement on YouTube and keep visitors on your website for longer.
That being said, you may want to make the button stand out by changing its background color, hover state, and text color.
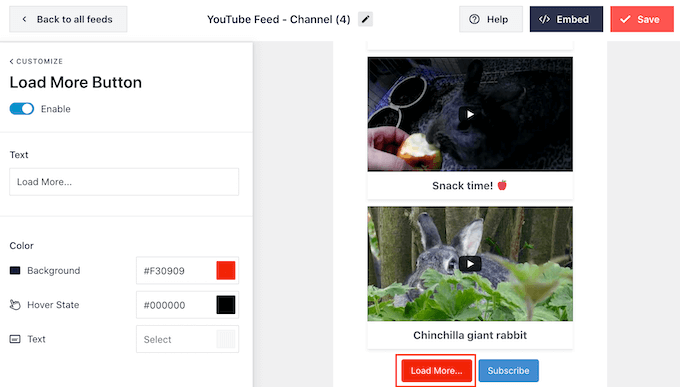
This button shows ‘Load More…’ by default, but you can add a custom message by typing into the ‘Text’ field.
By default, Smash Balloon shows a ‘Subscribe’ button below your video gallery.
This button makes it easier for visitors to join your YouTube channel, so you may want to customize it by selecting ‘Subscribe Button’ from the main Smash Balloon settings screen.
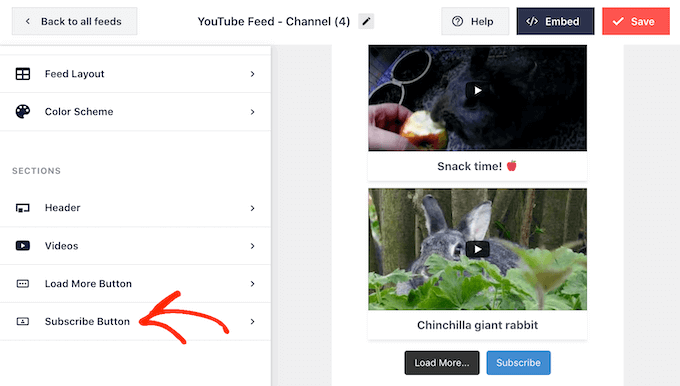
On this screen, you can change the button’s background color, hover state, and text color.
You can also replace ‘Subscribe’ with your own messaging by typing into the ‘Text’ box.
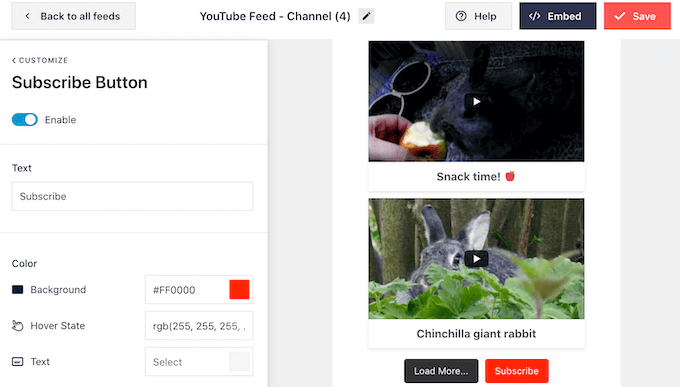
When you’re happy with how the video gallery looks, don’t forget to click on ‘Save’ to store your changes. You’re now ready to add the gallery to your website.
How to Embed a Video Gallery in WordPress
You can add your YouTube gallery to WordPress using a block, widget, or shortcode.
If you’ve created more than one feed using Smash Balloon, then you’ll need to know the gallery’s code if you’re going to add it using a block or widget.
To get the code, go to YouTube Feed » All Feeds and then copy the text under ‘Shortcode.’
In the following example, we’ll need to use youtube-feed feed=2.
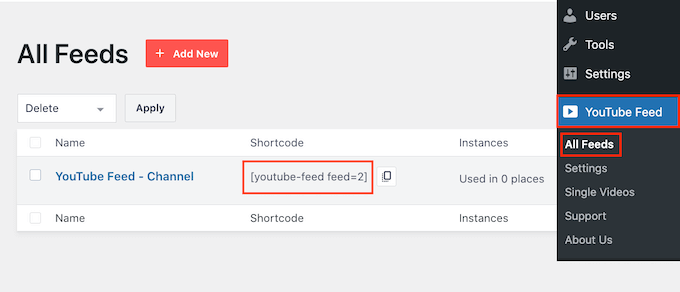
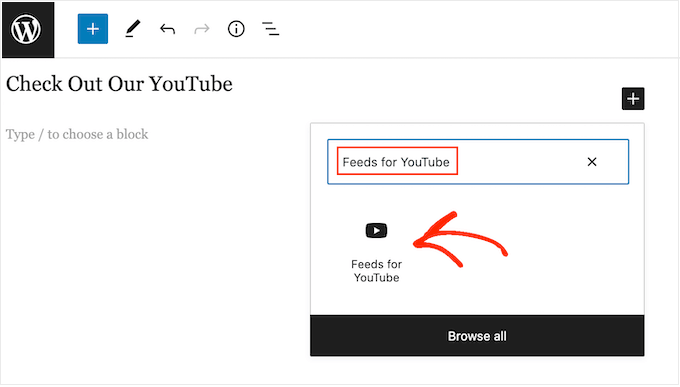
If you want to embed your video gallery in a page or post, then we recommend using the ‘Feeds for YouTube’ block.
To start, open the page or post where you want to embed the YouTube video gallery. Then, click on the ‘+’ icon to add a new block and start typing ‘Feeds for YouTube.’
When the right block appears, click to add it to the post or page.
The block will show one of your Smash Balloon feeds by default. If you want to use a different feed instead, then simply find ‘Shortcode Settings’ in the right-hand menu.
You can now add the shortcode to this box. Once you’ve done that, click on the ‘Apply Changes’ button.
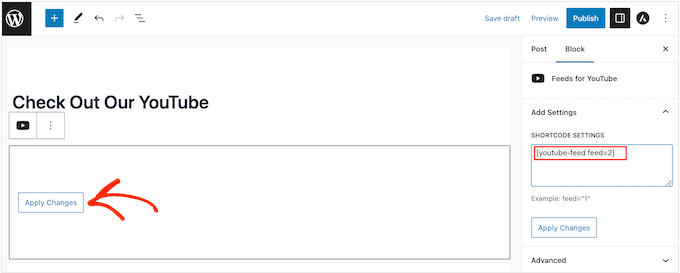
The block will now show all the videos from your YouTube channel. Simply publish or update the page to make your YouTube social media feed live.
Another option is to add the feed to any widget-ready area, such as the sidebar or similar section. This allows you to show the gallery across your entire website.
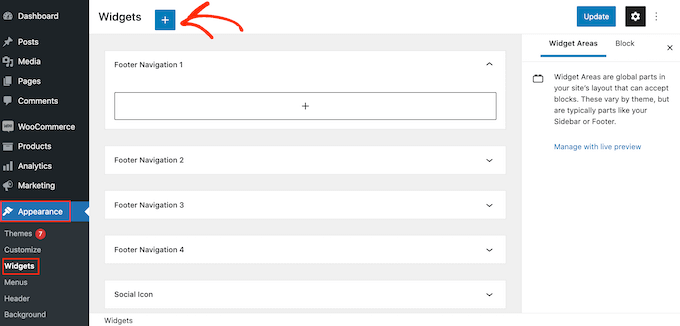
To do this, simply head over to Appearance » Widgets in the WordPress dashboard and then click on the blue ‘+’ button.
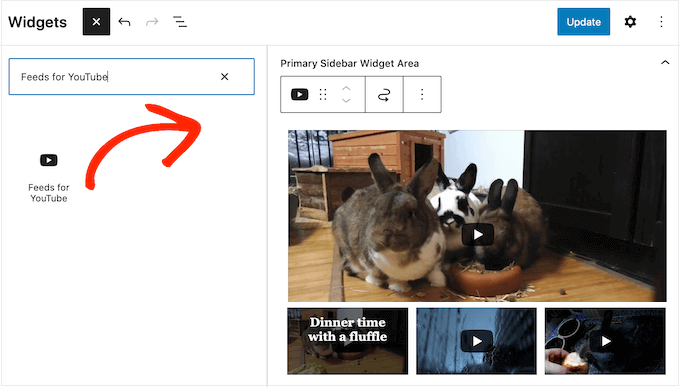
Now, start typing ‘Feeds for YouTube’ into the search bar to find the right widget.
After that, simply drag it onto the area where you want to show the video gallery.
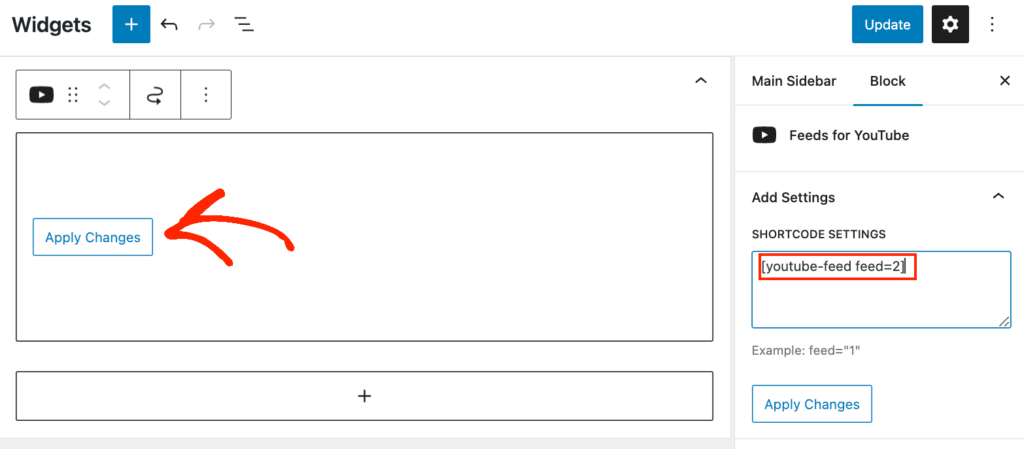
By default, the widget will show one of the feeds you created using the YouTube Feed Pro plugin. To show a different feed instead, type the feed’s code into the ‘Shortcode Settings’ box and then click on ‘Apply Changes.’
You can now click on the ‘Update’ button to make the widget live.
For more information, please see our step-by-step guide on how to add and use widgets.
You can also embed your video gallery on any page, post, or widget-ready area using a shortcode. To get the shortcode, simply go to YouTube Feed » All Feeds and copy the value in the ‘Shortcode’ column.
Then, simply add this code to your site. For more information, please see our detailed guide on how to add a shortcode in WordPress.
Finally, if you’re using a block-enabled theme, then you can use the full-site editor to add the Feeds for YouTube block anywhere on your site.
In the WordPress dashboard, simply go to Appearance » Editor.
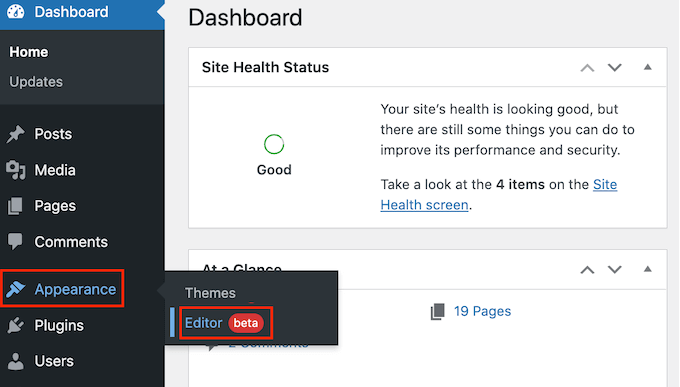
By default, the full-site editor will show your theme’s home template.
If you want to add the YouTube video gallery to a different template, then click on ‘Templates’ in the left-hand menu.
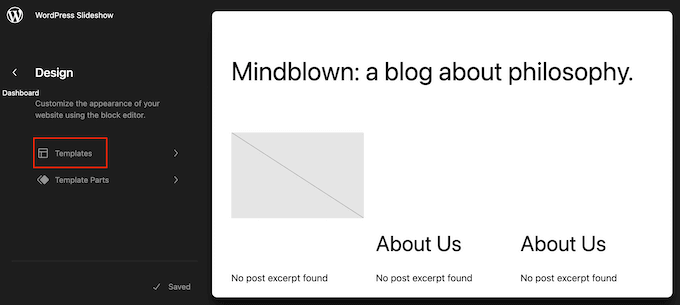
The editor will now show a list of all the templates that make up your WordPress theme.
Go ahead and click on the template you want to edit.
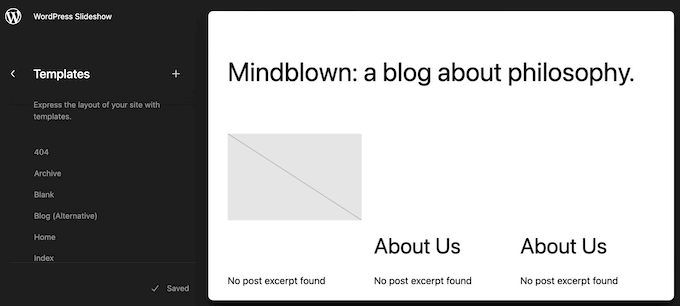
WordPress will now show a preview of the template.
If you’re happy to add the gallery to this part of your site, then click on the pencil icon.
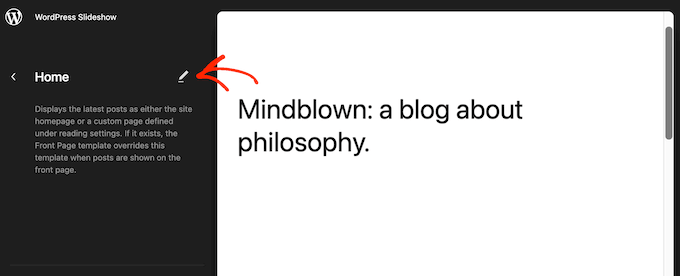
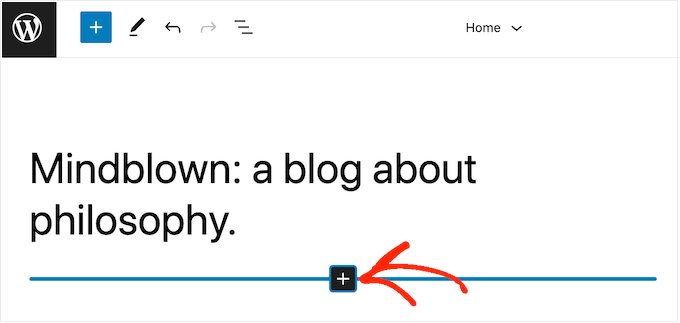
After choosing your template, hover your mouse over the area where you want to show the YouTube videos.
Then, click on the blue ‘+’ when it appears.
Once you have done that, start typing ‘Feeds For YouTube.’
When the right block appears, click to add it to your template.
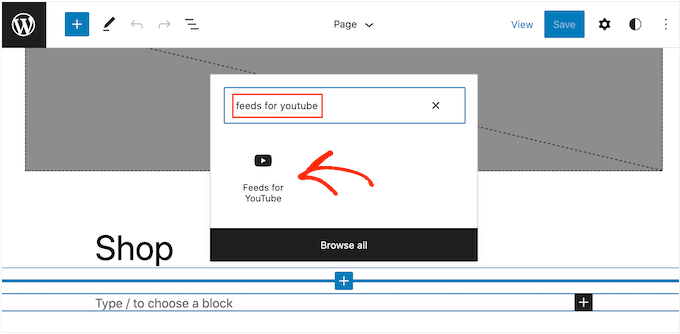
As always, Smash Balloon will show a feed by default. If this isn’t the YouTube gallery you want to use, then you can add the gallery’s shortcode following the exact same process described above.
Convert Your Video Gallery Into WordPress Posts
So far, we’ve seen how Smash Balloon lets you create a video gallery and customize it to fit perfectly with the rest of your website. This plugin also has a few more features you may want to explore, including turning the videos in your gallery into WordPress posts.
Using the plugin, you can quickly and easily create a post using any video from your YouTube channel. You can then add other content to that post using the familiar WordPress dashboard and tools.
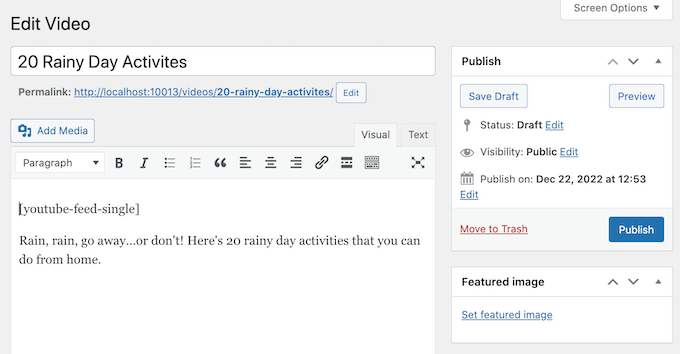
When you publish the post, Smash Balloon will show the video across the top of the screen, along with some information such as its title and the date it was published.
Any other content will appear below the video.
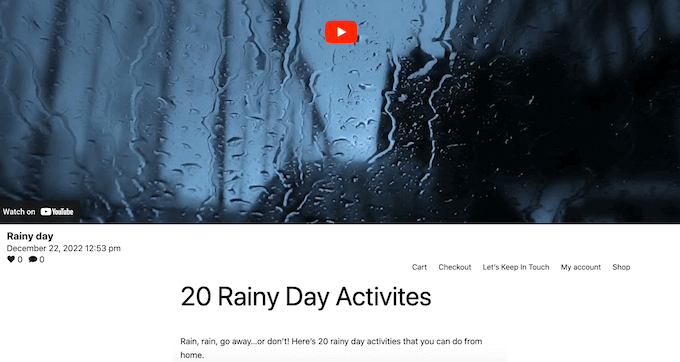
This is much faster than embedding each video in a blog post manually. It’s also an easy way to share individual videos. For example, you can drive people to a specific post by promoting it on social media or adding it to your email newsletter.
Your first task is choosing the information that’ll appear beneath each video by going to YouTube Feed » Settings.
Here, select the Single Videos tab.
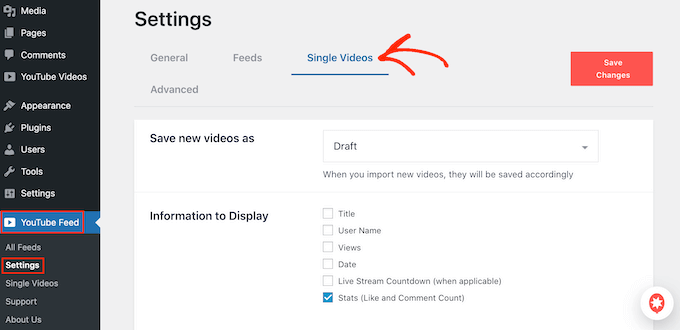
Simply check the box next to each piece of information you want to show.
Don’t forget to click on ‘Save Changes’ to store your settings.
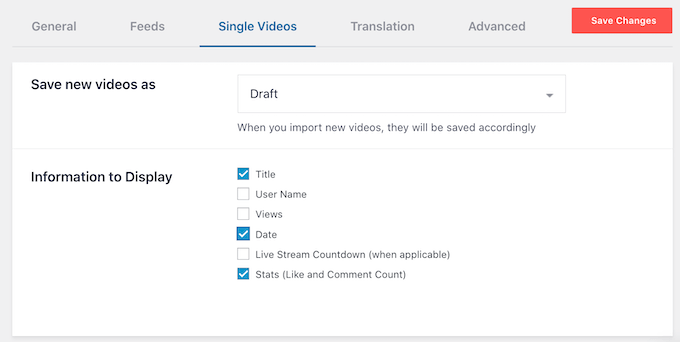
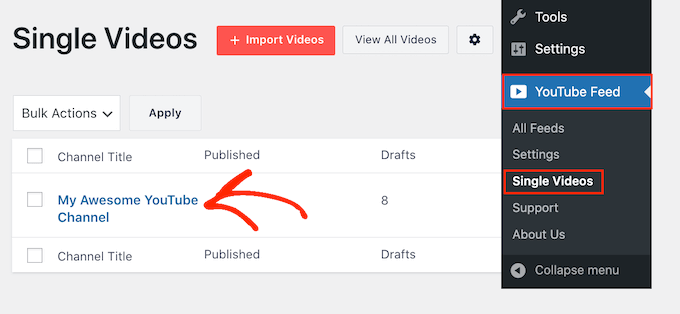
After that, go to YouTube Feed » Single Videos. Here, you’ll see all the YouTube channels you connected to WordPress using Smash Balloon.
Simply find the channel you want to use and click on its name.
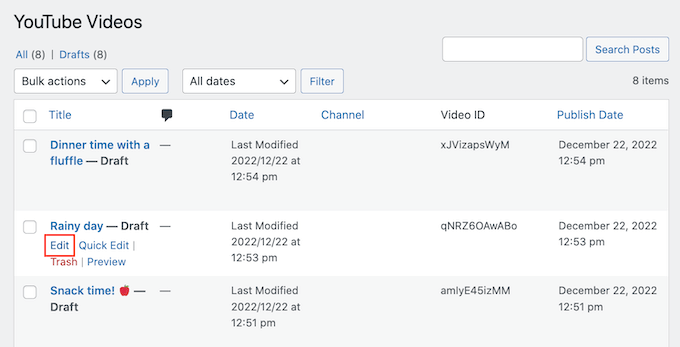
You’ll now see all the videos from this channel.
Simply find the video that you want to turn into a post and click on its ‘Edit’ link.
You can now add blocks, text, and any other content to the post, using the standard WordPress content editor.
When you’re ready to make the post and video live, simply click on the ‘Publish’ button as normal. Now, if you visit your website, you’ll see the new video post.
Related: If you want to create a TikTok video gallery on your WordPress site, Smash Balloon also offers a TikTok Feeds Pro plugin. For step by step instructions, see our guide on how to embed TikTok videos in WordPress.
We hope this article helped you create a video gallery in WordPress. You may also want to check out our guide on how to speed up your WordPress website and our expert pick of the best social media plugins.
If you liked this article, then please subscribe to our YouTube Channel for WordPress video tutorials. You can also find us on Twitter and Facebook.


Lyn
I’m looking for something that will enable me to insert a gallery of videos but ONLY select videos from the channel – in this instance only 4 – not the entire feed. Is there a plugin that does that?
WPBeginner Support
If the videos are in a playlist, the plugin has a pro version that allows you to specify the playlist to display
Admin
Kim
I followed all the steps and inserted the short code into a shortcode block on my wp blog post. when i preview all i see is the shortcode. Am I missing a step? I’ve tried looking everywhere to no avail. Please help!
WPBeginner Support
You may want to make sure there are no missed typos or you could use the Envira Gallery block if the issue continues
Admin
Blessmond Alebna Ayinbire
Thanks for your article. I have a different problem. Anytime I share a link from my WordPress site, the thumbnail is my site identity logo instead of the featured image in the post. Please help…
WPBeginner Support
For that, you would want to take a look at our article here: https://www.wpbeginner.com/wp-tutorials/how-to-fix-facebook-incorrect-thumbnail-issue-in-wordpress/
Admin
Sujal
I can’t able to find the youtube user id, need urgent help!
WPBeginner Support
Currently, you should be able to click the settings next to your YouTube account in the top right and open up advanced to find it.
Admin
rishabh
I tried using this plugin but it’s giving an error. It’s not displaying video. Error Type: Forbidden
WPBeginner Support
We mention two plugins in this article, you would want to reach out to the support for the plugin you are using for them to assist you with this error.
Admin
Kiran More
can not see Insert videos option in wordpress?
Eric
Hello, I’m new to WordPress. If I install this plugin, will it work with all themes? Can I use it to create new / custom thumbnails for all my videos? Is it a one time fee to buy the plugin or are there recurring subscription fees? Thanks…
Gaurav Khurana
The youtube plugin is not updated for the last 2 years. Will it be fine to use it on long term basis ?
WPBeginner Support
Hi Gaurav,
We have reached out to plugin author. Meanwhile, we tested the plugin and found that it still works perfectly.
Admin