Running a photo contest on your WordPress site can be a game-changer for engagement. It’s an exciting way to attract new visitors, boost user interaction, and grow your online community.
At WPBeginner, we’ve seen firsthand how photo contests can transform quiet websites into vibrant hubs of activity. It’s a versatile tool that works for showcasing customer creativity, spicing up content, or highlighting product uses.
In this guide, we’ll show you how to easily create a photo contest in WordPress, step by step.

When Should You Create a Photo Contest in WordPress?
Creating a photo contest in WordPress can be a powerful strategy in various situations. Here are some scenarios where it might be particularly beneficial:
- Boosting social media engagement: Encourage participants to share their entries on social platforms to increase your reach.
- Growing your email list: Use the contest as an opportunity to collect email addresses from participants.
- Increasing website traffic: A well-promoted contest can drive significant traffic to your site.
- Building community: Foster a sense of belonging among your audience by encouraging them to share their experiences.
- Gathering testimonials: Use photo submissions as visual testimonials for your products or services.
Remember, the key to a successful photo contest is aligning it with your marketing goals and your audience’s interests. When done right, it can provide valuable user-generated content, increase engagement, and strengthen your relationship with your audience.
With that in mind, let’s talk about how to create a photo contest in WordPress. You can use these quick links to navigate through the steps:
- Step 1: Install and Activate the RafflePress Plugin
- Step 2: Create Your First Photo Contest
- Step 3: Design Your Photo Contest
- Step 4: Configure the Photo Contest Settings
- Step 5: Add the Photo Contest Widget to Your Website
- Step 6: Promote Your Photo Contest Giveaway
- Step 7: Announce the Photo Contest Winners
Step 1: Install and Activate the RafflePress Plugin
The easiest way to create a photo contest in WordPress is by using RafflePress. It’s the best WordPress giveaway plugin and lets you create all kinds of contests using a simple drag-and-drop editor.
It allows visitors to enter your contest by following you on social media, joining your mailing list, submitting an image, and more.
For more information, see our complete RafflePress review.

The first thing you need to do is install and activate the RafflePress plugin. For more details, see our step-by-step guide on how to install a WordPress plugin.
Note: While there is a free version of RafflePress, we will be using the premium version since it lets participants submit an image.
Upon activation, you will see the RafflePress welcome screen in the WordPress dashboard. You can now go ahead and enter your license key.
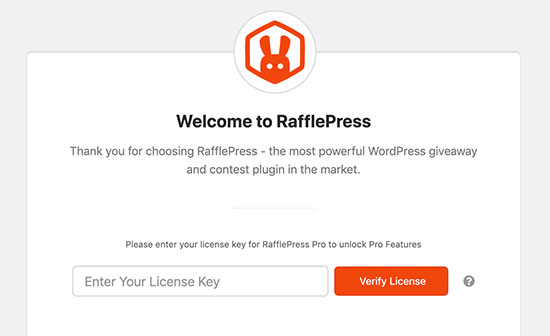
You will find this information in your account on the RafflePress website. Once you have done that, go ahead and click the ‘Verify Key’ button.
Now, you are ready to create a photo contest in WordPress.
Step 2: Create Your First Photo Contest
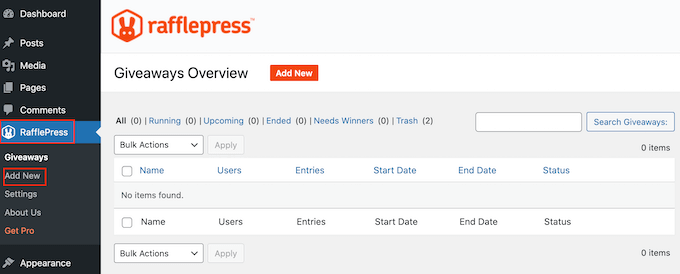
To create a new competition, go to RafflePress » Add New.
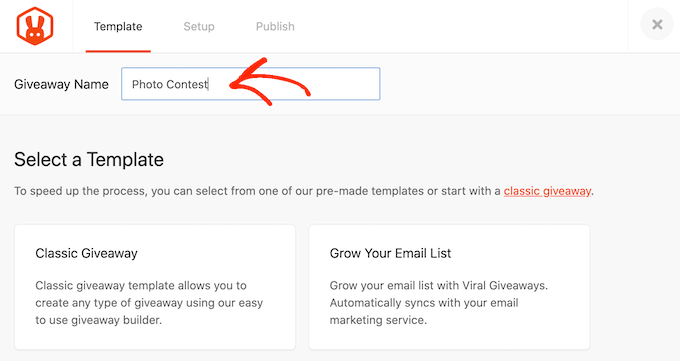
On the next screen, you will need to give your photo contest a name.
You can use anything you want, but it’s a good idea to choose a name that helps you identify the contest in the WordPress dashboard.
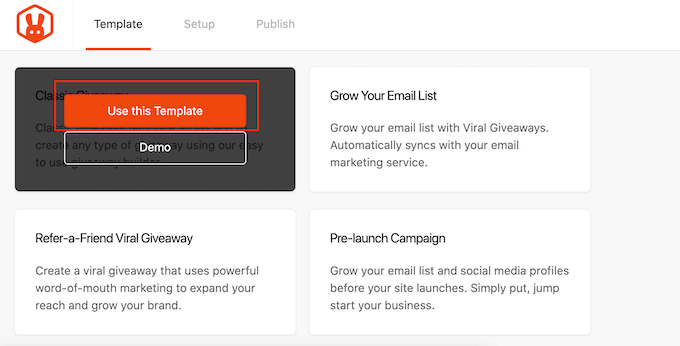
Next, choose the template that you want to use. RafflePress has ready-made templates for specific goals, such as running a social media contest to grow your site or using a Facebook giveaway to boost engagement.
You can select the template that best suits your goals, but for this guide, we will be using the Classic Giveaway template, as it lets us create a contest from scratch.
Simply hover your mouse over the Classic Giveaway template and then click on the ‘Use this Template’ button when it appears.
This opens the template in RafflePress’s drag-and-drop builder.
To start, you need to set the prize for your photo contest. Simply click to select the headline area, which shows ‘My Awesome Prize’ by default.
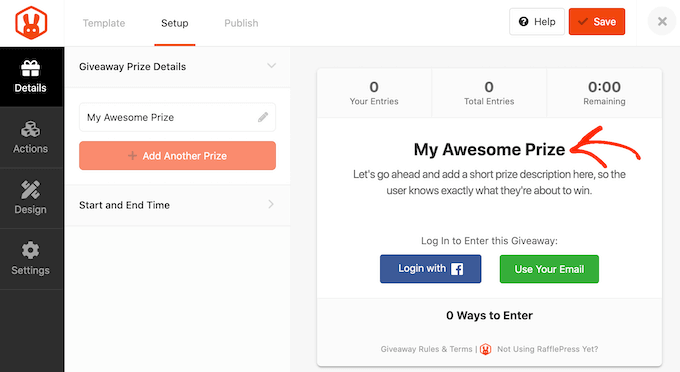
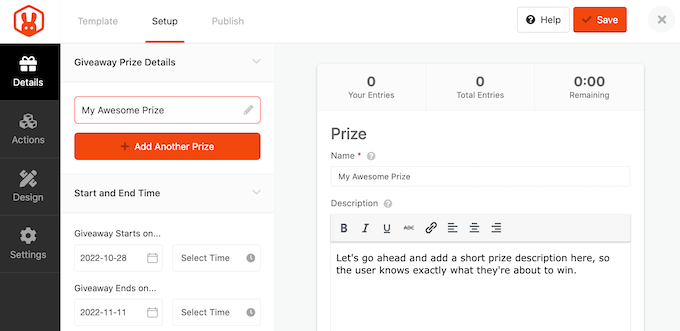
You can now go ahead and type a title into the ‘Name’ field. You will typically want to talk about your prize, but you can use any title you want.
Once you have done that, type in a description, which will appear below the headline.
For example, you may want to add some more information about your photo contest, such as why visitors will want the prize, how much it’s worth, and why you are running the photo contest.
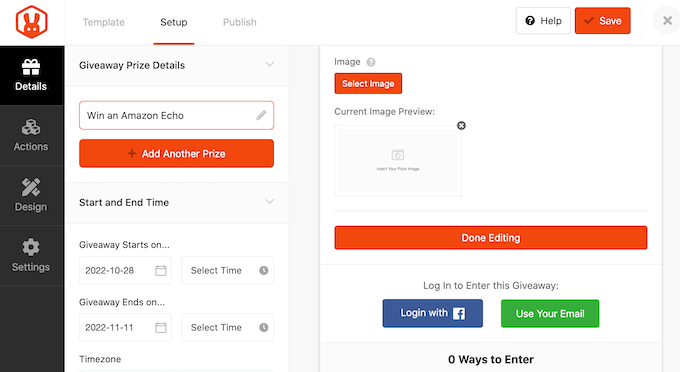
It’s also a good idea to add an image of the prize so people can see what’s on offer just by glancing at the giveaway.
To do this, simply click on ‘Select Image’ and then either choose an image from the WordPress media library or upload a new file from your computer.
Next, you need to choose the start and end date for the photo contest. If you plan to run lots of giveaways, then this feature lets you schedule them in advance. It also guarantees that the photo contest will start and end on time, no matter how busy you get.
Wherever possible, it’s a good idea to leave enough time before the start date so you can promote the giveaway properly.
For example, you might promote it using web push notifications or by sending SMS messages to your users. This helps you build a sense of excitement and anticipation before the contest goes live.
To schedule the photo contest, simply enter a date and time into the ‘Giveaway starts…’ and ‘Giveaway ends…’ sections.
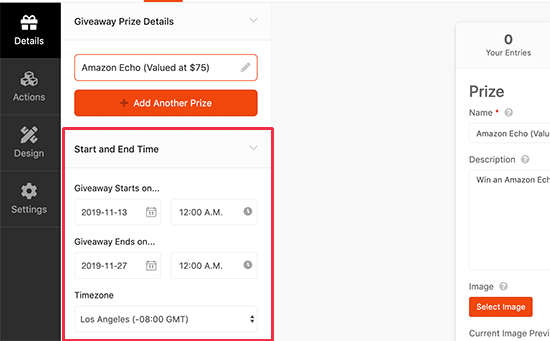
You will also want to check the ‘Timezone’ dropdown. By default, RafflePress uses the timezone in your WordPress settings, but you can change this to anything you want.
When you have finished making changes to this section, click on the ‘Done Editing’ button.
Add Giveaway Actions to Your Photo Contest
Now, let’s add some actions. Giveaway actions are the ways that users can enter the contest, such as sharing a post on social media.
To see all the different actions that you can add to your photo contest, simply select ‘Actions’ in the left-hand menu.
Since we are creating a photo contest, you will want to add the ‘Submit an image’ action.
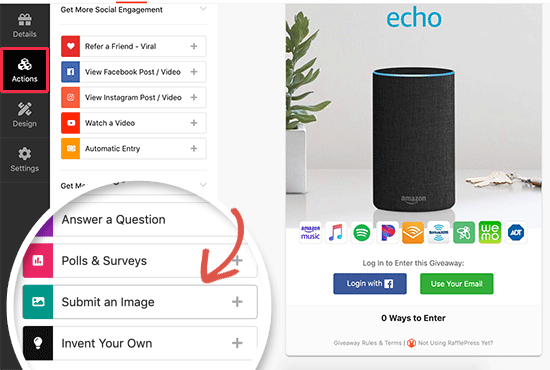
Simply click to add the action to your contest.
RafflePress will now show the action’s settings in the left-hand menu.
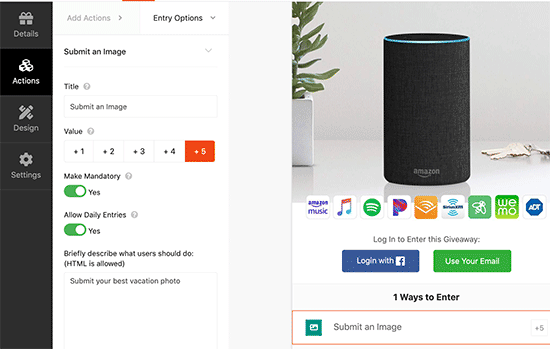
To start, you will want to describe how users can enter the competition. For example, you might ask them to submit their best vacation photo or an image of their pet.
You can type this information into the ‘Briefly describe box…’
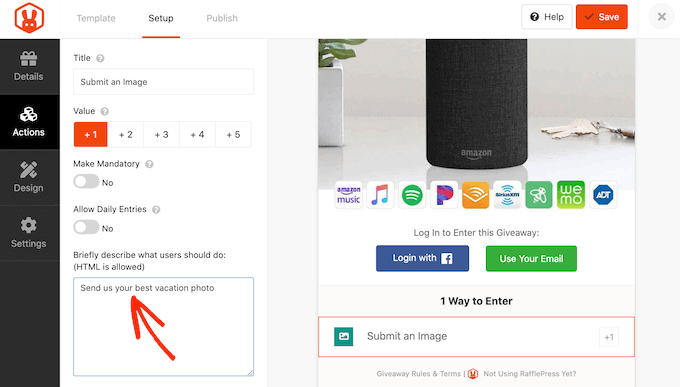
Each action also has some basic settings. To start, you can type in a title and select how many entries participants will get for performing this action.
You can also make an entry mandatory and even submit daily entries.
Once you have filled in these settings, you can add more entry methods to your competition by clicking on the ‘Add Actions’ tab.
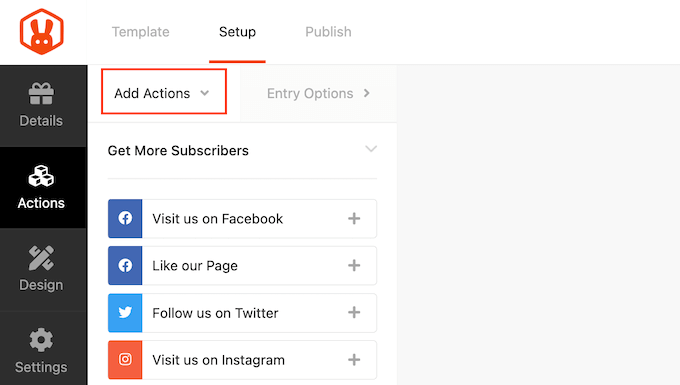
You can add as many actions as you like. Giving visitors multiple ways to participate can get you more entries. There may also be some people who complete all the actions to give themselves the best possible chance of winning the prize.
In this way, you can achieve multiple goals with a single giveaway, such as growing your email list and getting more TikTok followers.
However, it’s a good idea to prioritize actions based on your campaign goals. Since we want to create a photo contest, make sure you put the ‘Submit an Image’ action at the very top of the ‘Entry Methods’ list.
To do this, simply hover over the action in the editor and then grab the dotted button that appears to the left of the action. Then, move the entry method using drag and drop.
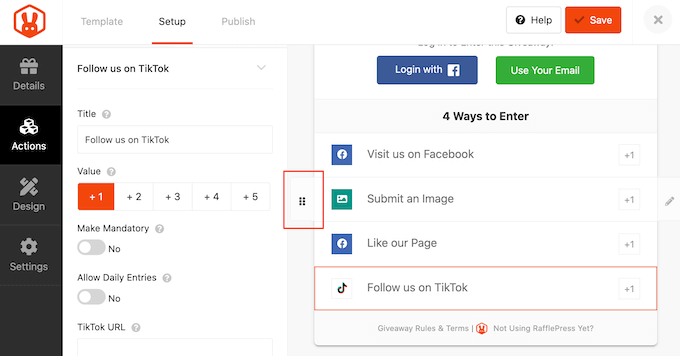
When you are happy with how the giveaway is set up, don’t forget to click on ‘Save’ to store your changes.
Step 3: Design Your Photo Contest
Now you have configured the giveaway, it’s time to change how the photo contest looks. An eye-catching and professionally designed competition can get you more entries, so it’s important to make sure the contest looks good.
Simply switch to the ‘Design’ tab, and you will see options to change the background color, select a new button color, change the fonts, and more.
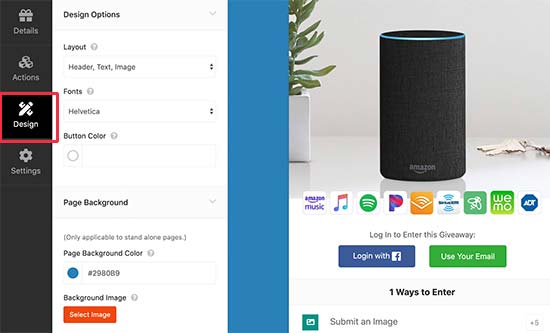
You can even customize the giveaway template using custom CSS.
RafflePress shows a live preview of the giveaway, so you can try different settings to see what looks the best. When you are happy with how your photo contest looks, go ahead and click on ‘Save’ to store your settings.
Step 4: Configure the Photo Contest Settings
Your next task is configuring the contest settings by selecting the ‘Settings’ tab.
Most of these options are self-explanatory, but we will go through them one by one.
First, we will review the general settings.
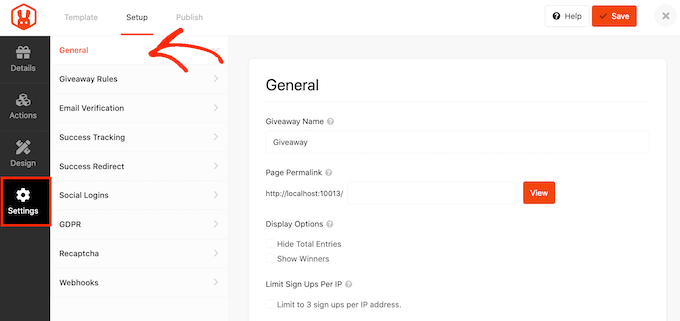
Here, you can set the basic options for your giveaway, including showing the contest’s winners, the total number of entries, limiting signups based on IP address, and more.
Next, switch to the ‘Giveaway Rules’ tab and create the rules for joining the giveaway.
RafflePress comes with a Rules Generator that you can use to create rules for your campaign using a sample template. To get started, click on the ‘Generate Rules’ button.
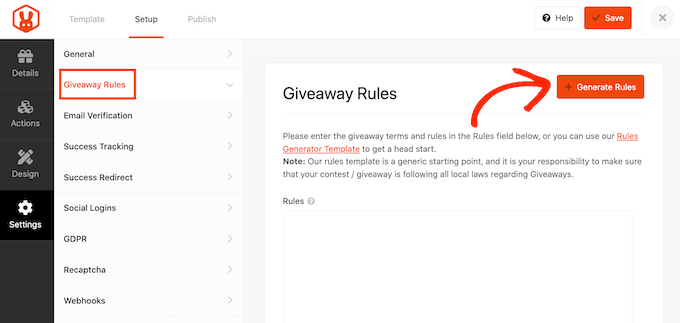
This will open a form where you can type in some information about the photo contest.
In most cases, you or your company will be the contest’s sponsor. This means you will need to enter your company name and business email address.
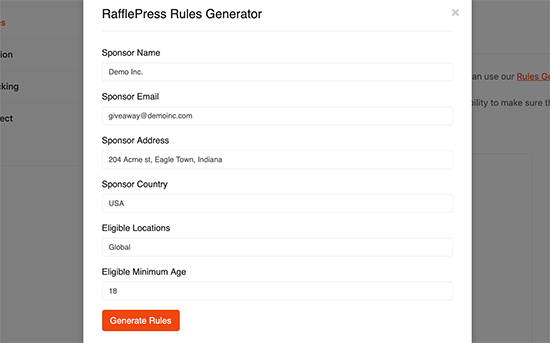
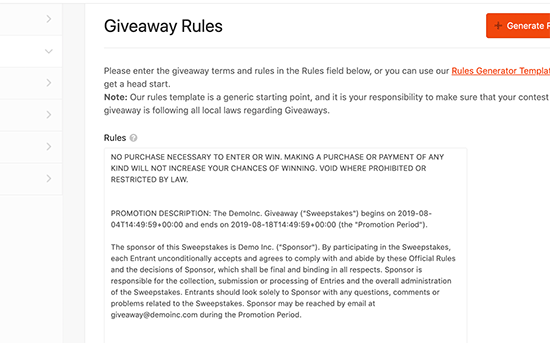
RafflePress will then use this information to create some basic rules for your photo contest.
Every location has its own rules about giveaways, so it’s a good idea to review these automatically generated rules and add any information that’s missing.
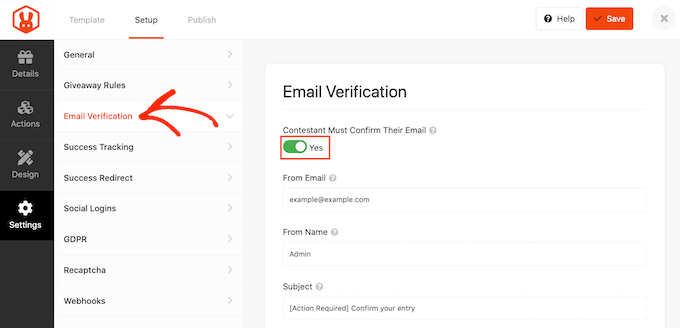
After that, switch to the ‘Email Verification’ tab. Here, you can turn email verification on and off using the ‘Contest must Confirm Their Email’ toggle.
If you are using the contest to get more subscribers for your email newsletter or mailing list, then it’s a good idea to only accept entries from people who verify their email addresses.
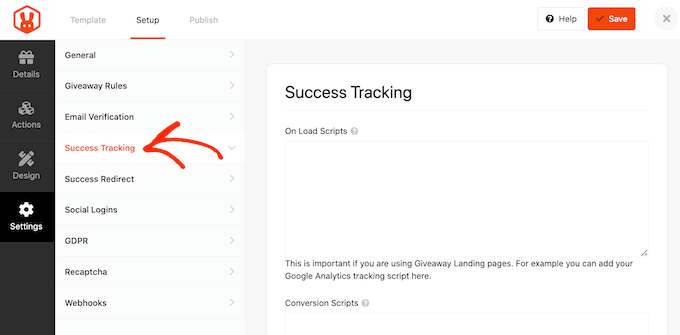
If you want to add Google Analytics or other tracking codes like Facebook pixel, then switch to the ‘Success Tracking’ tab.
Here, you can add those codes and track the people who visit your website.
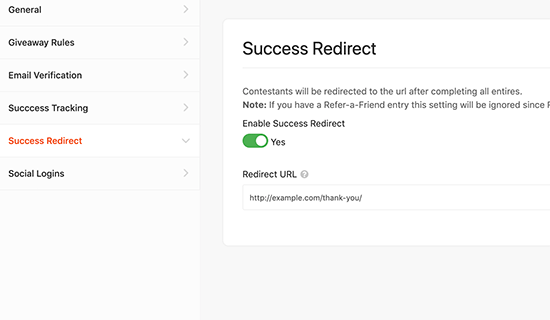
When a user submits a photo, it’s not the end of the process. You may want to redirect the participant to a custom thank you page, your top-performing blog, or some other page.
To create a redirect, select the ‘Success Redirect’ tab and then click the ‘Enable Success Redirect’ toggle. You can then add the page to the ‘Redirect URL’ field.
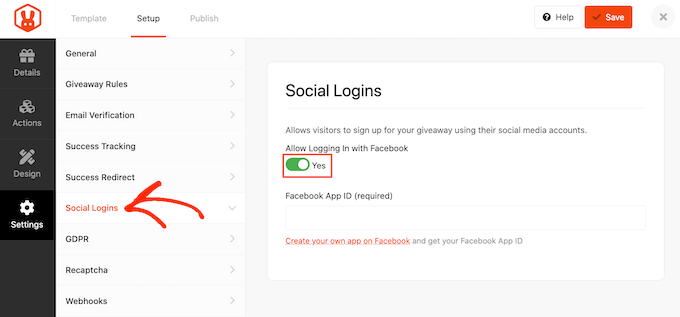
You may want to let visitors join your giveaway using their Facebook accounts. This can get you more entries by making it easier to participate in your giveaway.
To add a Facebook login to your contest, simply select the ‘Social Logins’ tab and then click to enable the ‘Allow logging in…’ toggle.
After that, click on the ‘GDPR’ tab. The General Data Protection Regulation (GDPR) is a European Union (EU) law that aims to give EU citizens more control over their personal data. If you break GDPR, then you could get a fine or even jail time.
RafflePress can help you comply with GDPR by asking for consent before each visitor enters your giveaway. To add this checkbox, simply activate the ‘GDPR Consent’ toggle.
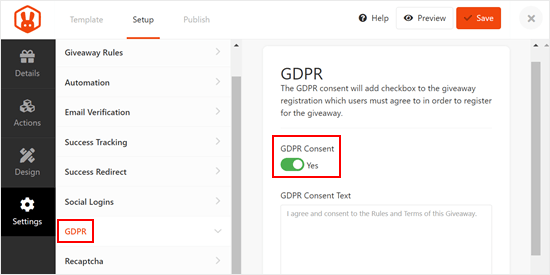
RafflePress has a default GDPR disclaimer that it will show to visitors, but you can change this if you want. To learn more, see our ultimate guide to WordPress and GDPR compliance.
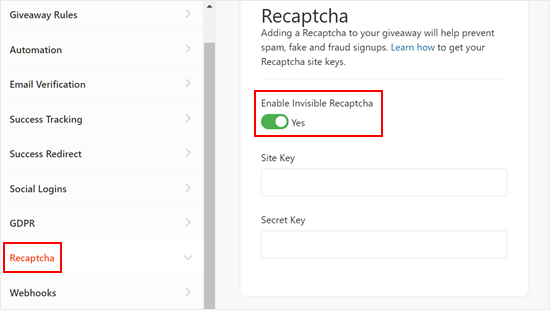
Spam and fake entries can stop you from achieving your goals. With that in mind, you may want to protect your photo giveaway with an invisible recaptcha.
Regular captchas typically ask visitors to complete a puzzle, which adds another step to the process. However, invisible recaptchas run in the background, so they block spam without adding friction to the visitor experience.
To add an invisible recaptcha to your giveaway, select the ‘Recaptcha’ tab. Then, activate the ‘Enable Invisible Recaptcha’ toggle.
For more information, see our guide on how to add recaptcha to WordPress.
When you are happy with how the photo contest is set up, click on the ‘Save’ button.
Step 5: Add the Photo Contest Widget to Your Website
There are a few different ways to add the photo contest to your website.
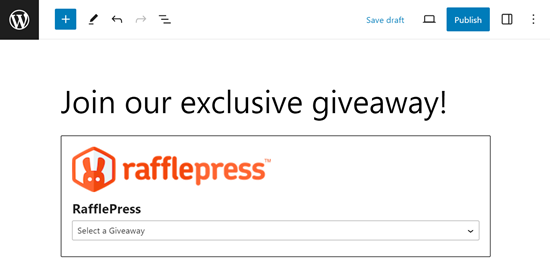
You can add it to any page or post using the RafflePress block. This is a great choice if you want to show the contest as part of a blog post or other page.
To start, simply create a new post or page in the WordPress block editor or edit an existing one. Then, click on the ‘+’ button and type in ‘RafflePress.’
When the right block appears, click to add it to the page or post.
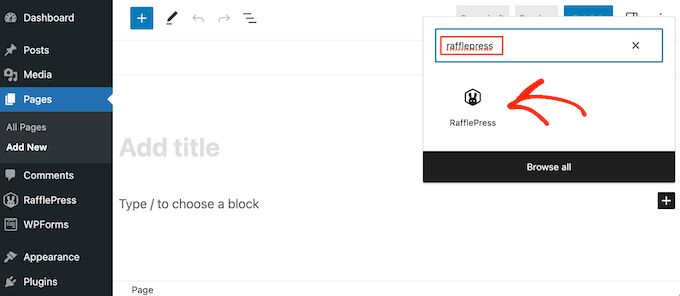
After adding the block, open the dropdown and choose the giveaway you created earlier. The RafflePress block will now show your giveaway inside the WordPress content editor.
Now, you can publish or update the page to make the contest live on your website.
You can also add the giveaway to any page, post, or widget-ready area using a shortcode. This is particularly useful if you want to show the contest in a sidebar widget so that it appears across your entire website.
In the RafflePress giveaway editor, go ahead and click on the ‘Publish’ tab. From here, click on ‘WordPress Shortcode’, and RafflePress will show the shortcode you can use.
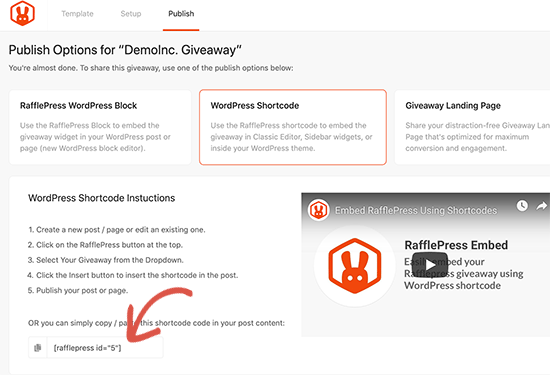
Simply copy the code and then add it to any page, post, or widget-ready area. For more information on how to place the shortcode, please see our guide on how to add a shortcode.
Another option is to create a standalone giveaway landing page. This is a great choice if you want to share the giveaway on social media or add it to your email newsletter.
In the RafflePress editor, select the ‘Publish’ tab. Then, choose ‘Giveaway Landing Page’ and select the ‘Click here…’ link.
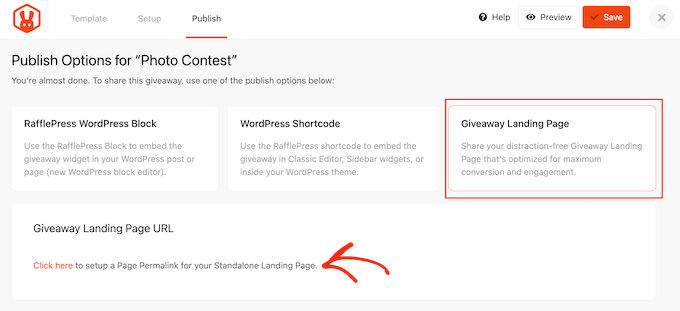
In ‘Page Permalink,’ type in the URL where you want to publish the photo contest.
After that, just click on the ‘View’ button.
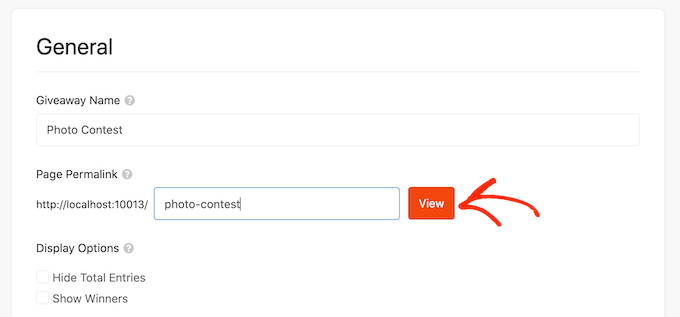
RafflePress will now publish your giveaway as a landing page.
Step 6: Promote Your Photo Contest Giveaway
If your photo contest is going to be a success, then you will need to plan ahead.
Whenever possible, it’s smart to start promoting a contest before publishing it so that you can create a sense of excitement and get a ton of entries as soon as you launch the giveaway.
You can start by sending an email newsletter to your subscribers. You may want to send a few newsletters: an initial announcement to generate buzz, a reminder as the deadline approaches, and a final “last chance” email just before the contest closes.
You should also announce the competition on your social media profiles. Using a tool like ClickSocial, you can easily create and schedule posts ahead of time, right from your WordPress website.
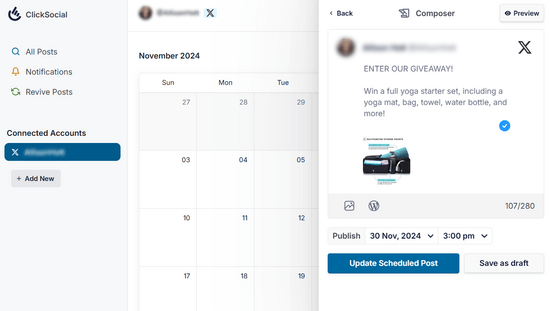
This saves you time and effort from manually posting.
Another option is creating a floating bar with a link to the giveaway using a plugin such as OptinMonster.
You can even create a sense of urgency by adding a countdown timer to the floating bar.
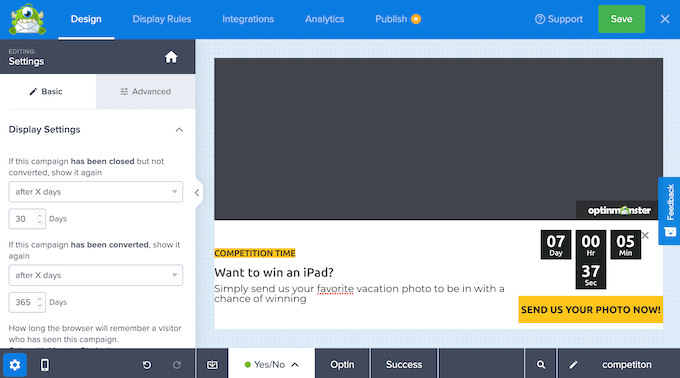
In this way, you can use FOMO on your WordPress site to get more entries.
Step 7: Announce the Photo Contest Winners
Once your giveaway closes, you need to pick a lucky winner by going to RafflePress » Giveaways in your WordPress dashboard.
You can either pick a winner at random or choose your favorite photo. To pick a winner at random, simply click on ‘Needs Winners.’
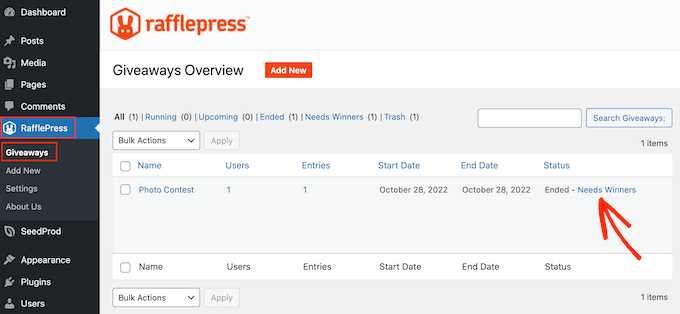
On the following page, RafflePress will show all the people who entered your giveaway along with the image they submitted.
Here, just type in the number of winners you want to pick.
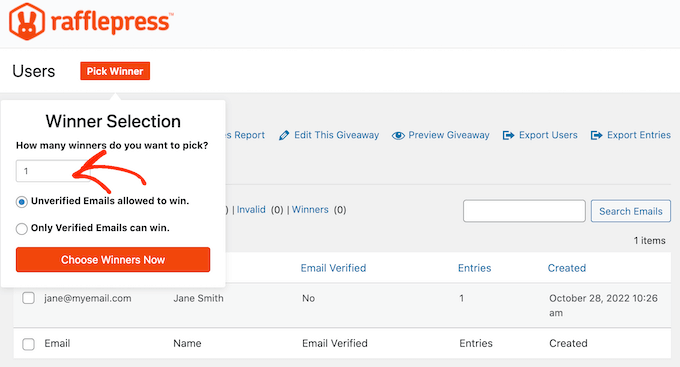
When you are ready, go ahead and click on the ‘Choose Winners Now’ button. RafflePress will then show the winner highlighted at the top of the list. Now, simply send this person an email to let them know the good news.
Another option is to choose the person who submitted your favorite photo. To do this, simply hover over the competition, but this time click on the ‘Image Entries’ link.
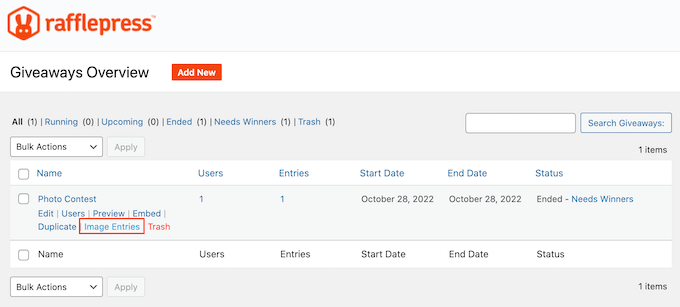
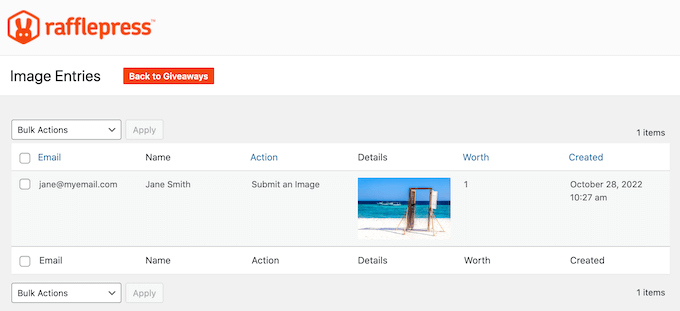
You will now see all the images people submitted, so you can choose your favorite.
On this screen, you will also see all the participant’s information, including their email address, so you can send them a message with information on how to claim their prize.
Bonus Tip: Create an Image Gallery for Your Photo Submissions
While not everyone can be winners, you can definitely still show some appreciation to all of your photo contestants.
One way to do that is by creating an image gallery of all your submissions. By doing this, you can showcase your users’ creative efforts. Plus, it also adds a sense of community to your website.
If you want to create an image gallery, then we recommend using Envira Gallery. After trying many gallery plugins, we find it to be the best WordPress image gallery plugin available.
With Envira, you can create beautiful and responsive image galleries that look good on any device, from desktop to mobile. It also loads super fast, so users won’t need to wait long to view the images.
For more details, just check out the articles below:
- How to Create an Image Gallery in WordPress (Step by Step)
- How to Create a Photo Gallery with Albums in WordPress
- How to Add a Gallery in WordPress with a Lightbox Effect
Video Tutorial
If you don’t like written instructions, you can check out our video tutorial on how to create a photo contest in WordPress instead:
We hope this article helped you learn how to easily create a photo contest in WordPress. You may also want to see our expert picks for the best WordPress slider plugins and our step-by-step guide on how to add a portfolio to your WordPress website.
If you liked this article, then please subscribe to our YouTube Channel for WordPress video tutorials. You can also find us on Twitter and Facebook.


John
Nice work.
Adding public voting and private voting on this plugin will be a good thing as well
WPBeginner Support
Thanks for sharing that recommendation!
Admin
Chris Hechler
So, if I may ask, where is that a contest? Users simply enter a raffle by uploading images. Is there no page where all uploaded images can be seen? No vote that happens by other users?
Would be nice ot have these features to make it a real contest then
WPBeginner Support
Those features are good for future options if you wanted a public vote contest and can certainly be looked into for future features.
This setup allows users to submit their artwork and allow you to review the entries before adding them to a page for votes to prevent spam entries or inappropriate content on your site
Admin
Sasson
Is it possible to collect payment with stripe / paypal for each submission?
WPBeginner Support
If you wanted you could add that as a requirement for your giveaway.
Admin
paul
Is it possible to have the participants of the photo contest be the ones that vote for the winner?
WPBeginner Support
Not at the moment with this plugin, that would require a different setup entirely from what this plugin attempts to do
Admin