Creating a photo gallery with albums in WordPress can enhance your website’s user experience, making it easier for visitors to find images quickly – whether it’s for a portfolio, product photos, or personal albums.
However, building a gallery that’s both functional and visually appealing can be tricky without the right tools. Some gallery plugins can be complex, especially for beginners.
At WPBeginner, we’ve helped countless users improve their sites with well-designed galleries with albums. And we know all the user-friendly solutions to help you create a sleek photo gallery with albums without any coding involved.
In this article, we’ll guide you through setting up a sleek photo gallery with albums in WordPress – no coding required.

Why Create a Photo Gallery With Albums?
While image galleries allow you to display multiple photos on a single page, albums let you show multiple galleries on a single page categorized by event, topic, location, and so on.
This is especially useful for restaurant websites, photography portfolios, travel blogs, or any businesses looking to organize and showcase different photo categories.
Albums make it super easy for your visitors to find exactly what they’re looking for. Instead of scrolling endlessly, they can just click on the relevant album and then find all the photos from that event or theme.
This kind of user-friendly navigation keeps people on your site longer and makes for a better overall experience.
Also, creating an album makes this easy if you want to share a specific set of photos with others. Instead of sharing an entire gallery, you can direct people to the specific album that contains the relevant images.
With that in mind, we will cover step-by-step instructions on how to easily add a photo gallery with albums in WordPress. Here’s a quick overview of all the steps we’ll show you in this article:
Let’s jump right in!
Step 1. Set Up a WordPress Gallery Plugin
If you want to create clean and organized albums in WordPress, then you will need a plugin for an easier process. We recommend Envira Gallery since it is the best image gallery plugin for WordPress on the market.
First, let’s install and activate the Envira Gallery plugin. For more details about installation, you can see our guide on how to install a WordPress plugin.
Upon activation, you will be asked to enter your license key on the Envira Gallery » Overview page.

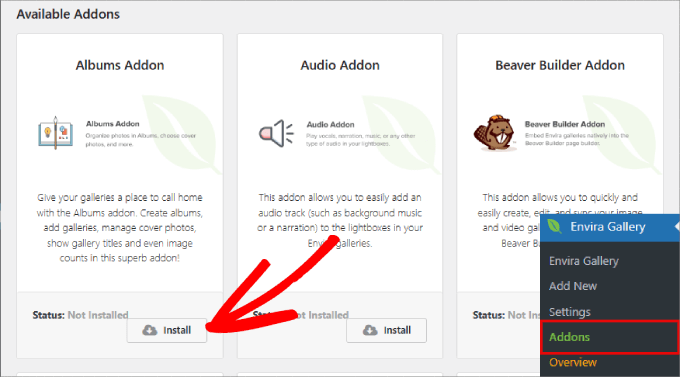
Once you activate the plugin, you’ll want to head over to Envira Gallery » Addons.
From the ‘Addons’ tab, you’ll click the ‘Install’ button for ‘Albums Addon.’
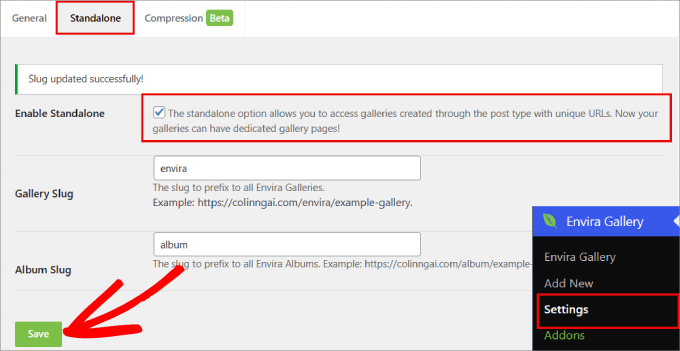
You will also need to enable the ‘Standalone’ option in addition to the ‘Albums Addon.’ Otherwise, it won’t work.
To do this, you can go to the Envira Gallery » Settings page. From there, you’ll want to switch the ‘Standalone’ tab and then check the ‘Enable Standalone’ box.
Then, make sure to click ‘Save’ at the bottom.
Step 2. Create Your First Photo Album
Before you can create albums, you will also need to make some image galleries. Here is a step-by-step guide on how to create responsive image galleries in WordPress with Envira.
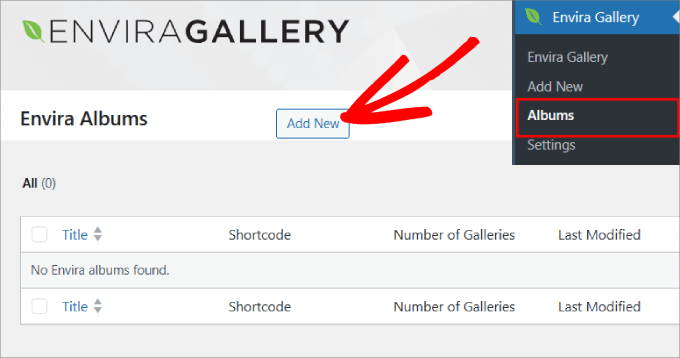
After you have created your image galleries, let’s navigate to Envira Gallery » Albums and click on the ‘Add New’ button.
Creating an album in Envira is similar to creating a gallery. The only difference is that you will drag and drop your galleries instead of uploading images.
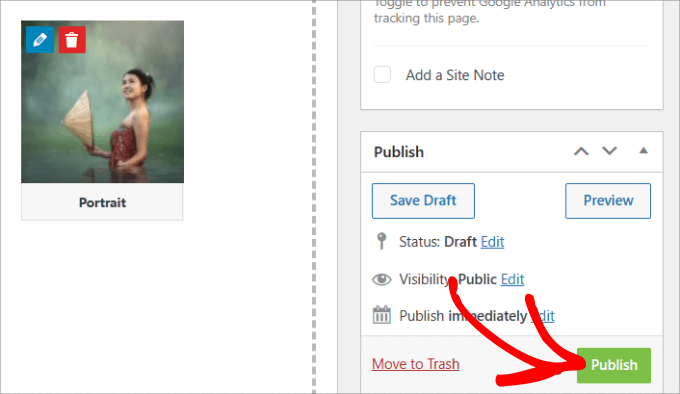
Now, you should start by giving your album a title. Then, you’ll need to drag your galleries into the dotted box.
Once added, you will see a pencil icon for each gallery.
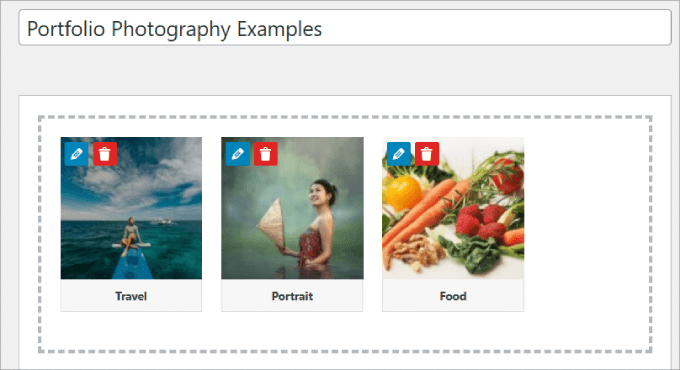
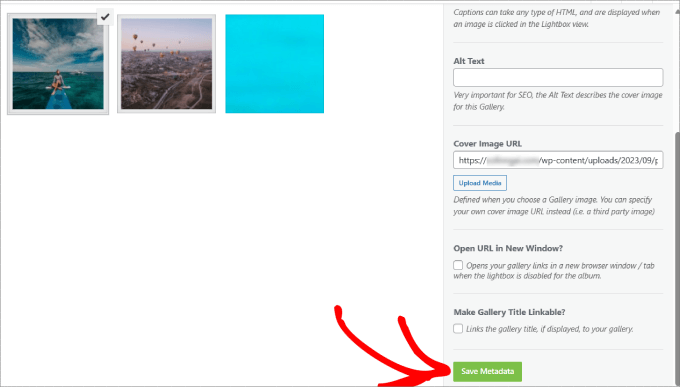
You can click that icon to change the gallery title, caption, alt text, and cover image.
When you’re happy with the changes you made, go ahead and hit the ‘Save Metadata’ button.
Step 3. Customize Your Photo Album’s Looks and Feel
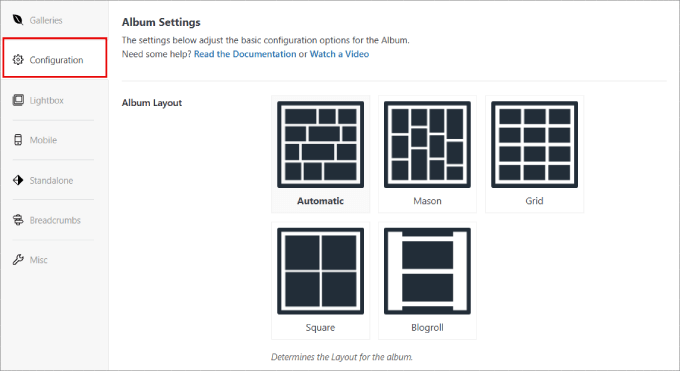
In this step, you’ll choose how your albums appear by clicking on the ‘Configuration’ tab in the Envira album settings.
For example, it will show different grid-like displays, and you can choose the layout you like best.
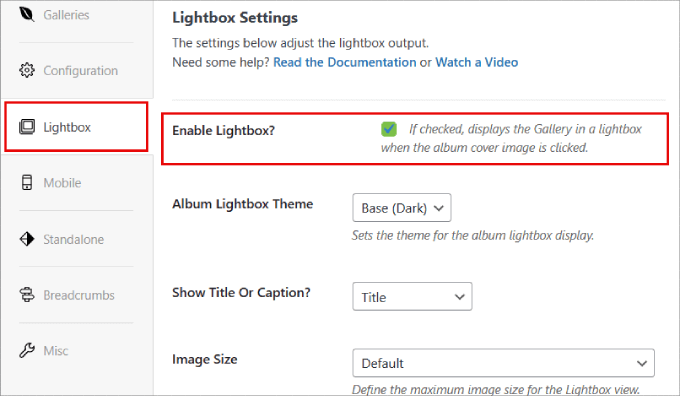
If you want your albums to open directly inside a lightbox, then you can click on the ‘Lightbox’ tab. Next up, go ahead and check the box that says ‘Enable Lightbox.’
Once the lightbox is enabled, you can change the image size, add transition effects, and toggle on other settings.
The albums are also mobile-responsive. This means that they automatically adjust to different mobile screen sizes.
Once you have done configuring your album, you can store its settings by clicking the ‘Publish’ button.
Step 4. Embed Your Photo Albums Into Your WordPress Site
Now that you’ve created your albums, it’s time to share them with your audience.
Below the ‘Publish’ section, you should see ‘Envira Album Code’. Go ahead and copy the shortcode so that you can embed the album anywhere on your WordPress website.
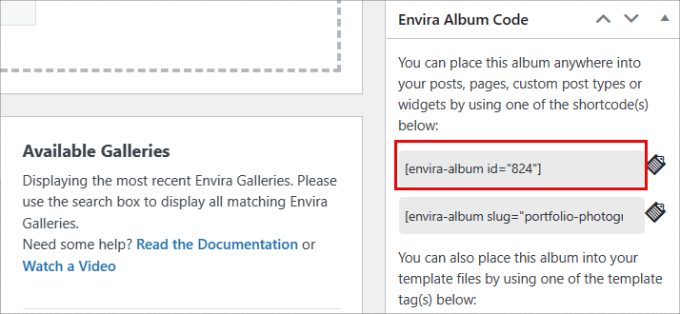
Your album is now ready, and you can add it to a post or page.
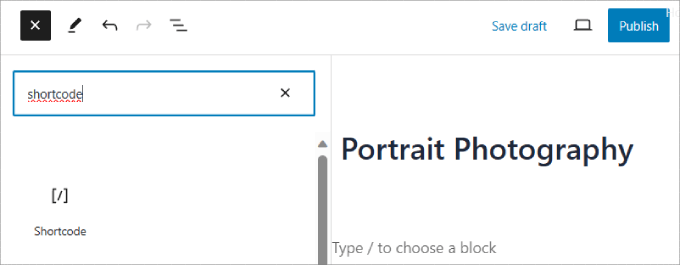
Simply create a new post or edit an existing one. Then, you can click the ‘+’ icon and select the ‘Shortcode’ block.
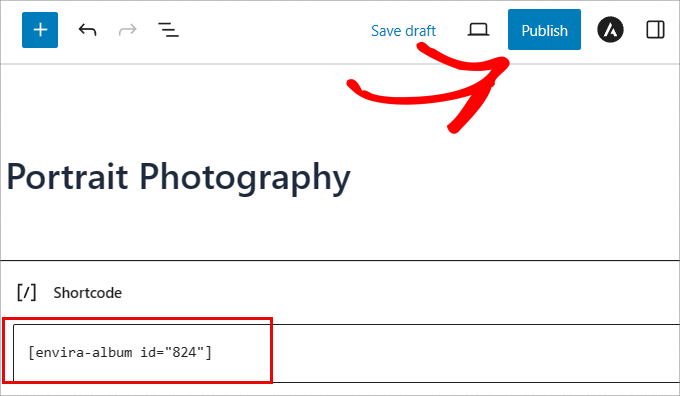
From here, you can paste the code into the ‘Shortcode’ block to embed your album into your page or post.
For more details, you can see our guide on how to use shortcodes in WordPress.
Finally, go ahead and click the ‘Publish’ or ‘Update’ button at the top.
You can visit your website to see your album in action.
Depending on how you’ve configured your gallery and album settings, the album should look something like this:

If you click on each photo, then a lightbox will appear, and you can click on the arrows to navigate through each gallery.
That’s all. You now know how to add a photo gallery with albums in WordPress.
Bonus Tip: Add a Responsive Slider in WordPress
While photo albums are great for organizing galleries, you may sometimes want to display images in a slider format.
A slideshow will allow you to show images or videos in different slides. Users can then use arrows to navigate between slides, or you can set it up to autoplay so they move between slides automatically.
This is a great way to highlight your latest YouTube videos, customer reviews, popular WooCommerce products, and more.
To do this, you simply need to download the Soliloquy plugin. Soliloquy is the best WordPress slider plugin that allows you to easily create slides using images from your media library.
Once activated, you can just go ahead and add a new slider. Then, Soliloquy will allow you to upload your images and videos, along with giving each media item a title, capture, and alt text.
When your slider is uploaded, it should look something like this:

For an in-depth tutorial, check out our step-by-step guide on how to add a responsive slider in WordPress.
Video Tutorial
Before you go, be sure to check out our video tutorial on how to create photo gallery albums in WordPress:
We hope this article helped you learn how to create a photo gallery with albums in WordPress. You may also want to check out our guide on how to switch from NextGEN to Envira Gallery in WordPress or see our expert picks for the best WordPress image compression plugins.
If you liked this article, then please subscribe to our YouTube Channel for WordPress video tutorials. You can also find us on Twitter and Facebook.


Jiří Vaněk
For many years, I first used the NextGen gallery and then the internal gallery of Elementor PRO. After reading several of your articles, I decided to try Envira because it made sense to me, and based on what you wrote about this plugin, it seemed like the perfect replacement for Elementor. And I made the right choice—it’s a really great plugin and a very good recommendation from you for an elegant gallery solution in WordPress.
Darcy
Loved your video. It’s exactly what I was looking for. The problem I ran into was that the addons look like you have to pay for them now. They looked free in the video. Is there a good plugin that you know of for multiple albums on a page? Any help would be appreciated. Thanks
WPBeginner Support
Apologies, we were using the paid version of this plugin for this tutorial, unless I hear otherwise we don’t have a recommended alternative at the moment.
Admin
Anneke
Hi there,
The video is very comprehensive, thank you. I want to download the stand alone albums add on but the only way I can do it is by paying for it. Is there a free way to display our pictures as albums? We are travellers on a budget!
Many thanks,
Tane and Anneke
mats
Hallo,
thanks for that tut!
Is it possible that a user can upload his own photos and see only his own photos on his gallery site? Do i need specific albums for each user?
thanks