
Do you ever notice how cluttered your WordPress dashboard can get? We’ve realized that every WordPress site is different, and sometimes, site owners need a simple way to jot down notes or share quick updates right where they’re most visible.
Adding a notepad to your WordPress dashboard can be incredibly useful, whether you’re managing a multi-author blog, coordinating with clients, or simply keeping track of your own tasks.
In this article, we’ll show you how to add a handy notepad feature to your WordPress admin area.
Why Add a Notepad on Your WordPress Dashboard?
If you manage a multi-author WordPress blog, there are plenty of ways to improve the editorial workflow but clear communication with your other authors is crucial.
You need somewhere to share information, list your goals, plan content, generate blog post ideas, post instructions, and more.
There are plenty of online tools that you can use to share sticky notes with your team. You could use Slack, OneNote, Evernote, free Google tools such as Google Drive, or even email.
However, the notes from those services won’t show up in the WordPress admin area, which is the one place everyone in your team goes to do their work.
The dashboard is the first thing everyone sees when they log into their WordPress account, so it’s the best place to put important information. With that being said, let’s see how you can add a notepad to your WordPress dashboard.
How to Add a Notepad to Your WordPress Dashboard
The easiest way to add notes to the WordPress dashboard is by using WP Dashboard Notes. This free plugin allows you to create as many public and private notes as you want, and use different colors to highlight the most important information.
Anyone who is logged into your WordPress website can use the notepad plugin including Authors and Contributors, so it’s also a great choice if you allow users to submit posts on your WordPress site.

Note: You may notice the plugin has not been tested with the latest WordPress versions. But we have tested it again ourselves and it works fine for this purpose. For more information, you can check out our piece on whether you should install plugins not tested with your WordPress version.
The first thing you need to do is install and activate WP Dashboard Notes. For more details, see our step-by-step guide on how to install a WordPress plugin.
The plugin works out of the box and there are no settings for you to configure.
Simply go to your site’s dashboard by clicking on Dashboard in the left-hand menu and you’ll see a new ‘Add note’ item in the toolbar.

To get started, go ahead and click on ‘Add note.’
Then, scroll to the bottom of the dashboard and you’ll see a ‘New note’ ready for you to customize. To add a title, hover your mouse over the ‘New Note’ text and click on the pencil icon when it appears.

You can now type in the new title.
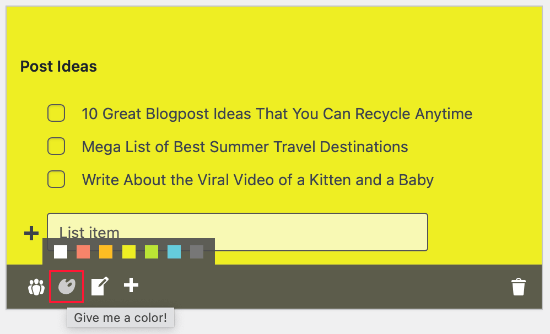
You’ll also notice there are some icons at the bottom of the note. The first controls who can see the note, and it’s set to ‘all users’ by default.

If you want to make the note private, then click on the icon so it shows a single figure only.
Private notes are ideal for creating a blog post checklist, recording your references, or simply jotting down ideas without cluttering up anyone else’s dashboard.

The second icon is the color palette, which changes the note’s background color.
Bright colors can make your most important notes stand out so that team members pay attention to them. For less urgent notes, you might use a plain white background just like the built-in dashboard widgets.
For more on this topic, please see our guide on how to choose the perfect color scheme.
By default, your note will be displayed as a list, which is perfect for jotting down tasks and quick reminders.
If you prefer, then you can switch to a plain note style by clicking on the ‘Convert…’ icon.
If you’ve already added a bullet point list, then these will stay in the list format.
Any text you type after clicking on the ‘Note’ icon will be added as plain text, as you can see in the following image.

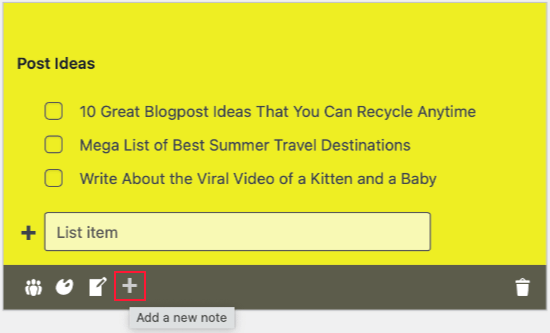
The next icon is ‘+,’ which creates a new note in your WordPress blog.
In this way, you can add multiple notes to the dashboard without having to click on the ‘New note’ button in the toolbar.
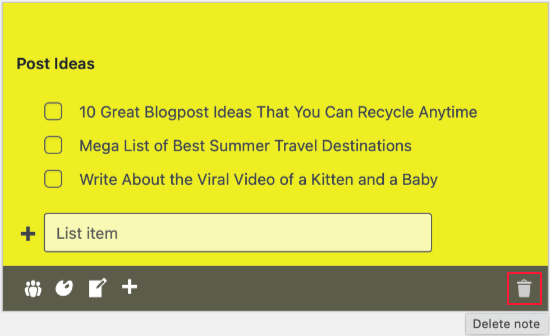
The final icon is the trash can, which will delete the note without asking for confirmation.
You can’t get the note back, so think carefully before clicking on this icon.
You’ve probably noticed that all new notes are created at the bottom of the admin area. Depending on how you’ve customized the WordPress admin dashboard, users may need to scroll to see these notes.
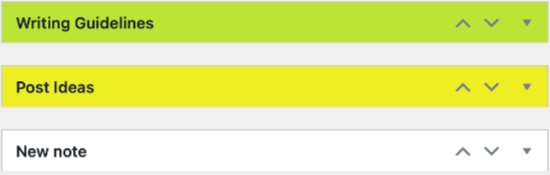
This isn’t ideal, as other authors, guest bloggers, and team members may miss important notes. For that reason, you may want to move notes around the dashboard using drag and drop. Another option is to use the ‘up’ and ‘down’ arrows next to each note’s title.
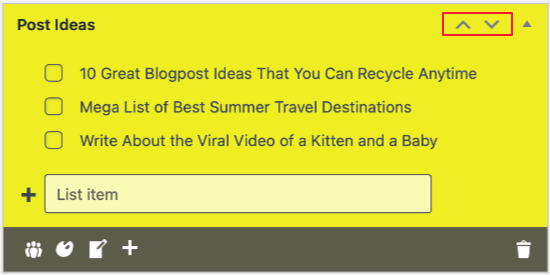
If you don’t see these arrows, then try refreshing the page.
You’ll typically want to place the most important notes at the top of the dashboard, and less important ones at the bottom where they won’t clutter your view of the other widgets.
You can also collapse a note to show only its title, by clicking the triangle icon.
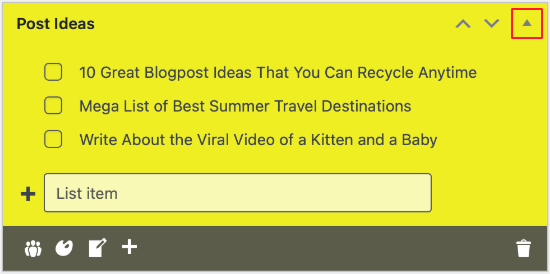
The note now takes up much less space so users can quickly scan multiple notes and decide which ones they want to look at.
To expand a note, simply click on the same triangle icon.
You’ll notice that your notes don’t have a Save or Publish button. This is because they’re saved automatically, although you can also save them manually by pressing the ‘Enter’ key on your keyboard.
Learn More Ways to Customize Your WordPress Admin
Besides adding notepads, here are other ways you can customize your WordPress admin area:
- How to Add Custom Admin Notices in WordPress
- How to Disable WordPress Admin Bar for All Users Except Administrators
- How to Change the Admin Color Scheme in WordPress (Quick & Easy)
- How to White Label Your WordPress Admin Dashboard
- How to Add Dark Mode to Your WordPress Admin Dashboard
- How to Add a Help / Resource Section in WordPress Admin
We hope this article helped you add a notepad to your WordPress dashboard. You may also want to check out our expert picks of the best WordPress activity log and tracking plugins and our list of tips to protect your WordPress admin area.
If you liked this article, then please subscribe to our YouTube Channel for WordPress video tutorials. You can also find us on Twitter and Facebook.
")

")

kzain
One quick question though: is there a way to restrict permissions, so other editors or contributors can’t delete notes created by someone else? Ideally, only admins should have the ability to edit and delete notes. This would be perfect for keeping everyone on the same page and avoiding accidental deletions.
WPBeginner Support
Not at the moment.
Admin
Jiří Vaněk
I have been searching for something to create ToDo lists within the WordPress admin for a while. For a multi-user website, tools like Google Docs or note-taking apps like OneNote are not very practical. It’s great that they are online and shared, but unfortunately, they are not suitable for multiple users. I immediately tested this plugin on a demo site, and so far, it completely meets my expectations. Not only as a note-taking blog but also as a ToDo list where completed tasks can be checked off as done. It looks great. Thanks for the tip because it seems like it will finally solve the problems with creating and managing task notes.
Ben
This is nice, but is there a way to make sure that other editors or contributors can’t delete other people’s notes? I noticed other editors can edit and even delete other people’s notes. Those options should only be available to the Admin.
WPBeginner Support
That is not an option with the plugin at the moment but if you let the plugin’s developer know they should be able to set that up in the future
Admin
Glam
Hey, it appears that the editorial staff did NOT check to see that this plugin has not been updated in over a year and is not tested with the version of Wordpress as of February 20,2023.
Your readers trust you so please check that your info is current before reusing old blog post info.
Thank you.
WPBeginner Support
Thank you for your feedback, however the plugin is currently supported and not all plugins need continual updates. We would recommend taking a look at our article below for more on this
https://www.wpbeginner.com/opinion/should-you-install-plugins-not-tested-with-your-wordpress-version/
Admin
Benny V Peterson
Hey Wpbeginner, did you develop this plug-in ⁉️