
Product reviews are one of the most powerful trust signals for any WooCommerce store. The problem is getting customers to actually leave them.
Most buyers are perfectly happy with their purchase. They just don’t think about writing a review unless there’s a clear reason to do it.
That’s where a simple incentive works wonders.
By automatically sending a coupon code right after a customer submits a review, you turn feedback into a fair exchange. Customers get a reward for their time, and you get authentic reviews that help new shoppers feel confident buying from you.
We’ve seen store owners use this exact setup to dramatically increase review rates, bring customers back for repeat purchases, and build stronger long-term loyalty.
In this guide, I’ll walk you through how to set up automatic review coupons in WooCommerce step by step, so the whole process runs on autopilot.

💡Quick Answer: How to Send a Coupon After a Customer Leaves a Review
You can automate coupon delivery using the Uncanny Automator plugin. You simply need to connect the “User reviews a product” trigger to the “Send an email” action.
Why Send a Coupon After a Customer Leaves a WooCommerce Product Review?
Sending a coupon is the most effective way to encourage customers to leave a review in your WooCommerce store.
Most happy customers won’t leave feedback unless they are motivated by a reward. Here are the main benefits of this strategy:
- Get More Reviews: Coupons give shoppers a specific reason to take the time to write a review.
- Build Social Proof: Positive reviews help future buyers feel confident in your business.
- Boost Sales: Customers are much more likely to buy products that have good ratings.
- Improve Loyalty: Rewarding customers makes them feel valued and encourages them to shop with you again.
Now, let’s take a look at how to send a coupon after a WooCommerce product review.
We’ve broken this guide into several steps, and you can navigate through them using these quick links:
Step 1: Set Up the Uncanny Automator Plugin
The best way to automatically send a WooCommerce coupon after the customer reviews a product is by using Uncanny Automator.
It is the best WordPress and WooCommerce automation plugin we’ve tested. It allows you to build complex workflows without coding and integrates smoothly with a wide range of WordPress plugins and third-party services.

Think of it like Zapier but for WordPress websites.
We’ve reviewed it in depth — check out our review of Uncanny Automator to see how it performs in real-world use.
Note: There is a free version of Uncanny Automator that handles basic tasks. However, we will use Uncanny Automator Pro because it allows you to automatically generate and email unique coupon codes.
The first step is to install the Uncanny Automator plugin. If you need help, then please see our guide on how to install a WordPress plugin.
Upon activation, go to Automator » Settings and enter your license key into the ‘Uncanny Automator Pro license key’ field. You can find this information in your account on the Uncanny Automator website.
With that done, click on ‘Activate license.’

Step 2: Create an Automated Recipe to Send Coupon Codes After a Product Review
At this point, you are ready to create an automated workflow that will send a coupon code every time a customer reviews one of your products.
Create a New Recipe
Simply go to Automator » Add new to create your first workflow, which Uncanny Automator calls a ‘recipe’.
You will be asked whether you want to create a recipe for logged-in users or everyone. We want to ensure the coupon goes to a verified user account, so select ‘Logged-in users’ and click the ‘Confirm’ button.
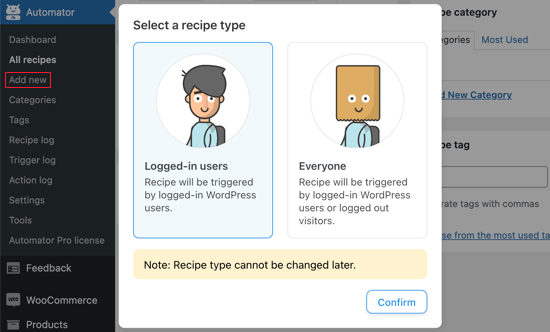
Next, you can give the recipe a name by typing it into the ‘Title’ field. This is just for your reference, so you can use anything you want.
Select WooCommerce as an Integration
Uncanny Automator looks at all the WordPress plugins and services set up on your WordPress website and shows the available integrations.
Under ‘Select an integration,’ go ahead and click on ‘WooCommerce.’

Add a Trigger
Now, you can choose your trigger, which is anything that kickstarts the recipe on your WordPress blog or website.
In the dropdown menu, start typing the following ‘A user reviews a product’ and then select the right option when it appears.
Next, you need to choose the condition that will trigger the action. You should start by clicking the WooCommerce icon under ‘Select an integration’.
In ‘Select a trigger,’ type in ‘Review.’ As you can see, you have two options.
If you choose ‘A user reviews a product,’ then Uncanny Automator will immediately email a coupon code to any user who posts a WooCommerce review.
On the other hand, if you want to manually approve the review before sending the coupon code, select the following trigger: ‘A user’s review on a product is approved.’

Next, you need to choose whether the workflow should run when a customer reviews any product in your online marketplace or a specific product only.
For this guide, we will use the default setting, which is ‘Any product’.

After that, click on the ‘Save’ button to store your changes.
Set an Action For the Workflow
It’s time to set up the action. This will be a bit more work because there are a lot of different ways to configure a coupon.
To get started, click on the ‘Add action’ button.

You will now see all of Uncanny Automator’s integrations. For example, there’s a Twilio integration that lets you send SMS notifications from WooCommerce.
Since we want to send a WooCommerce coupon code every time a customer posts a review, select ‘WooCommerce.’

In the search bar, start typing ‘Generate and email a coupon code to the user’ and then select the right option when it appears.
Configure Coupon Code Settings
This will add some new settings where you can create the coupon code.

If you have created a coupon using a plugin like Advanced Coupons, then simply type the code into the ‘Coupon code’ field.
If you don’t have a coupon code yet, you can leave this field blank. Uncanny Automator will generate a unique, single-use code for each customer. This prevents users from sharing the discount code with others.

Next, you need to type a description for the coupon into the ‘Description field.
In the ‘Discount type’ field, you can choose the kind of coupon you want to create, such as a fixed cart discount or percentage discount.
For this guide, we will select ‘Percentage discount’.

Next, you can type the percentage discount into the ‘Coupon amount’ field.
In the following image, we are offering customers a 30% discount on their purchase.

You can also offer free shipping by checking the ‘Allow free shipping’ box.
Set an Expiry Date For Your Coupon
Scheduling coupons in WooCommerce can save you a ton of time. With that said, you may want to set an expiry date for the coupon, either by using the YYY-MM-DD format or typing in the number of days until the coupon expires.
For example, in the following image, the coupon will expire after 14 days.

You can also set a minimum and maximum spend for the coupon. We will leave these fields blank so that the customer can use the code with any purchase.
Configure Coupon Restriction Settings
There are a number of other restrictions that you can apply to the coupon. ‘For individual use only’ prevents the customer from using this coupon in combination with other coupon codes in the same purchase.
There is also an ‘Exclude sale items’ box that you can check if you don’t want shoppers to use this coupon on sale items.

There are a lot of other settings you can change for the coupon. For example, you can limit this coupon usage to certain products.
These settings are fairly straightforward, so it’s worth looking through them to see whether you want to make any changes.
Once you have done that, scroll to the ‘Usage limit per coupon’ section. You want to make sure the specific code becomes invalid after the customer uses it. To do this, type ‘1’ in the field.

You can also limit the number of items the shopper can purchase in the transaction. For this guide, we will leave the field blank so the customer can use this coupon no matter how many items they have in their WooCommerce cart.
Create an Email to be Sent to Users After Posting a Review
Next, you can create an email that will be sent to customers whenever they post a review.
First, make sure that the From field has the ‘Admin email’ token and the To field has the ‘User email’ token. To add them, you can use the ‘*’ button on the right.

Next, in the ‘Subject’ field, simply type in the email subject.
After that, you can type the email into the small text editor.
To encourage shoppers to open the message, it’s a good idea to type in an email subject that’s clear and descriptive.

After that, you can customize the WooCommerce email message in the ‘Body’ box.
You can type plain text, but you can also create a more personal message by adding placeholder tokens from the shopper’s order. To do this, simply click on the ‘*’ and then search for the information you want to add.

When you are happy with the email, click on the ‘Save’ button to store your recipe.
Step 3: Activate the Uncanny Automator Coupon Code Email Recipe
After that, you can go ahead and make the recipe active.
In the ‘Recipe’ box, click the ‘Draft’ switch so that it shows ‘Live’ instead.

Now, the next time someone posts a review, they will get a coupon code in their inbox as a thank you.
Pro Tip: WooCommerce emails may sometimes fail to deliver. To prevent this from happening, you can use an SMTP plugin like WP Mail SMTP to increase your email delivery rate.
Besides sending automated emails after someone posts a review, you may also want to set up these WooCommerce emails:
- How to Send Automated Birthday & Anniversary Emails in WooCommerce
- How to Create a WooCommerce Subscription Reminder Email in WordPress
- How to Set Up WooCommerce Abandoned Cart Emails
- How to Send Twilio SMS Notifications from WooCommerce (Step by Step)
Frequently Asked Questions About WooCommerce Coupons
Here are some questions that our readers have frequently asked about WooCommerce coupons:
How to automatically apply a coupon in WooCommerce?
You can automatically apply a coupon using a specific URL link. While WooCommerce doesn’t do this by default, plugins like Advanced Coupons allow you to create “auto-apply” links that add the discount as soon as a user clicks them.
Can ChatGPT generate discount codes?
ChatGPT can suggest text for codes, such as “SUMMER20”, but it cannot create the actual active coupon in your store. You must still copy the text and set up the discount rules inside your WooCommerce dashboard manually.
How do I add coupons to WooCommerce checkout?
You can enable this option in the main WooCommerce settings. Go to WooCommerce » Settings and check the box labeled “Enable the use of coupon codes.” The field will then appear on your cart and checkout pages.
Is coupon glitching illegal?
Using a coupon glitch is often considered a violation of a store’s terms of service and can be treated as fraud. If you knowingly use a code not meant for you to get free products, the merchant can cancel the order or ban your account.
What is the best coupon plugin for WooCommerce?
We recommend Advanced Coupons as the best coupon plugin for WooCommerce. It adds features that the default system lacks, such as “Buy One Get One” (BOGO) deals, loyalty programs, and scheduled coupons.
To get started, see our tutorial on adding smart coupons in WooCommerce.
Where do I input a discount code?
You typically enter your discount code on the checkout or cart page. Look for a link at the top of the page that says, “Have a coupon? Click here to enter your code,” which opens a text field.
How do I bulk generate coupons in WooCommerce?
You need a plugin to create coupons in bulk. Tools like Advanced Coupons allow you to generate thousands of unique codes at once, which is perfect for email marketing campaigns.
We hope this tutorial has helped you learn how to send a coupon after a WooCommerce product review. You may also want to learn how to recover WooCommerce abandoned cart sales or check out our list of the best WooCommerce plugins for your store.
If you liked this article, then please subscribe to our YouTube Channel for WordPress video tutorials. You can also find us on Twitter and Facebook.


")
")
Have a question or suggestion? Please leave a comment to start the discussion.