Performing day-to-day website maintenance and admin tasks can be overwhelming. From moderating comments and sending notifications to updating content and managing user roles, these repetitive tasks can take up a significant amount of your time.
However, by creating automated workflows, you can simplify these processes and free up your schedule to focus on growing your website.
To do this, we recommend Uncanny Automator, which is a powerful tool that lets you connect your website with other apps and plugins.
Several of our partner brands use this tool to run automated tasks, and they have reported positive results. They have found that it improves efficiency and streamlines their workflows, making it an ideal choice.
In this article, we will show you how to easily create automated workflows in WordPress with Uncanny Automator.

Why Create Automated Workflows in WordPress?
Many website owners spend a lot of time doing the same tasks over and over. For example, you may post your latest blog posts to Facebook or send customers a coupon after they leave a product review.
Creating automated workflows for these repetitive, manual tasks can save you a lot of time and effort. Automation can also improve your customer service since everything happens instantly, and make your social accounts more engaging by posting content automatically.
However, the problem with automation is that WordPress plugins don’t talk to each other very well. For example, if you are using WooCommerce and a contact form plugin, then the two can’t communicate with each other by default.
This is where Uncanny Automator comes in.

What Is Uncanny Automator?
Uncanny Automator is the best WordPress automation plugin that helps you create automated workflows without having to write code.
It acts as a bridge so that you can get different WordPress plugins talking to each other. For example, every time someone completes a form, you could automatically add them to your email list.
You can even connect two separate WordPress websites so that they work together. For example, you might sell products in your online store and then manage customer accounts on your membership website.
Think of it like Zapier but for WordPress websites.
In fact, Uncanny Automator works with Zapier, so you can integrate WordPress with over 5,000 external apps, including Google Drive, Slack, Asana, Twitter, Instagram, and more.
That being said, let’s take a look at how to use Uncanny Automater to create automated workflows in WordPress.
Create Automated Workflows in WordPress
First, you need to install and activate the Uncanny Automator plugin. For more details, see our step-by-step guide on how to install a WordPress plugin.
Note: There is a free Uncanny Automator plugin that lets you automate many common tasks and comes with 300 automation triggers and actions. However, we will be using Uncanny Automator Pro because it integrates with more plugins and services.
Upon activation, you will also be asked to install the free version of Uncanny Automator core. The free plugin has limited features, but it’s used as the base for the Pro plan.
Next, head over to the Automator » Settings page from the WordPress dashboard and enter your license key.
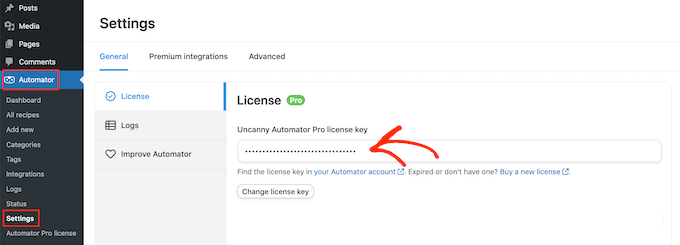
You can find this information in your account on the Uncanny Automator website.
After entering the key, click on the ‘Activate License’ button.
Create a New Automation Recipe
After adding the license, you are now ready to create automated workflows in WordPress. Uncanny Automator calls these workflows’ recipes.’
To get started, simply head to the Automator » Add New page. You will be asked whether you want to create a ‘Logged-in’ recipe or an ‘Everyone’ recipe.
Logged-in recipes can only be triggered by logged-in users, but anyone can trigger ‘Everyone’ recipes.
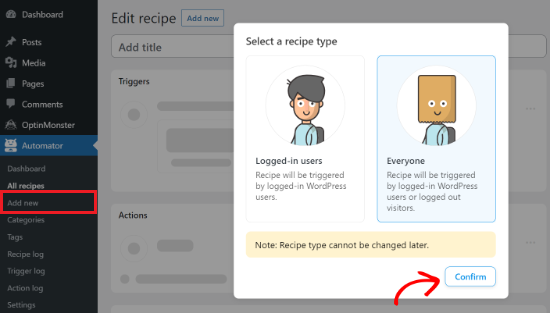
You will need to choose a recipe type based on the workflow you want to create and then click on the ‘Confirm’ button.
For this guide, we will create an Everyone recipe using the WPForms plugin. It is the best WordPress contact form plugin that allows you to create all kinds of forms using simple drag and drop.
We will be building an automated workflow that creates a new WordPress user account every time someone completes the contact form on our website.
After choosing a recipe type, you can give that recipe a name by typing it into the ‘Title’ field. This is just for your reference, so you can use anything you want.
Add Triggers and Actions to the Automated Workflow
Each recipe in Uncanny Automator has two parts called Triggers and Actions.
A trigger is any event that starts the automated workflow, such as a visitor submitting a form. Actions are the tasks the recipe will perform, such as creating an account for that person.
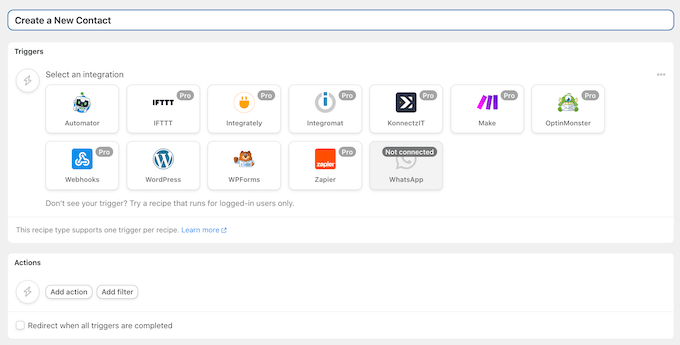
To start, you will need to set the trigger by choosing an integration.
Uncanny Automator will show all the integrations that are available for your WordPress website. In the following image, you can see that it has already detected WPForms.
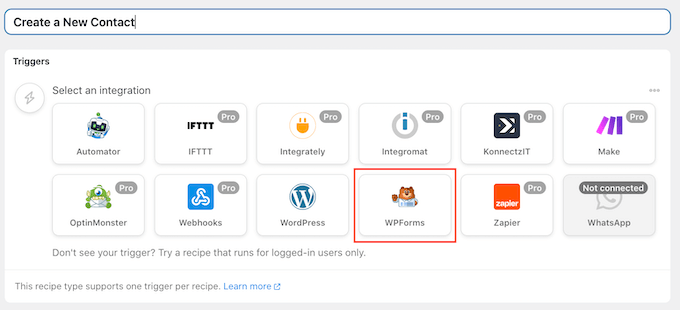
To continue, click on ‘WPForms.’
Next, you will need to select the trigger event. In the dropdown menu, simply go ahead and select ‘A form is submitted.’
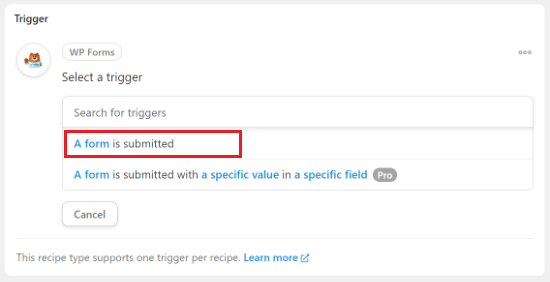
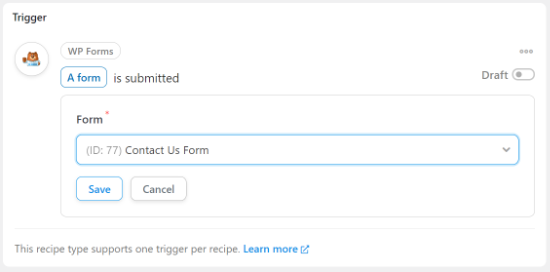
After that, you can open the dropdown menu to see all the forms you have created using the WPForms WordPress plugin.
Simply select the form that will trigger the recipe and then click on ‘Save.’
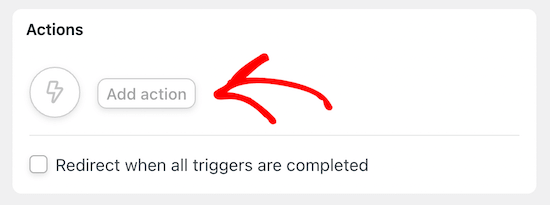
You can now move to the ‘Actions’ section and click the ‘Add Actions’ button.
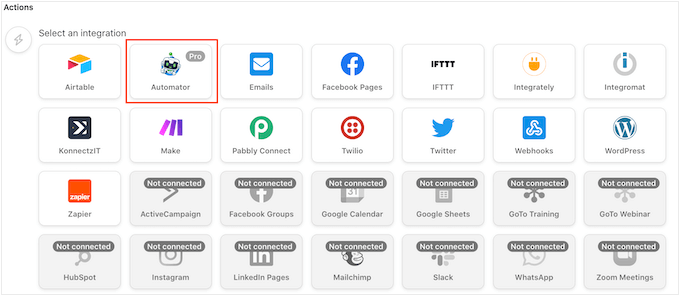
Uncanny Automator will now show all the different integrations you can use in the action.
You may see different options depending on whether you are creating a recipe for logged-in users or everyone.
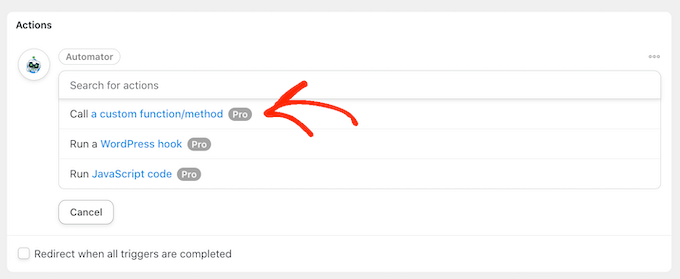
In ‘Actions,’ select ‘Automator’ as the integration.
After that, Uncanny Automator will ask you to select an action.
Go ahead and choose ‘Call a custom function/method’ from the dropdown menu.
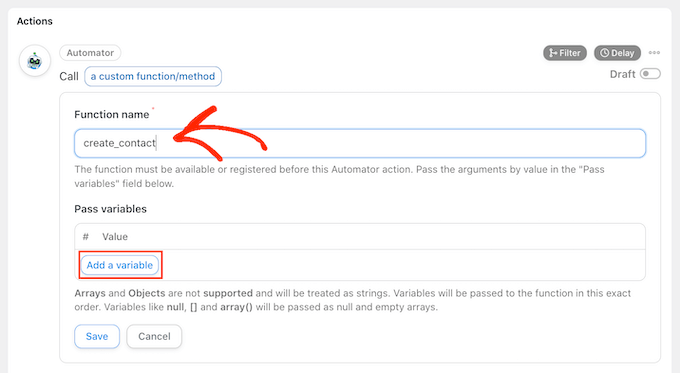
Now, you need to type in a name for the custom function you will use in this recipe. The function will create a new user account, so you can use a name such as ‘create_contact.’
After that, click on ‘Add Variable.’
Use Variables to Get Data From a Form
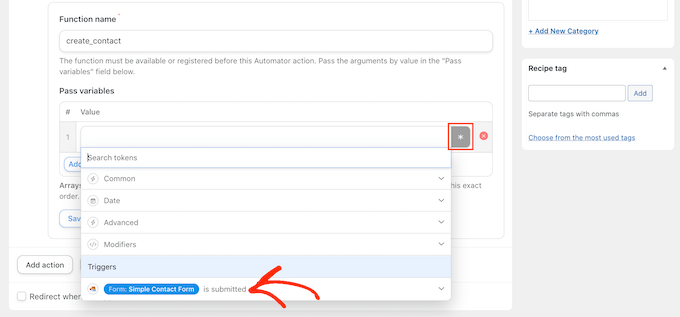
We want to take data from the WPForms contact form and then use it to create a new user account for the person who submitted the form.
To do this, click on the ‘*’ sign next to the empty field. In the dropdown, find ‘Triggers’ and then select the contact form.
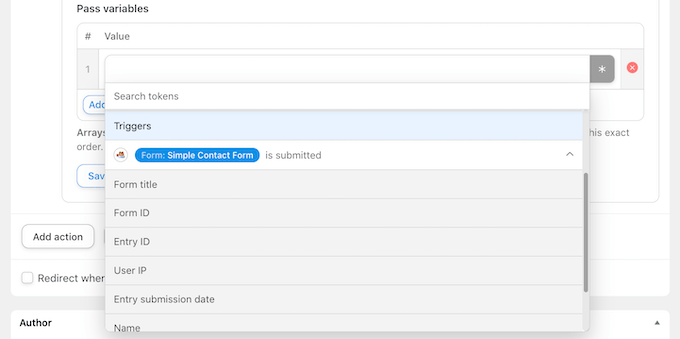
You will now see all the different fields that make up the form.
To use data from a field, give it a click. This will turn the field into a variable, which you will be able to use in the recipe.
You can now add more variables by following the exact process described above.
For example, in the following image, we are taking the person’s name and email address from the contact form so we can add that information to the user profile.
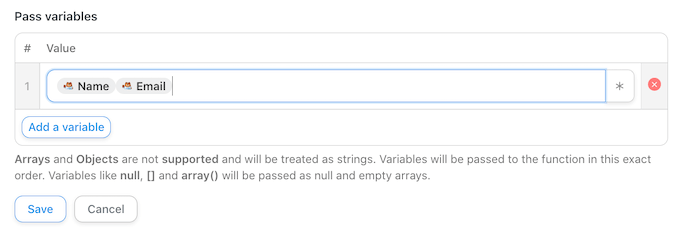
After adding all the variables you want to use, click on ‘Save.’
Automatically Create a New User Account
Next, click on the ‘Add action’ button and choose the next integration you want to use. In our case, that’s WordPress.
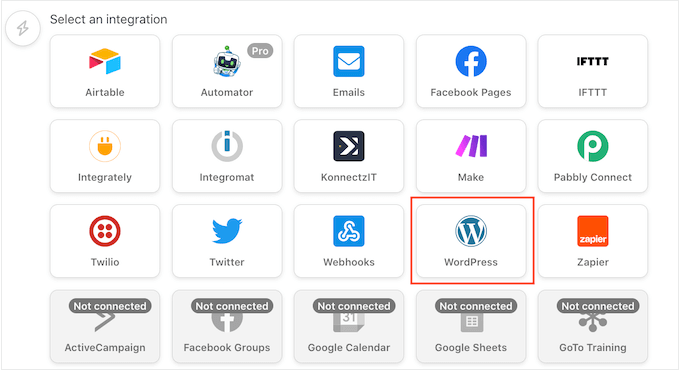
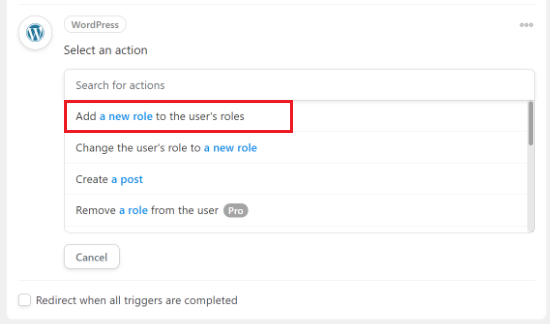
After that, Uncanny Automator will show all the actions you can perform using this integration.
Go ahead and select ‘Add a new role to the user’s roles’ from the dropdown menu.
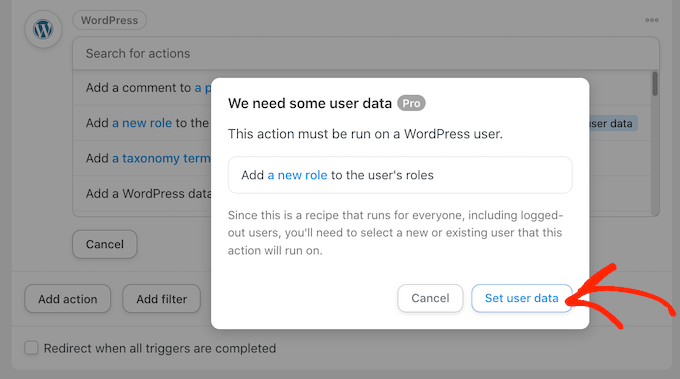
You will now see a popup asking for access to user data.
Simply click on the ‘Set user data’ button.
Since we are creating an ‘Everyone’ recipe, you can either perform this action on an ‘Existing user’ or a ‘New user.’
We are going to click on ‘New user’ since we don’t want to create accounts for people who are already registered with our WordPress blog or website.
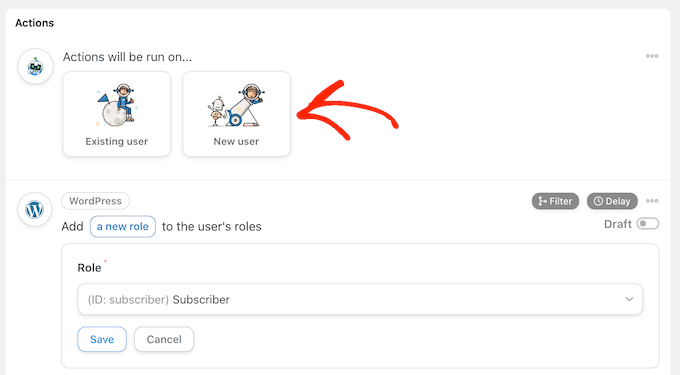
Uncanny Automator will now ask you to choose the data you will use in the new account.
You can map some of these fields to the variables passed from the contact form. For example, you can click on the ‘*’ button next to ‘First name’ and then select the contact form as your trigger.
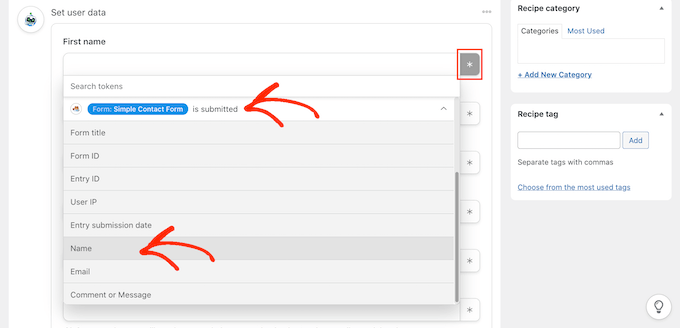
Then, choose the ‘Name’ variable from the dropdown menu.
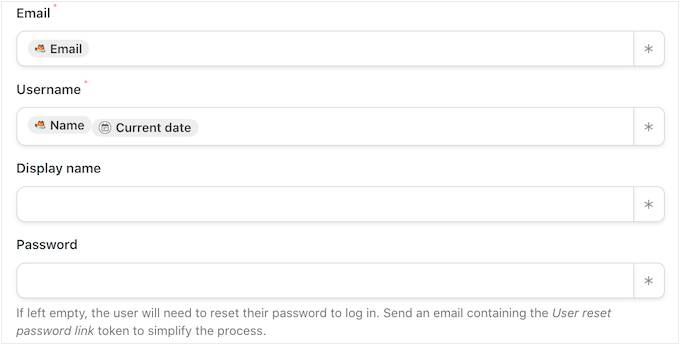
For other fields, you may want to use a combination of tokens and plain text. For example, you might generate a username at random by combining the person’s name with a series of numbers or even another token, such as today’s date.
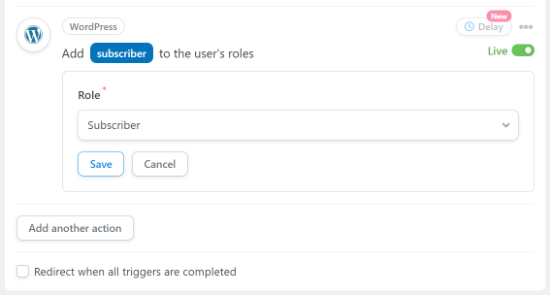
By default, Uncanny Automator will assign the ‘subscriber’ role to the new user.
To change this, simply open the ‘Role’ dropdown and choose a different role from the list.
If there is already an account linked to the email address or username, then we don’t want to create a duplicate account.
With that being said, make sure you select ‘Do nothing’ in the following section: ‘What to do if the user already exists.’

Publish the Automated WordPress Workflow
When you are done, don’t forget to click on the ‘Save’ button to store your changes.
After that, you can go ahead and publish the workflow. In the ‘Recipe’ box, click the ‘Draft’ switch so that it shows ‘Live’ instead.
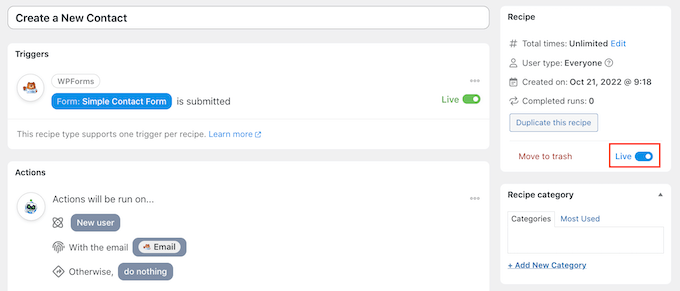
Your recipe is now live, and Uncanny Automator will automatically create a new account every time someone completes your site’s contact form.
Viewing Your Automation Logs in WordPress
After creating some automated workflows, you will want an easy way to track all the tasks that are happening in the background.
To see all the recipes, triggers, and actions performed by Uncanny Automator, simply visit the Automator » Logs page from the WordPress dashboard.
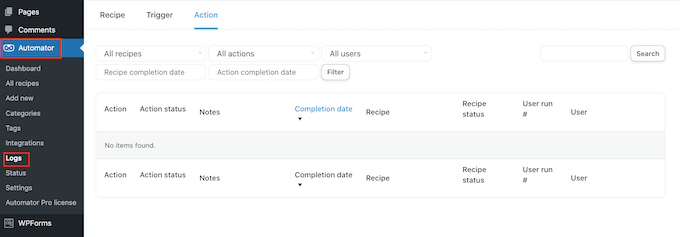
You can now use the dropdown menus to filter the data based on actions, users, and more.
In this guide, we just scratched the surface of how truly powerful the Uncanny Automator plugin really is. You can use it to connect WooCommerce, Formidable Forms, GiveWP, and dozens of other WordPress plugins. So, it’s worth experimenting to see what different kinds of automated workflows you can create.
Bonus: Connect Uncanny Automator With ChatGPT to Create AI Content
You can also use Uncanny Automator to create workflows with ChatGPT using OpenAI integration.
This lets you incorporate AI-generated content into your workflows in many different ways. For instance, you can create a new blog post with AI-generated content whenever a form is submitted.
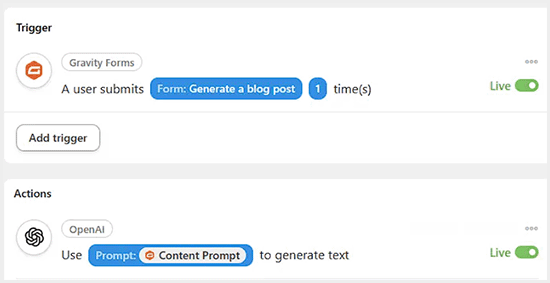
Similarly, you can create an AI workflow that automatically replies to questions asked in a forum, generate images based on prompts, or create a WhatsApp chatbot.
You can also use Uncanny Automator to connect AI with other WordPress plugins like OptinMonster to build amazing workflows without using any code.
For details, see our top picks for WordPress plugins using Artificial Intelligence and Machine Learning.
We hope this article helped you create automated workflows in WordPress with Uncanny Automator. You may also want to see our expert picks for the best electronic signature software for WordPress and our step-by-step guide on how to easily import Google Docs to WordPress.
If you liked this article, then please subscribe to our YouTube Channel for WordPress video tutorials. You can also find us on Twitter and Facebook.


kzain
I’ve been looking for a way to streamline my workflow and save time. Uncanny Automator looks like a game-changer. I especially liked the part about creating automated email sequences based on user behavior. I can’t wait to start experimenting with different recipes. Thanks for breaking down the process so clearly!
WPBeginner Support
You’re welcome, glad our guide was helpful
Admin
Mrteesurez
I think I like this functionality. If I understand it very well, meaning visitors can be automatically become a registered users with just filling a contact form. ok.
But can I connect two to three websites together, when a user register on a site, I will automatically create an account for him on other connected sites. thanks.
WPBeginner Support
For that, you would want to take a look at our guide on how to set that up below!
https://www.wpbeginner.com/plugins/how-to-share-users-and-logins-between-multiple-wordpress-sites/
Admin
Moinuddin Waheed
Automated workflows not just save times and energy but also increases the productivity and efficiency.
Having automatically sent posts to different social media and other workflows can be difficult to manage if not done through automation softwares.
Going through the article , it seems automator is the best option to create auto workflows. it comes with integrations with many other workflow softwares and other options.
I will definitely give it a try.