Adding Twilio SMS notifications to your WooCommerce store is a great way to keep your customers updated and improve communication.
Emails can be easy to miss or sent to spam, which can cause delays and confusion. This leads to frustrated customers who don’t get timely updates.
Twilio helps by sending SMS notifications directly to your customers’ phones. SMS messages are quick, easy to spot, and have better open rates than emails.
We have learned that many store owners love Twilio because it works smoothly with WooCommerce and can handle many messages without issues. We’ve tested it across several WooCommerce stores, and we can see why it’s a top choice for improving customer engagement.
In this guide, we will show you step-by-step instructions on how to set up Twilio SMS notifications in WooCommerce.
Why Add SMS Notifications to WooCommerce?
SMS notifications are the best way to give your customers information about their orders. Text messages are highly personal, and they are usually seen and opened within seconds of arriving on the person’s phone.
You can use SMS notifications to give your customers updates about their orders, such as order confirmation and shipping messages.
SMS notifications are also a creative way to encourage your audience to visit your store and buy more products. For example, you might use SMS messages to send coupon codes or remind them about abandoned carts.
With that in mind, we’ll show you how you can send WooCommerce SMS using Twilio. You can use these quick links to navigate through the steps:
Let’s get started!
Step 1: Set up Your Twilio SMS Account
The first thing you’ll need is a Twilio account.
Twilio is an online service that offers phone, voice messaging, and SMS services that can be used with applications like WordPress and WooCommerce.
Twilio has a free trial, so you can set up your account and try the service for free. To start, you’ll want to head over to the Twilio website and click on ‘Start for free.’

On the signup page, you’ll be asked to enter your personal information to set up your Twilio credentials.
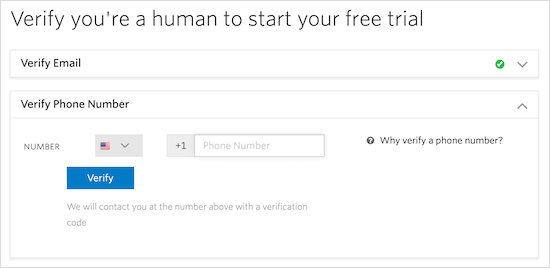
Then, you’ll need to verify your email address and phone number.
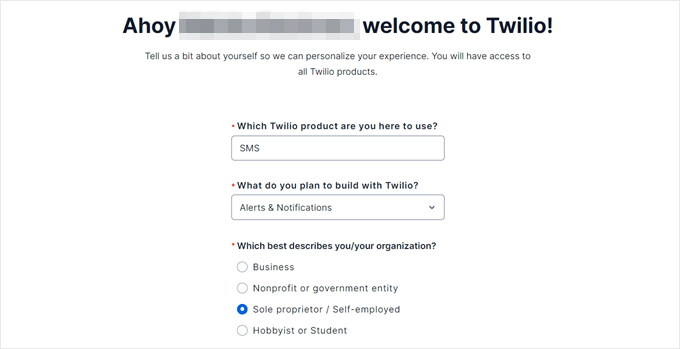
Next, select the product you want to use, what you plan to do with it, and what organization you will use it for.
This tutorial will cover ‘SMS,’ ‘Alerts & Notifications,’ and ‘Sole proprietor / Self-employed.’
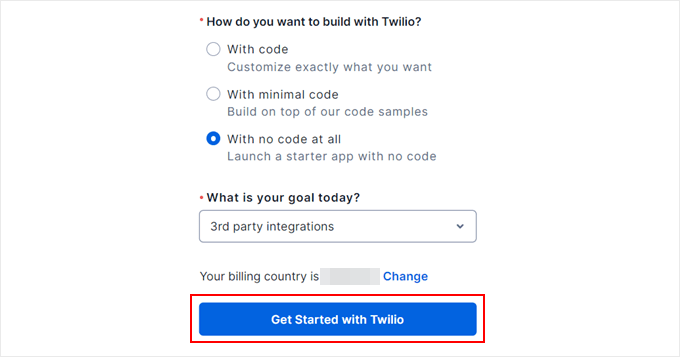
Once you enter your information, you can scroll down and select ‘With no code at all.’
Then, go ahead and click ‘Get Started with Twilio.’
After you sign up for an account, you’ll be taken to the Twilio dashboard.
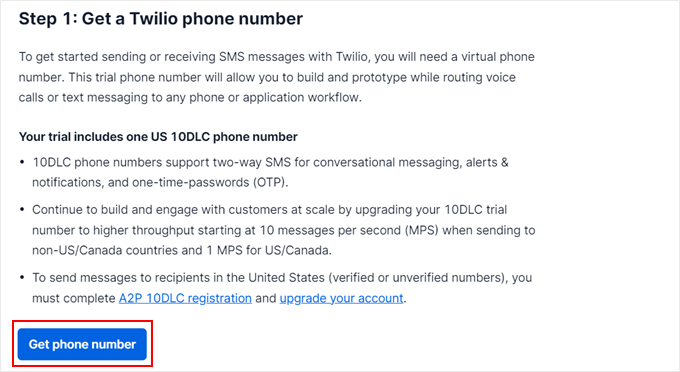
To get a phone number for your account, you’ll need to click the ‘Get phone number’ button.
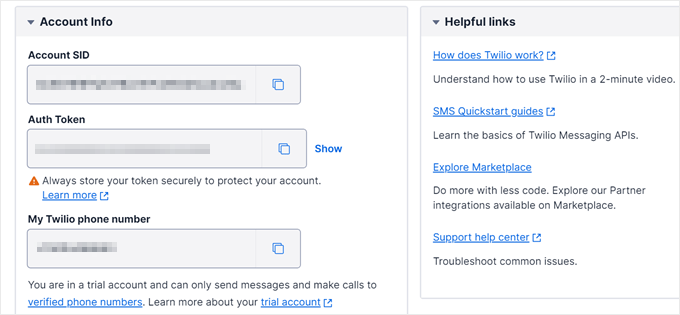
Now, you’ll want to scroll down to the ‘Account Info’ section.
Your account SID, auth token, and new Twilio number will be listed here. You’ll need this information later, so you might want to keep this tab open.
Step 2: Install and Activate Uncanny Automator
While there are many WooCommerce extensions you can use to connect Twilio with WooCommerce, the best method we’ve tried so far is using an automation plugin.
This plugin will connect Twilio and WooCommerce. It will then automatically notify Twilio to send WooCommerce SMS messages whenever there is a certain activity happening on your online store.
Uncanny Automator is the best WordPress automation plugin on the market. It lets you create powerful workflows to save time and reduce errors without writing any code.
For more information about the tool, you can see our complete Uncanny Automator review.

Uncanny Automator seamlessly integrates with all the must-have WordPress plugins and third-party tools.
Think of it like Zapier but for WordPress websites.
For this tutorial, you will need the Pro Uncanny Automator plugin, as it lets you connect with WooCommerce. While the free Uncanny Automator plugin allows Twilio integration, you cannot connect it with WooCommerce.
If you need help with plugin installation, please see our guide on how to install a WordPress plugin.
Then, you’ll want to follow through with our guide on how to create automated workflows in WordPress with Uncanny Automator.
Step 3: Set Up Twilio SMS Notification Triggers
Upon activating Uncanny Automator, you’re ready to set up a notification system so customers receive an SMS message every time they place an order.
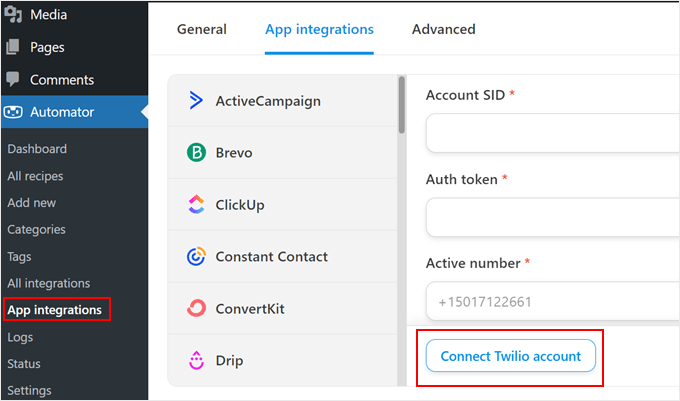
But first, you’ll need to connect your Twilio account to the Uncanny Automator plugin. To do that, go to Automator » App integrations. In the left-hand menu, select ‘Twilio.’
You can now enter your ‘Account SID,’ ‘Auth token,’ and Twilio ‘Active number.’
After entering the details, go ahead and click the ‘Connect Twilio account’ button.
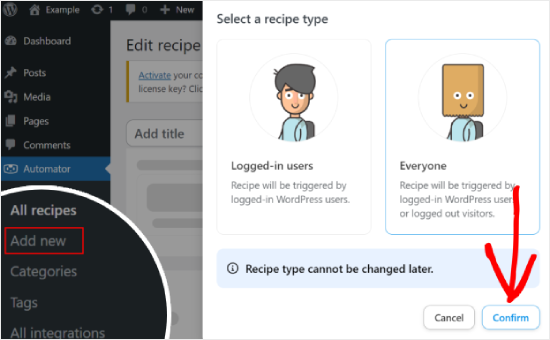
Then, you’ll need to navigate to Automator » Add new.
Here, you’ll be asked to choose ‘Logged-in users’ or ‘Everyone.’ We are going to select ‘Everyone’ so all shoppers will get an SMS notification, even if they checkout with a guest account.
With that done, go ahead and click on ‘Confirm.’
Next, you can name your recipe by typing into the ‘Title’ field. This is just for your reference, so you can use anything you want.
After that, you’ll click on ‘WooCommerce’ in the ‘Select an integration’ area.
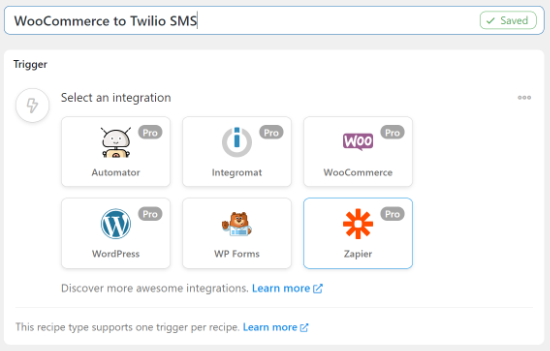
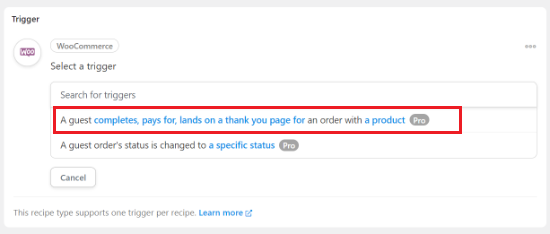
Now, you can choose your trigger, which is anything that kickstarts the recipe.
In the dropdown menu, let’s select the following option: ‘A guest completes, pays for, lands on a thank you page….’
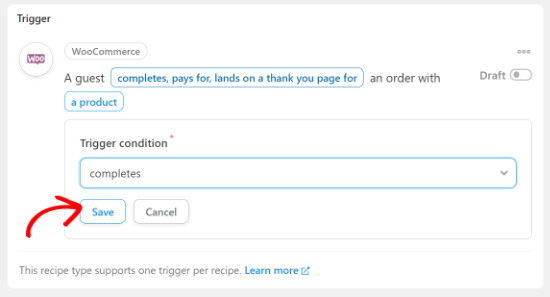
Next, you’ll need to open the ‘Trigger condition’ dropdown and select ‘completes,’ so the workflow will run every time a customer completes a purchase.
Don’t forget to click on ‘Save.’
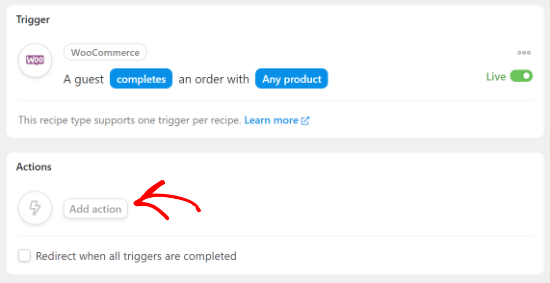
Next, you can link this recipe to a specific product.
We want to run the recipe when a customer buys any product, so you’ll want to select ‘Any product’ from the dropdown and then click ‘Save.’
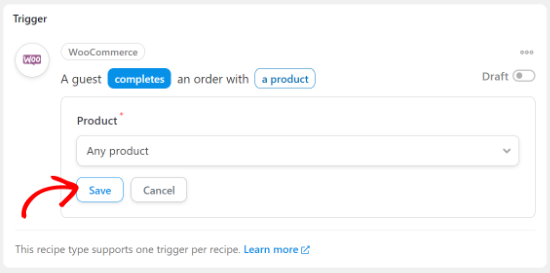
Uncanny Automator will now save your trigger, and you can move on to the ‘Actions’ section.
Here, let’s click the ‘Add action’ button to get started.
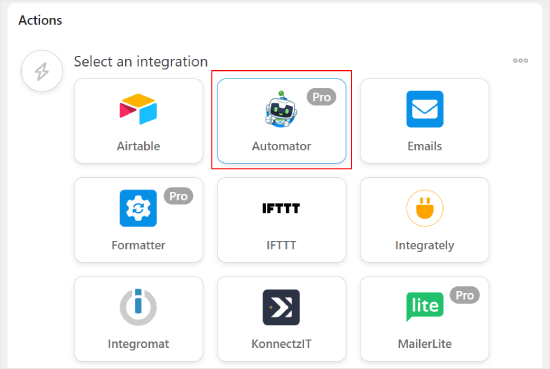
You will now see all of Uncanny Automator’s integrations, such as ActiveCampaign and Instagram.
In this section, you’ll want to click on ‘Automator.’
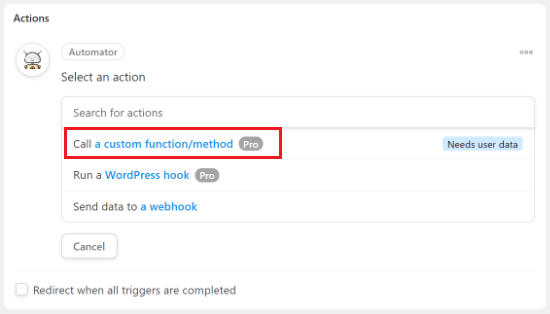
The next step is to select an action from the dropdown.
You can go ahead and choose the ‘Call a custom function/method’ option.
To start, let’s type in a name for the custom function that you want to create.
It can be something like ‘sms_notification.’
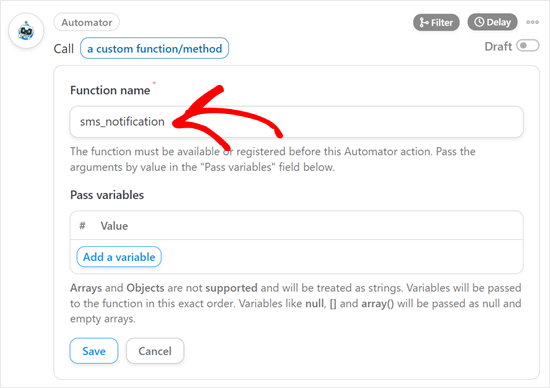
Then, you can click on ‘Add a variable.’
Now, click on the asterisk ‘*’ sign next to the empty field to specify all the data you want to use in your recipe.
In the search bar, you’ll type in ‘Billing first name’ and select it when it appears. This allows you to use the customer’s first name in your recipe.
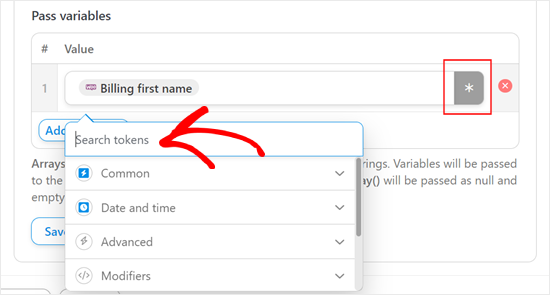
Once you’ve done that, go ahead and click on ‘Save.’
Now, you’ll click the ‘Add action’ button again and select the ‘Twilio’ integration.
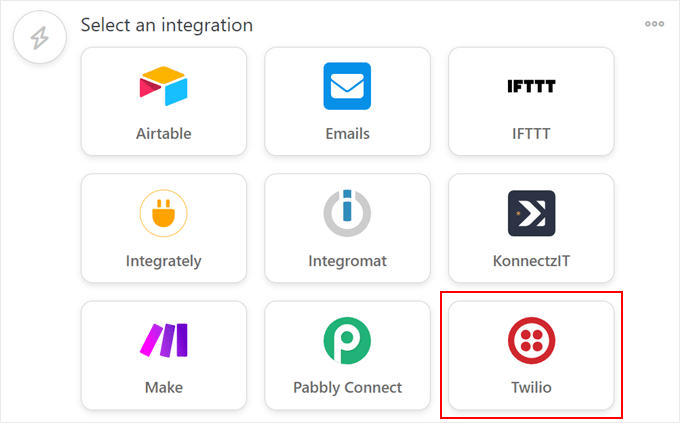
From the dropdown menu, simply select ‘Send an SMS message to a number.’
This will bring up a new box where you can add the ‘To’ address and the ‘Body’ of your SMS.
In the ‘To’ field, you can click the asterisk ‘*’ button and select ‘Billing phone’ from the dropdown list.
Then, it’s time for you to create the text message that will be sent to customers within the ‘Body’ section. Feel free to add data from the asterisk ‘*’ button to insert the shopper’s order information, such as the total price and delivery date.
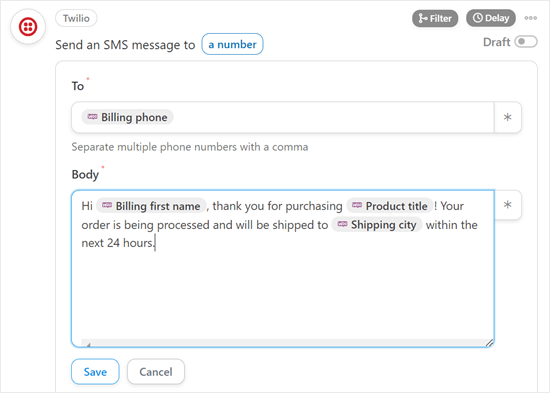
When you are happy with your message, just click on ‘Save.’
Now, you can navigate to the ‘Recipe’ box and click the ‘Draft’ switch so that it shows ‘Live’ instead.
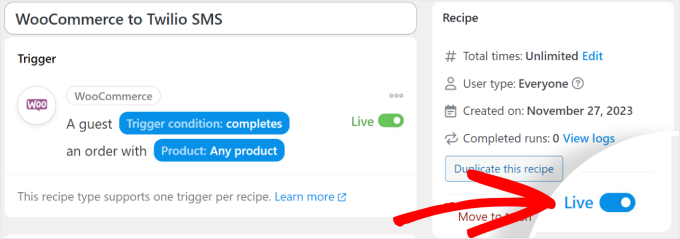
Your recipe is now live, and Uncanny Automator will automatically send SMS notifications to your customers using Twilio every time they make a purchase.
Bonus Tip: Use SMS Marketing to Build Customer Relationships
Sending Twilio SMS notifications from your WooCommerce store is just the beginning of SMS marketing. To take things further, we recommend using an SMS marketing plugin, such as OptinMonster or Nextiva.
SMS marketing is more than just order notifications. It can grow your customer relationships by informing buyers about upcoming discounts and sending out feedback surveys to improve their shopping experience.

To implement SMS marketing on your WooCommerce store, you can check out our list of the best SMS marketing plugins on the market.
We hope this article helped you learn how to send Twilio SMS notifications from WooCommerce. You may also want to see our guide on how to create an email newsletter and our expert list of the best WooCommerce points and rewards plugins for your store.
If you liked this article, then please subscribe to our YouTube Channel for WordPress video tutorials. You can also find us on Twitter and Facebook.


Mrteesurez
I am impressed with this post, Majority ecommerce platforms are not using SMS, they only depend on mails which can sometimes go the spam box or not even check by some users. Using SMS is more matured and shows the site is professional.
Thanks for sharing.