


Shoppers often add items to their cart but leave without completing the purchase. If this happens in your WooCommerce store, you’re not alone.
We have seen this on our own eCommerce sites, and an automated reminder email brings many of those shoppers back. In this guide, we will show you how to set up abandoned cart emails in WooCommerce.
TL;DR: In a hurry? Here’s how to do it step by step:
- Install and activate the free version of FunnelKit Automations
- Enable cart tracking in FunnelKit settings
- Import the Abandoned Cart Reminder workflow recipe
- Customize timing and content for each email
- Activate the automation to start recovering sales
Why Send WooCommerce Abandoned Cart Emails?
Over 70% of online shoppers abandon their cart before checkout. Email reminders can help you recover many of those sales.
- Recover lost revenue without extra advertising costs
- Many customers forget about items in their carts, and a friendly email shows you care about their experience.
- Abandoned cart emails can recover 10–15% of abandoned carts on average.
- High abandonment for a specific product can signal issues with its pricing, shipping costs, or description that you can fix.
Tip: Abandoned cart emails are one part of a cart recovery strategy. You can also use exit-intent popups, SMS, and push notifications to bring back shoppers. See our ultimate guide on setting up WooCommerce cart recovery for all these methods.
How to Set Up WooCommerce Abandoned Cart Emails
You can easily set up automated abandoned cart emails using FunnelKit Automations. It is the best marketing automation tool for WooCommerce stores.
The plugin comes with a drag-and-drop builder and pre-built email sequences, so you can get everything set up in a few minutes.
You can design abandoned cart emails from scratch and create automated workflows without writing any code. The plugin also tracks abandoned carts and sends timely follow-up emails to encourage customers to return and complete their purchases.
To learn more, see our FunnelKit Automations review.
Step 1: Install FunnelKit and Enable Cart Tracking
First, you need to install and activate the free FunnelKit Automations plugin. It covers everything you need for this tutorial.
For detailed instructions, see our beginner’s guide on how to install a WordPress plugin.
Upon activation, visit the FunnelKit Automations » Settings page from the WordPress admin sidebar and switch to the ‘Cart’ tab in the left column.
Once you’re there, check the ‘Enable Cart Tracking’ box. This is an essential step because FunnelKit Automations cannot track abandoned carts until you enable this feature.
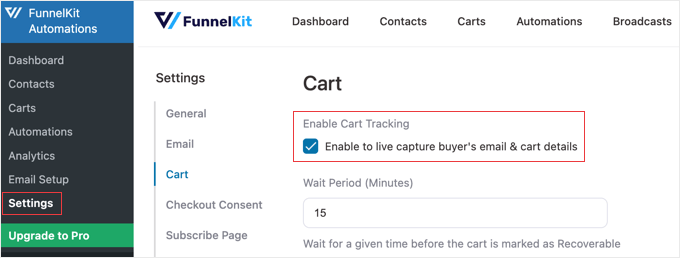
You can also adjust other settings here, such as how long to wait before marking a cart as abandoned, which email addresses to exclude, and whether to require GDPR consent before sending recovery emails.
This is important if you have customers in the European Union because it helps you comply with privacy regulations. After that, click the ‘Save’ button to store your changes.
Step 2: Create the Abandoned Cart Workflow
Next, head to the FunnelKit Automations » Automations page from the WordPress dashboard and click the ‘Create Automation’ button.

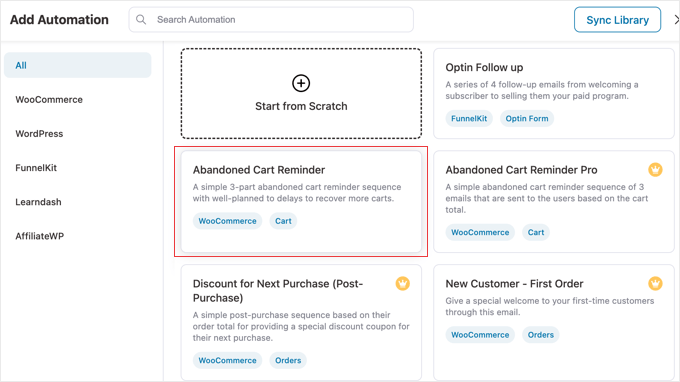
This will take you to the ‘Add Automation’ page, where you can select from premade email templates with abandoned cart email examples and workflows.
These templates are designed by marketing experts and have proven conversion rates.
For this tutorial, we will choose the ‘Abandoned Cart Reminder’ workflow, which sends users 3 abandoned cart emails over time. It gives customers several opportunities to return and complete their purchases.
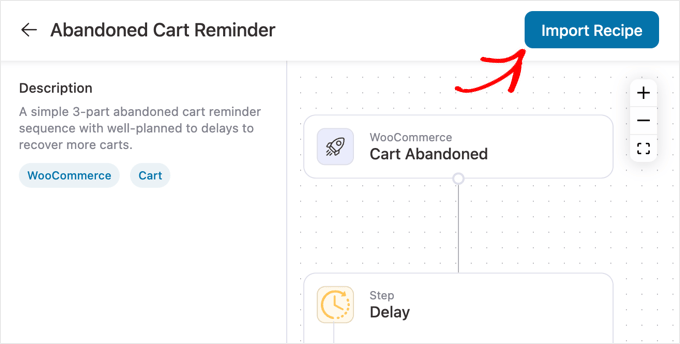
You will now be taken to a new screen where you can see the trigger, action, and delays for this workflow.
Next, click the ‘Import Recipe’ button in the top-right corner. This will load the pre-built workflow into the editor, turning it into your own customizable automation.
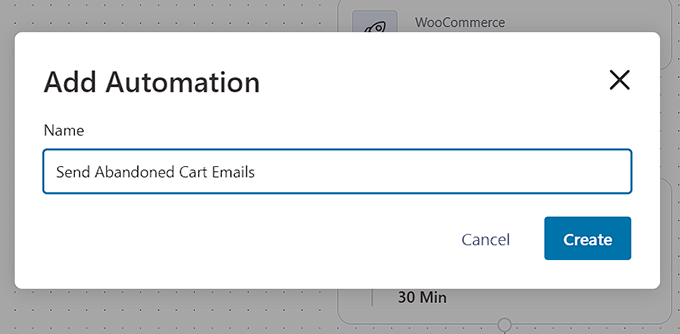
Once you do that, an ‘Add Automation’ prompt will open up. Give your new workflow a name you’ll easily recognize, and click the ‘Create’ button.
I recommend using a descriptive name like ‘Send Abandoned Cart Emails’.
FunnelKit will now open the template in its automation editor, where you can customize when the workflow starts, how long it waits, and what happens next.
You can even add other actions and delays by clicking the ‘+’ button. This flexibility lets you create more sophisticated campaigns as you get comfortable with the tool.
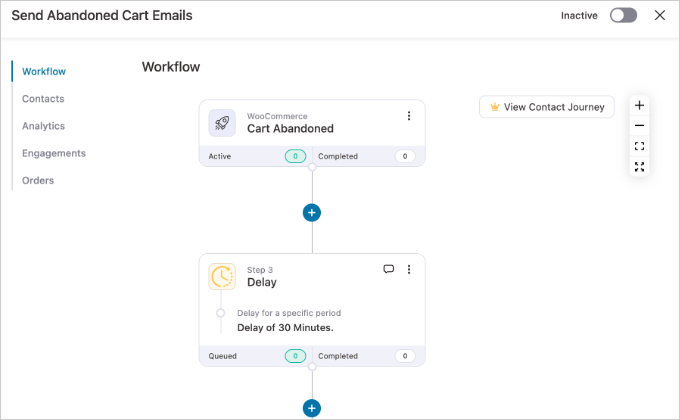
The workflow’s trigger is already set to ‘Cart Abandoned,’ so the sequence will begin automatically whenever a shopper leaves without completing their purchase.
Step 3: Customize Your 3-Part Email Sequence
The real power of this template is that it creates a 3-part email sequence for you.
Let’s customize the timing and content for each email to maximize your chances of recovering the sale. The goal is to move from a gentle reminder to a final, compelling offer.
Email 1: The Gentle Reminder (Sent After a Short Delay)
The first email should be a simple and helpful reminder. Many customers get distracted and need a little nudge.
Click on the ‘Delay’ action to configure its settings.
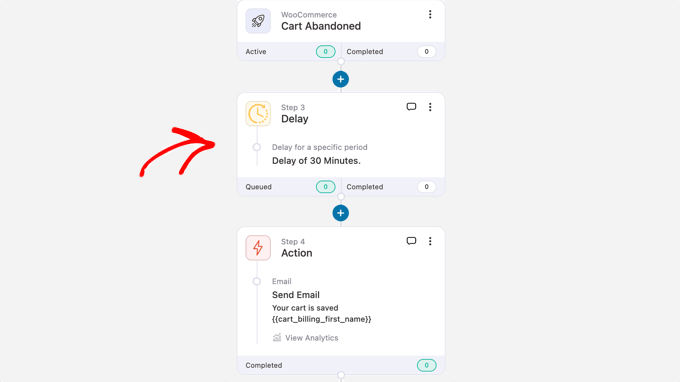
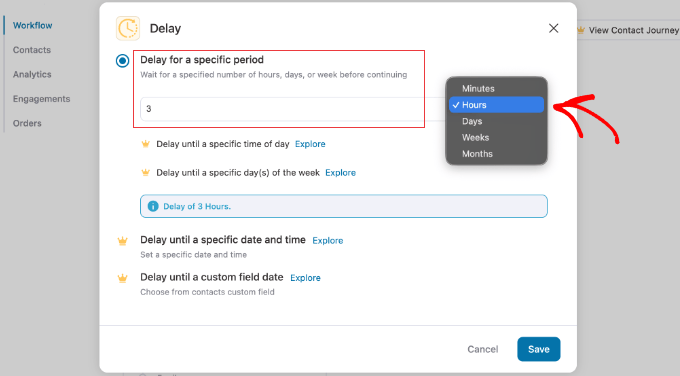
A prompt will appear. We recommend sending the first email within 1 to 24 hours.
A delay of 3 hours is a great starting point. Once you’ve set the time, click ‘Save’.
Next, click on the first ‘Send Email’ action below the delay you just configured.
In the prompt, you can customize the subject line and body.
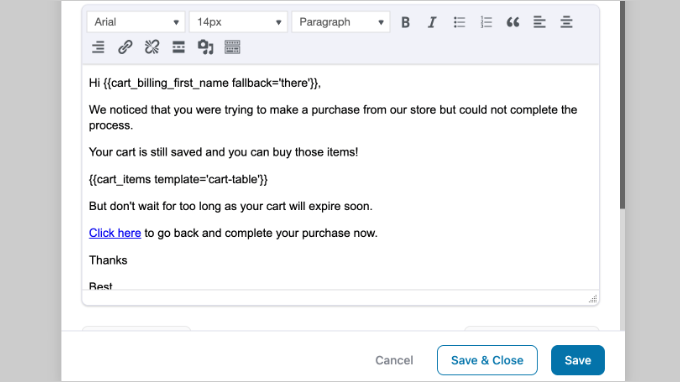
FunnelKit also supports merge tags, which let you personalize emails automatically. For example, you can add a merge tag that inserts the customer’s name into the email, making each message feel more personal.
Here is a great abandoned cart email example you can adapt:
- Subject: Did you forget something?
- Body: Hi {{cart_billing_first_name fallback=’there’}},
We noticed you left some items in your cart and wanted to make sure everything was okay. We’ve saved them for you!
When you’re ready, you can return to your cart to complete your purchase.
Once you’re done, click ‘Save’.
Email 2: The Social Proof Follow-Up (Sent After 1-2 Days)
If the first email didn’t bring the customer back, they might still be hesitant. For the second email, you can build trust by adding social proof, like a customer testimonial.
In the workflow, click on the next ‘Delay’ and set it for 1 day.
Then, click on the second ‘Send Email’ action. This time, you can add a short testimonial about your store or a popular product to build trust.
For example:
- Subject: Still thinking it over?
- Body: Hi {{cart_billing_first_name fallback=’there’}},
Your cart is waiting! We think you’ll love what you picked out. Here’s what one of our happy customers had to say about their experience:
[Insert a positive customer testimonial here. For example: “I love my new items! The quality is amazing and shipping was super fast. – Jane D.”]
Still have questions? Just reply to this email or visit our FAQ page.
Remember to save your changes before moving on.
Email 3: The Final Offer (Sent After 2-3 Days)
The third email is your last chance to bring the customer back. Creating a sense of urgency with a small discount can be very effective.
Click the final ‘Delay’ action and set it for another 2 days. Then, click the last ‘Send Email’ action.
- Subject: A special offer just for you
- Body: {{cart_billing_first_name fallback=’there’}},
We’ve missed you! To help you complete your purchase, we’d like to offer you 10% off your entire order. This offer is only good for the next 24 hours.
Use code: SAVE10
Click the button below to complete your order and claim your discount.
Remember that you will need to create this coupon code before adding it to the email. For details, see our guide on creating smart coupons in WooCommerce.
Step 4: Activate Your Automation
Finally, toggle the ‘Inactive’ switch to ‘Active’ to activate your automated workflow.

Now, any shopper who abandons a cart in your store will automatically receive this email sequence, helping you recover sales around the clock.
Here is an automated abandoned cart email example from our testing site:
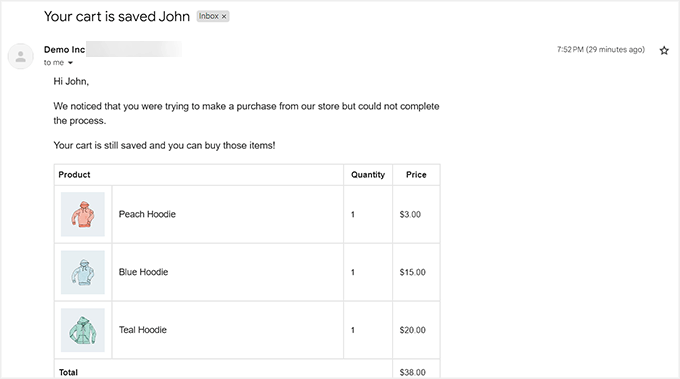
Pro Tip: Use an SMTP service like WP Mail SMTP to improve email deliverability and help keep your abandoned cart emails out of spam.
Bonus: Use WooCommerce Automations to Increase Sales
Apart from sending cart abandonment emails, you can also use other automated workflows to increase your WooCommerce sales.
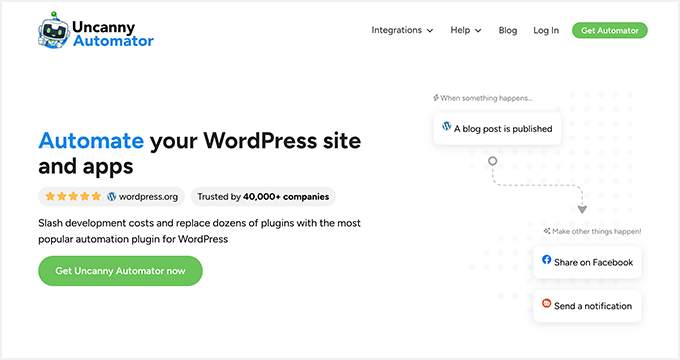
For example, send automated coupons to bring back users or create personalized email marketing campaigns. You can do all of this using Uncanny Automator.
While FunnelKit Automations focuses on marketing funnels and email campaigns, Uncanny Automator acts like a Zapier for WordPress. That means that Uncanny lets you connect your WordPress site with 150+ apps or WordPress plugins, including WPForms, Facebook, Twilio, and WhatsApp.
For more details, check out our Uncanny Automator review.
This lets you create workflows like:
- When a user submits a product question via WPForms, automatically create a task in a project management tool like Asana for your team to follow up.
- When a customer buys a specific product, automatically enroll them in a related course in your learning plugin.
- If a customer’s payment fails, instantly send them an SMS message with a link to update their details.
- Create, update, or delete users automatically based on triggers like registration or form submissions.
For detailed instructions, see our tutorial on creating automated workflows in WordPress with Uncanny Automator.
Frequently Asked Questions About WooCommerce Abandoned Carts
How long should I wait before sending an abandoned cart email?
Most successful stores send the first abandoned cart email within 1-24 hours after cart abandonment. Sending too quickly can feel pushy, while waiting too long means customers may forget about their purchase or buy elsewhere.
How many abandoned cart emails should I send?
I recommend sending 2-3 abandoned cart emails spaced 2-3 days apart for the best results. The first email serves as a gentle reminder, the second can include social proof or testimonials, and the third might offer a small incentive to complete the purchase.
What should I write in an abandoned cart email?
Your abandoned cart email should be helpful, not pushy. Start with a friendly reminder, show the items they left behind, and include a clear link back to their cart.
For your follow-up emails, you can add social proof like customer reviews or offer a small discount to encourage them to complete their purchase. We cover a few great abandoned cart email examples you can use in our section above.
Should I offer a discount in abandoned cart emails?
You don’t need to offer a discount in your first abandoned cart email, as many customers will return without an incentive. Save discount offers for the second or third email to create urgency without training customers to abandon carts to get discounts.
Can I customize the abandoned cart email templates?
Yes, FunnelKit Automations lets you fully customize your abandoned cart email templates, including subject lines, body text, images, and buttons. You can also use merge tags to personalize emails with customer names and specific cart items.
Will abandoned cart emails work with any WooCommerce theme?
Yes, abandoned cart emails work with any WooCommerce theme because they operate independently of your theme design. The emails are sent from FunnelKit Automations and display in your customers’ email inboxes, not on your website.
Do I need coding knowledge to set up abandoned cart emails?
No, you don’t need any coding knowledge to set up abandoned cart emails with FunnelKit Automations. The plugin provides pre-built templates and a visual drag-and-drop editor that makes it easy to create and customize your email campaigns.
Do abandoned cart emails actually work?
Yes. Abandoned cart emails consistently rank among the highest-converting email marketing tactics because they target people who already expressed interest in your products.
Most WooCommerce stores see meaningful recovery rates once a 3-part sequence is live, especially when the first email goes out within 1–3 hours of abandonment.
Are abandoned cart emails legal?
Yes, in most countries, but with conditions. In the US, abandoned cart emails fall under CAN-SPAM rules, which require a clear unsubscribe option and your business’s physical address.
In the EU, GDPR applies. You generally need prior consent (opt-in) or a ‘soft opt-in’ based on a previous purchase or inquiry. FunnelKit Automations includes GDPR consent options in its cart tracking settings, which we cover in Step 1 above.
What is a good cart recovery rate?
A recovery rate of 5–15% is considered solid for most WooCommerce stores. Factors that improve recovery rates include faster first-email timing, personalization (using the customer’s name and specific cart items), and a well-timed discount offer in the final email of your sequence.
Additional Resources to Boost Your WooCommerce Store
We hope this article helped you learn how to set up effective abandoned cart emails.
Now that your recovery system is running, you may find these other guides helpful for growing your store:
- How to Customize the WooCommerce Checkout Page – Learn how to simplify your checkout to reduce abandonment in the first place.
- Best WooCommerce Plugins for Your Store – Explore our top picks for plugins that can help you manage your store and increase sales.
- Ways to Recover WooCommerce Abandoned Cart Sales – Discover even more strategies to bring customers back and secure lost revenue.
If you liked this article, then please subscribe to our YouTube Channel for WordPress video tutorials. You can also find us on Twitter and Facebook.



Have a question or suggestion? Please leave a comment to start the discussion.