Want to make your WordPress site more accessible but struggling with font resizers? While browser zoom features exist, they often break your site’s layout and create a frustrating experience for users who need larger text 😞
We’ve helped thousands of WordPress beginners improve their site’s design. And here’s what we’ve learned: a proper font resizer should let visitors adjust text size without distorting other page elements.
This seemingly small feature can make a huge difference in keeping visitors engaged with your content.
In this guide, we’ll show you two proven ways to add a font resizer to your WordPress site – one for classic themes and another that works with any theme. Both methods are beginner-friendly and won’t break your site’s design.
Is It Important to Add Resizeable Text to Your Website? 🤔
Finding the right font for your WordPress website is important because it plays a massive role in making your site attractive and helps visitors read your content.
However, sometimes, it might not be enough to select the best font size in WordPress. If the font size is small, people will have a hard time reading your articles and eventually abandon your site.
An easier way of improving readability is by offering visitors the option to resize the main text on your website. This allows users to adjust the text size according to their liking and spend more time on your site.
Even though you can use the browser’s built-in zoom feature by pressing the ‘CTRL and +’ key, it increases the size of every WordPress design element on the page and not just text. This may break the website’s layout and not provide a great user experience.
That said, let’s see how you can easily add resizeable text for your visitors in WordPress. You can use the quick links below to skip to a specific method:
Method 1: Add WordPress Font Resizer With Plugin and Code
One easy way to allow users to change the text size on your website is by using a WordPress accessibility font resizer plugin like Accessibility Widget.
It’s a free WordPress plugin that lets you add an option to your site’s sidebar to change the text size. The plugin is lightweight and very easy to use.
That said, do note that the Accessibility Widget plugin is not compatible with Full Site Editing and block themes, so it will only work if you use a classic theme. You’ll know that you’re using a block theme if the theme customizer is missing on your WordPress admin.
The first thing you need to do is install and activate the Accessibility Widget plugin on your website. If you need help, then please see our guide on how to install a WordPress plugin.
Upon activation, simply go to Appearance » Widget from the WordPress admin panel. Next, you can click the ‘+’ button and add the ‘Accessibility Widget’ block to your sidebar.
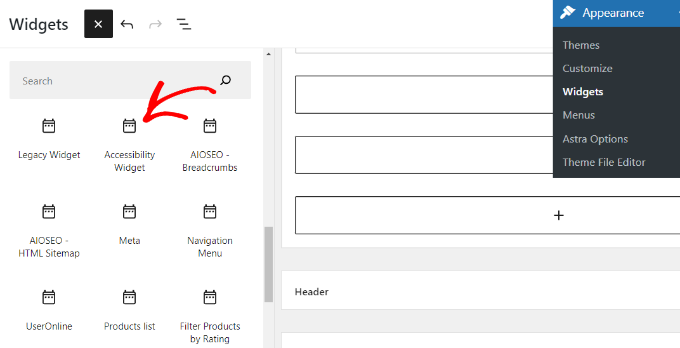
After that, you can enter a title for the widget, like ‘Change Text Size’ or ‘Resize Text’.
Next, you need to select which HTML elements or CSS classes will be affected by the widget. The default options are body, paragraph, list items, and table cells. These options should work for most websites.
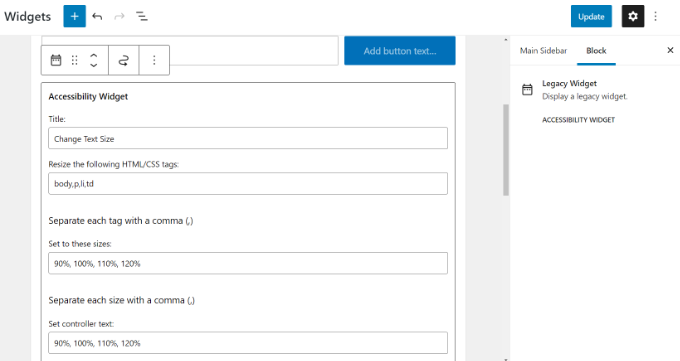
The widget allows up to four resize options. The default options are 90%, 100%, 110%, and 120%. You can increase or decrease the font sizes by entering the figures in the ‘Set to these sizes’ field.
The last widget setting is controller text, and this is the text users will see. You can keep the default percentages for the text size or use a letter to show different font sizes.
Once you are done, just click the ‘Update’ button to store your widget settings.
You can now visit your website to see the widget in action. This is how the widget should appear in your website sidebar:
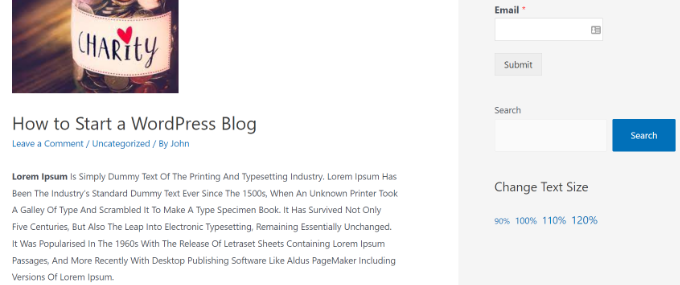
If you feel the controller text is not noticeable, then you can change that by using CSS.
To do this, just go to your WordPress admin and select Appearance » Customize.
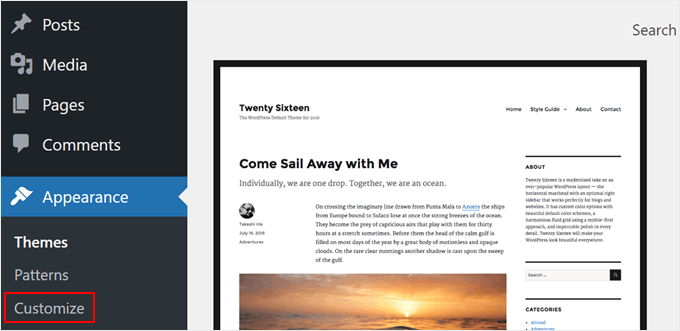
You should now see some options to customize your classic theme.
Here, select ‘Additional CSS.’
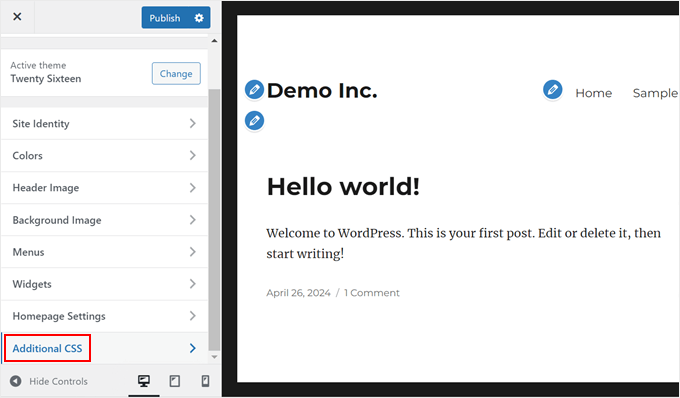
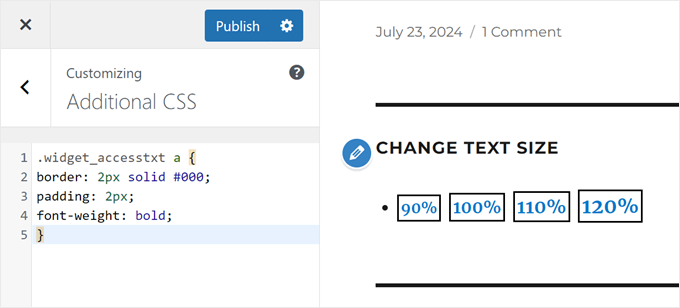
Now, you can add some CSS code to style the widget. Here’s what we added:
.widget_accesstxt a {
border: 2px solid #000;
padding: 2px;
font-weight: bold;
}
This CSS will add a border around the controller text, make it bold, and add a little padding. Once you’re happy with how the widget looks, just click ‘Publish.’
For more details, please see our guide on how to add custom CSS in WordPress.
Method 2: Use WordPress Accessibility Plugin
Another easy way to let users resize the text on your website is by using WP Accessibility. This plugin lets you add a toolbar to your site to change the text size, no matter what theme you’re using.
The first thing you need to do is install and activate the WP Accessibility plugin on your website. You can see our guide on how to install a WordPress plugin if you need help.
Upon activation, simply go to the WP Accessibility page from the WordPress admin panel.
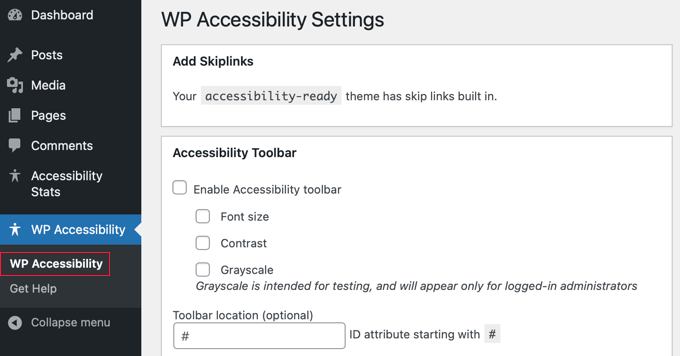
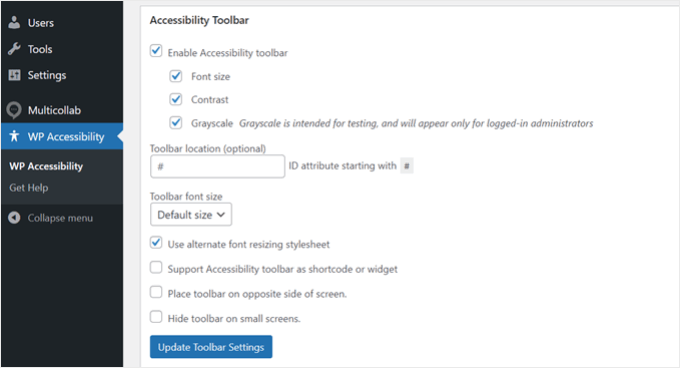
In the ‘Accessibility Toolbar’ section, click the ‘Enable Accessibility toolbar’ option and select ‘Font size.’ This will add a font resizer to the toolbar.
If needed, you can also enable the Contrast and Grayscale options, too.
Additionally, you can change the font size of the content when the toolbar is clicked. You can also just select ‘Default size’ in the dropdown menu if you’re not sure what to choose.
Other than that, we recommend enabling the ‘Use alternate font resizing stylesheet’ option. When this option is enabled, users can easily switch between the default font sizes and a larger, more readable version of the text.
Feel free to enable other settings in the plugin.
Once done, just click the ‘Update Toolbar Settings’ button.
That’s it!
Here is what our font resize toolbar looks like on the front end:

For more information, you can read our guide on how to improve your WordPress site’s accessibility.
Make Your WordPress Site Even Easier to Use With These Tips
Want to make your site easier to use and look great? Check out these helpful guides:
- How to Add Arrow-Key Keyboard Navigation in WordPress – Make it easier for people to move around your site.
- How to Customize Colors on Your WordPress Website – Pick the right colors to make your site look good and easy to read.
- How to Add a Preloader Animation to WordPress (Step by Step) – Add a cool loading screen to your site.
- How to Easily Add Dark Mode to Your WordPress Website – Let users switch to a darker theme if they prefer it.
- Ways to Create a Mobile-Friendly WordPress Site – Make sure your site works well on phones and tablets.
- How to Get Website Design Feedback in WordPress (Step by Step) – Learn how to ask people what they think about your site’s design.
- How to Highlight Text in WordPress (Beginner’s Guide) – Learn to make important words stand out on your pages.
Video Tutorial
We hope this article helped you add resizeable text to your WordPress site. You may also want to check out our expert picks of the best WordPress drag-and-drop page builders and our complete guide to WordPress theme updates.
If you liked this article, then please subscribe to our YouTube Channel for WordPress video tutorials. You can also find us on Twitter and Facebook.


Mrteesurez
The second method is what I choose to add the text resizer. I have a website where I post educational contents in orderly manner. I found this to be useful for my site users as some might be dealing blurred vision or need to see text more clearly so the resize will come in handy for them.
Shushanna
Hi, thanks for the amazing post. I wonder if your site does not have a sidebar, is it possible to to put the widget somewhere else, for example above the navigation.
WPBeginner Support
You can place it in your theme’s widget areas if your theme has widget areas available!
Admin
Jasper
I have installed the widget but don’t have the Set Controller Text box so on the website it shows the %s.
Any sugestions? Thanks
Ivo
Hi, I followed the instructions as on the video but noting happens. Please help.
I actually wont it to make my girlfriend site to be zoom-able when open in mobile devices. Please suggest…
Regards,
Ivo
Eric Paquette
is it possible to make the A A A bigger ?
Wrenling
This widget is AMAZING, thank you so much!!
I’m curious, I added it to my blog and it is EXACTLY what I wanted, but it only affects the main page of the blog – if you click on an individual post, the widget disappears. Can you tell me how to fix this?
WPBeginner Support
Your WordPress theme probably uses different sidebars for main page and single posts.
Admin