Do you want to add arrow-key keyboard navigation in WordPress?
Keyboard navigation can make your website more user-friendly by allowing visitors to move from post to post using arrow keys. However, WordPress does not offer these navigation features by default.
In this article, we will show you how to easily add arrow-key keyboard navigation in WordPress.

Why Add Arrow-Key Keyboard Navigation in WordPress?
Adding keyboard navigation allows users to browse blog posts on your WordPress website easily.
Users can view the next and previous blog posts by clicking on the right and left arrow keys on their keyboards.
This feature comes in handy when you want users to easily browse posts in sequential order. For instance, if you are using blog posts to publish chapters of a book, portfolio items, historical events, or more.
Adding arrow-key keyboard navigation can also be a great way to improve user experience on your WordPress blog by encouraging users to explore your site more.
That being said, let’s see how to easily add arrow-key keyboard navigation in WordPress, step by step:
Method 1: Adding Arrow-Key Keyboard Navigation Using WPCode (Recommended)
You can easily add arrow-key navigation on your WordPress site by adding code to your WordPress theme’s functions.php file.
On doing this, the users will be able to switch between different pages and posts on your site using the arrow keys on their keyboards.
However, keep in mind that adding custom code to WordPress core files can be risky, and a tiny mistake can break your site.
That is why we always recommend using WPCode. It is the best WordPress code snippets plugin on the market that makes it safe and easy to add code to your website.
First, you need to install and activate the WPCode plugin. For details, see our beginner’s guide on how to install a WordPress plugin.
Note: WPCode also has a free version that you can use for this tutorial. However, upgrading to the paid plan will unlock more features like code snippet library, conditional logic, CSS Snippet option, and more.
Upon activation, head over to the Code Snippets » + Add Snippet page from the WordPress admin dashboard.
Once you are there, you can click on the ‘Use Snippet’ button under the ‘Add Your Custom Code (New Snippet)’ option.

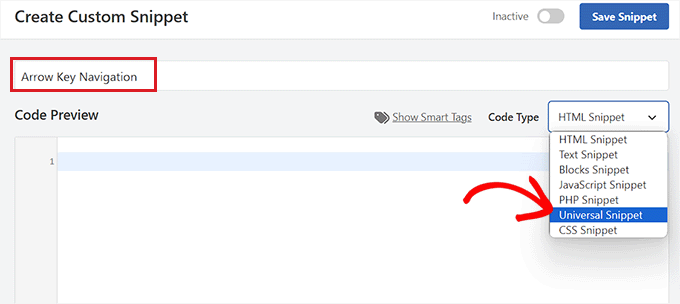
This will take you to the ‘Create Custom Snippet’ page where you can start by typing a name for your code snippet.
Then, simply select ‘Universal Snippet’ as the ‘Code Type’ from the dropdown menu in the right corner of the screen
Note: Please do not select ‘JavaScript’ as your code type. Even though it’s JavaScript code, the code only works on your site if you select the ‘Universal Snippet’ option.

Next, simply copy and paste the following code into the ‘Code Preview’ box:
<script type="text/javascript">
        document.onkeydown = function (e) {
            var e = e || event,
            keycode = e.which || e.keyCode;
            if (keycode == 37 || keycode == 33)
                location = "<?php echo get_permalink(get_previous_post()); ?>";
            if (keycode == 39 || keycode == 34)
                location = "<?php echo get_permalink(get_next_post()); ?>";
        }
    </script>
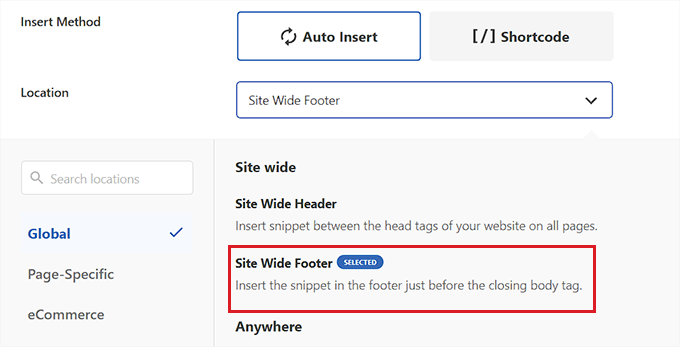
After that, scroll down to the ‘Insertion’ section to choose a location for the code snippet.
Here, simply select the ‘Site Wide Footer’ option from the dropdown menu next to the ‘Location’ option.

Next, choose ‘Auto Insert’ as the insertion method for the custom code.
The code will now be automatically executed on your website upon activation.

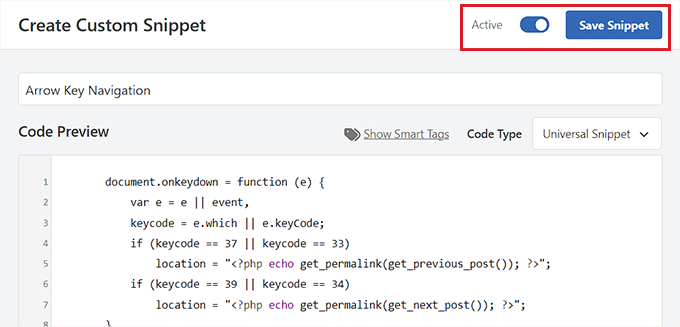
After that, scroll back to the top of the page and toggle the switch from ‘Inactive’ to ‘Active’.
Then, all you have to do is click on the ‘Save Snippet’ button.

That’s it! You’ve successfully added the left and right arrow-key navigation on your website.
Method 2: Adding Arrow-Key Keyboard Navigation Using the Arrow Keys Navigation Plugin
If you do not want to add code to your website, then you can use the Arrow Keys Navigation plugin.
This plugin enables you to navigate through your site’s previous and next posts using the right and left arrow keys on your keyboard.
First, you need to install and activate the Arrow Keys Navigation plugin. For more details, see our step-by-step guide on how to install a WordPress plugin.
Note: This plugin hasn’t been updated recently. However, we tested it with the latest version of WordPress, and it is still working.

Since it is a very simple plugin, it requires no additional configuration. Once you’ve activated the plugin, you can now switch to different posts on your site using the arrow keys.
Keep in mind that this plugin only allows you to switch between different posts on your website, so you won’t be able to use arrow keys to move from one page to another.
For example, you cannot switch from your ‘Home’ page to your ‘Contact Us’ page using arrow keys.
After you’ve activated the plugin, you can add an alert bar or popup on your website that tells the users that they can now navigate through various blog posts by simply using the arrow keys to move from one post to the next.
For more detailed instructions, please see our tutorial on how to create an alert bar in WordPress.
Arrow-Key Navigation for WordPress Slider and Image Galleries
The above two solutions will allow users to navigate your blog posts with arrow keys. However, sometimes you may want to add other functionalities like allowing users to move images with arrow keys or perhaps move your slider with arrow keys.
In these cases, you will need to use a WordPress gallery plugin and/or a WordPress slider plugin. Most popular slider and gallery plugins come built-in with arrow key navigation features.
We recommend using Envira Gallery because it is the best gallery plugin that allows you to customize your images according to your liking including watermarks, arrow keys, and alt text.

For details, see our tutorial on how to create an image gallery in WordPress.
We hope this article helped you learn how to add arrow-key keyboard navigation in WordPress. You may also want to see our top pick of the best WordPress plugins or our guide on how to add special characters in WordPress.
If you liked this article, then please subscribe to our YouTube Channel for WordPress video tutorials. You can also find us on Twitter and Facebook.


Syed Balkhi says
Hey WPBeginner readers,
Did you know you can win exciting prizes by commenting on WPBeginner?
Every month, our top blog commenters will win HUGE rewards, including premium WordPress plugin licenses and cash prizes.
You can get more details about the contest from here.
Start sharing your thoughts below to stand a chance to win!
Jiří Vaněk says
I tried using the snippet on my friend’s site and it works great. He has a travel blog designed as a travel diary and this was a very good way to make the site more enjoyable for people. Thanks for the code provided.
Brian says
Works like a charm, for the first WP Code option. But any ideas how to get this to ‘loop’ around all the available posts in a post type? Currently at the first or last post the implementation just reloads that post page.
WPBeginner Support says
Not at the moment but we will look into the possibility for a future article update!
Admin
Shiran says
Why does this work backwards? Meaning, I have to hit the “back” arrow to move forward…
WPBeginner Support says
There may be an issue with your keyboard itself, have you tried using an on-screen keyboard to see if the issue happens when using a different keyboard?
Admin