When we launched our first eCommerce store years ago, we were leaving money on the table without even knowing it. Like many store owners, we focused solely on getting customers to buy our main products. That was until we discovered order bumps.
If you’re running a WooCommerce store and haven’t set up order bumps yet, you’re missing out on an easy way to boost sales. Think of order bumps like those small items near the checkout counter at your local store – they’re strategic add-ons that customers can purchase with just one click during checkout.
In this guide, we’ll show you exactly how to create high-converting order bumps in WooCommerce. The best part? Our step-by-step instructions are beginner-friendly, so you don’t need any technical experience to follow along!
What Is an Order Bump?
An order bump is a smart sales strategy that shows shoppers extra products in the checkout page. Think of it as a friendly “Would you like fries with that?” but for your online store.
When customers reach the WooCommerce checkout page, they see a simple bump offer box with a related product. This order bump offer makes it easy for them to add another item to their cart with just one click.
You might wonder how this differs from an upsell. In our opinion, they are actually quite similar since both aim to increase your cart value.
In fact, you can even offer a higher-priced version of a product at checkout, which technically works as both an order bump and an upsell. However, in our experience, this isn’t as effective as offering cheaper order bumps.
When done right, order bumps can seriously boost your average order value. That said, you can’t just choose any product as an order bump. You need to be strategic about your offers. Here’s what we recommend:
- Choose WooCommerce products that naturally complement what’s in the cart (like phone cases for phones).
- Price your bump offer for WooCommerce lower than the main purchase to make them feel like easy add-ons.
- Keep your order bump offer simple and clear. One compelling product works better than multiple order bumps.
- Place your WooCommerce order bump offer where it’s visible but doesn’t interrupt the checkout flow.
WooCommerce doesn’t have built-in settings to set up an order bump. Thankfully, there are many WooCommerce plugins available for order bumps. And we’ve found one that is easy to use for users of all levels.
Here are the steps we’ll cover in this order bump WooComerce tutorial:
- Step 1: Install FunnelKit Funnel Builder
- Step 2: Customize Your Checkout Page
- Step 3: Add an Order Bump to Your Checkout
- Step 4: Customize the Order Bump Text and Image
- Step 5: Customize the Order Bump Design
- Step 6: Set Up Your Order Bump Discount
- Step 7: Set the Rules to Trigger the Order Bump
- Step 8: Monitor and Optimize Your Order Bump Conversions
Let’s get started.
👉 Note: In this tutorial, we will assume you have set up an online store with WooCommerce. If you need step-by-step guidance, then check out our WooCommerce made simple tutorial.
Step 1: Install FunnelKit Funnel Builder
Out of all the order bump WooCommerce plugins we tested, we found that FunnelKit Funnel Builder offers the easiest approach. This plugin lets you optimize your checkout flow and create powerful sales funnels with minimal effort.
We love FunnelKit as a bump offer plugin because it has many rules and settings you can customize. What’s more, it includes responsive order bump designs and support for all major product types in your WooCommerce store.

Other than that, FunnelKit comes with custom checkout templates to boost sales, cart abandonment funnels to recover lost potential revenue, and dashboard analytics to see your store’s performance.
This guide will use the FunnelKit Builder Pro Plus plan because the order bump feature is available in that version and higher. However, you can start with the free version if you want to explore the basic WooCommerce checkout features before committing.
For more information, check out our detailed FunnelKit Funnel Builder review.
After you purchase your plan, you’ll get access to the plugin zip file and license key. You’ll then need to install the plugin. For more information, check out our guide on how to install a WordPress plugin.
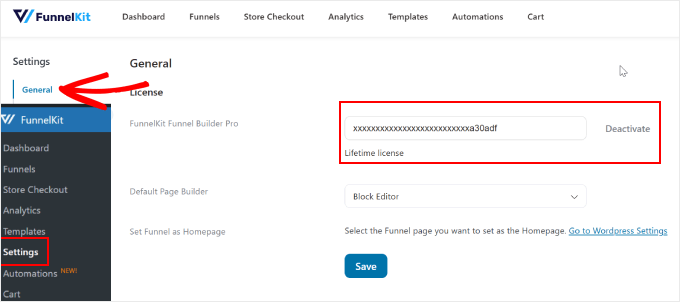
Then, you need to activate the license key. To do this, simply go to FunnelKit » Settings from your WordPress dashboard, navigate to the ‘General’ tab, and select ‘License.’
Copy and paste the license key into the ‘FunnelKit Funnel Builder Pro’ field and select the default page builder you are using. After that, just click ‘Activate’ and then ‘Save Changes.’
Step 2: Customize Your Checkout Page
Now that the plugin is active, you’ll need to set up your WooCommerce checkout page.
To do this, go to FunnelKit » Store Checkout. Then, switch to the ‘Store Checkout’ tab and click on the ‘Create Store Checkout’ button.
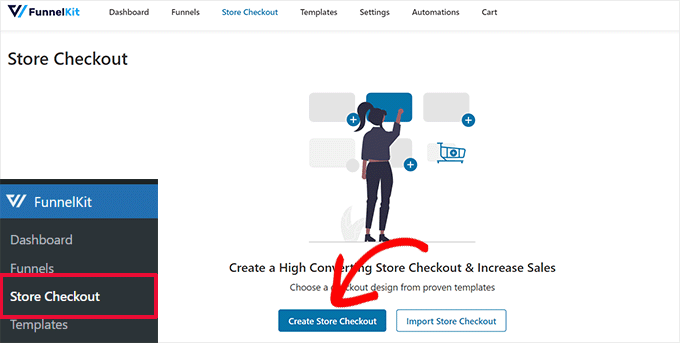
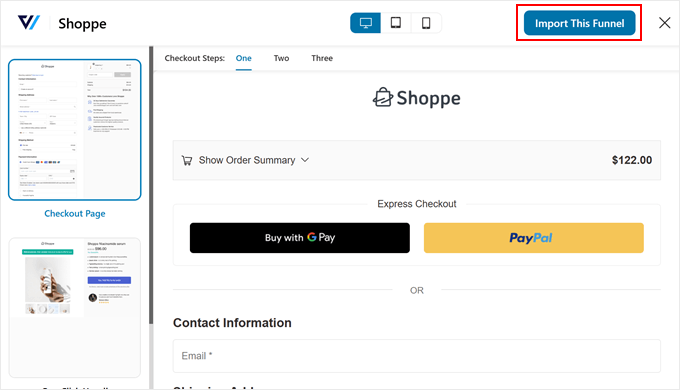
FunnelKit offers several checkout templates designed to boost sales. You can customize these using the block editor or popular page builder plugins like Divi or Bricks.
Make sure to choose your preferred platform at the top of the page. Then, simply click ‘Preview’ on your preferred checkout template.
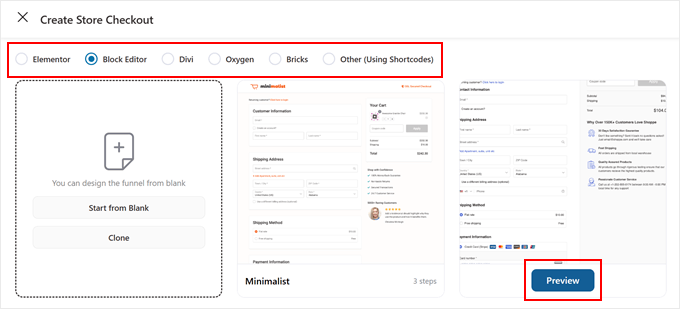
Most FunnelKit templates include three key pages: a WooCommerce checkout page, an upsell page, and a thank you page.
If you like how the template looks, click ‘Import This Funnel.’
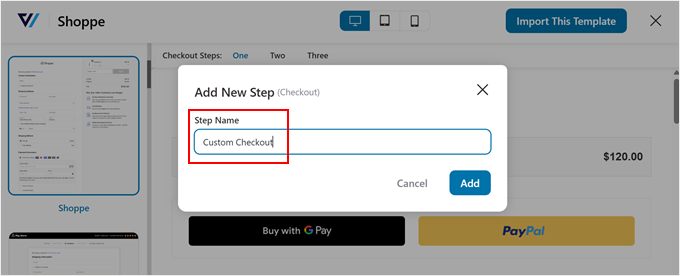
You’ll then need to name your checkout funnel, which is especially helpful if you plan to create multiple checkout funnels later.
After entering the name, just click ‘Add.’
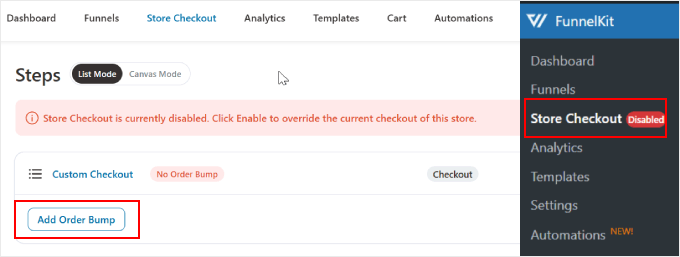
To begin customizing, click the checkout name above the ‘Add Order Bump’ button.
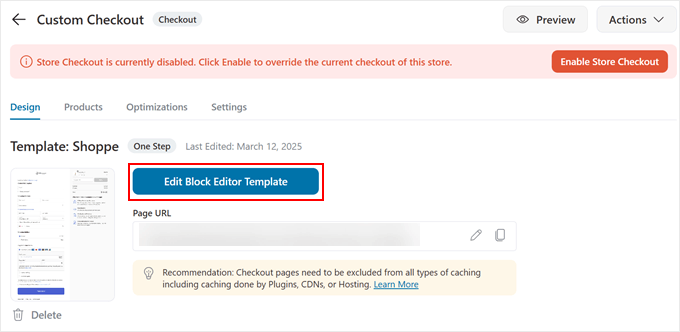
You’ll see various settings for your checkout page.

In the ‘Design’ tab, click ‘Edit Block Editor Template’ to customize using your chosen editing platform.
For detailed customization steps, check out our guide on how to customize the WooCommerce checkout page.
Once you’re satisfied with your checkout design, you can move on to adding your order bump offer.
Step 3: Add an Order Bump to Your Checkout
Now that you’ve configured the checkout page, let’s add a WooCommerce order bump to increase your sales.
First, go to FunnelKit » Store Checkout. Then, click on the ‘Add Order Bump’ button.
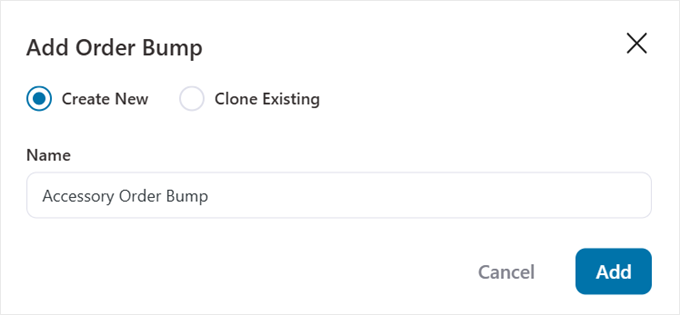
A popup will appear asking you to name the order bump. Adding a descriptive name is especially helpful if you plan to create multiple order bumps for different offers at checkout.
Once you’ve filled out a name, click ‘Add.’
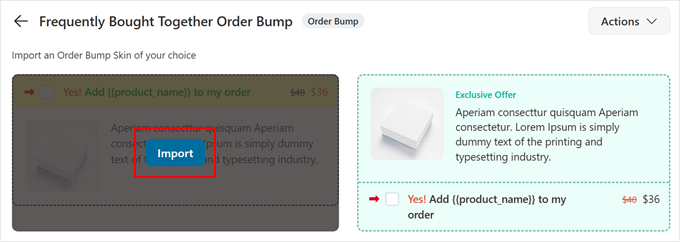
FunnelKit will then show you several bump offer box designs to choose from.
Each template is fully responsive and designed to boost sales by catching your customers’ attention at just the right moment.
You can pick a design that best matches your store’s style. After that, click ‘Import.’
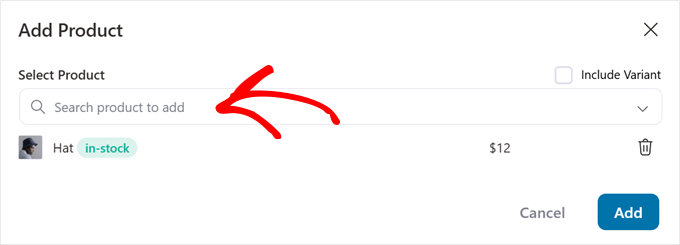
In the product selection popup, add the WooCommerce product you want to display as your order bump offer. We recommend keeping it simple with just one compelling offer. Too many choices can overwhelm customers and reduce conversions.
When you’re happy with your selection, simply click ‘Add.’
Step 4: Customize the Order Bump Text and Image
Now, in the ‘Design’ tab, you can customize your WooCommerce order bump to make it more appealing. Let’s start with making your bump offer box content compelling.
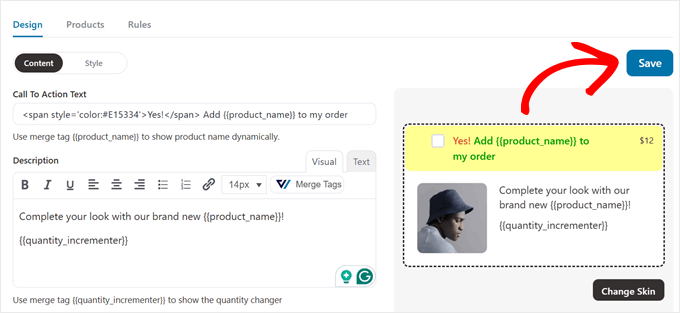
First, make sure you’re in the ‘Content’ tab. Here, you can craft the perfect order bump offer text. At the top, you’ll find the call-to-action field.
The default text reads “Yes! Add {{product_name}} to my order.” FunnelKit includes some HTML code for text colors here, so be careful to keep that formatting while editing if you want to maintain it.
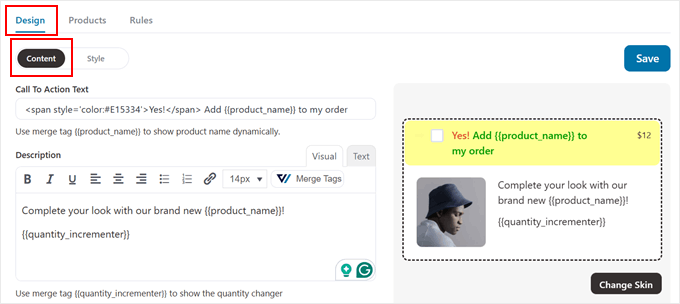
Also, we recommend keeping the {{product_name}} merge tag to dynamically show your product name.
A merge tag is like a placeholder that automatically fills in with the right information. When someone views your checkout page, FunnelKit replaces {{product_name}} with your actual product name without you having to update it manually.
Some effective call-to-action examples for your order bump might be:
- “Upgrade my order with
{{product_name}}“ - “Yes! I’d like to purchase
{{product_name}}“
In the ‘Description’ field, write a brief but compelling pitch for your offer at checkout.
For example, if you’re offering a subscription upgrade, try something like: “Upgrade to our 6-month plan now and get unlimited access to exclusive content, ad-free browsing, and priority customer support.”
To make your bump offer for WooCommerce even more dynamic, click the ‘Merge Tags’ button.
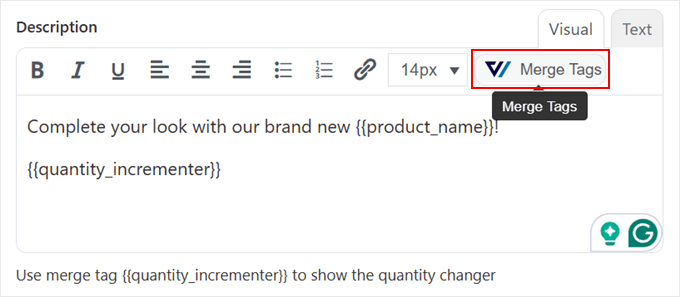
You’ll find other merge tags that may be useful for your order bump, such as:
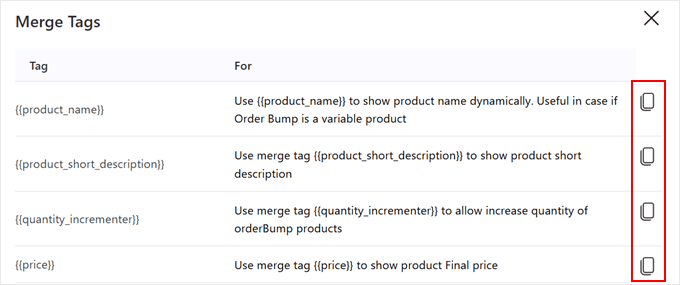
{{product_short_description}}– Pulls in your WooCommerce product’s short description{{subscription_summary}}– Shows subscription details automatically.{{quantity_incrementer}}– Lets customers adjust their order quantity.{{variation_attribute_html}}– Displays product variations when needed.
Feel free to click on the copy icon on a merge tag you’d like to use in your description.
Moving down, you will see a checkbox for adding an exclusive offer text to your WooCommerce order bump. You can enable this if you want to make your offer more urgent.
This kind of “exclusive” messaging can create a sense of special value and FOMO at checkout.

Also, you can customize this text to match your offer. Here are some effective examples for your bump offer:
- “One-time offer – only available now!”
- “Special checkout-only discount”
- “Exclusive bundle deal – save 50%”
- “Limited time offer – add to order now”
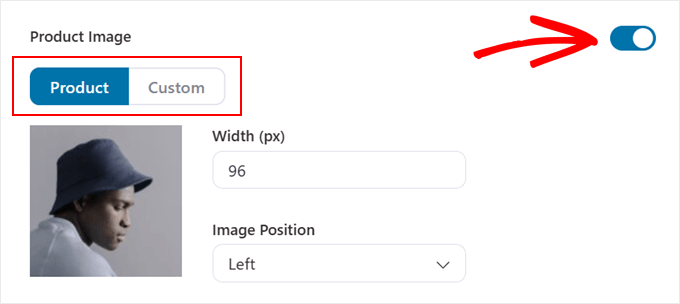
The last setting in the ‘Content’ tab allows you to choose an image to use in the order bump. If you don’t want to use an image, then just disable the ‘Product Image’ toggle.
Otherwise, you need to decide whether to use the product’s default image or select the ‘Custom’ option to upload a different one from your own computer.
Once you’ve chosen an image, you can edit its width and position.
Make sure to review and adjust all the settings until you’re happy with how the bump looks.
After that, scroll up to click on the ‘Save’ button.
Step 5: Customize the Order Bump Design
At this stage, you can switch to the ‘Style’ tab to customize every visual aspect of your WooCommerce order bump.
Let’s go through the most important settings to create an eye-catching bump offer box.
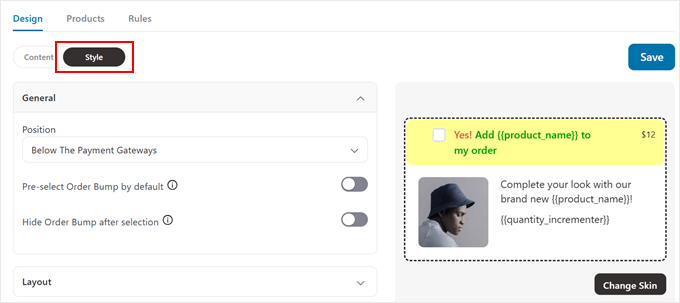
First, open the ‘General’ tab. In the ‘Position’ dropdown menu, you can choose where to display your order bump offer. Here are your options:
- Above or below the order summary
- Above or below the payment gateways
- Inside or above the mini cart
- Above the checkout form
The best position for your offers at checkout depends on your chosen template and what you’re selling. We recommend placing your order bump where it’s visible but doesn’t interrupt the natural checkout flow.
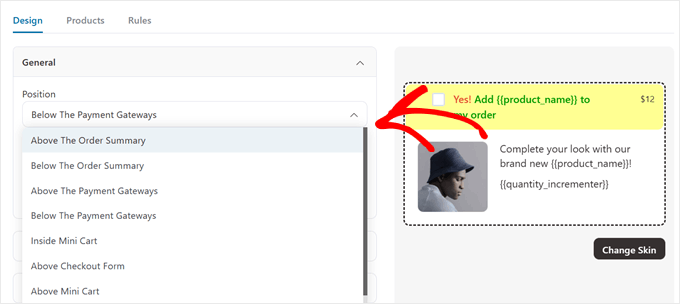
For most WooCommerce stores, positioning it near the order summary works well because customers are already reviewing their purchases.
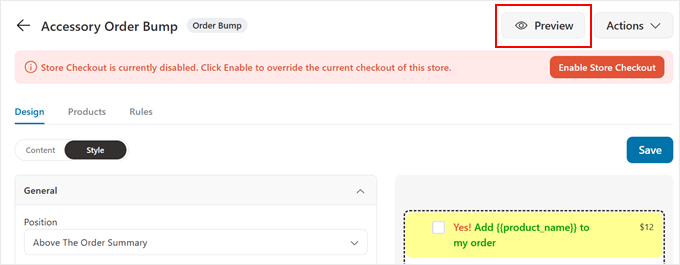
If you’re not sure, just click on the ‘Preview’ button to see what the checkout looks like.
You’ll also find two important settings in this tab.
First, the ‘Pre-select Order Bump by default’ option automatically checks the bump offer for customers. While this can increase conversions, we only recommend using it for free offers. Customers might feel tricked if they find an unexpected paid item in their WooCommerce cart.
Next, the ‘Hide Order Bump after selection’ setting removes the offer once accepted. This can be useful when you have multiple order bumps or want to keep your checkout page clean after the customer makes their choice.

If you open the ‘Layout’ tab, you can fully customize how your bump offer box looks. You can choose the background color of the bump, adjust padding, and modify border styles to match your store’s design.
You can also switch between ‘Default’ and ‘Hover’ modes to create a different appearance when the cursor lands on the order bump.
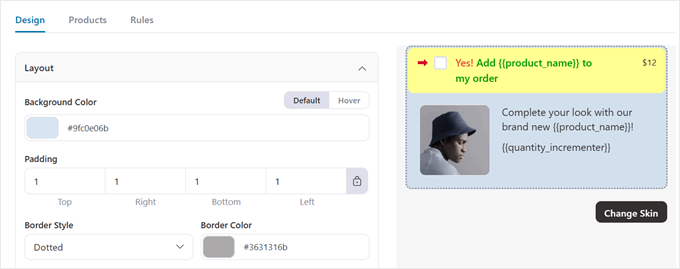
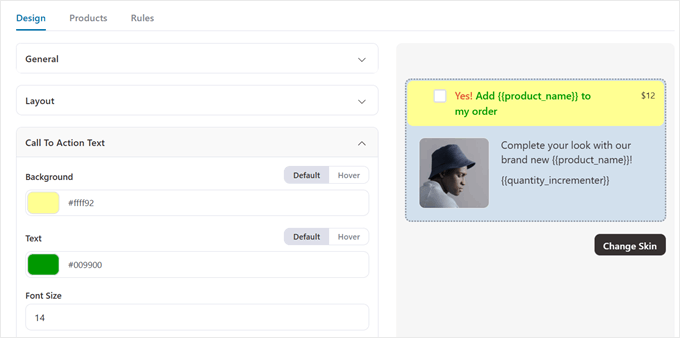
The ‘Call To Action Text’ tab is also important for your order bump design.
FunnelKit lets you customize that section’s background color, text color, font size, and hover state appearance.
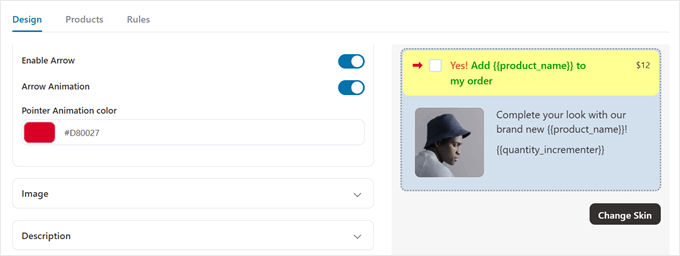
You can even add an arrow pointing to your call-to-action text, and enable the ‘Arrow Animation’ setting to make it animated.
While the default arrow is red, you can choose any color that matches your design. Just make sure it stands out enough to catch attention without clashing with your WooCommerce checkout design.
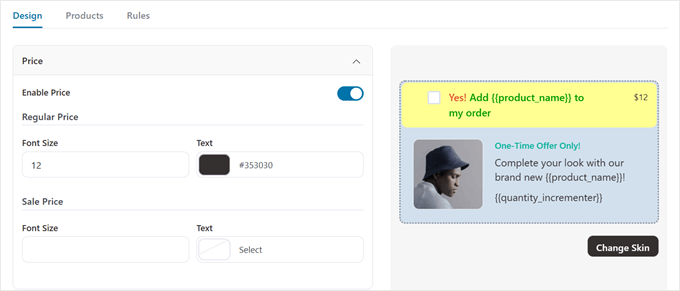
The next setting is ‘Price’ for pricing display. We recommend keeping it visible and prominent. Clear pricing builds trust and helps customers make quick decisions.
You can adjust the font size and text color to highlight the value of your product offer.
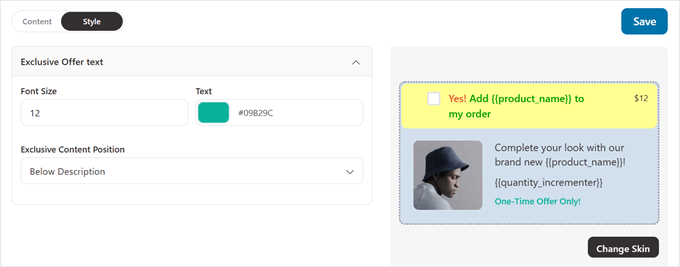
If you’ve enabled the exclusive offer text, you can customize its font size, text color, and position in the bump offer box.
Remember to click ‘Save’ once you’re happy with your customization choices.
Step 6: Set Up Your Order Bump Discount
Now, switch to the ‘Products’ tab to set up pricing for your WooCommerce order bump. Here, you can adjust how your product will be priced when displayed as a bump offer at checkout.
You should already have added a product from Step 3. In the ‘Discount’ field, you can choose from these discount types:
- Percentage % on Sale Price
- Percentage % on Regular Price
- Fixed Amount on Sale Price
- Fixed Amount on Regular Price
Choose ‘Regular Price’ options if you want to discount from the original price. Meanwhile, you can use ‘Sale Price’ options if the product is already discounted and you want to offer an even better deal in your order bump offer.

Make sure that your offer is compelling but reasonable. We recommend a discount between 15-30%, which is high enough to be attractive but not so high that it devalues your WooCommerce product.
If you want to offer it as a free gift, simply enter 100 in the discount field.
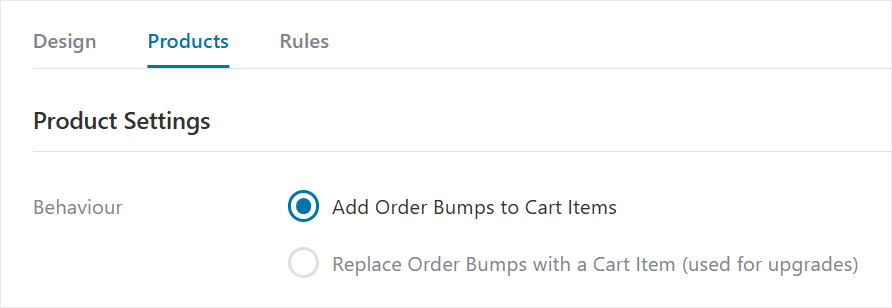
Scrolling down to the ‘Product Settings’ section, you’ll find two options for how your order bump works:
- Add Order Bumps to Cart Items (a standard WooCommerce order bump to boost sales)
- Replace Order Bumps with a Cart Item (lets you offer an upsell, like upgrading from a 6-month subscription to a 12-month one instead)
For this tutorial, we’ll focus on the first option.
Once you’re satisfied with the discount offer, just scroll back up.
Then, click ‘Save.’

Step 7: Set the Rules to Trigger the Order Bump
So far, we’ve configured the order bump products and design. Now, let’s set up the conditional logic that will make the order bump appear when a customer is checking out.
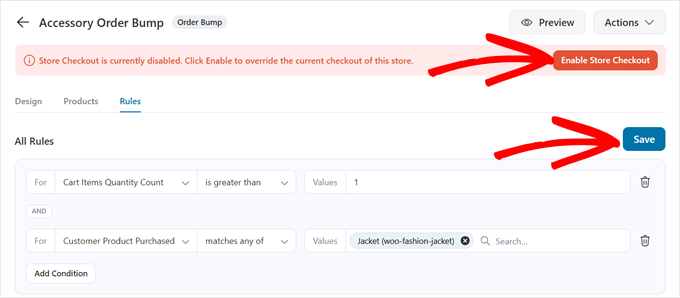
To do this, simply navigate to the ‘Rules’ tab. After that, click ‘Add Rules.’
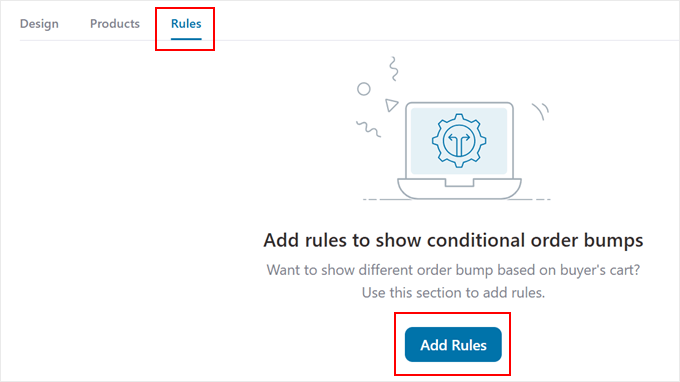
You can set multiple rules to make the order bump appear during checkout. The rules can be based on the cart, customer, geography, date and time, and/or the type of checkout page you are using.
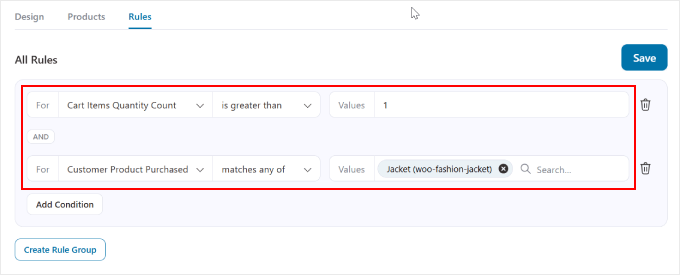
You can also combine multiple conditions in one rule using the ‘Add Condition’ button.
In the example below, the order bump will only be triggered if the customer purchases more than 1 item and they are buying a jacket.
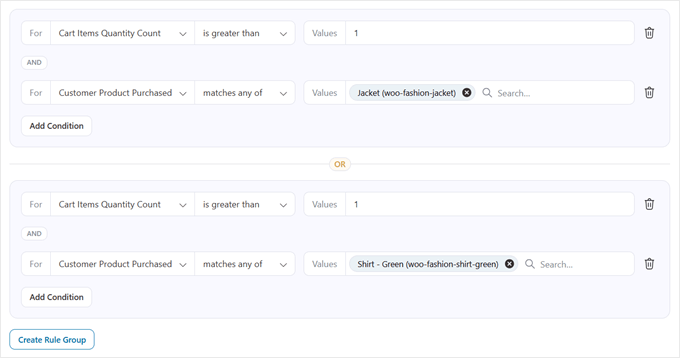
Now, if you click on the ‘Create Rule Group’ button below a rule, you can choose to have the order bump appear with a different condition.
For instance, you could set a condition where the order bump appears if the customer is buying either a jacket or a shirt. This gives you the option to promote the same offer for different products
We also recommend adding a rule to prevent your order bump from appearing when customers already have the offer product in their cart. You can do this by selecting:
- ‘Cart Item(s)’
- ‘does not contain’
- Your bump offer product
This prevents awkward situations and keeps your checkout funnel running smoothly.

Once you’re happy with the rules, simply click the ‘Save’ button in the top right corner to store your settings.
You also want to click on the ‘Enable Store Checkout’ button if you’re happy with your custom checkout funnel and want to make it live right away.
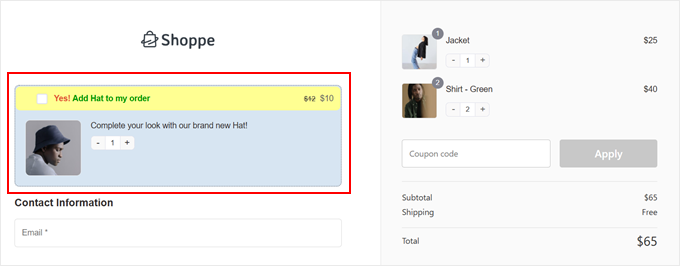
You can now test your checkout process to see what the WooCommerce order bump looks like.
Here’s an example of how it looks on our demo website.
Step 8: Monitor and Optimize Your Order Bump Conversions
Now that your WooCommerce order bump is live, you’ll want to track its performance to boost sales effectively. FunnelKit makes this easy with built-in analytics.
Simply go to FunnelKit » Store Checkout and switch to the ‘Analytics’ tab to see how your offers at checkout are performing.
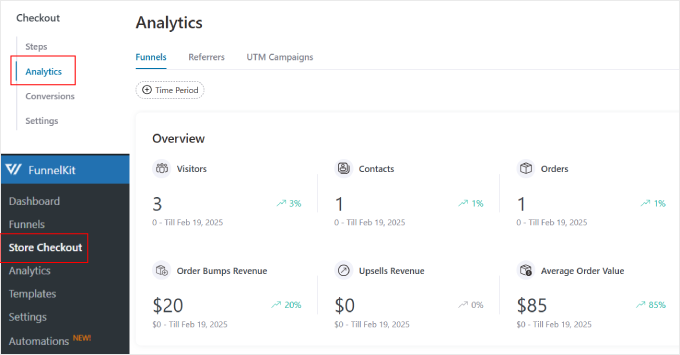
In the Analytics dashboard, you’ll find detailed information about your checkout sales funnel, including revenue specifically from order bump offers. This helps you understand how much extra income your bump offer for WooCommerce generates.
The ‘Referrers’ tab in the Analytics section reveals where your converting customers come from, whether it’s direct traffic, Facebook, Google, or Instagram.
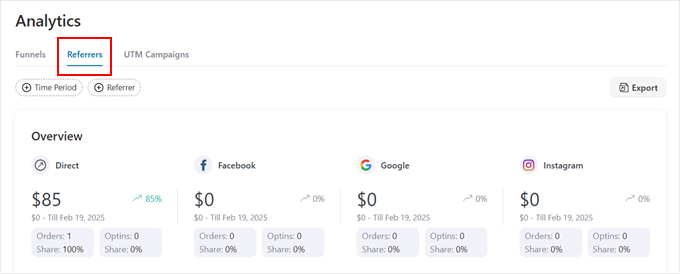
This insight helps you focus your marketing efforts where they work best.
You can also go to the ‘Conversions’ tab for more insights.
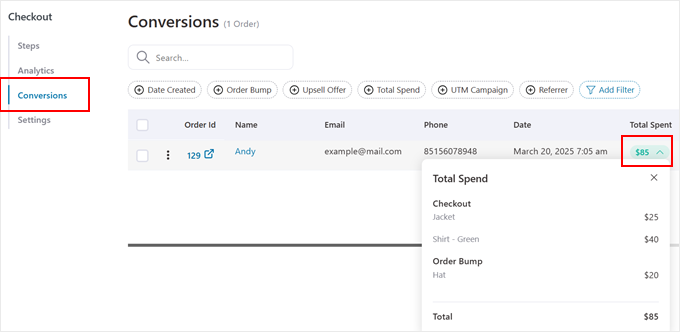
This section can show you total orders processed through your custom checkout. Plus, you can hover over the ‘Total Spent’ column to see how much of your WooCommerce sales come from order bumps.
Want even deeper insights? We recommend connecting Google Analytics to track your WooCommerce checkout performance comprehensively. Check out our guide on WooCommerce conversion tracking with Google Analytics for setup instructions.
To further optimize your order bump performance, explore these related guides:
- How to Show Frequently Bought Together Products in WooCommerce
- How to Show Product Recommendations in WordPress
- How to Make a High Converting Sales Funnel in WordPress
- How to Optimize the Customer Journey for WooCommerce Store
We hope this article helped you learn how to create an order bump for WooCommerce. You may also want to check out our expert picks of the best WooCommerce points and rewards plugins and our guide on how to sell product bundles in WooCommerce.
If you liked this article, then please subscribe to our YouTube Channel for WordPress video tutorials. You can also find us on Twitter and Facebook.


Moinuddin Waheed
This is a proven way to increase the chances of increased sales of the related products.
whenever I purchase something from Flipkart and Amazon and other such platforms like Myntra, Ajio, we are given this option to add more related products and people also buying with this products lists.
Many times we tend to forget such products and as soon as they pop up we make the buying decisions.
Jiří Vaněk
This is a great method where you can add to the product that the customer wants to buy an offer of additional things that, for example, go with the product, such as a mobile phone case, etc. Thanks for the tutorial. And while we’re talking about online store tricks, another good technique is when a registered customer doesn’t complete an order, after a while they get an email saying that they added something to the cart but didn’t complete the order. Can this also be solved in a similarly simple way in Woocommerce?
WPBeginner Support
You would normally need another plugin for that, we would recommend taking a look at our guide below for some options that you can use:
https://www.wpbeginner.com/wp-tutorials/ways-to-recover-woocommerce-abandoned-cart-sales/
Admin
Jiří Vaněk
Thank you very much for the advice, I will look into the article to be smarter as it seems like another great method that has gotten me to complete an order more than once.
Zia Khan
One thing that intrigued me is the choice of display position. It’s like placing candy at the checkout in a store—too tempting to resist! In your experience, what’s the most effective spot that’s worked wonders? Curious to know your “sweet spot” for maximizing conversions!
WPBeginner Support
We do not have a specific placement we would recommend at the moment but if we find a spot we will be sure to share!
Admin
THANKGOD JONATHAN
I believe Funnelkit is a CRM plugin and I think if I have another CRM plugin like Hubspot it is not ideal to install another one in the same site. So will I be able to do the same thing with hubspot CRM?
WPBeginner Support
We do not have a recommended method for setting this up with Hubspot at the moment.
Admin
Moinuddin Waheed
Order bump is a proven method to have an increased sale.
I myself have been several times purchased more products than initially I was thinking to buy.
related products and people also buy these products along with that is a common feature that almost all the big ecommerce industries have implemented on their websites.
Thanks for creating a tutorial for wordpress users to implement the same for wordpress woo commerce websites. it is really very helpful.