


Got something you want to sell, but no idea how to actually take payments on your own website?
You don’t need to hire a developer or spend thousands of dollars to get started. With WordPress and WooCommerce, you can build a fully functional online store in about an hour, for just a few dollars a month, and without writing a single line of code.
In this guide, we’ll show you exactly how to set up your online store, add products, accept payments, and start selling.
Why Choose WooCommerce for Your Online Store?
If you’re new to WordPress, WooCommerce is a free eCommerce plugin that you install on your WordPress website. It adds all the features you need to turn a regular WordPress site into a fully functional online store, including product listings, shopping carts, checkout, and payment options.
It’s no wonder why WooCommerce is the most popular eCommerce platform in the world. It gives you complete ownership of your store and its content. You can easily extend its features with plugins. Unlike other platforms, you don’t pay platform fees on top of what your payment processor charges.
WooCommerce is especially useful if you’re selling physical products that need to be shipped. You can create shipping zones, offer different delivery options, calculate shipping costs, and even set up rules based on factors like order weight or destination.
If you’re planning to sell digital downloads or online courses, then you can follow our dedicated step-by-step guides.
Follow this tutorial rigorously. By the end, you’ll have product pages, a shopping cart, secure checkout, payment processing, and shipping options set up, and your store will be ready to accept its first order.
Step 1. Get Your Store Online
To start your online store with WordPress and WooCommerce, you’ll need a domain name and web hosting.
Your web host stores your website files, while your domain name is the web address customers will use to find your store (for example, yourstore.com).
After testing dozens of WordPress hosting providers, we recommend Bluehost or Hostinger for beginners.
Both of them are affordable and include a free domain name for the first year, a free SSL certificate, and WordPress pre-installed.
Alternatively, if you need a managed WordPress host with plans tuned for WooCommerce stores, then Levamo is a great option. It handles performance, updates, and security, making it the right pick if you’d rather not deal with the technical side of running a website.
Once you’ve signed up for your preferred hosting account, connect your domain name and log in to your WordPress dashboard. If you’re using another host, then see our guide on how to install WordPress.
Step 2. Set Up WooCommerce
If your hosting plan didn’t pre-install WooCommerce, then you can install it like any other plugin. See our guide on how to install a WordPress plugin for help.
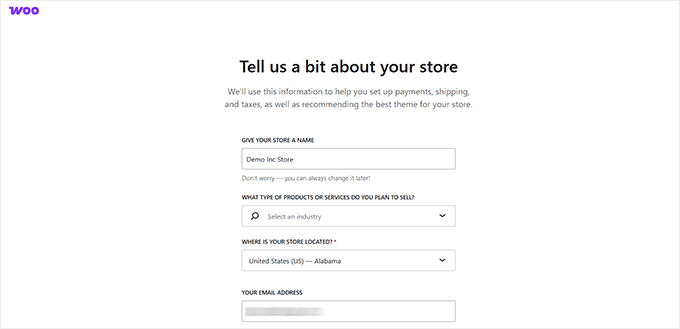
Follow the wizard to enter your store details, including your business information and store location. WooCommerce will also create a few pages that are essential to an eCommerce store, like Shop, Cart, Checkout, and My Account pages automatically.
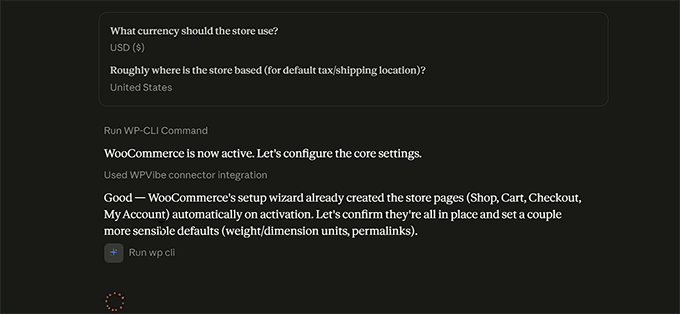
Alternatively, you can have AI set up your WooCommerce store for you.
All you have to do is to connect your AI assistant, like ChatGPT or Claude, to WordPress using the WPVibe plugin. Then, ask AI to set up your online store in plain English.
When WooCommerce recommends additional extensions, you can install the ones you need or click ‘Skip this step’ and add them later.
Your WooCommerce store is now ready to use. For a detailed walkthrough of every setting, see our complete WooCommerce made simple guide.
Step 3. Design Your Store
Next, you’ll need to make your eCommerce store look stunning by installing a free WordPress theme. On the free WordPress.org repository, you can find more than 3,000 eCommerce based themes.
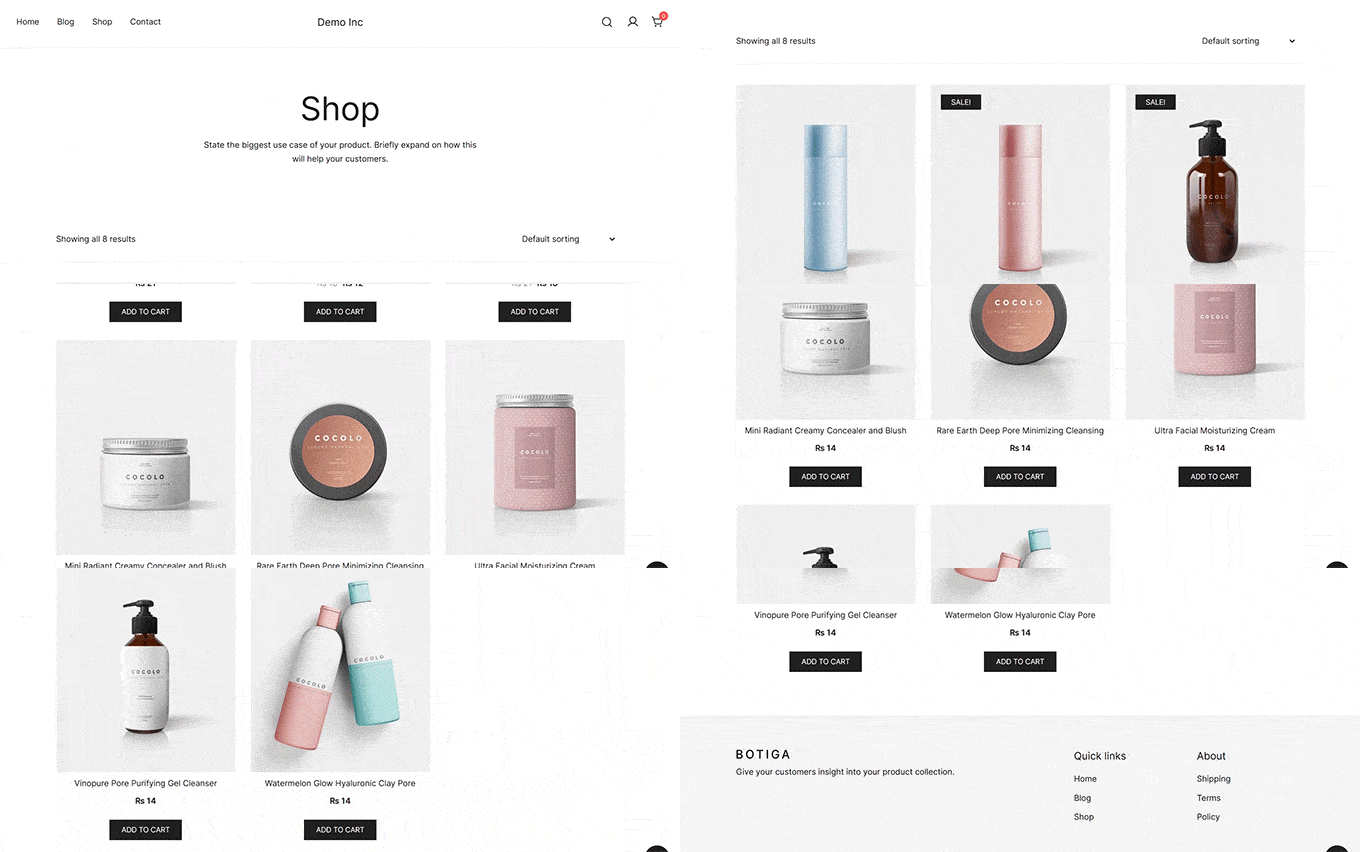
We recommend the free Botiga theme, which is built specific to WooCommerce stores. It comes with professionally designed starter sites, so you can import a full store layout instead of building each page yourself.
Install and activate Botiga by navigating to Appearance » Themes. After activation, click the ‘Let’s Get Started’ button, enter your website name, and select a starter site.
We used the Beauty starter site, which is the one included with the free theme.
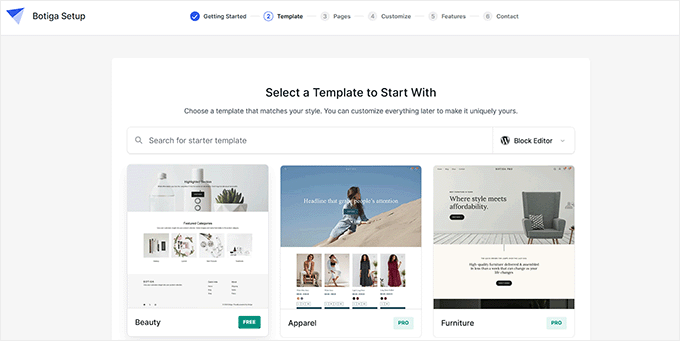
Before importing, you can select which pages to include, customize your colors and typography, and enable any recommended features.
Once the import is complete, replace the demo content with your own logo, images, and branding. You should also update your homepage to feature your best-selling or newest products.
Review everything before publishing to make sure your store’s design reflects your brand.
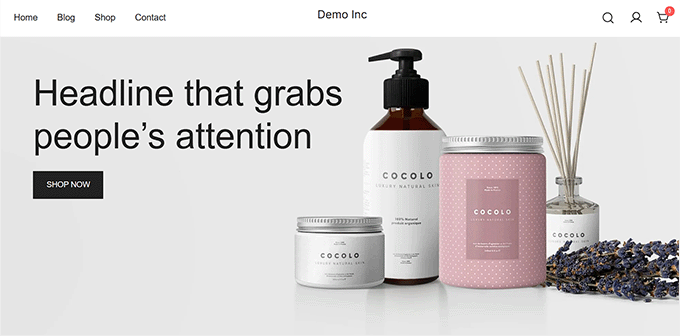
Finally, preview your store on a phone and tablet to confirm that your homepage, product pages, and checkout look great on every screen.
Step 4. Add Your Products
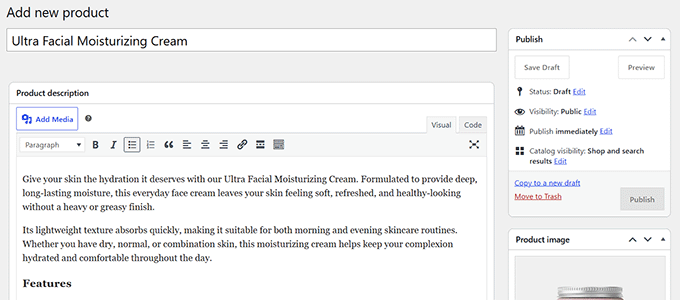
Once you’ve set up a WordPress theme and customized its appearance, it’s time to add products to your store. Simply go to Products » Add New Product in your WordPress dashboard.
Start by adding a clear product title and description that tell shoppers what you’re selling and why they should buy it.
AI can give you a head start by writing product titles and descriptions. But don’t publish the AI-generated text as-is. Review it carefully, add specific details about your product, and highlight the features that matter most to your customers.
This makes your product pages more useful and can also help them get discovered in search engines and AI search.
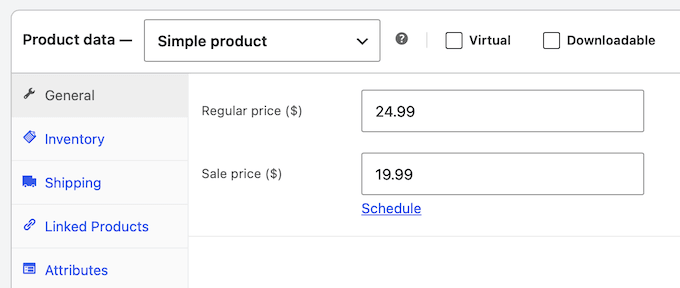
Next, choose your ‘Product Type’ by scrolling down to the Product Data section.
Most stores should use ‘Simple Product,’ while ‘Variable Product’ is best for items with different sizes, colors, or other options. Then, enter your product price.
If you want WooCommerce to track inventory automatically, enable ‘Stock Management’ and enter your stock quantity.
Adding an SKU is optional but recommended, since it makes it easier to track individual products in your orders and inventory reports.
Finally, upload a high-quality product image and any additional gallery images. Then, assign your product to one or more categories to keep your store organized. You can also use AI to generate descriptive alt text for your product images.
When you’re finished, click ‘Publish.’ Then repeat these steps for the rest of your products.
Step 5. Set Up Checkout
Before customers can place an order, you need to configure a few important checkout settings. This includes choosing how customers will pay, setting up taxes, and deciding how you’ll handle shipping.
Accept Payments
To get paid for your products, go to WooCommerce » Settings » Payments and enable the payment methods you want to offer.
WooPayments is the easiest option because it’s WooCommerce’s own payment solution and takes credit and debit cards without sending customers to another site.
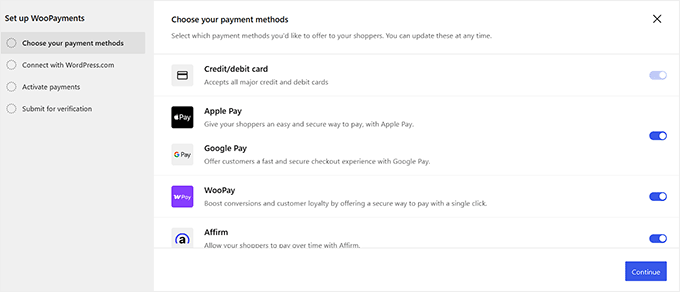
If it isn’t available in your country, then you can connect another gateway like Stripe or PayPal. You’ll need to sign in to your payment provider’s account during setup, or create one if you don’t already have it.
Configure Taxes
WooCommerce hides its tax settings until you turn them on, so go to WooCommerce » Settings » General, scroll down to the ‘Enable taxes’ option, and check the box.
Save your changes, and the Tax tab will appear.
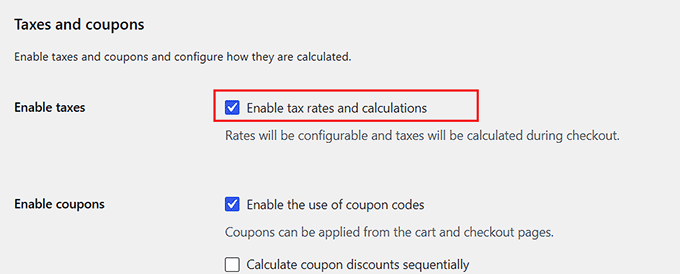
Open that tab to choose how WooCommerce calculates and displays tax at checkout.
You can select if your product prices include tax, how WooCommerce calculates tax at checkout, and whether your store displays prices with or without tax.
For most beginners, we recommend using the free WooCommerce Tax extension, which automatically calculates tax based on your customer’s location.
Please note that this extension requires you to connect a free WordPress.com account to calculate real-time rates.
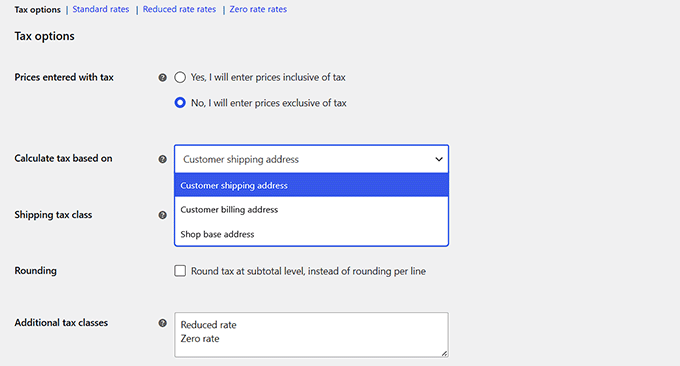
Before launching your store, make sure your tax settings comply with your local regulations. You can also see our tutorial on collecting taxes for Stripe payments to learn more.
Set Up Shipping
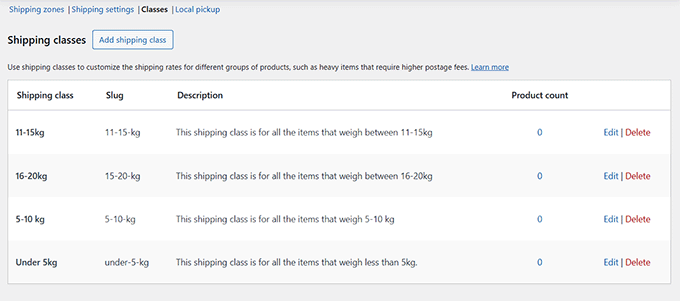
With your tax settings saved, switch to the Shipping tab and create shipping zones for the locations you deliver to.
Then, choose the shipping methods you want to offer, such as Free Shipping, Flat Rate, or Local Pickup.
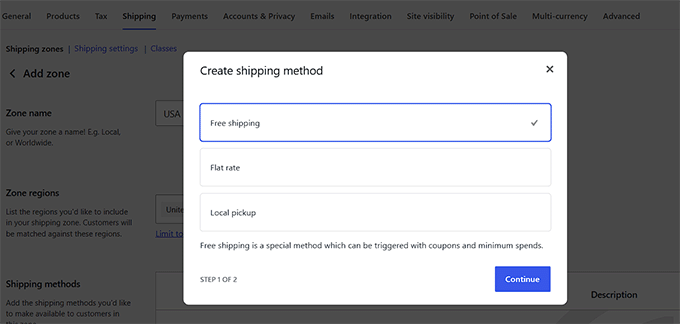
If your shipping costs vary based on the order, you can also create shipping rules. For example, you can charge different rates based on the order weight, destination, or cart total.
If you plan to use weight-based or carrier-calculated shipping, then make sure you’ve added your products’ weights and dimensions.
For step-by-step instructions, see our guide on setting up weight-based shipping in WooCommerce.
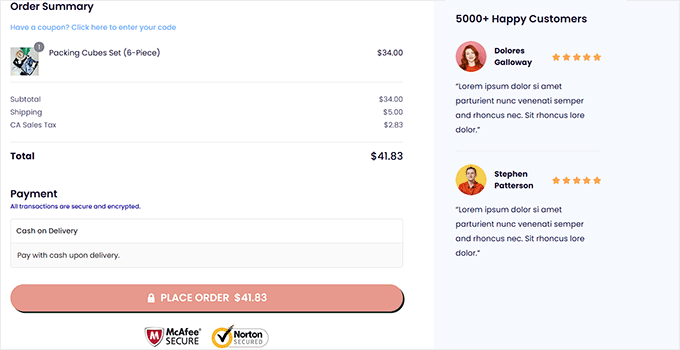
Once everything is configured, turn on your payment gateway’s test mode and place a test order yourself. Add a product to the cart, go through checkout, and confirm the order appears under WooCommerce » Orders.
This is where you’ll catch a shipping zone that doesn’t cover a customer’s address, or a tax rate that never applied.
Increase Sales with Checkout Optimization (Optional)
Getting customers to checkout is only half the job. A few checkout optimizations can help you close more sales and increase the value of each order.
- Show upsells and cross-sells to recommend related or premium products. WooCommerce includes these features by default.
- Offer one-page checkout so customers can complete their purchase on a single page.
- Add order bumps to encourage shoppers to include complementary products before placing their order.
- Enable express checkout with payment methods like Apple Pay and Google Pay for a faster checkout experience.
You can set up these checkout optimizations separately, but that often means using multiple plugins. If you want everything in one place, FunnelKit lets you create a custom checkout with features like order bumps, one-click upsells, and express checkout built in. To learn more, see our guide on creating a faster WooCommerce checkout.
Step 6. Prepare Your Store for Launch
Your store is almost ready to launch. Before you open the doors, run through these final checks to make sure everything works smoothly for your customers.
Optimize Your Store for SEO and AI Search
To help shoppers find your products through search engines and AI tools, you’ll want to make sure your store is properly optimized for search.
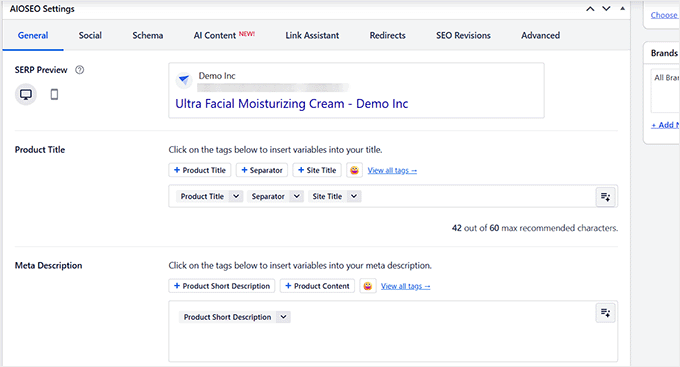
We recommend the All in One SEO plugin because it makes WooCommerce SEO much easier. It helps you optimize SEO titles and meta descriptions and generate product schema as well.
For a complete walkthrough, see our WooCommerce SEO guide.
Speed Up and Protect Your Store
A fast store gives shoppers a better experience and can also help your search rankings. Start by compressing your product images and enabling caching to reduce page load times.
You can also use Cloudflare to improve your store’s speed and add an extra layer of security.
Finally, protect your hard work with automatic backups. If something goes wrong, you’ll be able to quickly restore your store and get back up and running.
For more tips, see our tutorial on speeding up WooCommerce.
Build Customer Trust
Before launching, make sure your store includes important trust signals such as product reviews, a contact page, and clear shipping, return, and refund policies.
You can also display trust badges, such as Secure Checkout, SSL Secured, or Satisfaction Guaranteed, to reassure customers that your store is safe and reliable.
Track Your Store’s Performance
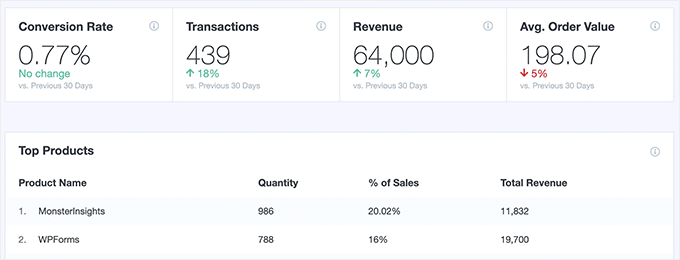
Set up tracking now, so that from day one you can see how customers find your products, what they buy, and where they leave the checkout process.
Google Analytics gives you these insights so you can improve your store over time. If setting it up sounds overwhelming, then we recommend the free MonsterInsights plugin.
It helps you set up the basic Google Analytics tracking for you. You can upgrade to the paid plan to unlock advanced eCommerce tracking features.
To set it up, take a look at our guide on WooCommerce conversion tracking.
Step 7. Get Your First Customers
Launching your store is just the beginning. You’ll also need to get it in front of the right people. Here are four simple ways to attract your first customers.
- Build an email list so you have a direct way to reach people who are interested in your products. Add an email signup form to your store and offer a reason to subscribe, such as a first-order discount or early access to new products.
- Promote your store on social media by sharing new products, customer stories, tutorials, and short videos. You can also add your store to Facebook so shoppers can buy directly from your posts.
- Create a launch offer with a limited-time discount, free shipping, or a free gift. WooCommerce’s built-in coupon feature makes it easy to run your first promotion.
- Publish helpful content such as buying guides, tutorials, FAQs, and product comparisons. This can bring long-term traffic from search engines and AI search while helping shoppers make informed buying decisions.
FAQs About Starting an Online Store
Can I start an online store for free?
Some eCommerce platforms offer limited free trials so you can get started without paying, but you’ll eventually need to sign up for a paid subscription once the trial period ends.
WooCommerce itself is completely free open-source software, but you’ll still need a domain name and a web hosting plan to get your store online, which do carry small upfront costs.
How much does it cost to start an online store?
The cost of starting an online store depends on your plan and budget. By using our exclusive link, you can launch your shop with Bluehost for just $2.99 per month while relying on free plugins and themes to keep your initial setup costs extra low.
We always recommend starting small and spending more on premium tools only as your business grows.
Can I create an online store without shipping products?
Yes. For example, you can use specialized dropshipping plugins to handle inventory, build an Amazon affiliate store to earn referral commissions, or run an online marketplace where other sellers handle their own order fulfillment.
Do I need to know how to code to run a WooCommerce store?
No. Everything in this guide, from initial setup to site design and payment processing, is done entirely through easy point-and-click settings and friendly plugins, so you never need to write a single line of code.
Video Tutorial
If you would rather watch than read, our video tutorial shows how to start an online store from beginning to end:
We hope this guide helped you learn how to start an online store. You may also want to see our actionable tips to drive traffic to your new store or our eCommerce launch checklist.
If you liked this article, then please subscribe to our YouTube Channel for WordPress video tutorials. You can also find us on Twitter and Facebook.


prab
Love your whole website, so helpful.
so we can set up a woo ecommerce shop on our blog ,like a seperate section?
WPBeginner Support
If you want to you can certainly have the store only be a part of your site
Admin
mohadese esmaeeli
I am still in the process of configuring and setting up my store. I appreciate this excellent article. The solutions mentioned were truly helpful for me. I learned a few new tips that I was not aware of before. The tutorial on payment settings was particularly practical.
WPBeginner Support
Glad our guide was helpful
Admin
Peter Iriogbe
I used to be nervous about starting an online store, but this article gave me the confidence with its clear steps. Thanks a bunch for the guidance!
WPBeginner Support
You’re welcome
Admin
THANKGOD JONATHAN
While cash on delivery and bank transfer are some of the most convenient payment methods.
However, I some countries PayPal is not fully available for making all business transactions. So, does woocommerce also provide other card payment methods?
WPBeginner Support
WooCommerce does have other payment methods available.
Admin
Dennis Muthomi
quick question….Since cryptocurrencies are popular, especially in certain regions, it would be really helpful if WooCommerce could natively accept payments in crypto like Bitcoin, Ethereum, etc.
While there may not be an official integration yet, are there any recommended third-party plugins that can enable crypto payments seamlessly on a WooCommerce store?
WPBeginner Comments
We happen to have a guide on setting up Bitcoin payments here: https://www.wpbeginner.com/plugins/how-to-accept-bitcoin-payments-in-wordpress/
Fajri
Good article, I followed the steps above to create my online store using WooCommerce, but, I’ve found in my country Stripe is not supported, so, I will set up my store with PayPal, I am still confused about setting it
Unarine Leo Netshifhefhe
Thanks for this article, does stripe cover for African countries? Does it intergrate with local banks which are around Africa? I want to have an option of Paypal and also a third party payment gateway that will work for me, I once tried payfast but i struggled with the setup
WPBeginner Support
You would want to reach out to Stripe for their current coverage and integration for this.
Admin
Lara Carter
Can I just say thank you so much to the creator of this website because I have looked at a number of articles on this website and they are all so well explained and fluently written. My young enterprise book has been looking into creating a store for our product and none of us had any idea how to go about it. I was recommended this website at a careers fair and have been reading the articles and have found that they are so well written and easy to understand. Usually, I am completely lost when it comes to understanding things like this but this webpage was so helpful and I just wanted to say thank you so much for whoever created this resource and it helpful so useful and amazing.
WPBeginner Support
Glad to hear you’ve found our guides helpful
Admin
Enricka Julien
I found this blog post on starting an online store in 2023, incredibly insightful and informative. The author’s step-by-step guide and up-to-date tips provide a solid foundation for anyone looking to venture into e-commerce. The video tutorial, along with practical advice, makes it a valuable resource for both beginners and experienced online store owners. I appreciate the effort put into creating this helpful resource, and I’ll definitely be referring back to it as I explore the world of online entrepreneurship. Thanks, WPBeginner!
WPBeginner Support
You’re welcome, glad you found our article helpful
Admin
Tessa
Loved this thorough info, thank you! The video touched on the fact that there is the account login button next to the shopping cart, but I’m not sure the best way to get that set up – do you have a tutorial on setting up customer account login?
WPBeginner Support
For the moment, the closest recommendation we would have is our article below!
https://www.wpbeginner.com/wp-tutorials/how-to-create-a-custom-woocommerce-customer-login-page/
Admin
ROB S.
Is it possible to build, populate, test. etc an ecommerce site offline and only buy the domain and pay for hosting once you have everything just as you want it.
if so, how?
As of right now i have maybe 20 minutes to an hour free a few times a week i’d like to spend making an ecommerce site but i also need to to make my product and take photo’s that will eventually be on my site. i’d rather not pay for hosting for months and months as i’m getting everything else done while the site remains invisible or unpublished.
WPBeginner Support
For what you’re wanting, we would recommend taking a look at our article below on creating a local install:
https://www.wpbeginner.com/wp-tutorials/how-to-install-wordpress-on-your-windows-computer-using-wamp/
Admin
Jav
Hi,
I was just wondering on where will I be able to enable the brands section in the product list.
I can’t seem to find it, do you have any suggestions on how to?
WPBeginner Support
Most would use a category or a custom taxonomy for what you are wanting.
Admin
Isabelle Roger
Hello,
Thank you for this article. It is very helpful. One thing I’m trying to do is make a checklist of all the pages and elements and features that a great ecommerce site should have (customer service page, package tracking, etc). You know, everything that makes an e-commerce site look very professional. Do you know if there is a comprehensive guide or checklist?
WPBeginner Support
We do not have a specific checklist for that at the moment as each site has its own needs and wants.
Admin
Ahmed
Thank you for the useful information,
I have a question, can I cancel the payment in the sense that the payment is through another famous site such as Amazon, but I only want to add to the basket, I hope you understand me
Francis
Great instructions above!!!! My client is from the Philippines, they don’t want to add a payment option/gateway but instead an order details (list of products ordered with price, quantity, color etc) will be sent to my client’s email to get the summary of a buyers order. Thank you
Abdou
Thank you, but I have a question first. When providing basic information about my store, my address, region and country. Do you mean my address and my real country or a target audience?
WPBeginner Support
Your store information would be for your store’s information and not your target audience.
Admin
Jacy P.
Thanks for walking me through the process of setting up an online store. You made it so easy for me.
God bless you.
Brenda
Hi there,
Thanks for a really informative site that I turn to to solve my WP issues. I have one now about this topic. I’ve read through the other questions that I can add a store to an existing WP site. Can I add the store link as a new menu item? I’m not a Macy’s as I’m just starting out?
WPBeginner Support
Yes, you can and probably should use a menu item to link to the store on your site
Admin
Anu
Hi ,
Can i have the word press for blogging and store separately and give different names to both .as the purpose i want to use both is different
WPBeginner Support
If you mean a different domain, while it is possible, it would normally be simpler to have two different sites for that.
Admin
Susana
Hi, I have set up my domain name, web hosting and SSl certificate with Bluehost but when I login into WP it I can’t find the woocommerce to set up my WP website
WPBeginner Support
You may need to add the plugin under Plugins>Add New if it is not included.
Admin
Mide Olu
Thanks for the good job. It’s been very helpful. Can a site hold more than one store?
WPBeginner Support
It would depend on your goal as the store can hold as much content as you like. If you want multiple users selling on your site then you would want to take a look at our guide below:
https://www.wpbeginner.com/wp-tutorials/how-to-create-an-online-marketplace-using-wordpress/
Admin
Tamara Ilic
wish i found this before i tried to set it up on my own!!!
Great tips, thanks for sharing.
WPBeginner Support
Glad you found our guide helpful
Admin
Will
Hello,
Is this promotion still active? When I follow the link you provided, it just goes to bluehost. There is no option for 3.95.
WPBeginner Support
BlueHost may have updated their pricing since the last update to this article.
Admin
Allen
Hi, I am at that step where I’m supposed t change HTTP to HTTPS, but it shows a temporary address for my WordPress address.
what do i do ?
should i change this to HTTPS ?
WPBeginner Support
You would want to change your domain to the correct domain before activating HTTPS, if you reach out to your host they can help with updating your domain
Admin
Stuart Mc Donald
I want to start an online store , I have a wordpress site. I do not want to bring the products to my place and send them to the customer, your article does not have suppliers. Once I find a supplier could I send it to the customer from the supplier ?
WPBeginner Support
For what it sounds like you’re wanting, you would want to take a look at dropshipping which we cover in the article below:
https://www.wpbeginner.com/beginners-guide/ultimate-dropshipping-guide-for-wordpress/
Admin
George E Murphy
My dilemma is that we already have a domain. Do we need to create a separate domain (website address) to do this? We have some items that we want to offer those who browse our website. The store would not be the whole website. Only a part (page) of the site. I presume I can still use the blueprint you offered. Look forward to your response.
WPBeginner Support
Yes, you can use this as part of a site instead of the entire site if you are wanting.
Admin
ABBEY MICHAEL
I wanna say a big thank to you. Your tutorial are awesome. Even a beginner can never get lost trying to follow the steps.
WPBeginner Support
Glad you found our guide helpful
Admin
Jhon Pace
Great article. As I am beginner it will helps me to start an online store. Thanks for this valuable article.
WPBeginner Support
Glad you found our guide helpful
Admin
Yoshiko
I am helping set up my friend who wants to sell products on this site. It does not seem like when he purchased a web hosting account, he did not get the hosting and Woocommerse bandle, but can I add Woocommerse plug in now and follow your direction from there?
WPBeginner Support
It would depend on the specific hosting but normally you should be able to add WooCommerce to different hosting even if it is not specifically a WooCommerce plan after which you can follow our guide.
Admin
Olanrewaju K Olaakande
Can WooCommerce be used for an ‘affiliate marketing” site?
WPBeginner Support
Yes, it would depend on how you’re wanting to use it for how to set that up.
Admin
Willem Rudolf Nel
On Wordpress I am only allowed a free website but it will have the wordpress extension in it unless I purchase a plan through wordpress as well?
WPBeginner Support
That would be a WordPress.com site, our tutorials are for WordPress.org and you can take a look at the comparison in our article below:
https://www.wpbeginner.com/beginners-guide/self-hosted-wordpress-org-vs-free-wordpress-com-infograph/
Admin
Carol
Can Woo Commerce be added to an existing WP site?
WPBeginner Support
Yes, it can
Admin
Olu David
Yes, of course.
You can get the WooCommerce, down the WordPress dashboard.
mahmoud
thanks.
great informations.
WPBeginner Support
You’re welcome
Admin
ali
I couldn’t find anymore clear instructions than what you have described. Great job!!
WPBeginner Support
Thank you
Admin
Julien
Hi, I’ve followed the steps until setting up HTTPS to use SSL. I’ve changed it from http to https, now I can’t open the my wordpress. it loads as 404 NOT FOUND. I can’t access Wordpress for my site anymore. How do I fix this?
WPBeginner Support
More than likely there may be an issue with your SSL certificate. If you reach out to your hosting provider they should be able to assist.
Admin
Samer Naseeb
good tutorial, thank you
WPBeginner Support
You’re welcome
Admin
Dan
This is very informative along with the other tutorials I was reading from your page. It’s simplified, easy to comprehend and I wasn’t confused with technical jargon that would’ve have stirred me away to keep searching. Much appreciation for your time and effort to provide such resources so that others may learn and hopefully prosper from.
WPBeginner Support
Glad you found our guide helpful
Admin
Suhas
Nice information for beginner
WPBeginner Support
Thank you
Admin
Syndee
Hi! Your article and videos have been so helpful! I purchased a hosting package through Bluehost that preinstalled WordPress and WooCommerce. I notice in this article you install WooCommerce later after setting the site up. If I follow your instructions will it cause issues since WooCommerce is already installed? One thing that’s confusing is that there are pages already set up for WooCommerce that don’t match the theme that I chose. So things aren’t matching when previewing my shop and website pages.
WPBeginner Support
No, it will not cause an issue.
Admin
Oringanje Philip chinedu
I want to start online business
WPBeginner Support
This article should help you do that
Admin
Bernice
I like this video don’t forget to subsribe
WPBeginner Support
Glad you liked our video
Admin
Nick
I cannot see the widgets live in my Sidebar what do I need to do?
WPBeginner Support
You would want to start by clearing all caching, we have an article on this below:
https://www.wpbeginner.com/beginners-guide/how-to-clear-your-cache-in-wordpress/
Admin
Aman
Hi there, will WooCommerce be idea/suitable for selling tickets/making bookings for online events/classes/courses etc?
WPBeginner Support
For booking plugins, we would recommend taking a look at our article below:
https://www.wpbeginner.com/plugins/5-best-wordpress-appointment-and-booking-plugins/
Admin
Solomon Etefia
Incredible, it’s really a step by step tutorial, very helpful thanks
WPBeginner Support
You’re welcome
Admin
Jean
Can I use the same information, the same way it’s being described for an online dropshipping business?
Because on dropshipping you don’t have the items you sell for a third party and get your commistion.
How does that work if I have to use this website?
WPBeginner Support
For learning dropshipping you would want to take a look at our guide on dropshipping below:
https://www.wpbeginner.com/beginners-guide/ultimate-dropshipping-guide-for-wordpress/
Admin
Florence
You guys are doing great job am bless to have you by my side thanks
WPBeginner Support
Glad we can be helpful and thank you for your kind words
Admin
Adam Ray
Thanks for sharing the great blog. This is very informative for my shop online. thanks.
WPBeginner Support
You’re welcome, glad our guide could be helpful
Admin
Lal Muhammad
Wpbegginer is really good and amazing site to learn a lot for begginers……..we support and appreciate you….
WPBeginner Support
Thank you, glad you like our content
Admin
Chandra
Great article!! Very useful for beginners
WPBeginner Support
Thank you, glad you found our article helpful
Admin
Dawn Groves
Folks, when I posted this article link in linkedin, the caption for the image was “How to start an online store in 2019” You might want to update that.
WPBeginner Support
Thank you for letting us know
Admin
Leah
I would like to set up my art gallery with just a Buy it Now button from PayPal. Is this possible or do I have to use WooCommerce?
WPBeginner Support
For single items you could do that, WooCommerce gives you more tools for showing and tracking purchases on your site.
Admin