Even after running a WordPress website for over a decade, we’ve encountered situations where unpublishing a page was necessary. It’s a simple task, but one with several methods, each suited to different needs.
Whether you’re updating content, making major edits, or temporarily hiding information, knowing how to unpublish a page is an essential skill for any WordPress user.
In this article, we’ll share four simple ways to unpublish a WordPress page. From quick individual changes to bulk updates, we’ll cover methods that work for various situations.
When to Unpublish Pages in WordPress
When you are building a WordPress website, you publish pages so that visitors can see them. However, there may be times when you want to unpublish a page so it’s no longer visible to the people who visit your website.
For example, maybe you want to take your WordPress blog in a new direction. You may have even accidentally published a draft and need to unpublish it.
Over time, a post may also become outdated or no longer relevant. Many website owners archive old posts or add an old post notification to the page header. However, if you plan to update the post in the future, then it’s a good idea to unpublish it instead.
That way, it remains in the WordPress admin dashboard as a draft that you can edit.
With that said, let’s take a look at a few different ways you can unpublish a page on your WordPress website. Simply use the quick links below to jump to the method you want to use:
Video Tutorial
If you’d prefer written instructions, then just keep reading.
Method 1: Unpublishing a Single WordPress Page (Quick and Easy)
Unpublishing a page or post removes it from your public WordPress content while still leaving you the option to edit the page and republish it later.
The easiest method is to simply switch the page to a draft. Visitors won’t be able to see the page, but it’ll still appear as a draft in the WordPress dashboard. If you’ve noticed errors on the page or want to improve the content, then this is a great option.
To turn a published page into a draft, go to Pages » All Pages. Here, hover over the page and then click the ‘Edit’ link when it appears.
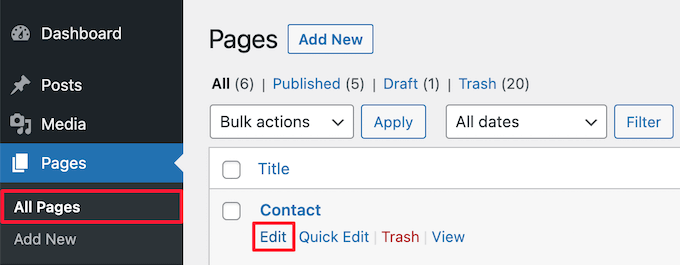
This will bring you to the page editor screen.
Here, click the ‘Switch to draft’ button at the top of the page.
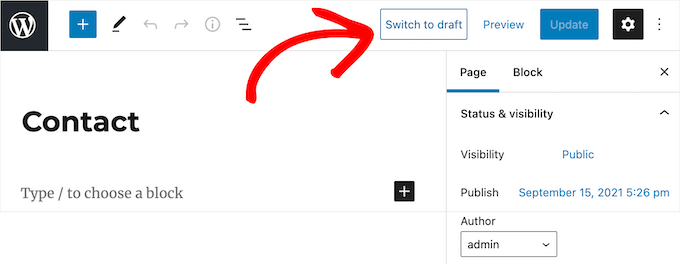
This brings up a popup asking whether you are sure you want to unpublish the post. Removing a live post from your site can cause broken links and may affect your WordPress SEO, so you’ll want to think about this carefully.
If the page you are unpublishing ranks in the search engines and is bringing visitors to your site, then we recommend redirecting the URL to another relevant page so you don’t lose SEO rankings.
For more details, see our beginner’s guide to creating 301 redirects in WordPress.
If you are happy to unpublish the post, then go ahead and click on the ‘OK’ button.

This will turn the live post into a draft.
If you no longer need the page at all, then you may want to delete it. This is similar to sending that page to the recycle bin on your computer.
To do this, click the ‘Move to trash’ button in the right-hand menu, and WordPress will send that page to the trash.
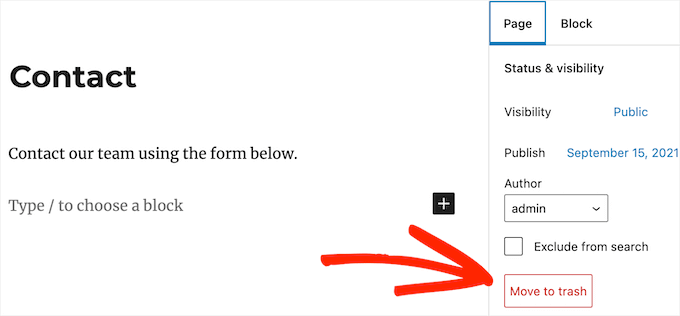
By default, WordPress automatically deletes anything in the trash after 30 days, so you still have time to change your mind.
To recover a page, simply go to Pages » All Pages and then click on the ‘Trash’ link.
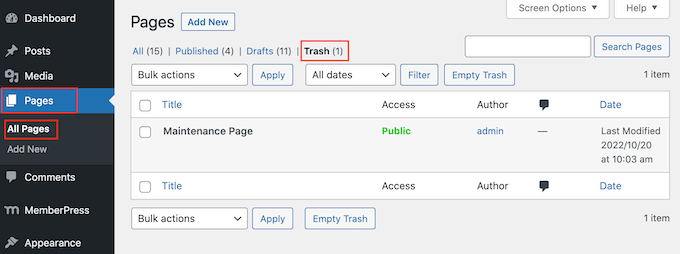
To restore a page, simply click on its ‘Restore’ link.
Method 2: Unpublishing Multiple WordPress Pages With the Bulk Tool
If you are redesigning or moving a website to a new domain, then you might have lots of pages you no longer need.
Instead of unpublishing each page individually, you can unpublish or delete them all at once. To do this, simply go to Pages » All Pages and check the box next to all the pages you want to unpublish.
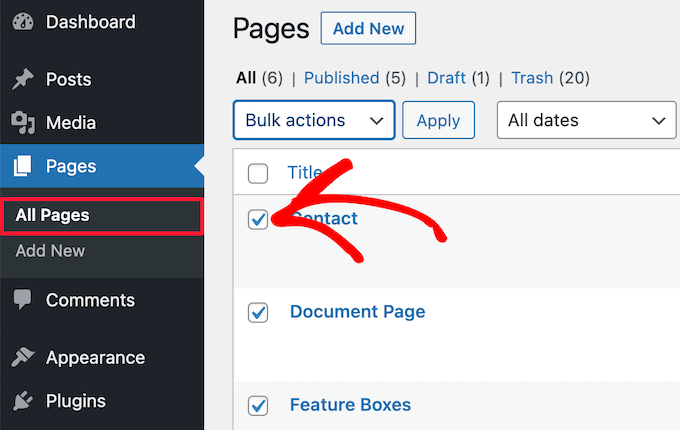
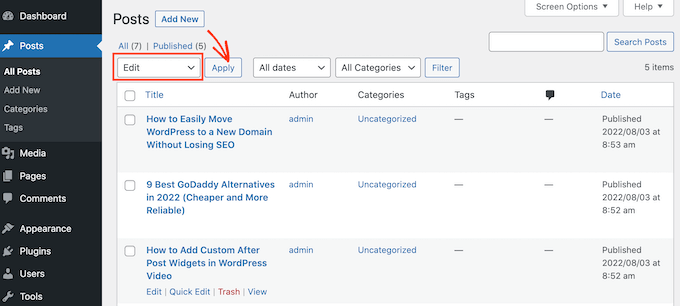
Next, click the ‘Bulk actions’ dropdown and select ‘Edit’ in the dropdown menu.
Then, click on ‘Apply’.
Besides bulk unpublishing, you can also add posts and pages or move posts to categories and tags in bulk.
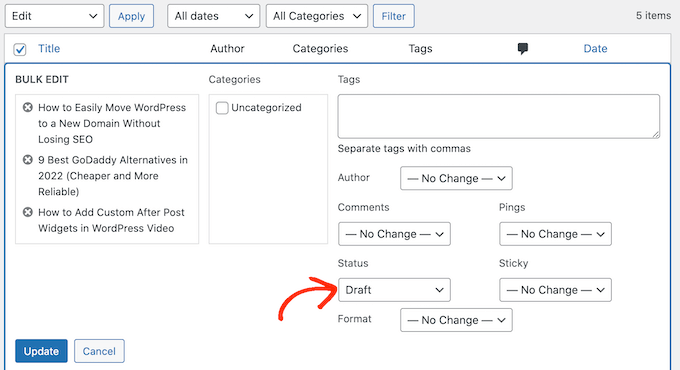
You can now use the settings to edit all the selected posts. For example, you can turn them all into sticky posts or change the author if you are running a multi-author blog.
To turn multiple live pages into drafts, open the ‘Status’ dropdown and select the ‘Draft’ option. Then, click on the ‘Update’ button.
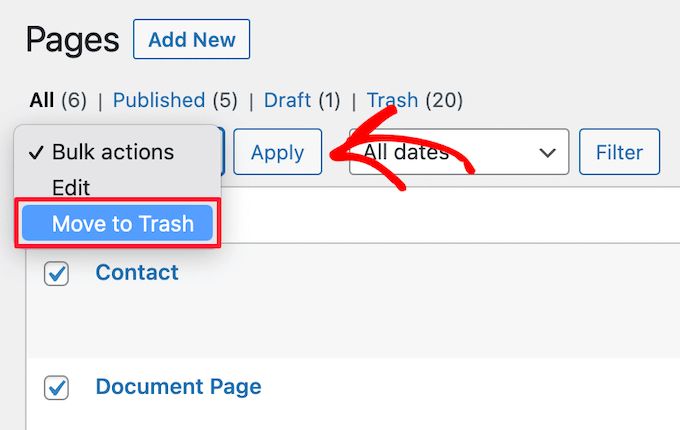
If you prefer, then you can move multiple pages to the trash by opening the ‘Bulk options’ dropdown and selecting ‘Move to Trash.’
Then, simply click on ‘Apply’.
Method 3: Making a WordPress Page Private or Password Protected
Password-protecting a page allows you to keep certain areas of your WordPress blog private.
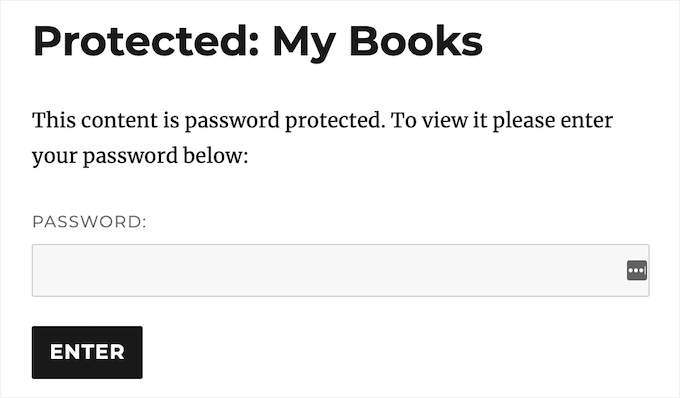
This can be helpful if you want to create a separate area of your website for co-workers or members or for building a client portal in WordPress.
It can also be useful if you want to restrict access to a site while you are working on it so that only approved testers, clients, or co-workers can visit the site.
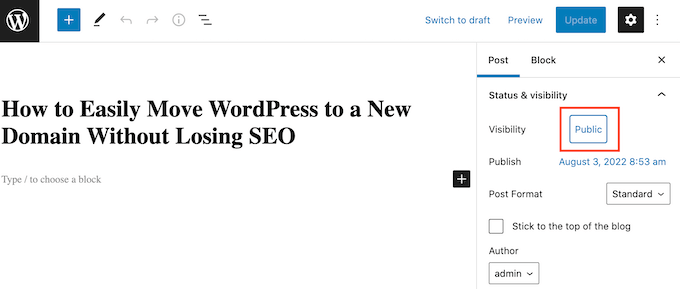
First, you need to open the page that you want to password-protect. Then, click on the ‘Public’ button next to ‘Visibility.’
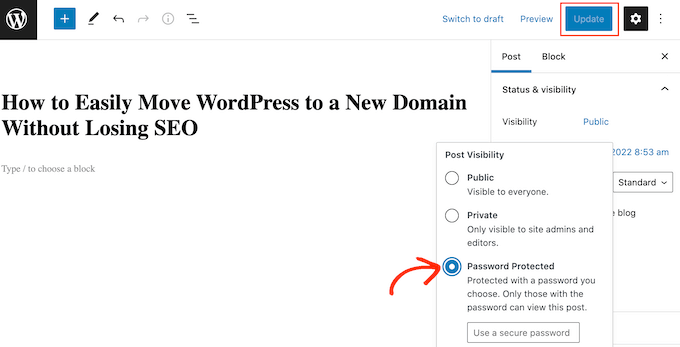
After that, select the ‘Password Protected’ button and type a password into the ‘Use a secure password’ field. Anyone with the password will be able to view this content, so you should choose a secure password with letters, numbers, and symbols.
With that done, click the ‘Update’ button to save your changes.
Now, WordPress will ask visitors for a password before showing them this page.
Another option is to make the page private so it’s only visible to logged-in users with the Editor or Administrator user role in WordPress.
To do this, click on the ‘Public’ button next to ‘Visibility’, but this time, select ‘Private.’
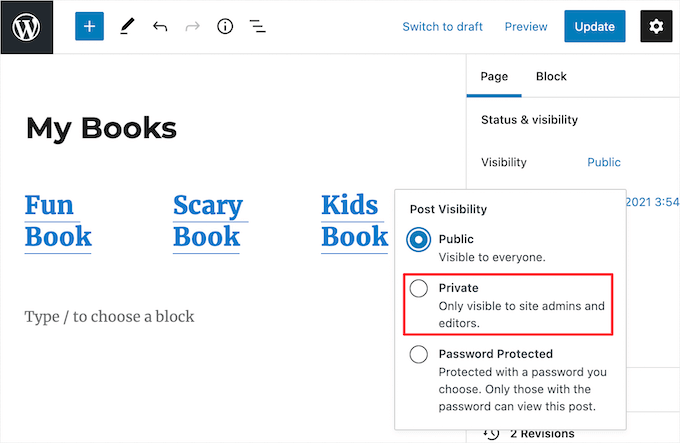
A popup will ask whether you want to make the page private.
Simply go ahead and click the ‘OK’ button.

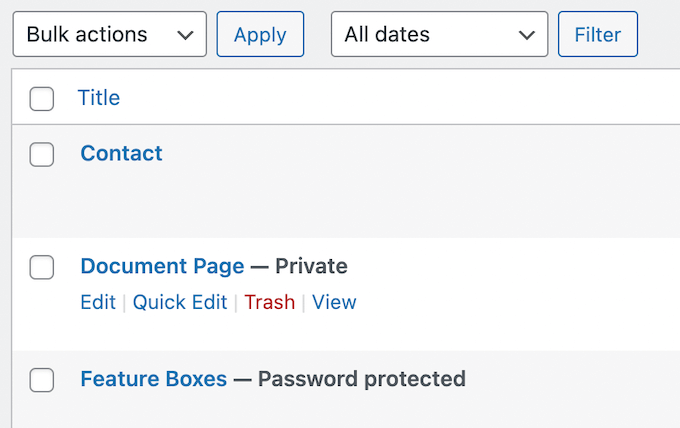
Now, if you go to Pages » All Pages, you can see all your published, draft, password-protected, and private pages at a glance.
The following image shows a published page, plus pages that are clearly marked as private and password-protected.
For more information about private WordPress content, check out these guides:
- How to Create a Private Post in WordPress
- How to Share Private Posts with User Groups in WordPress
- How to Change Private and Protected Posts Prefix in WordPress
Method 4: Making a WordPress Page Members-Only
If you have a membership site, then you can hide a page based on the user’s membership level. Visitors who aren’t members will need to sign up to see the page, so this can be a great way to collect email addresses and grow your email list.
You might even charge a fee for accessing your private, members-only content. In this way, you can make money online blogging with WordPress.
The best way to make a page members-only is with the MemberPress plugin.

It’s the best WordPress membership plugin and lets you create multiple subscriber levels, publish exclusive members-only content, and accept credit card payments on your WordPress website.
The plugin is very easy to use and even lets you sell online courses, premium downloads, drip content, and much more.
It also has powerful access control features that let you restrict access to specific WordPress pages with just a couple of clicks.
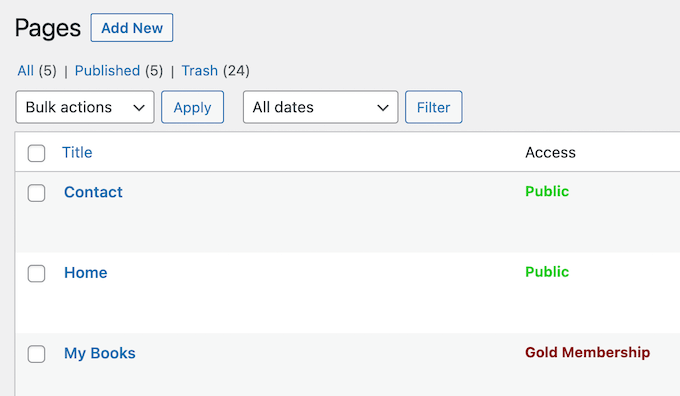
For more details on restricting access to specific pages, see our guide on how to create a paywall in WordPress.
Alternative: Put Your Entire WordPress Site Into Maintenance Mode
Do you need to temporarily fix your website? If so, it’s better to put your WordPress site into maintenance mode rather than unpublish the pages.
This way, you can let your visitors know that many pages on your site are not available right now, without having to unpublish them all.
The best way to put your WordPress site into maintenance mode is with SeedProd. This WordPress plugin lets you create a beautiful maintenance/coming soon page with its drag-and-drop page builder and 180+ templates.
Creating a custom maintenance page can improve user experience, as it informs visitors about the site’s status and expected return date. Plus, it can build trust in your brand by demonstrating active efforts to improve the site.
Alternatively, you can also enable maintenance mode on your WordPress web hosting service. For more details on this, check out our guide on how to make your WordPress blog completely private.
We hope this article helped you learn how to unpublish a WordPress page. You may also want to see our ultimate guide on WordPress post revisions and our list of the most important pages that every WordPress blog should have.
If you liked this article, then please subscribe to our YouTube Channel for WordPress video tutorials. You can also find us on Twitter and Facebook.


Moinuddin Waheed
initially I thought why would anyone want to unpublish a page or a post as anyone who makes a page or writes as blog posts mainly for publishing it and making it known to the world.
The main reason of un publishing a blog post or page and not deleting is to avoid broken links and search engine optimisation problem.
I used to trash earlier as I didn’t know the outcome.
WPBeginner Support
Glad we could at least share some of the why for you
Admin