Upon launching any new online store, we start to track conversions immediately. This unlocks valuable data that we use to optimize our campaigns and generate more money.
We have found that doing digital marketing without tracking conversions is like driving with our eyes closed. We simply can’t optimize what we don’t measure.
This principle holds true for TikTok advertising as well. Enter the TikTok Pixel.
The TikTok Pixel is a code snippet you need to add to your website when advertising with TikTok. It lets you see which ads and sponsored posts are hitting the mark and bringing in results.
In this guide, we will provide a clear, step-by-step tutorial on how to install the TikTok Pixel on your WordPress site. Get ready to see real results from your TikTok advertising.

Why Use the TikTok Ad Pixel in WordPress?
According to our latest marketing research, TikTok is one of the most popular social networks in the world, with over 1 billion monthly active users. This is why many online store owners and small business owners are using TikTok advertising to reach their audience.
TikTok ad pixel helps you maximize the ROI (return on investment) from your TikTok ads because it lets you track the effectiveness of your campaigns.
You can easily add the TikTok ad pixel on your WordPress website or WooCommerce store, so you can easily monitor user activity and ad sales and optimize your campaigns.
With that being said, let’s take a look at how to properly set up the TikTok ad pixel in WordPress.
Creating the TikTok Pixel Code
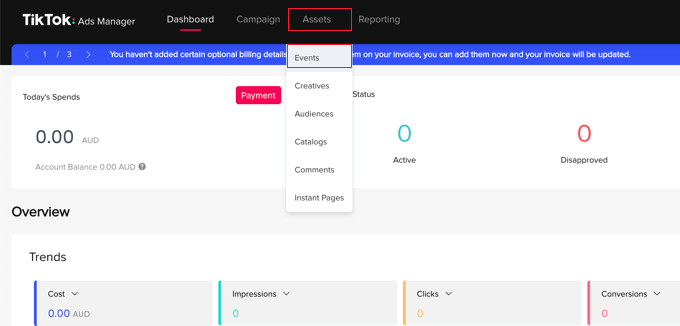
To get started, you need to go to the TikTok for Business website and sign into your account. After that, you should navigate to the Assets » Events page.
On the next page, you need to let TikTok know whether you will be sharing events that happen on your app or website.
You will be tracking events that happen on your website, so you need to click the ‘Manage’ button under ‘Web Events’.

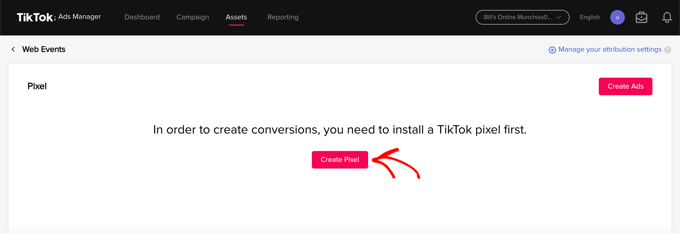
Next, you will see a message stating that you need to install a TikTok pixel.
Simply click the ‘Create Pixel’ button.
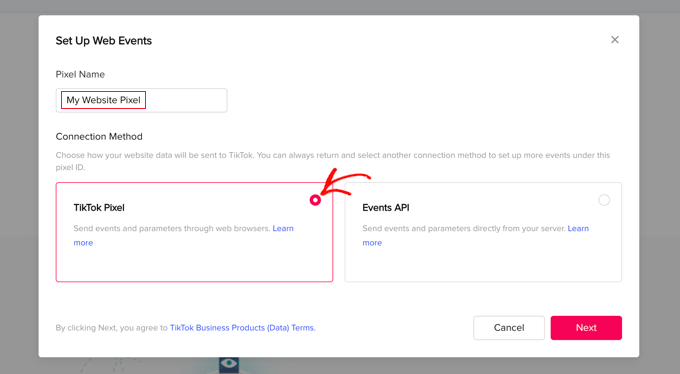
Now you should give the pixel a name, such as the name of your website.
After that, you need to select ‘TikTok Pixel’ as your connection method and then click the ‘Next’ button.
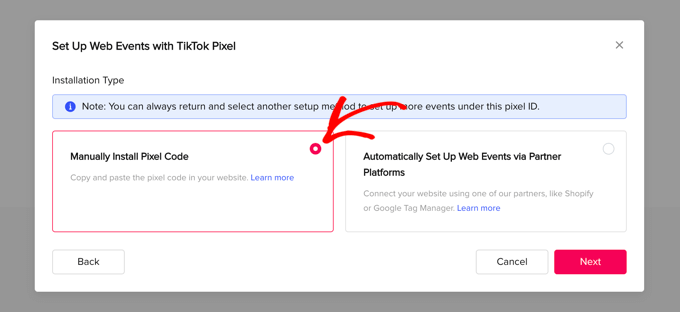
In the next step, you need to let TikTok know that you will install the pixel by copying the code to your website.
You should select the ‘Manually Install Pixel Code’ option and then click the ‘Next’ button.
You will now be able to see the pixel code.
You should copy it to the clipboard by clicking the ‘Copy Pixel Code’ button.
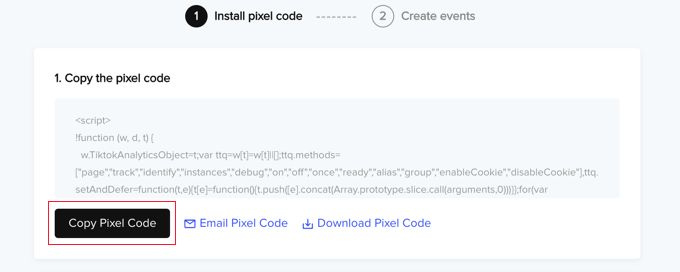
Now you can visit your website to set up the TikTok ad pixel in WordPress.
Adding the TikTok Pixel Code in WordPress
The easiest way to add the TikTok ad pixel code to your WordPress site is with WPCode, the most powerful code snippet plugin available for WordPress. It lets you easily add custom code to any area of your site, and best of all, it’s free.
First, you need to install and activate the free WPCode plugin. For more details, see our step-by-step guide on how to install a WordPress plugin.
Once activated, you need to go to Code Snippets » Headers & Footer.
Simply paste the TikTok pixel code you copied earlier into the ‘Header’ field and then click the ‘Save Changes’ button.
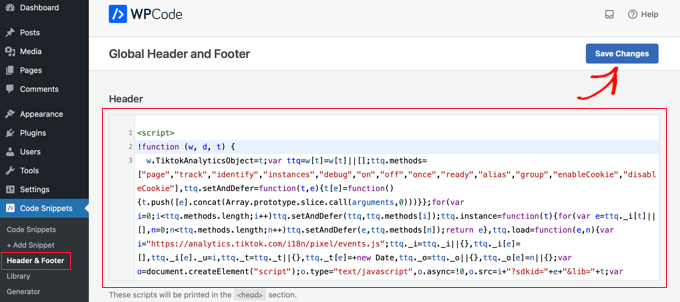
That’s it! The TikTok ad pixel has been added to your site.
Alternative: Adding the TikTok Pixel in WordPress with eCommerce Tracking
If you have an online store, you may want to upgrade to WPCode Pro to add the TikTok pixel with eCommerce tracking in WordPress.

WPCode Pro’s Conversion Pixels addon lets you easily add eCommerce tracking pixels for TikTok, Facebook, Google Ads, Snapchat, and Pinterest in just a few clicks.
It integrates with WooCommerce and Easy Digital Downloads so that you can track eCommerce events like product page view, add to cart, checkout page visit, and purchase.
This lets you see how your ads are performing so that you can improve your return on ad spend (ROAS) and increase conversions.
Simply go to Code Snippets » Conversion Pixels from your WordPress admin dashboard. Then, paste your ‘TikTok Pixel ID’ and the ‘Events API Access Token’ into the corresponding fields.
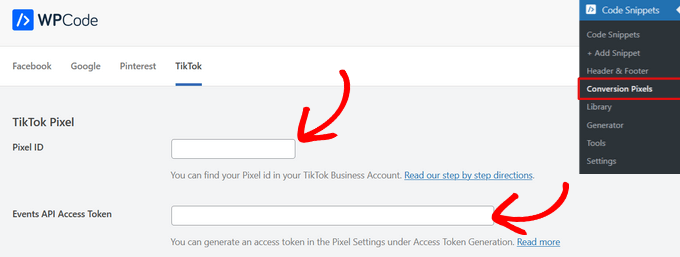
After that, you can scroll down the page to choose which events to track.
By default, all events tracking is enabled. But, if you want, you can toggle the switch to turn off event tracking for any of the options.
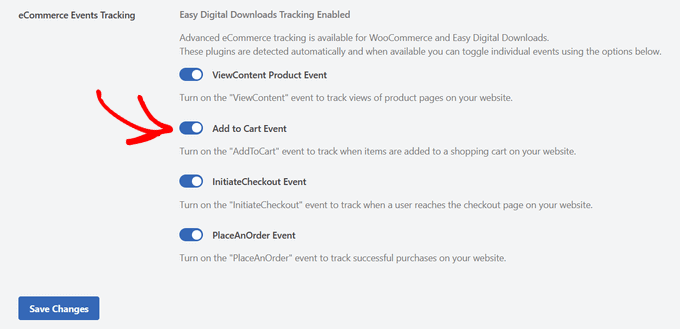
Once you click the ‘Save Changes’ button, you are ready to track eCommerce events for your TikTok campaigns.
Next, you will need to switch back to the TikTok website to create the events you wish to track.
Creating and Testing the Events You Wish to Track
When you return to the TikTok Ads Manager website, you will use the Event Builder to complete the setup. You should be looking at the ‘Create events to track actions’ page. There are two types of events you can track.
First, there are URL events. These will track each time someone visits a specific page on your site, such as a product page or order confirmation page.
Simply click the ‘+ Enter URL Keywords’ button and enter the event type and some keywords from the URL.
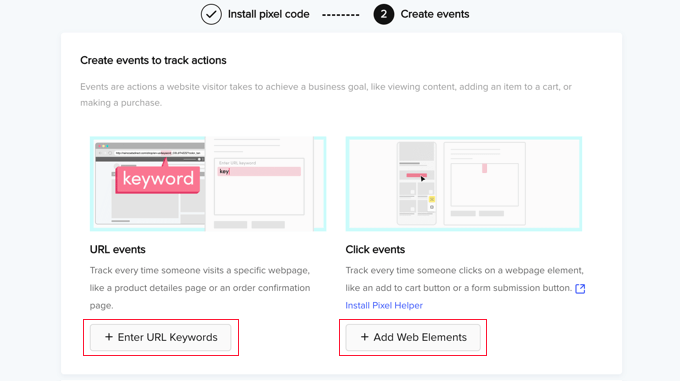
Second, there are click events. These events track when someone clicks a website element like an ‘add to cart’ button or a form submission button.
When you click the ‘+ Add Web Elements’ button, you will be prompted to install the ‘Pixel Helper’ Chrome extension. This extension will help you add click events, and it also tests to make sure your TikTok ad pixel is working correctly.
For detailed instructions on how to add both types of events, see the official TikTok Business Help Center documentation on how to create events.
Expert Guides on Advertising in WordPress
We hope this tutorial helped you learn how to properly set up the TikTok ad pixel in WordPress. You may also see some other guides related to advertising in WordPress:
- How to Add Facebook Pixel in WordPress (+ eCommerce Tracking)
- How to Create a Facebook Ads Landing Page in WordPress
- How to Properly Add Google AdSense to Your WordPress Site
- Highest Performing Google AdSense Banner Sizes & Formats for Your WordPress Site
- How to Add Amazon Ads to Your WordPress Site
- How to Manage Ads in WordPress with Adsanity Plugin
- How to Manage Ads in WordPress with AdRotate Plugin
- How to Increase Ad Impressions in WordPress with Ad Refresh
- Best WordPress Ad Management Plugins and Solutions
- How to Sell Ads on Your WordPress Blog (Step by Step)
If you liked this article, then please subscribe to our YouTube Channel for WordPress video tutorials. You can also find us on Twitter and Facebook.


Have a question or suggestion? Please leave a comment to start the discussion.