Creating a custom archives page in WordPress can significantly enhance your site’s navigation and content discoverability.
At WPBeginner, we’ve implemented our own custom archives page to help readers easily access our extensive collection of blog posts and tutorials.
A well-designed archives page can improve user experience, boost engagement, and even help with SEO by providing a clear site structure. It’s useful for content-rich sites, blogs, and online magazines where visitors might want to delve into specific topics.
In this article, we will show you how you can create a custom archives page in WordPress.
Why Create a Custom Archives Page in WordPress?
An archives page aims to display a chronological list of your past posts, making it easier for visitors to explore your content based on publication dates.
If you’re a blogger, having an archives page is a must. It provides a convenient way for users to access older posts without scrolling through the entire blog.
You may want to create a custom archives page if your current theme doesn’t have an archives page template in place. Even if it does, you may still want to customize it to your needs.
At WPBeginner, we use a custom archives page that features a button leading users to our WPBeginner Guide collection. This way, new readers can simply click on it to see our ultimate guide resources.
We also organize all our blog posts into years and months so that readers can easily see what articles are published in a certain period.
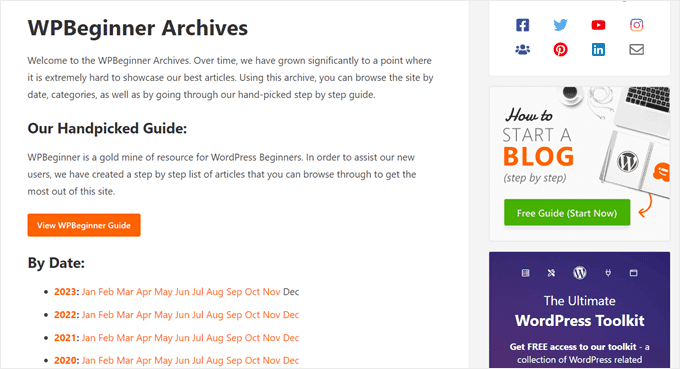
Here, we’ve also added our site’s categories and tags to the custom archive page.
In this way, visitors can easily find older posts that may interest them. If you do this for your own blog, you’ll have better chances of increasing your pageviews and reducing your bounce rate.

With that in mind, let’s look at how you can create a custom archives page in WordPress, no matter what theme you’re using.
Simply use the quick links below to jump straight to the method you want to use.
Method 1: Create a Custom Archives Template Using the Block Editor (No Plugin)
If you are using a block theme, then the full site editor makes it easy to design a custom archives page template.
This method doesn’t work with every theme, so if you’re not using a block-based WordPress theme, then we recommend using a page builder instead.
To start, simply create a new page or open an existing page that you want to use as your archive. In the right-hand menu, click on the ‘Page’ tab and then select the link next to ‘Template.’ The exact link text may vary depending on the template you are currently using.
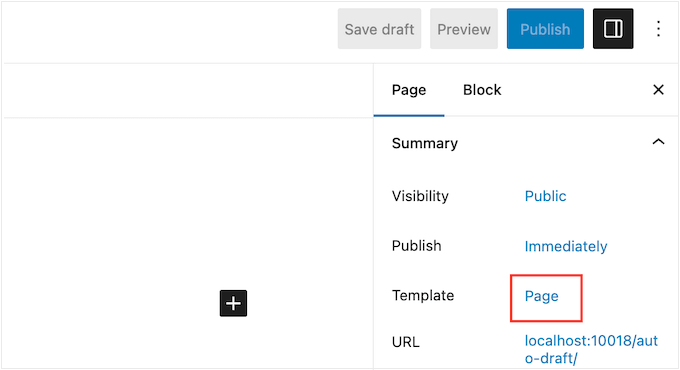
A popup will now appear with your current template.
Simply go ahead and click on the ‘New Template’ icon.
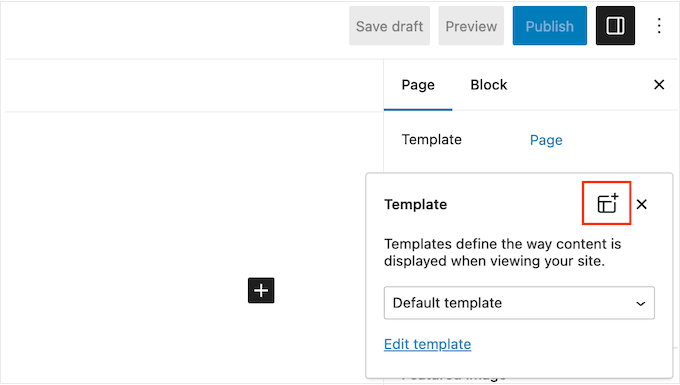
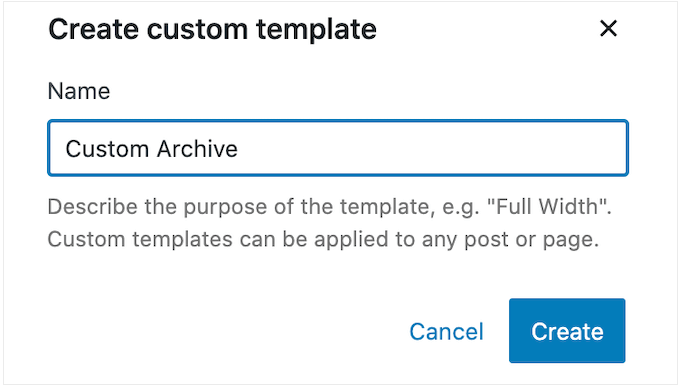
In the popup, type in a name for the custom page template. The template name is just for your reference, so you can use anything you want.
Then, go ahead and click on ‘Create’ to launch the template editor.
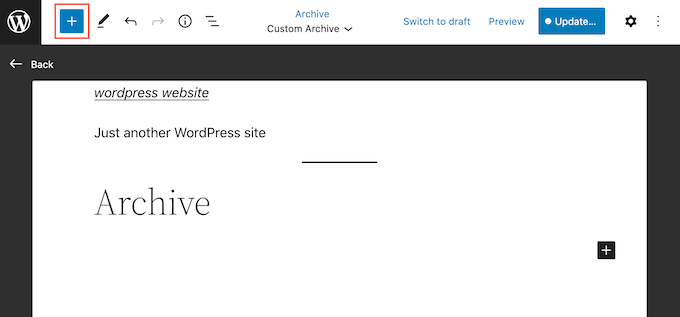
The template editor works similarly to the standard WordPress block editor.
To add blocks to your custom archives page, simply click on the blue ‘+’ button. You can then drag and drop to add blocks to your layout.
Since we are creating a custom archives page, you will typically want to start by adding an Archives block. This WordPress block allows visitors to explore your posts based on the year, month, week, or day.
For example, the following image shows an Archives block where the posts are organized into monthly archives.
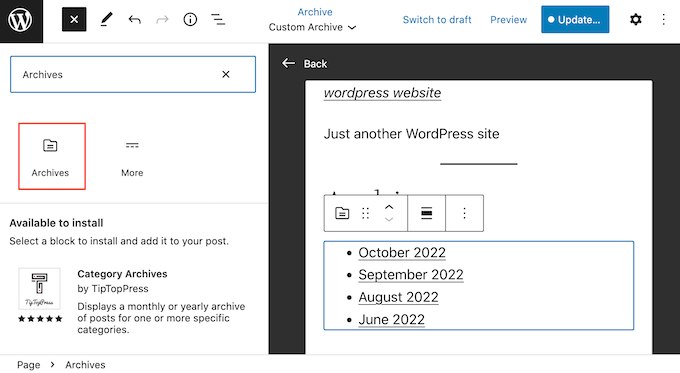
Clicking on any of these links will take the visitor to a new page showing all the posts published during that period.
To add an Archives block, simply find it in the left-hand menu and then drag it onto your layout. After adding any block, it’s a good idea to look at its settings in the right-hand menu.
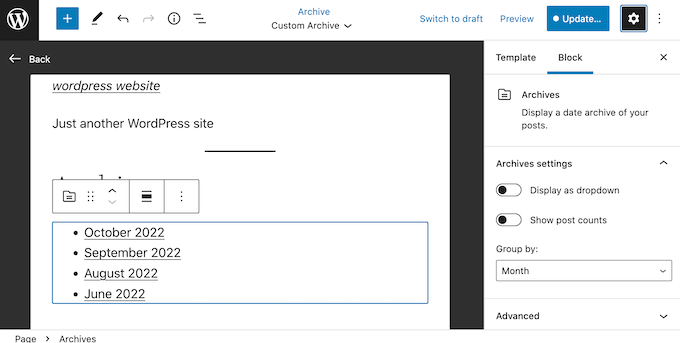
To start, you may want to change how the posts are organized by opening the ‘Group by’ dropdown and choosing an option from the list.
For example, if you only have a small number of posts then it may make sense to show them by day.
However, if you have lots of content, then you will typically want to choose ‘Month’ or even ‘Year’ so that you don’t overwhelm visitors with a long list.
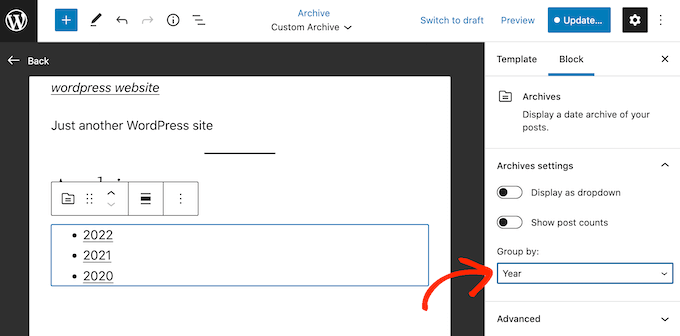
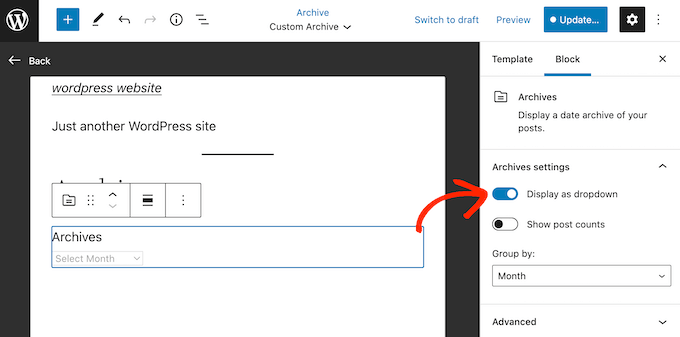
WordPress shows the archived posts in a bullet point list by default, but you can also present them as a dropdown menu.
This can be useful if you have a very small amount of space and need to create a compact archive. To switch to a dropdown format, simply click on the ‘Display as dropdown’ slider to make it active.
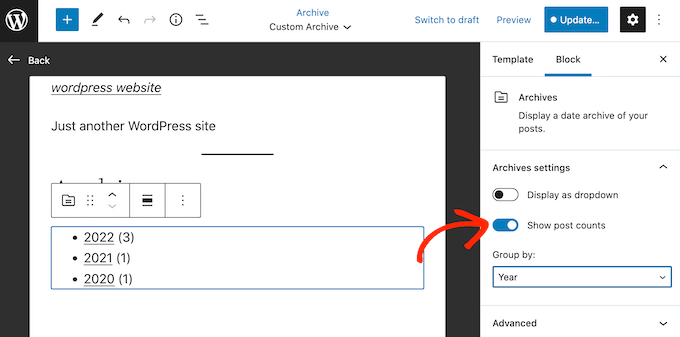
The Archive block can also show the total number of posts next to each heading.
This can help visitors decide which part of the archive they want to look at first.
You may also want to add a category archive so that visitors can explore your posts based on their content and not just the date. This can help visitors find interesting content, which will keep them on your website for longer and improve your WordPress SEO.
To add this block, simply click on the blue ‘+’ button and type in ‘Categories List.’ When the right block appears, add it to your layout using drag and drop.
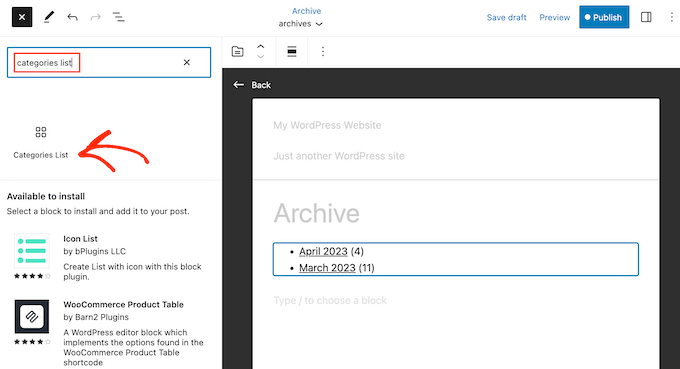
Once again, you may want to make some changes to the block’s settings.
Similar to the Archives block, you can add a post count to the list or show the categories as a dropdown menu rather than a bullet point list.
By default, this block shows all categories and subcategories in exactly the same way.
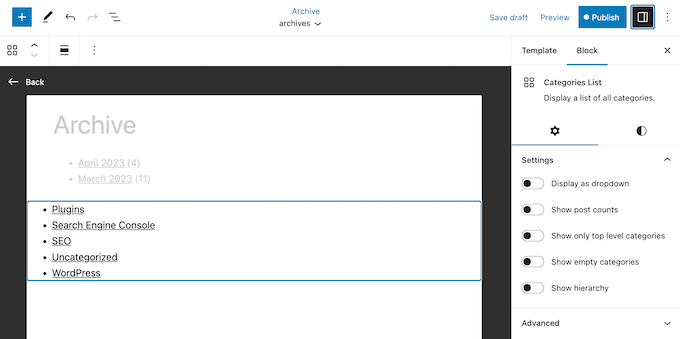
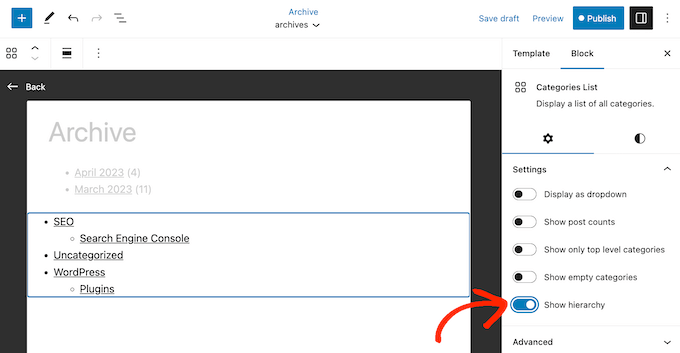
You may prefer to show the child categories indented beneath their parent.
To make this change, just click to activate the ‘Show hierarchy’ toggle.
Another option is to hide child categories completely by activating the ‘Show only top level categories’ toggle.
You may also want to add a tag cloud, which can help visitors find interesting related content. To do this, simply find ‘Tag Cloud’ in the left-hand menu and then drag it onto your layout.
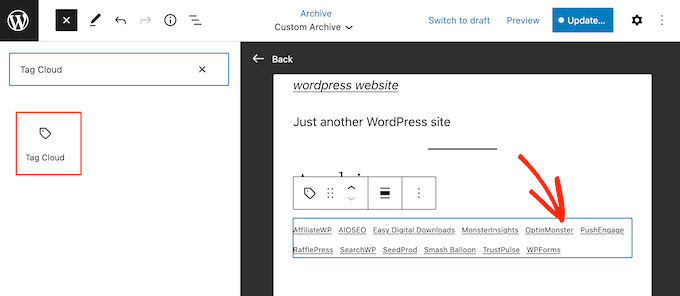
You can now select the block and configure it using the settings in the right-hand menu.
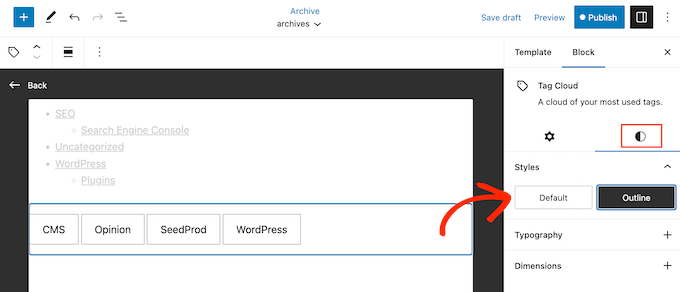
To start, the Tag Cloud has two styles: Default and Outline. You can switch between these by clicking on the small circle icon and then choosing one of the options under ‘Styles.’
You can also use show the total number of posts next to each tag, and change the number of tags that are included in the cloud.
Simply click on the small cog icon and then make your changes in this section.
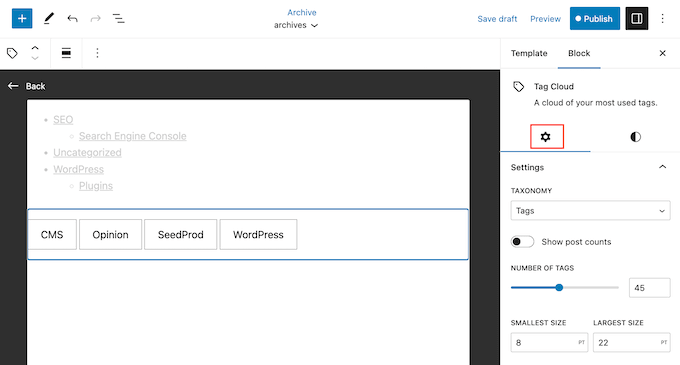
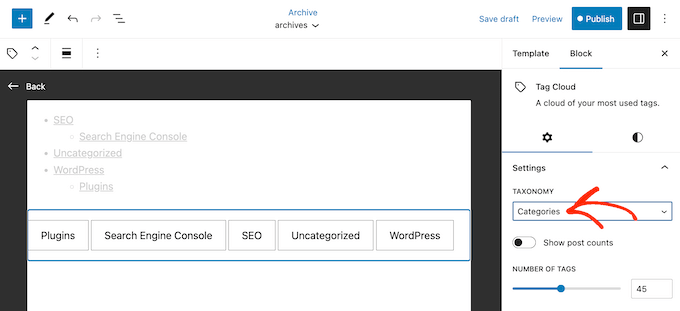
Despite the name, you can also show categories in the Tag Cloud. For example, you may prefer the styling of the Tag Cloud block compared to the Categories block.
To show your site’s categories instead, simply open the ‘Taxonomy’ dropdown and then choose ‘Categories.’
Archives are designed to give visitors easy access to all your content.
However, you may also want to highlight your site’s most recent posts by adding a Latest Posts block.
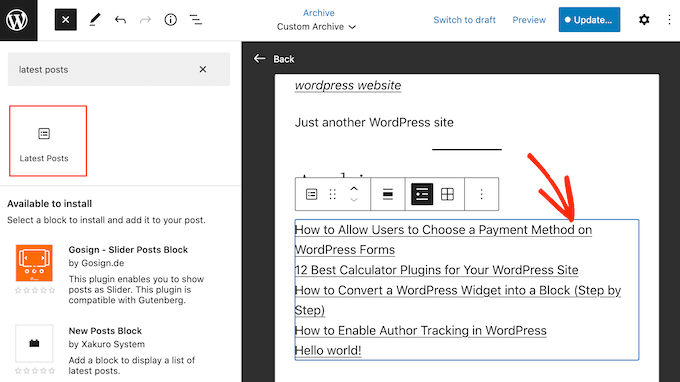
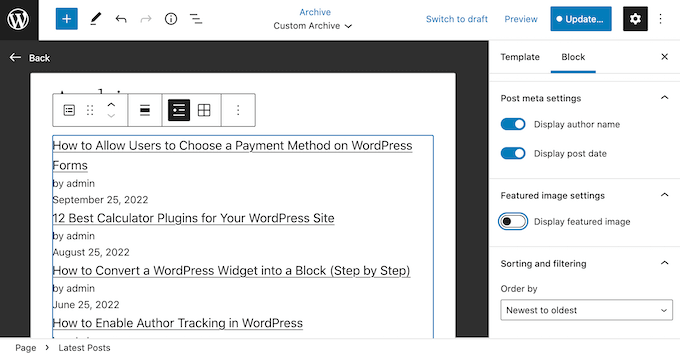
By default, this block simply shows each post’s title, but you can add the author, publication date, and featured image.
Simply use the toggles in the right-hand menu to make these changes.
You may also want to show the post excerpt, which can help visitors understand what each post is about.
To add the excerpts, go ahead and click to activate the ‘Post Content’ toggle.
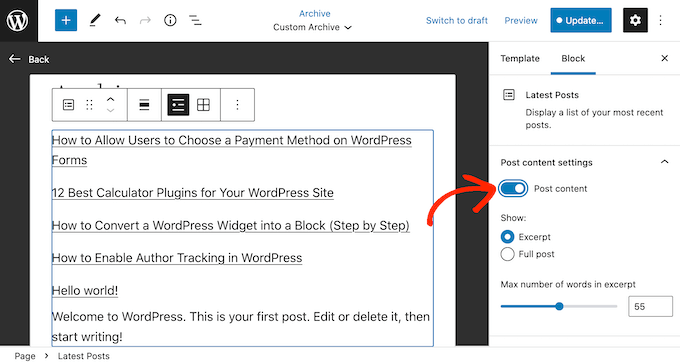
After that, click to select the ‘Excerpt’ button.
By default, WordPress will show a maximum of 55 words in the excerpt. To show more or fewer words, simply use the ‘Max number of words in excerpt’ settings.
After you have done that, scroll to the ‘Sorting and filtering’ section.
Here, you can see that the block organizes posts from newest to oldest. You can change this by opening the ‘Order’ dropdown and choosing a different option, such as ‘A-Z.’
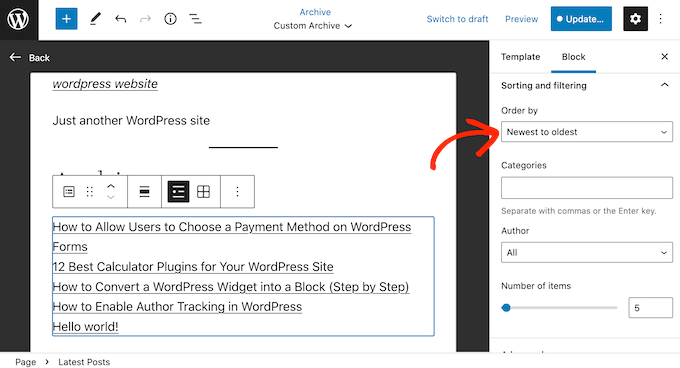
In this section, you can also choose to show posts from a particular author or category.
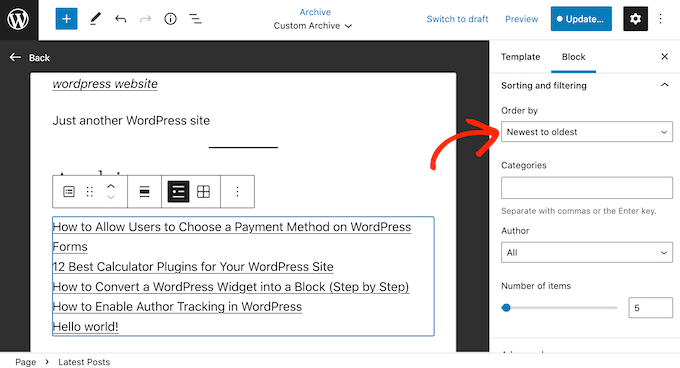
Finally, you can change how many posts WordPress shows in the block, either by typing a new number into the ‘Number of items’ section or by dragging the slider.
You can continue working on your archive page by adding more blocks and then configuring them in the right-hand menu.
For example, you may want to add an Image block and show a custom logo or add a search bar so that visitors can look for a particular post.
When you are happy with how the template looks, click on the ‘Publish’ button and then click on the ‘Save’ button.
The page you created earlier will now be using the new archive template. You can either update or publish the page, and then visit your WordPress website to see the custom archive page live.
For more information about using the WordPress full site editor, check out the following guides:
- A Complete Beginner’s Guide to WordPress Full Site Editing
- Beginner’s Guide: How to Use WordPress Block Patterns
Method 2: Create a Custom WordPress Archive Page Using Seedprod (Recommended)
The block-based editor lets you create a simple custom archives page. However, it doesn’t work with every theme, and you are limited to the built-in WordPress blocks and tools.
If you want to create a completely custom archives page that works with any WordPress theme, then we recommend using a page builder instead.
SeedProd is the best drag-and-drop page builder for WordPress. It comes with more than 180 templates and ready-made blocks, including a block that shows all your website’s posts.
First, you need to install and activate SeedProd. For more details, see our step-by-step guide on how to install a WordPress plugin.
Note: There is a free version of SeedProd that allows you to create custom pages if you’re on a tight budget and just getting started. However, for this guide, we will be using SeedProd Pro since it has lots more templates and blocks.
After activating the plugin, SeedProd will ask for your license key.

You can find this information under your account on the SeedProd website. After entering the key, click on the ‘Verify Key’ button.
Once you have done that, go to SeedProd » Landing Pages and click on the ‘Add New Landing Page’ button.
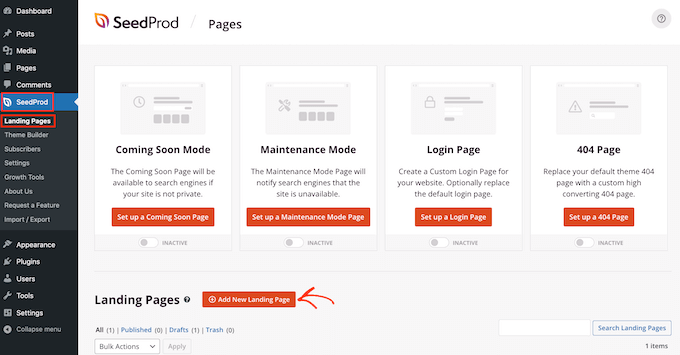
You can now choose a template for the custom archives page.
SeedProd’s templates are organized into different campaign types like lead squeeze, maintenance mode, and coming soon. You can click on the tabs at the top of the screen to filter the designs based on campaign type.
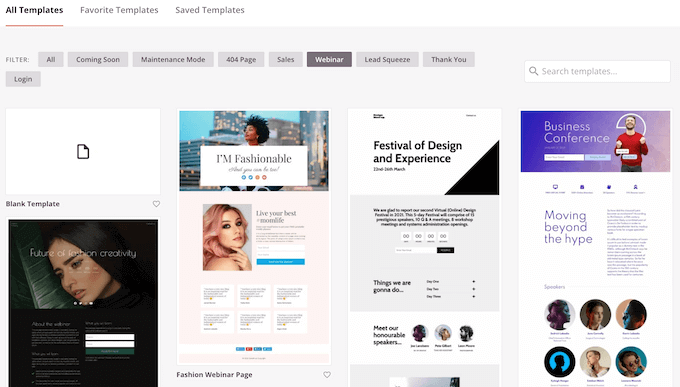
To preview any design, simply hover your mouse over that template.
Then, click on the magnifying glass icon that appears.
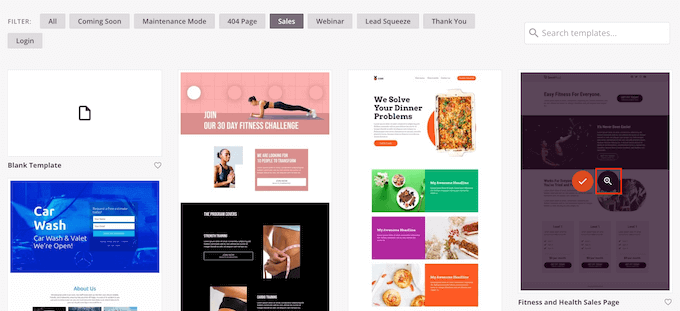
When you find a design that you like, click on ‘Choose This Template.’ We are using the ‘Blank Template’ as it lets us start with a clean slate, but you can use any template you want.
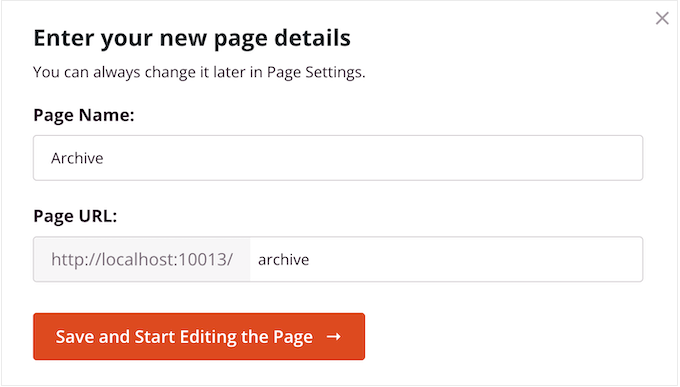
Next, go ahead and type in a name for the custom page. SeedProd will automatically create a URL based on the page’s title, but you can change this URL if you want.
When you are happy with the information you have entered, click on the ‘Save and Start Editing the Page’ button.
This will load the SeedProd page builder interface. It is a simple drag-and-drop builder that shows a live preview of your page to the right.
You will also see block settings on the left.
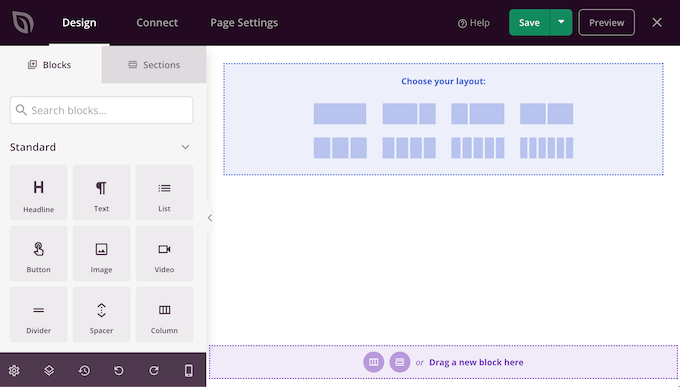
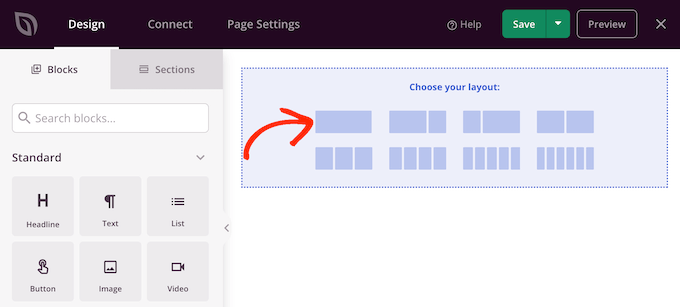
To start, you will need to choose a layout, which will you organize your content into columns.
In the ‘Choose your layout’ section, simply click on the layout you want to use. You can choose any layout, but we are using the full-screen layout in all our images.
After choosing a layout, you can start adding blocks to the archives page.
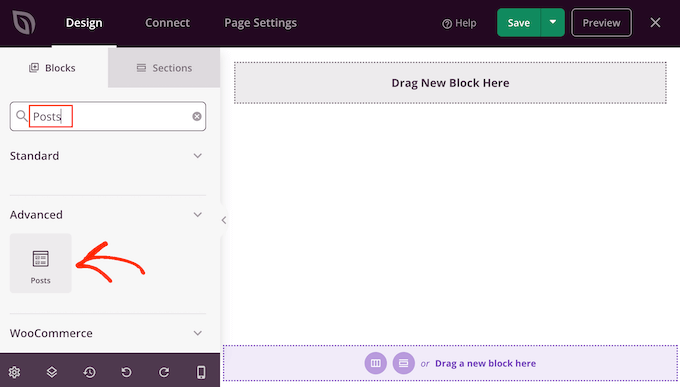
The left-hand menu shows all the different blocks that you can drag onto your design. Since we’re creating a custom archive page, we’re going to add a Posts block.
In the left-hand menu, start typing ‘Posts’ into the search bar. When the right block appears, drag and drop it onto your layout.
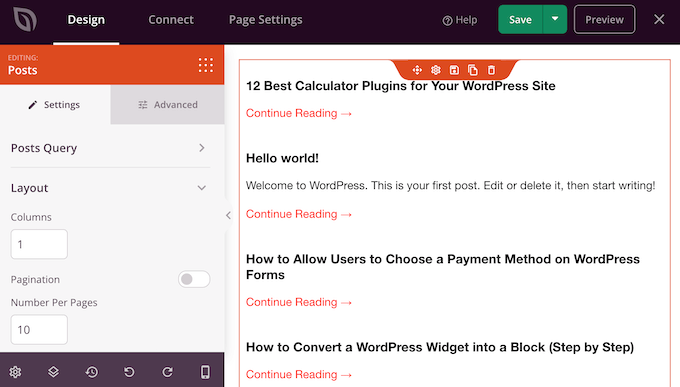
This block will now show the title for all your posts.
It also has a ‘Continue Reading’ link that visitors can click to read each post in full.
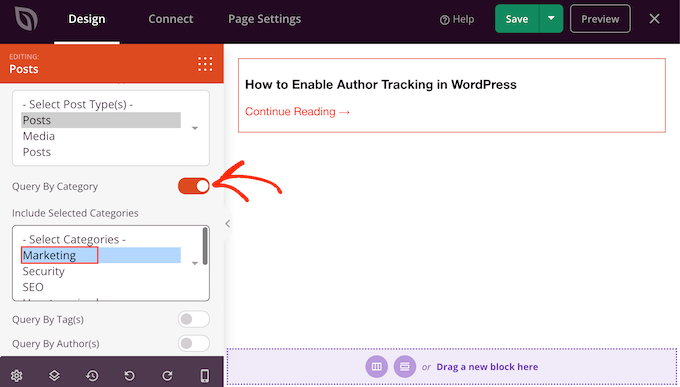
By default, this block shows all your posts, but you can change this to only show posts that have a particular category or tag, or posts published by a specific author.
To make this change, simply click to select the ‘Posts’ block in your layout and then use the settings in the left-hand menu.
For example, in the following image, we are only showing posts from the ‘Marketing’ category.
You can also change how the posts are organized in the block. For example, you might show posts based on when they were published, or how many comments they have.
To change the order of your posts, simply scroll to the ‘Order By’ box and then choose a new option. By default, SeedProd shows posts in ‘ASC’ order, which stands for ascending.
To arrange your posts in descending order instead, simply open the ‘Order’ dropdown and choose ‘DESC.’
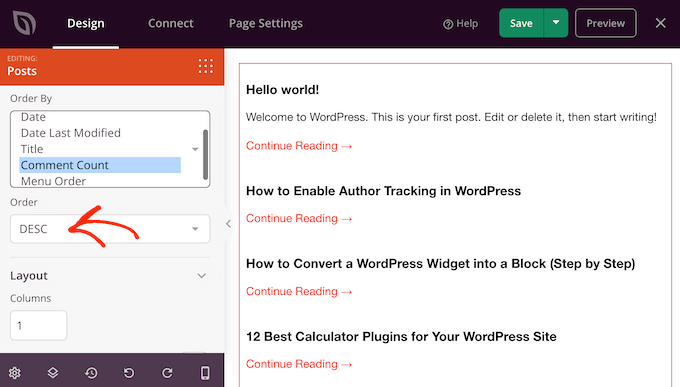
After that, you can scroll to the ‘Layout’ section and change how the list of posts is displayed.
For example, you can split the posts into multiple columns by typing a new number into the ‘Columns’ field.
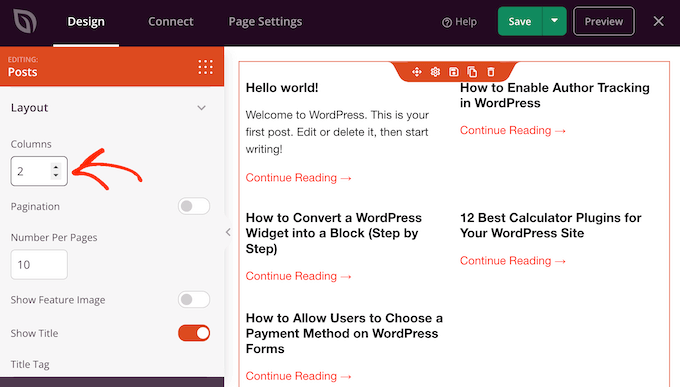
You can also change how many posts are included in the list, add or hide the post excerpts, and change the ‘Continue Reading’ text.
When you are happy with how the list of posts looks, you can add more blocks to your archives page and then customize those blocks using the settings in the left-hand menu.
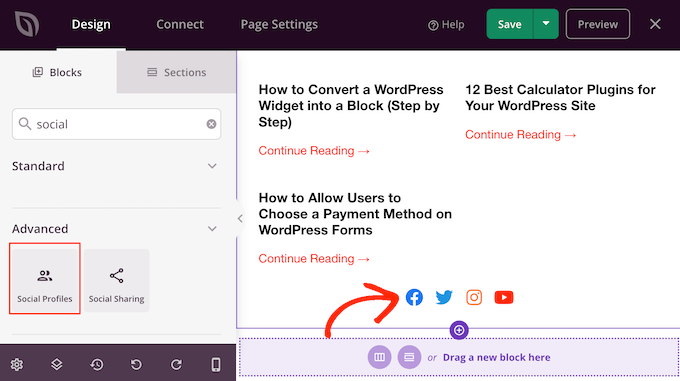
For example, you may want to encourage people to follow you on social media by adding a ‘Social Profiles’ block.
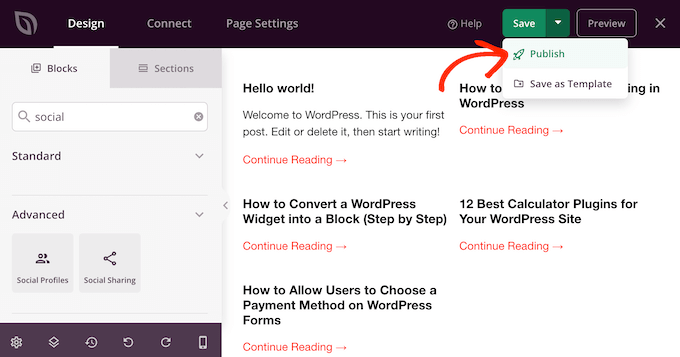
When you’re happy with how the page is set up, it’s time to publish it by clicking the dropdown arrow next to ‘Save’ and then selecting ‘Publish.’
Your custom page will now go live on the front end of your WordPress blog.
To help visitors find the archive page, you may want to add it to your navigation menu or your website’s footer.
Learn More Ways to Organize Your WordPress Posts
Creating a custom archives page is just one way to organize your WordPress content. Here are some additional methods to help your readers discover and navigate your posts more effectively:
- Showcase popular posts – Highlight your most-read content with popular posts plugins. Check out our comparison of the best popular posts plugins for WordPress to find the right solution for your site.
- Display posts by views – Learn how to display popular posts by views in WordPress using different methods. This can help draw attention to your most engaging content.
- Feature posts in the sidebar – Explore different methods to add featured posts in the WordPress sidebar. This is a great way to promote specific content or recent articles.
- Create custom post type archives – If you use custom post types, then you can learn how to create a custom post types archive page in WordPress to organize this specialized content.
- Show related posts – Increase reader engagement by displaying related content. Our step-by-step guide on how to display related posts in WordPress will show you how.
- Highlight the most commented posts – Showcase your most discussed content with our tutorial on how to display the most commented posts in WordPress using two different methods.
- Re-order posts – Take control of your post order with our guide on how to easily re-order posts in WordPress. This can be particularly useful for creating curated lists or series.
- Display posts by the same author – Encourage readers to explore more content from specific writers with our tutorial on how to display related posts by the same author in WordPress.
We hope this article has helped you create a custom archives page in WordPress. You may also want to read our article on the best coming soon page examples and our expert picks of the best related posts plugin in WordPress.
If you liked this article, then please subscribe to our YouTube Channel for WordPress video tutorials. You can also find us on Twitter and Facebook.


Martin
Great article.
I have maybe a silly question. Is there any SEO benefit if I have a custom archive page or even archive.php. in the theme folder?
Or is it the same as creating a new page with url mydomain/archive and listing all my posts and pages based on the categories I want. This is what I would prefer.
Thank you
WPBeginner Support
Having a custom archive would not give an SEO benefit, it would be personal preference and you can use your second method if you wanted.
Admin
Aileen
Hi–my site is using the Genesis framework an it has a child theme. I tried to implement the page-archive.php, but I skipped the part where I copy the page design from page.php and I’d hope it would work regardless.
So when I tried implementing this, when I go to my Archive place, it gives an Internal error, ie. 505 and cannot find the page itself.
How does this work with Genesis?
WPBeginner Support
Adding a custom page template would be the same as with any other theme, it seems like there may be a problem with the code you’re using to create the archive page.
Admin
Rahul Lakra
Firstly, Thank you so much. But I can’t see any sidebar in this page. In normal pages it is visible. I will be so happy if you can help me out to display sidebar here too. Thanks In advance!
WPBeginner Support
For the sidebar, sadly that is theme specific for what needs to be added, if you reach out to your theme’s support they should be able to let you know how they have the sidebars added to the templates.
Admin
Vijay Sundaram
Hi,
This was a great tutorial. However, the CSS code for the categories does not seem to work. It is shown as a list with categories and subcategories. Where do I embed the code that you have given in the style.css file? What is meant by make it appear inline? It would be great if you could help me resolve this?
Regards,
Vijay Sundaram
John Paul
Is it possible to filter the archive to just one category of a post?