Você deseja criar um tema filho no WordPress?
Um tema filho é um tema do WordPress que herda a funcionalidade de outro tema do WordPress. Muitos usuários criam um tema filho para seu tema atual para que possam personalizar com segurança o design do site sem perder as alterações quando o desenvolvedor do tema lança uma atualização.
Neste artigo, mostraremos como criar um tema filho para seu site WordPress.
Como funciona um tema filho e por que você precisa dele?
Um tema filho herda todos os recursos, funções e estilos de outro tema do WordPress. Quando você cria um tema filho, o tema original é chamado de tema pai.
A herança inclui o arquivo style.css do tema pai, que define o estilo principal do tema. O tema filho pode substituir ou estender suas propriedades herdadas adicionando seus próprios arquivos ou modificando os existentes.
Embora seja possível personalizar o tema do WordPress sem instalar um tema filho, há vários motivos pelos quais você pode precisar de um tema filho:
- Os temas filhos protegem suas personalizações durante as atualizações de temas, impedindo que sejam substituídas. Se você modificar o tema principal diretamente, esses ajustes poderão desaparecer quando você fizer a atualização.
- Os temas filhos permitem que você experimente com segurança novos designs ou recursos sem bagunçar o tema original do site, semelhante a um ambiente de teste.
- Se você sabe programar, os temas filhos podem tornar o processo de desenvolvimento mais eficiente. Os arquivos de um tema filho são muito mais simples do que os de um tema pai. Você pode se concentrar em modificar apenas as partes do tema pai que deseja alterar ou expandir.
O que fazer antes de criar um tema filho do WordPress
Vimos muitos usuários do WordPress entusiasmados em mergulhar nos aspectos técnicos, mas desanimados quando surgem erros. Nós entendemos isso. É por isso que é importante saber no que você está se metendo antes de criar um tema filho.
Aqui estão algumas coisas que recomendamos que você faça primeiro antes de continuar com este guia passo a passo:
- Esteja ciente de que você trabalhará com código. No mínimo, você precisará de um conhecimento básico de HTML, CSS, PHP e, opcionalmente, JavaScript para entender as alterações que precisa fazer. Você pode ler mais sobre isso no manual de temas do WordPress.
- Escolha um tema principal que tenha o design e os recursos desejados para seu site. Se possível, encontre um tema em que você só precise fazer algumas alterações.
- Use um site local ou um site de teste para o desenvolvimento do tema. Você não quer criar erros não intencionais em seu site ativo.
- Faça obackup de seu site primeiro.
Há várias maneiras de criar um tema filho a partir de seu tema existente. Uma delas é com código manual, enquanto outras exigem um plug-in, que é muito mais amigável para iniciantes.
O primeiro método pode parecer intimidador se você não tiver experiência técnica. Dito isso, mesmo que você escolha um dos métodos de plug-in, ainda assim recomendamos a leitura do método manual para se familiarizar com o processo e os arquivos envolvidos.
Dica profissional: Deseja personalizar seu tema sem criar um tema filho? Use o WPCode para habilitar com segurança novos recursos com trechos de código personalizados sem danificar seu site.
Com tudo isso em mente, vamos ver como criar um tema filho no WordPress. Você pode ir para o método que preferir usando os links abaixo:
- Method 1: Creating a Child WordPress Theme Manually
- Method 2: Creating a Child Classic Theme With a Plugin
- Method 3: Creating a Child Block Theme With a Plugin
- Bonus Tip: Find Out If Your Theme Has a Child Theme Generator
- How to Customize Your Classic Child Theme
- How to Customize Your Block Child Theme
- How to Edit a Child Theme's Template Files
- How to Add New Functionality to Your Child Theme
- How to Troubleshoot Your WordPress Child Theme
Método 1: Criar um tema filho do WordPress manualmente
Primeiro, você precisa abrir /wp-content/themes/ na pasta de instalação do WordPress.
Você pode fazer isso usando o gerenciador de arquivos da sua hospedagem WordPress ou um cliente FTP. Achamos que a primeira opção é muito mais fácil, portanto, vamos usá-la.
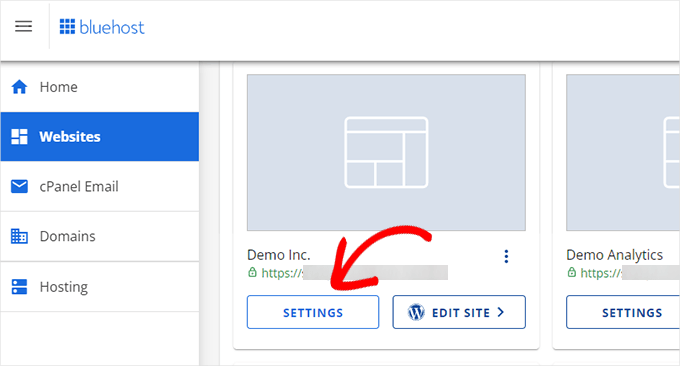
Se você for cliente da Bluehost, poderá fazer login no painel da sua conta de hospedagem e navegar até a guia “Websites”. Depois disso, clique em “Settings” (Configurações).
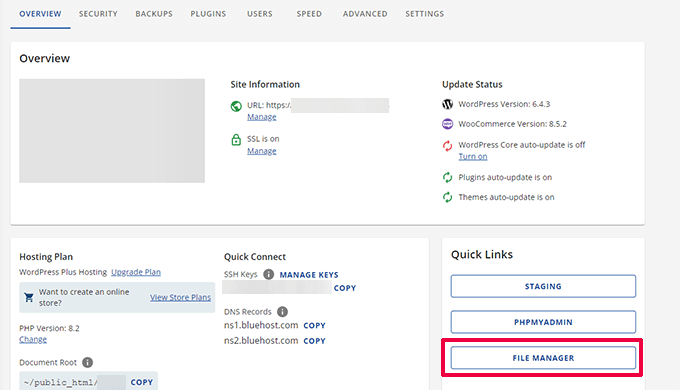
Na guia Overview (Visão geral), role para baixo até a seção “Quick Links” (Links rápidos).
Em seguida, selecione “Gerenciador de arquivos”.
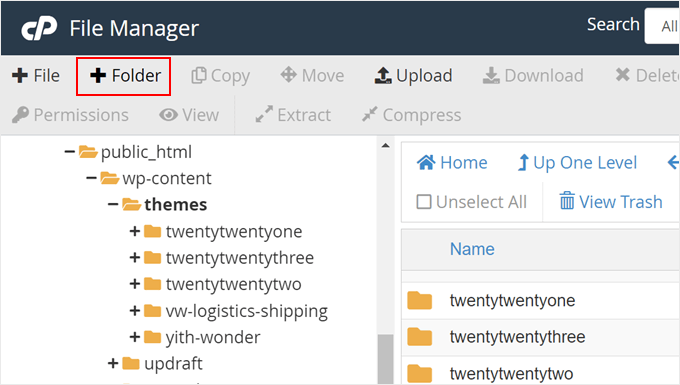
Nessa etapa, você precisa ir para a pasta public_html do seu site e abrir o caminho /wp-content/themes/.
Aqui, basta clicar no botão “+ Folder” (+ Pasta) no canto superior esquerdo para criar uma nova pasta para seu tema filho.
Você pode nomear a pasta como quiser.
Para este tutorial, usaremos apenas o nome da pasta twentytwentyone-child, pois usaremos o Twenty Twenty-One como nosso tema pai. Depois disso, basta clicar em “Create New Folder” (Criar nova pasta).
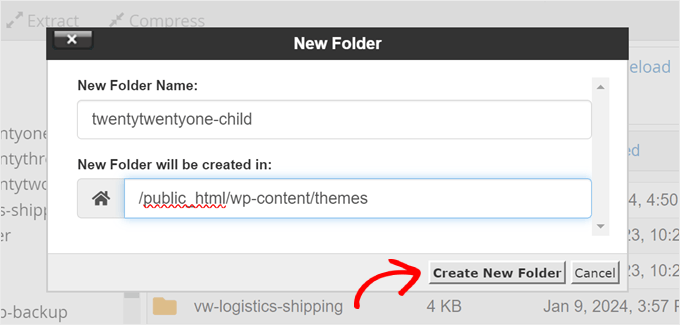
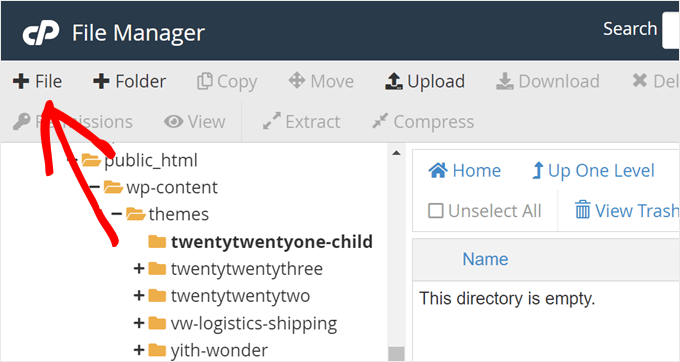
Em seguida, você deve abrir a pasta que acabou de criar e clicar em “+ File” (+ Arquivo) para criar o primeiro arquivo para o tema filho.
Se você usar um cliente FTP, poderá usar um editor de texto como o Bloco de Notas e carregar o arquivo posteriormente.
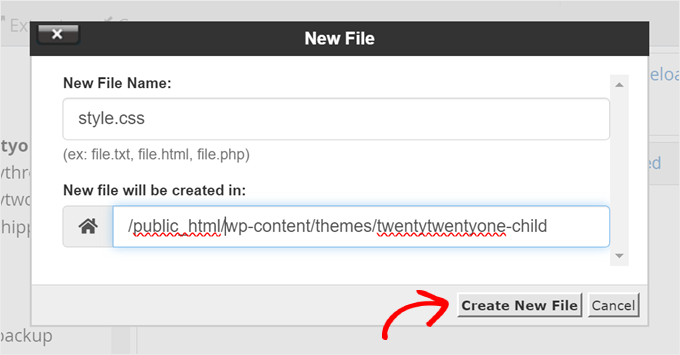
Vá em frente e nomeie esse arquivo como “style.css”, pois ele é a folha de estilo principal de seu filho e conterá informações sobre o tema filho.
Em seguida, clique em “Create New File” (Criar novo arquivo).
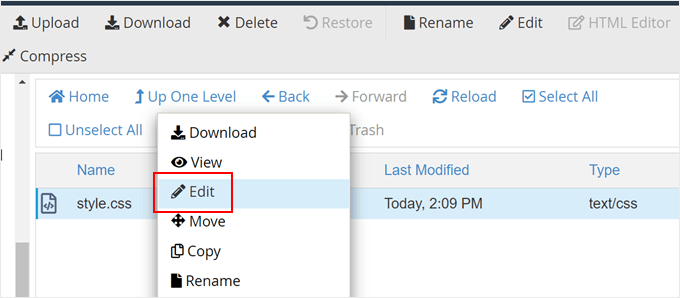
Agora, basta clicar com o botão direito do mouse no arquivo style.css.
Depois disso, clique em “Edit” (Editar) para abrir uma nova guia, como na captura de tela abaixo.
Nessa nova guia, você pode colar o texto a seguir e ajustá-lo de acordo com suas necessidades:
/*
Theme Name:   Twenty Twenty-One Child
Theme URI:    https://wordpress.org/themes/twentytwentyone/
Description:  Twenty Twenty-One child theme
Author:       WordPress.org
Author URI:   https://wordpress.org/
Template:     twentytwentyone
Version:      1.0.0
Text Domain:  twentytwentyonechild
*/
Depois disso, basta clicar em “Salvar alterações”.

A próxima coisa que você precisa fazer é criar um segundo arquivo e nomeá-lo functions.php. Esse arquivo importará ou enfileirará as folhas de estilo dos arquivos do tema principal.
Depois de criar o documento, adicione o seguinte código wp_enqueue:
add_action( 'wp_enqueue_scripts', 'my_theme_enqueue_styles' );
function my_theme_enqueue_styles() {
    $parenthandle = 'twenty-twenty-one-style'; // This is 'twenty-twenty-one-style' for the Twenty Twenty-one theme.
    $theme = wp_get_theme();
    wp_enqueue_style( $parenthandle, get_template_directory_uri() . '/style.css',
        array(), // if the parent theme code has a dependency, copy it to here
        $theme->parent()->get('Version')
    );
    wp_enqueue_style( 'custom-style', get_stylesheet_uri(),
        array( $parenthandle ),
        $theme->get('Version') // this only works if you have Version in the style header
    );
}
Quando terminar, salve o arquivo como na etapa anterior.
Observação: para esse método, recomendamos a leitura da documentação oficial sobre temas filhos e inclusão de ativos para garantir que as folhas de estilo do tema filho sejam carregadas corretamente.
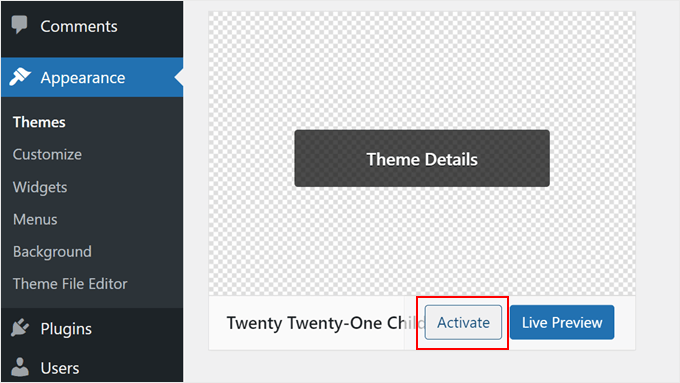
Agora você criou um tema filho muito básico. Ao acessar Appearance ” Temas no painel de administração do WordPress, você verá a opção Twenty Twenty-One Child.
Clique no botão “Activate” (Ativar) para começar a usar o tema filho em seu site.
Método 2: Criar um tema clássico filho com um plug-in
O próximo método usa o plug-in Child Theme Configurator. Esse plug-in do WordPress fácil de usar permite que você crie e personalize temas filhos do WordPress rapidamente sem usar código, mas só funciona bem com um tema clássico (sem blocos).
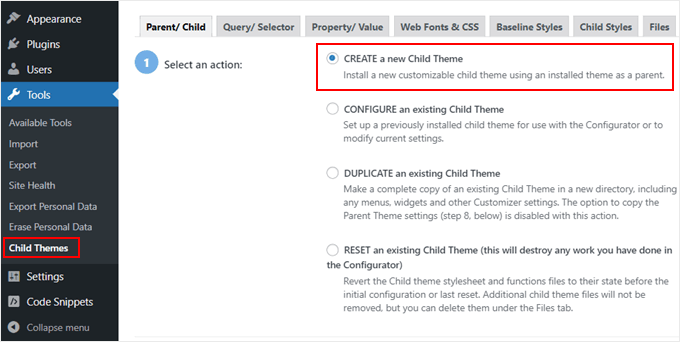
A primeira coisa que você precisa fazer é instalar e ativar o plug-in do WordPress. Após a ativação, você precisa navegar até Tools ” Child Themes no painel do WordPress.
Na guia Parent/Child, você será solicitado a escolher uma ação. Basta selecionar “CREATE a new Child Theme” (Criar um novo tema filho) para começar.
Em seguida, selecione um tema principal em um menu suspenso. Selecionaremos o tema Hestia.
Depois disso, basta clicar no botão “Analyze” (Analisar) para garantir que o tema seja adequado para uso como tema pai.

Em seguida, você será solicitado a nomear a pasta na qual o tema filho será salvo. Você pode usar qualquer nome de pasta que desejar.
Abaixo disso, você precisa selecionar onde salvar os novos estilos: na folha de estilo principal ou em uma folha separada.
A folha de estilo primária é a folha de estilo padrão que acompanha o tema filho. Quando você salva novos estilos personalizados nesse arquivo, está modificando diretamente os estilos principais do tema filho. Toda modificação substituirá o estilo do tema original.
A opção separada permite que você salve um novo estilo personalizado em um arquivo de folha de estilo separado. Isso é útil se você quiser preservar o estilo do tema original e não sobrescrevê-lo.
Para fins de demonstração, escolheremos a primeira opção. Mas, à medida que você for mais criativo com as personalizações do tema filho, sempre poderá repetir esse processo e selecionar a segunda opção.

Descendo, você deve escolher como a folha de estilo do tema pai será acessada.
Usaremos apenas a opção padrão “Use the WordPress style queue” (Usar a fila de estilos do WordPress), pois isso permitirá que o plug-in determine automaticamente as ações apropriadas.

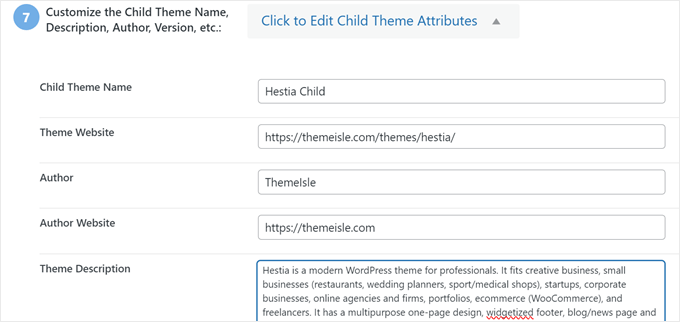
Ao chegar à etapa 7, você precisará clicar no botão “Click to Edit Child Theme Attributes” (Clique para editar os atributos do tema filho).
Em seguida, você pode preencher os detalhes do seu tema filho.
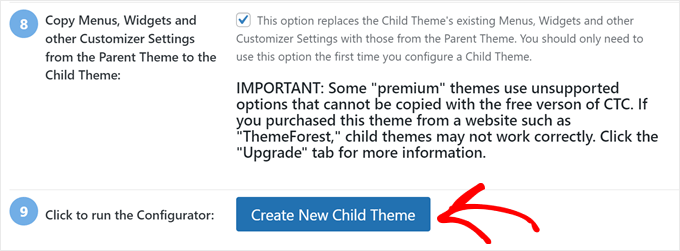
Ao criar um tema filho manualmente, você perderá os menus e widgets do tema pai. O Child Theme Configurator pode copiá-los do tema pai para o tema filho. Marque a caixa na etapa 8 se você quiser fazer isso.
Por fim, clique no botão “Create New Child Theme” (Criar novo tema filho) para criar seu novo tema filho.
O plug-in criará uma pasta para seu tema filho e adicionará os arquivos style.css e functions.php que você usará para personalizar o tema posteriormente.
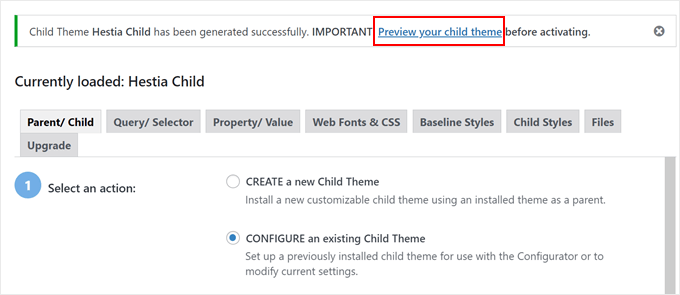
Antes de ativar o tema, clique no link próximo à parte superior da tela para visualizá-lo e certificar-se de que ele tem boa aparência e não prejudica seu site.
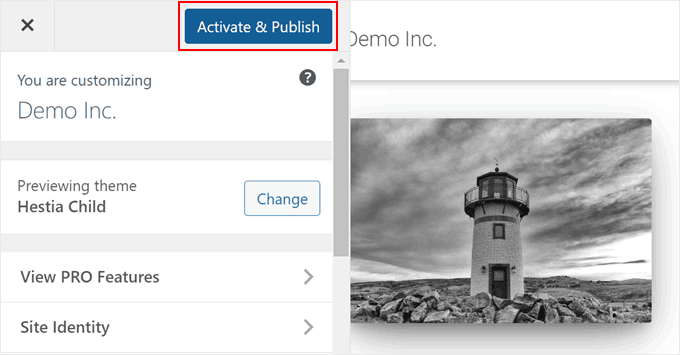
Se tudo parecer estar funcionando, clique no botão “Activate & Publish” (Ativar e publicar).
Agora, seu tema filho será ativado.
Nesse estágio, o tema filho terá aparência e comportamento exatamente iguais aos do tema pai.
Método 3: Criar um tema de bloco filho com um plug-in
Se você usa um tema de bloco, o WordPress oferece uma maneira fácil de criar um tema filho com o plug-in Create Block Theme.
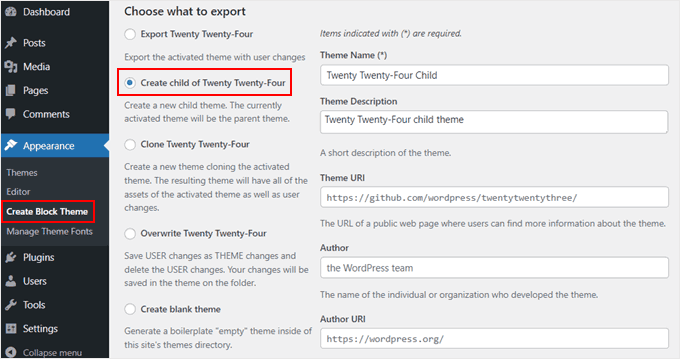
Primeiro, você precisará instalar e ativar o plug-in do WordPress. Depois disso, vá para Appearance ” Create Block Theme.
Aqui, basta selecionar “Criar filho de [nome do tema]”. Neste exemplo, estamos usando o Twenty Twenty-Four.
Depois de selecionar essa opção, preencha as informações do seu tema.
Em seguida, você pode fazer mais coisas, como carregar uma captura de tela do tema para diferenciá-lo de outros temas, adicionar créditos de imagem, criar links para plug-ins obrigatórios do WordPress, adicionar tags de tema e assim por diante.
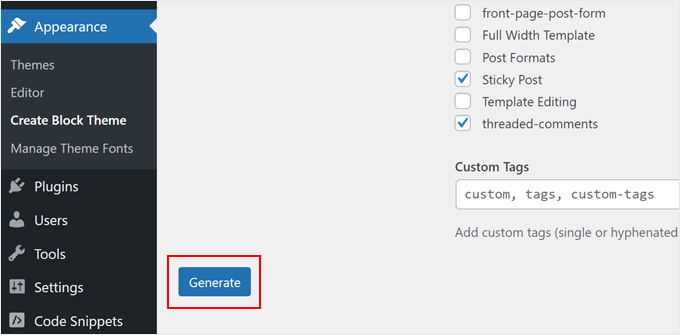
Quando terminar de definir as configurações, basta rolar a tela até o fim e clicar no botão “Generate” (Gerar).
O plug-in criará e baixará um novo arquivo zip do tema filho em seu computador.
Ao abri-lo, você verá três arquivos: readme, style.css e theme.json.
O arquivo theme.json define vários aspectos de um tema de bloco, incluindo suas cores, tipografia, layout e muito mais. O plug-in cria esse arquivo por padrão para que você possa substituir ou estender o estilo do tema principal no tema secundário posteriormente.
Nesse estágio, tudo o que você precisa fazer é ir para Appearance ” Themes.
Depois disso, clique em “Add New Theme” (Adicionar novo tema).
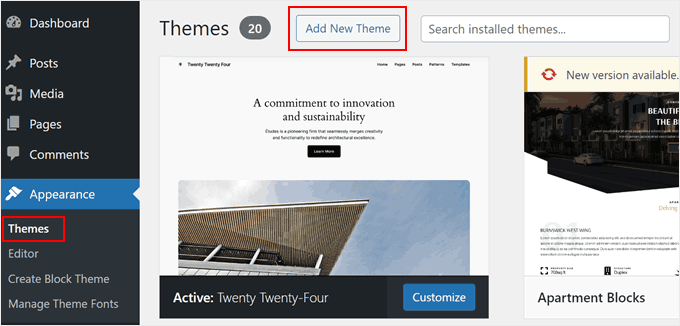
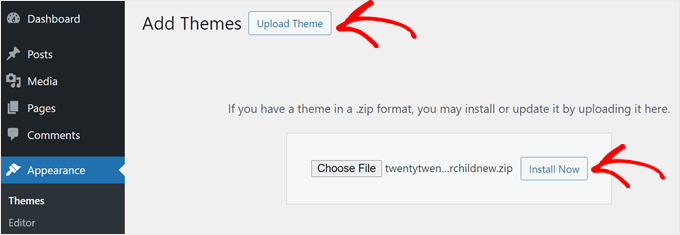
Em seguida, selecione “Upload Theme” (Carregar tema).
Em seguida, escolha o arquivo zip e clique em “Install Now” (Instalar agora) para instalar o tema do WordPress.
Dica bônus: Descubra se seu tema tem um gerador de tema filho
Se você tiver sorte, talvez seu tema do WordPress já tenha um recurso para criar um tema filho.
Por exemplo, se você usa o Astra, pode acessar o site Astra Child Theme Generator. Depois disso, basta preencher o nome do tema filho e clicar no botão “Generate” (Gerar).
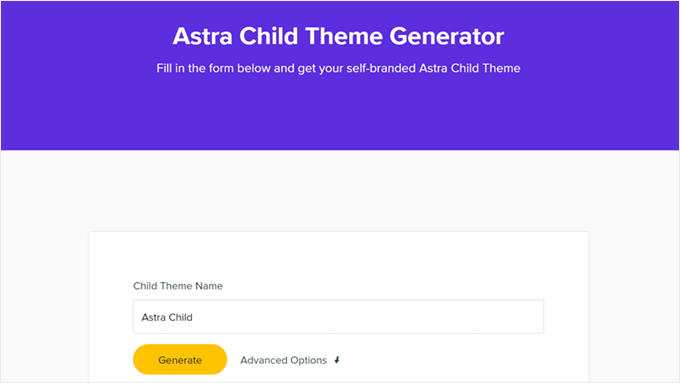
Seu navegador fará o download automático do tema filho para o computador, que poderá ser instalado no WordPress por você mesmo.
Também encontramos alguns outros temas populares do WordPress que têm um gerador de tema filho:
Como personalizar seu tema filho clássico
Observação: Esta seção é para usuários de temas clássicos do WordPress. Se você usa um tema de bloco, pule para a próxima seção.
Tecnicamente, você pode personalizar seu tema filho sem código usando o Theme Customizer. As alterações que você fizer não afetarão o tema pai. Se você ainda não se sente confortável com a codificação, fique à vontade para usar o Customizer.
Dito isso, também recomendamos personalizar o tema filho com código.
Além de aprender mais sobre o desenvolvimento de temas do WordPress, a personalização do código permite que as alterações sejam documentadas nos arquivos do tema filho, facilitando o rastreamento.
Agora, a maneira mais básica de personalizar um tema filho é adicionar CSS personalizado ao arquivo style.css. Para fazer isso, você precisa saber qual código precisa personalizar.
Você pode simplificar o processo copiando e modificando o código existente do tema principal. Você pode encontrar esse código usando a ferramenta Inspect do Chrome ou Firefox ou copiando-o diretamente do arquivo CSS do tema principal.
Método 1: Copiar código do inspetor do Chrome ou Firefox
A maneira mais fácil de descobrir o código CSS que você precisa modificar é usar as ferramentas do inspetor que vêm com o Google Chrome e o Firefox. Essas ferramentas permitem que você examine o HTML e o CSS por trás de qualquer elemento de uma página da Web.
Leia mais sobre a ferramenta inspetor em nosso guia sobre os fundamentos do elemento inspect: personalizando o WordPress para usuários DIY.
Ao clicar com o botão direito do mouse em sua página da Web e usar o elemento inspecionar, você verá o HTML e o CSS da página.
Ao mover o mouse sobre diferentes linhas HTML, o inspetor as destacará na janela superior. Ele também mostrará as regras CSS relacionadas ao elemento destacado, da seguinte forma:
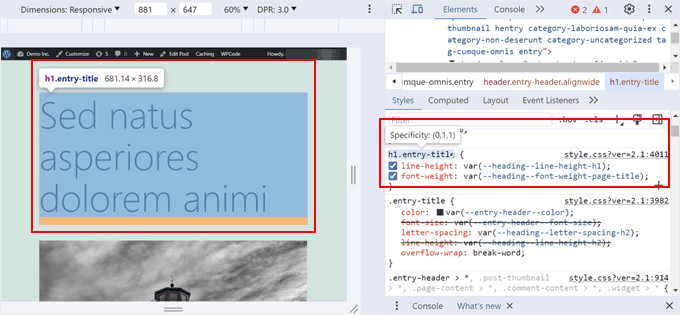
Você pode tentar editar o CSS ali mesmo para ver como ficaria. Por exemplo, vamos tentar alterar a cor de fundo do corpo do tema para #fdf8ef. Encontre a linha de código que diz body { e, dentro dela, o código que diz color:.
Basta clicar no ícone do seletor de cores ao lado de color: e colar o código HEX no campo apropriado, da seguinte forma:
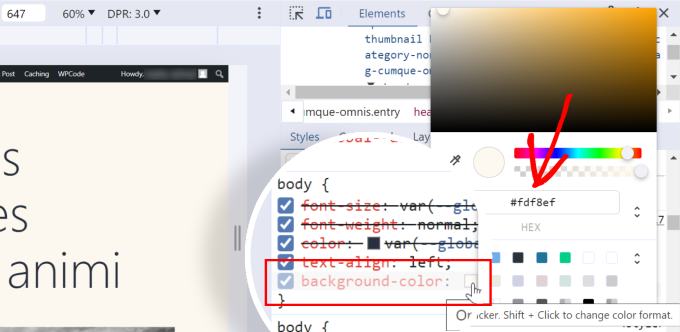
Agora, você sabe como alterar a cor do plano de fundo usando CSS. Para tornar as alterações permanentes, você pode abrir o arquivo style.css no diretório do tema filho (usando o gerenciador de arquivos ou o FTP).
Em seguida, cole o seguinte código abaixo das informações do tema filho, da seguinte forma:
/*
Theme Name:   Twenty Twenty-One Child
Theme URI:    https://wordpress.org/themes/twentytwentyone/
Description:  Twenty Twenty-One child theme
Author:       WordPress.org
Author URI:   https://wordpress.org/
Template:     twentytwentyone
Version:      1.0.0
Text Domain:  twentytwentyonechild
*/

body {
    background-color: #fdf8ef
}
Esta é a aparência que você terá se acessar o painel de administração do WordPress e abrir Appearance ” Theme File Editor:
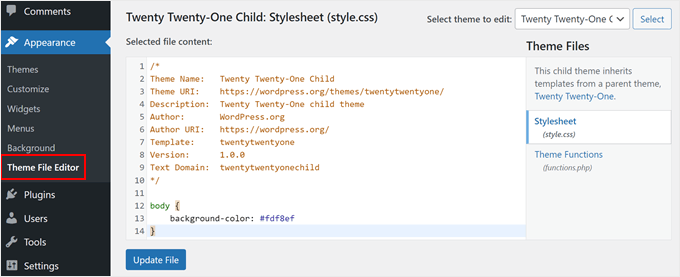
Se você for um iniciante e quiser fazer outras alterações, recomendamos que se familiarize com HTML e CSS para saber exatamente a que elemento cada código se refere. Há muitas folhas de consulta de HTML e CSS on-line que você pode consultar.
Aqui está a folha de estilo completa que criamos para o tema filho. Sinta-se à vontade para experimentar e modificá-la:
/*
Theme Name:   Twenty Twenty-One Child
Theme URI:    https://wordpress.org/themes/twentytwentyone/
Description:  Twenty Twenty-One child theme
Author:       WordPress.org
Author URI:   https://wordpress.org/
Template:     twentytwentyone
Version:      1.0.0
Text Domain:  twentytwentyonechild
*/

.site-title {
color: #7d7b77;
}
.site-description {
color: #aba8a2;
}
body {
background-color: #fdf8ef;
color: #7d7b77;
}
.entry-footer {
color: #aba8a2;
}
.entry-title {
color: #aba8a2;
font-weight: bold;
}
.widget-area {
color: #7d7b77;
}
Método 2: Copiar o código do arquivo style.css do tema principal
Talvez haja muitas coisas em seu tema filho que você queira personalizar. Nesse caso, pode ser mais rápido copiar algum código diretamente do arquivo style.css do tema pai, colá-lo no arquivo CSS do tema filho e modificá-lo.
A parte complicada é que o arquivo de folha de estilo de um tema pode parecer muito longo e complicado para os iniciantes. No entanto, depois que você entende o básico, não é tão difícil assim.
Vamos usar um exemplo real da folha de estilo do tema principal Twenty Twenty-One. Você precisa navegar até /wp-content/themes/twentytwentyone na pasta de instalação do WordPress e, em seguida, abrir o arquivo style.css no gerenciador de arquivos, no FTP ou no Theme File Editor.
Você verá as seguintes linhas de código:
:root {
/* Colors */
--global--color-black: #000;
--global--color-dark-gray: #28303d;
--global--color-gray: #39414d;
--global--color-light-gray: #f0f0f0;
--global--color-green: #d1e4dd;
--global--color-blue: #d1dfe4;
--global--color-purple: #d1d1e4;
--global--color-red: #e4d1d1;
--global--color-orange: #e4dad1;
--global--color-yellow: #eeeadd;
--global--color-white: #fff;
--global--color-white-50: rgba(255, 255, 255, 0.5);
--global--color-white-90: rgba(255, 255, 255, 0.9);
--global--color-primary: var(--global--color-dark-gray); /* Body text color, site title, footer text color. */
--global--color-secondary: var(--global--color-gray); /* Headings */
--global--color-primary-hover: var(--global--color-primary);
--global--color-background: var(--global--color-green); /* Mint, default body background */
--global--color-border: var(--global--color-primary); /* Used for borders (separators) */
}
As linhas 3 a 15 controlam o tipo de cores (como amarelo, verde, roxo) que o tema inteiro usará em seus códigos HEX específicos. E então, para linhas como ‘global-color-primary’ ou ‘global-color-secondary’, isso significa que essas são as cores primárias e secundárias desse tema.
Você pode copiar essas linhas de código para a folha de estilo do seu tema filho e alterar os códigos HEX para criar o esquema de cores perfeito.
Ao rolar para baixo na folha de estilo do tema pai, você perceberá que outras variáveis também podem ter essas variáveis de cor, como aqui:
/* Buttons */
--button--color-text: var(--global--color-background);
Isso significa basicamente que todos os textos dos botões usarão a mesma cor declarada em --global--color-background:, que é verde menta(--global--color-green: #d1e4dd). Se você alterar o HEX em --global--color-green:, o texto do botão também terá uma aparência diferente.
Observação: Se você usar o tema filho do Twenty Twenty-One e não observar nenhuma alteração, talvez seja necessário atualizar a parte “Versão” das informações do arquivo do tema (por exemplo, de 1.0 para 2.0) sempre que atualizar o arquivo style.css.
Você também pode seguir estes tutoriais para experimentar as personalizações do tema filho:
- Como alterar a cor do texto no WordPress
- Como alterar o tamanho do seu logotipo do WordPress (funciona com qualquer tema)
- Como personalizar o estilo de citações em bloco em temas do WordPress
- WordPress Body Class 101: dicas e truques para designers de temas
- Como adicionar um efeito Parallax a qualquer tema do WordPress
Como personalizar seu tema filho Block
Se você usar um tema de bloco filho, a maioria das personalizações será feita no arquivo theme.json, e não no style.css.
No entanto, durante nossos testes, descobrimos que o processo é complicado. Ao contrário dos temas filhos clássicos, há uma lacuna maior de conhecimento que você precisa preencher (especialmente sobre JSON e como o CSS é tratado nele) se você for novo no desenvolvimento de temas do WordPress.
Dito isso, encontramos uma alternativa muito mais fácil usando o plug-in Create Block Theme. Essa ferramenta pode registrar todas as alterações feitas no WordPress Full Site Editor no arquivo theme.json do seu tema filho. Portanto, você não precisará mexer em nenhum código, pois o plug-in cuidará disso para você.
Vamos lhe mostrar um exemplo. Primeiro, abra o WordPress Full Site Editor acessando Appearance ” Editor.
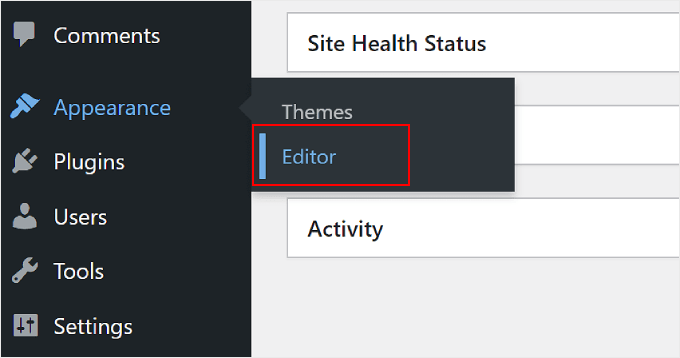
Você verá vários menus para escolher.
Aqui, basta selecionar “Styles” (Estilos).
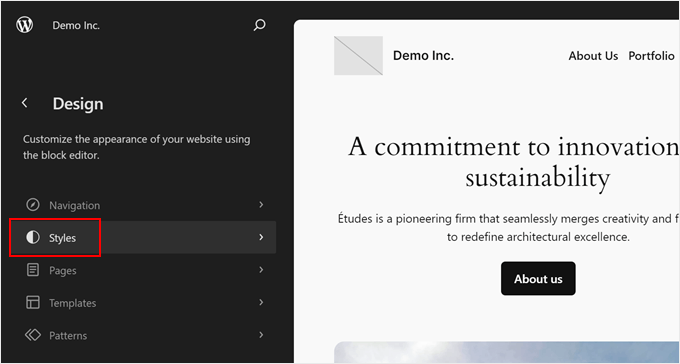
Na próxima página, você verá várias combinações de estilos incorporados para escolher.
Para nossa finalidade, você pode simplesmente ignorar tudo isso e clicar no ícone do lápis.
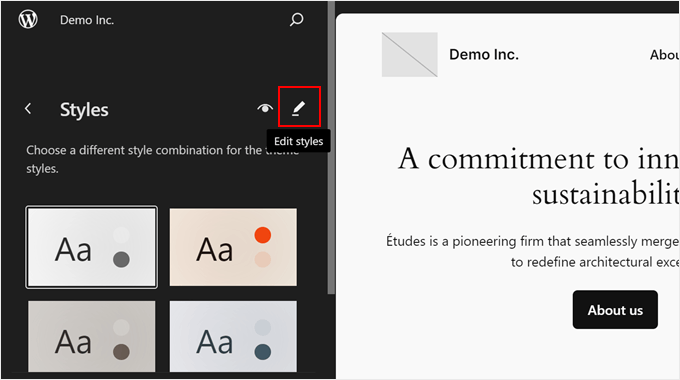
Agora, vamos tentar alterar algumas partes de seu tema filho, como as fontes.
Para este exemplo, clique em “Typography” (Tipografia) na barra lateral direita.
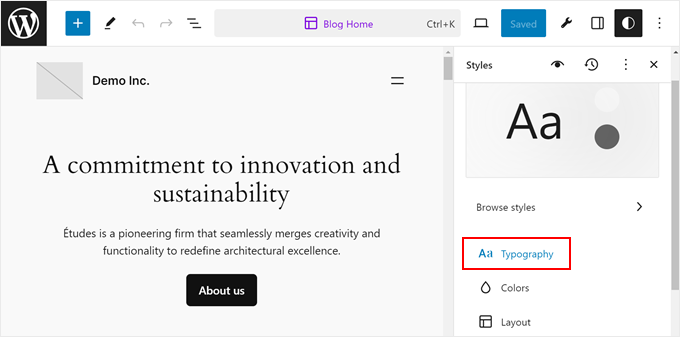
Em seguida, você verá algumas opções para alterar as fontes globais do tema para texto, links, títulos, legendas e botões.
Vamos clicar em“Headings” (Títulos) para fins de demonstração.

No menu suspenso Font (Fonte), altere a escolha original para qualquer fonte disponível.
Sinta-se à vontade para alterar a aparência, a altura da linha, o espaçamento entre letras e o revestimento das letras, se necessário.
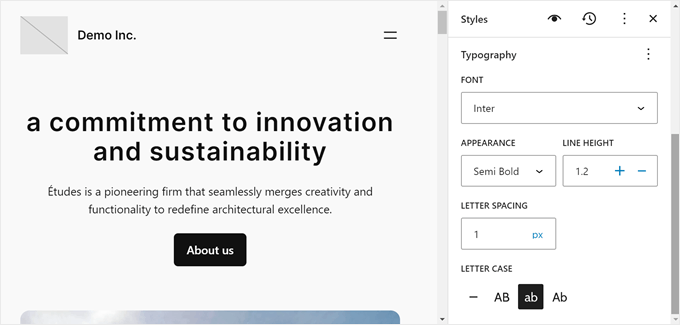
Quando terminar, basta clicar em “Save”. Depois disso, você pode clicar no botão Criar tema de bloco (o ícone de chave inglesa) ao lado de “Salvar”.
Em seguida, clique em “Save Changes” (Salvar alterações). Isso salvará todas as suas alterações no arquivo theme.json filho.
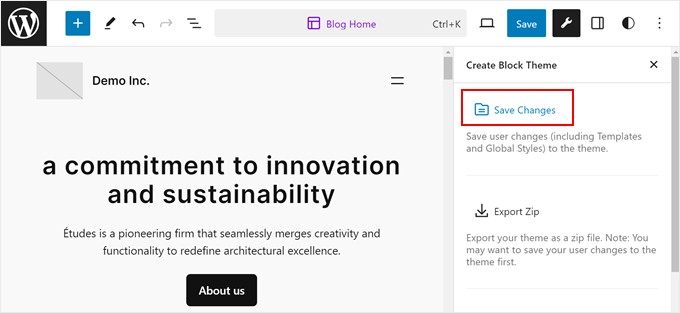
Se você abrir o arquivo theme.json, verá as alterações refletidas no código.
Veja o que vimos depois de atualizarmos nosso tema filho:
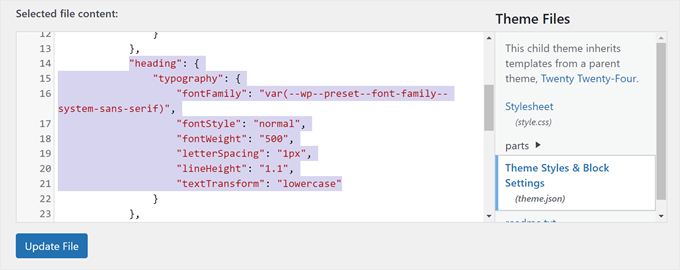
Como você pode ver, agora o arquivo inclui um código que indica que as tags de título usarão a fonte Inter com aparência semibold, altura de linha de 1,2, espaçamento de linha de 1 pixel e em letras minúsculas.
Portanto, sempre que você editar o tema do bloco filho, certifique-se de clicar no ícone de chave inglesa e salvar as alterações para que elas fiquem bem documentadas.
Como editar os arquivos de modelo de um tema filho
A maioria dos temas do WordPress tem modelos, que são arquivos de tema que controlam o design e o layout de uma área específica dentro de um tema. Por exemplo, a seção de rodapé geralmente é controlada pelo arquivo footer.php, e o cabeçalho é controlado pelo arquivo header.php.
Cada tema do WordPress também tem um layout diferente. Por exemplo, o tema Twenty Twenty-One tem um cabeçalho, um loop de conteúdo, uma área de widget de rodapé e um rodapé.
Se quiser modificar um modelo, você deverá localizar o arquivo na pasta do tema pai e copiá-lo para a pasta do tema filho. Depois disso, você deve abrir o arquivo e fazer as modificações desejadas.
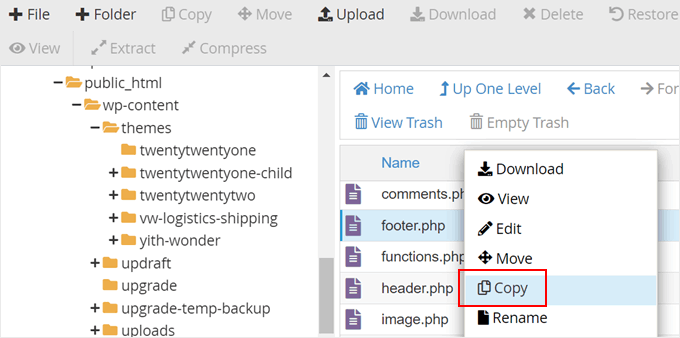
Por exemplo, se você usa a Bluehost e seu tema principal é o Twenty Twenty-One, poderá acessar /wp-content/themes/twentytwentyone no gerenciador de arquivos. Em seguida, clique com o botão direito do mouse em um arquivo de modelo como footer.php e selecione “Copiar”.
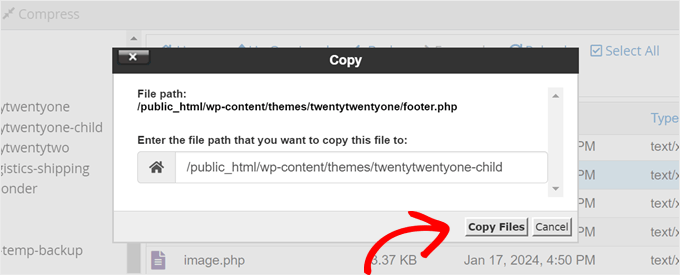
Depois disso, insira o caminho do arquivo do tema filho.
Quando terminar, basta clicar em ‘Copy Files’.
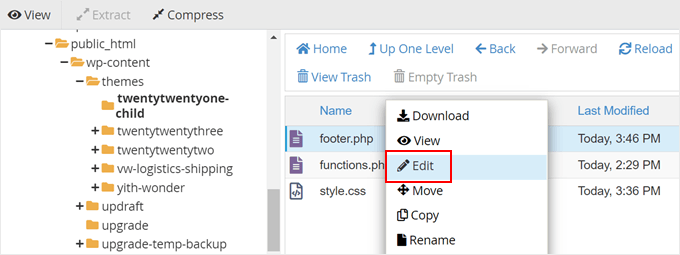
Em seguida, você será redirecionado para o caminho do arquivo.
Para editar o arquivo footer.php, basta clicar com o botão direito do mouse sobre ele e selecionar “Edit”.
Por exemplo, removeremos o link “Proudly powered by WordPress” da área do rodapé e adicionaremos um aviso de direitos autorais.
Para fazer isso, você deve excluir tudo o que estiver entre as tags <div class= "powered-by">:
<div class="powered-by">
				<?php
				printf(
					/* translators: %s: WordPress. */
					esc_html__( 'Proudly powered by %s.', 'twentytwentyone' ),
					'<a href="' . esc_url( __( 'https://wordpress.org/', 'twentytwentyone' ) ) . '">WordPress</a>'
				);
				?>
			</div><!-- .powered-by -->
Em seguida, você precisa colar o código que se encontra abaixo dessas tags no exemplo abaixo:
<div class="powered-by">
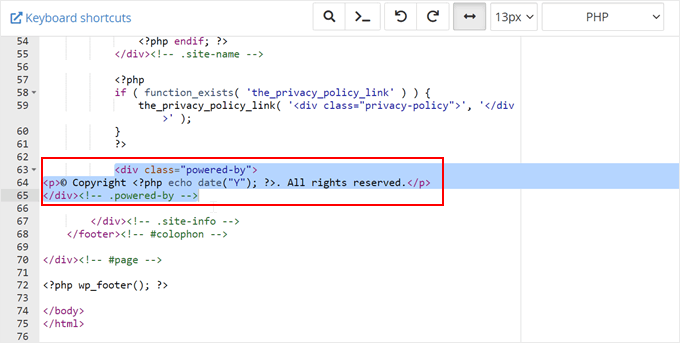
<p>© Copyright <?php echo date("Y"); ?>. All rights reserved.</p>
</div><!-- .powered-by -->
Veja o que você deve ter agora no editor de texto:
Continue e salve o arquivo para oficializar as alterações.
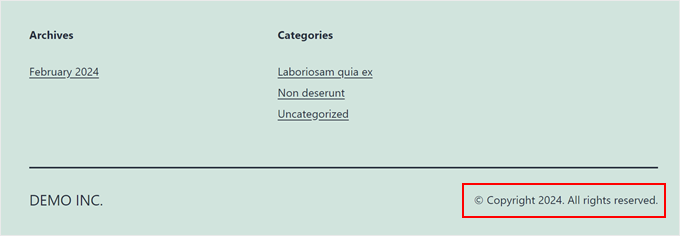
Depois disso, acesse seu site para ver o novo aviso de direitos autorais.
Como adicionar novas funcionalidades ao seu tema filho
O arquivo functions.php em um tema usa código PHP para adicionar recursos ou alterar recursos padrão em um site WordPress. Ele funciona como um plug-in para seu site WordPress que é ativado automaticamente com seu tema atual.
Você encontrará muitos tutoriais do WordPress que pedem para você copiar e colar trechos de código no functions.php. Mas se você adicionar suas modificações ao tema principal, elas serão substituídas sempre que você instalar uma nova atualização do tema.
É por isso que recomendamos o uso de um tema filho ao adicionar trechos de código personalizados. Neste tutorial, adicionaremos uma nova área de widget ao nosso tema.
Podemos fazer isso adicionando esse trecho de código ao arquivo functions.php do nosso tema filho. Para tornar o processo ainda mais seguro, recomendamos o uso do plug-in WPCode para que você não edite o arquivo functions.php diretamente, reduzindo o risco de erros.
Você pode ler nosso guia sobre como adicionar trechos de código personalizados para obter mais informações.
Aqui está o código que você precisa adicionar ao seu arquivo functions.php:
// Register Sidebars
function custom_sidebars() {

$args = array(
'id'            => 'custom_sidebar',
'name'          => __( 'Custom Widget Area', 'text_domain' ),
'description'   => __( 'A custom widget area', 'text_domain' ),
'before_title'  => '<h3 class="widget-title">',
'after_title'   => '</h3>',
'before_widget' => '<aside id="%1$s" class="widget %2$s">',
'after_widget'  => '</aside>',
);
register_sidebar( $args );

}
add_action( 'widgets_init', 'custom_sidebars' );
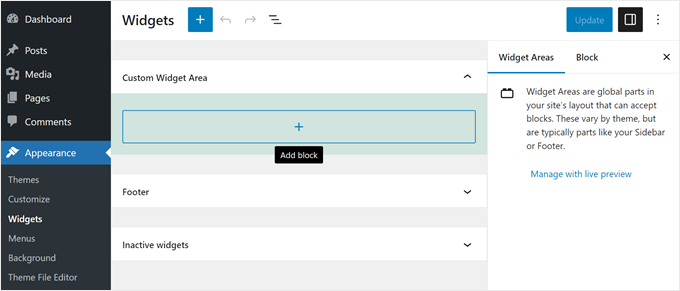
Depois de salvar o arquivo, você pode acessar a página Appearance ” Widgets do painel do WordPress.
Aqui, você verá sua nova área de widgets personalizados à qual poderá adicionar widgets.
Há muitos outros recursos que você pode adicionar ao seu tema usando trechos de código personalizados. Confira estes truques extremamente úteis para o arquivo functions.php do WordPress e os trechos de código úteis do WordPress para iniciantes.
Como solucionar problemas em seu tema filho do WordPress
Se você nunca criou um tema filho antes, há uma boa chance de cometer alguns erros, e isso é normal. É por isso que recomendamos o uso de um plugin de backup e a criação de um site local ou ambiente de teste para evitar erros fatais.
Dito isso, não desista tão rapidamente. A comunidade do WordPress é muito engenhosa, portanto, seja qual for o seu problema, provavelmente já existe uma solução.
Para começar, você pode conferir nossos erros mais comuns do WordPress para encontrar uma solução.
Os erros mais comuns que você provavelmente verá são erros de sintaxe causados por algo que você deixou passar no código. Você encontrará ajuda para resolver esses problemas em nosso guia rápido sobre como localizar e corrigir o erro de sintaxe no WordPress.
Além disso, você sempre pode começar de novo se algo der muito errado. Por exemplo, se você excluiu acidentalmente algo que o tema pai exigia, basta excluir o arquivo do tema filho e começar de novo.
Esperamos que este artigo tenha ajudado você a aprender como criar um tema filho do WordPress. Talvez você também queira conferir nosso guia definitivo para aumentar a velocidade e o desempenho do WordPress e nossa seleção especializada dos melhores construtores de páginas de arrastar e soltar para criar facilmente seu site.
Se você gostou deste artigo, inscreva-se em nosso canal do YouTube para receber tutoriais em vídeo sobre o WordPress. Você também pode nos encontrar no Twitter e no Facebook.


Syed Balkhi says
Hey WPBeginner readers,
Did you know you can win exciting prizes by commenting on WPBeginner?
Every month, our top blog commenters will win HUGE rewards, including premium WordPress plugin licenses and cash prizes.
You can get more details about the contest from here.
Start sharing your thoughts below to stand a chance to win!
Asad says
Sir, what should I write in function.php to call the Parent theme?
WPBeginner Support says
You would want to use the code from our article below the text /* enqueue scripts and style from parent theme */
Administrador
Yogesh Sambare says
Hi, Team wpbeginner,
Thanks for this awesome guide, now I think I’m able to make my themes child theme, and it’s really helpful for me .
WPBeginner Support says
Glad you found our guide helpful!
Administrador
Ricardo says
The line:
“wp_get_theme()->get(‘Version’) )”
Should be:
“wp_get_theme()->get(‘Version’) )”
cheers!
WPBeginner Support says
While our comments automatically changed that in your message, we see the issue, thank you for letting us know
Administrador
Rubb says
Can I delete the plugin after I create the child theme?
WPBeginner Support says
Currently, you can do that with the plugin
Administrador
Eitan says
You need to add quotation marks to the Y = (“Y”) at the echo date, or you’ll get an error. – echo date(“Y”)
WPBeginner Support says
Thank you for pointing out the typo
Administrador
Bomo says
So now that we have created a child theme, how do we update the parent theme when the child theme is activated?
WPBeginner Support says
You would update the parent theme as you normally would. For safety, you may want to create a backup before you update the parent theme in case there is a conflict somewhere.
Administrador
RYAD says
But do we have to activate the parent theme before we update and them desactivate it and reactivate the child theme ?
WPBeginner Support says
No, you can update the theme without it being active
Mahesh Yadav says
One thing I want to know, if we make a child theme then we have 2 CSS files to load one parent theme CSS and second child them CSS. Wouldn’t it increase the site load time and It added one more CSS to load?
WPBeginner Support says
While the load time would technically increase, it shouldn’t be by a noticeable amount.
Administrador
Nadia Shaheen says
Great work!
stay blessed and keep sharing awesome content.
WPBeginner Support says
Thank you, glad you liked our content
Administrador
Fahad says
Great Work !
This site is super helpful
Keep it up !!
WPBeginner Support says
Thank you, glad our article was helpful
Administrador
Daniel Waduka says
I am just starting to use child themes, and this article has been of so much help to me.
Thanks so much.
WPBeginner Support says
Glad our guide could be helpful
Administrador
Marcos Flores says
Hi! i’ve been reading this article and it works! but i also read wordpress documentation about this and they say this
“Note that the previous method was to import the parent theme stylesheet using @import: this is no longer best practice, as it increases the amount of time it takes style sheets to load. The correct method of enqueuing the parent theme stylesheet is to add a wp_enqueue_scripts action and use wp_enqueue_style() in your child theme’s functions.php ”
Should i use both method? or if i user the function.php i dont need to write import function inside style.css (located in my child-theme folder)
Khema says
Your instructions are missing a step with the functions.php creation. It should mention that needs to wrap the whole file. In this case I didn’t want to add the example you used and to another piece of code from the article you linked to. Naturally those codes didn’t include the php tag.
Thanks for the article. It’s very very helpful.
rReons says
So question. I was using my wordpress theme without any child theme and was doing all the changes in to it. I have created a child theme thanks to your guide and I’m using that now as the website theme.
My question is both themes have the same modifications changes. If I update the main theme from now on, will the changes affect the child theme also?
balu says
He! wpbeginner. WordPress official site saying this. You need to update the post. Thank You!
Note that the previous method was to import the parent theme stylesheet using @import: this is no longer best practice, as it increases the amount of time it takes style sheets to load. The correct method of enqueuing the parent theme stylesheet is to add a wp_enqueue_scripts action and use wp_enqueue_style() in your child theme’s functions.php. You will therefore need to create a functions.php in your child theme directory. The first line of your child theme’s functions.php will be an opening PHP tag (<?php), after which you can enqueue your parent and child theme stylesheets. The following example function will only work if your Parent Theme uses only one main style.css to hold all of the css. If your child theme has more than one .css file (eg. ie.css, style.css, main.css) then you will have to make sure to maintain all of the Parent Theme dependencies.
Pat says
Great info…you made it to my save list!! Thanks!
Alfonso de Garay says
I have a Child theme with the theme latest version installed in my site. WP version 4.7.5. Received a notice that says WP version is available please update now.
1. Do I have to backup my site again before updating?
2. Do I have to create another Child theme using Child version 1 one?
2. How can I change the Name, email and URL to Chile version 1
WPBeginner Support says
Hi Alfonso,
WordPress updates normally do not affect your themes so you do not need to create another child theme. You should always backup your website before updating WordPress.
Administrador
Lisa Bruce says
Hi, I can see that this video/post is a few years old, so I’m a little late to the party, but I have a questions I was hoping you could help me with.
I am a relatively new to WP and just came to realize the importance of child themes. I have been working on developing a site for a friend and have made several changes to the theme that I am using. I found a bug in the theme and contacted the theme developer and they said that the bug had been fixed in a recent update.
If I install the update I believe I will loose all my customizations. Is it too late to create a child them? Is it possible to do it now and then install the update? I prefer not to have to start from scratch.
WPBeginner Support says
Hi Lisa,
If you know what changes you made and to which files, then first download a backup of your existing theme to your computer. After that, install the updated version. You can now create a child theme and then copy and paste the code from your customized version to the child theme.
Administrador
Nell Yang says
Thank you for this helpful post. I have always been looking for a video to show me how exactly should I use child theme. It is quite time consuming that each time after I updated my theme, all my styles just went away. It is frustrating to do everything over again. I tried to read the documents from wordpress but still don’t know how to proceed after activate the child theme. Keep up the good work! Thank you again!
Tony Agee says
Good instructional video. Most tutorials I have watched tell you to paste the code in the file but they neglect to tell you what medium to paste the code to. I was going to use Notepad++ but I guess you can use regular notepad.
JP says
Hello, i just want to say that you are a very good writer, very clear and simple. I past a long time on your article for learn WP.
Thank you!
Rob Brooks says
Hi. Thank you for being a great WP resource. I am new to WP and really appreciate your guidance. I have followed the article to the letter but when I go to enable the child template on the site, I get the error “The parent theme is missing. Please install the “Real Estate Lite” parent theme. As you see I am using a free template called Real Estate light. it is located in the ../real-estate-lite/ directory of wp-content/themes. My code is below… did I do something wrong?
Theme Name: Real Estate Lite Child Theme Theme URI: http://www.example.com/ Description: Real Estate Lite child theme Author: me Author URI: http://www.example.com Template: Real Estate Lite Version: 1.0.0 */ @import url("../real-estate-lite/style.css");1-click Use in WordPress
In addition, I will mention the theme was free and is running on WP version 4.7.2 (Running on Plesk). I created style.css file directly on the server so no FTP issues.
I have already made significant changes to the parent style.css file as well as functions.php … I am not sure if this would affect this, but going to test on an unedited dummy domain to see if I get the same results
Any guidance/assistance you can provide would be greatly appreciated.
WPBeginner Support says
Hey Rob,
You will need parent theme to be installed on your site and Template value should match parent theme’s actual name which you can see in it’s style.css file.
Administrador
Carrie says
Hi! Great article! I am finally starting to understand how to edit css so that I get the result I want, thanks to this article.
Thanks much for the simplified explanation!
Nalin says
I created a child theme & Using @import for the “style.css” on a child theme. Now I want to change in another css file of parent theme’s folder ….. /font_awesome/css/fontawesome.css
Now, I want to know that where I will put my new fontawesome.css in child theme & how to use @import command.
or any other process to use more css file in child theme.
Rebecca says
So, I don’t have the wp content folder on my computer. What should I do?
Should I have downloaded this at some point?
WPBeginner Support says
Hi Rebecca,
The wp-content file is hosted on your hosting account not on your computer. You will need an FTP client to connect to your server.
Administrador
Brad says
Using @ import is no longer best practice
SAppa says
Then what is the best practice now? You should be able to back up your comment.
Jual beli rumah says
Thankyou
Jean-philippe says
I am learning so much since a few hours on your website. Everytime I search something in google related to “how to” in wordpress I find that the best information is here at WPbeginner. It is always well explained and easy to understand. I will always come back for information here without a doubt.
WPBeginner Support says
Hi Jean-philippe,
Thanks for the kind words, we are glad you find WPBeginner helpful Don’t forget to join us on Twitter for more WordPress tips and tutorials.
Administrador
Smart Rashed says
This is the article ,which i am looking for,thanks man.
Kevin says
I know this will be a stupid question. I’m so new to this and have no skills at all. If I am creating a file, style sheet, etc. on my wp installation file on my local pc, how does that get onto my website? I guess I’m missing that? I use like 3 different PCs to work on my website and those local files aren’t on all of them. Again, I am sure I am missing something really dumb. Not seeing the connection.
WPBeginner Support says
The files you edit on your computer need to be transferred to your website using an FTP client. See our guide on how to upload WordPress files using FTP.
Administrador
Kevin says
Ok, I got that and made a child theme, but when I activate it, the formatting on the site is all off from the parent theme. What did I do wrong?
Francesco says
Hi there,
I’m following your tutorial but WordPress (4.5.3) doesn’t recognise the new folder on my online server. How can I work around this?
Thanks,
F.
Muhammad Moosa says
Helpful article indeed, I followed it and created a child theme. Thanks.
Carolina says
Hi, thanks for the tutorial, very helpfull. But I have a question. Can I create a child theme from an already established website? I have a client who designed his own website but did not create a child theme. How to go about it?
WPBeginner Support says
If their current theme follows WordPress coding standards and best practices then you should have no trouble creating a child theme.
Administrador
Mike says
Thank you so much for the article and video. Apparently since these were created WordPress has new best practices listed in their codex which is confusing me.
“The final step is to enqueue the parent and child theme stylesheets. Note that the previous method was to import the parent theme stylesheet using @import: this is no longer best practice.”
Do I stick with the steps you outlined herein verbosely, or do I omit the import function and create the PHP file, or do I implement both?
My theme’s style.css file only contains a header so importing that file seems irrelevant, and there are multiple CSS files like main.css located elsewhere in the parent’s file structure. Not knowing any better as a beginner I have already made changes to main.css to achieve some of my goals and only now I realize the child theme is necessary.
Any advice is greatly appreciated.
Best regards,
Mike
WPBeginner Support says
You will need to import at least your style.css file it should be in your parent themes main directory. It should automatically import other CSS files.
Administrador
Mike says
Even if the style.css has nothing but the header?
Jack says
If your style.css file do not have imports to other css styles, you can import them directly, just like style.css.
Olamide says
Good day. When I did a live preview of the child theme, I noticed that it didn’t have the css of the parent theme. Maybe this is as a result of an error in the way I inserted the code?
This is the code that I inserted:
/*
Theme Name: sparkling child
Theme URI: https://www.wpbeginner.com/
Description: sparkling child theme
Author: djetlawyer
Author URI: http://www.example.com
Template: sparkling
Version: 1.0.0
*/
@import url(“../sparkling/style.css”);
The parent theme is “sparkling”. If there is any error, please correct me.
Thank you.
WPBeginner Support says
The code is correct.
Administrador
lucia says
Hi there,
I am trying to set up a child theme to activate my footer on twenty twelve, but I don’t know what code to use to set it up.
I tried this webpage
with various suggestions , and I have tried to change your suggestion as given on twenty thirteen , but I don’t succeed.
Could you please give me the right working code for setting up a child them for twelve twelve.
Leigh says
This was incredibly helpful – especially your HTML for us to copy. I’ve never been so excited to see colors change on a website before. This is easily the best “how-to” out there for this theme!
Bhautik Andhariya says
Hello, I have tried same example that you shown. But my child theme is replacing all the style of its parent theme.
It doesn’t have any style of it’s parent. What is the solution? Can you please help me? I am new in wordpress and i am learning it.
Angelo says
Hi there!
I’ve just installed the Bose template and also created a child theme for it. However, the following error message appears on the center of my website:
Warning: implode(): Invalid arguments passed in /home/hello582/public_html/teste/wp-content/themes/bose/featured.php on line 12
I’m a very beginner at websites creation, so I haven’t got any clue about what the problem is. Could anyone help me?
Thanks a lot!
WPBeginner Support says
Please contact the theme developer for support.
Administrador
Djamila says
Hi,
Thanks for the article! I could not get my child theme to ‘appear’ in the template section and it turned out I indeed misspelled the way the original template was named. What a difference a capital makes, huh?
However, now that I have my child theme I was able to update the parent theme and when I did all of a sudden I got an issue with a super important plugin ( I am building a review blog on a local database, for now and it’s the wrap up/grading plugin belong to the template designers).
In the parent template they ‘upgraded’ this plugin. I personally prefer the old one, but okay…anyway…underneath my review you now see *both*, the old wrap up with grades and the new one, which looks out of whack too. I have de-activated and re-activated but it stays like that. Super annoying and I don’t know where to look to either keep the old one (prettier) or only the new one and outlines as should.
Where should I start? Thanks for any help you can give me.
WPBeginner Support says
Contact the plugin support.
Administrador
Amanda says
Thanks for a great article!
If I use a child theme, will I still be able to customize it using the Appearance> Theme Options that comes with my theme in the admin panel such as font size, background colors etc. or do I have to go the code route?
If I have activated the Child theme and I use the Appearance tab to update the styling instead of using code, is it essentially still updating the parent theme because the related files are not in the child theme folder?
WPBeginner Support says
Yes, your child theme will inherit all these options.
Administrador
Amanda says
Thanks for your reply.
So if I activate the Child Theme and use the settings in the Appearance tab of my admin panel to change the styling (instead of writing css code), my changes won’t be overwritten when I do a theme or WordPress update on the parent theme?
Would I still need to copy the stylesheet, header, footer files etc. to the child theme folder to make the scenario above work?
Laura says
I’ve been following these (and other) steps to create a child theme based on twentytwelve. The issue I’m running into is that wordpress seems to ignore only some of the css I’ve changed from the original theme and it’s driving me nuts. For example, I’ve successfully changed the background colour of the menu, but it simply won’t let me change the text colours of anything. I’ve used your approach of editing it in chrome’s code inspector thing (which worked great, the colour got changed, suggesting my code was correct) and pasting the changed code into the style.css of the child theme, but it doesn’t seem to get picked up at all. I don’t know what to do about this, any insights would be very welcome!
Boyet says
Thank you very much for this tutorial. I don’t have problem editing my child theme’s stylesheet, header, and footer files.
My question is, what will I do if I wanted to change something in a file located in my mother theme’s folder like: public_html/wp-content/themes/shopera/woocommerce?
Do I need to create the same path in my child theme?
Thanks in advance…
WPBeginner Support says
Yes.
Administrador
Tony Arnold says
Very helpful and largely understood and executed.
I am trying to make my header image full width.My theme doesn’t ‘allow’ this as standard so do i change the file?
Thank you
Sohail Farooq says
Love this article I tried and got it worked at once.
Xander says
Hi, there!
It seems I have got stuck a little bit. I have already made some changes in the some .php-files (e.g. header.php, footer.php and so on) of my parent theme without having a child theme installed.
Now I want to create a child theme because updates of the parent one have been coming. What should I do with all those already modified files? Should I copy them in the child theme’s directory? What are folder I need to have it it? Should I create the same folders that the parent theme has got for the child theme?
Thank you,
WPBeginner Support says
You don’t need all the folders of your parent theme. You just need to recreate the files where you have made changes. We have a tutorial on how update themes without losing changes. It has a section where you can find out which files you have modified in your theme and what changes you have made to them.
Download a fresh copy of your parent theme on your computer. Download the old theme to your computer and then upload the fresh copy. After that create a new child theme. Copy the files where you have made changes from the fresh theme to your child theme. Copy the changes you have made in the old theme files into the files of your new child theme.
It would take some troubleshooting before you get it right. So we strongly recommend you to backup your site first. If possible test your changes on a local WordPress install first.
Administrador
Xander says
Thank you. Could you please give me a link on the tutorial mentioned?
There is another obstacle – I have changed functions.php file, how can I reconcile both of them in the parent and child themes?
Chris says
Can I load and install my new child theme on another site? If so how?
Thanks!
WPBeginner Support says
Download your child theme to your computer. Create a zip file containing the theme folder. Go to the admin area of another site and then visit Appearance » Themes. Click on the add new theme button and then click on the upload button. Upload the zip file you created earlier. WordPress will extract and install your child theme.
You will also need to install the parent theme as well.
Administrador
Daniel Garneau says
Hello,
I find this tutorial very useful to learn how to create a child theme. But in the process I made the following ajustments. There needs to be two files in the child-theme directory. They have to be named style.css and functions.php.
style.css must contain at least (supposing one is using the TwentyTen theme):
@import url(“../twentyten/style.css”);
Template: twentyten
When I consulted the turorial on 2015-05-12, the “template: twentyten” line was in the comment block. It must be a command that can be read by WordPress.
Also, there must be a functions.php file, and it has to have minimally the following line of command :
<?php
Your tutorial along with the wp codex, helped me creating my first child theme. Thank you.
Maria says
Is it safe to say that the changes I made in the custom css field can be placed into my child’s theme style.css?
WPBeginner Support says
Yes.
Administrador
Louise Mason says
I am falling at the first fence – how do i find /wp-content/themes/? Actually where is the WordPress installation folder? In the video i can’t see what you click on or how you open it, the file manager just appears by magic!
WPBeginner Support says
You can access File Manager by visiting your web hosting dashboard. Login to your web hosting account and locate File Manager.
Administrador
Sonam says
when I select the file manager of my web hosting account , I get four options :
1)home directory
2)web root
3)public ftp root
4)Document root
which one should I select to work on.
Kylee says
Hi – I go with Home Directory. That takes me to all the files. I click on Public HTML on the left to access my various sites. You probably figured it out at some stage but just in case you didn’t…
Viju says
Hi,
I’m using a child theme for my website. What I’m struggling is to give a version to my style.css of the child theme. WordPress seems to append default wordpress version at the end of the file like /style.css?ver=4.1.1
I’m incrementing the value of ‘version’ in my child’s style.css , but wordpress is not picking it.
Because of this my changes to the child theme are not getting reflected to users who has the cached version of the css.
can you advise how to handle this ?