A equipe do WPBeginner cria regularmente sites locais do WordPress em seus computadores para testar temas, plugins e funcionalidades do site sem afetar um site ativo.
O XAMPP é um pacote de software gratuito e de código aberto que fornece uma plataforma fácil de usar para configurar uma instância local do WordPress.
Neste artigo, mostraremos como criar facilmente um site local do WordPress usando o XAMPP para que você possa fazer experiências com o WordPress e refinar suas habilidades de desenvolvimento em um ambiente seguro.

Por que criar um site WordPress local?
A criação de sites locais do WordPress é uma prática comum entre desenvolvedores e proprietários de sites. Isso permite que você teste o WordPress sem criar um site real na Internet.
Os sites locais só ficam visíveis para você em seu computador. Você pode experimentar diferentes temas e plug-ins do WordPress, testar seus recursos e aprender os conceitos básicos do WordPress.
Se você já tiver um site WordPress, poderá criar uma cópia local do site no computador para experimentar novas atualizações de plug-ins antes de implementá-las no site ativo.
Importante: um site local só estará visível para você em seu computador. Se quiser criar um site ativo, você precisará de um nome de domínio e de hospedagem do WordPress.
Siga as instruções passo a passo em nosso guia sobre como iniciar um blog WordPress quando estiver pronto para criar um site ativo.
Dito isso, vamos ver como instalar o WordPress localmente no Windows, Mac ou Linux usando o XAMPP.
O que é o XAMPP?
O XAMPP é um pacote de software que inclui tudo o que você precisa para configurar um ambiente de servidor local em seu computador.
Para criar um site local do WordPress, você precisa configurar um software de servidor da Web (Apache), PHP e MySQL em seu computador.
PHP é uma linguagem de programação e MySQL é um software de gerenciamento de banco de dados. Ambos são necessários para executar o WordPress.
Instalá-los separadamente é bastante difícil para iniciantes. É aí que entra o XAMPP.
O XAMPP facilita a criação de sites WordPress localmente. Ele está disponível para computadores com Windows, Mac e Linux.
Vamos começar instalando o XAMPP e configurando-o para executar seu site local do WordPress.
Instalação do XAMPP em seu computador
Primeiro, você precisa acessar o site do XAMPP e clicar no botão “Download” para seu sistema operacional.
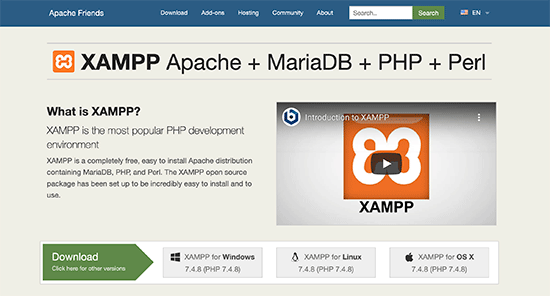
Dependendo do seu sistema operacional, o assistente de instalação e a interface do aplicativo podem ser diferentes das capturas de tela aqui apresentadas. Para fins deste artigo, mostraremos a versão do software para Windows.
Depois de fazer o download do XAMPP, você precisará clicar e executar o instalador.
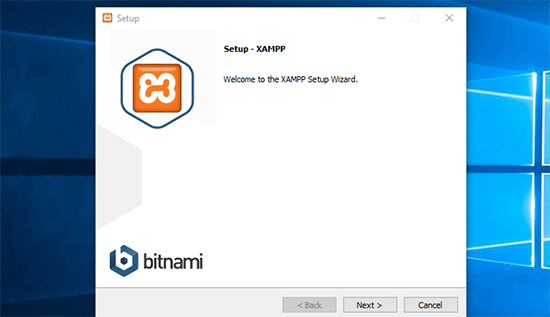
O XAMPP perguntará onde instalar o software e quais pacotes você deseja instalar. As configurações padrão funcionarão para a maioria dos usuários. Continue clicando no botão “Next” para concluir o assistente de configuração.
Após concluir o assistente, marque a opção “iniciar o painel de controle agora” e clique no botão “Concluir”.
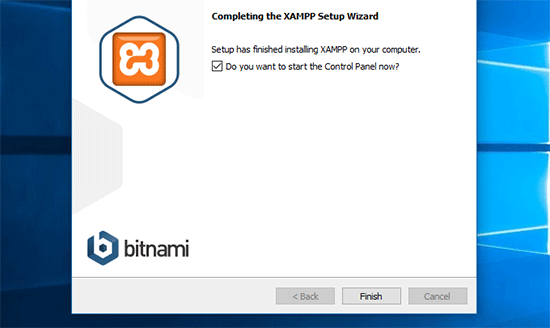
Isso iniciará o aplicativo do Painel de controle do XAMPP.
Usando o aplicativo XAMPP, você pode executar o servidor da Web Apache como servidor local e o MySQL como servidor de banco de dados. Vá em frente e clique no botão “Start” (Iniciar) ao lado do Apache e do MySQL.
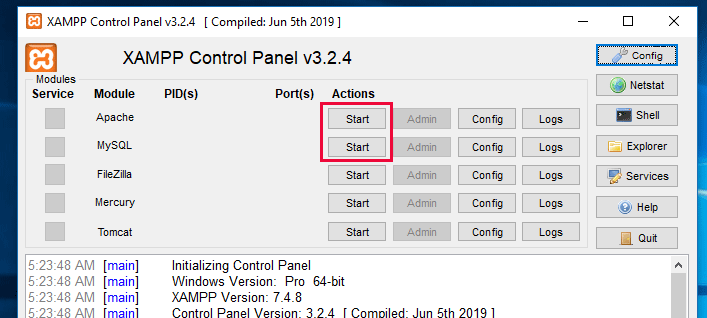
O XAMPP agora iniciará o Apache e o MySQL.
Você poderá ver uma notificação do firewall do Windows. É importante que você clique no botão “Permitir acesso” para que ambos os aplicativos sejam executados no seu computador.
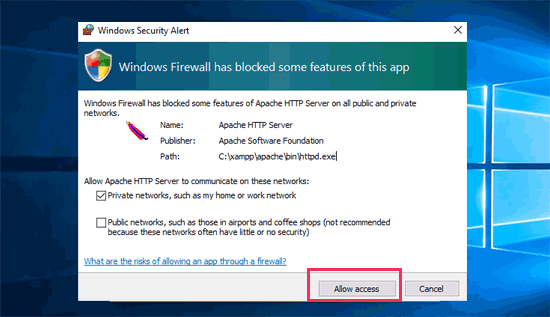
Quando os dois aplicativos forem iniciados, seus nomes serão destacados em verde.
Agora, você está pronto para criar um site local e instalar o WordPress usando o XAMPP.
Criação de um site WordPress local com o XAMPP
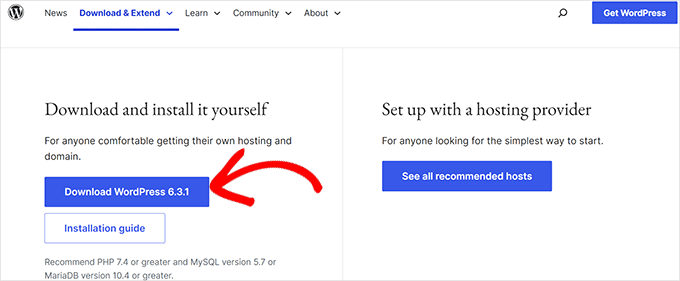
Primeiro, você precisará fazer o download do WordPress. Visite o site WordPress.org e clique no botão “Download WordPress”.
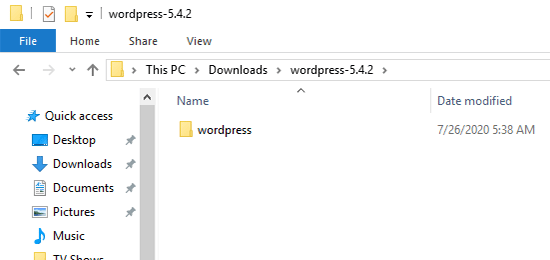
Depois de fazer o download do WordPress, é necessário extrair o arquivo zip e você verá uma pasta wordpress.
Você precisa copiar essa pasta.
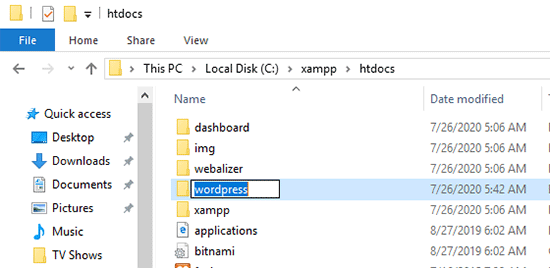
Em seguida, vá para a pasta de instalação do XAMPP.
No Windows, será C:/Program Files/XAMPP/htdocs ou C:/Xampp/htdocs.
No Mac, será /Applications/XAMPP/htdocs.
Cole a pasta wordpress que você copiou anteriormente dentro da pasta “htdocs”.
Recomendamos renomear a pasta “wordpress” para “website” ou qualquer outro nome. Isso o ajudará a identificar facilmente seu site local.
Em seguida, você precisa abrir seu navegador da Web favorito.
Você pode inserir o seguinte URL na barra de endereços do navegador:
https://localhost/website1/
Se você renomeou a pasta WordPress para outro nome, certifique-se de substituir “website1” pelo nome da sua própria pasta.
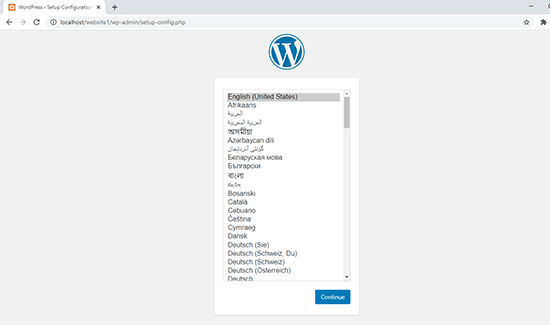
Isso carregará o assistente de instalação do WordPress e você será solicitado a selecionar um idioma. Depois de selecionar um idioma, clique no botão “Continue” (Continuar).
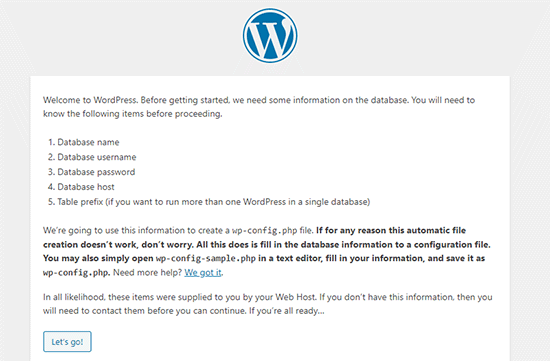
Na próxima tela, você verá a tela de boas-vindas do WordPress.
Ele inclui um aviso de que o WordPress precisa de um nome de banco de dados, nome de usuário do banco de dados, senha e informações do host.
Vamos criar um banco de dados para seu site WordPress.
Você precisará abrir uma nova guia do navegador e acessar https://localhost/phpmyadmin/.
Isso iniciará o aplicativo phpMyAdmin que vem pré-instalado com o XAMPP. Ele permite que você gerencie facilmente seus bancos de dados usando uma interface mais simples.
Você precisa clicar em “Databases” (Bancos de dados) e fornecer um nome para o seu novo banco de dados. Depois disso, clique no botão “Create” (Criar) para continuar.
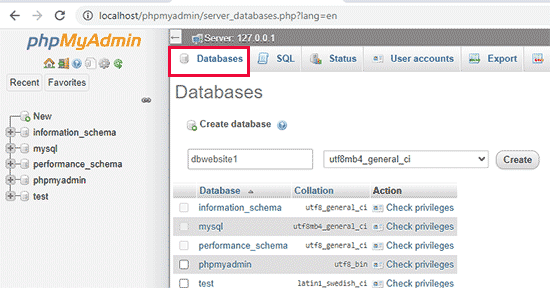
Agora que você criou um banco de dados, pode usá-lo em seu site WordPress.
Volte para a guia do navegador /localhost/website1/ e clique no botão “Let’s Go”.
Na próxima tela, você será solicitado a fornecer as informações do banco de dados do WordPress.
Digite o nome do banco de dados que você criou anteriormente. Seu nome de usuário é “root” e você deve deixar o campo de senha em branco. No campo host do banco de dados, você precisa usar localhost.
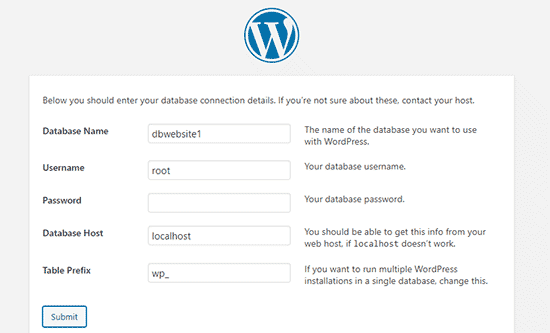
Quando terminar, clique no botão “Submit” (Enviar) para continuar.
Se você estiver no Windows ou no Linux, o WordPress armazenará essas configurações no arquivo de configuração do WordPress chamado wp-config.php.
No entanto, se você estiver em um Mac, ele mostrará o conteúdo do arquivo e solicitará que você o crie.
Você precisará criar esse arquivo na pasta raiz do seu site.
Depois de criar o arquivo, cole nele o texto que você copiou anteriormente. Em seguida, você precisa salvar o arquivo e voltar ao instalador do WordPress para continuar.
Na próxima etapa, o WordPress solicitará que você forneça informações sobre o seu site. Primeiro, digite o título que você deseja usar para o site.
Depois disso, é necessário inserir um nome de usuário, uma senha e um endereço de e-mail para sua conta de administrador.
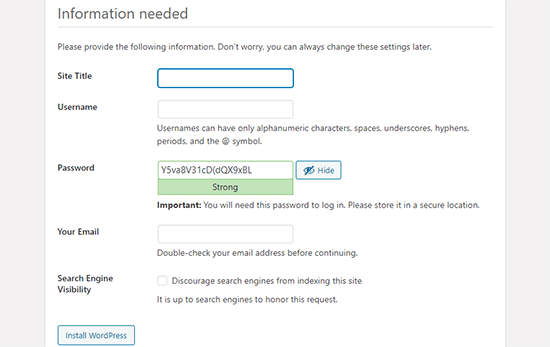
Depois de preencher todas as informações, clique no botão “Install WordPress” para continuar.
O WordPress agora executará a instalação e solicitará que você faça login assim que ela for concluída.
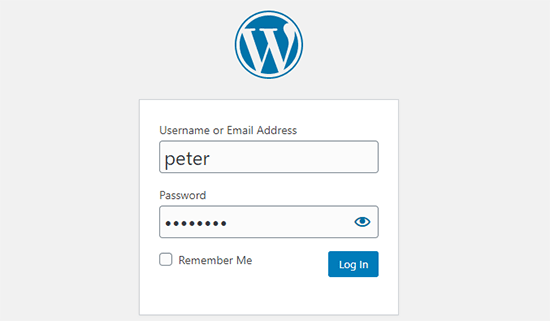
Você pode fazer login no seu site acessando a página /localhost/website1/wp-admin e usando o nome de usuário e a senha inseridos durante a instalação.
Coisas para tentar depois de criar um site WordPress local
Agora que você criou seu site WordPress local usando o XAMPP, pode trabalhar nele como faria em um site WordPress ativo.
Vá até o menu Appearance (Aparência) na barra lateral de administração do WordPress para personalizar a aparência do seu site ou instalar um novo tema.
Aqui estão alguns ótimos temas gratuitos que você pode experimentar.
A próxima coisa que você deve tentar é instalar alguns plug-ins do WordPress.
Os plug-ins são como aplicativos para o seu site WordPress e permitem adicionar recursos interessantes, como um formulário de contato, botões de mídia social, uma loja de comércio eletrônico e muito mais.
Precisa de ajuda para instalar plug-ins? Consulte nosso guia passo a passo sobre como instalar um plug-in do WordPress.
Bônus: Como mover um site WordPress local para um servidor ativo
Depois de trabalhar em seu site local do WordPress, talvez você queira movê-lo para um servidor ativo para criar seu primeiro blog ou site do WordPress.
Para fazer isso, você precisará de um nome de domínio e de uma conta de hospedagem na Web. Normalmente, um nome de domínio custa US$ 14,99, e a hospedagem de sites começa em US$ 7,99 por mês.
Isso é demais se você estiver apenas começando.
Felizmente, a Bluehost está oferecendo aos usuários do WPBeginner um nome de domínio gratuito com um desconto generoso na hospedagem. Basicamente, você pode começar por US$ 1,99 por mês.
Para obter mais recomendações de hospedagem, dê uma olhada em nosso guia completo de hospedagem WordPress.
Depois de se inscrever para a hospedagem, você pode seguir nosso guia passo a passo sobre como mover o WordPress de um servidor local para um site ativo.
Talvez você também queira dar uma olhada em maneiras alternativas de criar sites locais do WordPress no Windows usando o Wampserver e no Mac usando o MAMP.
Guias especializados sobre sites WordPress locais
Agora que você sabe como criar um site local do WordPress usando o XAMPP, talvez queira ver alguns outros guias relacionados a instalações locais do WordPress.
- Glossário: Localhost
- Como instalar o WordPress localmente no Mac (2 maneiras fáceis)
- Como instalar o WordPress em um computador Windows (2 métodos)
- Como mover o WordPress de um servidor local para um site ativo (2 métodos)
- Como mover um site WordPress ativo para um servidor local
- Como receber e-mails do WordPress do host local com SMTP
- Como redefinir a senha de administrador do WordPress em um host local
- Como criar facilmente um site de teste para WordPress (passo a passo)
Esperamos que este artigo tenha ajudado você a aprender como criar um site WordPress local usando o XAMPP. Talvez você também queira ver nosso guia sobre por que você deve usar o WordPress para seu site ou nossas escolhas de especialistas para a melhor hospedagem gratuita de sites.
Se você gostou deste artigo, inscreva-se em nosso canal do YouTube para receber tutoriais em vídeo sobre o WordPress. Você também pode nos encontrar no Twitter e no Facebook.


Syed Balkhi says
Hey WPBeginner readers,
Did you know you can win exciting prizes by commenting on WPBeginner?
Every month, our top blog commenters will win HUGE rewards, including premium WordPress plugin licenses and cash prizes.
You can get more details about the contest from here.
Start sharing your thoughts below to stand a chance to win!
Moinuddin Waheed says
I have been using xampp for a long time and first time when I installed it , it was for running php code.
I have also used it for wordpress local environment for understanding and developing websites locally.
one thing that has bother me regarding wordpress installation is username and password.
why we keep user as root and password blank?
this is not the case for live servers though?
WPBeginner Support says
It is not something that you would use for a live site but the username being root and the password being blank is the defaults for XAMPP. As your local site would only be active on your computer you do not need to change it for your local XMPP installation.
Administrador
Jiří Vaněk says
Sometimes I use XAMPP. The only problem I sometimes encounter is shared hosting, to which the website is migrated from localhost. The problem is that the PHP limits are not always set in the same way on the shared server, or even the PHP version does not match (on the local 8.x and on the server, for example, the old version 7.x). This can often cause a problem in the functionality of the website, which was debugged on a different PHP than the one on the server. That’s probably the only flaw.
Donatas says
Hi, I have used these Xampp instructions to create a server on a PC (Windows 10 Education N). Everything worked perfectly fine and it’s a very useful article. I stuck in one place because I thought the database credentials folder had to be manualy created on Windows the same way it has to be on a Mac but these steps were exclusively for Mac. Thanks a lot!
WPBeginner Support says
You’re welcome, glad our guide was helpful!
Administrador
Paul says
After having created the database and entered the database connection details, hitting submit gets me this message “There has been a critical error on this website”. Checked everything twice, what should I do?
Thank you for your attention.
WPBeginner Support says
For a fresh install, you would want to check the error log for XAMP to help narrow down the specific reason.
Administrador
John says
Error logs didn’t help. But, as it turns out, for some reason, the most recent version of Xampp caused the same “critical error” response to happen for me too. I ended up uninstalling that version and went with the previous version of Xampp and presto! It works.
lee kent says
Hello. If I were to follow these steps and then decide i wanted to make another site, How would you create a new website locally?
WPBeginner Support says
You would create a new folder and database and install the site in the new folder.
Administrador
Smita says
Thanks for detailed steps. Very useful.
WPBeginner Support says
Glad our guide was helpful
Administrador
Tife says
Can I use local Host to develop my custom wordpress theme also.
WPBeginner Support says
You can if you would like.
Administrador
priyanka says
I’m getting this error
Your server is running PHP version 5.6.3 but WordPress 5.5.3 requires at least 5.6.20.
p/lease help
WPBeginner Support says
It is saying you want to upgrade the PHP you are using for your site to remove that error.
Administrador
tarun says
I get the following error, when I run http://localhost/mysite/wp-admin/setup-config.php
One or more database tables are unavailable. The database may need to be repaired.
I tried to do global search for “WP-config” file in my xampp folder but just found “wp-config-sample”. though I added the below line in
“wp-config-sample.php” file
// define(‘WP_ALLOW_REPAIR’, true);
not really sure what to do after that.
WPBeginner Support says
You would want to open phpMyAdmin and run the repair on all of your tables and if that does not work you would need to reach out to XAMPP’s support
Administrador
tarun says
I am not able to figure out why I am getting this strange error, though I tried to reinstall and connect several times, all I did was I tried to drop my existing database and tried to create a new wrodpress login but All I can see is the following error
One or more database tables are unavailable. The database may need to be repaired.
WPBeginner Support says
You would want to try to repair your database, you can also use method 3 in our article below:
https://www.wpbeginner.com/wp-tutorials/how-to-fix-the-error-establishing-a-database-connection-in-wordpress/
Administrador
Mohsin Zubair says
Hi Sir, I hope you are doing well. I am facing this error while creating data base.
Error
MySQL said: Documentation
Cannot connect: invalid settings.
phpMyAdmin tried to connect to the MySQL server, and the server rejected the connection. You should check the host, username and password in your configuration and make sure that they correspond to the information given by the administrator of the MySQL server.
WPBeginner Support says
You would want to check your configuration settings to see if it is set incorrectly.
Administrador
David says
This is exactly what I have been looking for: a local testing server to develop a website without signing up to a plan/paid service first.
The explanations are brilliant and easy to follow. It’s genius! Many thanks.
WPBeginner Support says
You’re welcome, glad our guide was helpful
Administrador
Ray Silva says
I installed wordpress. Then I put the wordpress folder in xampp’s htdocs folder. When I go to localhost on my browser, I get sent to the xampp dashboard and welcome to xampp page.
WPBeginner Support says
You may want to try localhost/foldername where foldername is the name of the folder where you placed WordPress to see if that is how it is currently set up.
Administrador
Hussain Abbas says
Hi
My url to login to WordPress dashboard is coming as “/localhost/sitename/wordpress/wp-admin” whereas as per the above instructions it should be “/localhost/sitename/wp-admin” .
Would request your help to know how can I remove “wordpess” from the link.
Thanks
WPBeginner Support says
For that, you installed the site in a folder named WordPress, if you are just starting out you can reinstall the site without the WordPress folder.
Administrador
muhammad waqar says
easy and good tutorial for beginners
WPBeginner Support says
Glad you found our guide helpful
Administrador
Darren Howes says
Hi,
Great instructions, complete novice, everything is working apart from when I try to add/upload images I get the the message
Unable to create directory wp-content/uploads/2020/09. Is its parent directory writable by the server?
I am working on a mac, any ideas on how to solve this?
Regards
Darren
WPBeginner Support says
You would need to navigate to your XAMPP folder, right-click, and modify your sharing for that folder so that it can be updated.
Administrador
marni says
When setting up WordPress I used “admin” as the user name and changed the password supplied by WordPress. As a precaution I copied the supplied password. I cannot log in with either password (no typing errors).
WPBeginner Support says
You should be able to force reset the password using the database method in our guide below:
https://www.wpbeginner.com/beginners-guide/how-to-change-your-password-in-wordpress/
Administrador
gaurav sachan says
everything is done but database is not created so please me that why are not creting database in my php
WPBeginner Support says
You would need to manually create the database in the phpMyAdmin interface
Administrador
Dimitris says
Hello after following the procedure after the following step:
Next, you need to open your favorite web browser and visit localhost/website1. You will see a page like this:
I get this message on the screen.
Warning: require_once: failed to open stream: No such file or directory
WPBeginner Support says
You may need to try unzipping the WordPress files again, the most common reason for this issue is covered in our article below:
https://www.wpbeginner.com/wp-tutorials/how-to-fix-the-wordpress-failed-to-open-stream-error
You can follow our guide for manually updating your site and you wouldn’t need to use FTP to readd the files, our guide on this can be found below:
https://www.wpbeginner.com/beginners-guide/ultimate-guide-to-upgrade-wordpress-for-beginners-infograph
Administrador
Muhammad Kamran Khan says
after all these setting localhost/website1 started working. after shut down and restarted my laptop now when i go to localhost/website1/wp-admin/ error message came : This site cant be reached. localhost refused to connect.
WPBeginner Support says
You would want to ensure XAMPP is running to be able to see your site
Administrador
dilshan says
This is really helpful because sometimes I want test some plugins but i dont want to install them to my website. I can try them in this local host site thanks to you
WPBeginner Support says
Glad our guide was helpful
Administrador
Osazuwa says
A very helpful tutorial.
I have implemented them
But on loading
Localhost/website1
it displays
Parse error: syntax error, unexpected’.’ expecting ‘&’ or variable (T_VARIABLE) in C:\xampp\htcdocs\website1\wp-includes\functions.php on line 1081
Thanks
WPBeginner Support says
You would want to ensure the PHP you are using is up to date for the most common reason for that error.
Administrador
Julio Talaverano says
Hi,
Yesterday I installed XAMPP and WordPress and I worked a bit on a new page using localhost/wordpress.
I also installed some Plugins in WordPress.
But today when put into the browser localhost/wordpress I just get the Page I created yesterday.
Could you please tell me how I can continue editing my page with WordPress?
Thanks
WPBeginner Support says
If we’re understanding your question correctly, you would want to ensure XAMPP is running for your site to be visible when visiting the page.
Administrador
Ronny says
Hello,
As always your tutorials are great. One question though. How do I make multiple localhosts using Xampp.
Think of me as a noob the this. I’ve read a few other tutorials on the subject, but it seems they assume one would have some deeper understanding of processes.
WPBeginner Support says
You would create a folder with a different name in the htdocs folder and follow the steps under the ‘Creating a Local WordPress Site with XAMPP’ section and navigate to the new site’s folder when you want to see the other site rather than your first site.
Administrador
Calvin Mutashu says
Thanks 4 a clear step by step guide. Keep the good work.
WPBeginner Support says
You’re welcome, glad you liked our guide
Administrador
Anjuli says
Hello! My browser cannot open to localhost after putting the WordPress folder to htdocs and renaming it to website1. What should I do? Thank you.
WPBeginner Support says
If you’re returning to the site after a day, please ensure XAMPP is running on your computer for it to load porperly.
Administrador
SANTOS says
Hi, how do I take my local wordpress site to a live wordpress site with a domain name?
WPBeginner Support says
Once you purchase hosting with a domain name, you would follow our guide here:
https://www.wpbeginner.com/wp-tutorials/how-to-move-wordpress-from-local-server-to-live-site/
Administrador
Zaid says
I have a question if i am customizing my localhost wordpress site and my pc turned off. I will loss my site..?
WPBeginner Support says
No, as long as you save your changes those saved changes will remain the next time you pull up your local installation
Administrador
Carla says
Guys, Just wanted to say thank you for this post! I successfully implemented a localhost on my computer thanks to your clear, step-by-step process outlined in the post! So excited to get practising my wp skills on this new installation!
WPBeginner Support says
Awesome, glad our guide could help get you set up
Administrador
Victor says
Great job!! Is there a way, or a tutorial to transfer an existing website to this service ? This one deals with a brand new one. I have a website, and I’d love to add it to XAMPP! Thanks !
WPBeginner Support says
For that, you would want to take a look at our article here:
https://www.wpbeginner.com/wp-tutorials/how-to-move-live-wordpress-site-to-local-server/
Administrador
Blessings Chibisa says
Guys I installed WordPress on a local machine. Am using xamp server I created a database but they is a problem in connection of WordPress and the database…. What should I do ?
Help me pliz
WPBeginner Support says
For an error with your database connection, you would want to take a look at our article here: https://www.wpbeginner.com/wp-tutorials/how-to-fix-the-error-establishing-a-database-connection-in-wordpress/
Administrador
Vikas says
Great artice. It worked perfectly. I am a new learner. Sir could you guide me about How I could run multiple local sites using xampp.
Any help will be aporeciated.
WPBeginner Support says
You would want to create a new folder for the next site and then you should be able to follow the directions in the article to create a new database and site.
Administrador
AASIMA says
SIR.
I successfully followed your instructions to make a website on the localhost. but the next day it doesn’t open and showing some error?
WPBeginner Support says
You would want to be sure XAMPP is running to see your local site
Administrador
Mate says
Good guys
I have my website running on local xampp server on windows 10 system I want to move to my new Mac pro computer how do I do it? thanks.
WPBeginner Support says
You would follow the steps in our article here: https://www.wpbeginner.com/wp-tutorials/how-to-move-live-wordpress-site-to-local-server/
Administrador
Keith says
I followed your directions and it was great, thanks.
I am trying to upload the AVADA theme that I have install previously on Hostgator and it worked.
It is 6mb and a zip file.
When I try to add this theme I get this message: “The uploaded file exceeds the upload_max_filesize directive in php.ini”.
Where am I going wrong? Thank You,
WPBeginner Support says
You may want to ensure that there isn’t the theme files in what you’re uploading. If it’s only the theme’s files then you can update your upload size on your XAMPP site using the methods in our article here: https://www.wpbeginner.com/wp-tutorials/how-to-increase-the-maximum-file-upload-size-in-wordpress/
Administrador
Deepak Singh says
Very helpful post, thanks for this..
WPBeginner Support says
You’re welcome
Administrador
Mary says
Good evening, thanks for the great work done here. I have followed these steps and I am unable to log in to my website. All I am getting is this. I am feed up already. Connection for controluser as defined in your configuration failed.
WPBeginner Support says
You would want to reach out to XAMPP’s support as there are multiple possible reasons from mysql not running to needing to reinstall xampp
Administrador
Sam Arora says
Your site is so much helpful, had a great lesson here
WPBeginner Support says
You’re welcome, glad our site could be helpful
Administrador
Kashif Ch says
Assalam o Alikum Sir!
Currently, I am learning WordPress and want to build different websites like membership website, LMS, e-commerce store for learning best practices.
Can we create two different websites using localhost or any other free hosting?
WPBeginner Support says
For a local installation, you should only need to create a new database and folder for the second site, for free hosting you may want to first take a look at our page and the warning at the beginning here: https://www.wpbeginner.com/showcase/best-free-website-hosting-compared/
Administrador
Xander says
I followed the steps and it worked perfectly yesterday.
This morning, trying to connect to the localhost I received the following error:
“This site can’t be reached localhost refused to connect.
Search Google for localhost wordpress jack admin
ERR_CONNECTION_REFUSED”
WPBeginner Support says
Is your XAMPP running when you try to connect to your localhost?
Administrador
Samar Jamil says
Thanks for sharing!
WPBeginner Support says
Glad you liked the article
Administrador
Daniyal says
Hello there,
I’ve followed all the steps given in the article but stuck when I click “Install WordPress”, it gives me an error > “The site is experiencing technical difficulties”
after setting Site Title, username, password, email.
Can you help me, please
WPBeginner Support says
There are a few possible reasons for that error message. To start resolving it you would want to go through the options in our article here: https://www.wpbeginner.com/wp-tutorials/how-to-fix-the-wordpress-white-screen-of-death/
Administrador
haley says
Thank you for this article. I am on the step where I need to open up the local site in a web browser but when I do, I get an error page saying “the local host has refused to connect.” I’m guessing I messed up on one of the former steps but I don’t know which one. I’m working on a Mac.
Any guidance would be appreciated!
WPBeginner Support says
If you are returning to the site you would want to ensure xampp is running when trying to view your local site
Administrador
Charlie McCormack says
Hi
Thanks for this. Installation went 100%
I am trying to test Divi which has to be loaded from a zip file
I get this when I try to install it from aperance/upload theme
The uploaded file exceeds the upload_max_filesize directive in php.ini.
Any solutions would be great
Charlie
WPBeginner Support says
You could increase the maximum upload size using:
https://www.wpbeginner.com/wp-tutorials/how-to-increase-the-maximum-file-upload-size-in-wordpress/
Another option would be to add the unziped theme folder where your themes are:
https://www.wpbeginner.com/beginners-guide/how-to-install-a-wordpress-theme/
Administrador
Charlie McCormack says
Thanks for your reply
I cannot log in on the FTP maybe because its on a local drive
I am trying to load the theme the way you say
and still get the error.I
I bought a new domain name so will try to load it live and work on it like that
Thanks again
Charlie
WPBeginner Support says
On a local site, you can use your built-in file manager rather than FTP to add the folder to your WordPress site
YINGLI says
Hi, thanks for writing this article!
I have a question though:
I am at the step where I have to fill in a site title, username, password and email address for my admin account for WordPress. May I know whether the information that I use here should be the same as the information that I would use for my actual online WordPress account? I have an existing unlaunched WordPress site through Bluehost.
Thanks so much!
WPBeginner Support says
It is not required but if you’re creating a local site to test then it may be a good idea to set that as the same.
Administrador
Pooja says
Thanks for help , best artical
WPBeginner Support says
You’re welcome
Administrador
Karen says
thanks for the great video. question. am i understanding the process correctly? 1) set up a test site (mysite1) But should i also set up a database/wp install for each client website that I build (and maintain)? I’m guessing yes.
WPBeginner Support says
Yes, you would want a different install and database for each local site
Administrador
Miso says
Great job, simple, straightforward. That’s exactly what a beginner, like me needs.
WPBeginner Support says
Thank you, glad our tutorial was helpful
Administrador
God's Son says
Hi,i am very glad and grateful to you for this article. It was very simple and comprehensive,the photo illustrations helped me a lot. You are a great teacher,i hope i will be able to learn and share my knowlege with others like you soon,thanks.
WPBeginner Support says
Happy our articles can simplify this process for you
Administrador
Aftab Hussain says
Thanks for such a nice guideline. I have successfully install wordpress on my local computer by the help of this post.
WPBeginner Support says
Glad our article could help
Administrador