El equipo de WPBeginner crea regularmente sitios locales de WordPress en sus ordenadores para probar temas, plugins y la funcionalidad del sitio web sin afectar a un sitio en vivo.
XAMPP es un paquete de software gratuito y de código abierto que proporciona una plataforma fácil de usar para establecer una instancia local de WordPress.
En este artículo, te mostraremos cómo crear fácilmente un sitio local de WordPress usando XAMPP para que puedas experimentar con WordPress y refinar tus habilidades de desarrollo en un entorno seguro.

¿Por qué crear un sitio WordPress regional?
La creación de sitios locales de WordPress es una práctica común entre desarrolladores y propietarios de sitios. Permite probar WordPress sin crear un sitio web real en Internet.
Los sitios web regionales solo son visibles para usted en su ordenador. Puedes probar diferentes temas y plugins de WordPress, comprobar sus características y aprender los conceptos básicos de WordPress.
Si ya tiene un sitio web WordPress, puede crear una copia local de su sitio web en su ordenador para probar las actualizaciones de los nuevos plugins antes de implementarlas en su sitio web activo.
Importante: Un sitio web local solo será visible para ti en tu ordenador. Si quieres crear un sitio web, necesitarás un nombre de dominio y alojamiento WordPress.
Siga las instrucciones paso a paso de nuestra guía sobre cómo crear un blog en WordPress cuando esté listo para crear un sitio web.
Dicho esto, vamos a marcar / comprobar cómo instalar WordPress localmente en Windows, Mac o Linux usando XAMPP.
¿Qué es XAMPP?
XAMPP es un paquete de software que incluye todo lo necesario para establecer un entorno de servidor local en tu ordenador.
Para crear un sitio local de WordPress, debe establecer un software de servidor web (Apache), PHP y MySQL en su ordenador.
PHP es un idioma de programación y MySQL es un software de gestión de bases de datos. Ambos son obligatorios / requeridos / necesarios para ejecutar WordPress.
Instalarlos por separado es bastante difícil para los principiantes. Aquí es donde entra en juego XAMPP.
XAMPP facilita la creación de sitios web WordPress a nivel local. Está disponible para ordenadores con Windows, Mac y Linux.
Vamos a empezar instalando XAMPP y estableciéndolo para ejecutar tu sitio local de WordPress.
Instalación de XAMPP en su ordenador
En primer lugar, tienes que visitar el sitio web de XAMPP y hacer clic en el botón “Descargar” correspondiente a tu sistema operativo.
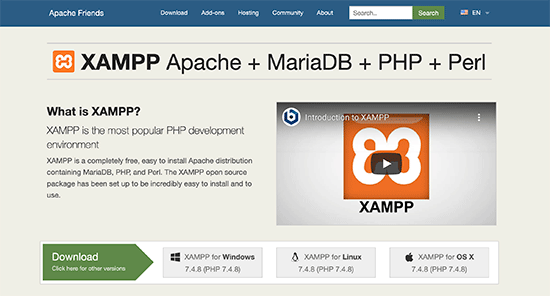
Dependiendo de su sistema operativo, el asistente de instalación y la interfaz de la aplicación pueden diferir de las capturas de pantalla que aparecen aquí. Por el bien de este artículo, le mostraremos la versión Windows del software.
Después de descargar XAMPP, tendrás que hacer clic y ejecutar el instalador.
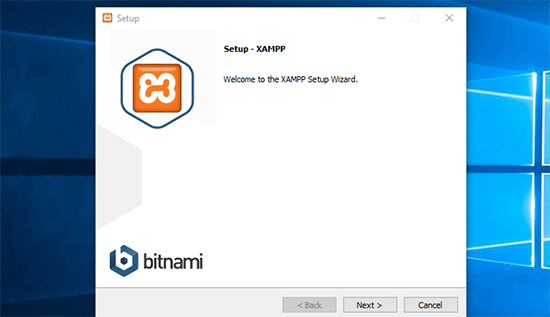
XAMPP te preguntará dónde instalar el software y qué paquetes quieres instalar. Los ajustes por defecto funcionarán para la mayoría de los usuarios. Sigue haciendo clic en el botón “Siguiente” para finalizar el asistente de instalación.
Una vez finalizado el asistente, marque la opción “iniciar el panel de control ahora” y, a continuación, haga clic en el botón “Finalizar”.
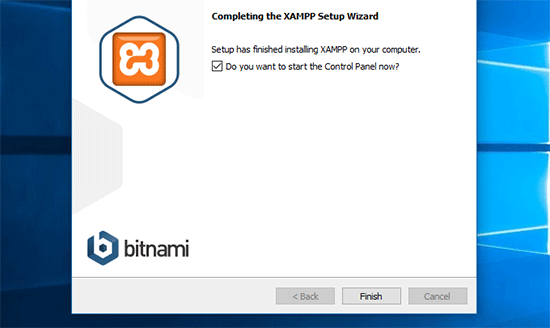
Esto lanzará la aplicación del Panel de Control XAMPP.
Usando la aplicación XAMPP, puedes ejecutar el servidor web Apache como servidor local y MySQL como servidor de base de datos. Sigue adelante y haz clic en el botón ‘Start’ siguiente a Apache y MySQL.
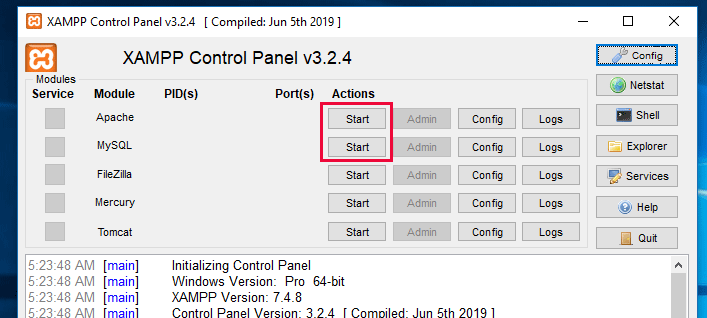
XAMPP iniciará ahora Apache y MySQL.
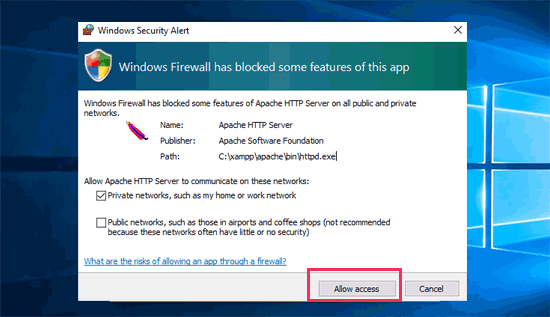
Es posible que aparezca un aviso del cortafuegos de Windows. Es importante que haga clic en el botón “Permitir acceso” para que ambas aplicaciones se ejecuten en su ordenador.
Una vez iniciadas ambas aplicaciones, sus nombres aparecerán resaltados en verde.
Ahora, estás listo para crear un sitio web local e instalar WordPress usando XAMPP.
Creación de un sitio WordPress local con XAMPP
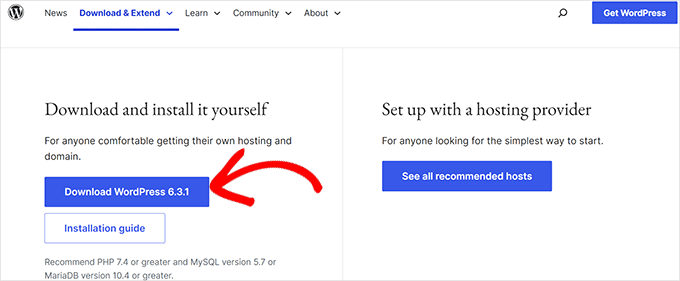
En primer lugar, tendrás que descargar WordPress. Visita el sitio web WordPress.org y haz clic en el botón “Descargar WordPress”.
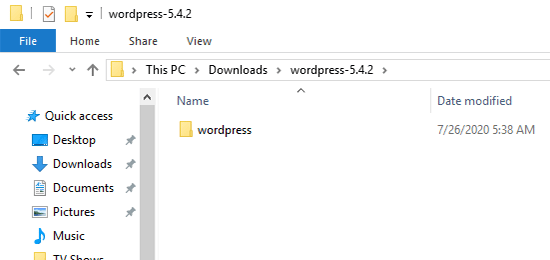
Después de descargar WordPress, tienes que extraer el archivo zip, y verás una carpeta wordpress.
Debe copiar esta carpeta.
A continuación, dirígete a tu carpeta de instalación de XAMPP.
En Windows, será C:/Archivos de programa/XAMPP/htdocs o C:/Xampp/htdocs.
En Mac, será /Applications/XAMPP/htdocs.
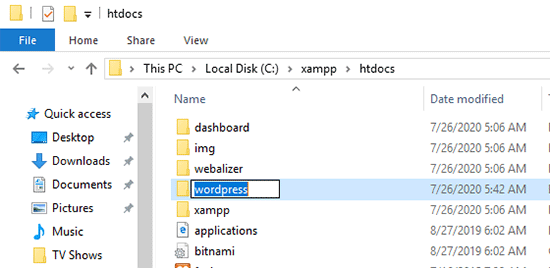
Pega la carpeta wordpress que copiaste anteriormente dentro de la carpeta ‘htdocs’.
Le recomendamos que cambie el nombre de la carpeta ‘wordpress’ por ‘sitio web’ o cualquier otro. Esto le ayudará a identificar fácilmente su sitio regional.
A continuación, abra su navegador / explorador favorito.
Puede introducir la siguiente URL en la barra de direcciones de su navegador / explorador:
https://localhost/website1/
Si ha cambiado el nombre de la carpeta de WordPress por otro, asegúrese de sustituir “website1” por su propio nombre de carpeta.
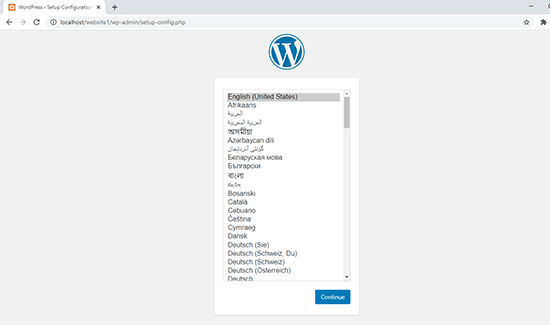
Se abrirá el asistente de instalación de WordPress y se te pedirá que selecciones un idioma. Tras seleccionar un idioma, haz clic en el botón “Continuar”.
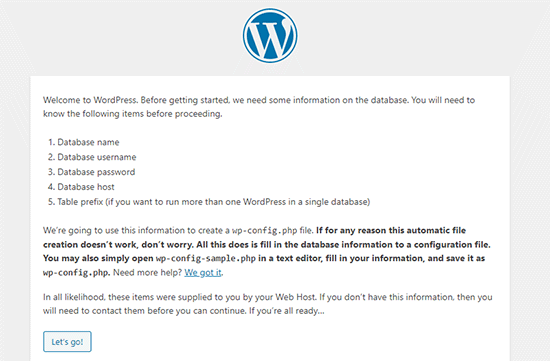
En la siguiente pantalla, verá la pantalla de bienvenida de WordPress.
Incluye un aviso de que WordPress necesita un nombre de base de datos, nombre de usuario de la base de datos, contraseña e información del alojamiento.
Vamos a crear una base de datos para su sitio WordPress.
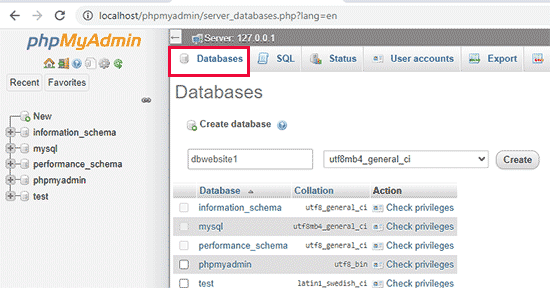
Tendrá que abrir una nueva pestaña del navegador y visitar https://localhost/phpmyadmin/.
Esto lanzará la aplicación phpMyAdmin que viene preinstalada con XAMPP. Te permite gestionar fácilmente tus bases de datos usando una interfaz más sencilla.
Tiene que hacer clic en “Bases de datos” y dar un nombre a su nueva base de datos. A continuación, haga clic en el botón “Crear” para continuar.
Ahora que ha creado una base de datos, puede utilizarla para su sitio WordPress.
Vuelva a la pestaña del navegador /localhost/website1/ y haga clic en el botón “Vámonos”.
En la siguiente pantalla, se le pedirá que proporcione la información de su base de datos de WordPress.
Introduce el nombre de la base de datos que creaste anteriormente. Tu nombre de usuario es ‘root’, y debes dejar el campo de contraseña en blanco. Para el campo de host de la base de datos, debe utilizar localhost.
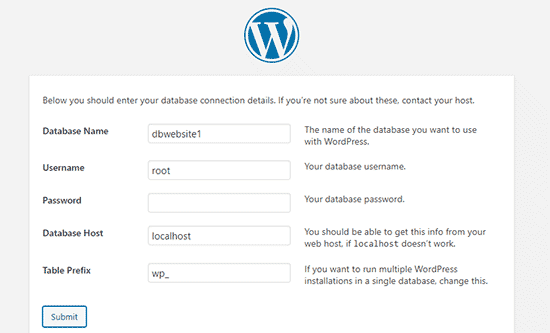
Cuando haya terminado, haga clic en el botón “Enviar” para continuar.
Si utiliza Windows o Linux, WordPress almacenará estos ajustes en su archivo de configuración de WordPress llamado wp-config.php.
Sin embargo, si estás en un Mac, te mostrará el contenido del archivo y te pedirá que lo crees.
Deberá crear este archivo en la carpeta raíz de su sitio web.
Una vez creado el archivo, pegue en él el texto que ha copiado anteriormente. A continuación, debe guardar el archivo y volver al instalador de WordPress para continuar.
En el siguiente paso, WordPress le pedirá que proporcione información acerca de su sitio web. En primer lugar, introduzca el título que desea utilizar para este sitio.
A continuación, deberá introducir el nombre de usuario, la contraseña y la dirección de correo electrónico de su cuenta de administrador.
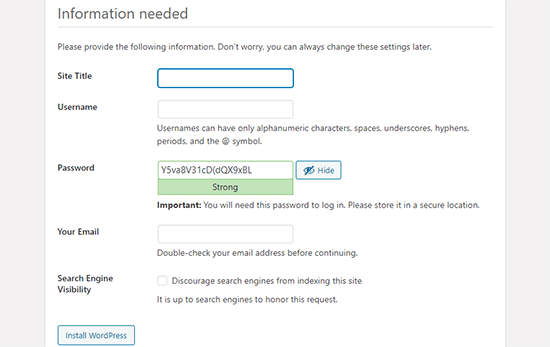
Una vez que haya rellenado toda la información, haga clic en el botón “Instalar WordPress” para continuar.
WordPress ejecutará la instalación y le indicará que acceda una vez que haya terminado.
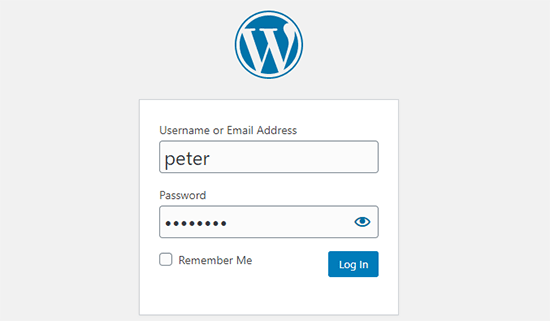
Puede acceder a su sitio web accediendo a la página /localhost/website1/wp-admin y utilizando el nombre de usuario y la contraseña que introdujo durante la instalación.
Cosas que debe probar después de crear un sitio WordPress regional
Ahora que has creado tu sitio WordPress local usando XAMPP, puedes trabajar en él como lo harías en un sitio WordPress real.
Diríjase al menú Apariencia de la barra lateral de administrador de WordPress para personalizar la apariencia de su sitio o instalar un nuevo tema.
Aquí tienes algunos temas gratuitos que puedes probar.
Lo siguiente que deberías probar es instalar algunos plugins de WordPress.
Los plugins son como aplicaciones para su sitio de WordPress y le permiten añadir características interesantes como un formulario de contacto, botones de medios sociales, una tienda de comercio electrónico y mucho más.
¿Necesitas ayuda para instalar plugins? Consulte nuestra guía paso a paso sobre cómo instalar un plugin de WordPress.
Bonificación: Traslado de un sitio WordPress local a un servidor activo
Después de trabajar en su sitio local de WordPress, es posible que desee moverlo a un servidor en vivo para hacer su primer blog o sitio web de WordPress.
Para ello, necesitarás un nombre de dominio y una cuenta de alojamiento web. Normalmente, un nombre de dominio cuesta 14,99 € y el alojamiento de sitios web, a partir de 7,99 € al mes.
Eso es demasiado si acabas de empezar.
Por suerte, Bluehost ofrece a los usuarios de WPBeginner un nombre de dominio gratuito con un generoso descuento en alojamiento. Básicamente, puedes empezar por 1,99 dólares al mes.
Para más recomendaciones de alojamiento, eche un vistazo a nuestra guía completa de alojamiento de WordPress.
Una vez que hayas contratado el alojamiento, puedes seguir paso a paso nuestra guía sobre cómo trasladar WordPress de un servidor local a un sitio activo.
También puedes buscar formas alternativas de crear sitios WordPress locales en Windows usando Wampserver y en Mac usando MAMP.
Guías de expertos sobre sitios WordPress regionales
Ahora que ya sabes cómo crear un sitio WordPress local usando XAMPP, puede que te interese ver otras guías relacionadas con instalaciones locales de WordPress.
- Glosario: Localhost
- Cómo instalar WordPress localmente en Mac (2 formas sencillas)
- Cómo instalar WordPress en un ordenador con Windows (2 métodos)
- Cómo trasladar WordPress de un servidor local a un sitio activo (2 métodos)
- Cómo trasladar un sitio WordPress activo a un servidor local
- Cómo recibir correos electrónicos de WordPress desde Localhost con SMTP
- Cómo restablecer la contraseña de administrador de WordPress en Localhost
- Cómo crear fácilmente un sitio de pruebas para WordPress (paso a paso)
Esperamos que este artículo te haya ayudado a aprender cómo crear un sitio WordPress local usando XAMPP. Puede que también quieras ver nuestra guía sobre por qué deberías usar WordPress para tu sitio web o nuestra selección de expertos sobre el mejor alojamiento gratuito de sitios web.
If you liked this article, then please subscribe to our YouTube Channel for WordPress video tutorials. You can also find us on Twitter and Facebook.


Syed Balkhi says
Hey WPBeginner readers,
Did you know you can win exciting prizes by commenting on WPBeginner?
Every month, our top blog commenters will win HUGE rewards, including premium WordPress plugin licenses and cash prizes.
You can get more details about the contest from here.
Start sharing your thoughts below to stand a chance to win!
Moinuddin Waheed says
I have been using xampp for a long time and first time when I installed it , it was for running php code.
I have also used it for wordpress local environment for understanding and developing websites locally.
one thing that has bother me regarding wordpress installation is username and password.
why we keep user as root and password blank?
this is not the case for live servers though?
WPBeginner Support says
It is not something that you would use for a live site but the username being root and the password being blank is the defaults for XAMPP. As your local site would only be active on your computer you do not need to change it for your local XMPP installation.
Administrador
Jiří Vaněk says
Sometimes I use XAMPP. The only problem I sometimes encounter is shared hosting, to which the website is migrated from localhost. The problem is that the PHP limits are not always set in the same way on the shared server, or even the PHP version does not match (on the local 8.x and on the server, for example, the old version 7.x). This can often cause a problem in the functionality of the website, which was debugged on a different PHP than the one on the server. That’s probably the only flaw.
Donatas says
Hi, I have used these Xampp instructions to create a server on a PC (Windows 10 Education N). Everything worked perfectly fine and it’s a very useful article. I stuck in one place because I thought the database credentials folder had to be manualy created on Windows the same way it has to be on a Mac but these steps were exclusively for Mac. Thanks a lot!
WPBeginner Support says
You’re welcome, glad our guide was helpful!
Administrador
Paul says
After having created the database and entered the database connection details, hitting submit gets me this message “There has been a critical error on this website”. Checked everything twice, what should I do?
Thank you for your attention.
WPBeginner Support says
For a fresh install, you would want to check the error log for XAMP to help narrow down the specific reason.
Administrador
John says
Error logs didn’t help. But, as it turns out, for some reason, the most recent version of Xampp caused the same “critical error” response to happen for me too. I ended up uninstalling that version and went with the previous version of Xampp and presto! It works.
lee kent says
Hello. If I were to follow these steps and then decide i wanted to make another site, How would you create a new website locally?
WPBeginner Support says
You would create a new folder and database and install the site in the new folder.
Administrador
Smita says
Thanks for detailed steps. Very useful.
WPBeginner Support says
Glad our guide was helpful
Administrador
Tife says
Can I use local Host to develop my custom wordpress theme also.
WPBeginner Support says
You can if you would like.
Administrador
priyanka says
I’m getting this error
Your server is running PHP version 5.6.3 but WordPress 5.5.3 requires at least 5.6.20.
p/lease help
WPBeginner Support says
It is saying you want to upgrade the PHP you are using for your site to remove that error.
Administrador
tarun says
I get the following error, when I run http://localhost/mysite/wp-admin/setup-config.php
One or more database tables are unavailable. The database may need to be repaired.
I tried to do global search for “WP-config” file in my xampp folder but just found “wp-config-sample”. though I added the below line in
“wp-config-sample.php” file
// define(‘WP_ALLOW_REPAIR’, true);
not really sure what to do after that.
WPBeginner Support says
You would want to open phpMyAdmin and run the repair on all of your tables and if that does not work you would need to reach out to XAMPP’s support
Administrador
tarun says
I am not able to figure out why I am getting this strange error, though I tried to reinstall and connect several times, all I did was I tried to drop my existing database and tried to create a new wrodpress login but All I can see is the following error
One or more database tables are unavailable. The database may need to be repaired.
WPBeginner Support says
You would want to try to repair your database, you can also use method 3 in our article below:
https://www.wpbeginner.com/wp-tutorials/how-to-fix-the-error-establishing-a-database-connection-in-wordpress/
Administrador
Mohsin Zubair says
Hi Sir, I hope you are doing well. I am facing this error while creating data base.
Error
MySQL said: Documentation
Cannot connect: invalid settings.
phpMyAdmin tried to connect to the MySQL server, and the server rejected the connection. You should check the host, username and password in your configuration and make sure that they correspond to the information given by the administrator of the MySQL server.
WPBeginner Support says
You would want to check your configuration settings to see if it is set incorrectly.
Administrador
David says
This is exactly what I have been looking for: a local testing server to develop a website without signing up to a plan/paid service first.
The explanations are brilliant and easy to follow. It’s genius! Many thanks.
WPBeginner Support says
You’re welcome, glad our guide was helpful
Administrador
Ray Silva says
I installed wordpress. Then I put the wordpress folder in xampp’s htdocs folder. When I go to localhost on my browser, I get sent to the xampp dashboard and welcome to xampp page.
WPBeginner Support says
You may want to try localhost/foldername where foldername is the name of the folder where you placed WordPress to see if that is how it is currently set up.
Administrador
Hussain Abbas says
Hi
My url to login to WordPress dashboard is coming as “/localhost/sitename/wordpress/wp-admin” whereas as per the above instructions it should be “/localhost/sitename/wp-admin” .
Would request your help to know how can I remove “wordpess” from the link.
Thanks
WPBeginner Support says
For that, you installed the site in a folder named WordPress, if you are just starting out you can reinstall the site without the WordPress folder.
Administrador
muhammad waqar says
easy and good tutorial for beginners
WPBeginner Support says
Glad you found our guide helpful
Administrador
Darren Howes says
Hi,
Great instructions, complete novice, everything is working apart from when I try to add/upload images I get the the message
Unable to create directory wp-content/uploads/2020/09. Is its parent directory writable by the server?
I am working on a mac, any ideas on how to solve this?
Regards
Darren
WPBeginner Support says
You would need to navigate to your XAMPP folder, right-click, and modify your sharing for that folder so that it can be updated.
Administrador
marni says
When setting up WordPress I used “admin” as the user name and changed the password supplied by WordPress. As a precaution I copied the supplied password. I cannot log in with either password (no typing errors).
WPBeginner Support says
You should be able to force reset the password using the database method in our guide below:
https://www.wpbeginner.com/beginners-guide/how-to-change-your-password-in-wordpress/
Administrador
gaurav sachan says
everything is done but database is not created so please me that why are not creting database in my php
WPBeginner Support says
You would need to manually create the database in the phpMyAdmin interface
Administrador
Dimitris says
Hello after following the procedure after the following step:
Next, you need to open your favorite web browser and visit localhost/website1. You will see a page like this:
I get this message on the screen.
Warning: require_once: failed to open stream: No such file or directory
WPBeginner Support says
You may need to try unzipping the WordPress files again, the most common reason for this issue is covered in our article below:
https://www.wpbeginner.com/wp-tutorials/how-to-fix-the-wordpress-failed-to-open-stream-error
You can follow our guide for manually updating your site and you wouldn’t need to use FTP to readd the files, our guide on this can be found below:
https://www.wpbeginner.com/beginners-guide/ultimate-guide-to-upgrade-wordpress-for-beginners-infograph
Administrador
Muhammad Kamran Khan says
after all these setting localhost/website1 started working. after shut down and restarted my laptop now when i go to localhost/website1/wp-admin/ error message came : This site cant be reached. localhost refused to connect.
WPBeginner Support says
You would want to ensure XAMPP is running to be able to see your site
Administrador
dilshan says
This is really helpful because sometimes I want test some plugins but i dont want to install them to my website. I can try them in this local host site thanks to you
WPBeginner Support says
Glad our guide was helpful
Administrador
Osazuwa says
A very helpful tutorial.
I have implemented them
But on loading
Localhost/website1
it displays
Parse error: syntax error, unexpected’.’ expecting ‘&’ or variable (T_VARIABLE) in C:\xampp\htcdocs\website1\wp-includes\functions.php on line 1081
Thanks
WPBeginner Support says
You would want to ensure the PHP you are using is up to date for the most common reason for that error.
Administrador
Julio Talaverano says
Hi,
Yesterday I installed XAMPP and WordPress and I worked a bit on a new page using localhost/wordpress.
I also installed some Plugins in WordPress.
But today when put into the browser localhost/wordpress I just get the Page I created yesterday.
Could you please tell me how I can continue editing my page with WordPress?
Thanks
WPBeginner Support says
If we’re understanding your question correctly, you would want to ensure XAMPP is running for your site to be visible when visiting the page.
Administrador
Ronny says
Hello,
As always your tutorials are great. One question though. How do I make multiple localhosts using Xampp.
Think of me as a noob the this. I’ve read a few other tutorials on the subject, but it seems they assume one would have some deeper understanding of processes.
WPBeginner Support says
You would create a folder with a different name in the htdocs folder and follow the steps under the ‘Creating a Local WordPress Site with XAMPP’ section and navigate to the new site’s folder when you want to see the other site rather than your first site.
Administrador
Calvin Mutashu says
Thanks 4 a clear step by step guide. Keep the good work.
WPBeginner Support says
You’re welcome, glad you liked our guide
Administrador
Anjuli says
Hello! My browser cannot open to localhost after putting the WordPress folder to htdocs and renaming it to website1. What should I do? Thank you.
WPBeginner Support says
If you’re returning to the site after a day, please ensure XAMPP is running on your computer for it to load porperly.
Administrador
SANTOS says
Hi, how do I take my local wordpress site to a live wordpress site with a domain name?
WPBeginner Support says
Once you purchase hosting with a domain name, you would follow our guide here:
https://www.wpbeginner.com/wp-tutorials/how-to-move-wordpress-from-local-server-to-live-site/
Administrador
Zaid says
I have a question if i am customizing my localhost wordpress site and my pc turned off. I will loss my site..?
WPBeginner Support says
No, as long as you save your changes those saved changes will remain the next time you pull up your local installation
Administrador
Carla says
Guys, Just wanted to say thank you for this post! I successfully implemented a localhost on my computer thanks to your clear, step-by-step process outlined in the post! So excited to get practising my wp skills on this new installation!
WPBeginner Support says
Awesome, glad our guide could help get you set up
Administrador
Victor says
Great job!! Is there a way, or a tutorial to transfer an existing website to this service ? This one deals with a brand new one. I have a website, and I’d love to add it to XAMPP! Thanks !
WPBeginner Support says
For that, you would want to take a look at our article here:
https://www.wpbeginner.com/wp-tutorials/how-to-move-live-wordpress-site-to-local-server/
Administrador
Blessings Chibisa says
Guys I installed WordPress on a local machine. Am using xamp server I created a database but they is a problem in connection of WordPress and the database…. What should I do ?
Help me pliz
WPBeginner Support says
For an error with your database connection, you would want to take a look at our article here: https://www.wpbeginner.com/wp-tutorials/how-to-fix-the-error-establishing-a-database-connection-in-wordpress/
Administrador
Vikas says
Great artice. It worked perfectly. I am a new learner. Sir could you guide me about How I could run multiple local sites using xampp.
Any help will be aporeciated.
WPBeginner Support says
You would want to create a new folder for the next site and then you should be able to follow the directions in the article to create a new database and site.
Administrador
AASIMA says
SIR.
I successfully followed your instructions to make a website on the localhost. but the next day it doesn’t open and showing some error?
WPBeginner Support says
You would want to be sure XAMPP is running to see your local site
Administrador
Mate says
Good guys
I have my website running on local xampp server on windows 10 system I want to move to my new Mac pro computer how do I do it? thanks.
WPBeginner Support says
You would follow the steps in our article here: https://www.wpbeginner.com/wp-tutorials/how-to-move-live-wordpress-site-to-local-server/
Administrador
Keith says
I followed your directions and it was great, thanks.
I am trying to upload the AVADA theme that I have install previously on Hostgator and it worked.
It is 6mb and a zip file.
When I try to add this theme I get this message: “The uploaded file exceeds the upload_max_filesize directive in php.ini”.
Where am I going wrong? Thank You,
WPBeginner Support says
You may want to ensure that there isn’t the theme files in what you’re uploading. If it’s only the theme’s files then you can update your upload size on your XAMPP site using the methods in our article here: https://www.wpbeginner.com/wp-tutorials/how-to-increase-the-maximum-file-upload-size-in-wordpress/
Administrador
Deepak Singh says
Very helpful post, thanks for this..
WPBeginner Support says
You’re welcome
Administrador
Mary says
Good evening, thanks for the great work done here. I have followed these steps and I am unable to log in to my website. All I am getting is this. I am feed up already. Connection for controluser as defined in your configuration failed.
WPBeginner Support says
You would want to reach out to XAMPP’s support as there are multiple possible reasons from mysql not running to needing to reinstall xampp
Administrador
Sam Arora says
Your site is so much helpful, had a great lesson here
WPBeginner Support says
You’re welcome, glad our site could be helpful
Administrador
Kashif Ch says
Assalam o Alikum Sir!
Currently, I am learning WordPress and want to build different websites like membership website, LMS, e-commerce store for learning best practices.
Can we create two different websites using localhost or any other free hosting?
WPBeginner Support says
For a local installation, you should only need to create a new database and folder for the second site, for free hosting you may want to first take a look at our page and the warning at the beginning here: https://www.wpbeginner.com/showcase/best-free-website-hosting-compared/
Administrador
Xander says
I followed the steps and it worked perfectly yesterday.
This morning, trying to connect to the localhost I received the following error:
“This site can’t be reached localhost refused to connect.
Search Google for localhost wordpress jack admin
ERR_CONNECTION_REFUSED”
WPBeginner Support says
Is your XAMPP running when you try to connect to your localhost?
Administrador
Samar Jamil says
Thanks for sharing!
WPBeginner Support says
Glad you liked the article
Administrador
Daniyal says
Hello there,
I’ve followed all the steps given in the article but stuck when I click “Install WordPress”, it gives me an error > “The site is experiencing technical difficulties”
after setting Site Title, username, password, email.
Can you help me, please
WPBeginner Support says
There are a few possible reasons for that error message. To start resolving it you would want to go through the options in our article here: https://www.wpbeginner.com/wp-tutorials/how-to-fix-the-wordpress-white-screen-of-death/
Administrador
haley says
Thank you for this article. I am on the step where I need to open up the local site in a web browser but when I do, I get an error page saying “the local host has refused to connect.” I’m guessing I messed up on one of the former steps but I don’t know which one. I’m working on a Mac.
Any guidance would be appreciated!
WPBeginner Support says
If you are returning to the site you would want to ensure xampp is running when trying to view your local site
Administrador
Charlie McCormack says
Hi
Thanks for this. Installation went 100%
I am trying to test Divi which has to be loaded from a zip file
I get this when I try to install it from aperance/upload theme
The uploaded file exceeds the upload_max_filesize directive in php.ini.
Any solutions would be great
Charlie
WPBeginner Support says
You could increase the maximum upload size using:
https://www.wpbeginner.com/wp-tutorials/how-to-increase-the-maximum-file-upload-size-in-wordpress/
Another option would be to add the unziped theme folder where your themes are:
https://www.wpbeginner.com/beginners-guide/how-to-install-a-wordpress-theme/
Administrador
Charlie McCormack says
Thanks for your reply
I cannot log in on the FTP maybe because its on a local drive
I am trying to load the theme the way you say
and still get the error.I
I bought a new domain name so will try to load it live and work on it like that
Thanks again
Charlie
WPBeginner Support says
On a local site, you can use your built-in file manager rather than FTP to add the folder to your WordPress site
YINGLI says
Hi, thanks for writing this article!
I have a question though:
I am at the step where I have to fill in a site title, username, password and email address for my admin account for WordPress. May I know whether the information that I use here should be the same as the information that I would use for my actual online WordPress account? I have an existing unlaunched WordPress site through Bluehost.
Thanks so much!
WPBeginner Support says
It is not required but if you’re creating a local site to test then it may be a good idea to set that as the same.
Administrador
Pooja says
Thanks for help , best artical
WPBeginner Support says
You’re welcome
Administrador
Karen says
thanks for the great video. question. am i understanding the process correctly? 1) set up a test site (mysite1) But should i also set up a database/wp install for each client website that I build (and maintain)? I’m guessing yes.
WPBeginner Support says
Yes, you would want a different install and database for each local site
Administrador
Miso says
Great job, simple, straightforward. That’s exactly what a beginner, like me needs.
WPBeginner Support says
Thank you, glad our tutorial was helpful
Administrador
God's Son says
Hi,i am very glad and grateful to you for this article. It was very simple and comprehensive,the photo illustrations helped me a lot. You are a great teacher,i hope i will be able to learn and share my knowlege with others like you soon,thanks.
WPBeginner Support says
Happy our articles can simplify this process for you
Administrador
Aftab Hussain says
Thanks for such a nice guideline. I have successfully install wordpress on my local computer by the help of this post.
WPBeginner Support says
Glad our article could help
Administrador