Il team di WPBeginner crea normalmente siti WordPress locali sui propri computer per testare temi, plugin e funzionalità del sito web senza impattare su un sito live.
XAMPP è un pacchetto software libero e gratuito che fornisce una piattaforma di facile utilizzo per l’impostazione di un’istanza locale di WordPress.
In questo articolo vi mostreremo come creare facilmente un sito WordPress locale utilizzando XAMPP, in modo da poter sperimentare WordPress e affinare le vostre capacità di sviluppo in un ambiente sicuro.

Perché creare un sito WordPress locale?
La creazione di siti WordPress locali è una pratica comune tra gli sviluppatori e i proprietari di siti. Permette di testare WordPress senza creare un vero e proprio sito web su Internet.
I siti web locali sono visibili solo sul vostro computer. Potete provare diversi temi e plugin di WordPress, testarne le funzionalità e imparare le basi di WordPress.
Se avete già un sito web WordPress, potete creare una copia locale del vostro sito web sul computer per provare i nuovi aggiornamenti dei plugin prima di implementarli sul vostro sito web reale.
Importante: un sito web locale sarà visibile solo sul vostro computer. Se si desidera creare un sito web live, è necessario disporre di un nome di dominio e di un hosting WordPress.
Seguite le istruzioni passo-passo della nostra guida su come avviare un blog WordPress quando siete pronti a creare un sito web dal vivo.
Detto questo, vediamo come installare WordPress in locale su Windows, Mac o Linux utilizzando XAMPP.
Che cos’è XAMPP?
XAMPP è un pacchetto software che include tutto ciò che serve per configurare un ambiente server locale sul proprio computer.
Per creare un sito WordPress locale, è necessario configurare un server web (Apache), PHP e MySQL sul proprio computer.
PHP è un linguaggio di programmazione e MySQL è un software di gestione di database. Entrambi sono necessari per far funzionare WordPress.
Installarli separatamente è piuttosto difficile per i principianti. È qui che entra in gioco XAMPP.
XAMPP semplifica la creazione di siti web WordPress in locale. È disponibile per computer basati su Windows, Mac e Linux.
Iniziamo installando XAMPP e configurandolo per gestire il vostro sito WordPress locale.
Installazione di XAMPP sul computer
Per prima cosa, è necessario visitare il sito web di XAMPP e fare clic sul pulsante “Download” per il proprio sistema operativo.
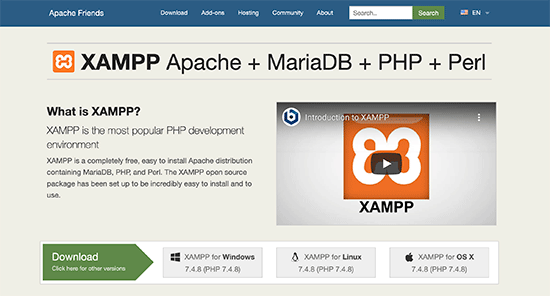
A seconda del sistema operativo, l’installazione guidata e l’interfaccia dell’applicazione potrebbero differire dalle schermate qui riportate. Per il bene di questo articolo, vi mostreremo la versione Windows del software.
Dopo aver scaricato XAMPP, è necessario fare clic ed eseguire il programma di installazione.
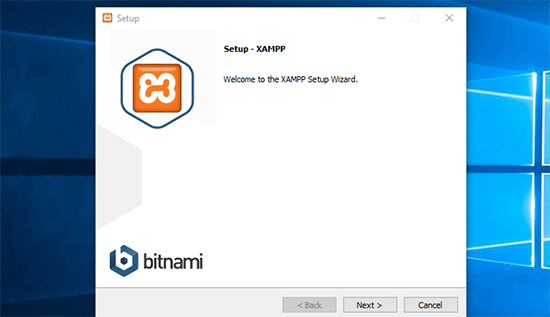
XAMPP chiederà dove installare il software e quali pacchetti si desidera installare. Le impostazioni predefinite andranno bene per la maggior parte degli utenti. Continuate a fare clic sul pulsante “Avanti” per terminare l’installazione guidata.
Al termine della procedura guidata, selezionare l’opzione “Avvia il pannello di controllo ora” e quindi fare clic sul pulsante “Fine”.
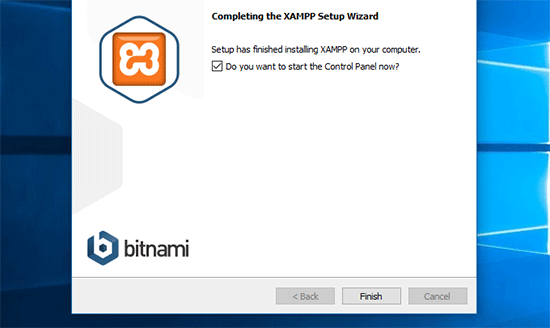
In questo modo si avvia l’applicazione Pannello di controllo XAMPP.
Utilizzando l’applicazione XAMPP, è possibile eseguire il server web Apache come server locale e MySQL come server di database. Cliccate sul pulsante “Avvia” accanto ad Apache e MySQL.
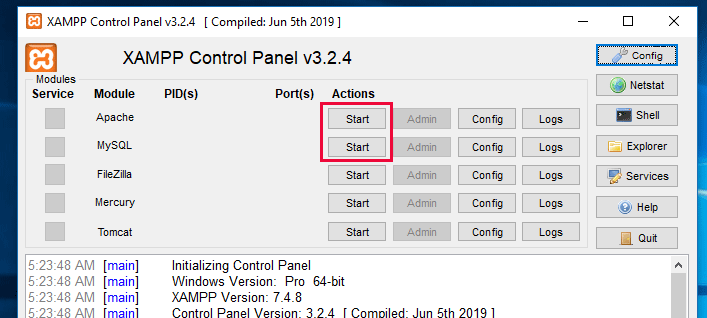
XAMPP avvierà ora Apache e MySQL.
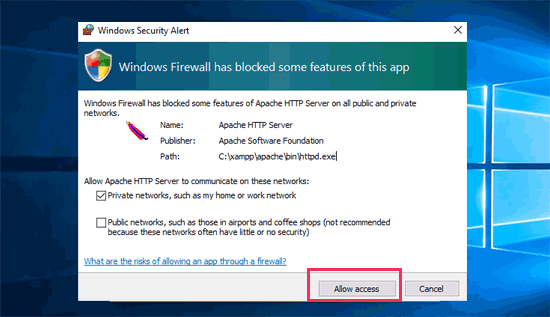
È possibile che venga visualizzata una notifica del firewall di Windows. È importante fare clic sul pulsante “Consenti accesso” affinché entrambe le applicazioni possano essere eseguite sul computer.
Una volta avviate entrambe le applicazioni, i loro nomi saranno evidenziati in verde.
Ora siete pronti a creare un sito web locale e a installare WordPress utilizzando XAMPP.
Creare un sito WordPress locale con XAMPP
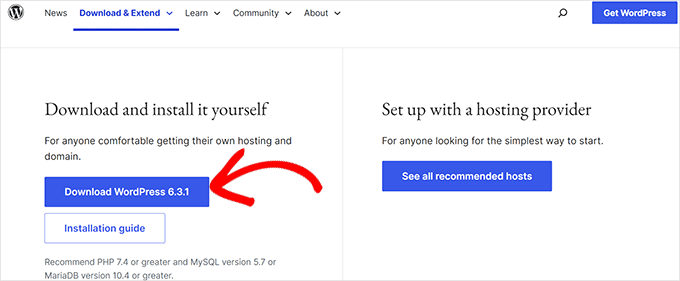
Per prima cosa, è necessario scaricare WordPress. Visitate il sito WordPress.org e fate clic sul pulsante “Scarica WordPress”.
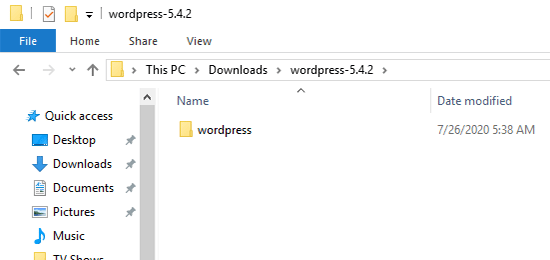
Dopo aver scaricato WordPress, è necessario estrarre il file zip e si vedrà una cartella wordpress.
È necessario copiare questa cartella.
Quindi, andare nella cartella di installazione di XAMPP.
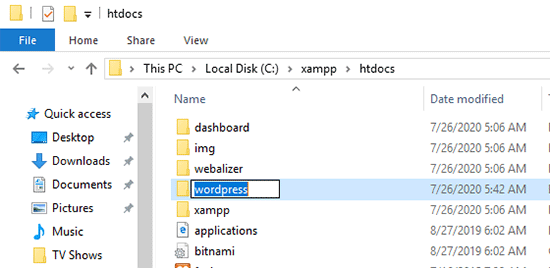
Su Windows, sarà C:/Program Files/XAMPP/htdocs o C:/Xampp/htdocs.
Su Mac, sarà /Applications/XAMPP/htdocs.
Incollare la cartella wordpress copiata in precedenza all’interno della cartella ‘htdocs’.
Si consiglia di rinominare la cartella ‘wordpress’ in ‘website’ o altro. Questo vi aiuterà a identificare facilmente il vostro sito locale.
Successivamente, è necessario aprire il proprio browser web preferito.
È possibile inserire il seguente URL nella barra degli indirizzi del browser:
https://localhost/website1/
Se avete rinominato la cartella WordPress in un altro modo, assicuratevi di sostituire ‘website1’ con il nome della vostra cartella.
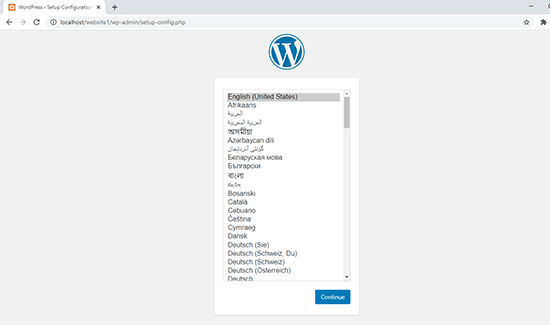
Si aprirà la procedura guidata di installazione di WordPress e vi verrà chiesto di selezionare una lingua. Dopo aver selezionato una lingua, fate clic sul pulsante “Continua”.
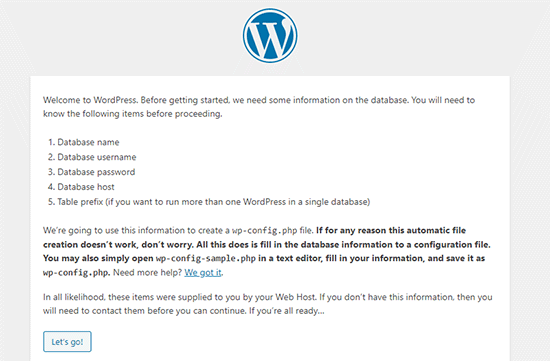
Nella schermata successiva, apparirà la schermata di benvenuto di WordPress.
Include un avviso che indica che WordPress ha bisogno del nome del database, del nome utente del database, della password e delle informazioni sull’host.
Creiamo un database per il vostro sito WordPress.
È necessario aprire una nuova scheda del browser e visitare https://localhost/phpmyadmin/.
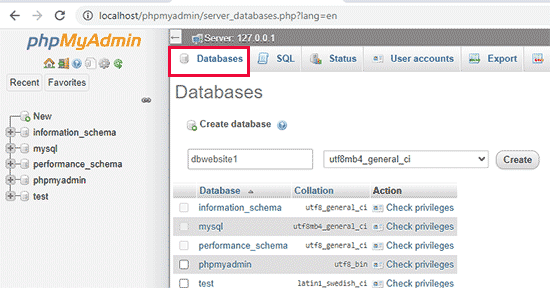
In questo modo si avvia l’applicazione phpMyAdmin, preinstallata in XAMPP. Permette di gestire facilmente i database utilizzando un’interfaccia più semplice.
È necessario fare clic su “Database” e indicare un nome per il nuovo database. Quindi, fare clic sul pulsante “Crea” per continuare.
Ora che avete creato un database, potete utilizzarlo per il vostro sito WordPress.
Tornate alla scheda del browser /localhost/website1/ e fate clic sul pulsante “Let’s Go”.
Nella schermata successiva, vi verrà chiesto di fornire le informazioni sul database di WordPress.
Inserire il nome del database creato in precedenza. Il nome utente è “root” e il campo della password va lasciato vuoto. Per il campo host del database, è necessario utilizzare localhost.
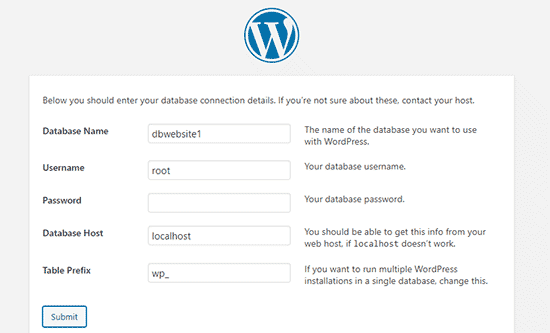
Una volta terminato, fare clic sul pulsante “Invia” per continuare.
Se siete su Windows o Linux, WordPress memorizzerà queste impostazioni nel file di configurazione di WordPress chiamato wp-config.php.
Tuttavia, se siete su un Mac, vi mostrerà il contenuto del file e vi chiederà di crearlo.
È necessario creare questo file nella cartella principale del sito web.
Dopo aver creato il file, incollate al suo interno il testo copiato in precedenza. Successivamente, è necessario salvare il file e tornare al programma di installazione di WordPress per continuare.
Nella fase successiva, WordPress vi chiederà di fornire informazioni sul vostro sito web. Innanzitutto, inserite il titolo che volete utilizzare per questo sito.
Successivamente, è necessario inserire un nome utente, una password e un indirizzo e-mail per l’account amministratore.
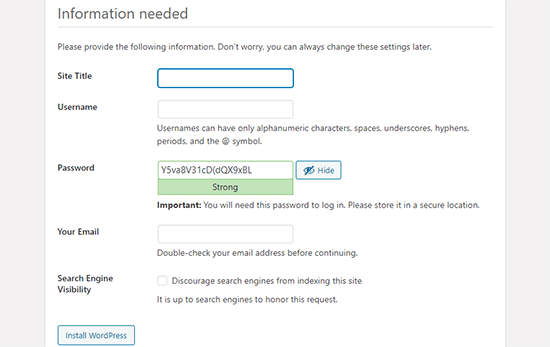
Una volta compilate tutte le informazioni, fate clic sul pulsante “Installa WordPress” per continuare.
A questo punto WordPress eseguirà l’installazione e chiederà di effettuare il login una volta terminata.
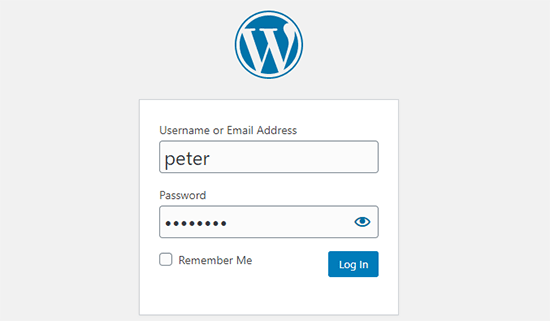
È possibile accedere al proprio sito web andando alla pagina /localhost/website1/wp-admin e utilizzando il nome utente e la password inseriti durante l’installazione.
Cose da provare dopo la creazione di un sito WordPress locale
Ora che avete creato il vostro sito WordPress locale utilizzando XAMPP, potete lavorare su di esso come fareste con un sito WordPress dal vivo.
Andate al menu Aspetto nella barra laterale di amministrazione di WordPress per personalizzare l’aspetto del vostro sito o installare un nuovo tema.
Ecco alcuni fantastici temi gratuiti che potete provare.
La prossima cosa da fare è installare alcuni plugin di WordPress.
I plugin sono come applicazioni per il vostro sito WordPress e vi permettono di aggiungere funzioni interessanti come un modulo di contatto, pulsanti per i social media, un negozio di e-commerce e molto altro.
Avete bisogno di aiuto per installare i plugin? Consultate la nostra guida passo passo su come installare un plugin di WordPress.
Bonus: Spostare un sito WordPress locale su un server live
Dopo aver lavorato sul vostro sito WordPress locale, potreste volerlo spostare su un server live per creare il vostro primo blog o sito web WordPress.
Per farlo, avrete bisogno di un nome di dominio e di un account di web hosting. Normalmente, un nome di dominio costa 14,99 dollari e l’hosting di un sito web parte da 7,99 dollari al mese.
È troppo se si è agli inizi.
Per fortuna, Bluehost offre agli utenti di WPBeginner un nome di dominio gratuito e un generoso sconto sull’hosting. In pratica, potete iniziare a lavorare per 1,99 dollari al mese.
Per ulteriori consigli sull’hosting, date un’occhiata alla nostra guida completa all’hosting WordPress.
Dopo aver sottoscritto l’hosting, potete seguire la nostra guida passo passo su come spostare WordPress da un server locale a un sito live.
Potreste anche voler dare un’occhiata ai modi alternativi per creare siti WordPress locali su Windows usando Wampserver e su Mac usando MAMP.
Guide di esperti sui siti WordPress locali
Ora che sapete come creare un sito WordPress locale utilizzando XAMPP, potreste voler consultare altre guide relative alle installazioni locali di WordPress.
- Glossario: Localhost
- Come installare WordPress in locale su Mac (2 modi semplici)
- Come installare WordPress su un computer Windows (2 metodi)
- Come spostare WordPress dal server locale al sito live (2 metodi)
- Come spostare un sito WordPress live su un server locale
- Come ricevere le e-mail di WordPress da localhost con SMTP
- Come resettare la password dell’amministratore di WordPress su localhost
- Come creare facilmente un sito di staging per WordPress (passo dopo passo)
Speriamo che questo articolo vi abbia aiutato a imparare come creare un sito WordPress locale utilizzando XAMPP. Potreste anche voler consultare la nostra guida sul perché utilizzare WordPress per il vostro sito web o la nostra selezione di esperti per il miglior hosting gratuito di siti web.
Se questo articolo vi è piaciuto, iscrivetevi al nostro canale YouTube per le esercitazioni video su WordPress. Potete trovarci anche su Twitter e Facebook.


Syed Balkhi says
Hey WPBeginner readers,
Did you know you can win exciting prizes by commenting on WPBeginner?
Every month, our top blog commenters will win HUGE rewards, including premium WordPress plugin licenses and cash prizes.
You can get more details about the contest from here.
Start sharing your thoughts below to stand a chance to win!
Moinuddin Waheed says
I have been using xampp for a long time and first time when I installed it , it was for running php code.
I have also used it for wordpress local environment for understanding and developing websites locally.
one thing that has bother me regarding wordpress installation is username and password.
why we keep user as root and password blank?
this is not the case for live servers though?
WPBeginner Support says
It is not something that you would use for a live site but the username being root and the password being blank is the defaults for XAMPP. As your local site would only be active on your computer you do not need to change it for your local XMPP installation.
Admin
Jiří Vaněk says
Sometimes I use XAMPP. The only problem I sometimes encounter is shared hosting, to which the website is migrated from localhost. The problem is that the PHP limits are not always set in the same way on the shared server, or even the PHP version does not match (on the local 8.x and on the server, for example, the old version 7.x). This can often cause a problem in the functionality of the website, which was debugged on a different PHP than the one on the server. That’s probably the only flaw.
Donatas says
Hi, I have used these Xampp instructions to create a server on a PC (Windows 10 Education N). Everything worked perfectly fine and it’s a very useful article. I stuck in one place because I thought the database credentials folder had to be manualy created on Windows the same way it has to be on a Mac but these steps were exclusively for Mac. Thanks a lot!
WPBeginner Support says
You’re welcome, glad our guide was helpful!
Admin
Paul says
After having created the database and entered the database connection details, hitting submit gets me this message “There has been a critical error on this website”. Checked everything twice, what should I do?
Thank you for your attention.
WPBeginner Support says
For a fresh install, you would want to check the error log for XAMP to help narrow down the specific reason.
Admin
John says
Error logs didn’t help. But, as it turns out, for some reason, the most recent version of Xampp caused the same “critical error” response to happen for me too. I ended up uninstalling that version and went with the previous version of Xampp and presto! It works.
lee kent says
Hello. If I were to follow these steps and then decide i wanted to make another site, How would you create a new website locally?
WPBeginner Support says
You would create a new folder and database and install the site in the new folder.
Admin
Smita says
Thanks for detailed steps. Very useful.
WPBeginner Support says
Glad our guide was helpful
Admin
Tife says
Can I use local Host to develop my custom wordpress theme also.
WPBeginner Support says
You can if you would like.
Admin
priyanka says
I’m getting this error
Your server is running PHP version 5.6.3 but WordPress 5.5.3 requires at least 5.6.20.
p/lease help
WPBeginner Support says
It is saying you want to upgrade the PHP you are using for your site to remove that error.
Admin
tarun says
I get the following error, when I run http://localhost/mysite/wp-admin/setup-config.php
One or more database tables are unavailable. The database may need to be repaired.
I tried to do global search for “WP-config” file in my xampp folder but just found “wp-config-sample”. though I added the below line in
“wp-config-sample.php” file
// define(‘WP_ALLOW_REPAIR’, true);
not really sure what to do after that.
WPBeginner Support says
You would want to open phpMyAdmin and run the repair on all of your tables and if that does not work you would need to reach out to XAMPP’s support
Admin
tarun says
I am not able to figure out why I am getting this strange error, though I tried to reinstall and connect several times, all I did was I tried to drop my existing database and tried to create a new wrodpress login but All I can see is the following error
One or more database tables are unavailable. The database may need to be repaired.
WPBeginner Support says
You would want to try to repair your database, you can also use method 3 in our article below:
https://www.wpbeginner.com/wp-tutorials/how-to-fix-the-error-establishing-a-database-connection-in-wordpress/
Admin
Mohsin Zubair says
Hi Sir, I hope you are doing well. I am facing this error while creating data base.
Error
MySQL said: Documentation
Cannot connect: invalid settings.
phpMyAdmin tried to connect to the MySQL server, and the server rejected the connection. You should check the host, username and password in your configuration and make sure that they correspond to the information given by the administrator of the MySQL server.
WPBeginner Support says
You would want to check your configuration settings to see if it is set incorrectly.
Admin
David says
This is exactly what I have been looking for: a local testing server to develop a website without signing up to a plan/paid service first.
The explanations are brilliant and easy to follow. It’s genius! Many thanks.
WPBeginner Support says
You’re welcome, glad our guide was helpful
Admin
Ray Silva says
I installed wordpress. Then I put the wordpress folder in xampp’s htdocs folder. When I go to localhost on my browser, I get sent to the xampp dashboard and welcome to xampp page.
WPBeginner Support says
You may want to try localhost/foldername where foldername is the name of the folder where you placed WordPress to see if that is how it is currently set up.
Admin
Hussain Abbas says
Hi
My url to login to WordPress dashboard is coming as “/localhost/sitename/wordpress/wp-admin” whereas as per the above instructions it should be “/localhost/sitename/wp-admin” .
Would request your help to know how can I remove “wordpess” from the link.
Thanks
WPBeginner Support says
For that, you installed the site in a folder named WordPress, if you are just starting out you can reinstall the site without the WordPress folder.
Admin
muhammad waqar says
easy and good tutorial for beginners
WPBeginner Support says
Glad you found our guide helpful
Admin
Darren Howes says
Hi,
Great instructions, complete novice, everything is working apart from when I try to add/upload images I get the the message
Unable to create directory wp-content/uploads/2020/09. Is its parent directory writable by the server?
I am working on a mac, any ideas on how to solve this?
Regards
Darren
WPBeginner Support says
You would need to navigate to your XAMPP folder, right-click, and modify your sharing for that folder so that it can be updated.
Admin
marni says
When setting up WordPress I used “admin” as the user name and changed the password supplied by WordPress. As a precaution I copied the supplied password. I cannot log in with either password (no typing errors).
WPBeginner Support says
You should be able to force reset the password using the database method in our guide below:
https://www.wpbeginner.com/beginners-guide/how-to-change-your-password-in-wordpress/
Admin
gaurav sachan says
everything is done but database is not created so please me that why are not creting database in my php
WPBeginner Support says
You would need to manually create the database in the phpMyAdmin interface
Admin
Dimitris says
Hello after following the procedure after the following step:
Next, you need to open your favorite web browser and visit localhost/website1. You will see a page like this:
I get this message on the screen.
Warning: require_once: failed to open stream: No such file or directory
WPBeginner Support says
You may need to try unzipping the WordPress files again, the most common reason for this issue is covered in our article below:
https://www.wpbeginner.com/wp-tutorials/how-to-fix-the-wordpress-failed-to-open-stream-error
You can follow our guide for manually updating your site and you wouldn’t need to use FTP to readd the files, our guide on this can be found below:
https://www.wpbeginner.com/beginners-guide/ultimate-guide-to-upgrade-wordpress-for-beginners-infograph
Admin
Muhammad Kamran Khan says
after all these setting localhost/website1 started working. after shut down and restarted my laptop now when i go to localhost/website1/wp-admin/ error message came : This site cant be reached. localhost refused to connect.
WPBeginner Support says
You would want to ensure XAMPP is running to be able to see your site
Admin
dilshan says
This is really helpful because sometimes I want test some plugins but i dont want to install them to my website. I can try them in this local host site thanks to you
WPBeginner Support says
Glad our guide was helpful
Admin
Osazuwa says
A very helpful tutorial.
I have implemented them
But on loading
Localhost/website1
it displays
Parse error: syntax error, unexpected’.’ expecting ‘&’ or variable (T_VARIABLE) in C:\xampp\htcdocs\website1\wp-includes\functions.php on line 1081
Thanks
WPBeginner Support says
You would want to ensure the PHP you are using is up to date for the most common reason for that error.
Admin
Julio Talaverano says
Hi,
Yesterday I installed XAMPP and WordPress and I worked a bit on a new page using localhost/wordpress.
I also installed some Plugins in WordPress.
But today when put into the browser localhost/wordpress I just get the Page I created yesterday.
Could you please tell me how I can continue editing my page with WordPress?
Thanks
WPBeginner Support says
If we’re understanding your question correctly, you would want to ensure XAMPP is running for your site to be visible when visiting the page.
Admin
Ronny says
Hello,
As always your tutorials are great. One question though. How do I make multiple localhosts using Xampp.
Think of me as a noob the this. I’ve read a few other tutorials on the subject, but it seems they assume one would have some deeper understanding of processes.
WPBeginner Support says
You would create a folder with a different name in the htdocs folder and follow the steps under the ‘Creating a Local WordPress Site with XAMPP’ section and navigate to the new site’s folder when you want to see the other site rather than your first site.
Admin
Calvin Mutashu says
Thanks 4 a clear step by step guide. Keep the good work.
WPBeginner Support says
You’re welcome, glad you liked our guide
Admin
Anjuli says
Hello! My browser cannot open to localhost after putting the WordPress folder to htdocs and renaming it to website1. What should I do? Thank you.
WPBeginner Support says
If you’re returning to the site after a day, please ensure XAMPP is running on your computer for it to load porperly.
Admin
SANTOS says
Hi, how do I take my local wordpress site to a live wordpress site with a domain name?
WPBeginner Support says
Once you purchase hosting with a domain name, you would follow our guide here:
https://www.wpbeginner.com/wp-tutorials/how-to-move-wordpress-from-local-server-to-live-site/
Admin
Zaid says
I have a question if i am customizing my localhost wordpress site and my pc turned off. I will loss my site..?
WPBeginner Support says
No, as long as you save your changes those saved changes will remain the next time you pull up your local installation
Admin
Carla says
Guys, Just wanted to say thank you for this post! I successfully implemented a localhost on my computer thanks to your clear, step-by-step process outlined in the post! So excited to get practising my wp skills on this new installation!
WPBeginner Support says
Awesome, glad our guide could help get you set up
Admin
Victor says
Great job!! Is there a way, or a tutorial to transfer an existing website to this service ? This one deals with a brand new one. I have a website, and I’d love to add it to XAMPP! Thanks !
WPBeginner Support says
For that, you would want to take a look at our article here:
https://www.wpbeginner.com/wp-tutorials/how-to-move-live-wordpress-site-to-local-server/
Admin
Blessings Chibisa says
Guys I installed WordPress on a local machine. Am using xamp server I created a database but they is a problem in connection of WordPress and the database…. What should I do ?
Help me pliz
WPBeginner Support says
For an error with your database connection, you would want to take a look at our article here: https://www.wpbeginner.com/wp-tutorials/how-to-fix-the-error-establishing-a-database-connection-in-wordpress/
Admin
Vikas says
Great artice. It worked perfectly. I am a new learner. Sir could you guide me about How I could run multiple local sites using xampp.
Any help will be aporeciated.
WPBeginner Support says
You would want to create a new folder for the next site and then you should be able to follow the directions in the article to create a new database and site.
Admin
AASIMA says
SIR.
I successfully followed your instructions to make a website on the localhost. but the next day it doesn’t open and showing some error?
WPBeginner Support says
You would want to be sure XAMPP is running to see your local site
Admin
Mate says
Good guys
I have my website running on local xampp server on windows 10 system I want to move to my new Mac pro computer how do I do it? thanks.
WPBeginner Support says
You would follow the steps in our article here: https://www.wpbeginner.com/wp-tutorials/how-to-move-live-wordpress-site-to-local-server/
Admin
Keith says
I followed your directions and it was great, thanks.
I am trying to upload the AVADA theme that I have install previously on Hostgator and it worked.
It is 6mb and a zip file.
When I try to add this theme I get this message: “The uploaded file exceeds the upload_max_filesize directive in php.ini”.
Where am I going wrong? Thank You,
WPBeginner Support says
You may want to ensure that there isn’t the theme files in what you’re uploading. If it’s only the theme’s files then you can update your upload size on your XAMPP site using the methods in our article here: https://www.wpbeginner.com/wp-tutorials/how-to-increase-the-maximum-file-upload-size-in-wordpress/
Admin
Deepak Singh says
Very helpful post, thanks for this..
WPBeginner Support says
You’re welcome
Admin
Mary says
Good evening, thanks for the great work done here. I have followed these steps and I am unable to log in to my website. All I am getting is this. I am feed up already. Connection for controluser as defined in your configuration failed.
WPBeginner Support says
You would want to reach out to XAMPP’s support as there are multiple possible reasons from mysql not running to needing to reinstall xampp
Admin
Sam Arora says
Your site is so much helpful, had a great lesson here
WPBeginner Support says
You’re welcome, glad our site could be helpful
Admin
Kashif Ch says
Assalam o Alikum Sir!
Currently, I am learning WordPress and want to build different websites like membership website, LMS, e-commerce store for learning best practices.
Can we create two different websites using localhost or any other free hosting?
WPBeginner Support says
For a local installation, you should only need to create a new database and folder for the second site, for free hosting you may want to first take a look at our page and the warning at the beginning here: https://www.wpbeginner.com/showcase/best-free-website-hosting-compared/
Admin
Xander says
I followed the steps and it worked perfectly yesterday.
This morning, trying to connect to the localhost I received the following error:
“This site can’t be reached localhost refused to connect.
Search Google for localhost wordpress jack admin
ERR_CONNECTION_REFUSED”
WPBeginner Support says
Is your XAMPP running when you try to connect to your localhost?
Admin
Samar Jamil says
Thanks for sharing!
WPBeginner Support says
Glad you liked the article
Admin
Daniyal says
Hello there,
I’ve followed all the steps given in the article but stuck when I click “Install WordPress”, it gives me an error > “The site is experiencing technical difficulties”
after setting Site Title, username, password, email.
Can you help me, please
WPBeginner Support says
There are a few possible reasons for that error message. To start resolving it you would want to go through the options in our article here: https://www.wpbeginner.com/wp-tutorials/how-to-fix-the-wordpress-white-screen-of-death/
Admin
haley says
Thank you for this article. I am on the step where I need to open up the local site in a web browser but when I do, I get an error page saying “the local host has refused to connect.” I’m guessing I messed up on one of the former steps but I don’t know which one. I’m working on a Mac.
Any guidance would be appreciated!
WPBeginner Support says
If you are returning to the site you would want to ensure xampp is running when trying to view your local site
Admin
Charlie McCormack says
Hi
Thanks for this. Installation went 100%
I am trying to test Divi which has to be loaded from a zip file
I get this when I try to install it from aperance/upload theme
The uploaded file exceeds the upload_max_filesize directive in php.ini.
Any solutions would be great
Charlie
WPBeginner Support says
You could increase the maximum upload size using:
https://www.wpbeginner.com/wp-tutorials/how-to-increase-the-maximum-file-upload-size-in-wordpress/
Another option would be to add the unziped theme folder where your themes are:
https://www.wpbeginner.com/beginners-guide/how-to-install-a-wordpress-theme/
Admin
Charlie McCormack says
Thanks for your reply
I cannot log in on the FTP maybe because its on a local drive
I am trying to load the theme the way you say
and still get the error.I
I bought a new domain name so will try to load it live and work on it like that
Thanks again
Charlie
WPBeginner Support says
On a local site, you can use your built-in file manager rather than FTP to add the folder to your WordPress site
YINGLI says
Hi, thanks for writing this article!
I have a question though:
I am at the step where I have to fill in a site title, username, password and email address for my admin account for WordPress. May I know whether the information that I use here should be the same as the information that I would use for my actual online WordPress account? I have an existing unlaunched WordPress site through Bluehost.
Thanks so much!
WPBeginner Support says
It is not required but if you’re creating a local site to test then it may be a good idea to set that as the same.
Admin
Pooja says
Thanks for help , best artical
WPBeginner Support says
You’re welcome
Admin
Karen says
thanks for the great video. question. am i understanding the process correctly? 1) set up a test site (mysite1) But should i also set up a database/wp install for each client website that I build (and maintain)? I’m guessing yes.
WPBeginner Support says
Yes, you would want a different install and database for each local site
Admin
Miso says
Great job, simple, straightforward. That’s exactly what a beginner, like me needs.
WPBeginner Support says
Thank you, glad our tutorial was helpful
Admin
God's Son says
Hi,i am very glad and grateful to you for this article. It was very simple and comprehensive,the photo illustrations helped me a lot. You are a great teacher,i hope i will be able to learn and share my knowlege with others like you soon,thanks.
WPBeginner Support says
Happy our articles can simplify this process for you
Admin
Aftab Hussain says
Thanks for such a nice guideline. I have successfully install wordpress on my local computer by the help of this post.
WPBeginner Support says
Glad our article could help
Admin