Volete creare un modulo di contatto e aggiungerlo al vostro sito WordPress?
Ogni sito web ha bisogno di un modulo di contatto, in modo che i visitatori possano facilmente contattarvi per i vostri prodotti e servizi. Per impostazione predefinita, WordPress non dispone di un modulo di contatto integrato, ma esiste un modo semplice per aggiungere moduli di contatto al vostro sito.
In questo articolo vi mostreremo come creare facilmente un modulo di contatto in WordPress senza toccare una sola riga di codice.
Perché avete bisogno di un modulo di contatto WordPress?
Vi starete chiedendo: perché ho bisogno di un modulo di contatto? Non posso semplicemente aggiungere il mio indirizzo e-mail sul mio sito web, in modo che le persone possano inviarmi un’e-mail?
È una domanda molto frequente da parte dei principianti, che temono che l’aggiunta di un modulo di contatto richieda conoscenze di codifica.
Fortunatamente, è possibile utilizzare un plugin di WordPress per aggiungere semplicemente un modulo di contatto al vostro sito web WordPress senza alcuna conoscenza di codifica.
Ecco i 3 motivi principali per cui un modulo di contatto è meglio che incollare l’indirizzo e-mail in una pagina.
- Protezione antispam – I bot antispam scansionano regolarmente i siti web alla ricerca del tag mailto: indirizzo e-mail. Quando pubblicate il vostro indirizzo e-mail sul sito web, inizierete a ricevere molte e-mail di spam. D’altra parte, il vostro modulo di contatto può bloccare lo spam del modulo di contatto e bloccare quasi tutte le e-mail di spam.
- Informazioni coerenti – Quando si invia un’e-mail, le persone non sempre inviano tutte le informazioni necessarie. Con un modulo di contatto, potete dire all’utente esattamente quali informazioni state cercando, come il numero di telefono, il budget, i dettagli del progetto e altro ancora.
- Risparmio di tempo – I moduli di contatto aiutano a risparmiare tempo in più modi di quanto si possa immaginare. Oltre a fornire informazioni coerenti, è possibile utilizzare le conferme dei moduli per indicare all’utente i passi successivi da compiere. Ad esempio, guardare un video o aspettare fino a 24 ore per ricevere una risposta, in modo che non vi inviino più richieste.
Detto questo, vi mostriamo come creare facilmente un modulo di contatto in WordPress, passo dopo passo.
Video tutorial
Se preferite le istruzioni scritte, continuate a leggere.
Passo 1. Scegliere il miglior plugin per il modulo di contatto di WordPress
La prima cosa da fare è scegliere un plugin per il modulo di contatto di WordPress.
Sebbene esistano diversi plugin gratuiti e a pagamento per i moduli di contatto di WordPress, noi utilizziamo WPForms sul nostro sito e riteniamo che sia l’opzione migliore sul mercato.
Ecco i tre motivi per cui riteniamo che WPForms sia il migliore:
- È il plugin per moduli di contatto più facile da usare per i principianti. È possibile utilizzare il costruttore drag & drop per creare facilmente un modulo di contatto in pochi clic.
- WPForms Lite è gratuito al 100% e può essere utilizzato per creare un semplice modulo di contatto (oltre 6 milioni di siti lo utilizzano).
- Quando sarete pronti per funzioni più potenti, potrete passare a WPForms Pro.
Per saperne di più, consultate la nostra recensione dettagliata di WPForms.
Ora che abbiamo scelto il plugin per il modulo di contatto, andiamo avanti e installiamolo sul sito.
Passo 2. Installare un plugin per il modulo di contatto in WordPress
Per questo tutorial, utilizzeremo WPForms Lite perché è gratuito e facile da usare.
È possibile installare questo plugin sul proprio sito accedendo alla dashboard di WordPress e andando su Plugin ” Aggiungi nuovo“.
Quindi, nel campo di ricerca, digitate “WPForms” e fate clic sul pulsante “Installa ora”.
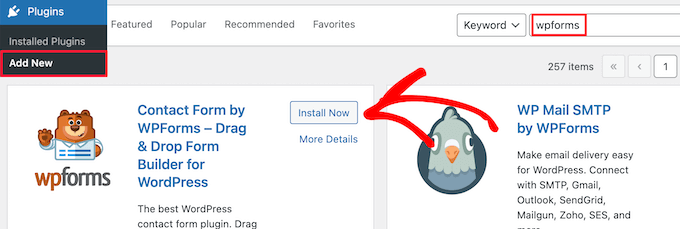
Questo installerà automaticamente il plugin sul vostro sito.
Successivamente, è necessario attivare il plugin facendo clic sul pulsante “Attiva”.

Se non vedete il menu dei plugin o volete istruzioni più dettagliate, consultate la nostra guida passo passo su come installare un plugin di WordPress.
Passo 3. Creare un modulo di contatto in WordPress
Ora che avete attivato WPForms, siete pronti a creare un modulo di contatto in WordPress.
A tal fine, nel pannello di amministrazione di WordPress, navigare in WPForms ” Tutti i moduli”. Quindi, fate clic sul pulsante “Aggiungi nuovo”.

Si aprirà la libreria di modelli del costruttore di moduli WPForms. Iniziate dando un nome al vostro modulo di contatto e poi selezionate il modello di modulo di contatto.
Per scegliere un modello è sufficiente passarci sopra e fare clic sul pulsante “Usa modello”.
WPForms Lite è dotato di oltre 20 modelli di moduli gratuiti tra cui scegliere. È possibile utilizzarli per creare qualsiasi tipo di modulo di contatto.
Per questo esempio, selezioneremo il modello “Modulo di contatto semplice”. Verranno aggiunti automaticamente i campi Nome, Email e Messaggio.

È possibile fare clic su qualsiasi campo del modulo per modificarlo.
Quando si fa clic su un campo del modulo, viene visualizzato il pannello “Opzioni campo” sulla sinistra, dove è possibile apportare modifiche.

È anche possibile trascinare i campi con il mouse per modificarne l’ordine.
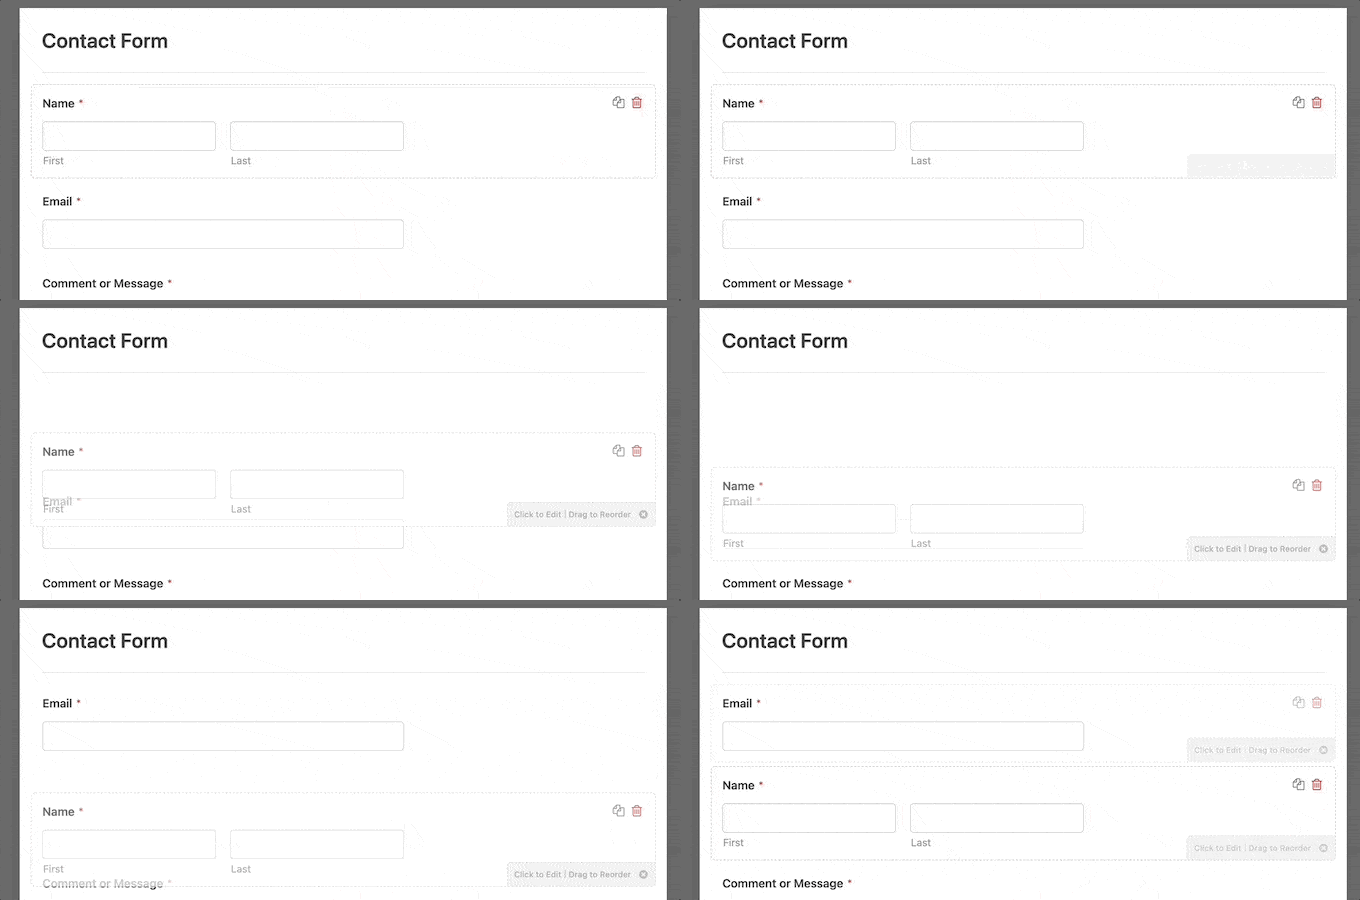
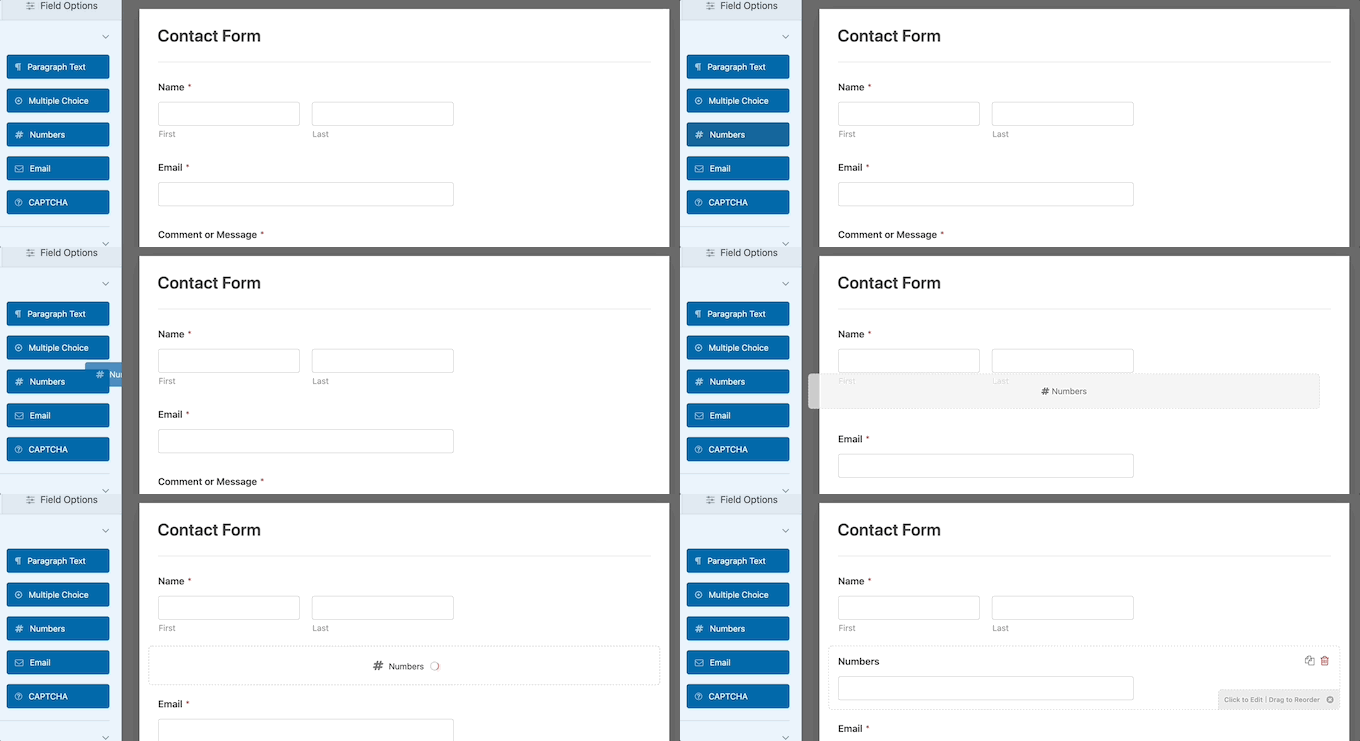
Se si desidera aggiungere un nuovo campo, è sufficiente selezionarlo tra quelli disponibili nella barra laterale di sinistra.
È possibile trascinarlo sul modulo o fare clic su di esso e verrà aggiunto automaticamente al modulo.
Una volta terminata la personalizzazione del modulo, assicurarsi di fare clic sul pulsante “Salva”.
Passo 4. Configurazione delle notifiche e delle conferme del modulo WordPress
Dopo aver creato il modulo di contatto, è importante configurare correttamente le opzioni di notifica e di conferma del modulo.
La conferma del modulo è ciò che il visitatore del sito web vede dopo l’invio del modulo. Può essere un semplice messaggio di ringraziamento, una pagina in cui avete caricato dei PDF scaricabili o qualsiasi altra cosa desideriate.
La notifica del modulo è l’e-mail che si riceve dopo che qualcuno ha inviato il modulo di contatto sul vostro blog WordPress.
Per personalizzare il messaggio di conferma, fare clic sulla scheda “Impostazioni” e poi sulla scheda “Conferme” all’interno del costruttore di moduli.
Esiste già un messaggio di ringraziamento predefinito.
Tuttavia, se lo si desidera, è possibile personalizzarlo nella casella “Messaggio di conferma”.

Se si desidera reindirizzare gli utenti dopo l’invio del modulo invece di mostrare un messaggio, selezionare “Vai all’URL” dal menu a tendina “Tipo di conferma”.
Quindi, inserire l’URL a cui si desidera reindirizzare gli utenti.

Se si apportano modifiche, fare clic sul pulsante “Salva”.
Dopodiché, si può verificare che le impostazioni di notifica del modulo siano corrette. È sufficiente fare clic sulla scheda “Notifiche” dallo stesso menu “Impostazioni”.
La cosa migliore di WPForms è che le impostazioni predefinite sono ideali per i principianti. Quando si accede alle impostazioni di notifica, tutti i campi vengono precompilati dinamicamente.

Per impostazione predefinita, le notifiche vengono inviate all’e-mail di amministrazione impostata al momento della creazione del sito.
Se si desidera inviare la notifica a un indirizzo e-mail personalizzato, è possibile modificarlo. Se si desidera inviare la notifica a più e-mail, è sufficiente separare ogni indirizzo e-mail con una virgola.
L'”Oggetto dell’e-mail” è precompilato con il nome del modulo. Il campo “Da” è popolato automaticamente con il nome dell’utente.

Quando si risponde alla richiesta del modulo, la risposta viene inviata all’e-mail che l’utente ha inserito nel modulo di contatto.
Assicurarsi di fare clic sul pulsante “Salva” se si apportano modifiche qui.
Se volete inviare l’e-mail del modulo a più persone o a diversi reparti, consultate la nostra guida su come creare un modulo di contatto con più destinatari.
Se avete problemi con la ricezione delle e-mail dei moduli, consultate la nostra guida su come risolvere il problema del mancato invio di e-mail da parte di WordPress.
Passo 5. Aggiunta del modulo di contatto di WordPress in una pagina
Ora che avete finito di configurare il modulo di contatto di WordPress, è il momento di aggiungerlo a una pagina.
Si può aggiungere a una pagina di contatto esistente o creare una nuova pagina in WordPress.
Per creare una nuova pagina di modulo di contatto, basta andare su Pagine ” Aggiungi nuovo e dare un nome alla pagina.
Utilizzeremo il blocco WPForms per aggiungere il modulo in una pagina. È sufficiente fare clic sul pulsante “Più” per aggiungere un blocco e cercare “WPForms”.
Quindi, fare clic sul blocco “WPForms”.

Il blocco WPForm apparirà ora nell’area del contenuto della pagina.
È necessario fare clic sul menu a discesa per selezionare il modulo creato in precedenza.

WPForms caricherà l’anteprima del modulo di contatto nell’editor. Ora è possibile fare clic sul pulsante “Pubblica” o “Aggiorna” per salvare il modulo.
Ora potete visitare il vostro sito web per vederlo in azione.
Ecco come appariva il modulo su un esempio di pagina di contatto di WordPress:
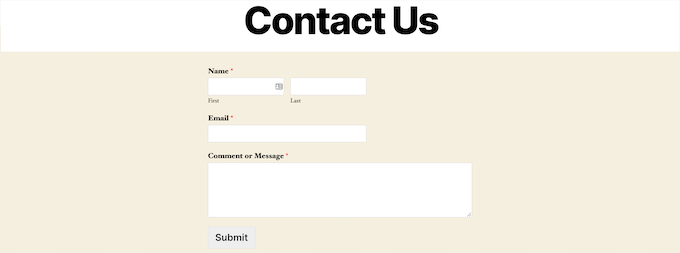
Se si vuole aggiungere solo il modulo di contatto alla pagina, il gioco è fatto. Congratulazioni.
WPForms è dotato anche di uno shortcode per i moduli di contatto di WordPress. È possibile utilizzarlo visitando WPForms ” Tutti i moduli e copiare lo shortcode accanto al modulo.

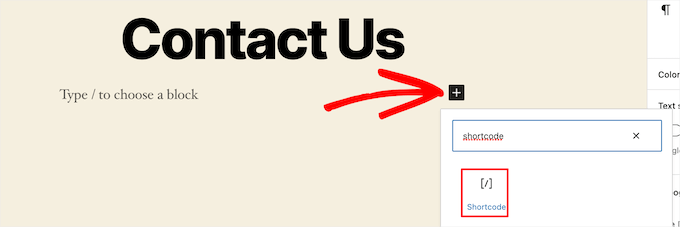
Quindi, tutto ciò che dovete fare è aprire la pagina in cui volete aggiungerlo e fare clic sul pulsante “Più” per aggiungere il blocco e cercare “Shortcode”.
Quindi, fare clic sul blocco “Shortcode”.
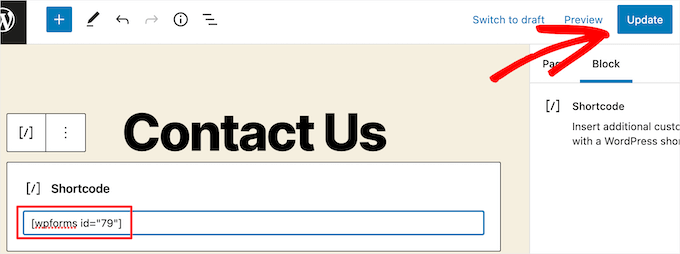
Quindi, incollare nella casella lo shortcode copiato in precedenza.
Dopodiché, fate clic su “Aggiorna” o “Pubblica” e il modulo di contatto sarà attivo sul vostro sito web, proprio come sopra.
Per saperne di più sugli shortcode, consultate la nostra guida definitiva su come aggiungere uno shortcode in WordPress.
Passo 6. Aggiunta del modulo di contatto di WordPress in una barra laterale
WPForms è dotato anche di un widget per il modulo di contatto di WordPress che potete utilizzare per aggiungere il vostro modulo di contatto a una barra laterale o a qualsiasi altra area predisposta per widget nel vostro tema WordPress.
Per farlo, è necessario andare su Aspetto ” Widget e poi fare clic sull’icona ‘Più’ per aggiungere il blocco nell’area del widget che si desidera aggiungere al modulo.

Quindi, cercare “WPForms”.
Quindi, fare clic sul blocco “WPForms” per aggiungerlo alla barra laterale.

Successivamente, è necessario selezionare il modulo di contatto dall’elenco a discesa.
In questo modo si caricherà automaticamente un’anteprima del modulo.

Quindi, fare clic sul pulsante “Aggiorna” per salvare le modifiche.
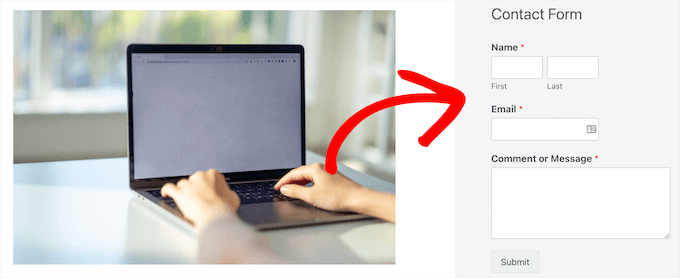
Ora è possibile visitare il sito per vedere il modulo di contatto nella barra laterale o in un’altra area widget.
Per saperne di più sui widget, consultate la nostra guida su come aggiungere e utilizzare i widget in WordPress.
Portare il modulo di contatto di WordPress al livello successivo
A lato della creazione di semplici moduli di contatto, WPForms Pro viene fornito con oltre 1.800 template di moduli già pronti che potete utilizzare per creare rapidamente qualsiasi tipo di modulo WordPress di cui abbiate bisogno.
Ci sono funzioni potenti come la logica condizionale, i sondaggi, la raccolta di firme elettroniche, l’abbandono dei moduli, i dati di geolocalizzazione, i codici coupon personalizzabili e molto altro ancora.
Inoltre, consente di accettare facilmente pagamenti online tramite Stripe, PayPal, Authorize.net e Square. Anche la versione gratuita di WPForms consente di raccogliere pagamenti tramite Stripe.
Inoltre, si integra con migliaia di strumenti di marketing e aziendali, come Google sheets, HubSpot e altri ancora, per aiutarvi a ottimizzare il vostro flusso di lavoro.
WPForms ha anche aggiunto strumenti di personalizzazione dei moduli, come landing page, moduli conversazionali, lead form e moduli di calcolo, che consentono di add-on moduli interattivi sul sito senza costi elevati.

Per ulteriori suggerimenti, consultate la nostra guida su come creare moduli più interattivi in WordPress.
Avete riscontrato errori nel modulo di contatto? Lasciate che WPBeginner Pro Services li corregga! Offriamo un’assistenza WordPress di emergenza a prezzi accessibili per risolvere rapidamente i problemi e correggere gli errori dei moduli di contatto. Salvate il tempo, ottenete la massima tranquillità e assicuratevi che i vostri clienti possano raggiungervi. Programmate oggi stesso i servizi di assistenza WordPress!
Speriamo che questo articolo vi abbia aiutato a creare un semplice modulo di contatto in WordPress. Vi consigliamo anche di consultare la nostra guida su come creare una newsletter via e-mail nel modo giusto e la nostra selezione dei migliori servizi telefonici per le piccole imprese.
Se questo articolo vi è piaciuto, iscrivetevi al nostro canale YouTube per le esercitazioni video su WordPress. Potete trovarci anche su Twitter e Facebook.


Syed Balkhi says
Hey WPBeginner readers,
Did you know you can win exciting prizes by commenting on WPBeginner?
Every month, our top blog commenters will win HUGE rewards, including premium WordPress plugin licenses and cash prizes.
You can get more details about the contest from here.
Start sharing your thoughts below to stand a chance to win!
Will Beadenkopf says
I used the basic contact form from WPForms on my wife’s blog and website, but we get more spam replies from people trying to sell something than we do real replies.
Can we put more validation in the basic form, or do we have to go to the Pro version?
WPBeginner Comments says
The free version of WPForms has a couple CAPTCHA options available. These can be very powerful in blocking spam.
Jiří Vaněk says
I use WP Forms since I won a full license in your giveaway. I’ve never won anything before, and then I received a full license for WP Forms from you for free. I have to say, it’s a great plugin.
WPBeginner Support says
Glad you liked the plugin
Admin
susan says
Hello, I followed the steps howevert he contact page does not appear on the webite. How should I proceed as I have attempted it numerous times now.
WPBeginner Support says
If you mean the page that you added the contact form to is not on your menu, then we would recommend taking a look at our article below for how to create and manage your menu:
https://www.wpbeginner.com/beginners-guide/how-to-add-navigation-menu-in-wordpress-beginners-guide/
Admin
Bryan says
Hello, thanks for the help. You mentioned that the email address can be changed. Can you please share how this is done and where?
Thanks
Karolina says
I followed all the steps but for whatever reason, this form doesn’t work. I uninstalled and installed it few times. I followed exactly as on video but when sending a test contact form I don’t receive any emails or notifications.
WPBeginner Support says
If you’re not receiving emails on your site, we would recommend following our guide below as it is more than likely due to how WordPress sends emails than the form itself:
https://www.wpbeginner.com/plugins/how-to-send-email-in-wordpress-using-the-gmail-smtp-server/
Admin
Eric says
I followed your video to put a contact form on my site and you made it easy and enjoyable. I noticed that you had your address and contact information on the side. How do I put my contact information there? Thank you in advance.
Eric
WPBeginner Support says
If you mean from the video, we placed another block on the page and manually added the text
Admin
Natalia says
hi, how to edit buttons and typeface in the form?
WPBeginner Support says
It would depend on the form plugin you decide to use and there are different locations for that customization.
Admin
Amaka obi says
I fid all these but when I tried to test it, I didn’t get any notification in my mail from my website. Please what could be the cause?
Thank you
WPBeginner Support says
For the most common reason, it would be due to how WordPress sends emails, you can get around this issue by following our guide below:
https://www.wpbeginner.com/plugins/how-to-set-up-wp-mail-smtp-with-any-host-ultimate-guide/
Admin
Saiqa says
Thank you so much! it really helped me:)
WPBeginner Support says
Glad our guide was helpful
Admin
JITEN PATIL says
Thanks! this plugin is nice. i am using it and it is very simple & easy to build forms in less time.
WPBeginner Support says
Glad you found the plugin helpful
Admin
Brian Leggero says
Wow! It sure doesn’t get any easier than that!
Great instructions! Nice slow talking too, easy to understand.
Keep up the GREAT work!
WPBeginner Support says
Thank you, glad you found our guide helpful
Admin
Geoff Anderson says
I’ve installed WPForms Lite and activated it but it doesn’t show up in the side menu bar in WordPress. I can see it in the Plugins but I don’t have an option to select settings just deactivate.
So I’m unable to access the plugin at all. Any suggestions?
Cheers, Geoff
WPBeginner Support says
You may want to try reinstalling the plugin in case there was a hiccup with your download. Otherwise, please reach out directly to WPForms’ support and they would be able to assist.
Admin
Flora tony says
please when i click on submit, i go to my mail and i dont see any mail
i have tried it several times
WPBeginner Support says
For not receiving emails there are a few possible reasons, to start we would recommend ensuring your site is using SMTP by following our guide below:
https://www.wpbeginner.com/plugins/how-to-send-email-in-wordpress-using-the-gmail-smtp-server/
Admin
Daniel Putman says
I am getting very frustrated with your tutorials. They seem to be out of date because the view that I get is different than what you are showing. Please update these tutorials.
WPBeginner Support says
This article is up to date, you may want to ensure you are not on WordPress.com, we cover the difference between WordPress.com and WordPress.org on our article below:
https://www.wpbeginner.com/beginners-guide/self-hosted-wordpress-org-vs-free-wordpress-com-infograph/
Admin
Court says
This no longer works as your need a business plan to have a contact form.
WPBeginner Support says
That is for WordPress.com, our tutorials are for WordPress.org. We cover the difference between the two in our article below:
https://www.wpbeginner.com/beginners-guide/self-hosted-wordpress-org-vs-free-wordpress-com-infograph/
Admin
Court says
Thanks for the clarification!!
WPBeginner Support says
You’re welcome
Chris says
I just installed WPForms and created a contact form for my website.
When I visit the contact page, I see two contact forms; the one from WPForms and another one. I don’t have any other form plugin except WPForm.
How can I resolve this?
WPBeginner Support says
By default, WordPress does not have a contact form tool, you would want to check through your plugins again for plugins that add a contact form tool.
Admin
Chris says
I later found out that the problem was from my theme. I contacted support and they gave me a code to disable it.
Thanks for your feedback.
Marguerite F Cleveland says
I have my form set up but when I test it in my site and click the submit button nothing happens. I set it up using the block editor.
WPBeginner Support says
If you mean you did not receive an email then it is likely due to how WordPress is sending the emails, we would recommend setting up SMTP to help ensure you receive any messages from your site by following our guide here:
https://www.wpbeginner.com/plugins/how-to-send-email-in-wordpress-using-the-gmail-smtp-server/
Admin
Luz Manalo-Cruz says
Hi. I am unable to add the contact form in Pages. When I click on Pages in my dashboard, there is no Add Forms field. Is there another way? I am on localhost.
WPBeginner Support says
You’re likely using the block editor, you would want to check for the WPForms block to add the form to your page
Admin
Luz Manalo-Cruz says
That worked, thanks!
WPBeginner Support says
Glad we could help
Sakshi Kaushik says
I have installed the WPforms plugin. but where do i check my form entries from? I am unable to see the entries that my viewers are giving. Please help.
WPBeginner Support says
Under the WPForms menu item, there should be entires as an option. If you are unable to see the entires, you would want to reach out to WPForms’ support and they would assist with your specific issue.
Admin
Adepoju Olaide says
Thanks for this post. i hope this would work for me!
WPBeginner Support says
You’re welcome, our guide should work for every WordPress.org site so it should work for you as well
Admin
Ainjel M says
Great post! Thank you. Was so simple!
WPBeginner Support says
You’re welcome, glad we could simplify the process for you
Admin
Jennifer Preissler says
I am using divi theme and I am not finding the add form button…
WPBeginner Support says
If you are editing a post/page with the block editor you would want to add the WPForms block instead of looking for a button
Admin
santoshrana says
informative detail. That list has helped a lot in my task.
WPBeginner Support says
Glad our guide could help
Admin
brenda s says
I need help, I have created a form and would like to know how I can receive the information once submit button is pressed, where does my information go.
WPBeginner Support says
It would depend on what form you are using but the default is to email the submissions to the email under Settings>General
Admin
beth pross says
I have made my contact form too many times to count. I have tried to upload it also several times. it will be in the preview. It will NOT publish.
I have followed your directions every time. I have invested over ten hours on this one edit.
What am I doing wrong?
WPBeginner Support says
It would depend on which plugin you’re using. If you reach out to your contact form plugin’s support they should be able to assist with what the issue could be.
Admin
Ranojit Kumar says
Thanks for this post.
WPBeginner Support says
You’re welcome
Admin
Kathy Rowland says
Thanks for the great tutorial! Off to update and activate my Contact Form. Let the emails begin
WPBeginner Support says
You’re welcome, glad you liked our article
Admin
Jochen Gererstorfer says
Do we have to install another plugin, if we upgrade from the lite version to WPForms Pro?
WPBeginner Support says
When you add your license key the lite version should replace itself with the pro version for you.
Admin
Kathleen says
This is great…sounds easy enough. I’m going to try it with my granddaughters website. Thanks…
WPBeginner Support says
You’re welcome, glad our guide is helpful
Admin
Burhan says
The contact form is one of the must have elements of a website.
This article is all you need to learn making the best and proffessional contact form.
WPBeginner Support says
Thank you for your recommendation of our article
Admin
Henry Bartimus says
when I click “confirmation and an empty box opens with no content, thank you
WPBeginner Support says
That’s quite strange, you could start by disabling your other plugins to see if it is a plugin conflict. Otherwise, please reach out to WPForms’ support directly and they should be able to assist with the issue
Admin
Susan says
I’ve installed WP forms Lite, but can’t see the configuration options anywhere in settings – there isn’t much at all there. Any clues?
WPBeginner Support says
It would depend on what specific option you’re looking for as some options are in the forms themselves. If you reach out to the plugin’s support they can help point you to what you’re looking for
Admin
Greg says
I created the Simple contact form and the problem I am having is the email that is sent goes into the Junk Email folder. I have tried adding the domain and sender as safe but it still goes to Junk Email. How can I stop this?
WPBeginner Support says
If you’re sending emails using SMTP such as the method in our article: https://www.wpbeginner.com/plugins/how-to-send-email-in-wordpress-using-the-gmail-smtp-server/
You may want to reach out to the support for your email provider to see if there is a setting on their end that could be causing this.
Admin
Clement says
Great tutorial for anyone who wants to create a contact form in an easy-to-follow manner
WPBeginner Support says
THank you
Admin
Khan says
Nice post Bro. I want to ask, does this form comply with GDPR?
WPBeginner Support says
For specifics on GDPR compliance when creating a form, you would want to take a look at: https://www.wpbeginner.com/plugins/how-to-create-gdpr-compliant-forms-in-wordpress/
and
https://www.wpbeginner.com/beginners-guide/the-ultimate-guide-to-wordpress-and-gdpr-compliance-everything-you-need-to-know/
Admin
Jess says
Hi there, thank you for your insightful articles, they have helped me a lot!
I am wondering if you know how to insert a code that allows the user to remove a file that has been uploaded to a Contact 7 form? Say it was uploaded by mistake and they want to remove it and try again. At the moment my form doesn’t allow me to delete any uploaded files… Appreciate your help.
WPBeginner Support says
For a question specific to contact form 7, you would want to reach out to the plugin’s support and they should be able to assist.
Admin
Eucharia says
Thanks for the wonderful article, I have been following it to create my site but I have problem with adding my Form to the contact page. When I click on add page it opens a bar to add title but I don’t see the add form option. I have not been able to add my contacts form to my contacts page.
Please I need you to help me. Thanks
John says
When I make a new page, I don’t see an “add form” button. This is WP 5.0.2, freshly reset.
WPBeginner Support says
For the new blocks editor you would want to add a WPForms block and that would allow you to add the form
Admin
Himanshu says
Thank you for your hard work and the videos. I learn a lot from your videos. However, one thing I noticed consistently is that often you skip some steps or zip past a simple action that confuses the newcomers, especially when you are ‘WPbeginner’ instructors. Example. While tutoring the making of a Contact Us form, before publishing/updating it, you zipped past the text We’d Love to Hear From You text. This is the text you entered but did not show and that confused me a lot as to how come that text did not show up in my form because I have been following you step by step to create the form on my new website while I am watching your video. I went back and forth and created 4 forms to no avail–the text just would not show up. Then I said to my self, what the heck! and entered it on my own and proceeded to remaining video. I noticed the same issue in your other videos as well. Could you be a little slower and specific? Please note, this is not a criticism; this is a constructive suggestion. You folks do a great job and without you, I would not have my website created on my own and I would not be writing to you here. Thanks a million for doing this
WPBeginner Support says
Hi Himanshu,
Thank you for your kind feedback, we really appreciate it. We are aware of the issue you are referring to, and our team is continuously working on improving the videos. We will put more effort into it.
Meanwhile, if you are unable to follow instructions shown in a video or one of our tutorials, then please do not hesitate to ask us. You can do so by leaving a comment or sending us a message using the contact form on our website. We try our best to answer all user questions.
Admin
Brenda Donovan says
The simple form is all I need and it looks good and is looking good on cell phone too.
I set the reCaptcha up but it doesn’t show up on the contact page where the form code is.
Is there a short code for that also? and if so where in the settings is it?
Thanks…
WPBeginner Support says
Hi Brenda,
No, you will need to setup recaptcha in plugin settings.
Admin
Michel Kapteijns says
Hello,
I followed al the steps, I see the contact form on my site. I can fill in a message, and after I submit the message I neatly see the ‘thank you’ message. Butt.. I do nog receive the mesage in my e-mail account. What am I doing wrong?
Thank you very much for your answer on this.
Regards, Michel
WPBeginner Support says
Hi Michel,
Please see our article on how to fix WordPress not sending email issue.
Admin
Shamli says
Hi, I’ve done all the steps as mentioned above, but I cannot see the Contact page when I preview.
Please help me to solve.
Thank you.
WPBeginner Support says
Hi Shamli,
You need to edit the page, insert the form, and then click on the preview button. Your contact form will only appear on the page where you insert the form.
Admin
Brenda says
HI – We are using this contact form and it’s fine but I would like to add Captcha and, more importantly, some text that can be overwritten in the message box. There is a local company with a very similar name so we are constantly receiving messages which relate to this other company. We want to have some text, that has to be overwritten, to reiterate what our company is to try and reduce these messages. Is this possible?
Brenda Donovan says
I redid the form and rechecked the add recaptcha on the confirmation settings and it worked this time. I had done it before but somehow didn’t take.
now on to the mail problem. thanks
safi says
sir how can i know which email system notify or receive message i did everything but don,t which i will receive the email from client i am beginner with wp
WPBeginner Support says
Hi Safi,
Please see how to fix WordPress not sending emails issue
Admin
Yamin Kamboh says
Thank you, was really helpful.
Sarah Zubair says
So how do I access the library of media (if I’ve an option of attaching some files in my WP forms) then where do they all get stored?
WPBeginner Support says
Hi Sarah,
By default, the user-uploaded files are stored in the WPForms folder inside the Uploads directory of your site.
If you’d prefer to upload the files to the WordPress Media Library, click on the File Upload field in the form builder. Then, under Advanced Options, check the box next to Store file in WordPress Media Library.
For more details see this guide.
Admin
marypeter says
This is truly helpful. I can say it is my first time to leave a review in any website. The information you have provided has prompted me to do this. Thank you a thousand times!!
Eston says
Hi
how do i set it up that i recieve emails in Gmail, and be able to reply to customers right there in Gmail.com?
WPBeginner Support says
Hi Eston,
You can go to settings section of any form and click on the confirmation tab. From here you can add any email address where you want to be notified.
Admin
Cathy says
I found this very helpful in setting up, however, after completion I ran a test, so did a friend of mine, I cannot figure out why we are not receiving the email tests sent from the web site? Although I’ve gone through the steps a second time to be sure all was correctly set up, I am not receiving messages from the web site, I hope you can assist with constructive suggestions to aid in problem solving, much appreciate the assistance…
Lori Jo says
I am very new, easily confused! Regarding the assigned admin email address in my WP blog site, can that actually be used to receive messages from the contact form? I think the address looks more professional and it would be nice to have all site messages responding back to the actual site instead of an outside email like my Gmail. I did a test and I could not find the reply, installed Flamingo and I did see it but there is no reply option like regular email.
Please let me know, thanks!